# Figma integration
The [Pushwoosh plugin](https://www.figma.com/community/plugin/1690328126861361607) for [Figma](https://www.figma.com/) sends frames from your design file straight to the [Media storage](/product/content/media-store/) of a Pushwoosh application. Push images, in-app banners, and email headers go from Figma to your content without exporting, downloading, and re-uploading files.
The plugin works in the Figma editor and in Dev Mode (the Figma mode where developers inspect designs).
## Integration overview
### Integration type
**Destination:** Images exported from Figma are sent to the Pushwoosh Media storage.
### Prerequisites
* A Pushwoosh account in the Europe (`app.pushwoosh.com`) or United States (`app.pushwoosh.us`) region. If you sign in to Pushwoosh at a different address, the plugin isn't available for your account.
* Access to the Pushwoosh application you want to send images to. The plugin lists only the applications you can open in the Control Panel.
* A Figma account and the [Pushwoosh plugin](https://www.figma.com/community/plugin/1690328126861361607) from Figma Community.
### How does the integration work?
Each Pushwoosh user connects the plugin with their own login. You start signing in from the plugin, and it shows a short code. You enter that code in the Pushwoosh Control Panel and allow access. From then on, the plugin can do two things on your behalf:
* see the list of your applications
* upload images to the Media storage of those applications
The plugin never gets your Pushwoosh password, and it can't read or change anything else in your account.
## Connect the plugin
1. Open the [Pushwoosh plugin](https://www.figma.com/community/plugin/1690328126861361607) in Figma Community and run it in your design file.
2. In **Region**, select where your Pushwoosh account is hosted: **Europe (app.pushwoosh.com)** or **United States (app.pushwoosh.us)**.
3. Click **Sign in to Pushwoosh**. The plugin shows a code.
4. Click **Open Pushwoosh**. The Control Panel opens on the **3rd-party integrations** page with the code form already open.
If the form doesn't open, for example because you had to sign in to the Control Panel first, go to **Settings > 3rd-party integrations** and click **Enter code** on the **Figma** card.
5. Enter the code from the plugin and click **Continue**.
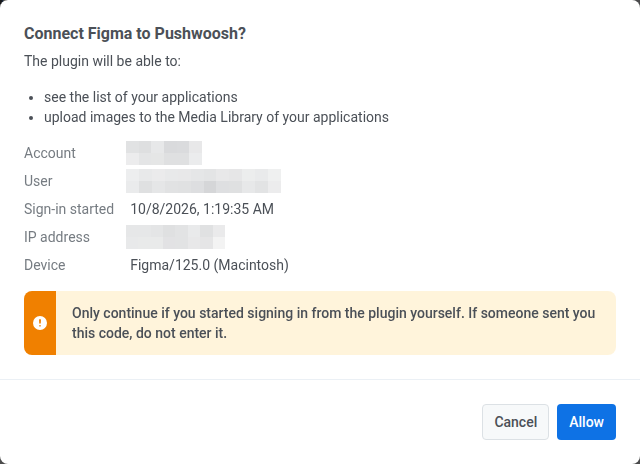
6. Check the details of the sign-in request: the account and user the plugin connects to, when the sign-in started, the IP address, and the device. Click **Allow** only if you started signing in from the plugin yourself.
7. Return to Figma. The plugin signs in on its own and shows your account name and email.
The code expires in 10 minutes. If it expires before you click **Allow**, the plugin says so. Click **Sign in to Pushwoosh** again to get a new code. After five wrong codes, the Control Panel stops accepting codes for a few minutes.
## Send frames to the Media storage
1. On the Figma canvas, select one or more frames. You can also select other layers, such as groups or components.
2. In **Application**, select the application to send the images to. If the list is empty, you don't have access to any application yet. Ask an account admin to give you access.
3. In **Format**, select **PNG** or **JPG**.
4. In **Scale**, select **1×**, **2×**, or **3×**. Each selected frame is listed with its size in Figma and the size of the exported image, for example `720×360 → 1440×720`.
5. Click **Send**. The button shows how many frames will be sent, for example **Send 3 frames**.
When the upload finishes, every frame appears in the [Media storage](/product/content/media-store/) of the selected application. To paste an image into your content right away, click **Copy URL** next to the frame in the plugin.
### Image limits
The Media storage accepts images up to 25 megapixels and 10 MB. The plugin checks both before sending:
* **25 megapixels:** the limit applies to the exported image after scaling. A frame that would be larger is marked in the list, for example `over 25 MP, use 2×`, and is not sent. Select a smaller scale to send it.
* **10 MB:** a PNG larger than 10 MB is sent as JPG instead. A JPG larger than 10 MB is not sent.
JPG has no transparency, so transparent areas of a frame become white.
### Send an updated frame
When you change a frame and send it again to the same application, the plugin uploads it as a new version of the image it sent before. The button shows this, for example **Send 3 frames (1 as new version)**, and the frame is marked `new version` in the list.
The Media storage then shows the new version in place of the previous one. The new version has its own URL, so copy it again and update the content where the image should change.
A frame is sent as a new image, not a new version, when:
* you send a copy of the frame, or the same frame from another Figma file
* you send it to another application or region
* the previous image was deleted from the Media storage
## Manage connections
Each sign-in from the plugin is a separate connection under your login. When at least one connection exists, the **Figma** card moves to **Connected services** and shows how many devices are connected.
To see or remove your connections:
1. Go to **Settings > 3rd-party integrations**.
2. On the **Figma** card, click **Manage**.
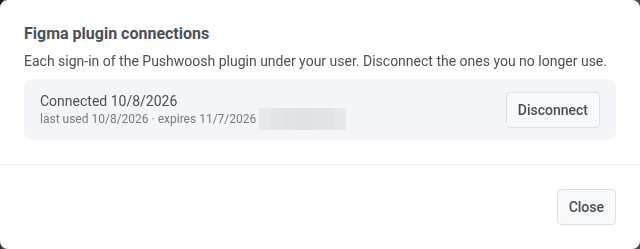
3. Review the list. Each connection shows when it was connected, when it was last used, when it expires, and its IP address.
4. Click **Disconnect** next to a connection you no longer use. The plugin on that device stops working at once and has to sign in again.
A connection expires after 30 days without use, and in any case 90 days after you allowed it. After that, sign in from the plugin again.
## FAQ
### Which Pushwoosh regions does the plugin support?
Europe (`app.pushwoosh.com`) and United States (`app.pushwoosh.us`). Accounts hosted at any other address can't use the plugin.
### Can my teammates send images from my connection?
No. Every teammate connects the plugin with their own Pushwoosh login, and each connection sees only the applications that person can access. Disconnecting a connection doesn't affect anyone else's.
### Which formats and sizes can I send?
PNG or JPG, exported at 1×, 2×, or 3×. Each image can be up to 25 megapixels after scaling and up to 10 MB.
 5. Enter the code from the plugin and click **Continue**.
6. Check the details of the sign-in request: the account and user the plugin connects to, when the sign-in started, the IP address, and the device. Click **Allow** only if you started signing in from the plugin yourself.
5. Enter the code from the plugin and click **Continue**.
6. Check the details of the sign-in request: the account and user the plugin connects to, when the sign-in started, the IP address, and the device. Click **Allow** only if you started signing in from the plugin yourself.
 7. Return to Figma. The plugin signs in on its own and shows your account name and email.
The code expires in 10 minutes. If it expires before you click **Allow**, the plugin says so. Click **Sign in to Pushwoosh** again to get a new code. After five wrong codes, the Control Panel stops accepting codes for a few minutes.
## Send frames to the Media storage
1. On the Figma canvas, select one or more frames. You can also select other layers, such as groups or components.
2. In **Application**, select the application to send the images to. If the list is empty, you don't have access to any application yet. Ask an account admin to give you access.
3. In **Format**, select **PNG** or **JPG**.
4. In **Scale**, select **1×**, **2×**, or **3×**. Each selected frame is listed with its size in Figma and the size of the exported image, for example `720×360 → 1440×720`.
5. Click **Send**. The button shows how many frames will be sent, for example **Send 3 frames**.
When the upload finishes, every frame appears in the [Media storage](/product/content/media-store/) of the selected application. To paste an image into your content right away, click **Copy URL** next to the frame in the plugin.
### Image limits
The Media storage accepts images up to 25 megapixels and 10 MB. The plugin checks both before sending:
* **25 megapixels:** the limit applies to the exported image after scaling. A frame that would be larger is marked in the list, for example `over 25 MP, use 2×`, and is not sent. Select a smaller scale to send it.
* **10 MB:** a PNG larger than 10 MB is sent as JPG instead. A JPG larger than 10 MB is not sent.
JPG has no transparency, so transparent areas of a frame become white.
### Send an updated frame
When you change a frame and send it again to the same application, the plugin uploads it as a new version of the image it sent before. The button shows this, for example **Send 3 frames (1 as new version)**, and the frame is marked `new version` in the list.
The Media storage then shows the new version in place of the previous one. The new version has its own URL, so copy it again and update the content where the image should change.
A frame is sent as a new image, not a new version, when:
* you send a copy of the frame, or the same frame from another Figma file
* you send it to another application or region
* the previous image was deleted from the Media storage
## Manage connections
Each sign-in from the plugin is a separate connection under your login. When at least one connection exists, the **Figma** card moves to **Connected services** and shows how many devices are connected.
To see or remove your connections:
1. Go to **Settings > 3rd-party integrations**.
2. On the **Figma** card, click **Manage**.
3. Review the list. Each connection shows when it was connected, when it was last used, when it expires, and its IP address.
7. Return to Figma. The plugin signs in on its own and shows your account name and email.
The code expires in 10 minutes. If it expires before you click **Allow**, the plugin says so. Click **Sign in to Pushwoosh** again to get a new code. After five wrong codes, the Control Panel stops accepting codes for a few minutes.
## Send frames to the Media storage
1. On the Figma canvas, select one or more frames. You can also select other layers, such as groups or components.
2. In **Application**, select the application to send the images to. If the list is empty, you don't have access to any application yet. Ask an account admin to give you access.
3. In **Format**, select **PNG** or **JPG**.
4. In **Scale**, select **1×**, **2×**, or **3×**. Each selected frame is listed with its size in Figma and the size of the exported image, for example `720×360 → 1440×720`.
5. Click **Send**. The button shows how many frames will be sent, for example **Send 3 frames**.
When the upload finishes, every frame appears in the [Media storage](/product/content/media-store/) of the selected application. To paste an image into your content right away, click **Copy URL** next to the frame in the plugin.
### Image limits
The Media storage accepts images up to 25 megapixels and 10 MB. The plugin checks both before sending:
* **25 megapixels:** the limit applies to the exported image after scaling. A frame that would be larger is marked in the list, for example `over 25 MP, use 2×`, and is not sent. Select a smaller scale to send it.
* **10 MB:** a PNG larger than 10 MB is sent as JPG instead. A JPG larger than 10 MB is not sent.
JPG has no transparency, so transparent areas of a frame become white.
### Send an updated frame
When you change a frame and send it again to the same application, the plugin uploads it as a new version of the image it sent before. The button shows this, for example **Send 3 frames (1 as new version)**, and the frame is marked `new version` in the list.
The Media storage then shows the new version in place of the previous one. The new version has its own URL, so copy it again and update the content where the image should change.
A frame is sent as a new image, not a new version, when:
* you send a copy of the frame, or the same frame from another Figma file
* you send it to another application or region
* the previous image was deleted from the Media storage
## Manage connections
Each sign-in from the plugin is a separate connection under your login. When at least one connection exists, the **Figma** card moves to **Connected services** and shows how many devices are connected.
To see or remove your connections:
1. Go to **Settings > 3rd-party integrations**.
2. On the **Figma** card, click **Manage**.
3. Review the list. Each connection shows when it was connected, when it was last used, when it expires, and its IP address.
 4. Click **Disconnect** next to a connection you no longer use. The plugin on that device stops working at once and has to sign in again.
A connection expires after 30 days without use, and in any case 90 days after you allowed it. After that, sign in from the plugin again.
## FAQ
### Which Pushwoosh regions does the plugin support?
Europe (`app.pushwoosh.com`) and United States (`app.pushwoosh.us`). Accounts hosted at any other address can't use the plugin.
### Can my teammates send images from my connection?
No. Every teammate connects the plugin with their own Pushwoosh login, and each connection sees only the applications that person can access. Disconnecting a connection doesn't affect anyone else's.
### Which formats and sizes can I send?
PNG or JPG, exported at 1×, 2×, or 3×. Each image can be up to 25 megapixels after scaling and up to 10 MB.
4. Click **Disconnect** next to a connection you no longer use. The plugin on that device stops working at once and has to sign in again.
A connection expires after 30 days without use, and in any case 90 days after you allowed it. After that, sign in from the plugin again.
## FAQ
### Which Pushwoosh regions does the plugin support?
Europe (`app.pushwoosh.com`) and United States (`app.pushwoosh.us`). Accounts hosted at any other address can't use the plugin.
### Can my teammates send images from my connection?
No. Every teammate connects the plugin with their own Pushwoosh login, and each connection sees only the applications that person can access. Disconnecting a connection doesn't affect anyone else's.
### Which formats and sizes can I send?
PNG or JPG, exported at 1×, 2×, or 3×. Each image can be up to 25 megapixels after scaling and up to 10 MB.