# How to set up an abandoned cart campaign
Shoppers who add items to a cart and leave without buying are some of the easiest conversions to recover. They've already shown intent.
This guide shows how to send them an abandoned cart email in Pushwoosh: fire the `PW_AbandonedCart` event from your store, show the left-behind items in the email with the [Products](/product/content/email-content/drag-and-drop-email-editor/blocks/#products) block, and trigger the send from a Customer Journey.
## What is PW_AbandonedCart
`PW_AbandonedCart` marks that a user left items in their cart without buying. It is not a built-in [default event](/product/audience-data-and-segmentation/events/default-events/). It is a shared event name used across Pushwoosh e-commerce integrations so journeys, the Products block, and segments all work the same way.
* **[Magento integration](/product/integrations/magento-integration/):** sends `PW_AbandonedCart` and `PW_OrderCreated` for you automatically.
* **Any other store or custom backend:** your team sends both events via [postEvent](/developer/api-reference/user-centric-api/#postevent) with the names and attributes in [How to send abandoned cart reminders](#how-to-send-abandoned-cart-reminders).
### What happens when you send PW_AbandonedCart
Sending `PW_AbandonedCart` does two things on the Pushwoosh side:
1. It's recorded like any other custom event, so you can see it in [Event statistics](/product/audience-data-and-segmentation/events/) and use it in [segments](/product/audience-data-and-segmentation/segmentation/create-segments/by-events/).
2. Pushwoosh stores the cart contents and tags the user with:
* **PW_AbandonedCartID:** an identifier for the current cart, used to fetch its contents at send time.
* **PW_AbandonedCartDate:** the `abandonedDate` value from the event payload.
### What happens when you send PW_OrderCreated
When the shopper places an order, send `PW_OrderCreated` (or `PW_OrderUpdated`). Pushwoosh clears `PW_AbandonedCartID` and `PW_AbandonedCartDate` for that user right away. It does not match `orderId` values: any order from the user removes both tags, even if the purchase was for a different cart.
**Example:** A shopper abandons cart `ORDER-100`, then buys `ORDER-200` before the reminder goes out. Pushwoosh clears the tags, so they won't get a reminder about `ORDER-100`.
## How to send abandoned cart reminders
Follow these steps to create the events, send them from your store, build the email, and launch the Customer Journey.
### Create the events in your Control Panel
1. Go to **Audience → Events** in your Pushwoosh Control Panel and click **Create Event**.
2. Create a custom event named `PW_AbandonedCart` with these attributes:
| Attribute | Type |
| :---- | :---- |
| `email` | string |
| `orderId` | string |
| `customerId` | string |
| `orderUrl` | string |
| `abandonedDate` | date |
| `createdDate` | date |
| `totalPrice` | decimal (price) |
| `shippingAmount` | decimal (price) |
| `taxAmount` | decimal (price) |
| `discountAmount` | decimal (price) |
| `currency` | string |
3. Repeat for `PW_OrderCreated` with a single `orderId` attribute.
[Learn more about creating custom events](/product/audience-data-and-segmentation/events/custom-events/#creating-custom-events).
### Send the events from your backend
Ask your development team to call [postEvent](/developer/api-reference/user-centric-api/#postevent) whenever a cart is abandoned, using this attribute schema:
```json
{
"request": {
"hwid": "8f65b16df378e7a6bece9614e1530fb2",
"application": "XXXXX-XXXXX",
"event": "PW_AbandonedCart",
"attributes": {
"email": "shopper@example.com",
"orderId": "ORDER-10293",
"customerId": "CUST-4471",
"orderUrl": "https://yourstore.com/cart/restore/ORDER-10293",
"abandonedDate": "2026-07-28T10:15:00Z",
"createdDate": "2026-07-28T09:40:00Z",
"totalPrice": 129.90,
"shippingAmount": 9.90,
"taxAmount": 0,
"discountAmount": 0,
"currency": "USD",
"items": [
{
"productId": "SKU-4821",
"name": "Wireless headphones",
"quantity": 1,
"price": 119.90,
"sku": "SKU-4821",
"description": "Over-ear, noise-cancelling",
"imageUrl": "https://yourstore.com/media/sku-4821.jpg",
"productUrl": "https://yourstore.com/products/sku-4821",
"category": "Audio"
}
]
},
"userId": "shopper@example.com"
}
}
```
When the cart converts into an order, send `PW_OrderCreated` with just the `orderId` to clear the cart tags:
```json
{
"request": {
"hwid": "8f65b16df378e7a6bece9614e1530fb2",
"application": "XXXXX-XXXXX",
"event": "PW_OrderCreated",
"attributes": {
"orderId": "ORDER-10293"
},
"userId": "shopper@example.com"
}
}
```
### Add a Products block to your email
1. Open the [email content editor](/product/content/email-content/drag-and-drop-email-editor/) and add a [Products](/product/content/email-content/drag-and-drop-email-editor/blocks/#products) block to the canvas.
2. In the settings panel, set **Source** to [Cart](/product/content/email-content/drag-and-drop-email-editor/blocks/#show-items-from-the-cart).
3. Set **Max products shown** to limit how many cart items appear in the email.
4. Style the grid and card template as needed. See [Style the grid](/product/content/email-content/drag-and-drop-email-editor/blocks/#style-the-grid).
When the email sends, the Products block looks up each recipient's stored cart using their `PW_AbandonedCartID` tag. It then fills the block with the current cart items: image, title, price, and a link back to the cart. The layout comes from the card template you set in the editor. Recipients without that tag (nothing abandoned, or already ordered) skip the block instead of showing empty content, so it's safe to use in a broader campaign too.
### Build the Customer Journey
1. Add a [Trigger-based Entry](/product/customer-journey/journey-elements/entry-elements/trigger-based-entry/) using the `PW_AbandonedCart` event.
2. Add a [Wait for Trigger](/product/customer-journey/journey-elements/flow-controls/wait-for-trigger/) step. Set its waiting period to an hour or two. Name the branch **Order placed** and add the `PW_OrderCreated` event to it.
3. Route the **Order placed** branch to [Exit](/product/customer-journey/journey-elements/flow-controls/exit/). The user already bought, so don't remind them.
4. Route the **Not triggered** branch to the [Email](/product/customer-journey/journey-elements/channels/email/) step. Save the email you built in [Add a Products block to your email](#add-a-products-block-to-your-email) as [email content](/product/content/email-content/), then select it as this step's content.
### Test before you launch
1. Send a test `PW_AbandonedCart` event for a test device. Don't set the `PW_AbandonedCartID` tag manually: the Products block loads cart contents from the stored cart that the event creates, not from the tag value. Without a real event, the block renders empty.
2. Preview the email and confirm the layout and product content before sending to real shoppers.
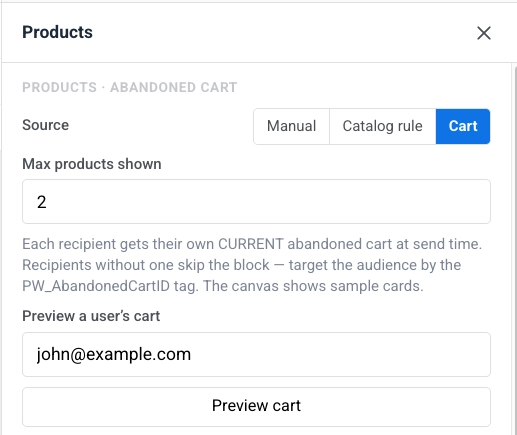 4. Style the grid and card template as needed. See [Style the grid](/product/content/email-content/drag-and-drop-email-editor/blocks/#style-the-grid).
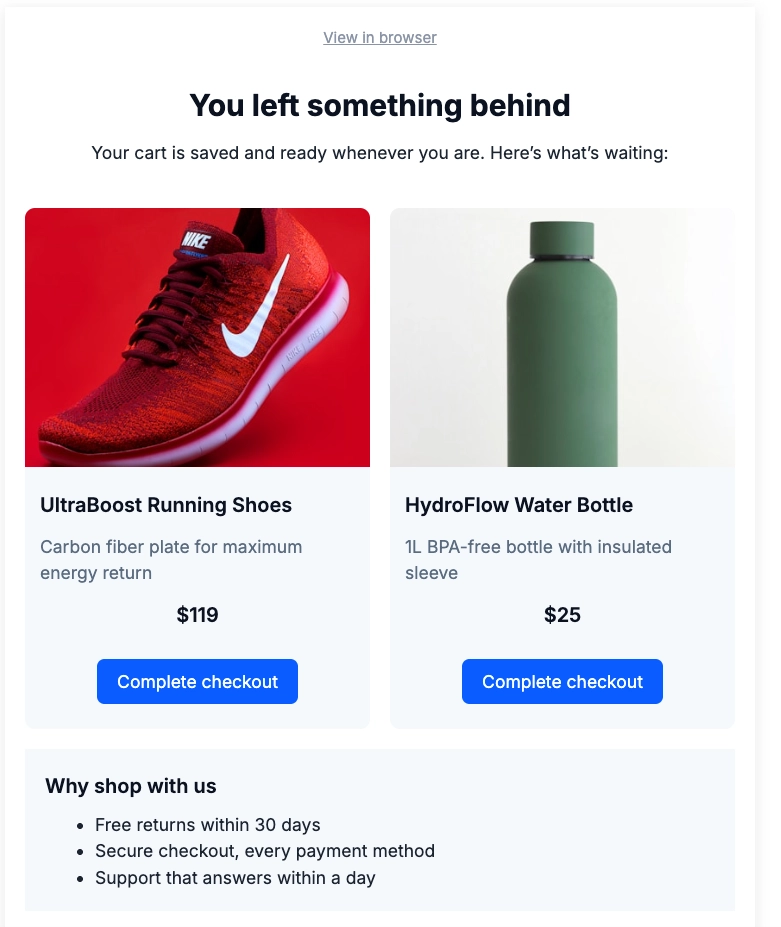 When the email sends, the Products block looks up each recipient's stored cart using their `PW_AbandonedCartID` tag. It then fills the block with the current cart items: image, title, price, and a link back to the cart. The layout comes from the card template you set in the editor. Recipients without that tag (nothing abandoned, or already ordered) skip the block instead of showing empty content, so it's safe to use in a broader campaign too.
### Build the Customer Journey
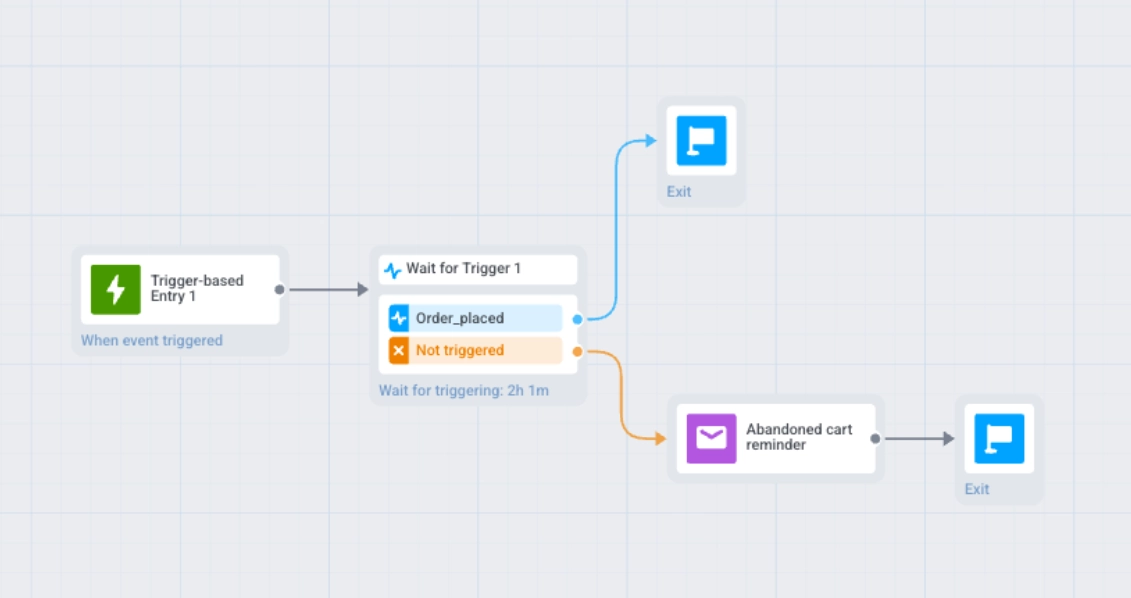
1. Add a [Trigger-based Entry](/product/customer-journey/journey-elements/entry-elements/trigger-based-entry/) using the `PW_AbandonedCart` event.
2. Add a [Wait for Trigger](/product/customer-journey/journey-elements/flow-controls/wait-for-trigger/) step. Set its waiting period to an hour or two. Name the branch **Order placed** and add the `PW_OrderCreated` event to it.
3. Route the **Order placed** branch to [Exit](/product/customer-journey/journey-elements/flow-controls/exit/). The user already bought, so don't remind them.
4. Route the **Not triggered** branch to the [Email](/product/customer-journey/journey-elements/channels/email/) step. Save the email you built in [Add a Products block to your email](#add-a-products-block-to-your-email) as [email content](/product/content/email-content/), then select it as this step's content.
When the email sends, the Products block looks up each recipient's stored cart using their `PW_AbandonedCartID` tag. It then fills the block with the current cart items: image, title, price, and a link back to the cart. The layout comes from the card template you set in the editor. Recipients without that tag (nothing abandoned, or already ordered) skip the block instead of showing empty content, so it's safe to use in a broader campaign too.
### Build the Customer Journey
1. Add a [Trigger-based Entry](/product/customer-journey/journey-elements/entry-elements/trigger-based-entry/) using the `PW_AbandonedCart` event.
2. Add a [Wait for Trigger](/product/customer-journey/journey-elements/flow-controls/wait-for-trigger/) step. Set its waiting period to an hour or two. Name the branch **Order placed** and add the `PW_OrderCreated` event to it.
3. Route the **Order placed** branch to [Exit](/product/customer-journey/journey-elements/flow-controls/exit/). The user already bought, so don't remind them.
4. Route the **Not triggered** branch to the [Email](/product/customer-journey/journey-elements/channels/email/) step. Save the email you built in [Add a Products block to your email](#add-a-products-block-to-your-email) as [email content](/product/content/email-content/), then select it as this step's content.
 ### Test before you launch
1. Send a test `PW_AbandonedCart` event for a test device. Don't set the `PW_AbandonedCartID` tag manually: the Products block loads cart contents from the stored cart that the event creates, not from the tag value. Without a real event, the block renders empty.
2. Preview the email and confirm the layout and product content before sending to real shoppers.
### Test before you launch
1. Send a test `PW_AbandonedCart` event for a test device. Don't set the `PW_AbandonedCartID` tag manually: the Products block loads cart contents from the stored cart that the event creates, not from the tag value. Without a real event, the block renders empty.
2. Preview the email and confirm the layout and product content before sending to real shoppers.