# How to set up a user activation campaign with Pushwoosh
User acquiring is tricky, [onboarding](/product/how-to-guides/lifecycle-marketing-campaigns/how-to-onboard-users-with-pushwoosh/) is crucial, and user activation is a turning point – you can only say you've won a user when they are activated. User activation campaigns are intended to encourage customers to start using your product, i.e. to perform actions indicative of their engagement.
[Pushwoosh Customer Journey Builder](/product/customer-journey/pushwoosh-journey-overview) is an 'all-inclusive' for building user activation campaigns – make your user flow smooth and fluent, and your customers won't be long to benefit from your app!
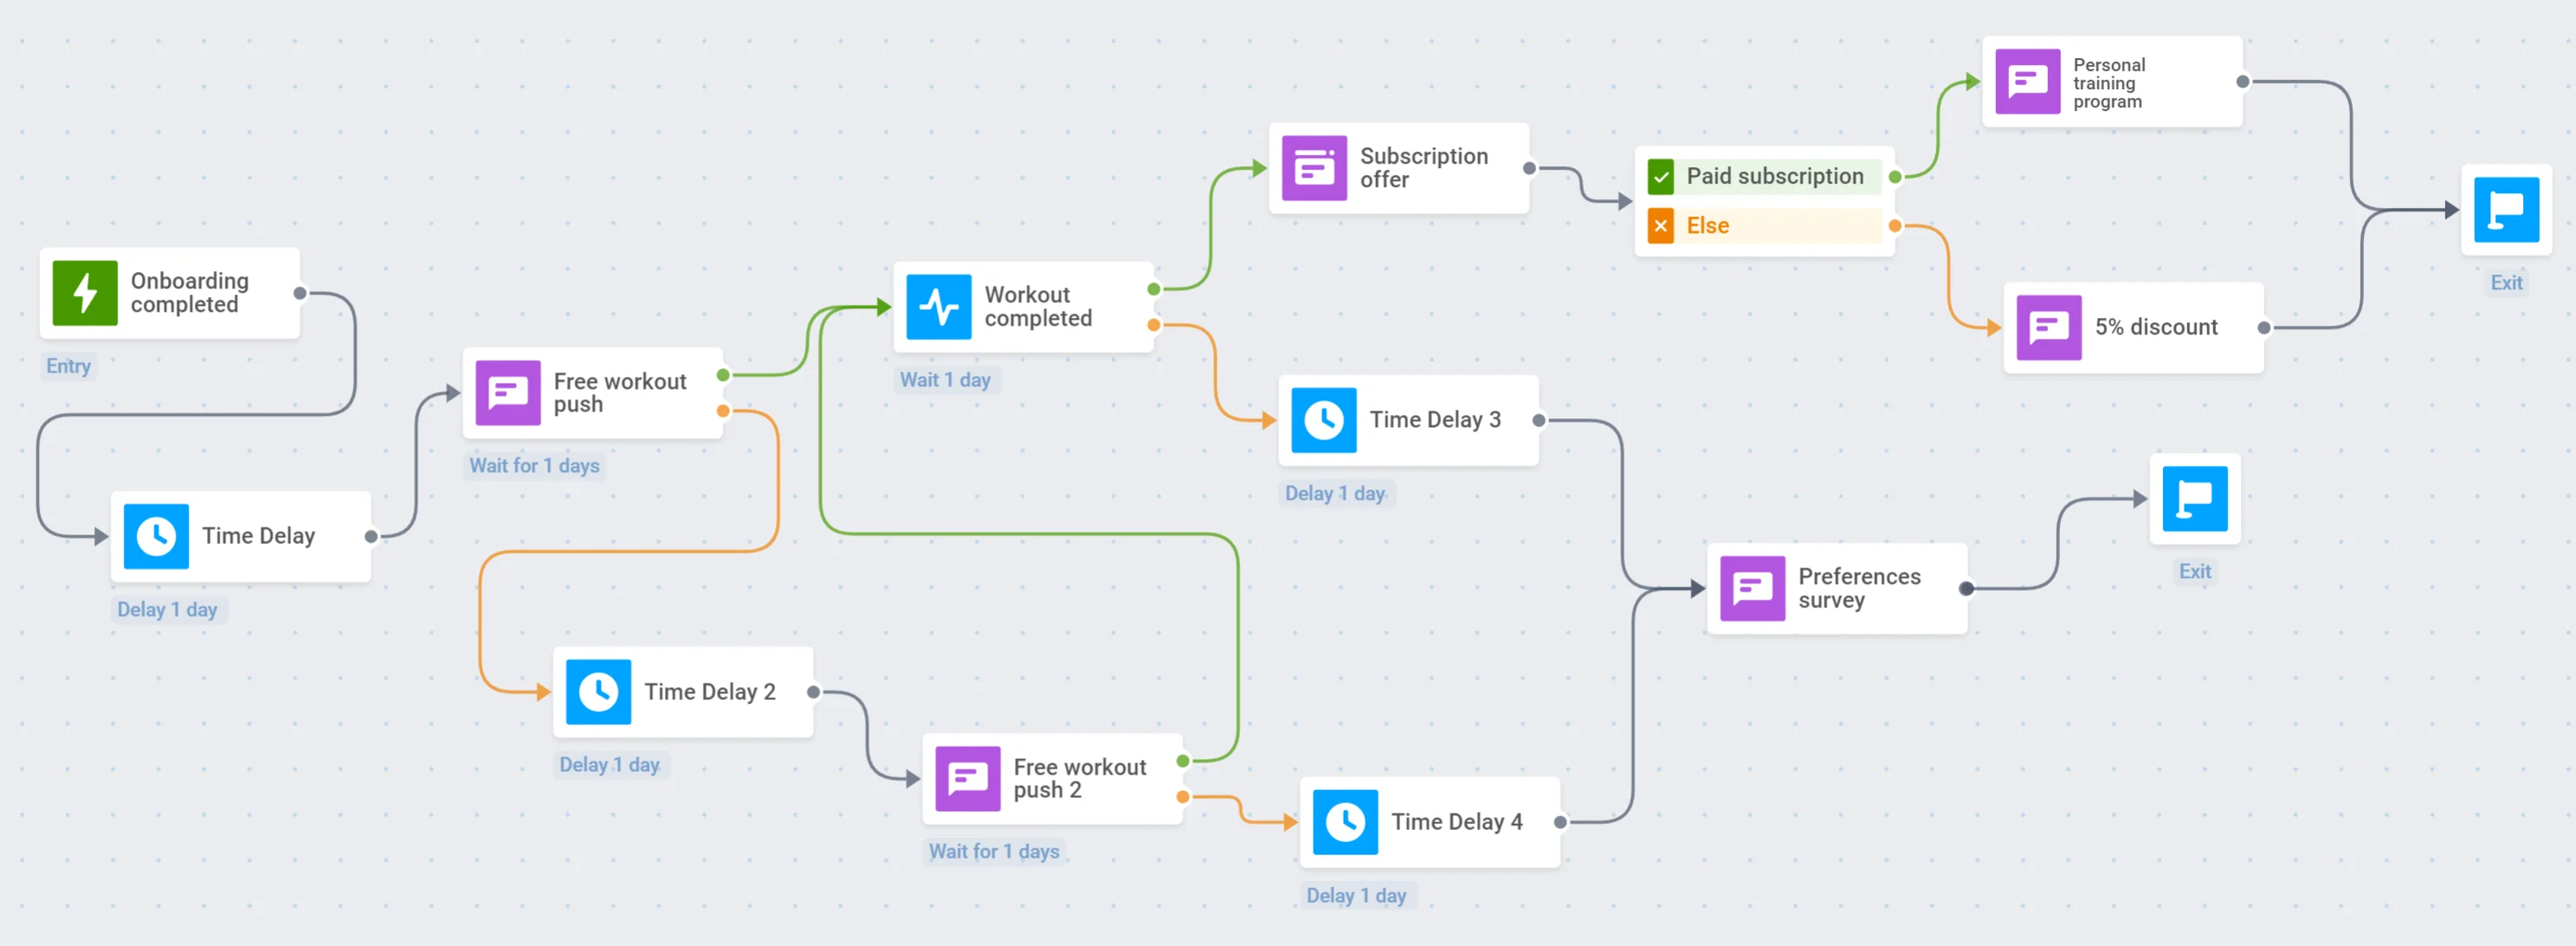
Given your newly gained users have already completed their onboarding, it's time to move them forward to their first in-app action. Let's say we're building an activation campaign for a paid-subscription daily workout app.
Here are a few steps to launch an activation campaign ending with purchasing a subscription:
1. Define your main **activation goal**: what actions do you want users to perform? When do you count them as activated?
2. Decide **where to start** the journey: set up a trigger or a segment to begin the campaign.
3. Prepare **compelling content** – your activation campaign should convince users they really need your app. Leverage the omnichannel messaging for more conversions: create [Push Presets](/product/content/push-presets) for short daily communication, [Email content](/product/content/email-content) for delivering loads of value, and [in-app messages](/product/content/in-apps/) to catch users' eyes and hearts.
4. Do not forget to **measure your results**: collect user data with [Tags](/product/audience-data-and-segmentation/user-data-tags/tags/), keep track of your [journey statistics](/product/statistics-and-analytics/journey-statistics), or run [A/B tests](/product/customer-journey/journey-elements#abn-split) to understand better what works best.
## Set up conversion goals
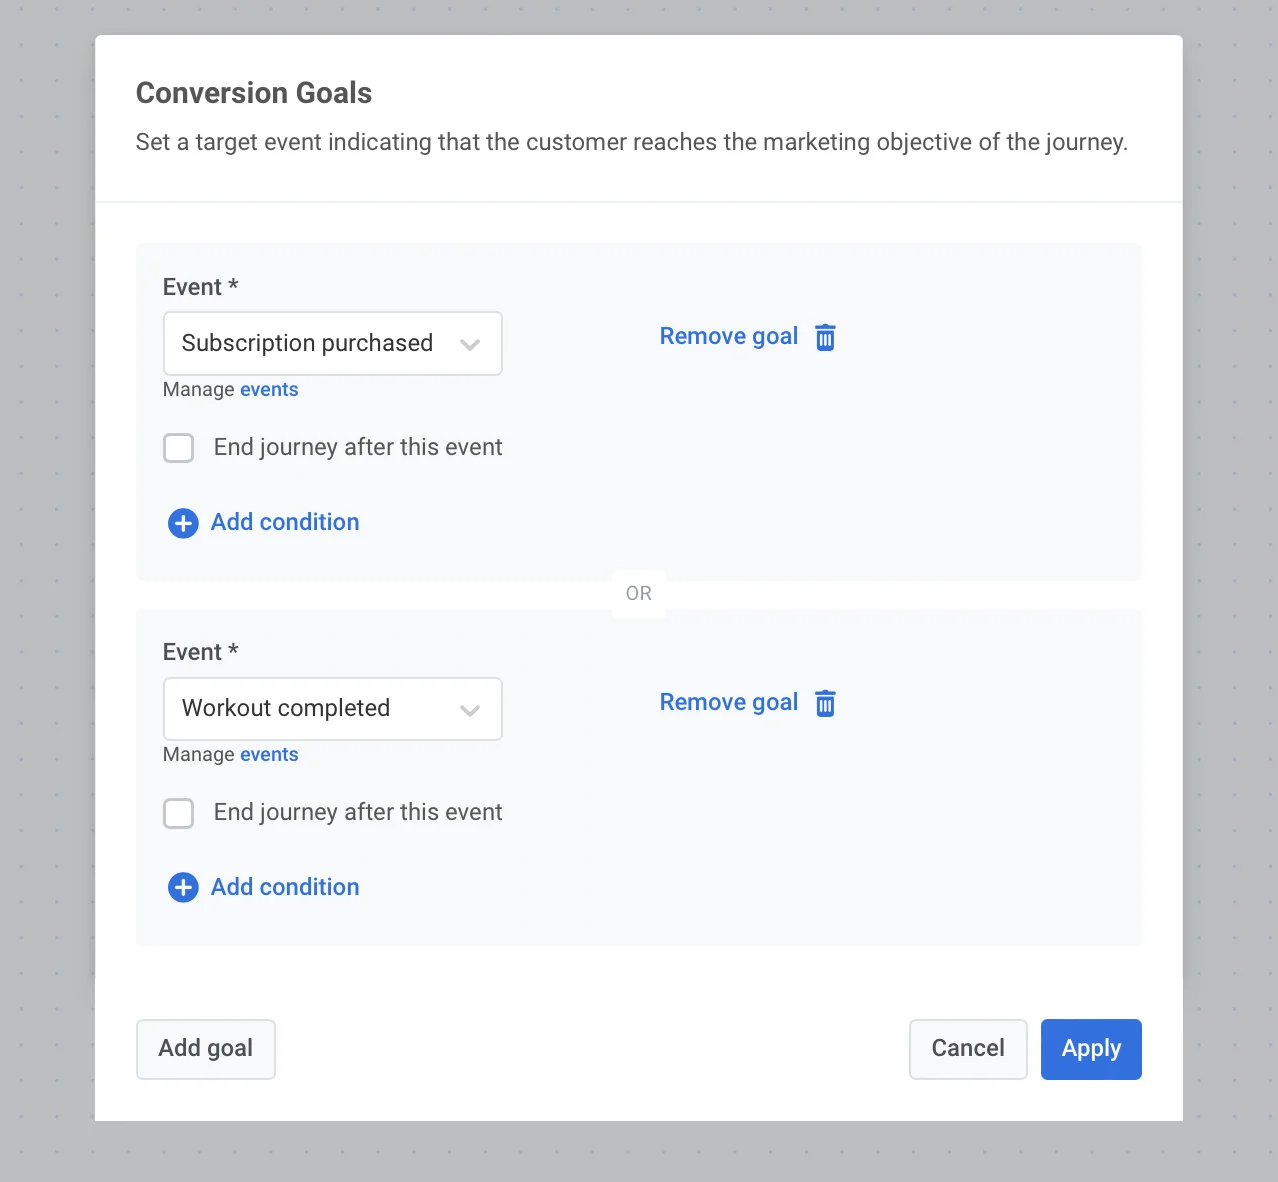
As an activation campaign aims to encourage desired users' behavior, its efficiency can be easily measured by the conversion rate. To track the journey's conversions, set the [Conversion Goals](/product/customer-journey/journey-settings#conversion-goals) – target actions you'd like users to perform.
1. First, [set the target event](/product/audience-data-and-segmentation/events#implementation) in your Pushwoosh Control Panel and [integrate it into your app](/product/audience-data-and-segmentation/events#3-call-postevent-api) to be tracked.
2. Then, add that event (or several events) as a [Conversion Goal](/product/customer-journey/journey-settings#conversion-goals) of your Customer Journey.
## Add a trigger-based entry
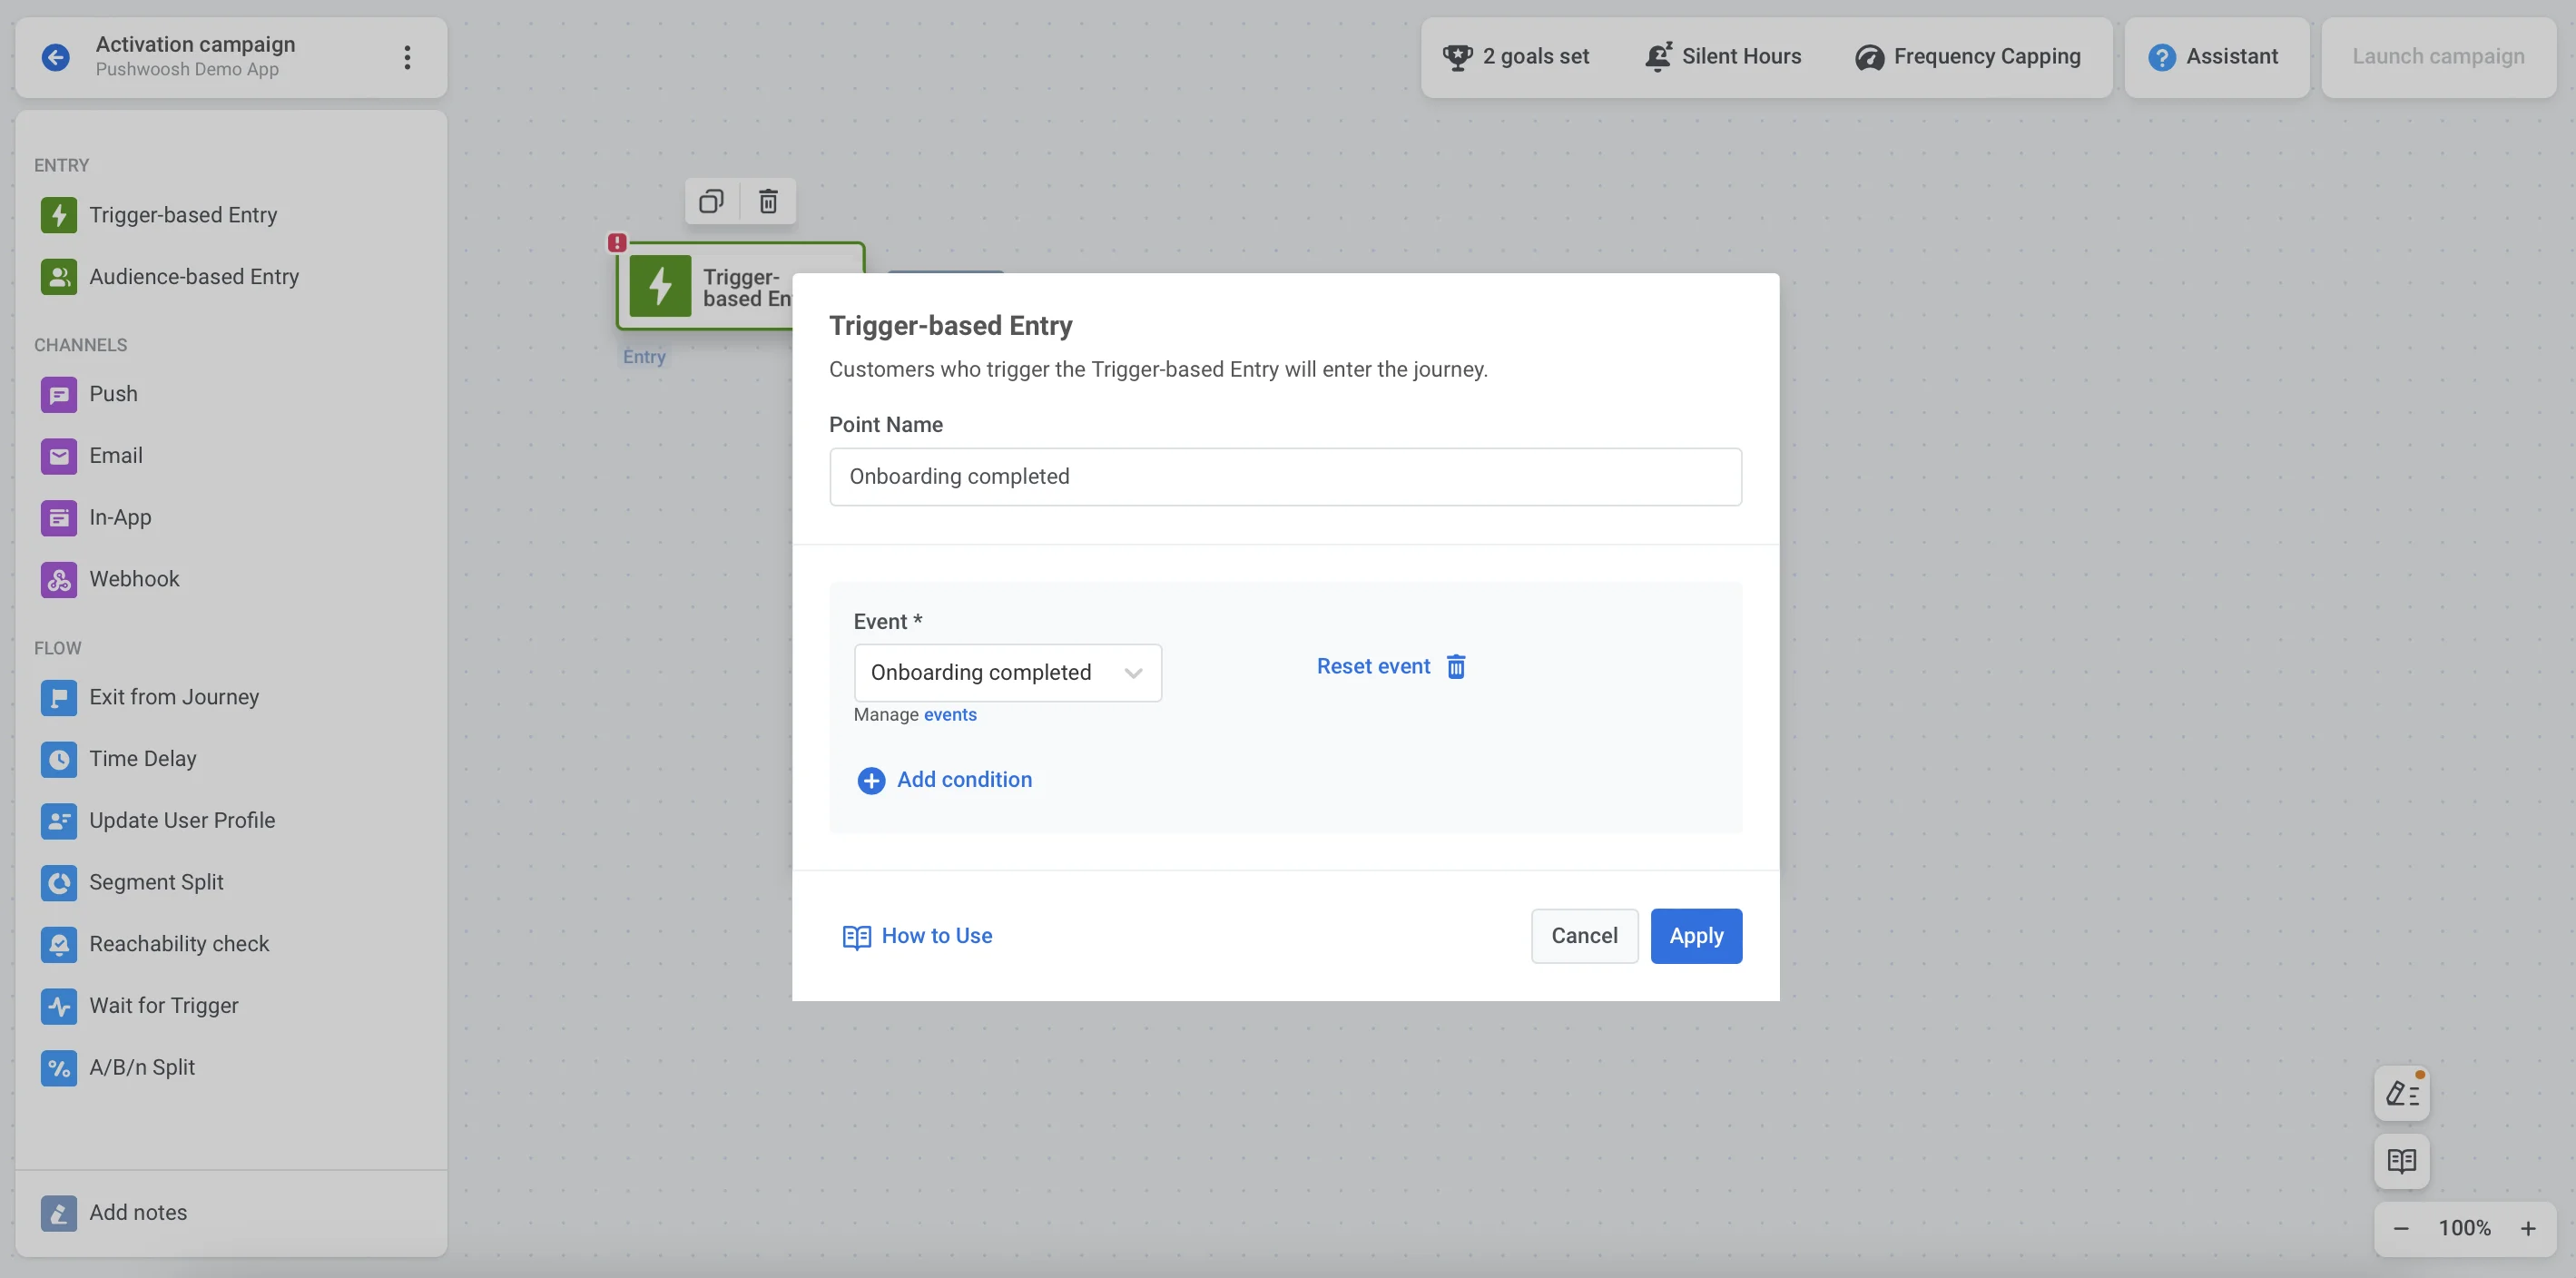
Before creating a journey, [set up the entry event](/product/audience-data-and-segmentation/events/#implementation) in your Control Panel. Then, integrate the [postEvent](/product/audience-data-and-segmentation/events#3-call-postevent-api) to be sent upon the event triggering.
Finally, add this event as a [Trigger-based Entry](/product/customer-journey/journey-elements#trigger-based-entry) to the journey canvas.
## Add a time delay
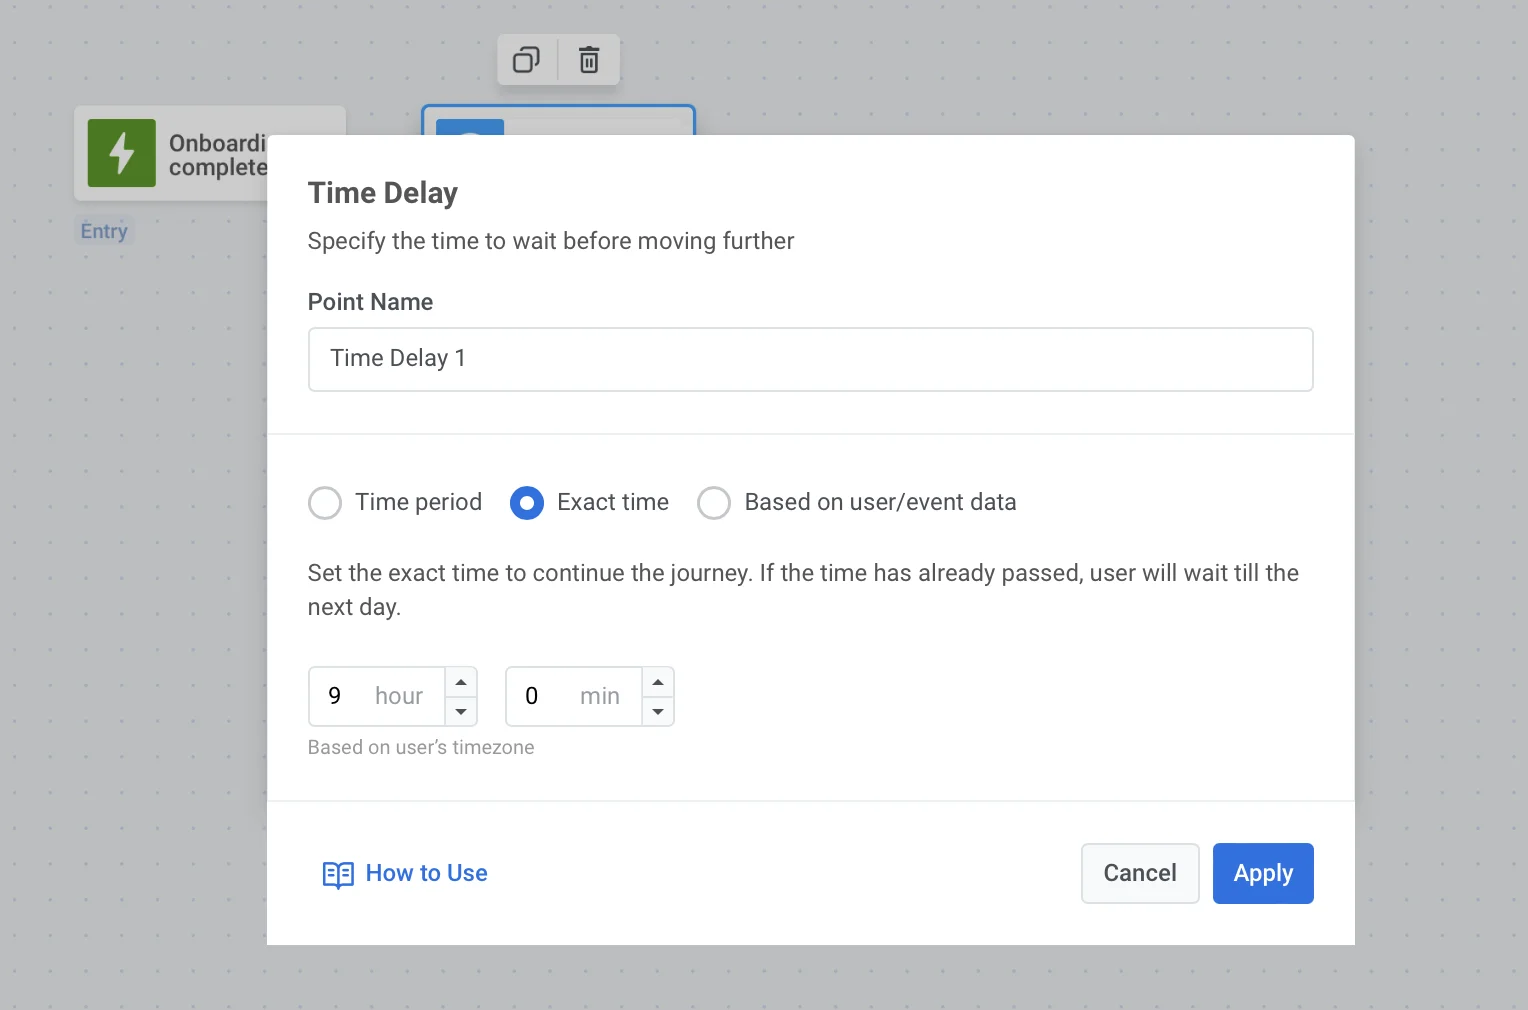
As users tend to interact with push notifications at a specific time of the day, it's better to adjust your communications to users' timezones and most convenient day times. For example, as a daily workout app, we're helping users start their day healthily: before messaging users, wait till their morning by setting the timezone-sensitive [Time Delay](/product/customer-journey/journey-elements#time-delay).
## Send the first push notification
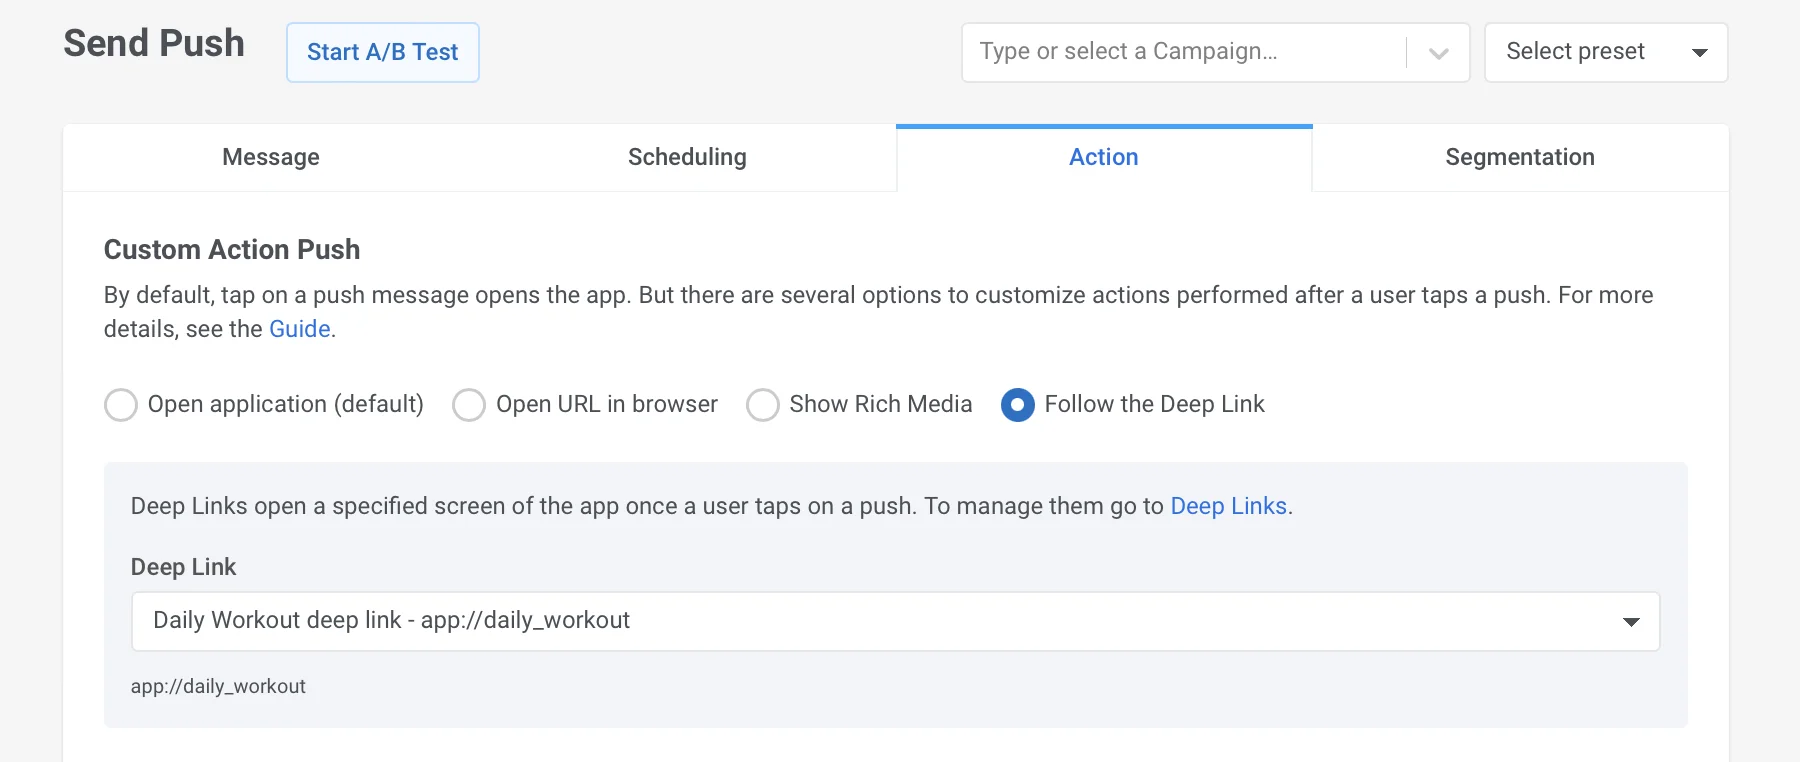
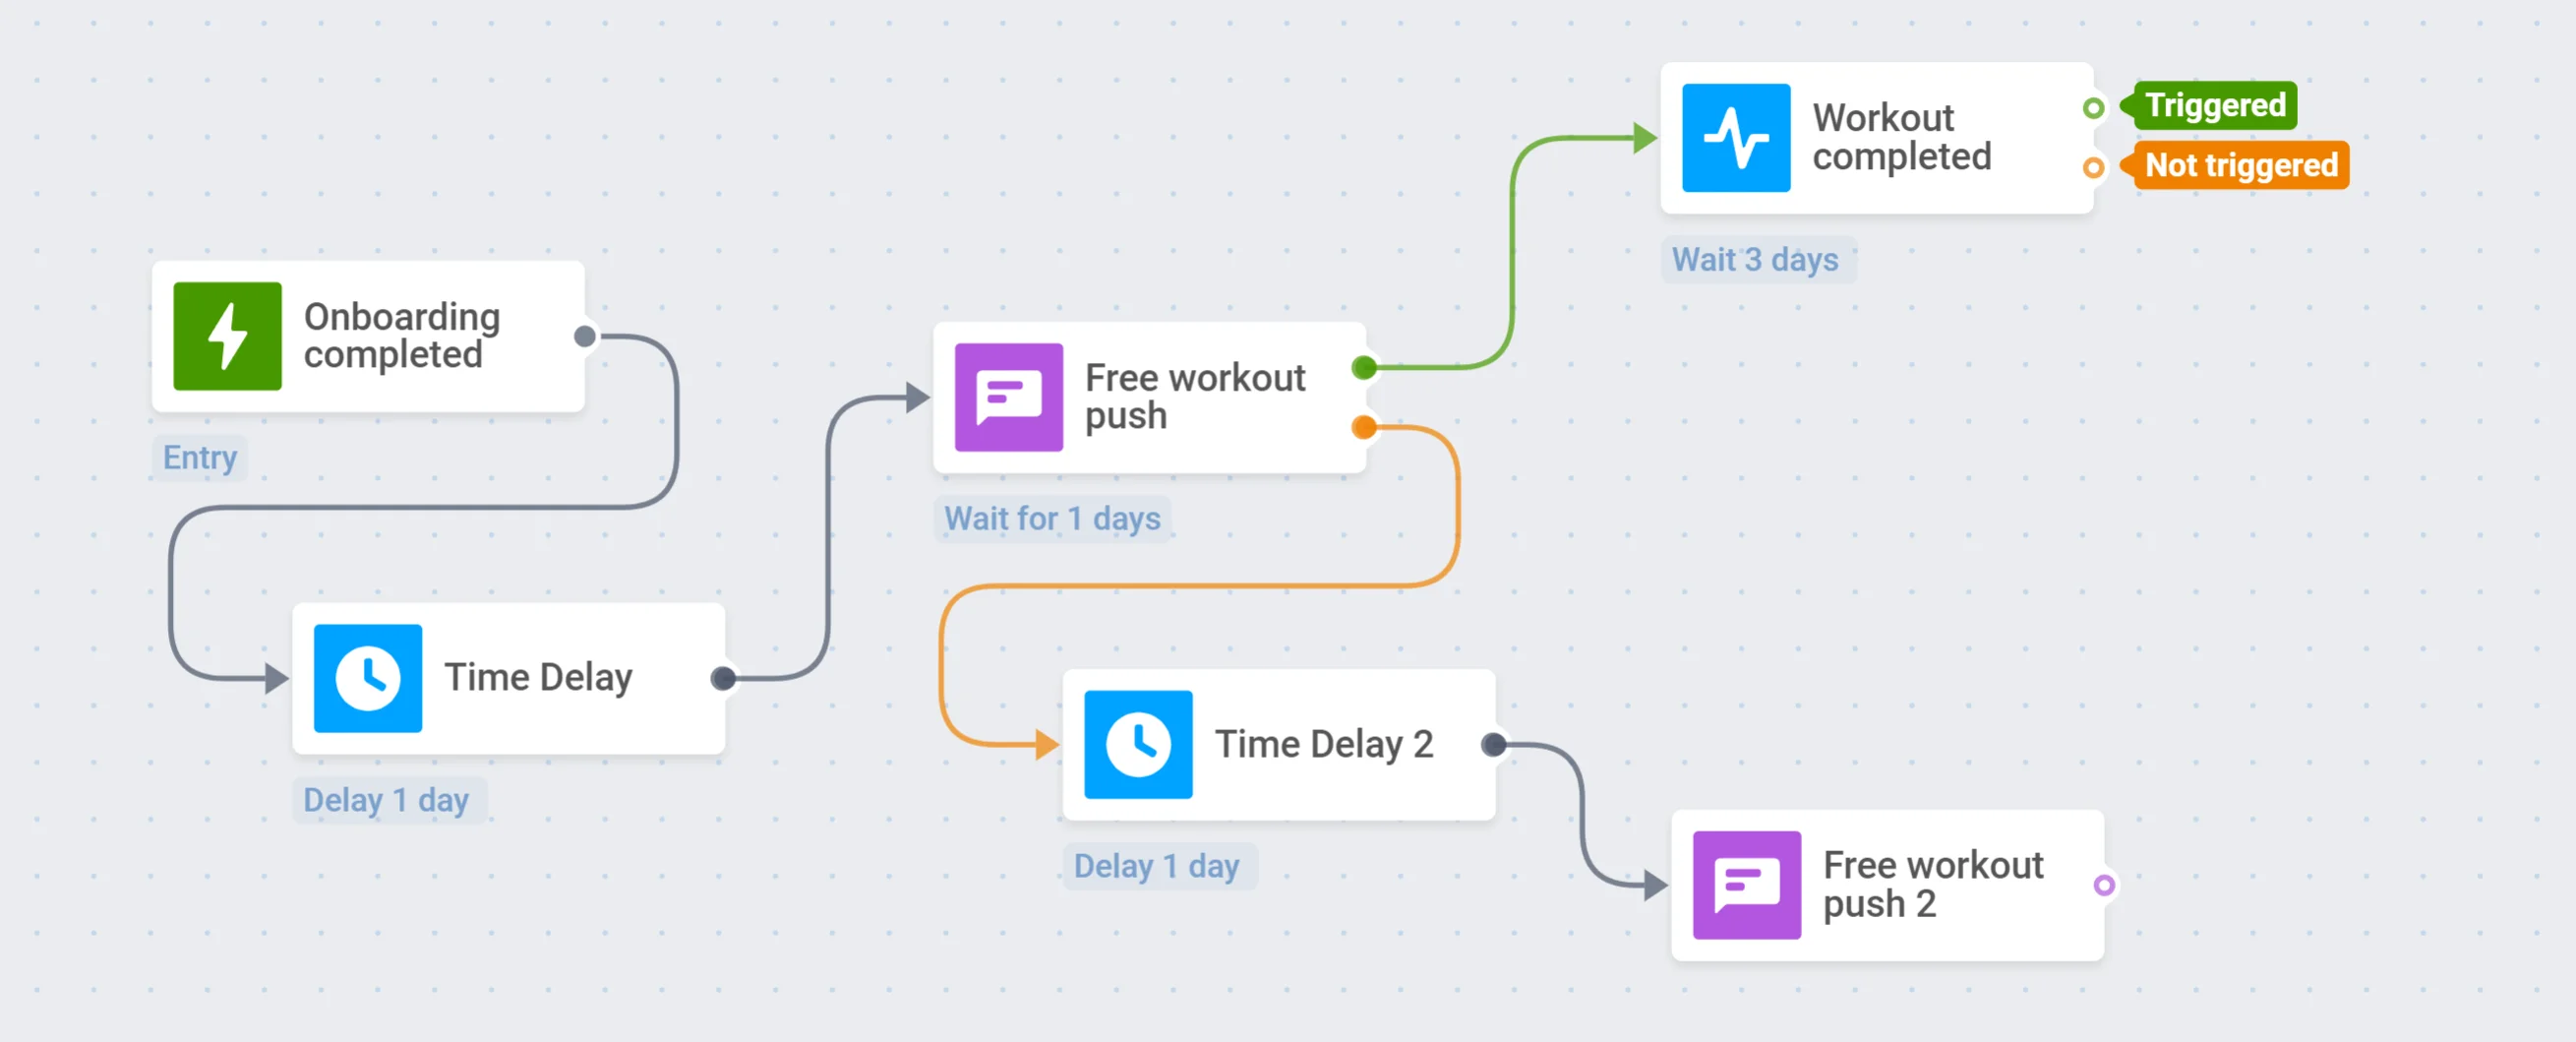
The first communication of your activation campaign is essential: the more value it shows the user, the more likely the user will continue their journey. So, prepare the Push Preset in advance containing all the best you can offer at this journey point: for example, set the Deep Link directing users to a today's workout, and friendly invite them to join.
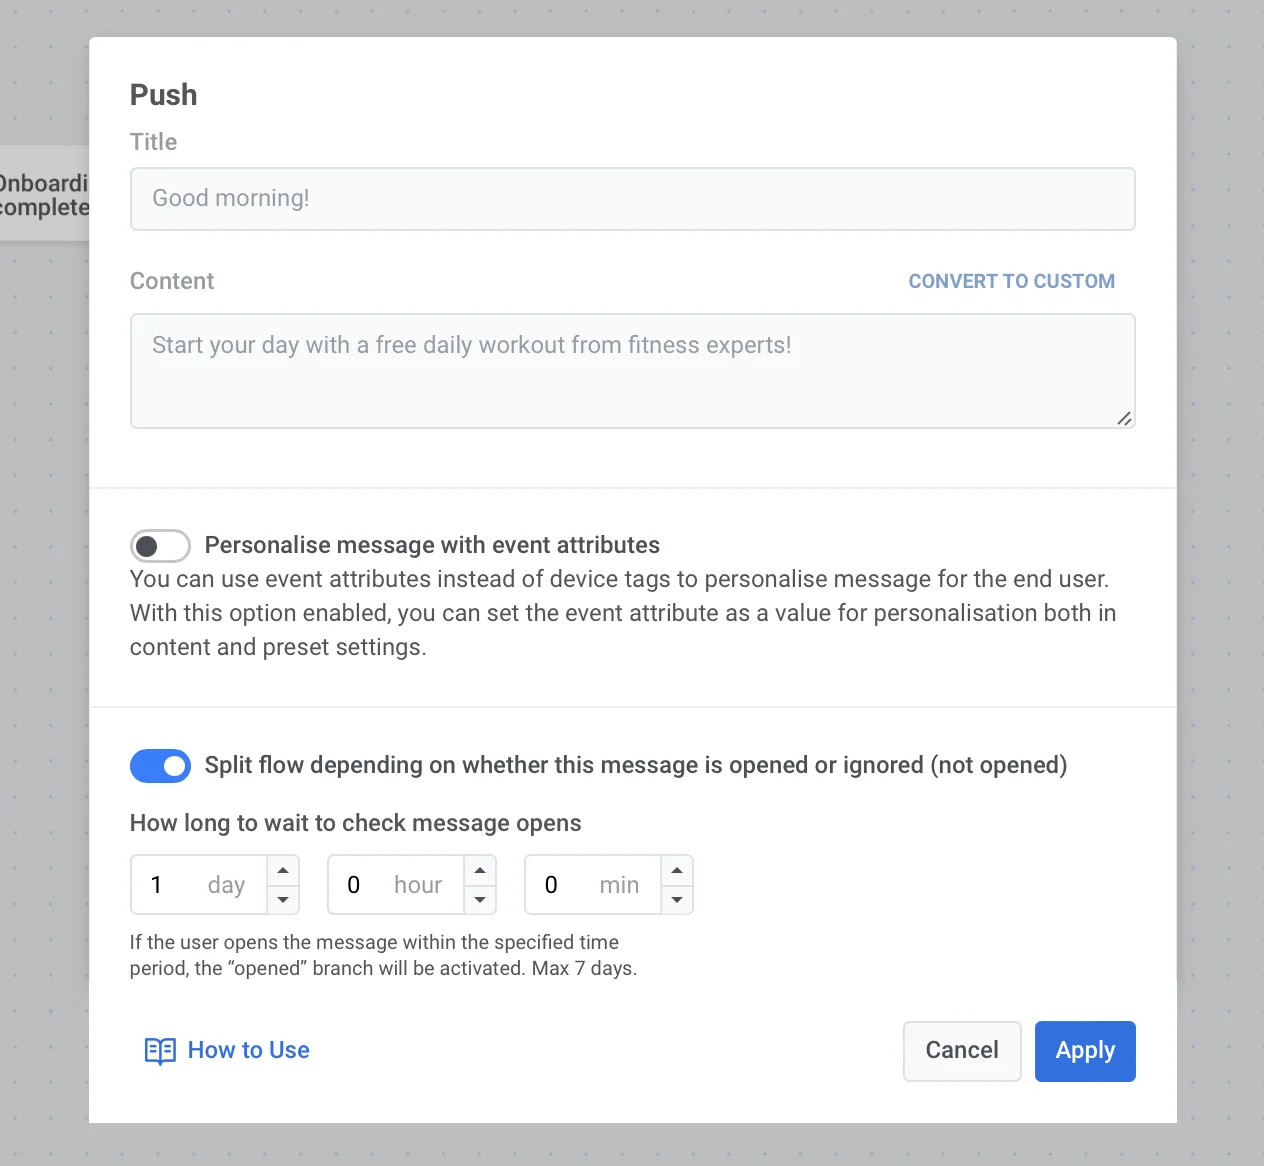
Split the further flow depending on whether users open this push or not: for those who have not, one more reminder might work.
## Set up a wait for trigger
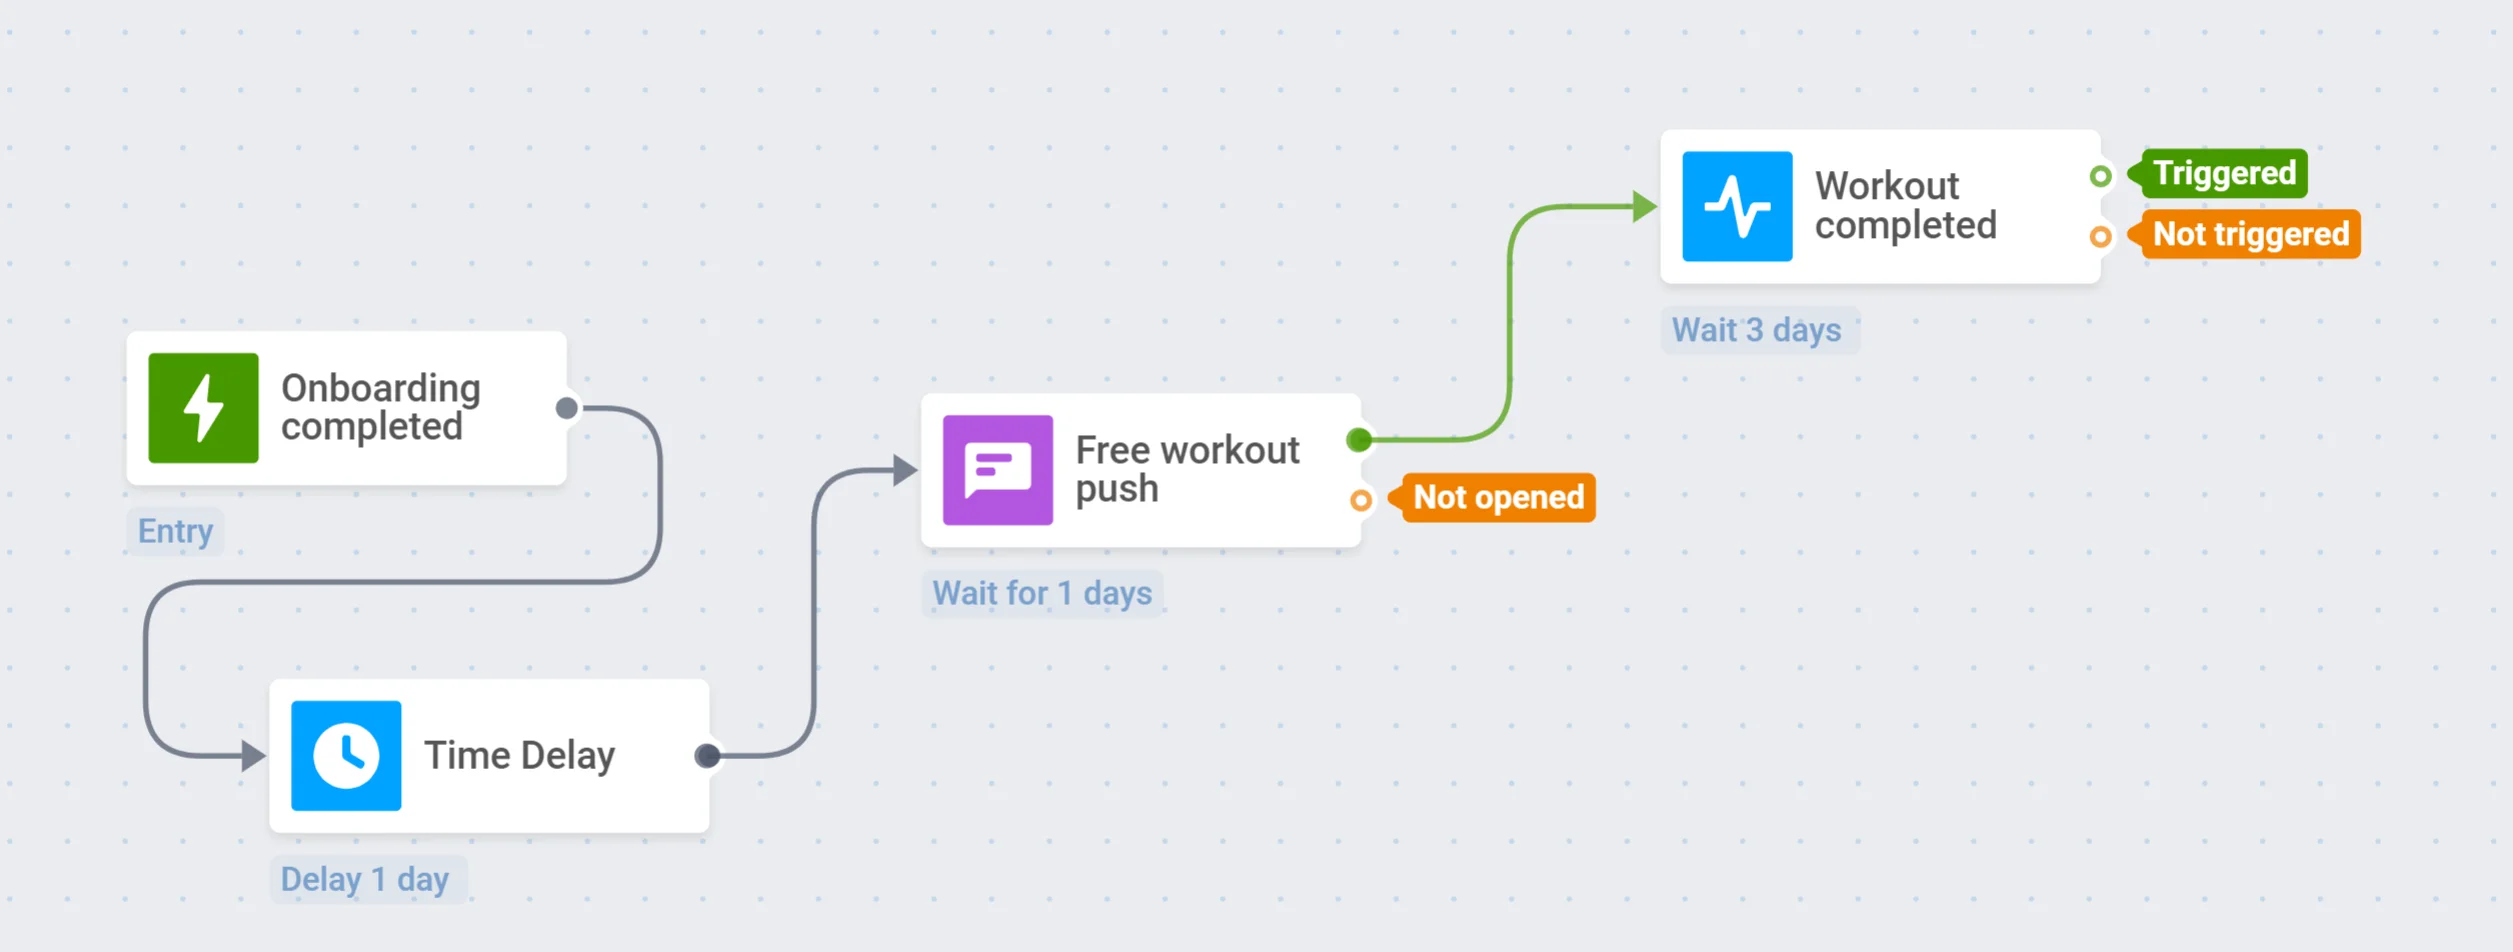
For users who have opened the push message, let's wait a bit to complete their first activation action. To track that, you have to set up a corresponding Event first, and add the [Wait for Trigger](/product/customer-journey/journey-elements#wait-for-trigger) step to your journey.
For this guide's example, we'd say the first activation event is 'Workout completed', and it's fair to wait a couple of days for the user to get involved.
## Send the second push notification
As for those users who have not opened your first push, add one more [Time Delay](#time-delay) for them and then send the second push notification offering a free workout.
## Display an in-app message
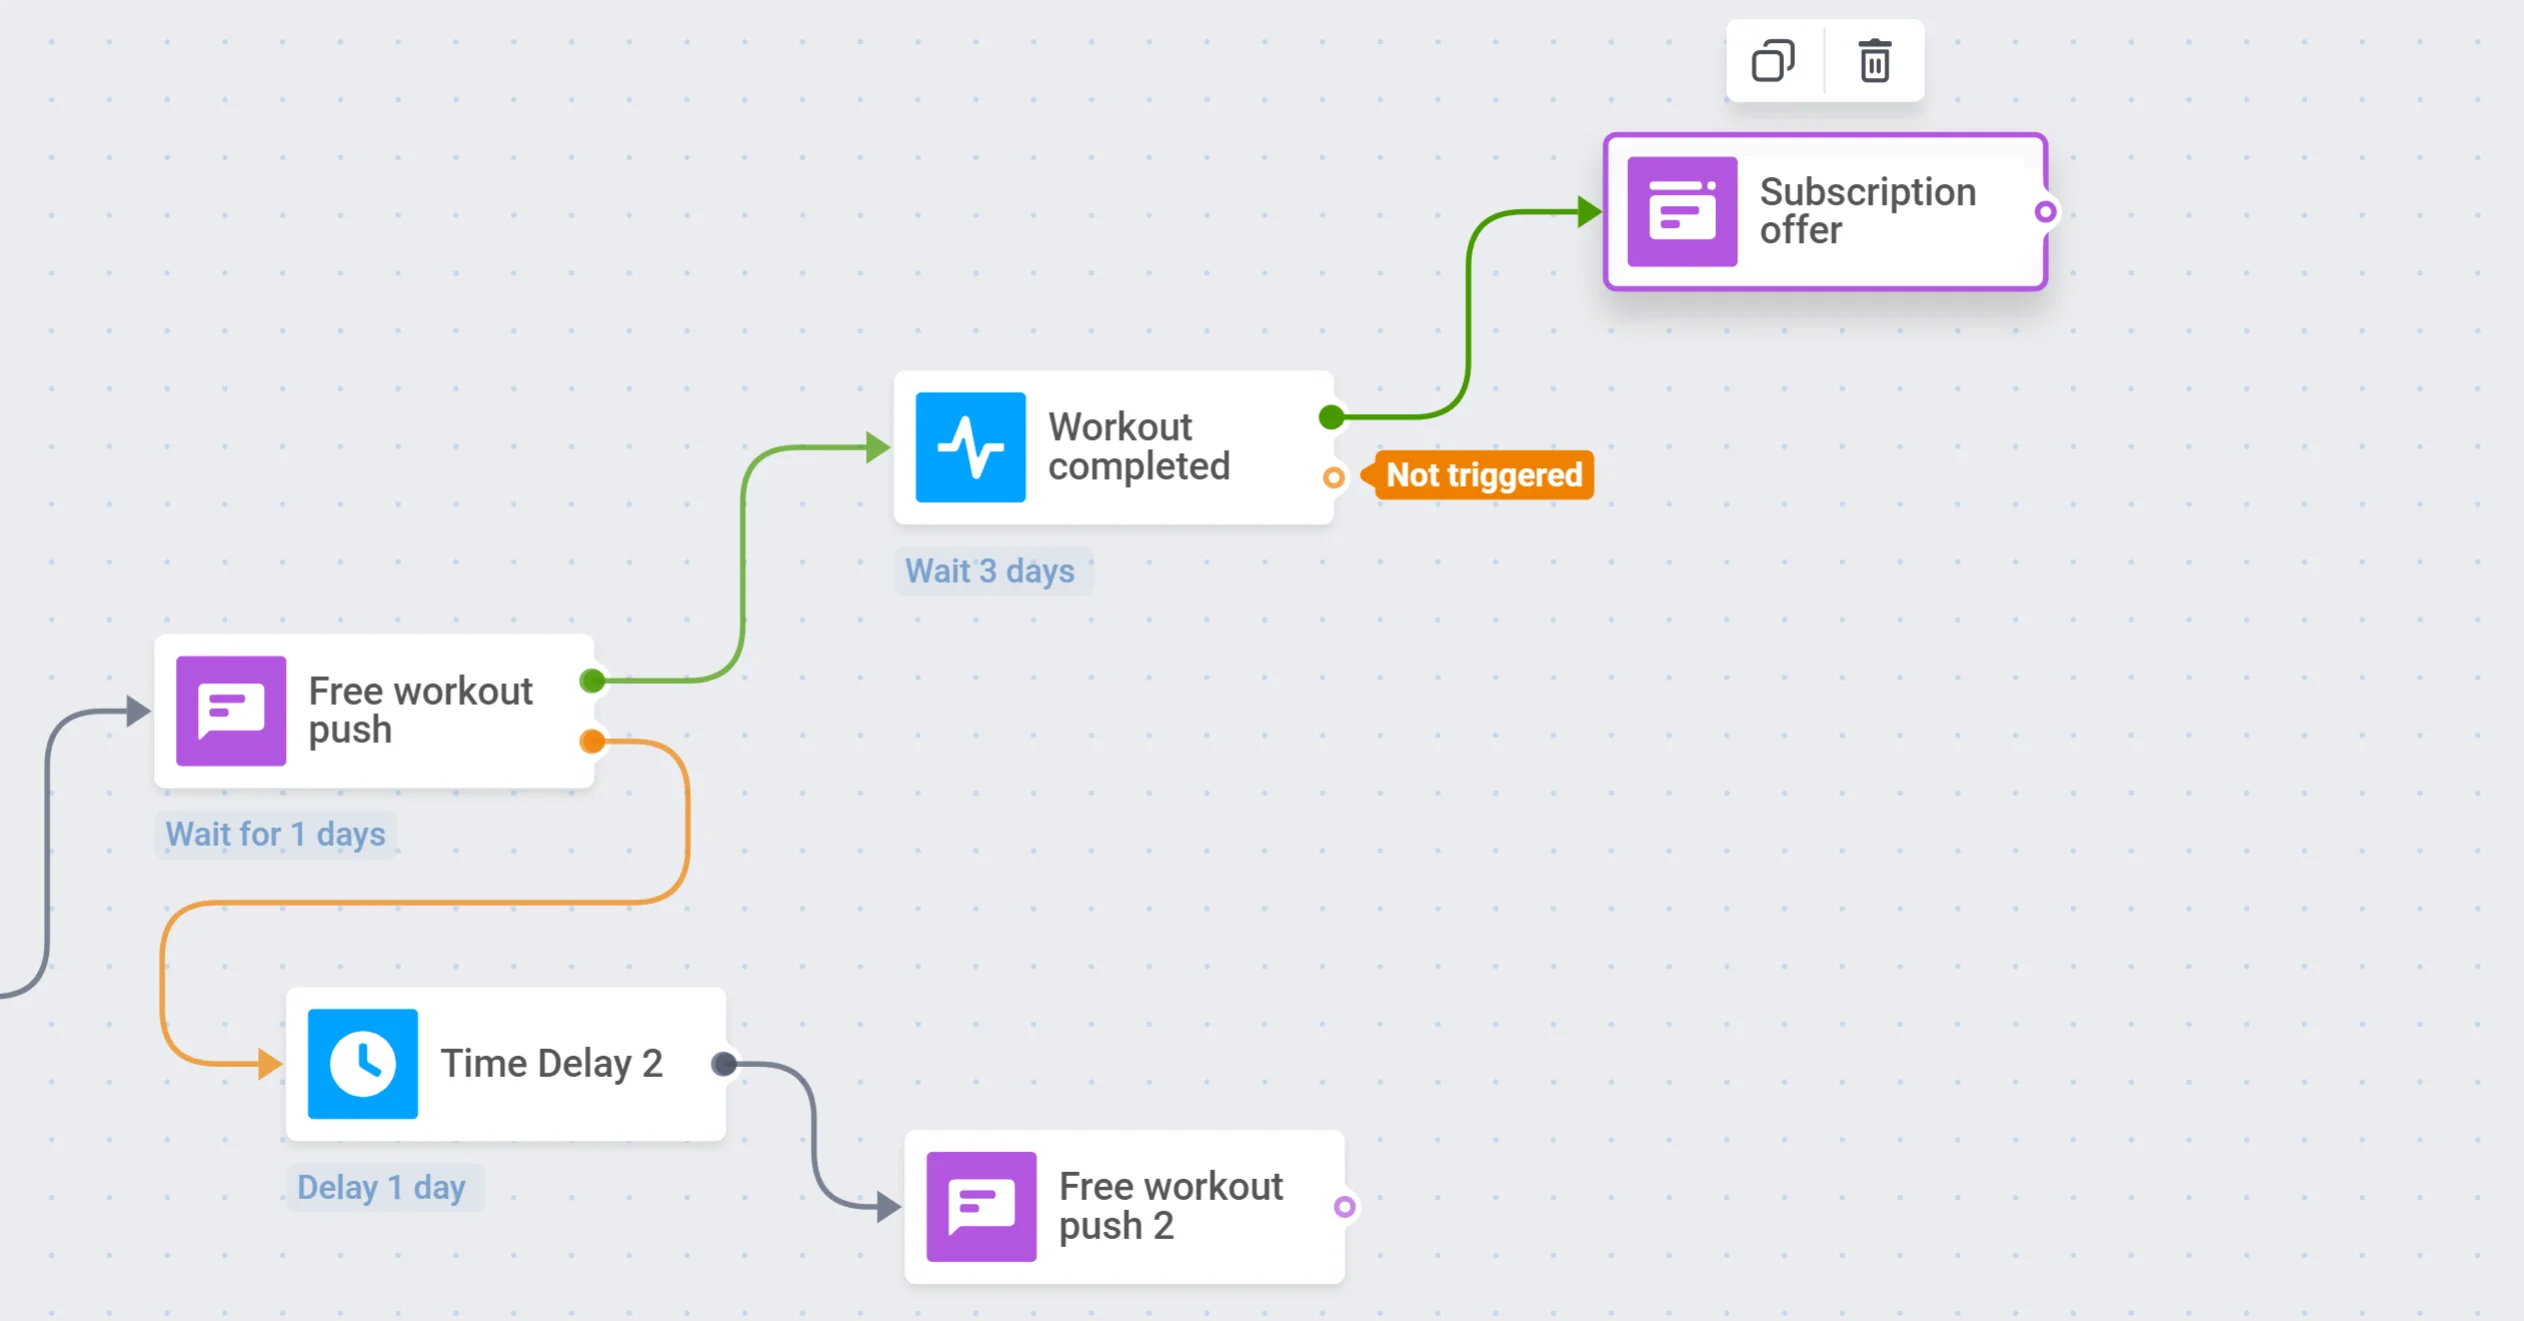
Since the Wait for trigger step splits the further flow into two branches – of users who trigger the event and those who do not – the former ones are ready for their next activation step. So, it's time to make an offer: create an appealing [in-app message](/product/content/in-apps/) offering a paid subscription and highlighting all its benefits for customers who've tried your product already.
## Add a preferences survey
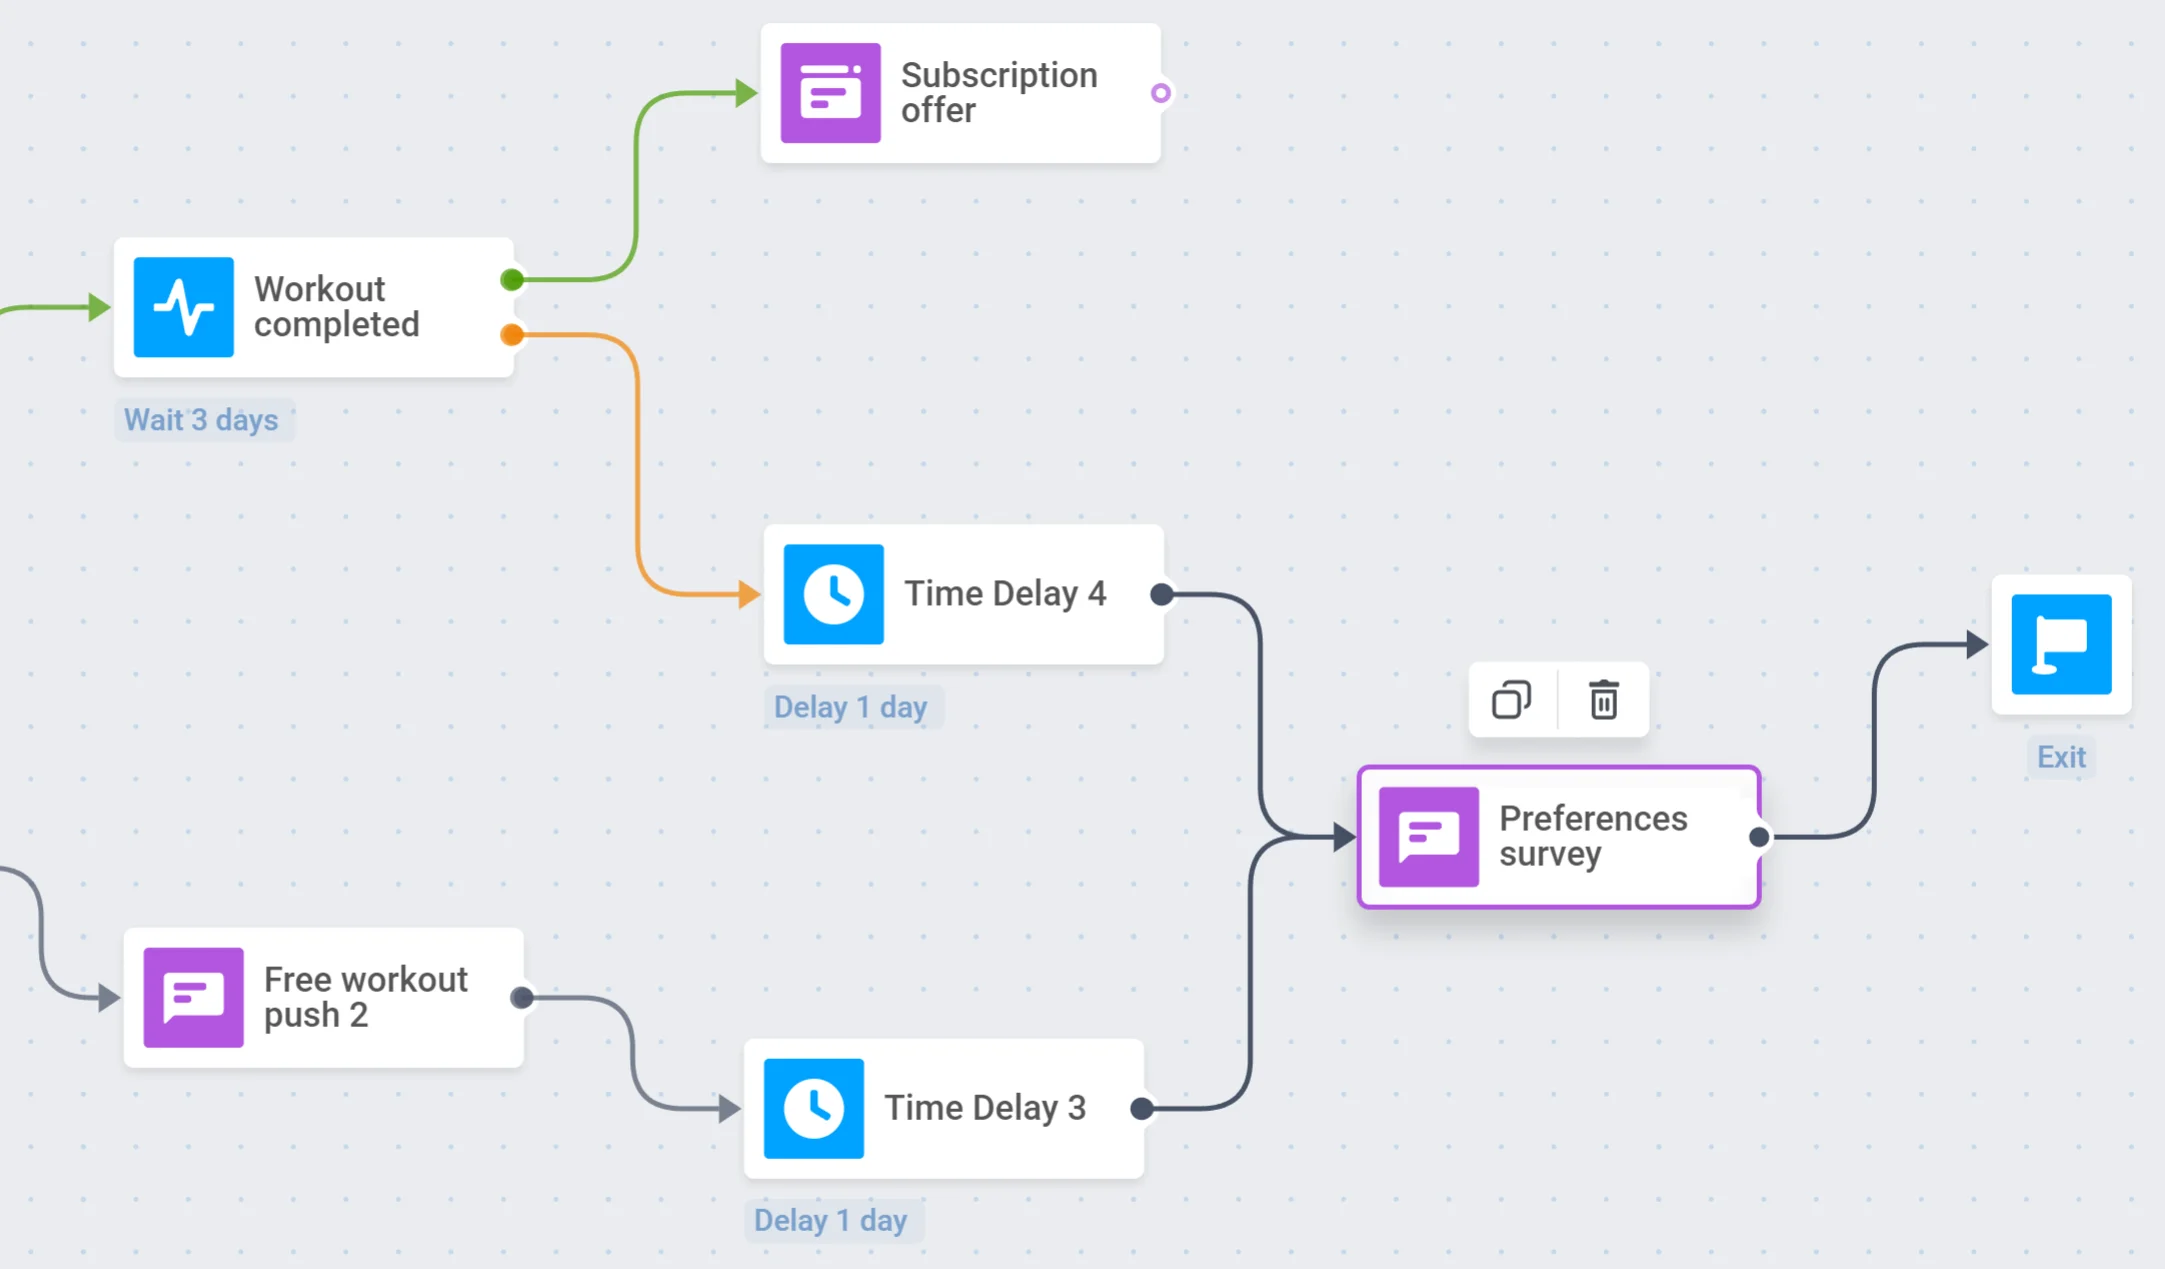
If a user has not performed the action you'd waited for, try to find out what might interest them. To do this, prompt them to take a survey about their workout preferences. This survey will help you improve your app and make more relevant and personalized offers.
You can offer to take a survey to those who did not open the second push or did not complete the free workout. After that, you can end the journey for these users.
## Configure a condition split
And that's the whole turning point of your activation campaign – do users activate after all your efforts? To observe your results and build further user engagement relevantly, split users in the journey based on whether they've reached the goals you set.
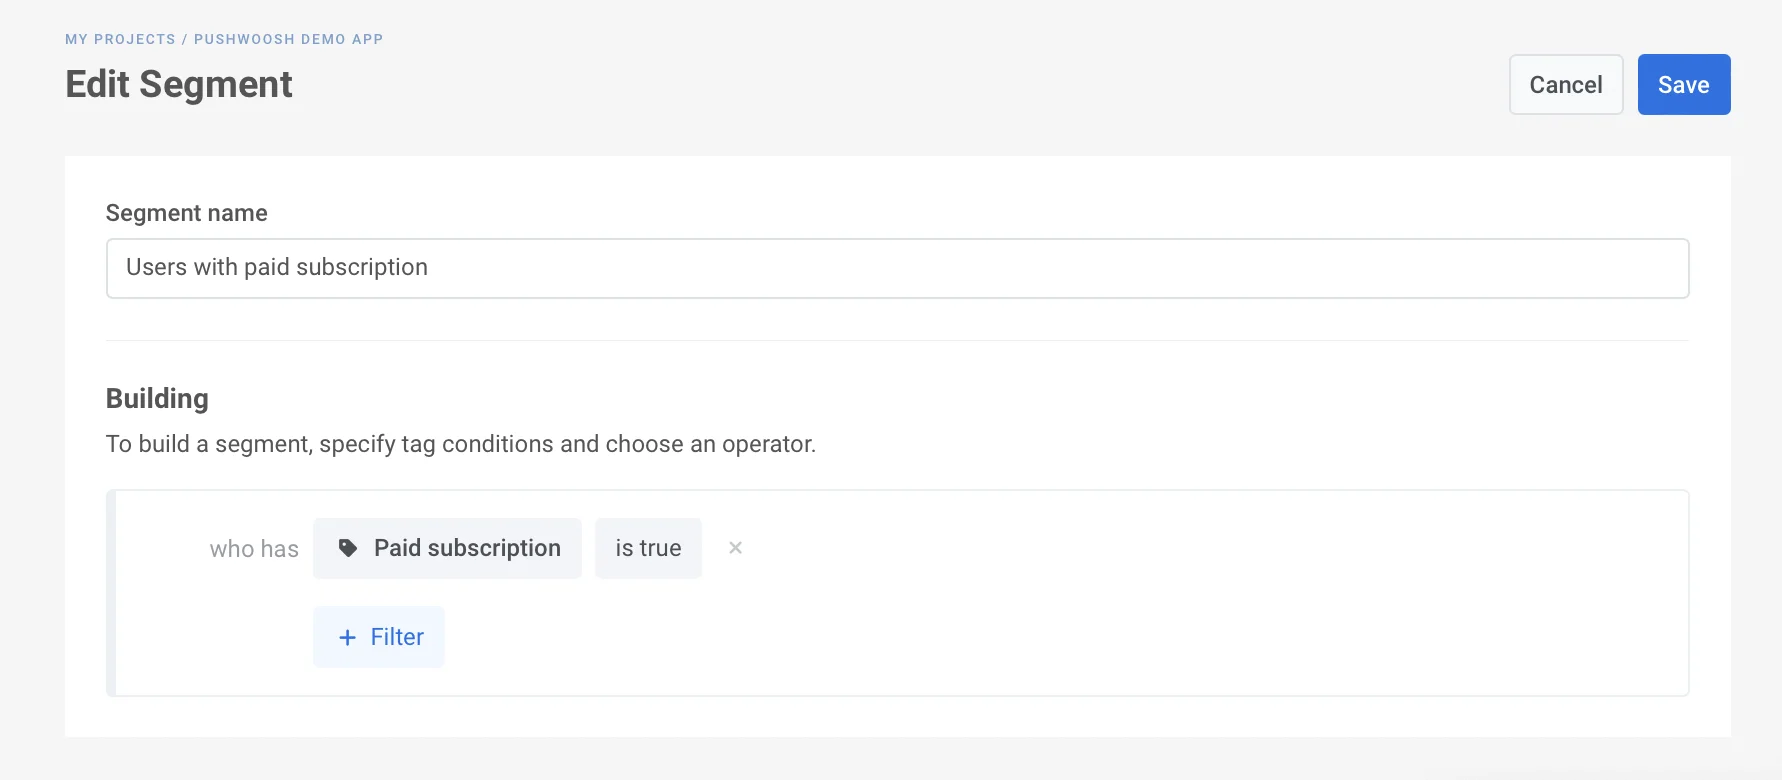
1. First, [create a segment](/product/audience-data-and-segmentation/segmentation/) of users who have performed an activation action: for example, those who purchased a subscription and thus have the 'Paid subscription' tag you've set on the previous step.
2. Then, add the [Condition split](/product/customer-journey/journey-elements/flow-controls/segment-split/) element to your journey canvas.
3. Offer more to activated users, for example, give them a chance to personalize their experience with a push notification containing a Deep Link to their account settings or personal preferences choice.
4. If users are still not engaged enough to perform the activation event, you may want to get them a boost with a special, limited-time offer or a discount.
## Launch the campaign
That's it! Your activation campaign is ready to start, and all you need is to set its exit point, check every step once again, and launch the journey.
 Here are a few steps to launch an activation campaign ending with purchasing a subscription:
1. Define your main **activation goal**: what actions do you want users to perform? When do you count them as activated?
2. Decide **where to start** the journey: set up a trigger or a segment to begin the campaign.
3. Prepare **compelling content** – your activation campaign should convince users they really need your app. Leverage the omnichannel messaging for more conversions: create [Push Presets](/product/content/push-presets) for short daily communication, [Email content](/product/content/email-content) for delivering loads of value, and [in-app messages](/product/content/in-apps/) to catch users' eyes and hearts.
4. Do not forget to **measure your results**: collect user data with [Tags](/product/audience-data-and-segmentation/user-data-tags/tags/), keep track of your [journey statistics](/product/statistics-and-analytics/journey-statistics), or run [A/B tests](/product/customer-journey/journey-elements#abn-split) to understand better what works best.
## Set up conversion goals
As an activation campaign aims to encourage desired users' behavior, its efficiency can be easily measured by the conversion rate. To track the journey's conversions, set the [Conversion Goals](/product/customer-journey/journey-settings#conversion-goals) – target actions you'd like users to perform.
1. First, [set the target event](/product/audience-data-and-segmentation/events#implementation) in your Pushwoosh Control Panel and [integrate it into your app](/product/audience-data-and-segmentation/events#3-call-postevent-api) to be tracked.
2. Then, add that event (or several events) as a [Conversion Goal](/product/customer-journey/journey-settings#conversion-goals) of your Customer Journey.
Here are a few steps to launch an activation campaign ending with purchasing a subscription:
1. Define your main **activation goal**: what actions do you want users to perform? When do you count them as activated?
2. Decide **where to start** the journey: set up a trigger or a segment to begin the campaign.
3. Prepare **compelling content** – your activation campaign should convince users they really need your app. Leverage the omnichannel messaging for more conversions: create [Push Presets](/product/content/push-presets) for short daily communication, [Email content](/product/content/email-content) for delivering loads of value, and [in-app messages](/product/content/in-apps/) to catch users' eyes and hearts.
4. Do not forget to **measure your results**: collect user data with [Tags](/product/audience-data-and-segmentation/user-data-tags/tags/), keep track of your [journey statistics](/product/statistics-and-analytics/journey-statistics), or run [A/B tests](/product/customer-journey/journey-elements#abn-split) to understand better what works best.
## Set up conversion goals
As an activation campaign aims to encourage desired users' behavior, its efficiency can be easily measured by the conversion rate. To track the journey's conversions, set the [Conversion Goals](/product/customer-journey/journey-settings#conversion-goals) – target actions you'd like users to perform.
1. First, [set the target event](/product/audience-data-and-segmentation/events#implementation) in your Pushwoosh Control Panel and [integrate it into your app](/product/audience-data-and-segmentation/events#3-call-postevent-api) to be tracked.
2. Then, add that event (or several events) as a [Conversion Goal](/product/customer-journey/journey-settings#conversion-goals) of your Customer Journey.
 ## Add a trigger-based entry
Before creating a journey, [set up the entry event](/product/audience-data-and-segmentation/events/#implementation) in your Control Panel. Then, integrate the [postEvent](/product/audience-data-and-segmentation/events#3-call-postevent-api) to be sent upon the event triggering.
Finally, add this event as a [Trigger-based Entry](/product/customer-journey/journey-elements#trigger-based-entry) to the journey canvas.
## Add a trigger-based entry
Before creating a journey, [set up the entry event](/product/audience-data-and-segmentation/events/#implementation) in your Control Panel. Then, integrate the [postEvent](/product/audience-data-and-segmentation/events#3-call-postevent-api) to be sent upon the event triggering.
Finally, add this event as a [Trigger-based Entry](/product/customer-journey/journey-elements#trigger-based-entry) to the journey canvas.
 ## Add a time delay
As users tend to interact with push notifications at a specific time of the day, it's better to adjust your communications to users' timezones and most convenient day times. For example, as a daily workout app, we're helping users start their day healthily: before messaging users, wait till their morning by setting the timezone-sensitive [Time Delay](/product/customer-journey/journey-elements#time-delay).
## Add a time delay
As users tend to interact with push notifications at a specific time of the day, it's better to adjust your communications to users' timezones and most convenient day times. For example, as a daily workout app, we're helping users start their day healthily: before messaging users, wait till their morning by setting the timezone-sensitive [Time Delay](/product/customer-journey/journey-elements#time-delay).
 ## Send the first push notification
The first communication of your activation campaign is essential: the more value it shows the user, the more likely the user will continue their journey. So, prepare the Push Preset in advance containing all the best you can offer at this journey point: for example, set the Deep Link directing users to a today's workout, and friendly invite them to join.
## Send the first push notification
The first communication of your activation campaign is essential: the more value it shows the user, the more likely the user will continue their journey. So, prepare the Push Preset in advance containing all the best you can offer at this journey point: for example, set the Deep Link directing users to a today's workout, and friendly invite them to join.
 Split the further flow depending on whether users open this push or not: for those who have not, one more reminder might work.
 ## Set up a wait for trigger
For users who have opened the push message, let's wait a bit to complete their first activation action. To track that, you have to set up a corresponding Event first, and add the [Wait for Trigger](/product/customer-journey/journey-elements#wait-for-trigger) step to your journey.
For this guide's example, we'd say the first activation event is 'Workout completed', and it's fair to wait a couple of days for the user to get involved.
## Set up a wait for trigger
For users who have opened the push message, let's wait a bit to complete their first activation action. To track that, you have to set up a corresponding Event first, and add the [Wait for Trigger](/product/customer-journey/journey-elements#wait-for-trigger) step to your journey.
For this guide's example, we'd say the first activation event is 'Workout completed', and it's fair to wait a couple of days for the user to get involved.
 ## Send the second push notification
As for those users who have not opened your first push, add one more [Time Delay](#time-delay) for them and then send the second push notification offering a free workout.
## Send the second push notification
As for those users who have not opened your first push, add one more [Time Delay](#time-delay) for them and then send the second push notification offering a free workout.
 ## Display an in-app message
Since the Wait for trigger step splits the further flow into two branches – of users who trigger the event and those who do not – the former ones are ready for their next activation step. So, it's time to make an offer: create an appealing [in-app message](/product/content/in-apps/) offering a paid subscription and highlighting all its benefits for customers who've tried your product already.
## Display an in-app message
Since the Wait for trigger step splits the further flow into two branches – of users who trigger the event and those who do not – the former ones are ready for their next activation step. So, it's time to make an offer: create an appealing [in-app message](/product/content/in-apps/) offering a paid subscription and highlighting all its benefits for customers who've tried your product already.
 ## Add a preferences survey
If a user has not performed the action you'd waited for, try to find out what might interest them. To do this, prompt them to take a survey about their workout preferences. This survey will help you improve your app and make more relevant and personalized offers.
You can offer to take a survey to those who did not open the second push or did not complete the free workout. After that, you can end the journey for these users.
## Add a preferences survey
If a user has not performed the action you'd waited for, try to find out what might interest them. To do this, prompt them to take a survey about their workout preferences. This survey will help you improve your app and make more relevant and personalized offers.
You can offer to take a survey to those who did not open the second push or did not complete the free workout. After that, you can end the journey for these users.
 ## Configure a condition split
And that's the whole turning point of your activation campaign – do users activate after all your efforts? To observe your results and build further user engagement relevantly, split users in the journey based on whether they've reached the goals you set.
1. First, [create a segment](/product/audience-data-and-segmentation/segmentation/) of users who have performed an activation action: for example, those who purchased a subscription and thus have the 'Paid subscription' tag you've set on the previous step.
## Configure a condition split
And that's the whole turning point of your activation campaign – do users activate after all your efforts? To observe your results and build further user engagement relevantly, split users in the journey based on whether they've reached the goals you set.
1. First, [create a segment](/product/audience-data-and-segmentation/segmentation/) of users who have performed an activation action: for example, those who purchased a subscription and thus have the 'Paid subscription' tag you've set on the previous step.
 2. Then, add the [Condition split](/product/customer-journey/journey-elements/flow-controls/segment-split/) element to your journey canvas.
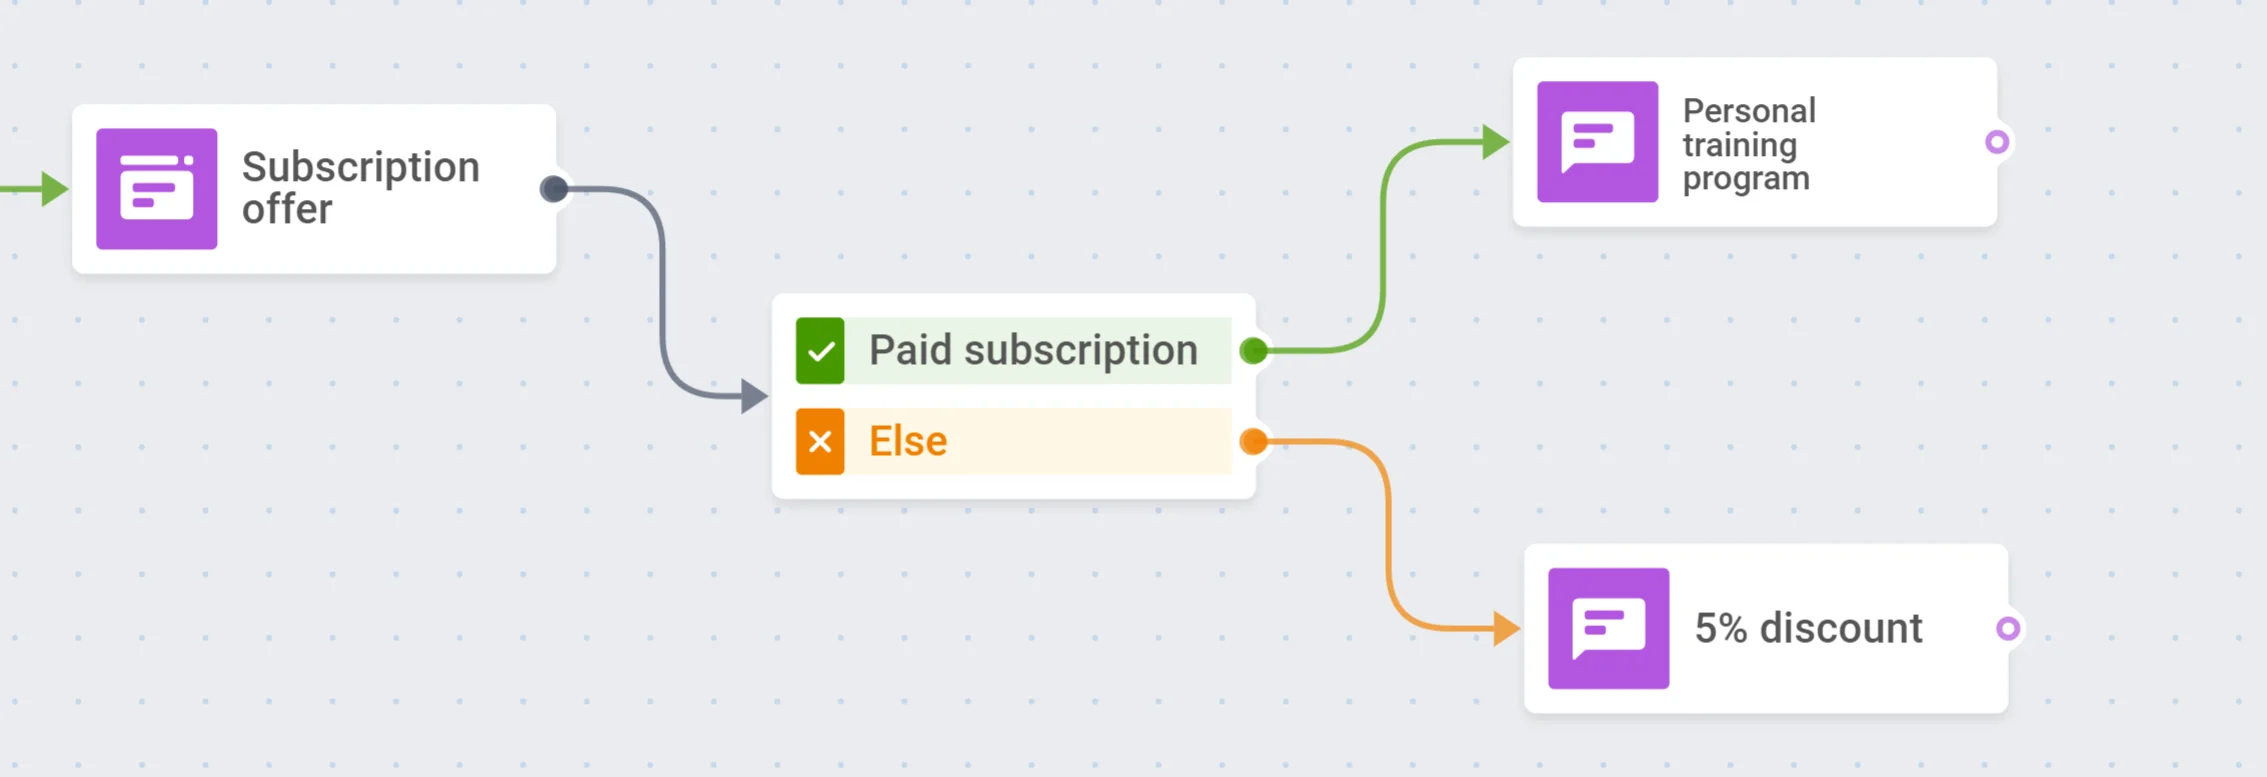
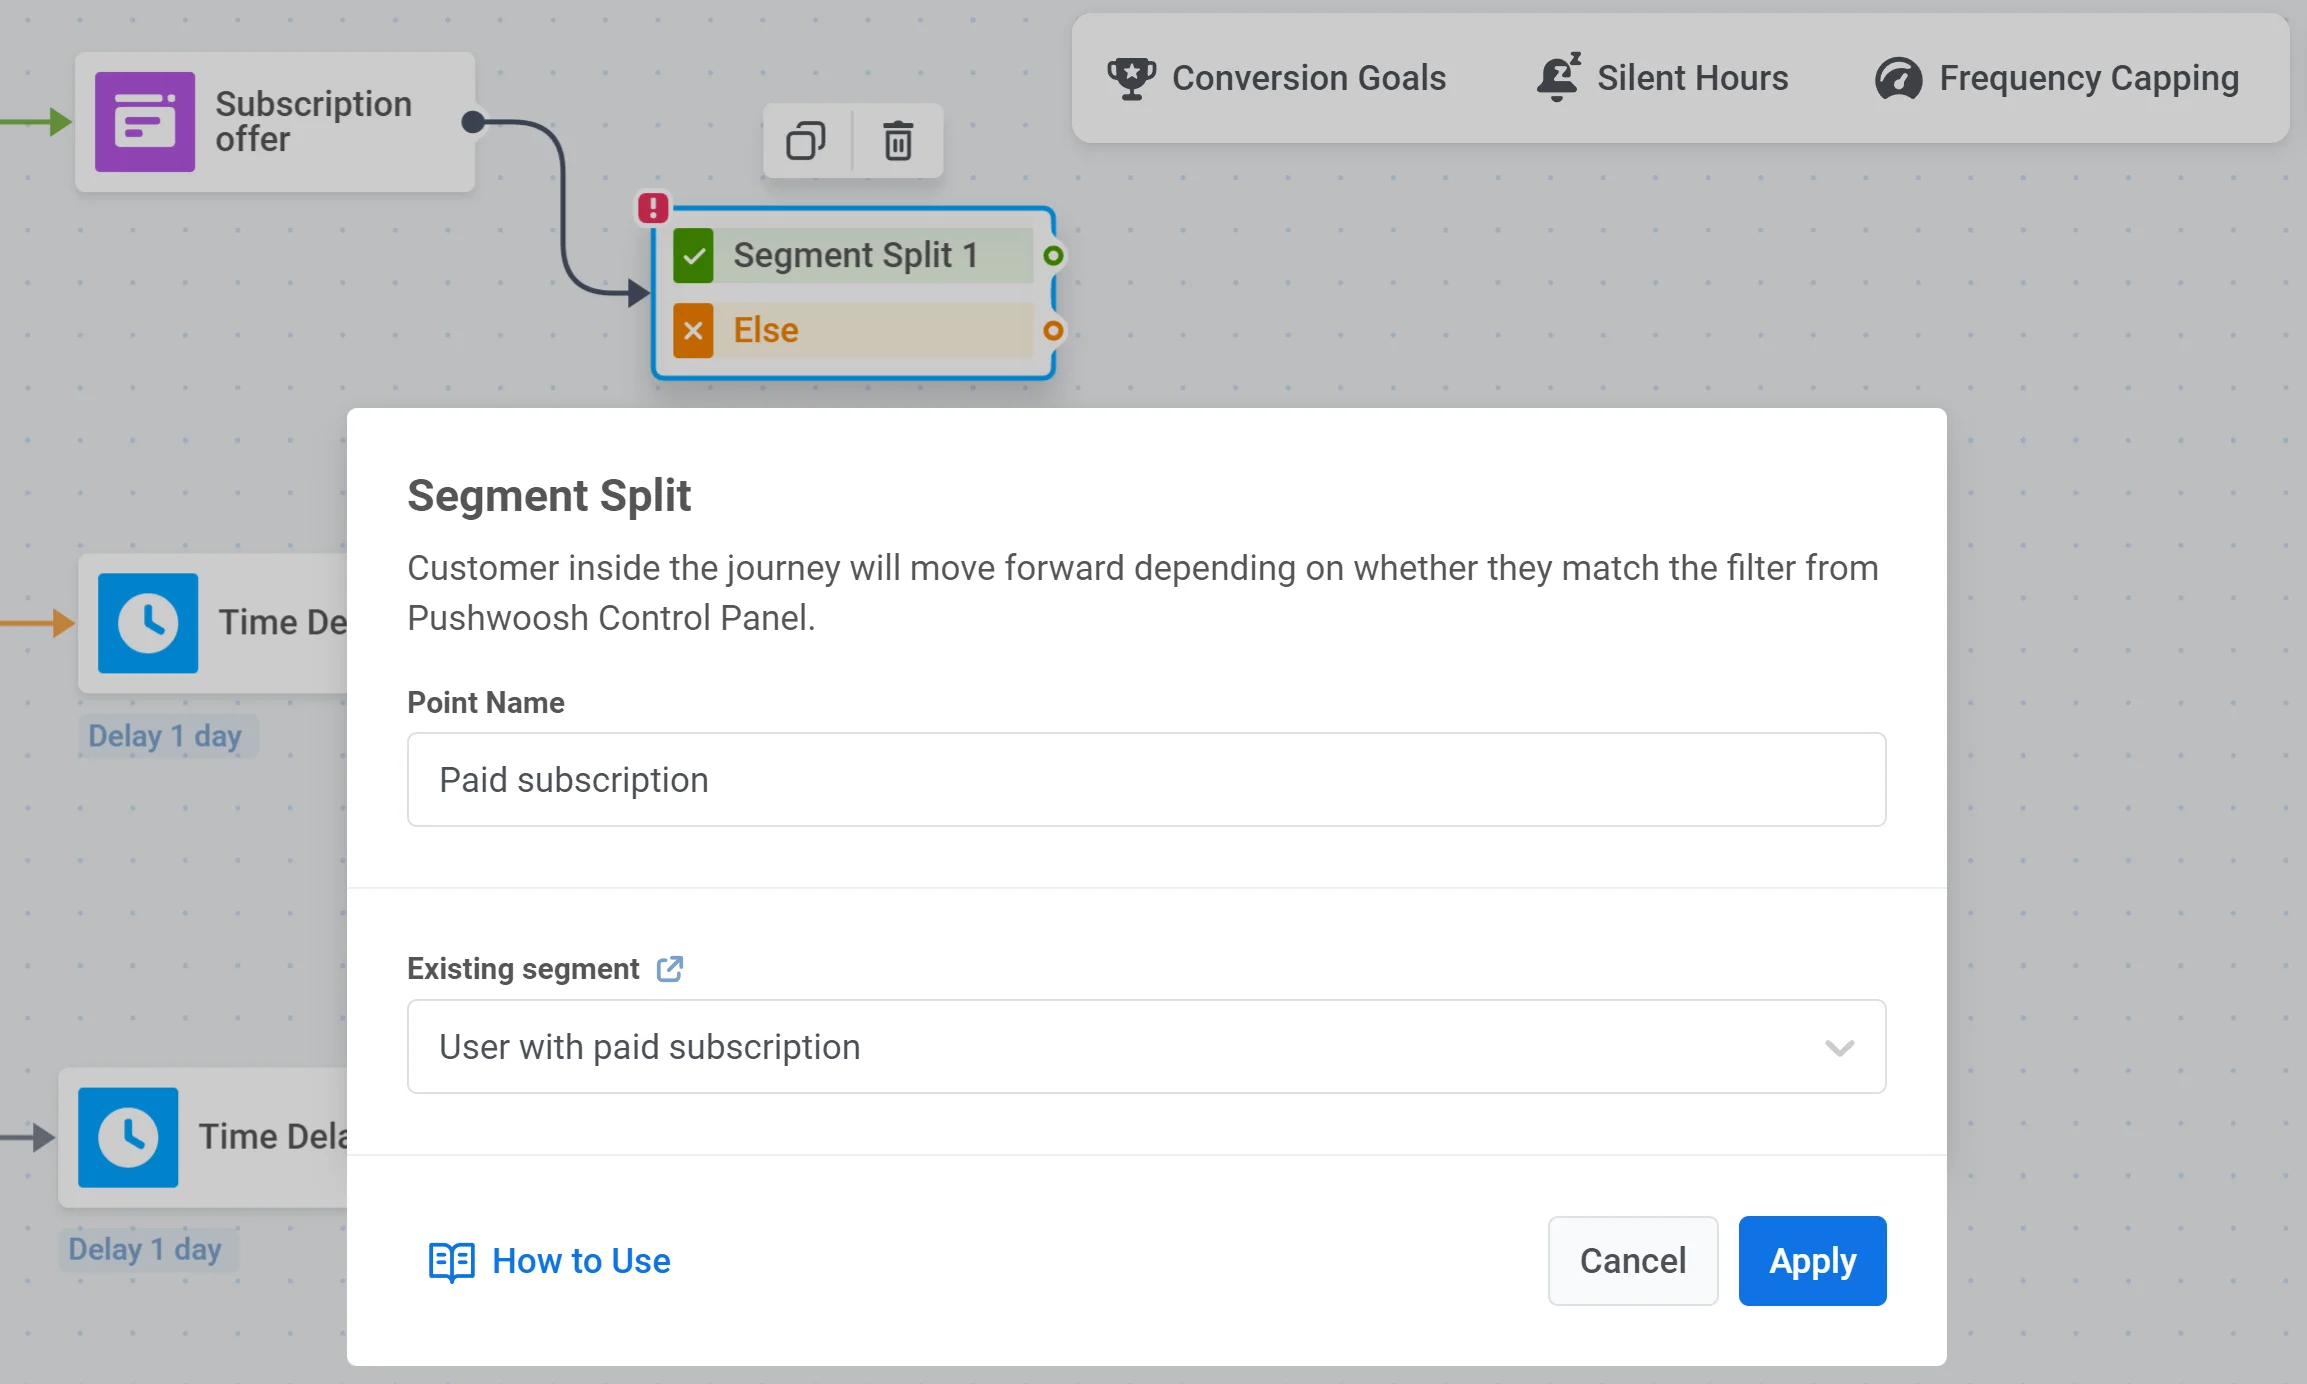 3. Offer more to activated users, for example, give them a chance to personalize their experience with a push notification containing a Deep Link to their account settings or personal preferences choice.
4. If users are still not engaged enough to perform the activation event, you may want to get them a boost with a special, limited-time offer or a discount.
3. Offer more to activated users, for example, give them a chance to personalize their experience with a push notification containing a Deep Link to their account settings or personal preferences choice.
4. If users are still not engaged enough to perform the activation event, you may want to get them a boost with a special, limited-time offer or a discount.
 ## Launch the campaign
That's it! Your activation campaign is ready to start, and all you need is to set its exit point, check every step once again, and launch the journey.
## Launch the campaign
That's it! Your activation campaign is ready to start, and all you need is to set its exit point, check every step once again, and launch the journey.