# How to set up a retention campaign in Pushwoosh
If you have already successfully [onboarded](/product/how-to-guides/lifecycle-marketing-campaigns/how-to-onboard-users-with-pushwoosh/) and [activated](/product/how-to-guides/lifecycle-marketing-campaigns/how-to-set-up-a-user-activation-campaign-with-pushwoosh/) a user, this may still not be enough for them to continue using your app for a long time. Create retention campaigns in Pushwoosh [Customer Journey Builder](/product/customer-journey/pushwoosh-journey-overview) to keep users returning to your app and reduce churn rate.
Tips for creating an effective retention campaign:
* **Provide value:** show how your app will entertain your users or help them solve their problems.
* **Personalize communication:** send content that matches the user's preferences, address users by their names, and use a friendly tone.
* **Use multiple channels:** send push notifications, show in-app messages or launch retention email campaigns depending on the type of your business and the stage your user is currently on.
* **Continuously improve your campaigns:** experiment with segmentation and sending time, analyze user behavior, reduce drop-offs, and make more relevant content and offers.
Below, we will show you how to create two types of retention campaigns in Customer Journey Builder: a [user retention campaign](#user-retention-campaign) and a [customer retention campaign](#customer-retention-campaign). In our examples, these two types of campaigns have different conversion goals: the user retention campaign appeals to taking the target action in the app, while the customer retention campaign motivates buyers to make another purchase. As the goals differ, the customer journey is also different for these two types of campaigns.
## User retention campaign
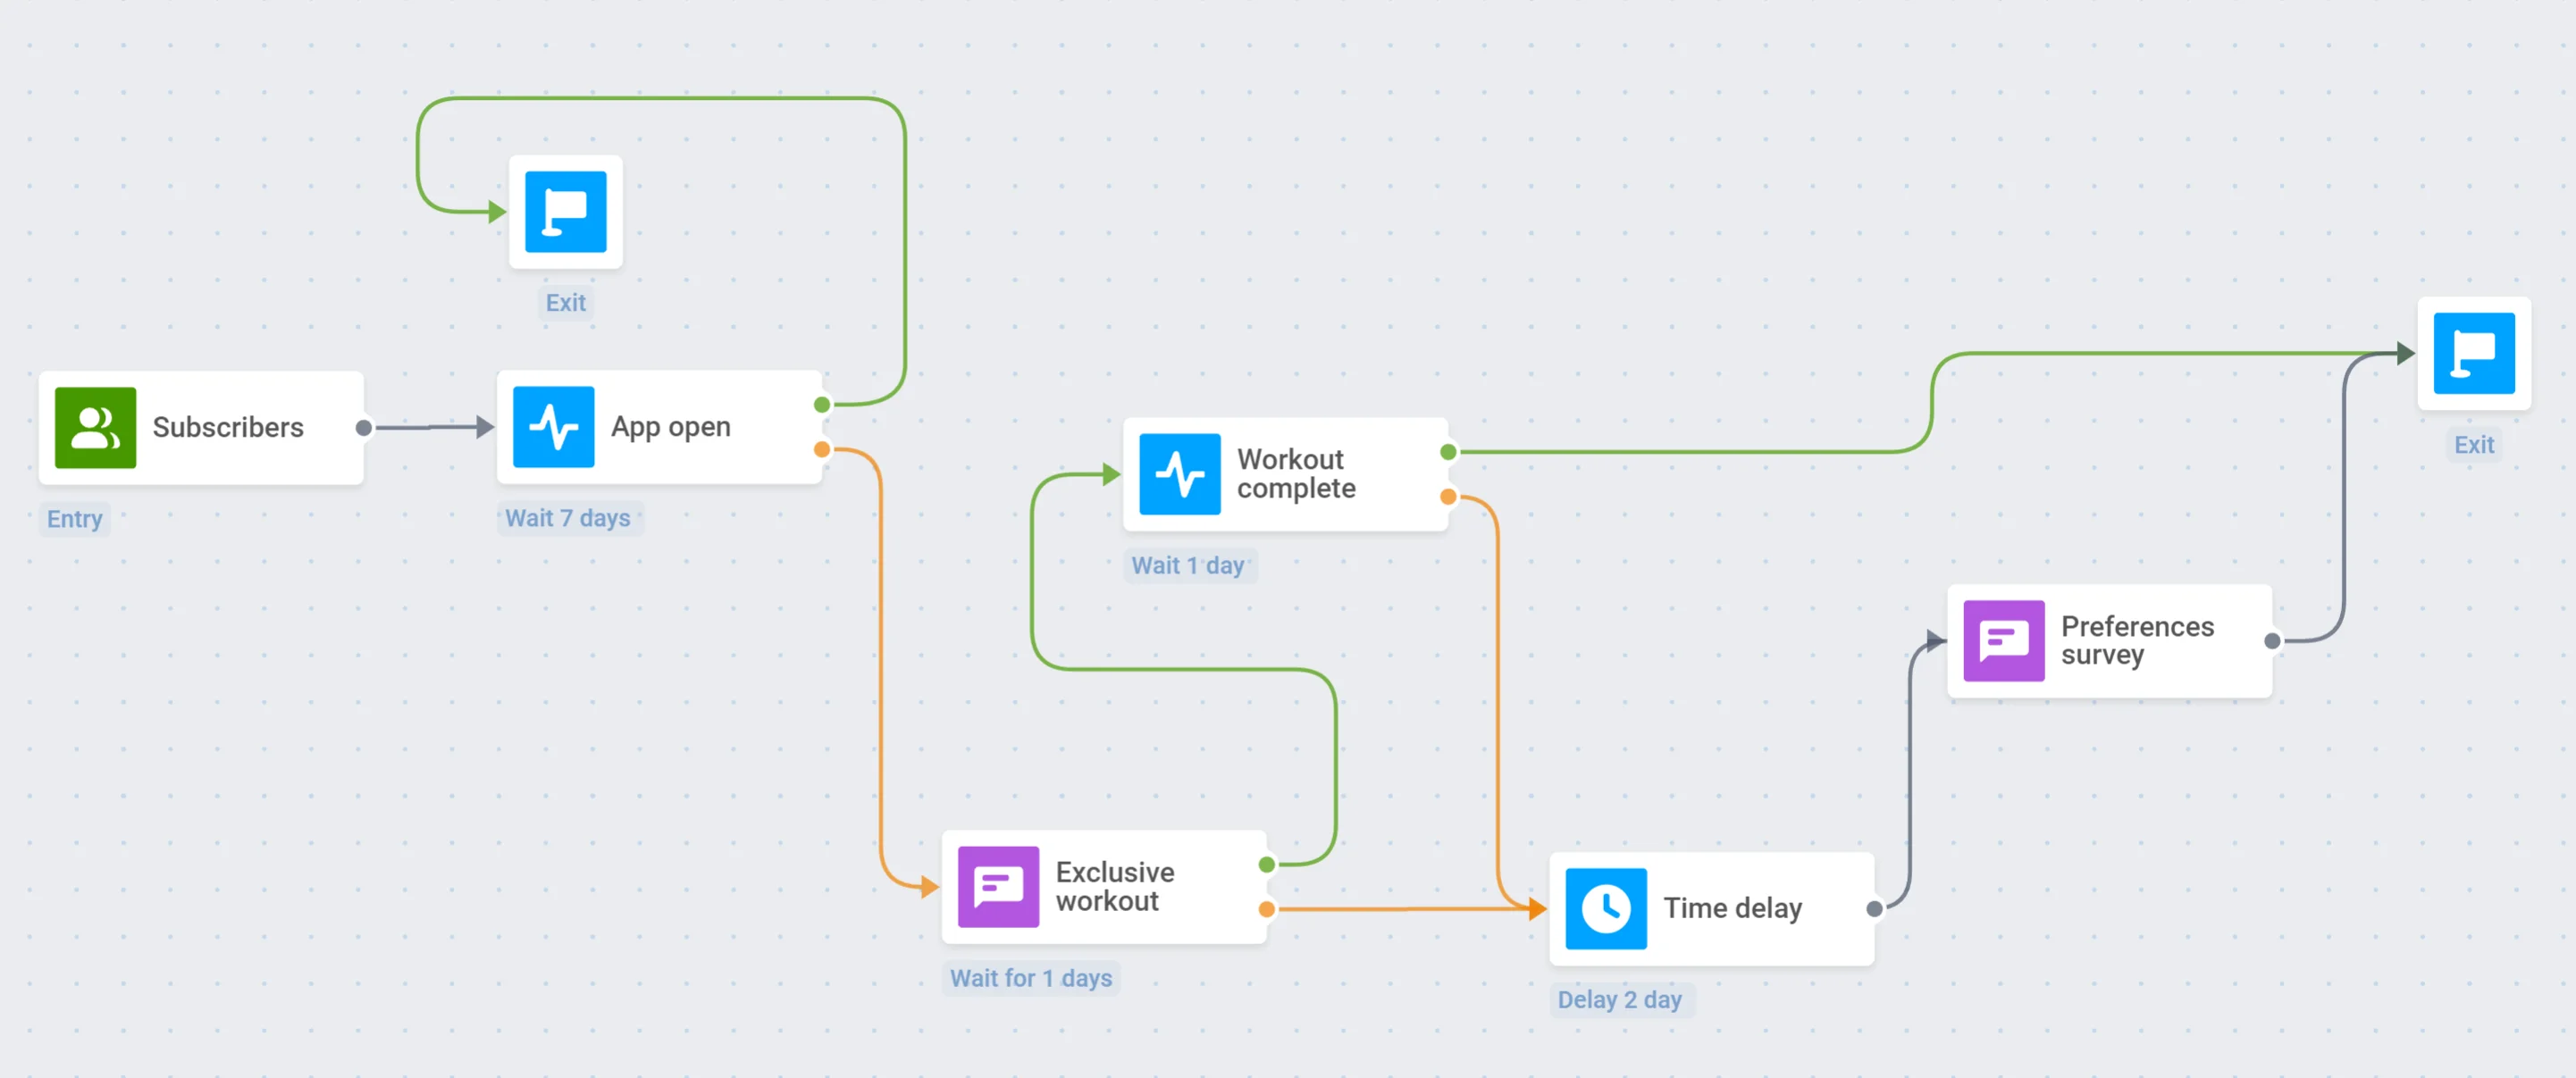
Let’s draft a retention campaign for a paid-subscription workout app. Once complete, it will look like this:
**1. Conversion goal**
Setting a conversion goal is necessary so that users do not re-enter the same Journey if they have already completed the goal. We will assume that our user retention campaign reaches its goal if a user completes the workout.
First, we will create the _Workout complete_ [event](/product/audience-data-and-segmentation/events/#implementation) in the Pushwoosh project and configure it in our example workout app using the [postEvent](/product/audience-data-and-segmentation/events/#3-call-postevent-api) API.
After that, we will start creating a new Customer Journey. On the top bar, we will click on **Conversion Goals** and select the _Workout complete_ event. We want the Journey to end for the user that fires the target event, so we will enable this option and then apply changes:
**2. Entry point and trigger**
We want to launch a retention campaign for app subscribers who haven't opened the app for seven days.
First, we will add the **Audience-based Entry** and select _Subscribers_ as the audience source:
Then, we will add the **Wait for Trigger** element and specify the default _PW\_ApplicationOpen_ event with a seven-day waiting period:
If a user opens the app at least once within seven days, they will exit the Journey:
**3. First push notification**
If a user has not opened the app at least once in seven days, we will send them a push notification offering to try an exclusive workout:
Now, let’s split the flow depending on whether this [push is opened or ignored](/product/customer-journey/journey-elements#split-to-openedignored):
We will also set [Silent Hours](/product/customer-journey/journey-settings#silent-hours) to prevent users from receiving workout push notifications at inappropriate times:
**4. Workout trigger**
_for those who opened the first push notification_
If a user clicks on the push notification, we will check if they have completed the workout.
First, we will set up the _Workout complete_ [event](/product/audience-data-and-segmentation/events/) in the app and the Pushwoosh project. Then, we will add the **Wait for Trigger** element with the _Workout complete_ event selected:
If a user completes the workout, they will exit the Journey:
**5. Time delay**
_for those who did not open the first push notification or did not complete the workout_
If a user ignores the push notification or does not complete the workout, we will wait for two days before sending anything else. To do this, we will add the **Time Delay** element:
**6. Second push notification**
After the specified time, we will send the second push notification prompting users to take a survey and tell about their preferences. This survey will help us improve our workout app and launch personalized campaigns in the future.
After sending the second push notification, we will end the Journey:
## Customer retention campaign
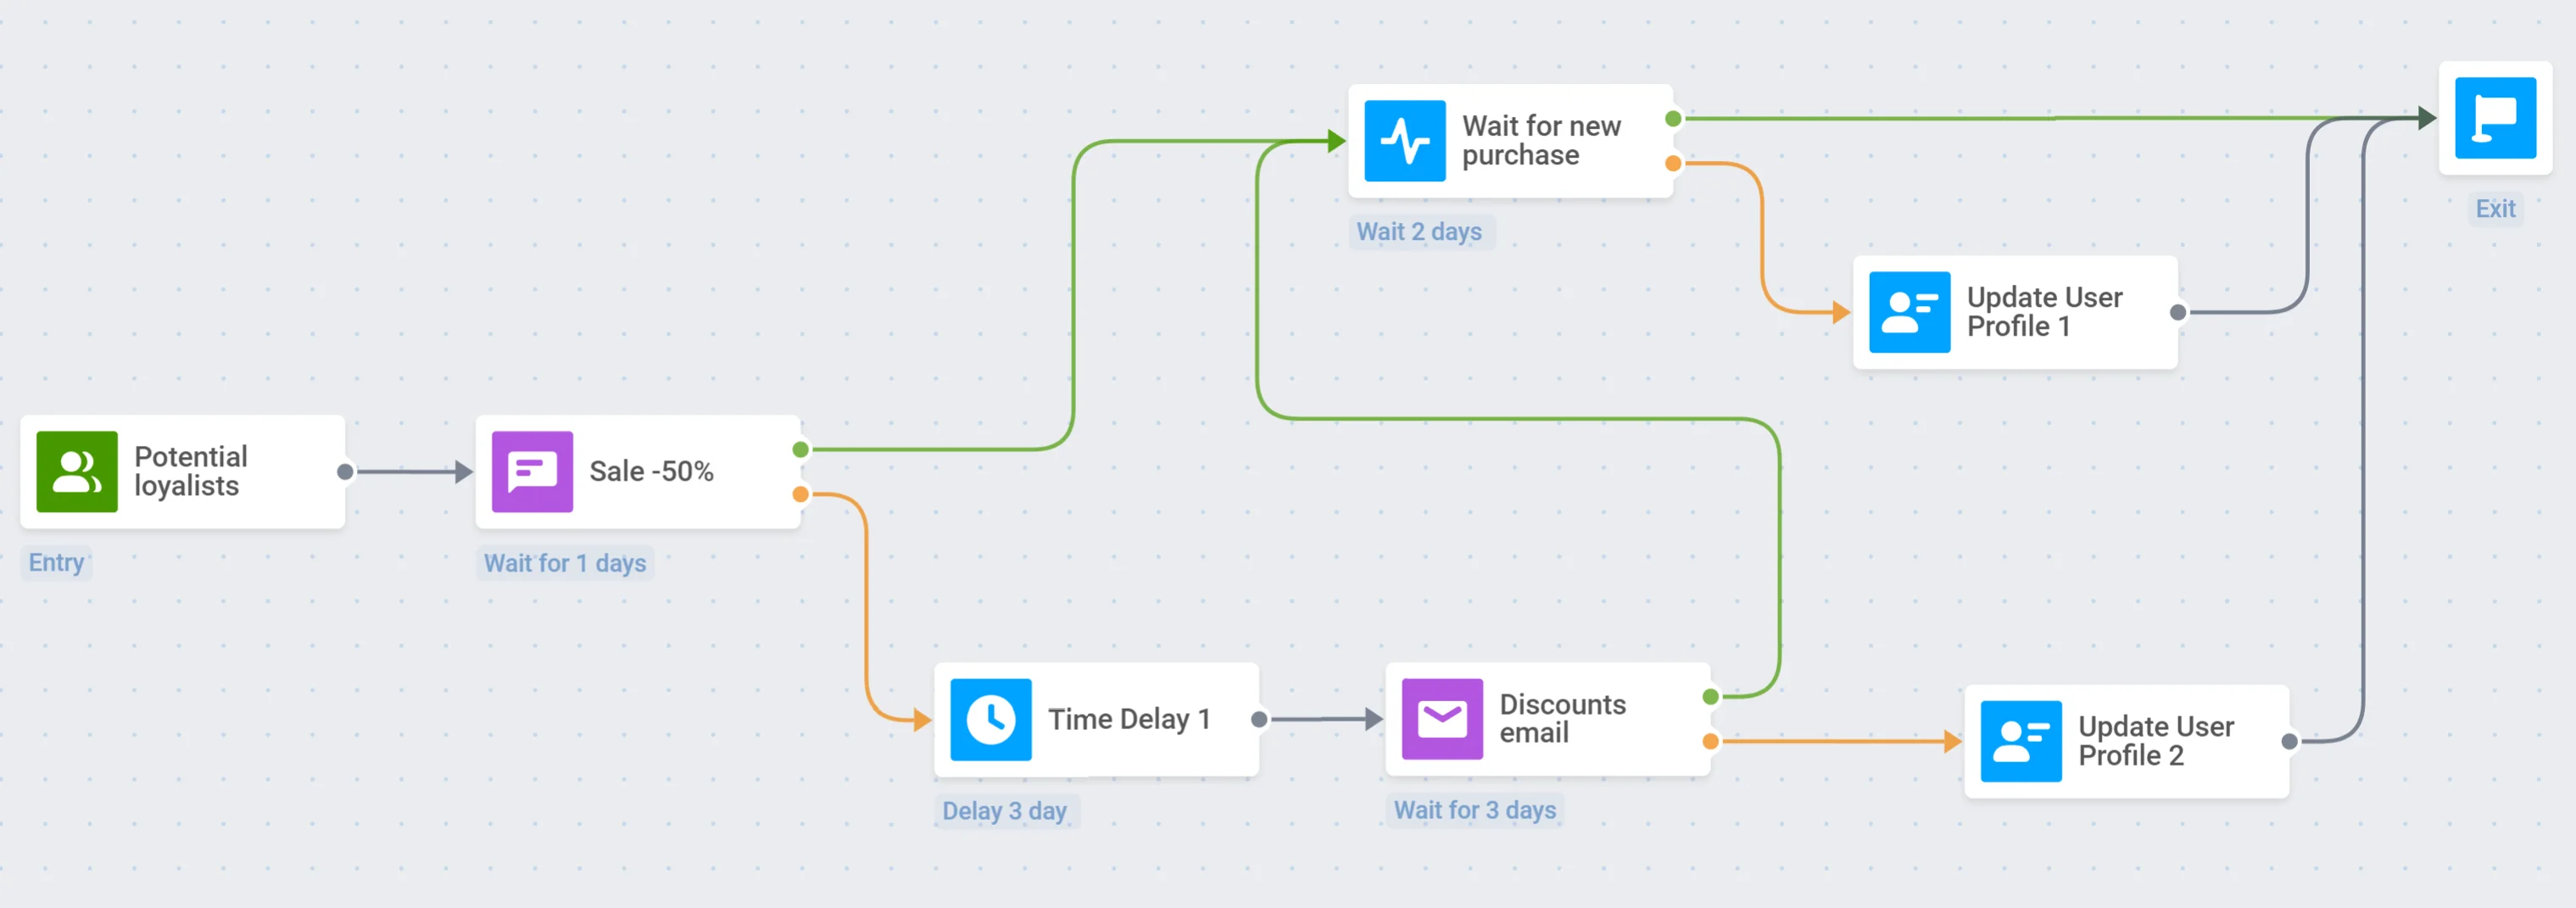
As an example of a customer retention campaign, we will create a Customer Journey for a clothing app. Once complete, it will look like this:
**1. Conversion goal**
Setting a conversion goal is necessary so that users do not re-enter the same Journey if they have already completed the goal. We will assume that our customer retention campaign reaches its goal if a user makes a purchase.
On the top bar of the new Customer Journey window, we will click on **Conversion Goals** and select the default _PW\_InAppPurchase_ event. We want the Journey to end for the user after the event fires, so we will enable this option and then apply changes:
**2. Entry point and trigger**
We are going to launch a retention campaign for customers who purchased something recently. We want to motivate these people to buy more often and improve their loyalty to our e-commerce app.
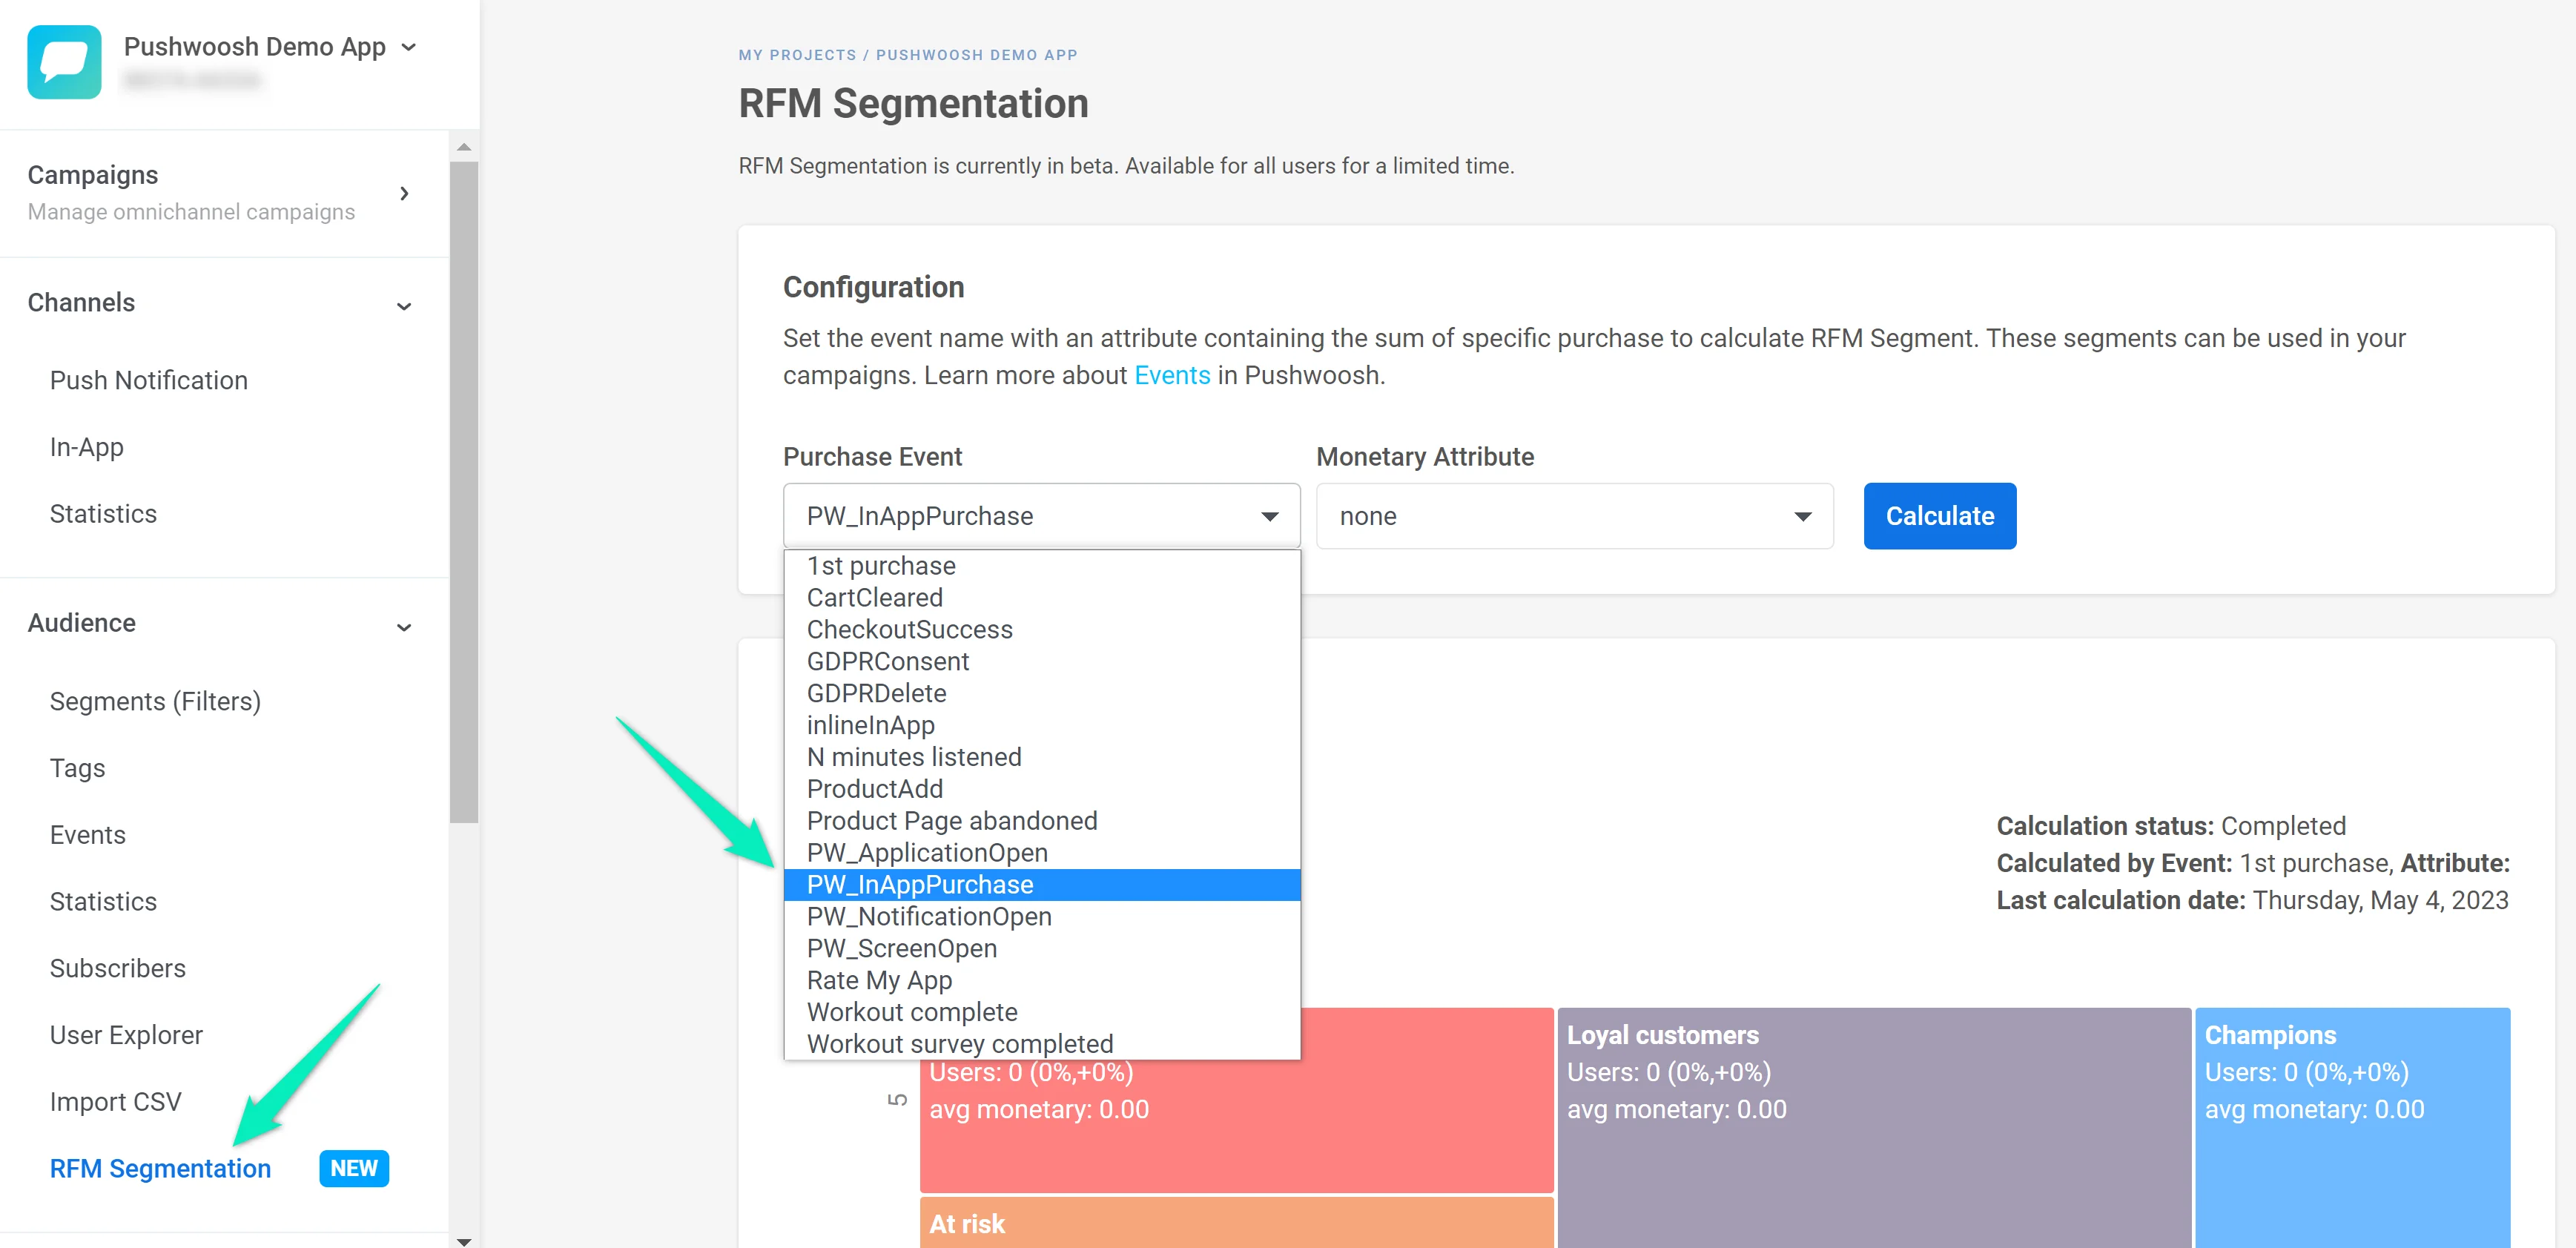
First, we will calculate segments of users who made a purchase in our app at least once. To do this, we will go to the [RFM segmentation](/product/audience-data-and-segmentation/segmentation/rfm-segmentation/) section and select the default _PW\_InAppPurchase_ event:
Pushwoosh will automatically create several customer segments of users who performed the _PW\_InAppPurchase event_. We will use the _Potential loyalists_ segment because it includes customers who purchased something recently.
Now we will add the **Audience-based Entry** and select _RFM Potential loyalists_ as the audience source:
**3. Push notification**
We will send our _Potential loyalists_ a push notification about the sale in our example app:
Let’s split the flow depending on whether the customer opened the push:
It is also important to set **Silent Hours** so that users do not receive push notifications at odd hours:
**4. New purchase trigger**
_for those who opened the push notification_
If a user is interested in our sale and clicks on the push notification, we will check if they make a new purchase within two days.
To do so, we will add the **Wait for Trigger** element and specify the default _PW\_InAppPurchase_ event with a two-day waiting period:
If a user makes a new purchase, they will exit the Journey:
**5. Tagging users who have not made a purchase**
_for those who opened the push notification but has not purchased anything_
If a user has opened the push notification but has not purchased anything within two days, we will update their profile to assign them the _Retention drop-off_ Tag with the _Didn't like the sale_ value. This will allow us to make a segment of customers who were interested in the sale but did not find anything suitable. Later, we can think about what might interest such customers more and launch another retention campaign for them.
**6. Time delay**
_for those who did not open the push notification_
If a user ignores the push notification, we will wait for three days before sending anything else. To do this, we will add the **Time Delay** element:
**7. Email**
After the specified time, we will send an email with a selection of discounted clothes.
First, ask your development team to [configure the Email platform](/product/first-steps/start-with-your-project/configure-platforms/email-verification).
Then, create the email using the Pushwoosh [Drag & drop editor](/product/content/email-content/drag-and-drop-email-editor) or the [HTML code editor](/product/content/email-content/html-code-editor).
Next, we will add the **Email** element to our Journey and select the template we created. We will split the flow and wait for the email to be opened for three days:
If a customer opens the email, we will wait for a new purchase within two days, and then the Journey will continue as described in steps 4 and 5:
**8. Tagging users who have not opened the email**
If a user has not opened the email within three days, we will update their profile to assign them the _Retention drop-off_ Tag with the _Not interested in offers_ value. Using this Tag, we will be able to make a segment of customers who are not interested in any offer within our retention campaign or are not ready to buy clothes at the moment. We can launch another retention campaign for such customers in the future.
## You may also find interesting
* [More about Pushwoosh Customer Journey Builder](https://pushwoosh.com/products/customer-journey)
* [The best strategy to increase your mobile app retention](https://blog.pushwoosh.com/blog/increase-user-retention-rate/)
 **1. Conversion goal**
Setting a conversion goal is necessary so that users do not re-enter the same Journey if they have already completed the goal. We will assume that our user retention campaign reaches its goal if a user completes the workout.
First, we will create the _Workout complete_ [event](/product/audience-data-and-segmentation/events/#implementation) in the Pushwoosh project and configure it in our example workout app using the [postEvent](/product/audience-data-and-segmentation/events/#3-call-postevent-api) API.
After that, we will start creating a new Customer Journey. On the top bar, we will click on **Conversion Goals** and select the _Workout complete_ event. We want the Journey to end for the user that fires the target event, so we will enable this option and then apply changes:
**2. Entry point and trigger**
We want to launch a retention campaign for app subscribers who haven't opened the app for seven days.
First, we will add the **Audience-based Entry** and select _Subscribers_ as the audience source:
Then, we will add the **Wait for Trigger** element and specify the default _PW\_ApplicationOpen_ event with a seven-day waiting period:
If a user opens the app at least once within seven days, they will exit the Journey:
**3. First push notification**
If a user has not opened the app at least once in seven days, we will send them a push notification offering to try an exclusive workout:
Now, let’s split the flow depending on whether this [push is opened or ignored](/product/customer-journey/journey-elements#split-to-openedignored):
We will also set [Silent Hours](/product/customer-journey/journey-settings#silent-hours) to prevent users from receiving workout push notifications at inappropriate times:
**4. Workout trigger**
_for those who opened the first push notification_
If a user clicks on the push notification, we will check if they have completed the workout.
First, we will set up the _Workout complete_ [event](/product/audience-data-and-segmentation/events/) in the app and the Pushwoosh project. Then, we will add the **Wait for Trigger** element with the _Workout complete_ event selected:
If a user completes the workout, they will exit the Journey:
**5. Time delay**
_for those who did not open the first push notification or did not complete the workout_
If a user ignores the push notification or does not complete the workout, we will wait for two days before sending anything else. To do this, we will add the **Time Delay** element:
**6. Second push notification**
After the specified time, we will send the second push notification prompting users to take a survey and tell about their preferences. This survey will help us improve our workout app and launch personalized campaigns in the future.
After sending the second push notification, we will end the Journey:
## Customer retention campaign
As an example of a customer retention campaign, we will create a Customer Journey for a clothing app. Once complete, it will look like this:
**1. Conversion goal**
Setting a conversion goal is necessary so that users do not re-enter the same Journey if they have already completed the goal. We will assume that our user retention campaign reaches its goal if a user completes the workout.
First, we will create the _Workout complete_ [event](/product/audience-data-and-segmentation/events/#implementation) in the Pushwoosh project and configure it in our example workout app using the [postEvent](/product/audience-data-and-segmentation/events/#3-call-postevent-api) API.
After that, we will start creating a new Customer Journey. On the top bar, we will click on **Conversion Goals** and select the _Workout complete_ event. We want the Journey to end for the user that fires the target event, so we will enable this option and then apply changes:
**2. Entry point and trigger**
We want to launch a retention campaign for app subscribers who haven't opened the app for seven days.
First, we will add the **Audience-based Entry** and select _Subscribers_ as the audience source:
Then, we will add the **Wait for Trigger** element and specify the default _PW\_ApplicationOpen_ event with a seven-day waiting period:
If a user opens the app at least once within seven days, they will exit the Journey:
**3. First push notification**
If a user has not opened the app at least once in seven days, we will send them a push notification offering to try an exclusive workout:
Now, let’s split the flow depending on whether this [push is opened or ignored](/product/customer-journey/journey-elements#split-to-openedignored):
We will also set [Silent Hours](/product/customer-journey/journey-settings#silent-hours) to prevent users from receiving workout push notifications at inappropriate times:
**4. Workout trigger**
_for those who opened the first push notification_
If a user clicks on the push notification, we will check if they have completed the workout.
First, we will set up the _Workout complete_ [event](/product/audience-data-and-segmentation/events/) in the app and the Pushwoosh project. Then, we will add the **Wait for Trigger** element with the _Workout complete_ event selected:
If a user completes the workout, they will exit the Journey:
**5. Time delay**
_for those who did not open the first push notification or did not complete the workout_
If a user ignores the push notification or does not complete the workout, we will wait for two days before sending anything else. To do this, we will add the **Time Delay** element:
**6. Second push notification**
After the specified time, we will send the second push notification prompting users to take a survey and tell about their preferences. This survey will help us improve our workout app and launch personalized campaigns in the future.
After sending the second push notification, we will end the Journey:
## Customer retention campaign
As an example of a customer retention campaign, we will create a Customer Journey for a clothing app. Once complete, it will look like this:
 **1. Conversion goal**
Setting a conversion goal is necessary so that users do not re-enter the same Journey if they have already completed the goal. We will assume that our customer retention campaign reaches its goal if a user makes a purchase.
On the top bar of the new Customer Journey window, we will click on **Conversion Goals** and select the default _PW\_InAppPurchase_ event. We want the Journey to end for the user after the event fires, so we will enable this option and then apply changes:
**2. Entry point and trigger**
We are going to launch a retention campaign for customers who purchased something recently. We want to motivate these people to buy more often and improve their loyalty to our e-commerce app.
First, we will calculate segments of users who made a purchase in our app at least once. To do this, we will go to the [RFM segmentation](/product/audience-data-and-segmentation/segmentation/rfm-segmentation/) section and select the default _PW\_InAppPurchase_ event:
**1. Conversion goal**
Setting a conversion goal is necessary so that users do not re-enter the same Journey if they have already completed the goal. We will assume that our customer retention campaign reaches its goal if a user makes a purchase.
On the top bar of the new Customer Journey window, we will click on **Conversion Goals** and select the default _PW\_InAppPurchase_ event. We want the Journey to end for the user after the event fires, so we will enable this option and then apply changes:
**2. Entry point and trigger**
We are going to launch a retention campaign for customers who purchased something recently. We want to motivate these people to buy more often and improve their loyalty to our e-commerce app.
First, we will calculate segments of users who made a purchase in our app at least once. To do this, we will go to the [RFM segmentation](/product/audience-data-and-segmentation/segmentation/rfm-segmentation/) section and select the default _PW\_InAppPurchase_ event:
 Pushwoosh will automatically create several customer segments of users who performed the _PW\_InAppPurchase event_. We will use the _Potential loyalists_ segment because it includes customers who purchased something recently.
Now we will add the **Audience-based Entry** and select _RFM Potential loyalists_ as the audience source:
**3. Push notification**
We will send our _Potential loyalists_ a push notification about the sale in our example app:
Let’s split the flow depending on whether the customer opened the push:
It is also important to set **Silent Hours** so that users do not receive push notifications at odd hours:
**4. New purchase trigger**
_for those who opened the push notification_
If a user is interested in our sale and clicks on the push notification, we will check if they make a new purchase within two days.
To do so, we will add the **Wait for Trigger** element and specify the default _PW\_InAppPurchase_ event with a two-day waiting period:
If a user makes a new purchase, they will exit the Journey:
**5. Tagging users who have not made a purchase**
_for those who opened the push notification but has not purchased anything_
If a user has opened the push notification but has not purchased anything within two days, we will update their profile to assign them the _Retention drop-off_ Tag with the _Didn't like the sale_ value. This will allow us to make a segment of customers who were interested in the sale but did not find anything suitable. Later, we can think about what might interest such customers more and launch another retention campaign for them.
**6. Time delay**
_for those who did not open the push notification_
If a user ignores the push notification, we will wait for three days before sending anything else. To do this, we will add the **Time Delay** element:
**7. Email**
After the specified time, we will send an email with a selection of discounted clothes.
First, ask your development team to [configure the Email platform](/product/first-steps/start-with-your-project/configure-platforms/email-verification).
Then, create the email using the Pushwoosh [Drag & drop editor](/product/content/email-content/drag-and-drop-email-editor) or the [HTML code editor](/product/content/email-content/html-code-editor).
Next, we will add the **Email** element to our Journey and select the template we created. We will split the flow and wait for the email to be opened for three days:
If a customer opens the email, we will wait for a new purchase within two days, and then the Journey will continue as described in steps 4 and 5:
**8. Tagging users who have not opened the email**
If a user has not opened the email within three days, we will update their profile to assign them the _Retention drop-off_ Tag with the _Not interested in offers_ value. Using this Tag, we will be able to make a segment of customers who are not interested in any offer within our retention campaign or are not ready to buy clothes at the moment. We can launch another retention campaign for such customers in the future.
## You may also find interesting
* [More about Pushwoosh Customer Journey Builder](https://pushwoosh.com/products/customer-journey)
* [The best strategy to increase your mobile app retention](https://blog.pushwoosh.com/blog/increase-user-retention-rate/)
Pushwoosh will automatically create several customer segments of users who performed the _PW\_InAppPurchase event_. We will use the _Potential loyalists_ segment because it includes customers who purchased something recently.
Now we will add the **Audience-based Entry** and select _RFM Potential loyalists_ as the audience source:
**3. Push notification**
We will send our _Potential loyalists_ a push notification about the sale in our example app:
Let’s split the flow depending on whether the customer opened the push:
It is also important to set **Silent Hours** so that users do not receive push notifications at odd hours:
**4. New purchase trigger**
_for those who opened the push notification_
If a user is interested in our sale and clicks on the push notification, we will check if they make a new purchase within two days.
To do so, we will add the **Wait for Trigger** element and specify the default _PW\_InAppPurchase_ event with a two-day waiting period:
If a user makes a new purchase, they will exit the Journey:
**5. Tagging users who have not made a purchase**
_for those who opened the push notification but has not purchased anything_
If a user has opened the push notification but has not purchased anything within two days, we will update their profile to assign them the _Retention drop-off_ Tag with the _Didn't like the sale_ value. This will allow us to make a segment of customers who were interested in the sale but did not find anything suitable. Later, we can think about what might interest such customers more and launch another retention campaign for them.
**6. Time delay**
_for those who did not open the push notification_
If a user ignores the push notification, we will wait for three days before sending anything else. To do this, we will add the **Time Delay** element:
**7. Email**
After the specified time, we will send an email with a selection of discounted clothes.
First, ask your development team to [configure the Email platform](/product/first-steps/start-with-your-project/configure-platforms/email-verification).
Then, create the email using the Pushwoosh [Drag & drop editor](/product/content/email-content/drag-and-drop-email-editor) or the [HTML code editor](/product/content/email-content/html-code-editor).
Next, we will add the **Email** element to our Journey and select the template we created. We will split the flow and wait for the email to be opened for three days:
If a customer opens the email, we will wait for a new purchase within two days, and then the Journey will continue as described in steps 4 and 5:
**8. Tagging users who have not opened the email**
If a user has not opened the email within three days, we will update their profile to assign them the _Retention drop-off_ Tag with the _Not interested in offers_ value. Using this Tag, we will be able to make a segment of customers who are not interested in any offer within our retention campaign or are not ready to buy clothes at the moment. We can launch another retention campaign for such customers in the future.
## You may also find interesting
* [More about Pushwoosh Customer Journey Builder](https://pushwoosh.com/products/customer-journey)
* [The best strategy to increase your mobile app retention](https://blog.pushwoosh.com/blog/increase-user-retention-rate/)