# How to onboard users with Pushwoosh
As the first personal touch, user onboarding must be perfectly tailored, seamless, and gently engaging. Run your onboarding campaigns with Pushwoosh smoothly and easily. Customer Journey Builder lets you create mobile and email onboarding campaigns with a simple visual editor.
## Mobile onboarding campaign
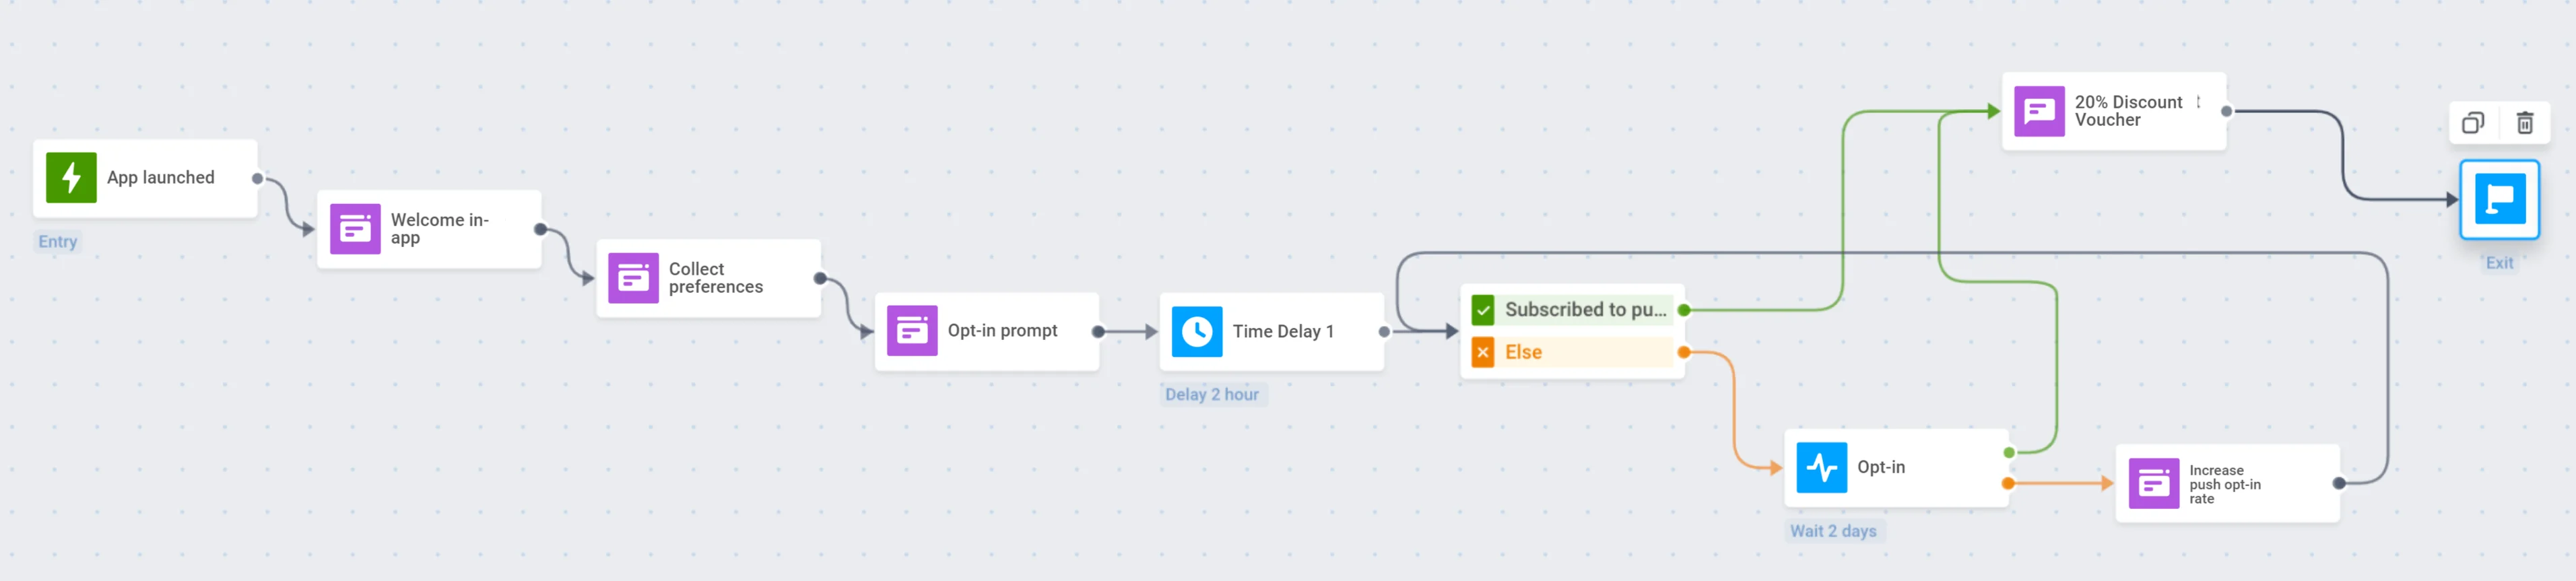
Here are a few steps to onboard users who recently joined your mobile app with Pushwoosh Customer Journey Builder.
### Trigger-based Entry
Define the event the journey starts with: it might be the first-time app launch, registration in the app, or first in-app actions.
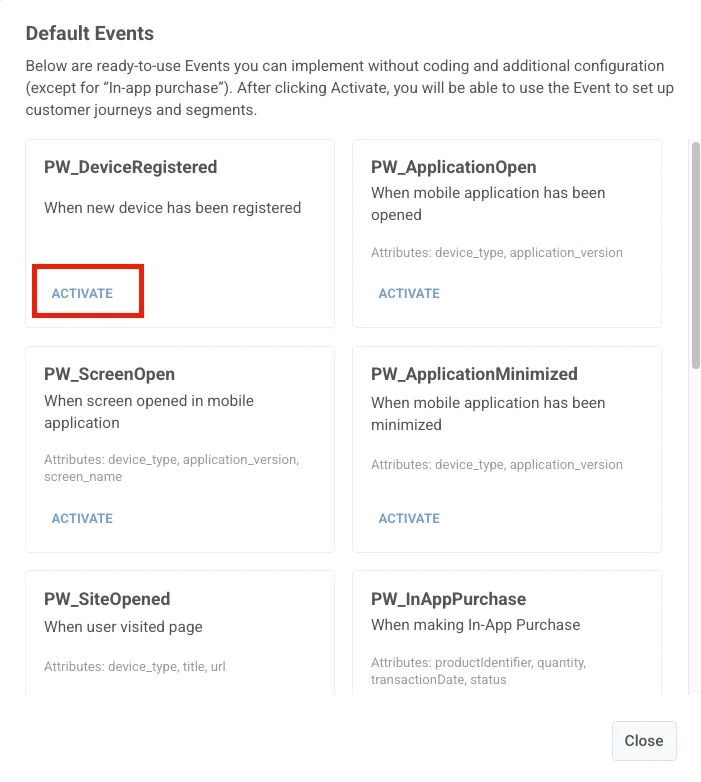
1. In this example, we’ll use the default [PW\_DeviceRegistered](/product/audience-data-and-segmentation/events/default-events/#pw_deviceregistered) event, which is triggered when the app is launched for the first time.
To enable this event, open your Pushwoosh Control Panel, go to **Audience → Events**, and click **Create event**. In the dropdown, select **Default events**, then find **Device Registered** in the list and click **Activate**.
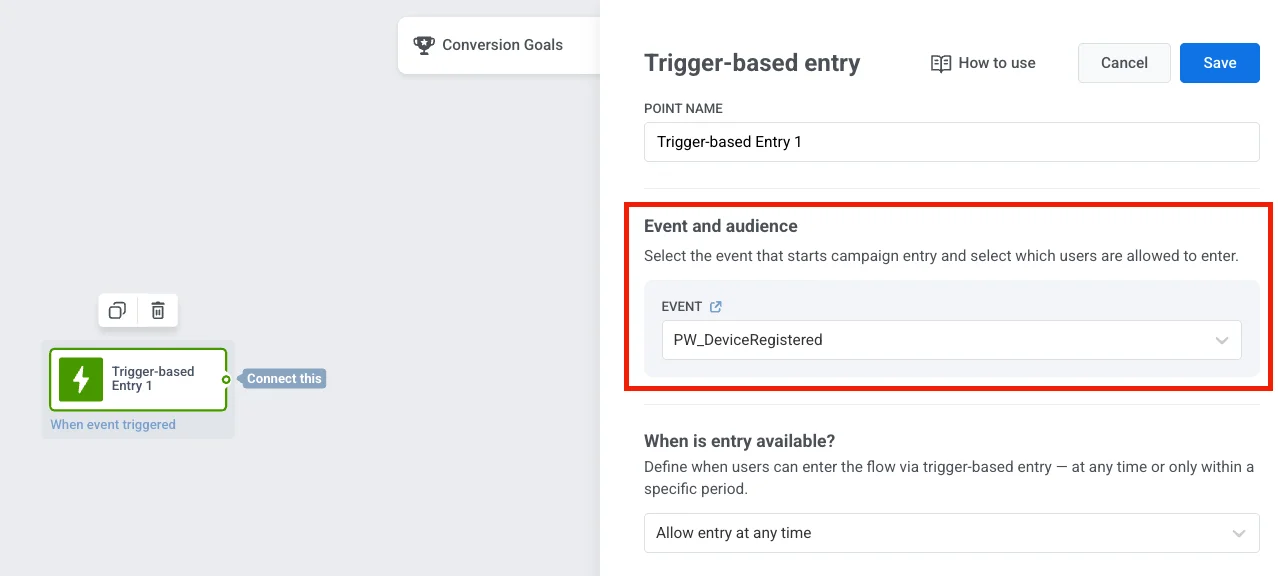
2. Add the [Trigger-based Entry](/product/customer-journey/journey-elements#trigger-based-entry) step to the journey canvas and select the required Event.
### Welcome In-App
**Welcome users warmly:** Add the welcoming [In-App message](/product/customer-journey/journey-elements#in-app) to be shown right after the trigger event.
1. Create a Rich Media greeting the user and describing what they will experience with the app. You can use the Welcome Newcomers template or create a new one fitting your app's look and feel.
2. Add the [In-App step](/product/customer-journey/journey-elements#in-app) following the journey's start event and select the pre-created welcome Rich Media.
### Acquaintance In-App
On the next journey step, let your users tell a bit about themselves: ask users in the journey a few questions to personalize their further experience.
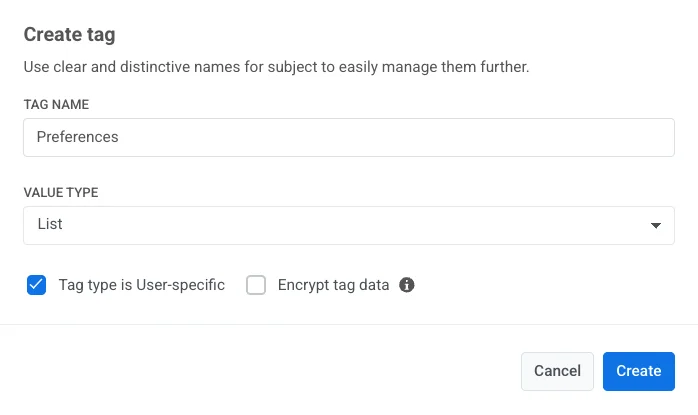
1. [Create a Tag](/product/audience-data-and-segmentation/user-data-tags/tags/#how-to-set-up-a-custom-tag) of the list type to gather users' preferences.
2. Create an [in-app message template](/product/content/in-apps) containing the list of options a user can choose. You can upload an HTML file with a ready-made template or build an in-app page from scratch using our [block-based editor](/product/content/in-apps/create-rich-media-in-the-built-in-editor).
3. [Set the Tag values](/developer/api-reference/device-api#settags) based on what options users select.
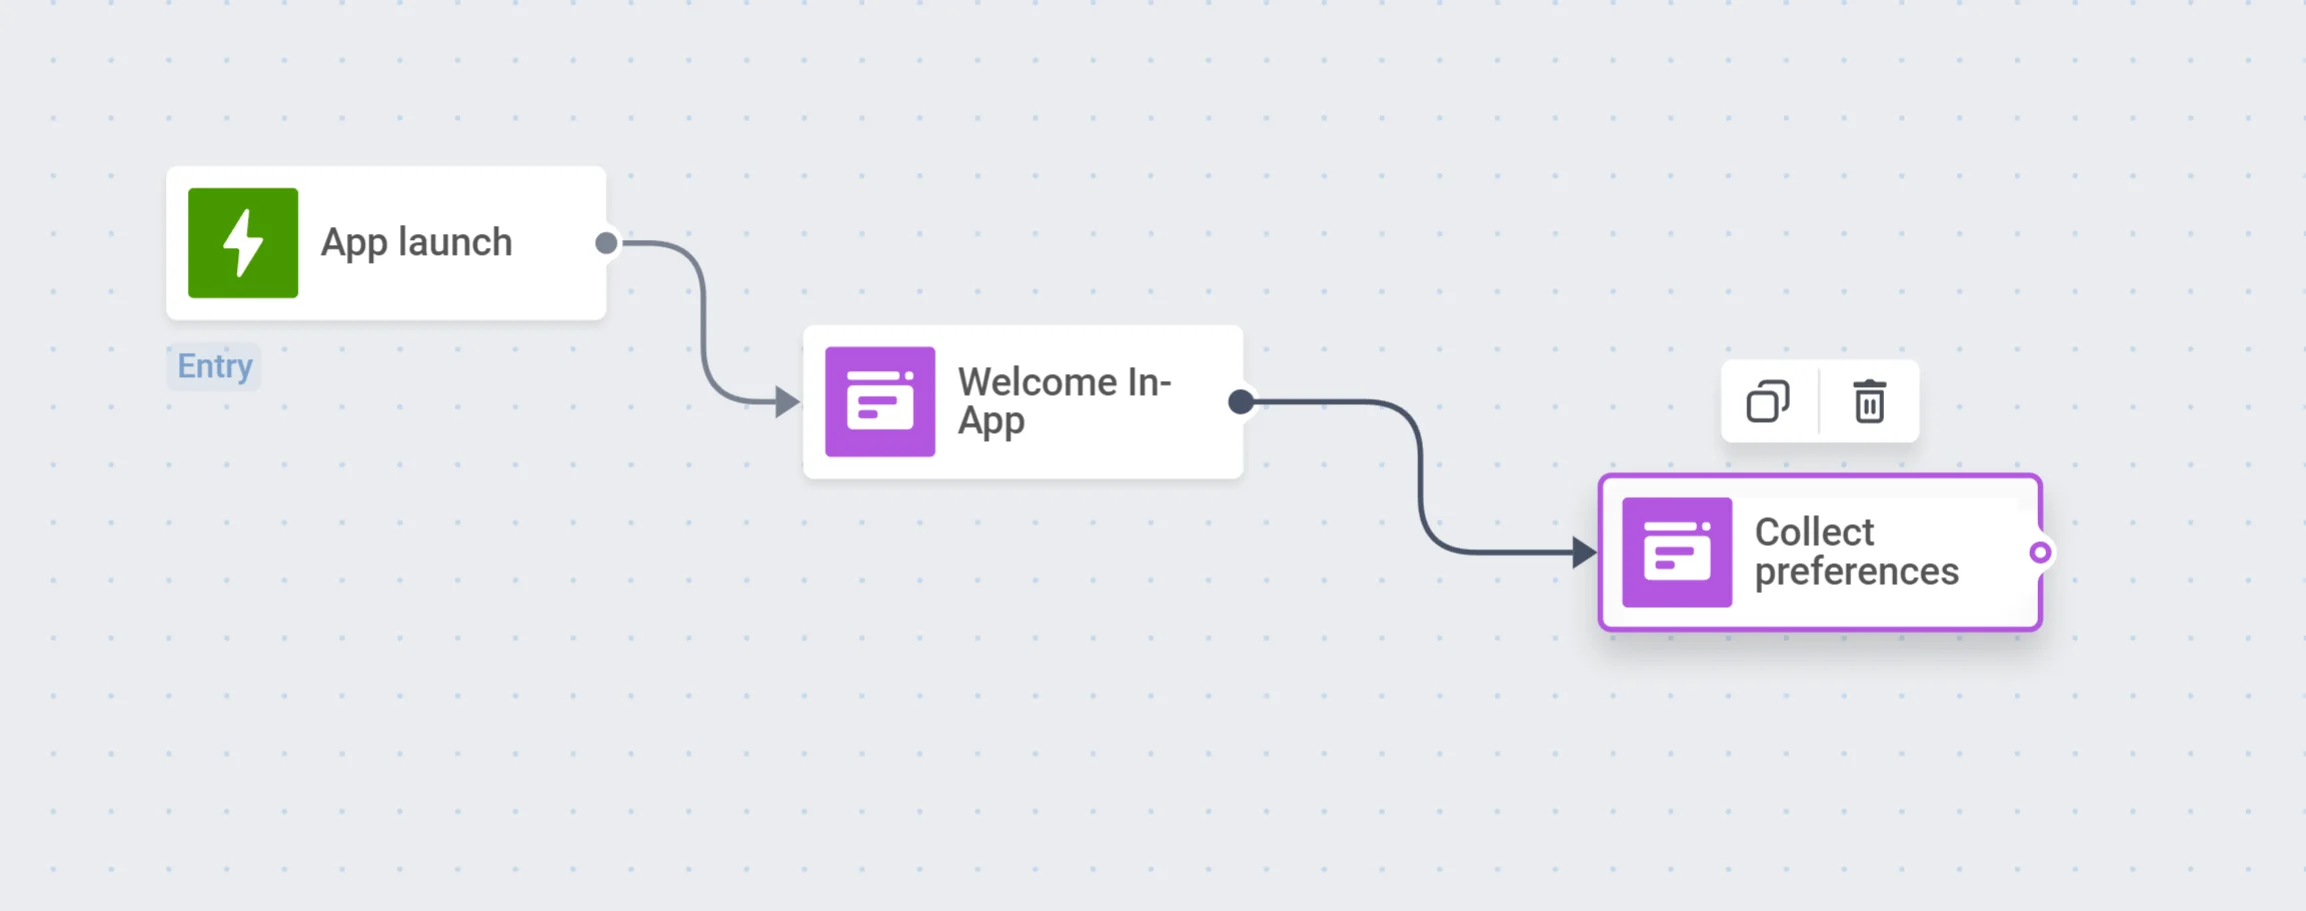
4. Follow the first welcome screen with the [In-App element ](/product/customer-journey/journey-elements#in-app)containing the Rich Media you've created.
### Opt-in prompt
Help users get the most out of your app with push notifications – show the in-app subscription prompt to encourage users to sign up for your messages.
1. Create an in-app opt-in prompt. You can use the ready-made template, upload your HTML, or create a new template using [the built-in editor](/product/content/in-apps/create-rich-media-in-the-built-in-editor/).
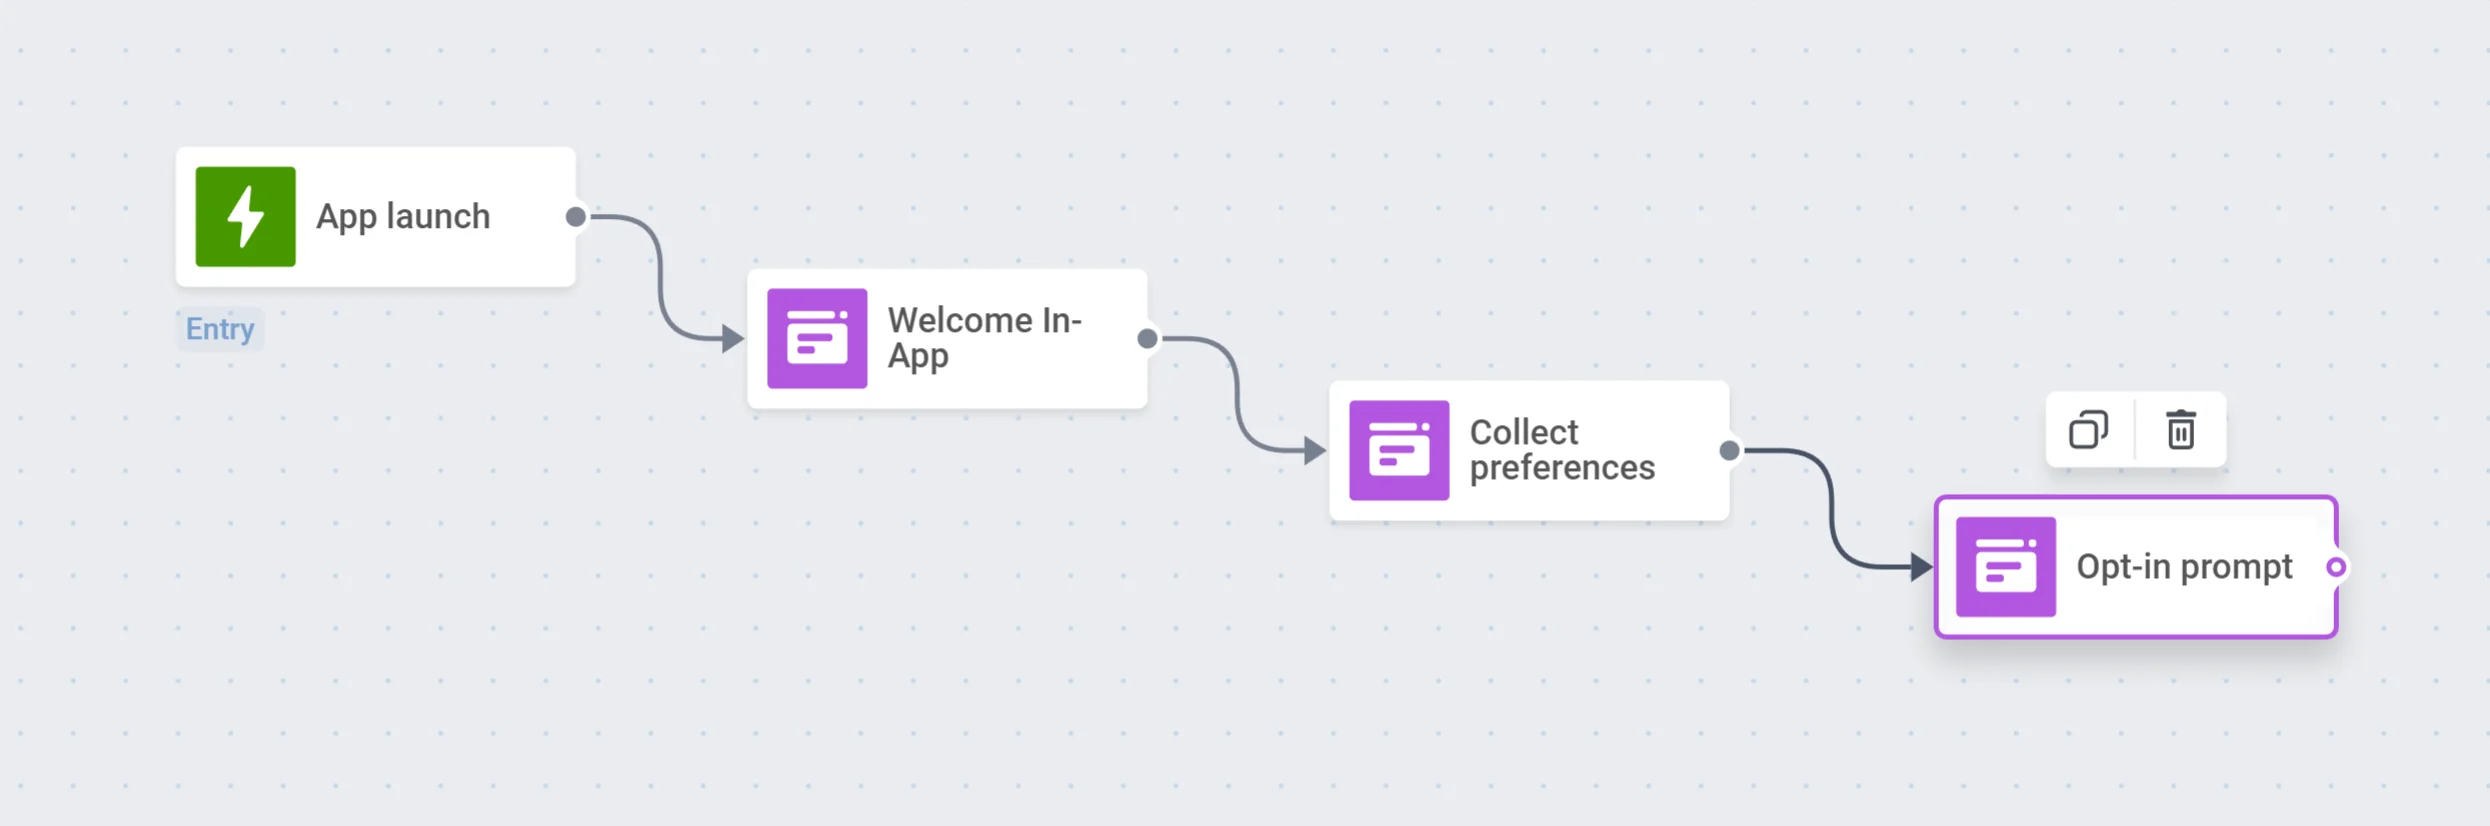
2. Add the In-App step to your journey to display this Rich Media. Once a user subscribes to push notifications, the Pushwoosh SDK sets the [default Push Alerts Enabled tag](/product/audience-data-and-segmentation/user-data-tags/tags/#default-tags) for this user to 'true'.
### Time delay
Set a [delay](/product/customer-journey/journey-elements#time-delay) for a couple of hours to give users some time to explore your app and sign up for pushes.
### Segment Splitter
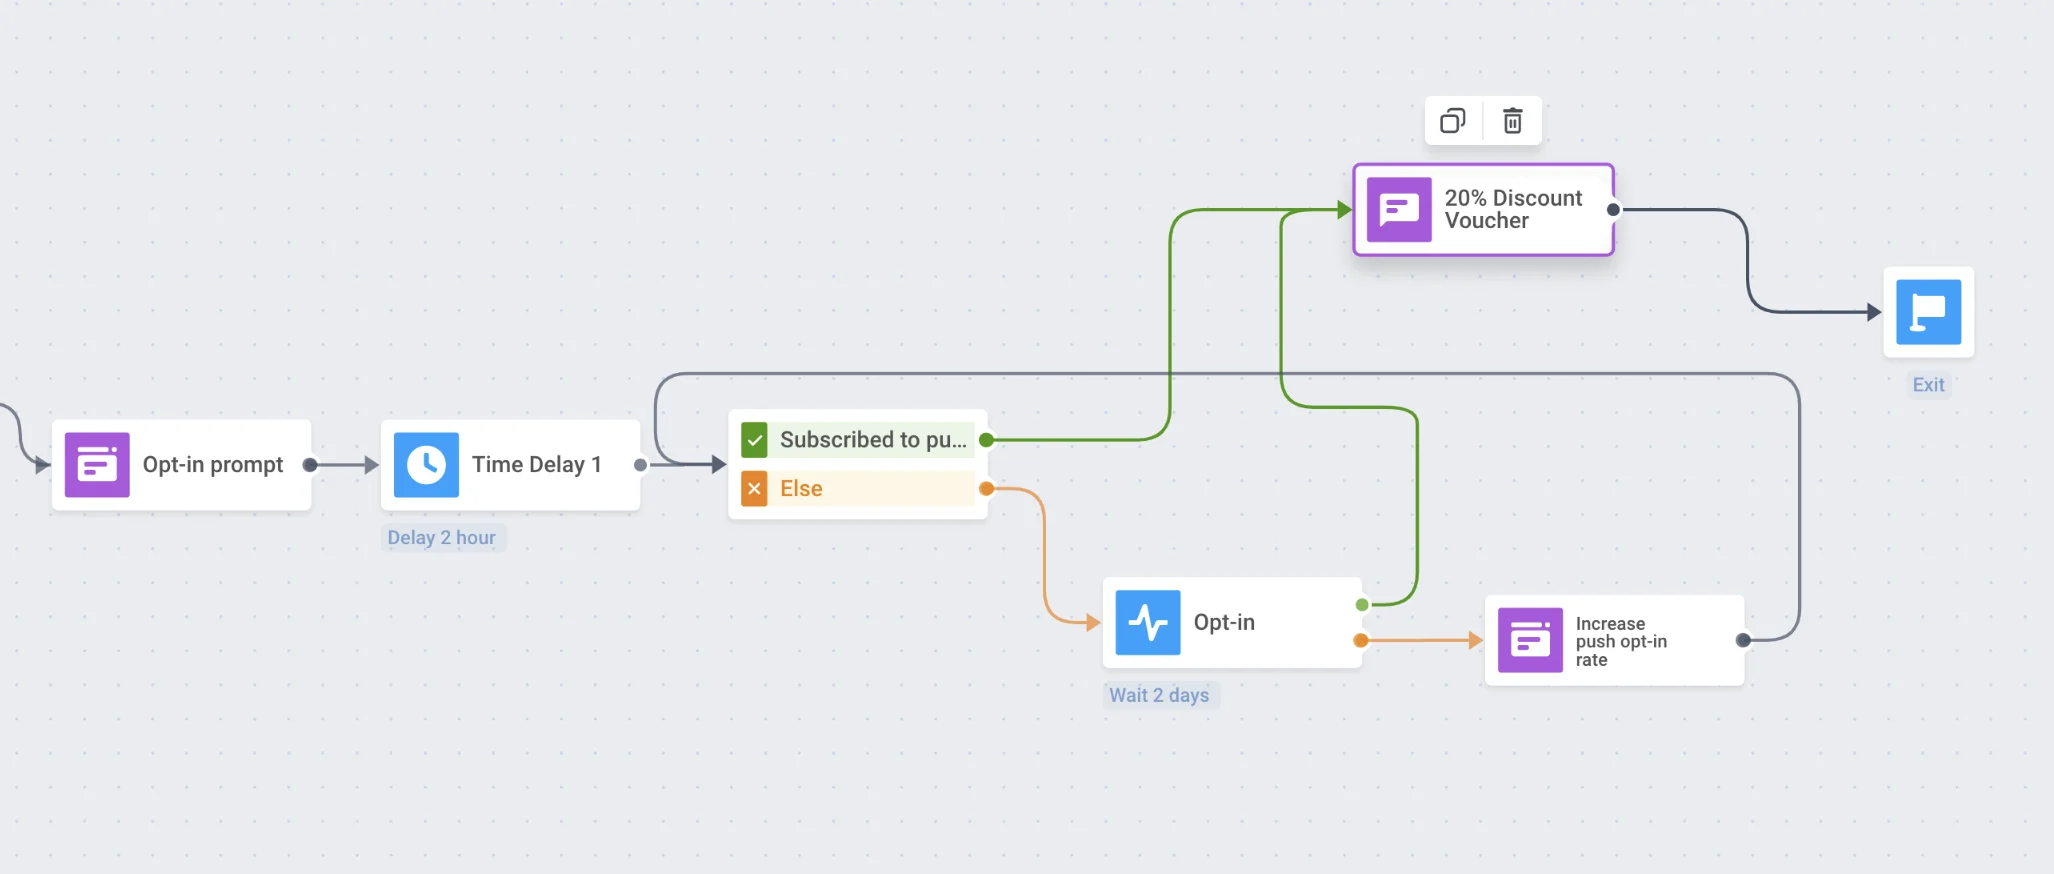
Split users in the journey into branches based on what they have decided: for those who enabled push notifications, it is time to get their first one! For those who have not, one more In-App can help them understand the value of your push notifications.
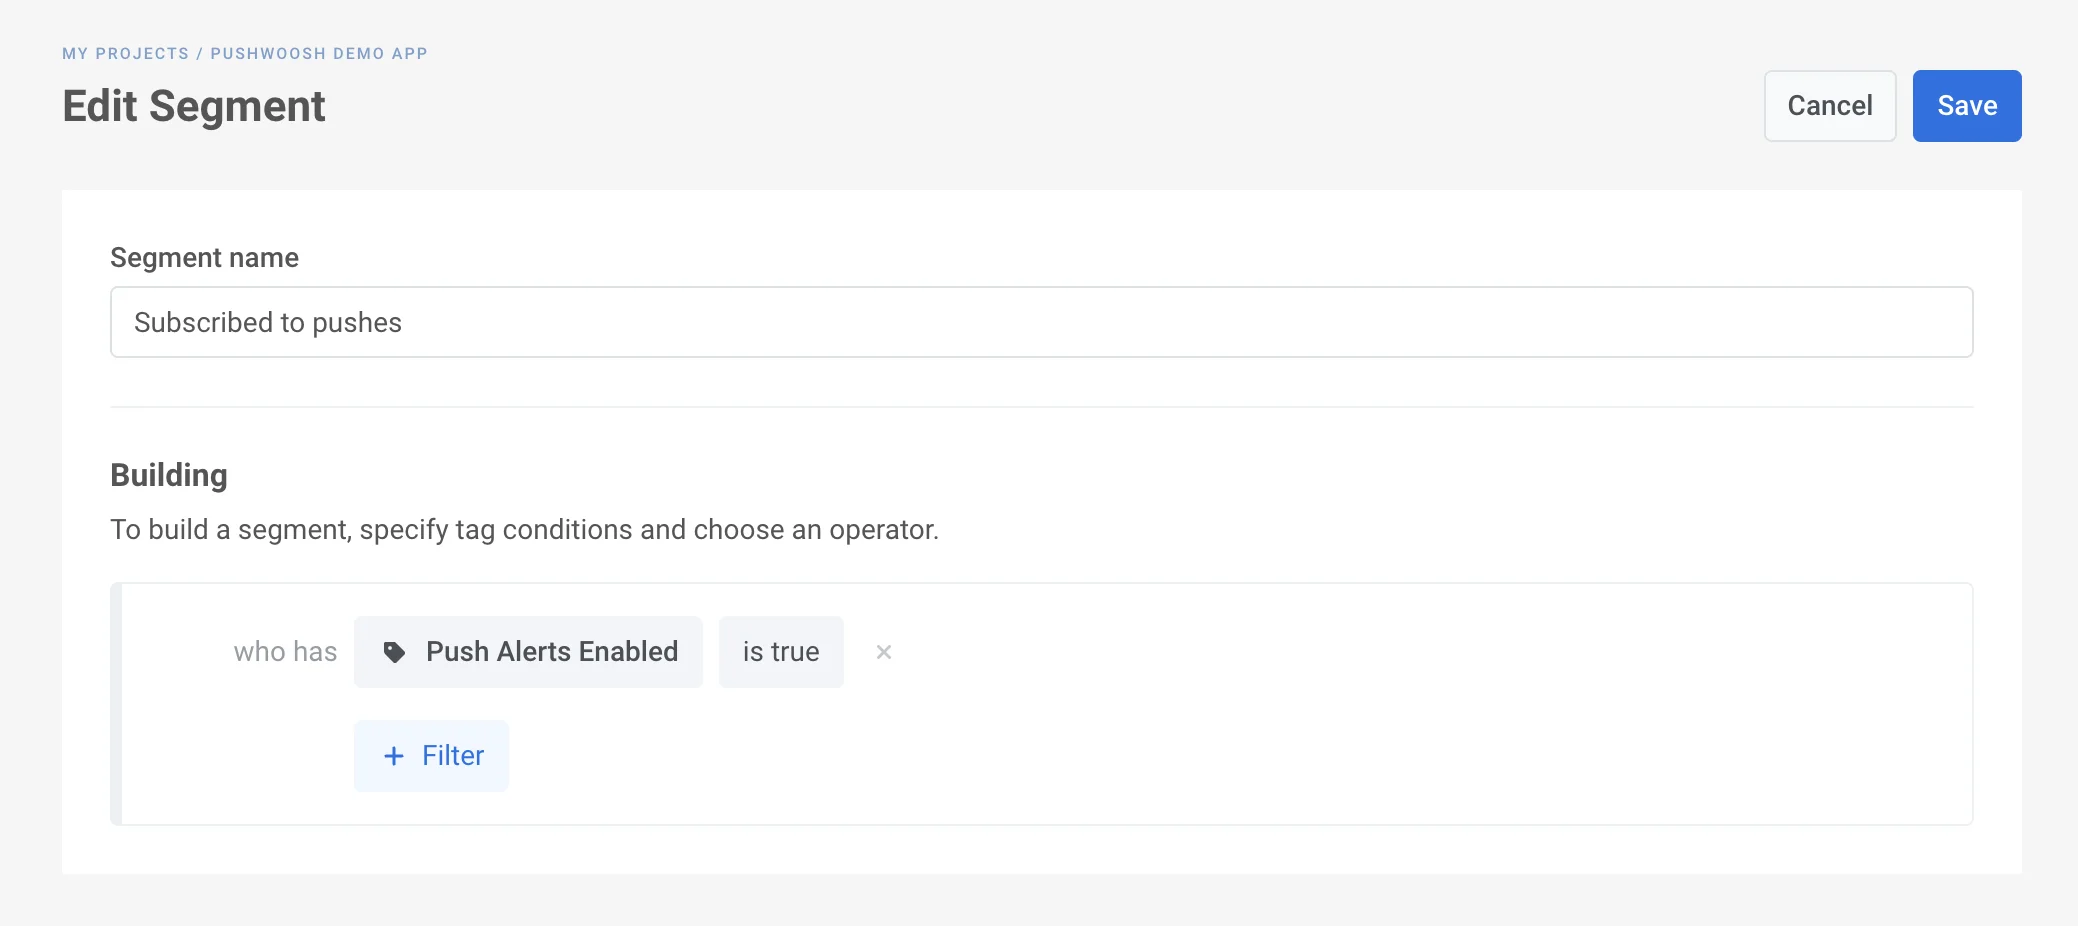
1. [Create a segment](/product/audience-data-and-segmentation/segmentation/) of users subscribed to push notifications using the Push Alerts Enabled tag.
2. Add a [Condition split element](/product/customer-journey/journey-elements/flow-controls/segment-split) to the canvas. Select the segment you've created.
3. Follow the segment branches with corresponding communication flows:
* Send a [first push notification](/product/customer-journey/journey-elements#push) encouraging opted-in users to open the app and continue exploring its features;
* Show others one more In-App on their next app launch.
### Exit
Do not overwhelm users with too many onboarding steps – let them enjoy your app after the essential onboarding is completed and start your engagement campaign!
## Email onboarding campaign
To onboard users via email messages, the basic flow is quite the same:
* Consider the onboarding steps the newcomers should take first.
* Prepare engaging onboarding email content. [Learn more](/product/content/email-content/drag-and-drop-email-editor)
* Make sure to integrate all the necessary [Events](/product/audience-data-and-segmentation/events/), for example, signing up for emails or leaving the email address in a registration form.
* Create [audience segments](/product/audience-data-and-segmentation/segmentation/) needed for your onboarding campaign splitters based on your onboarding goals and communication flow.
* Finally, build your email onboarding campaign in [Customer Journey Builder](/product/customer-journey/journey-elements)!
 Here are a few steps to onboard users who recently joined your mobile app with Pushwoosh Customer Journey Builder.
### Trigger-based Entry
Define the event the journey starts with: it might be the first-time app launch, registration in the app, or first in-app actions.
1. In this example, we’ll use the default [PW\_DeviceRegistered](/product/audience-data-and-segmentation/events/default-events/#pw_deviceregistered) event, which is triggered when the app is launched for the first time.
To enable this event, open your Pushwoosh Control Panel, go to **Audience → Events**, and click **Create event**. In the dropdown, select **Default events**, then find **Device Registered** in the list and click **Activate**.
Here are a few steps to onboard users who recently joined your mobile app with Pushwoosh Customer Journey Builder.
### Trigger-based Entry
Define the event the journey starts with: it might be the first-time app launch, registration in the app, or first in-app actions.
1. In this example, we’ll use the default [PW\_DeviceRegistered](/product/audience-data-and-segmentation/events/default-events/#pw_deviceregistered) event, which is triggered when the app is launched for the first time.
To enable this event, open your Pushwoosh Control Panel, go to **Audience → Events**, and click **Create event**. In the dropdown, select **Default events**, then find **Device Registered** in the list and click **Activate**.
 2. Add the [Trigger-based Entry](/product/customer-journey/journey-elements#trigger-based-entry) step to the journey canvas and select the required Event.
 ### Welcome In-App
**Welcome users warmly:** Add the welcoming [In-App message](/product/customer-journey/journey-elements#in-app) to be shown right after the trigger event.
1. Create a Rich Media greeting the user and describing what they will experience with the app. You can use the Welcome Newcomers template or create a new one fitting your app's look and feel.
2. Add the [In-App step](/product/customer-journey/journey-elements#in-app) following the journey's start event and select the pre-created welcome Rich Media.
### Acquaintance In-App
On the next journey step, let your users tell a bit about themselves: ask users in the journey a few questions to personalize their further experience.
1. [Create a Tag](/product/audience-data-and-segmentation/user-data-tags/tags/#how-to-set-up-a-custom-tag) of the list type to gather users' preferences.
### Welcome In-App
**Welcome users warmly:** Add the welcoming [In-App message](/product/customer-journey/journey-elements#in-app) to be shown right after the trigger event.
1. Create a Rich Media greeting the user and describing what they will experience with the app. You can use the Welcome Newcomers template or create a new one fitting your app's look and feel.
2. Add the [In-App step](/product/customer-journey/journey-elements#in-app) following the journey's start event and select the pre-created welcome Rich Media.
### Acquaintance In-App
On the next journey step, let your users tell a bit about themselves: ask users in the journey a few questions to personalize their further experience.
1. [Create a Tag](/product/audience-data-and-segmentation/user-data-tags/tags/#how-to-set-up-a-custom-tag) of the list type to gather users' preferences.
 2. Create an [in-app message template](/product/content/in-apps) containing the list of options a user can choose. You can upload an HTML file with a ready-made template or build an in-app page from scratch using our [block-based editor](/product/content/in-apps/create-rich-media-in-the-built-in-editor).
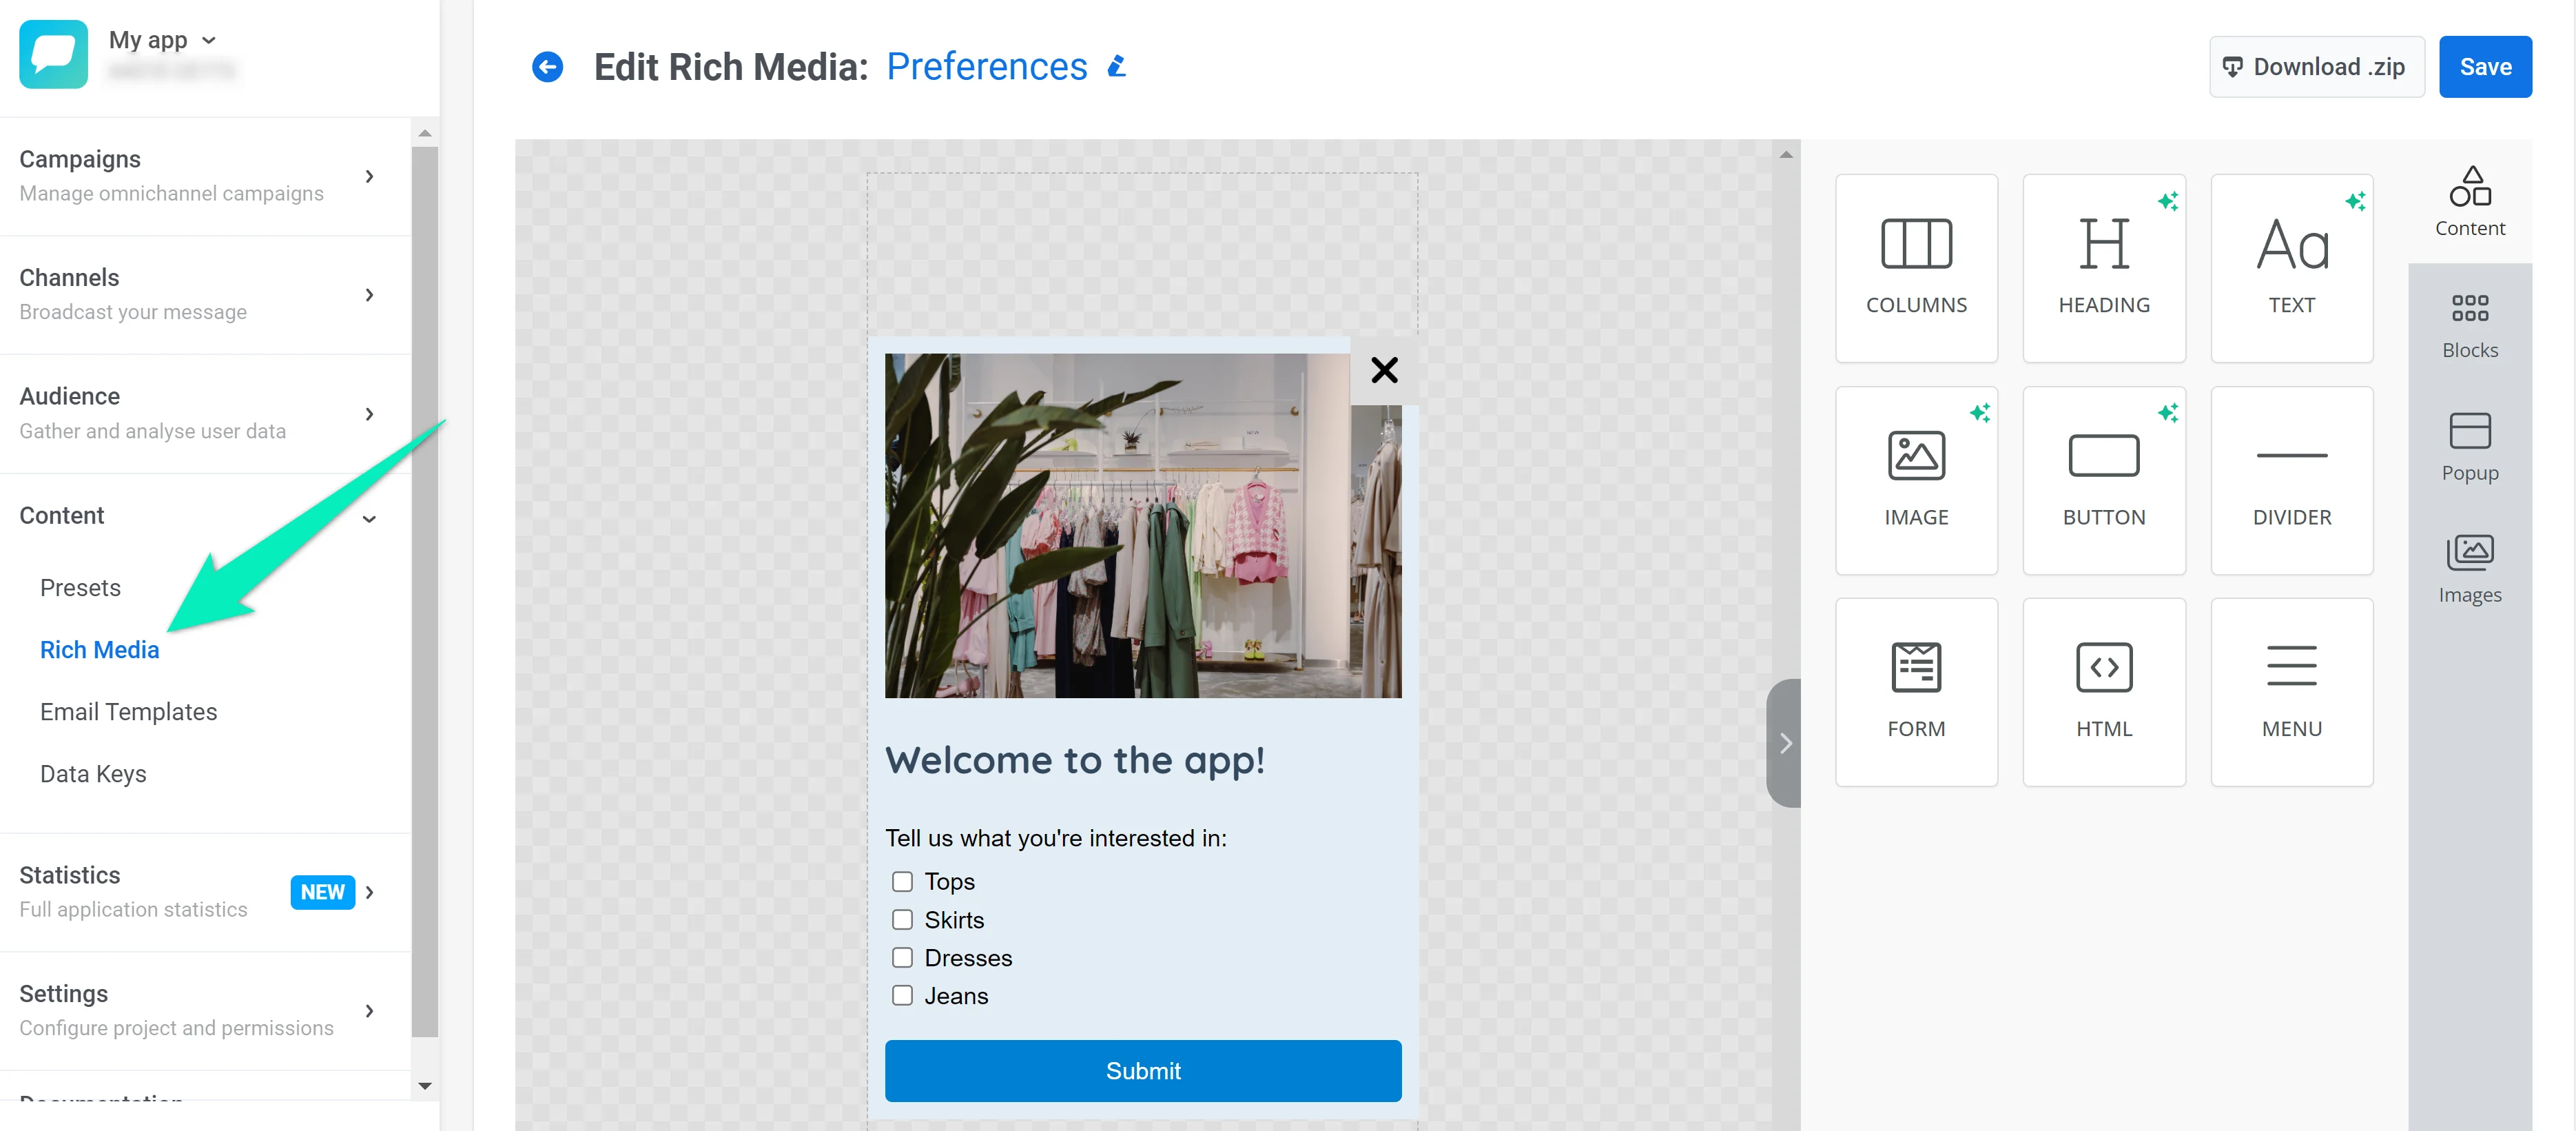 3. [Set the Tag values](/developer/api-reference/device-api#settags) based on what options users select.
4. Follow the first welcome screen with the [In-App element ](/product/customer-journey/journey-elements#in-app)containing the Rich Media you've created.
3. [Set the Tag values](/developer/api-reference/device-api#settags) based on what options users select.
4. Follow the first welcome screen with the [In-App element ](/product/customer-journey/journey-elements#in-app)containing the Rich Media you've created.
 ### Opt-in prompt
Help users get the most out of your app with push notifications – show the in-app subscription prompt to encourage users to sign up for your messages.
1. Create an in-app opt-in prompt. You can use the ready-made template, upload your HTML, or create a new template using [the built-in editor](/product/content/in-apps/create-rich-media-in-the-built-in-editor/).
### Opt-in prompt
Help users get the most out of your app with push notifications – show the in-app subscription prompt to encourage users to sign up for your messages.
1. Create an in-app opt-in prompt. You can use the ready-made template, upload your HTML, or create a new template using [the built-in editor](/product/content/in-apps/create-rich-media-in-the-built-in-editor/).
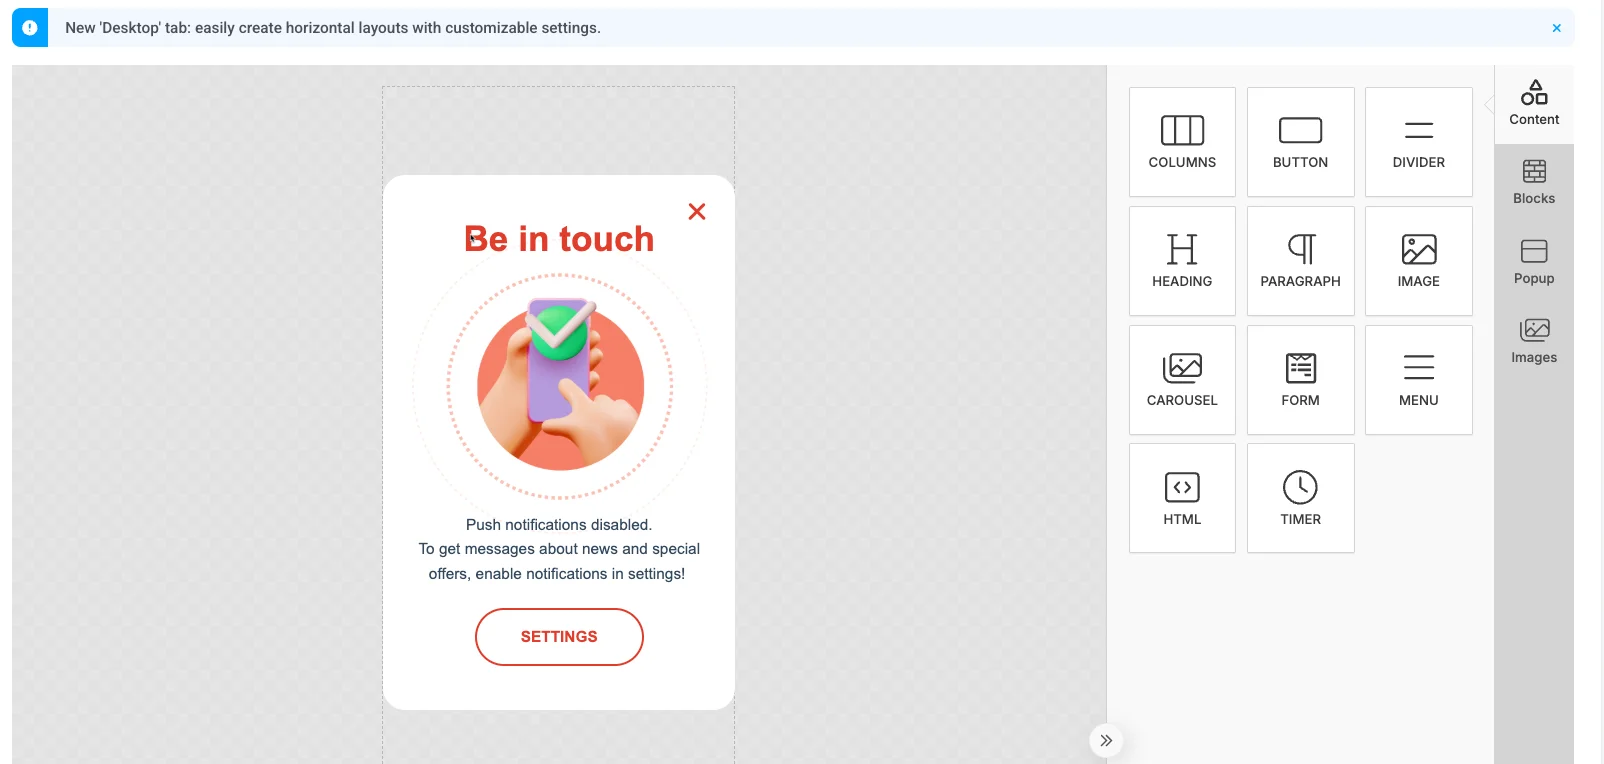 2. Add the In-App step to your journey to display this Rich Media. Once a user subscribes to push notifications, the Pushwoosh SDK sets the [default Push Alerts Enabled tag](/product/audience-data-and-segmentation/user-data-tags/tags/#default-tags) for this user to 'true'.
 ### Time delay
Set a [delay](/product/customer-journey/journey-elements#time-delay) for a couple of hours to give users some time to explore your app and sign up for pushes.
### Segment Splitter
Split users in the journey into branches based on what they have decided: for those who enabled push notifications, it is time to get their first one! For those who have not, one more In-App can help them understand the value of your push notifications.
1. [Create a segment](/product/audience-data-and-segmentation/segmentation/) of users subscribed to push notifications using the Push Alerts Enabled tag.
### Time delay
Set a [delay](/product/customer-journey/journey-elements#time-delay) for a couple of hours to give users some time to explore your app and sign up for pushes.
### Segment Splitter
Split users in the journey into branches based on what they have decided: for those who enabled push notifications, it is time to get their first one! For those who have not, one more In-App can help them understand the value of your push notifications.
1. [Create a segment](/product/audience-data-and-segmentation/segmentation/) of users subscribed to push notifications using the Push Alerts Enabled tag.
 2. Add a [Condition split element](/product/customer-journey/journey-elements/flow-controls/segment-split) to the canvas. Select the segment you've created.
3. Follow the segment branches with corresponding communication flows:
* Send a [first push notification](/product/customer-journey/journey-elements#push) encouraging opted-in users to open the app and continue exploring its features;
* Show others one more In-App on their next app launch.
2. Add a [Condition split element](/product/customer-journey/journey-elements/flow-controls/segment-split) to the canvas. Select the segment you've created.
3. Follow the segment branches with corresponding communication flows:
* Send a [first push notification](/product/customer-journey/journey-elements#push) encouraging opted-in users to open the app and continue exploring its features;
* Show others one more In-App on their next app launch.
 ### Exit
Do not overwhelm users with too many onboarding steps – let them enjoy your app after the essential onboarding is completed and start your engagement campaign!
## Email onboarding campaign
To onboard users via email messages, the basic flow is quite the same:
* Consider the onboarding steps the newcomers should take first.
* Prepare engaging onboarding email content. [Learn more](/product/content/email-content/drag-and-drop-email-editor)
* Make sure to integrate all the necessary [Events](/product/audience-data-and-segmentation/events/), for example, signing up for emails or leaving the email address in a registration form.
* Create [audience segments](/product/audience-data-and-segmentation/segmentation/) needed for your onboarding campaign splitters based on your onboarding goals and communication flow.
* Finally, build your email onboarding campaign in [Customer Journey Builder](/product/customer-journey/journey-elements)!
### Exit
Do not overwhelm users with too many onboarding steps – let them enjoy your app after the essential onboarding is completed and start your engagement campaign!
## Email onboarding campaign
To onboard users via email messages, the basic flow is quite the same:
* Consider the onboarding steps the newcomers should take first.
* Prepare engaging onboarding email content. [Learn more](/product/content/email-content/drag-and-drop-email-editor)
* Make sure to integrate all the necessary [Events](/product/audience-data-and-segmentation/events/), for example, signing up for emails or leaving the email address in a registration form.
* Create [audience segments](/product/audience-data-and-segmentation/segmentation/) needed for your onboarding campaign splitters based on your onboarding goals and communication flow.
* Finally, build your email onboarding campaign in [Customer Journey Builder](/product/customer-journey/journey-elements)!