# How to send transactional messages
Transactional messages, such as order confirmations, subscription renewals, password resets, shipping updates, or payment notifications, are essential for providing users with timely, relevant information based on specific actions. Pushwoosh allows you to automate these messages using the **Customer Journey Builder** tool.
## Prerequisites
Before setting up transactional messages, ensure that:
* The [**Pushwoosh SDK**](/developer/pushwoosh-sdk/pushwoosh-sdk-overview) is integrated into your mobile app or website.
* The events you want to use in transactional journeys are created, set up, and tracked in Pushwoosh. [Learn more about creating events](/product/audience-data-and-segmentation/events#implementation)
Below are examples of common transactional messages and the steps to configure them using [**Customer Journey Builder**](/product/customer-journey/pushwoosh-journey-overview).
## Sending an order confirmation
To automatically send personalized order confirmation messages when a purchase event occurs, follow these steps:
1. In your Pushwoosh account, go to **Campaigns > Customer Journey Builder** and click **Create campaign** to start building the transactional message flow.
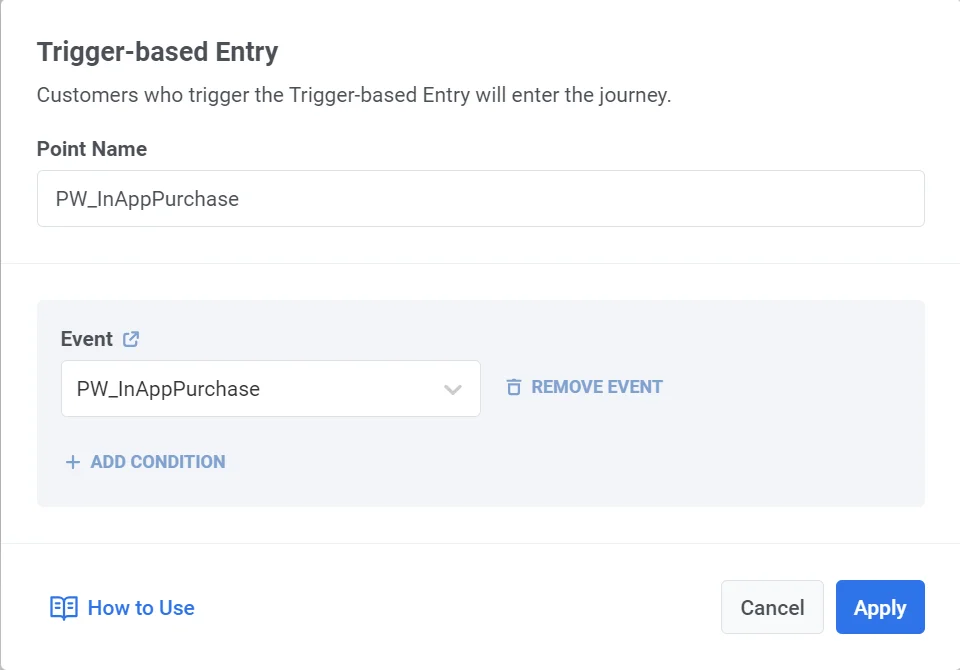
2. In the **Customer Journey Builder**, add the **Trigger-based entry element** to the canvas and select the [PW_InAppPurchase](/product/audience-data-and-segmentation/events/default-events#pw_inapppurchase) event (a default event). Ensure the event is properly configured. [Learn more](/product/audience-data-and-segmentation/events/default-events#pw_inapppurchase)
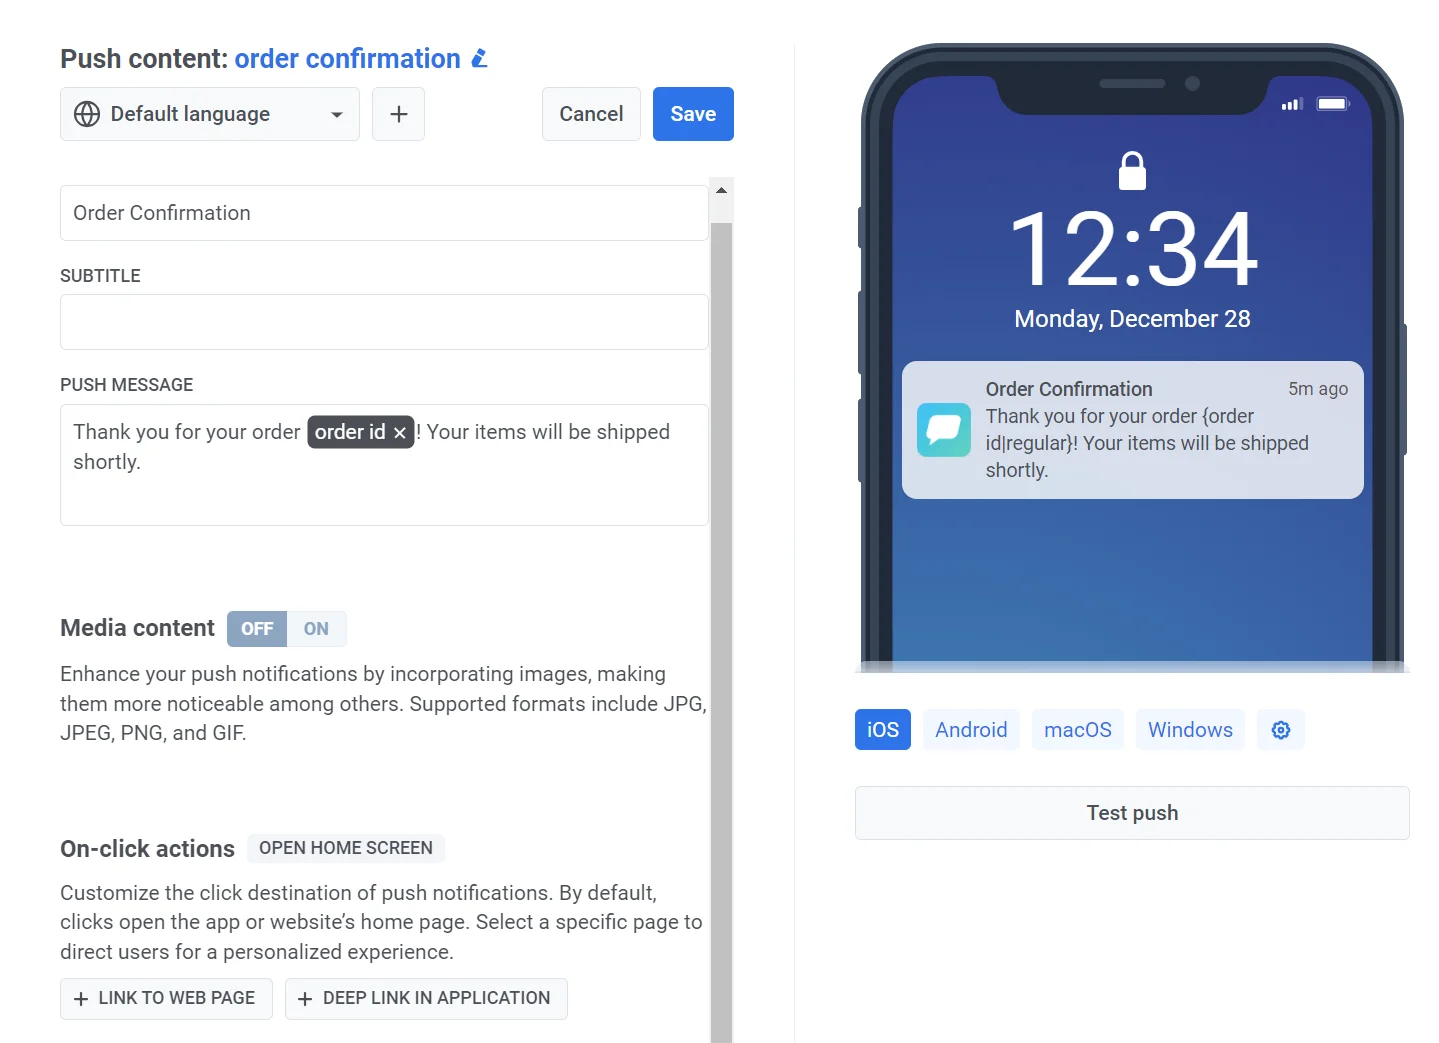
3. Add a [**push notification**](/product/customer-journey/journey-elements#push) element to the canvas. Create the message content, and use placeholders like `{order_id}` to personalize the message.
### Example push content
**Title**: "Order Confirmation"
**Message**: "Thank you for your order `{order_id}`! Your items will be shipped shortly."
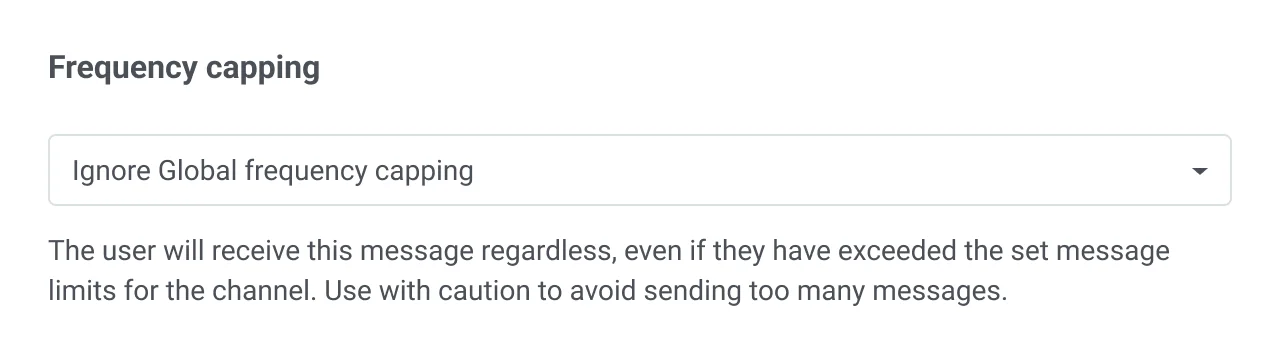
4. To make sure the message is delivered regardless of any message limits, select [**Send messages without global frequency capping**](/product/messaging-channels/global-frequency-capping/#ignore-global-frequency-capping) in the delivery settings.
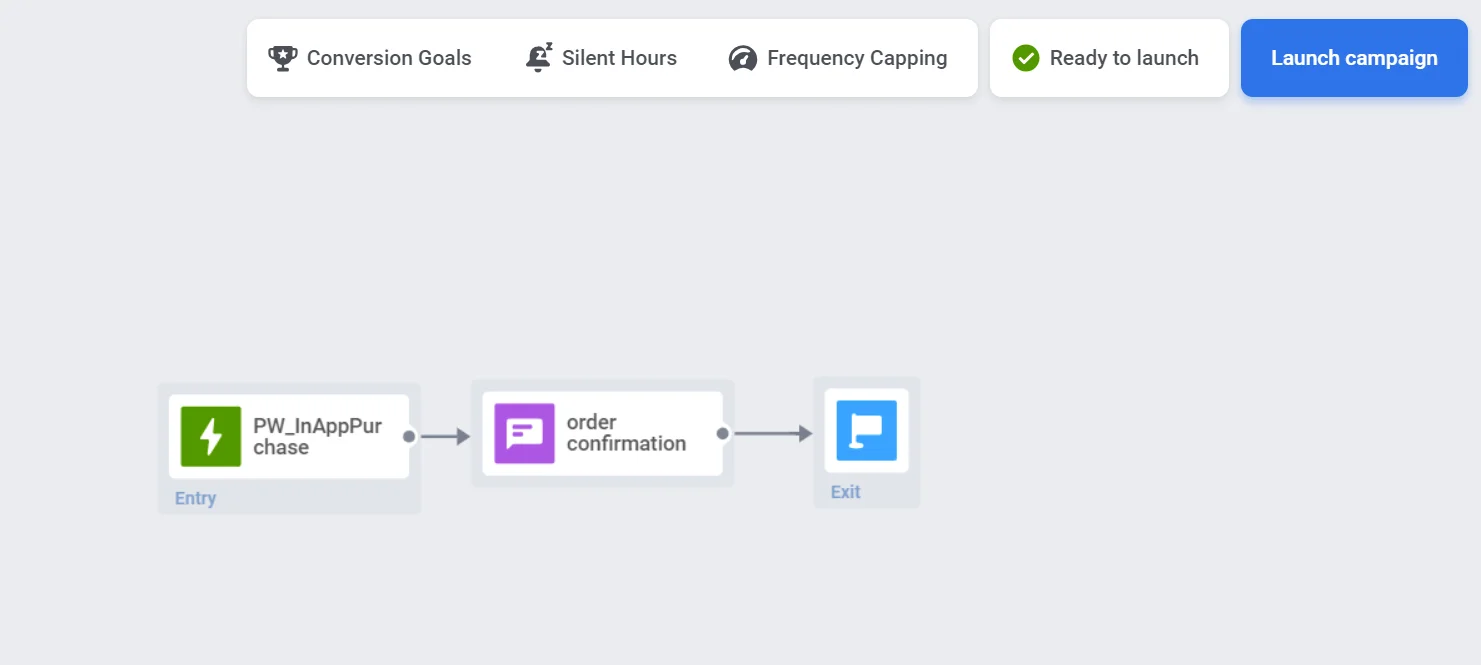
5. **Finalize and launch the Journey**. Configure the message, and any optional segmentation or wait steps. Add the [**Exit element**](/product/customer-journey/journey-elements#exit-from-journey) and click **Launch** to start the journey.
The transactional message will now be sent automatically when the trigger conditions are met.
## Sending a subscription renewal email
By using third-party subscription management services such as [**Adapty**](/product/integrations/adapty-integration), [**Apphud**](https://docs.apphud.com/docs/pushwoosh), etc., you can automatically send renewal notifications or emails to users when their subscription expires, prompting them to renew. For this, do the following:
1. First, configure the integration of the service with Pushwoosh. [Learn more about available integrations](/product/integrations/#in-app-purchases)
2. Next, set up the **Subscription_expired** event in your chosen subscription management service. When a user's subscription expires, the service will send a **subscription expired** event to Pushwoosh.
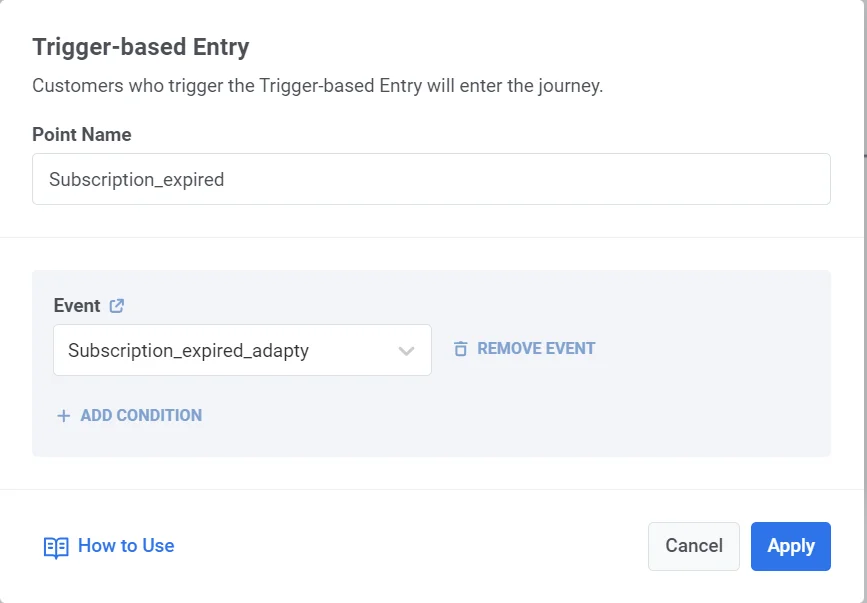
3. Once you have set up the event, in the **Customer Journey Builder**, click **Create campaign** and add the **Trigger-based entry element** to the canvas.
4. Select the **subscription expired** event sent from the third-party service.
5. Add the [**email element**](/product/customer-journey/journey-elements#email) to the canvas and select the email content you’ve created in advance.
### Example email content
***Subject**: "Your Subscription Has Expired – Renew Now to Stay Connected!"*
***Body:***
*Hi,*
*We noticed that your subscription has expired, and we don’t want you to miss out on all the great benefits\! Renew your subscription today to continue enjoying uninterrupted access to our services.*
*[Renew My Subscription]*
*Thank you for being a valued customer. We look forward to having you back!*
6. To make sure the message is delivered regardless of any message limits, select [**Send messages without global frequency capping**](/product/messaging-channels/global-frequency-capping/#ignore-global-frequency-capping) in the delivery settings.
7. Complete the Journey configuration and click **Launch campaign.**
Once set up, the renewal notifications will be sent automatically when the subscription expired event is triggered by the third-party service.
## Sending a password reset message
To send a password reset email, you’ll need to set up the password reset event, configure the password reset link on your end, and then [build a Customer Journey](/product/customer-journey/create-a-customer-journey-for-your-project) to send the email.
Follow the steps below to complete the setup:
### Step 1. Configure the password reset event in Pushwoosh
When a user requests a password change, you trigger an event, such as **password change requested**. You need to set up this event in advance.
1. Navigate to **Events** in the Pushwoosh dashboard and click **Create event**.
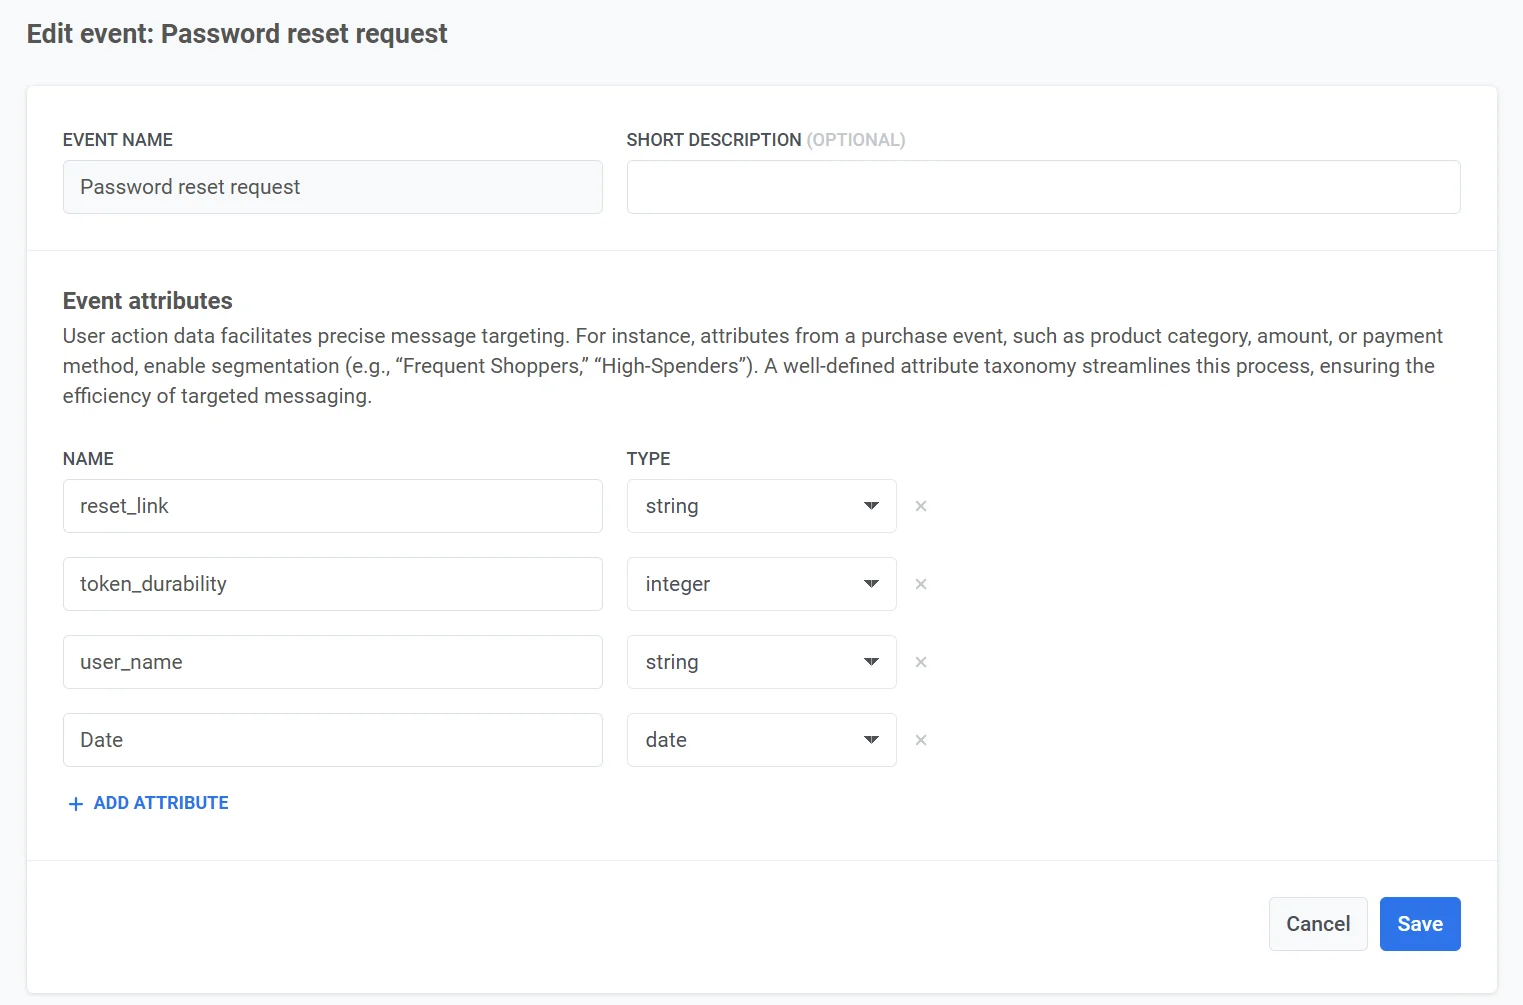
2. Name the event, for example, **Password reset request**.
3. Add the following attributes to the event:
| Attribute Name | Type | Description | Example Value |
| ----- | ----- | ----- | ----- |
| reset_link | String | The unique password reset link. | https://yourapp.com/reset-password?token=abc |
| user_name | String | The user’s name for personalization. | John |
| token_durability | Integer | Token validity in seconds (e.g., 24 hours). | 86400 |
| date | Date | The date and time of the reset request. | 2024-11-18T10:00:00Z |
These attributes act as placeholders, receiving dynamic data from your system when the event is triggered.
Set up the event in your app. [Learn more about setting up custom events](/product/audience-data-and-segmentation/events#implementation)
### Step 2. Generate a password reset link
When a user requests a password reset (e.g., by clicking "Forgot Password"), you’ll need to:
1. **Generate a unique token**. Create a secure, randomly generated token for the user. For example, 12345-abcde-67890.
2. Combine the token with your password reset URL. For example, https://yourapp.com/reset-password?token=12345-abcde-67890.
3. Save the token in your database, linked to the user's account, and set an expiration time (e.g., 24 hours).
4. Include the reset link in the reset_link event attribute when triggering the **Password Reset Request** event.
### Step 3. Create email content
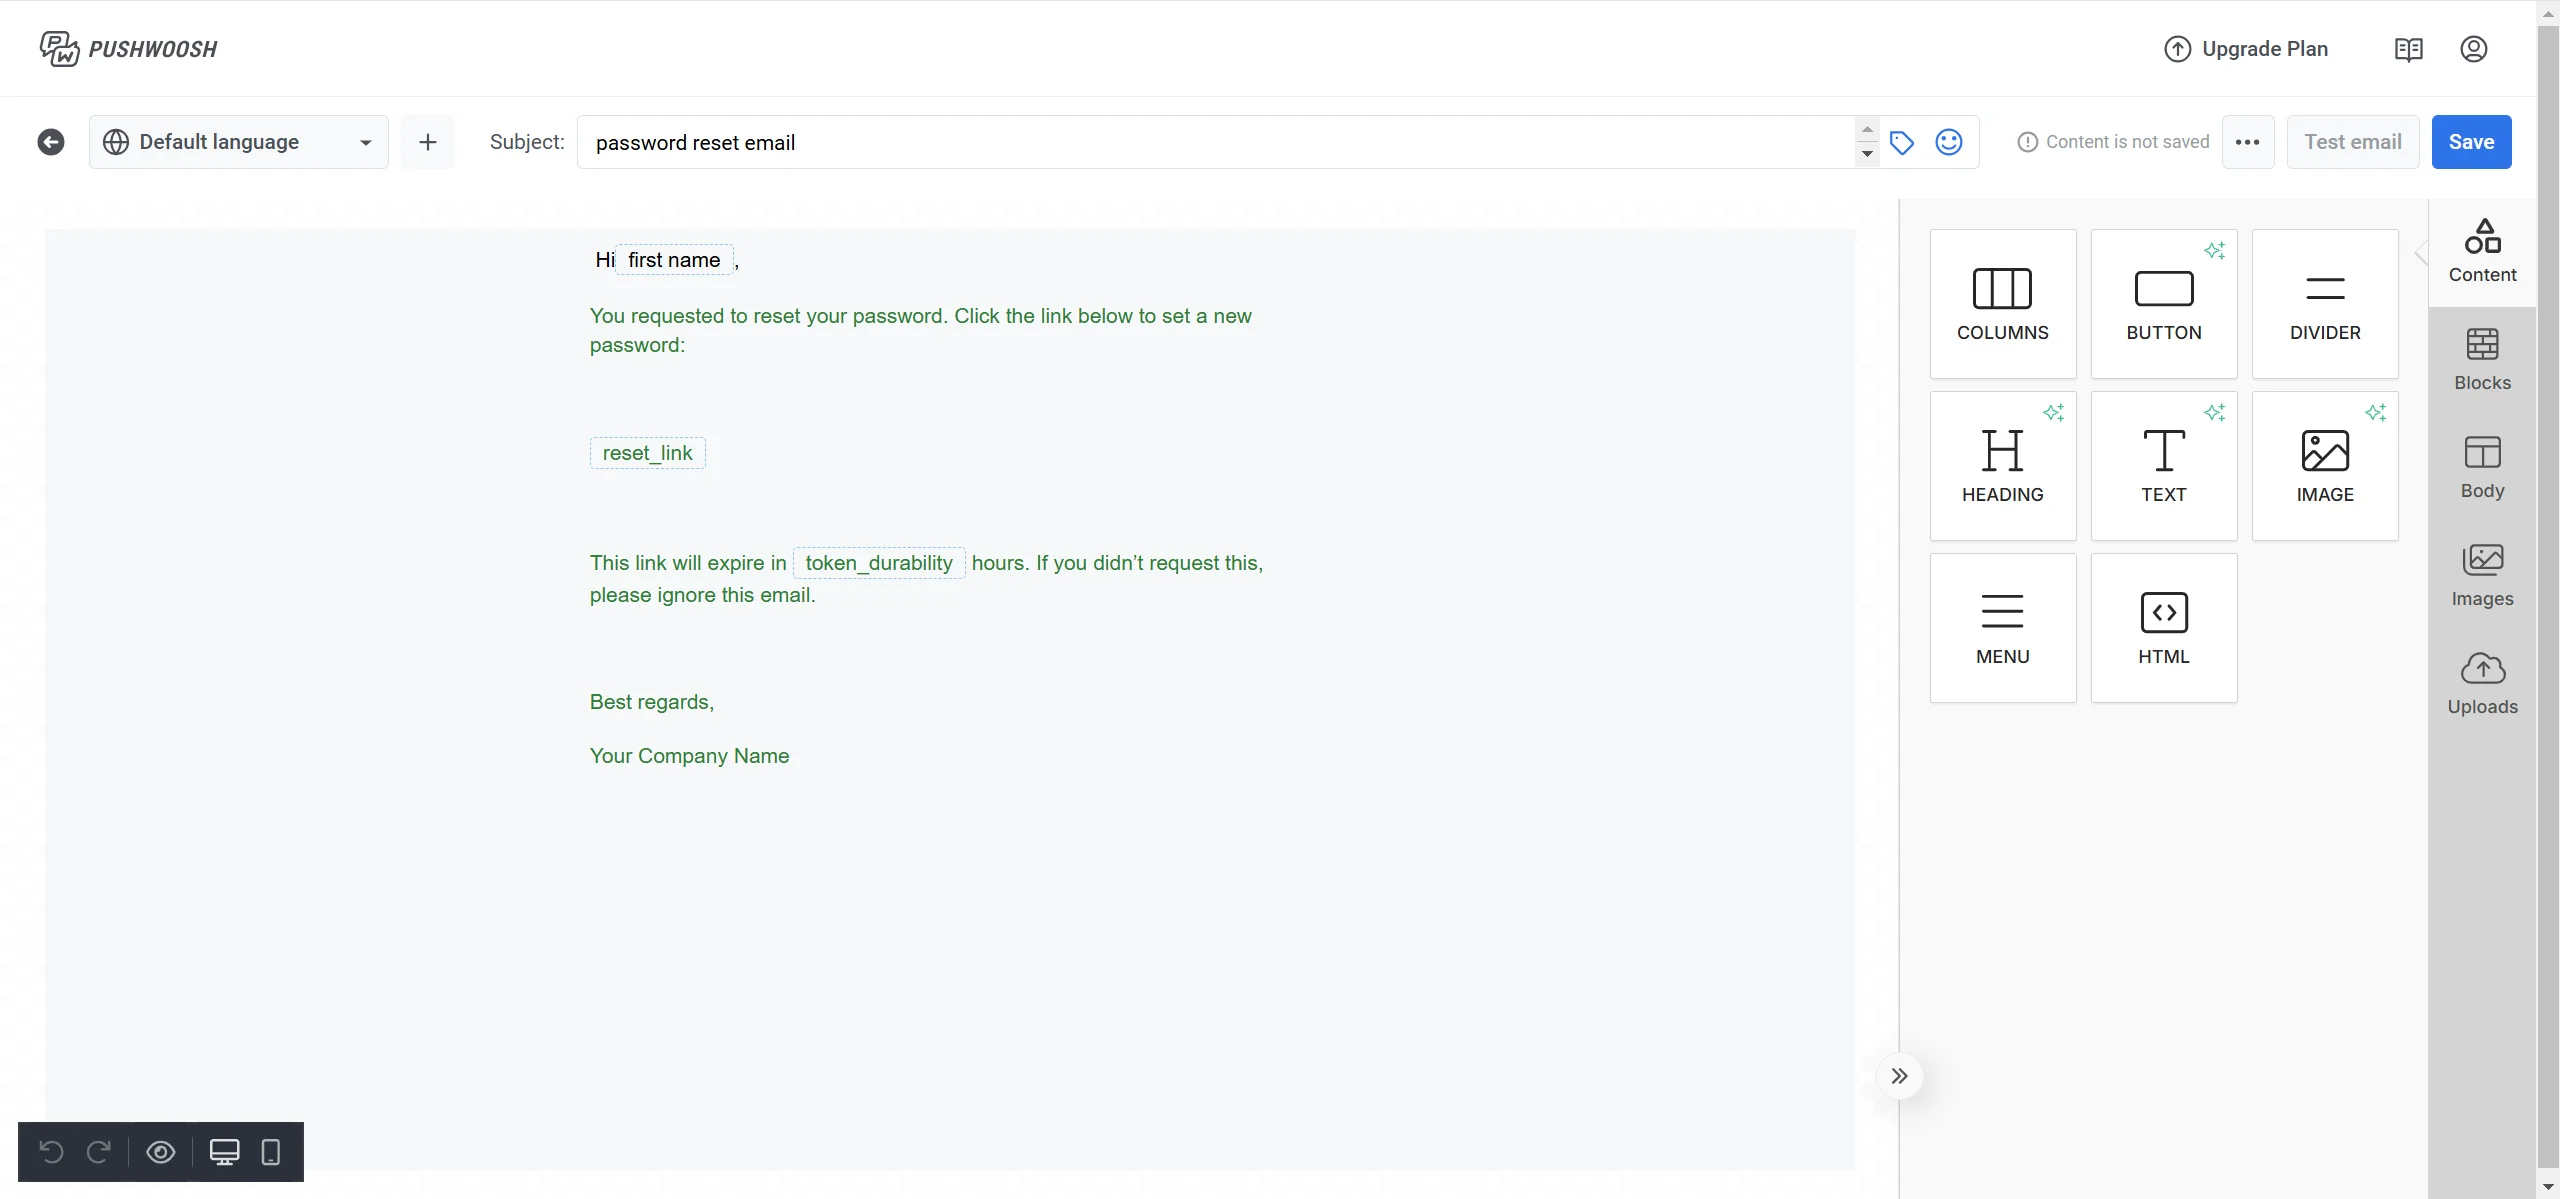
1. Navigate to **Email content** in Pushwoosh and create new email content. [Learn more](/product/content/email-content/drag-and-drop-email-editor/create-email-content-with-drag-and-drop-editor/#create-new-email-content)
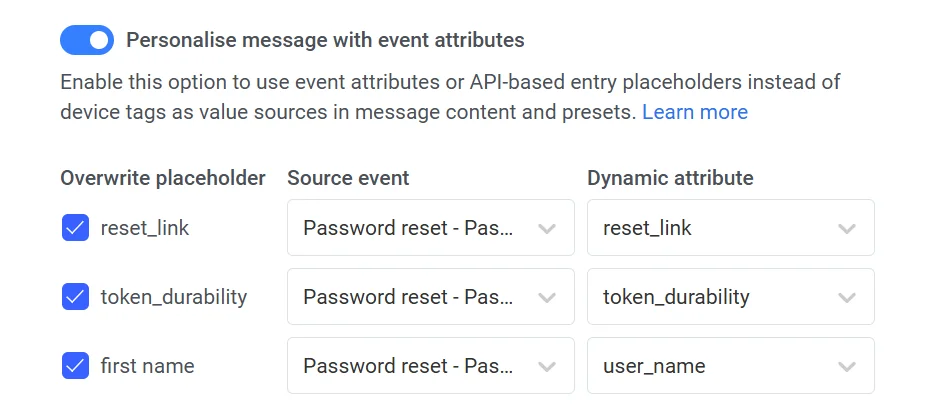
2. Add placeholders for dynamic content:
1. `{reset_link}` for the password reset link.
2. `{user_name}` for the user’s name.
3. `{token_durability}` for the link expiration time.
### Step 4. Create the Campaign
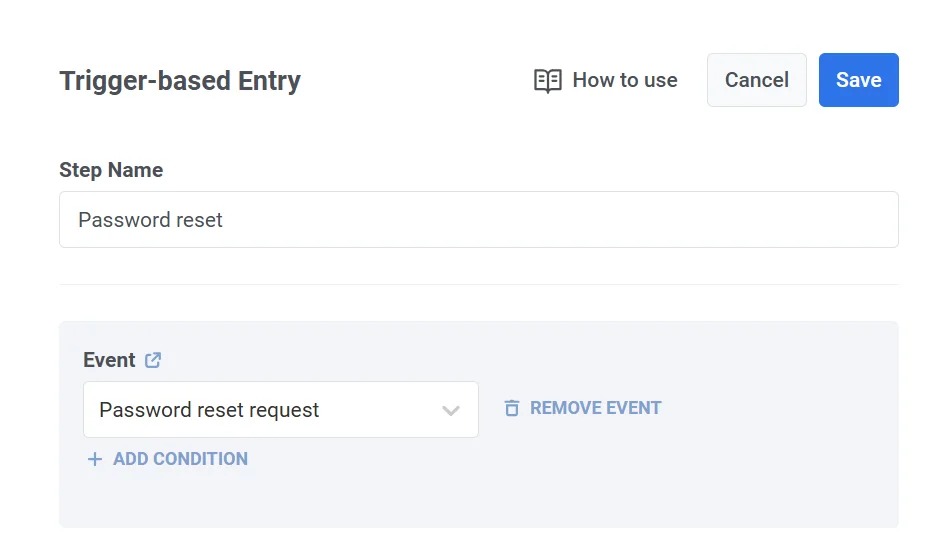
1. Navigate to the **Customer Journey** section in Pushwoosh and click **Create Campaign**.
2. Drag and drop a **Trigger-based entry** element onto the canvas.
3. Configure the trigger to activate when your system sends the **Password Reset Request** event.
4. Add an **Email** element to the canvas.
5. Link the email to the **Trigger-based entry** element.
6. Select the previously created email content with placeholders for the reset link and user details.
7. To make sure the message is delivered regardless of any message limits, select **Send messages without global frequency capping** in the delivery settings.
8. After adding the message content, ensure all steps in the journey are configured correctly. Add the **Exit** element and click **Launch campaign** to start the journey.
Once activated, the **password reset message** will automatically be sent when a user requests to reset their password, providing a seamless and secure experience.
 3. Add a [**push notification**](/product/customer-journey/journey-elements#push) element to the canvas. Create the message content, and use placeholders like `{order_id}` to personalize the message.
### Example push content
**Title**: "Order Confirmation"
**Message**: "Thank you for your order `{order_id}`! Your items will be shipped shortly."
3. Add a [**push notification**](/product/customer-journey/journey-elements#push) element to the canvas. Create the message content, and use placeholders like `{order_id}` to personalize the message.
### Example push content
**Title**: "Order Confirmation"
**Message**: "Thank you for your order `{order_id}`! Your items will be shipped shortly."
 4. To make sure the message is delivered regardless of any message limits, select [**Send messages without global frequency capping**](/product/messaging-channels/global-frequency-capping/#ignore-global-frequency-capping) in the delivery settings.
 5. **Finalize and launch the Journey**. Configure the message, and any optional segmentation or wait steps. Add the [**Exit element**](/product/customer-journey/journey-elements#exit-from-journey) and click **Launch** to start the journey.
 The transactional message will now be sent automatically when the trigger conditions are met.
## Sending a subscription renewal email
By using third-party subscription management services such as [**Adapty**](/product/integrations/adapty-integration), [**Apphud**](https://docs.apphud.com/docs/pushwoosh), etc., you can automatically send renewal notifications or emails to users when their subscription expires, prompting them to renew. For this, do the following:
1. First, configure the integration of the service with Pushwoosh. [Learn more about available integrations](/product/integrations/#in-app-purchases)
2. Next, set up the **Subscription_expired** event in your chosen subscription management service. When a user's subscription expires, the service will send a **subscription expired** event to Pushwoosh.
3. Once you have set up the event, in the **Customer Journey Builder**, click **Create campaign** and add the **Trigger-based entry element** to the canvas.
4. Select the **subscription expired** event sent from the third-party service.
The transactional message will now be sent automatically when the trigger conditions are met.
## Sending a subscription renewal email
By using third-party subscription management services such as [**Adapty**](/product/integrations/adapty-integration), [**Apphud**](https://docs.apphud.com/docs/pushwoosh), etc., you can automatically send renewal notifications or emails to users when their subscription expires, prompting them to renew. For this, do the following:
1. First, configure the integration of the service with Pushwoosh. [Learn more about available integrations](/product/integrations/#in-app-purchases)
2. Next, set up the **Subscription_expired** event in your chosen subscription management service. When a user's subscription expires, the service will send a **subscription expired** event to Pushwoosh.
3. Once you have set up the event, in the **Customer Journey Builder**, click **Create campaign** and add the **Trigger-based entry element** to the canvas.
4. Select the **subscription expired** event sent from the third-party service.
 5. Add the [**email element**](/product/customer-journey/journey-elements#email) to the canvas and select the email content you’ve created in advance.
### Example email content
***Subject**: "Your Subscription Has Expired – Renew Now to Stay Connected!"*
***Body:***
*Hi,*
*We noticed that your subscription has expired, and we don’t want you to miss out on all the great benefits\! Renew your subscription today to continue enjoying uninterrupted access to our services.*
*[Renew My Subscription]*
*Thank you for being a valued customer. We look forward to having you back!*
6. To make sure the message is delivered regardless of any message limits, select [**Send messages without global frequency capping**](/product/messaging-channels/global-frequency-capping/#ignore-global-frequency-capping) in the delivery settings.
7. Complete the Journey configuration and click **Launch campaign.**
5. Add the [**email element**](/product/customer-journey/journey-elements#email) to the canvas and select the email content you’ve created in advance.
### Example email content
***Subject**: "Your Subscription Has Expired – Renew Now to Stay Connected!"*
***Body:***
*Hi,*
*We noticed that your subscription has expired, and we don’t want you to miss out on all the great benefits\! Renew your subscription today to continue enjoying uninterrupted access to our services.*
*[Renew My Subscription]*
*Thank you for being a valued customer. We look forward to having you back!*
6. To make sure the message is delivered regardless of any message limits, select [**Send messages without global frequency capping**](/product/messaging-channels/global-frequency-capping/#ignore-global-frequency-capping) in the delivery settings.
7. Complete the Journey configuration and click **Launch campaign.**
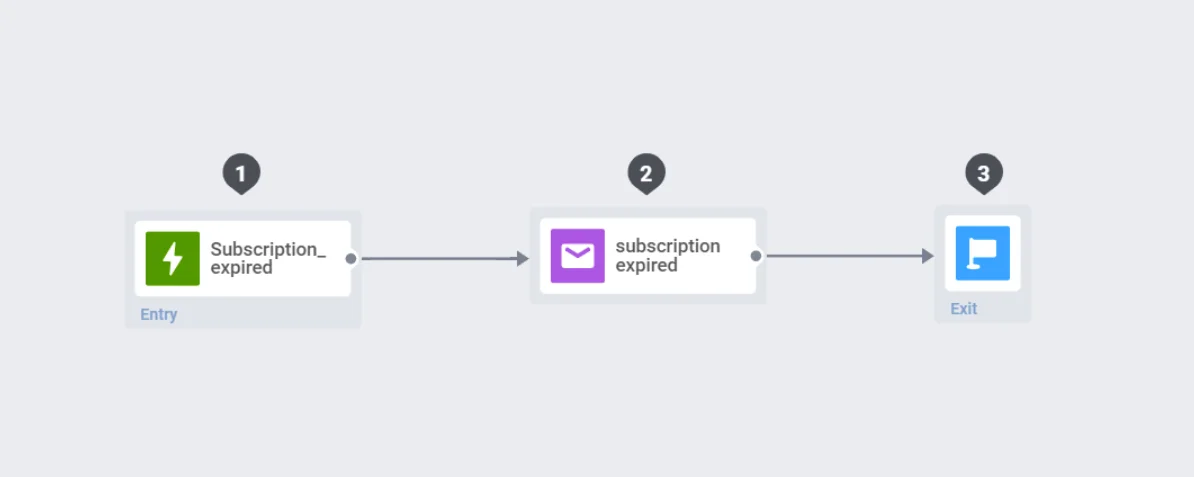 Once set up, the renewal notifications will be sent automatically when the subscription expired event is triggered by the third-party service.
## Sending a password reset message
To send a password reset email, you’ll need to set up the password reset event, configure the password reset link on your end, and then [build a Customer Journey](/product/customer-journey/create-a-customer-journey-for-your-project) to send the email.
Follow the steps below to complete the setup:
### Step 1. Configure the password reset event in Pushwoosh
When a user requests a password change, you trigger an event, such as **password change requested**. You need to set up this event in advance.
1. Navigate to **Events** in the Pushwoosh dashboard and click **Create event**.
2. Name the event, for example, **Password reset request**.
3. Add the following attributes to the event:
| Attribute Name | Type | Description | Example Value |
| ----- | ----- | ----- | ----- |
| reset_link | String | The unique password reset link. | https://yourapp.com/reset-password?token=abc |
| user_name | String | The user’s name for personalization. | John |
| token_durability | Integer | Token validity in seconds (e.g., 24 hours). | 86400 |
| date | Date | The date and time of the reset request. | 2024-11-18T10:00:00Z |
These attributes act as placeholders, receiving dynamic data from your system when the event is triggered.
Once set up, the renewal notifications will be sent automatically when the subscription expired event is triggered by the third-party service.
## Sending a password reset message
To send a password reset email, you’ll need to set up the password reset event, configure the password reset link on your end, and then [build a Customer Journey](/product/customer-journey/create-a-customer-journey-for-your-project) to send the email.
Follow the steps below to complete the setup:
### Step 1. Configure the password reset event in Pushwoosh
When a user requests a password change, you trigger an event, such as **password change requested**. You need to set up this event in advance.
1. Navigate to **Events** in the Pushwoosh dashboard and click **Create event**.
2. Name the event, for example, **Password reset request**.
3. Add the following attributes to the event:
| Attribute Name | Type | Description | Example Value |
| ----- | ----- | ----- | ----- |
| reset_link | String | The unique password reset link. | https://yourapp.com/reset-password?token=abc |
| user_name | String | The user’s name for personalization. | John |
| token_durability | Integer | Token validity in seconds (e.g., 24 hours). | 86400 |
| date | Date | The date and time of the reset request. | 2024-11-18T10:00:00Z |
These attributes act as placeholders, receiving dynamic data from your system when the event is triggered.
 Set up the event in your app. [Learn more about setting up custom events](/product/audience-data-and-segmentation/events#implementation)
### Step 2. Generate a password reset link
When a user requests a password reset (e.g., by clicking "Forgot Password"), you’ll need to:
1. **Generate a unique token**. Create a secure, randomly generated token for the user. For example, 12345-abcde-67890.
2. Combine the token with your password reset URL. For example, https://yourapp.com/reset-password?token=12345-abcde-67890.
3. Save the token in your database, linked to the user's account, and set an expiration time (e.g., 24 hours).
4. Include the reset link in the reset_link event attribute when triggering the **Password Reset Request** event.
### Step 3. Create email content
1. Navigate to **Email content** in Pushwoosh and create new email content. [Learn more](/product/content/email-content/drag-and-drop-email-editor/create-email-content-with-drag-and-drop-editor/#create-new-email-content)
2. Add placeholders for dynamic content:
1. `{reset_link}` for the password reset link.
2. `{user_name}` for the user’s name.
3. `{token_durability}` for the link expiration time.
Set up the event in your app. [Learn more about setting up custom events](/product/audience-data-and-segmentation/events#implementation)
### Step 2. Generate a password reset link
When a user requests a password reset (e.g., by clicking "Forgot Password"), you’ll need to:
1. **Generate a unique token**. Create a secure, randomly generated token for the user. For example, 12345-abcde-67890.
2. Combine the token with your password reset URL. For example, https://yourapp.com/reset-password?token=12345-abcde-67890.
3. Save the token in your database, linked to the user's account, and set an expiration time (e.g., 24 hours).
4. Include the reset link in the reset_link event attribute when triggering the **Password Reset Request** event.
### Step 3. Create email content
1. Navigate to **Email content** in Pushwoosh and create new email content. [Learn more](/product/content/email-content/drag-and-drop-email-editor/create-email-content-with-drag-and-drop-editor/#create-new-email-content)
2. Add placeholders for dynamic content:
1. `{reset_link}` for the password reset link.
2. `{user_name}` for the user’s name.
3. `{token_durability}` for the link expiration time.
 ### Step 4. Create the Campaign
1. Navigate to the **Customer Journey** section in Pushwoosh and click **Create Campaign**.
2. Drag and drop a **Trigger-based entry** element onto the canvas.
3. Configure the trigger to activate when your system sends the **Password Reset Request** event.
### Step 4. Create the Campaign
1. Navigate to the **Customer Journey** section in Pushwoosh and click **Create Campaign**.
2. Drag and drop a **Trigger-based entry** element onto the canvas.
3. Configure the trigger to activate when your system sends the **Password Reset Request** event.
 4. Add an **Email** element to the canvas.
5. Link the email to the **Trigger-based entry** element.
6. Select the previously created email content with placeholders for the reset link and user details.
4. Add an **Email** element to the canvas.
5. Link the email to the **Trigger-based entry** element.
6. Select the previously created email content with placeholders for the reset link and user details.
 7. To make sure the message is delivered regardless of any message limits, select **Send messages without global frequency capping** in the delivery settings.
8. After adding the message content, ensure all steps in the journey are configured correctly. Add the **Exit** element and click **Launch campaign** to start the journey.
7. To make sure the message is delivered regardless of any message limits, select **Send messages without global frequency capping** in the delivery settings.
8. After adding the message content, ensure all steps in the journey are configured correctly. Add the **Exit** element and click **Launch campaign** to start the journey.
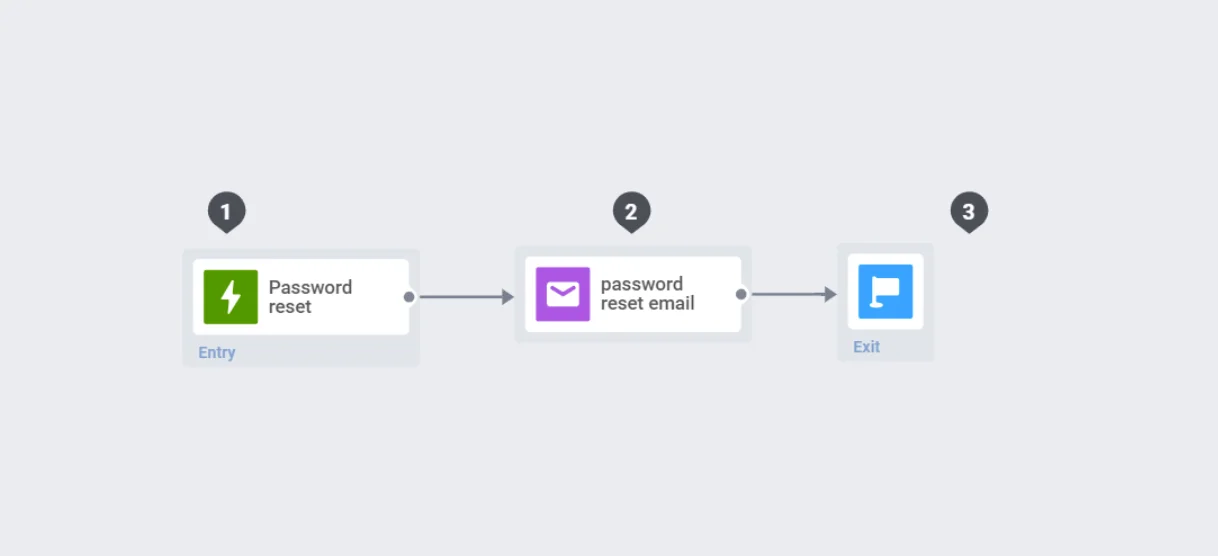 Once activated, the **password reset message** will automatically be sent when a user requests to reset their password, providing a seamless and secure experience.