# How to schedule a message
Pushwoosh makes it simple to schedule messages across multiple channels, including [push notifications](/product/messaging-channels/push-notifications), [emails](/product/messaging-channels/emails), [in-app messages](/product/messaging-channels/in-apps), [WhatsApp](/product/messaging-channels/whatsapp-messages), and [SMS](/product/messaging-channels/sms).
Whether you're sending a one-time message, scheduling messages for specific dates, or setting up recurring campaigns, the Customer Journey Builder offers flexible options to manage your campaign timing effectively. For push notifications, you can also use the [one-time push message form](/product/messaging-channels/push-notifications/scheduled-push). For one-time emails, you can use the [one-time email form](/product/messaging-channels/emails/sending-emails/send-one-time-emails).
This guide provides step-by-step instructions for scheduling messages through the Customer Journey Builder, applicable to all supported messaging channels.
## How to schedule messages that start a communication flow
Scheduling is configured in the [**Audience-based entry**](/product/customer-journey/journey-elements/entry-elements/audience-based-entry/#entry-schedule) element via **Entry schedule**:
* **One-time entry:** users enter the journey once. Choose **Immediately** (as soon as the journey is activated) or **Schedule for a specific day** (date and time).
* **Recurring entry:** users enter repeatedly. Choose **On specific dates** (multiple dates you pick) or **Periodically** (e.g. every 1 day, every 1 week).
### Configure the entry schedule
1. Add the **Audience-based entry** element and define the users who will enter the journey. Select the **Audience source** to determine who will receive the message or [create a segment](/product/audience-data-and-segmentation/segmentation/). Once the audience is set, you can proceed to schedule the message.
2. In the **Audience-based entry** element, set **Entry schedule** and choose **One-time entry** or **Recurring entry**, then pick the option that matches when the message should be sent.
3. Set the time and timezone as described in the sections below. For details, see [Audience-based entry](/product/customer-journey/journey-elements/entry-elements/audience-based-entry/).
### Schedule a message for a specific date and time
To send a message on a specific date and time:
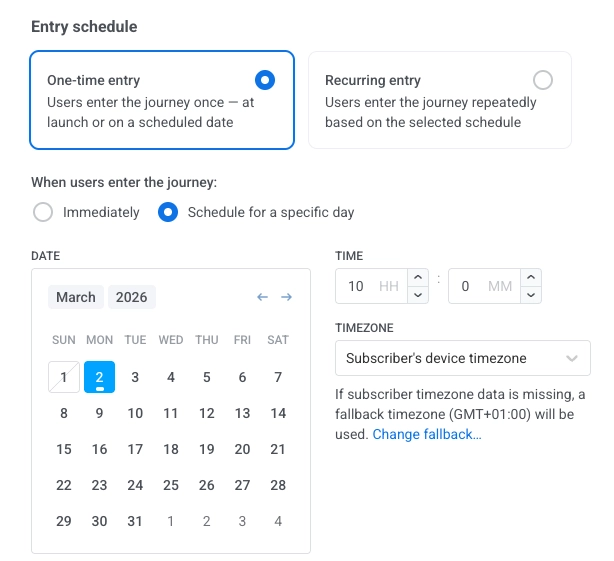
1. Set **Entry schedule** to **One-time entry**, then choose **Schedule for a specific day**. Set the date and time.
2. Select the timezone:
* **Subscriber's device timezone (default):** entry uses each subscriber's device timezone. If timezone is missing, a fallback is used. Click **Change fallback** to change it.
* **Specific timezone:** pick a timezone from the dropdown for a fixed entry time.
Once the schedule is set, click **Apply** to confirm.
### Schedule a message for multiple specific dates
To send messages on multiple specific dates:
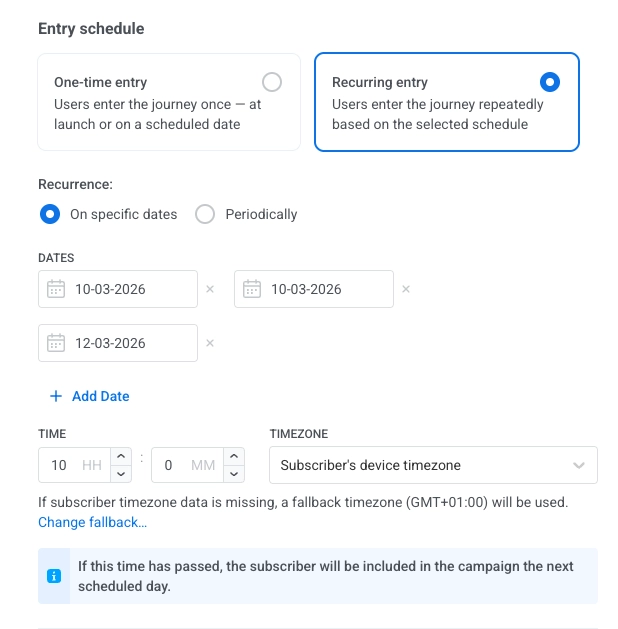
1. Set **Entry schedule** to **Recurring entry**, then choose **On specific dates**.
2. Pick the dates in the calendar. Click **+ Add Date** to add more dates.
3. Set the time and timezone the same way as for [Schedule for a specific day](#schedule-a-message-for-a-specific-date-and-time) (Subscriber's device timezone or Specific timezone).
Once the schedule is set, click **Apply** to confirm.
### Set up a recurring message to be sent at regular intervals
To send messages at regular intervals (e.g. daily, weekly):
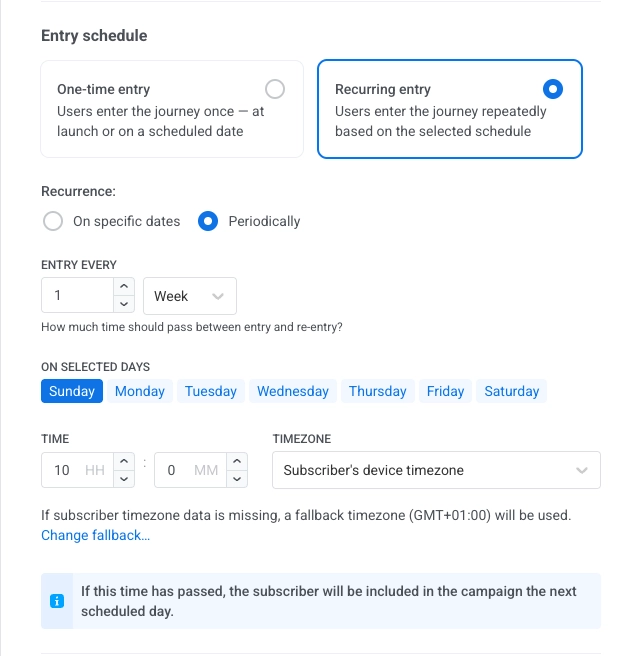
1. Set **Entry schedule** to **Recurring entry**, then choose **Periodically**.
2. In **ENTRY EVERY**, set the interval (e.g. every 1 day, every 1 week) and pick the days (of the week or month, depending on the interval).
3. Set the time and timezone the same way as for [Schedule for a specific date and time](#schedule-a-message-for-a-specific-date-and-time).
Once the schedule is set, click **Apply** to confirm.
After you've set the scheduling options, add the message element and configure the rest of your journey. Once you've reviewed all the configurations, click **Launch campaign**.
## How to schedule messages that continue a communication flow
If your scheduled message is part of an ongoing journey, you can insert a Time Delay element to control when the message is sent within the flow. For this:
1. Insert the **Time Delay** element between the preceding communication elements and the message you wish to schedule:
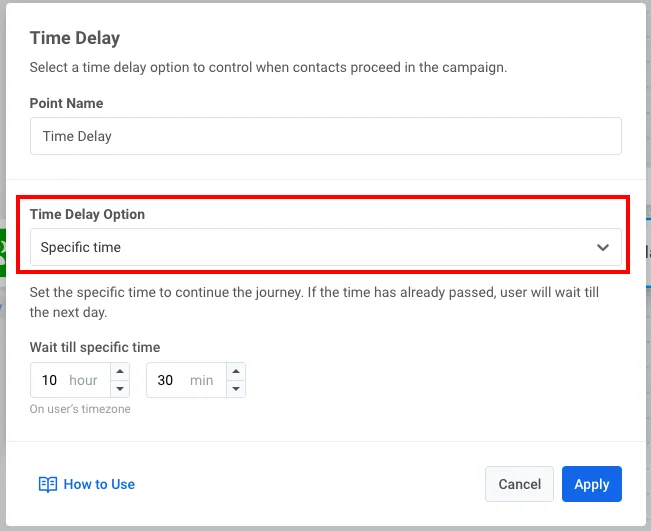
2. Double-click the **Time Delay** element. In the **Time Delay Option** field, select either **Specific time**:
or **Date**:
## Example scenario: Setting up a recurring push notification for a fitness app
Let’s say you're running a fitness app and want to send motivational push notifications to users to keep them engaged. You decide to send the same notification every Monday at 9:00 AM, reminding users to log their workout progress.
1. **Create a basic push flow.** Add the **Audience-based entry** to the journey canvas and select an **Audience source**.
2. **Set recurring entry.** In the **Audience-based entry** element, set **Entry schedule** to **Recurring entry**, then choose **Periodically**. In **ENTRY EVERY**, set **every 1 week** and select **Monday**.
3. **Set time and timezone.** Set the time to **9:00 AM** and select **Subscriber's device timezone** so notifications are sent based on each user's local time.
4. **Review and finalize the journey.** Proceed to configure the rest of your journey and create push notification content.
Finally, add the [**Exit**](/product/customer-journey/journey-elements/flow-controls/exit/) element to your journey. Before launching the journey, review the entire setup to ensure everything is configured correctly.
The recurring notification is now ready to remind users to log their workouts every Monday at 9:00 AM in their local timezones.
 ### Schedule a message for multiple specific dates
To send messages on multiple specific dates:
1. Set **Entry schedule** to **Recurring entry**, then choose **On specific dates**.
2. Pick the dates in the calendar. Click **+ Add Date** to add more dates.
3. Set the time and timezone the same way as for [Schedule for a specific day](#schedule-a-message-for-a-specific-date-and-time) (Subscriber's device timezone or Specific timezone).
### Schedule a message for multiple specific dates
To send messages on multiple specific dates:
1. Set **Entry schedule** to **Recurring entry**, then choose **On specific dates**.
2. Pick the dates in the calendar. Click **+ Add Date** to add more dates.
3. Set the time and timezone the same way as for [Schedule for a specific day](#schedule-a-message-for-a-specific-date-and-time) (Subscriber's device timezone or Specific timezone).
 Once the schedule is set, click **Apply** to confirm.
### Set up a recurring message to be sent at regular intervals
To send messages at regular intervals (e.g. daily, weekly):
1. Set **Entry schedule** to **Recurring entry**, then choose **Periodically**.
2. In **ENTRY EVERY**, set the interval (e.g. every 1 day, every 1 week) and pick the days (of the week or month, depending on the interval).
3. Set the time and timezone the same way as for [Schedule for a specific date and time](#schedule-a-message-for-a-specific-date-and-time).
Once the schedule is set, click **Apply** to confirm.
### Set up a recurring message to be sent at regular intervals
To send messages at regular intervals (e.g. daily, weekly):
1. Set **Entry schedule** to **Recurring entry**, then choose **Periodically**.
2. In **ENTRY EVERY**, set the interval (e.g. every 1 day, every 1 week) and pick the days (of the week or month, depending on the interval).
3. Set the time and timezone the same way as for [Schedule for a specific date and time](#schedule-a-message-for-a-specific-date-and-time).
 Once the schedule is set, click **Apply** to confirm.
After you've set the scheduling options, add the message element and configure the rest of your journey. Once you've reviewed all the configurations, click **Launch campaign**.
## How to schedule messages that continue a communication flow
If your scheduled message is part of an ongoing journey, you can insert a Time Delay element to control when the message is sent within the flow. For this:
1. Insert the **Time Delay** element between the preceding communication elements and the message you wish to schedule:
2. Double-click the **Time Delay** element. In the **Time Delay Option** field, select either **Specific time**:
Once the schedule is set, click **Apply** to confirm.
After you've set the scheduling options, add the message element and configure the rest of your journey. Once you've reviewed all the configurations, click **Launch campaign**.
## How to schedule messages that continue a communication flow
If your scheduled message is part of an ongoing journey, you can insert a Time Delay element to control when the message is sent within the flow. For this:
1. Insert the **Time Delay** element between the preceding communication elements and the message you wish to schedule:
2. Double-click the **Time Delay** element. In the **Time Delay Option** field, select either **Specific time**:
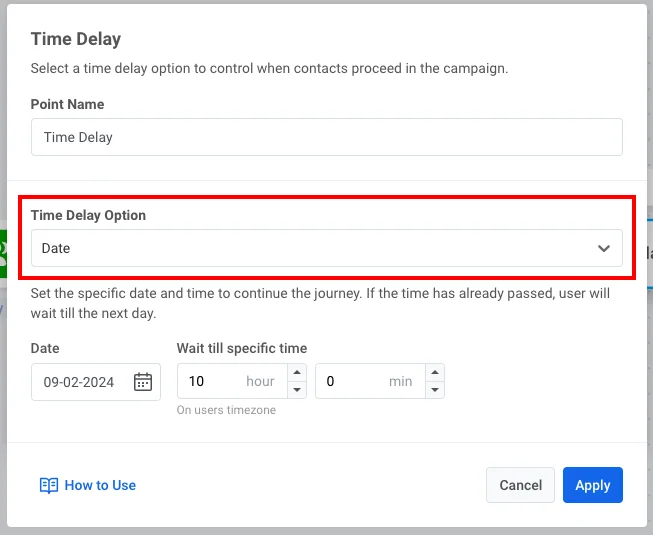
 or **Date**:
 ## Example scenario: Setting up a recurring push notification for a fitness app
Let’s say you're running a fitness app and want to send motivational push notifications to users to keep them engaged. You decide to send the same notification every Monday at 9:00 AM, reminding users to log their workout progress.
1. **Create a basic push flow.** Add the **Audience-based entry** to the journey canvas and select an **Audience source**.
2. **Set recurring entry.** In the **Audience-based entry** element, set **Entry schedule** to **Recurring entry**, then choose **Periodically**. In **ENTRY EVERY**, set **every 1 week** and select **Monday**.
3. **Set time and timezone.** Set the time to **9:00 AM** and select **Subscriber's device timezone** so notifications are sent based on each user's local time.
4. **Review and finalize the journey.** Proceed to configure the rest of your journey and create push notification content.
Finally, add the [**Exit**](/product/customer-journey/journey-elements/flow-controls/exit/) element to your journey. Before launching the journey, review the entire setup to ensure everything is configured correctly.
The recurring notification is now ready to remind users to log their workouts every Monday at 9:00 AM in their local timezones.
## Example scenario: Setting up a recurring push notification for a fitness app
Let’s say you're running a fitness app and want to send motivational push notifications to users to keep them engaged. You decide to send the same notification every Monday at 9:00 AM, reminding users to log their workout progress.
1. **Create a basic push flow.** Add the **Audience-based entry** to the journey canvas and select an **Audience source**.
2. **Set recurring entry.** In the **Audience-based entry** element, set **Entry schedule** to **Recurring entry**, then choose **Periodically**. In **ENTRY EVERY**, set **every 1 week** and select **Monday**.
3. **Set time and timezone.** Set the time to **9:00 AM** and select **Subscriber's device timezone** so notifications are sent based on each user's local time.
4. **Review and finalize the journey.** Proceed to configure the rest of your journey and create push notification content.
Finally, add the [**Exit**](/product/customer-journey/journey-elements/flow-controls/exit/) element to your journey. Before launching the journey, review the entire setup to ensure everything is configured correctly.
The recurring notification is now ready to remind users to log their workouts every Monday at 9:00 AM in their local timezones.