# Test devices
**Test Devices** enable you to preview how push notifications, emails, or SMS messages will appear on a device before sending them to your audience. This feature helps ensure that your messages are accurate and display correctly before launching campaigns to a larger audience.
To use this feature, you must first register your device (push device, email, or phone number) as a Test Device.
**Note:** Test devices are application-specific, meaning you’ll need to configure them separately for each application.
To add a test device:
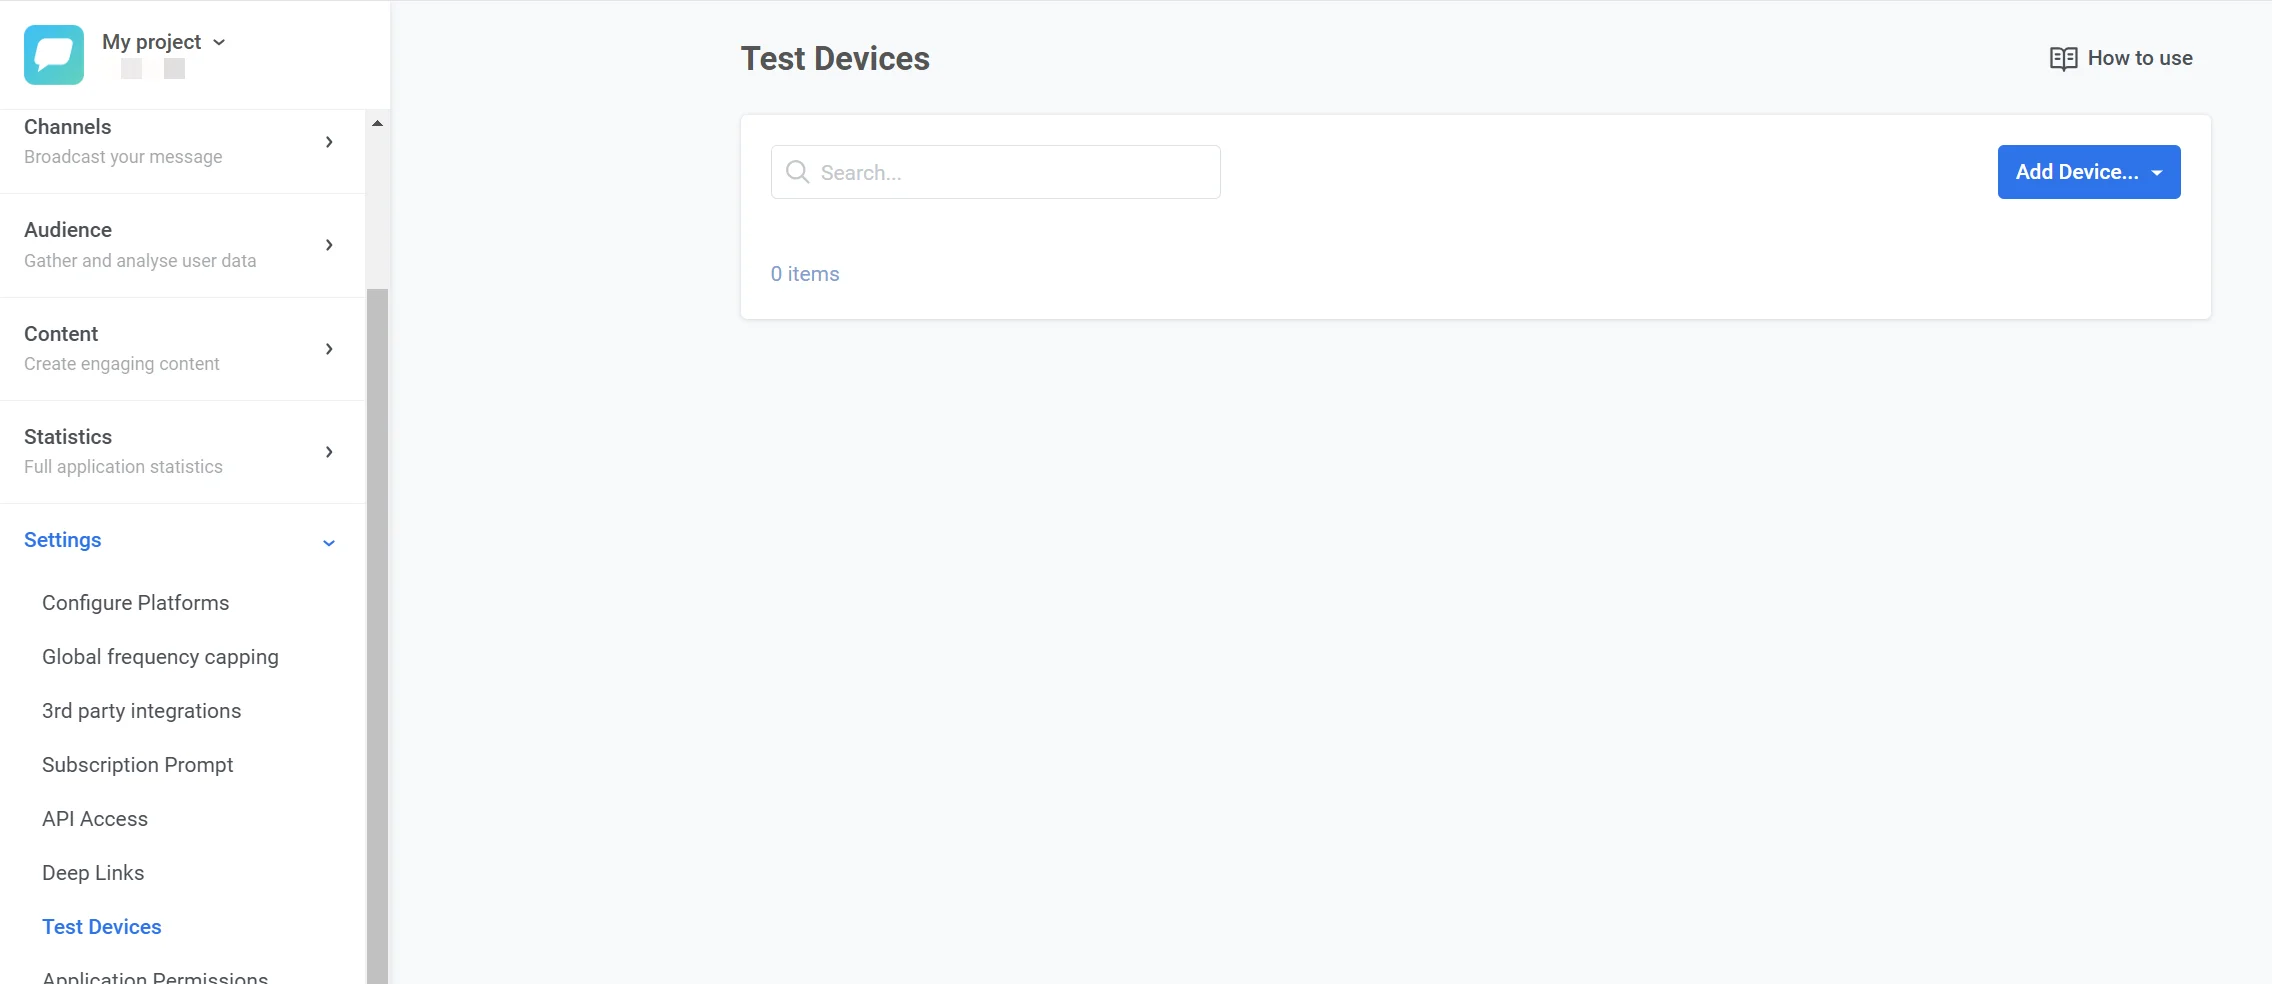
1. Navigate to the **Test devices** section in your Pushwoosh account.
2. Click the **Create test device** dropdown button in the top-right corner.
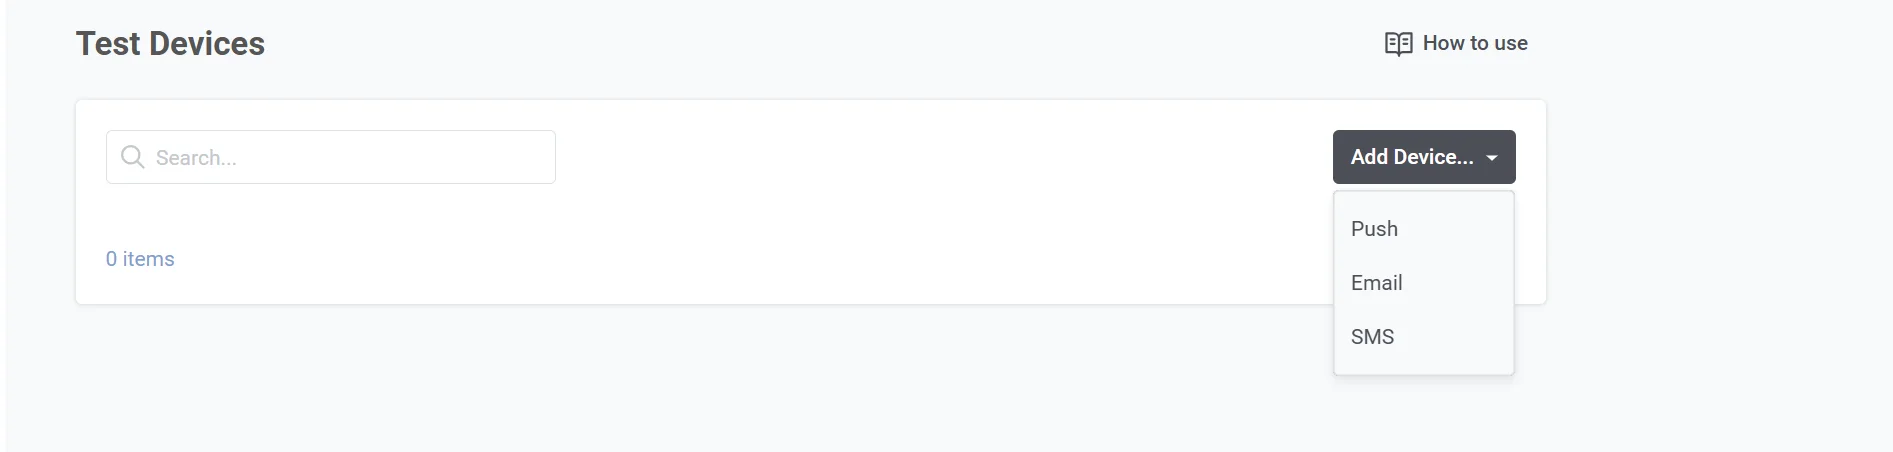
3. Select the type of device you want to add:
* **Push**: Add a mobile or web push device.
* **Email**: Add an email address for testing email notifications.
* **SMS**: Add a phone number for testing SMS messages.
## Test push device
You can add a push test device in one of three ways:
* **QR code:** After a one-time setup in the app (deep links), anyone with the app installed can scan a QR code and register the device. [Learn more](#register-a-push-device-via-qr-code)
* **From the app:** The app registers the current device itself, without scanning or manual entry. [Learn more](#registering-a-test-device-from-the-app)
* **Manual:** Your developer gets the device Hardware ID (HWID) and enters it in **Create test device → Push**. Full steps are in the developer guide: [Adding test devices manually](/developer/first-steps/test-your-integration/test-devices/#adding-test-devices-manually).
### Register a push device via QR code
First, your developer needs to enable deep links for test devices in the app. This is a one-time setup, usually done when integrating the Pushwoosh SDK. See the [Implementation steps](/developer/first-steps/test-your-integration/test-devices/#implementation) for details.
After that, anyone with the app installed can register their device by scanning a QR code. No developer is needed for each new device, and this method doesn't depend on the registration window described below.
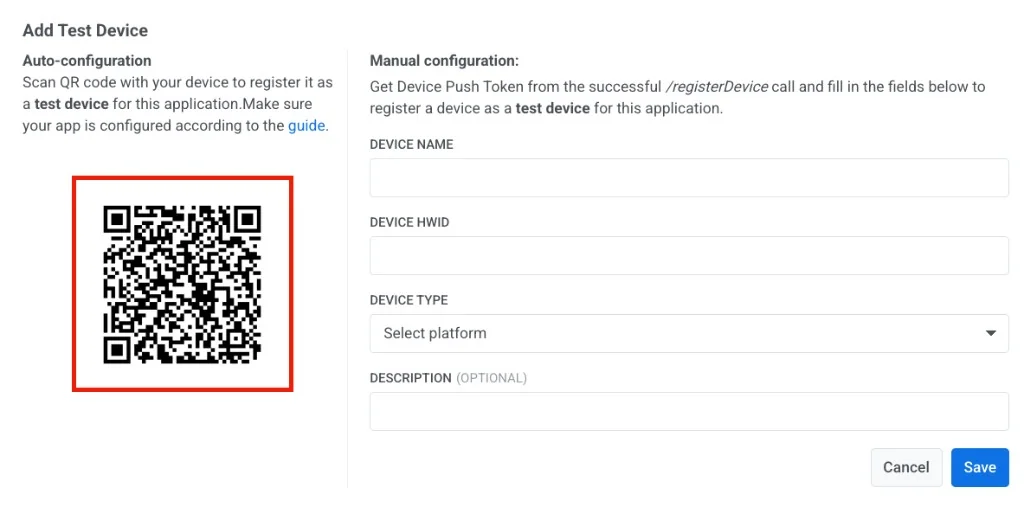
1. Open the **Test Devices** section and click **Create test device → Push**.
2. Scan the QR code from the popup with any QR scanner app. See the [QR code / deep link method](/developer/first-steps/test-your-integration/test-devices/#adding-test-devices-automatically) for details.
[Learn how to send a test push notification](/product/first-steps/start-with-your-project/test-your-integration/#how-to-preview-your-first-push-notification-on-a-test-device)
### Registering a test device from the app
Independently of the QR code method above, the Pushwoosh SDK can register the current device as a test device on its own: send the app to the background and bring it back to the foreground 6 times within 30 seconds. No scanning or manual entry is needed.
To prevent unintentional registrations, this only works while the 1-hour registration window is open.
1. Open the **Test Devices** section.
2. In the page header, turn on **Add test devices from the app**. This opens the registration window for 1 hour. A countdown next to the toggle shows how much time is left.
3. While the window is open, background and foreground the app 6 times within 30 seconds. The device appears in the **Test Devices** list.
When the hour ends, the window closes automatically and the toggle turns off. You can also close the window earlier by turning the toggle off yourself.
## Test email device
You can also register an email address as a test device to test your email campaigns before launch.
To add a test email device:
1. Go to **Settings → Test Devices** and click **Create test device → Email**
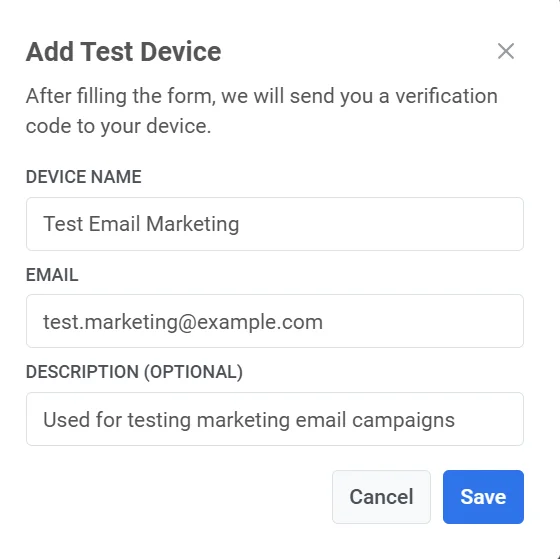
2. In the popup, fill in the required fields:
* **Device Name**: Enter a descriptive name for the test device (e.g., "Test Email - Marketing").
* **Email**: Enter the email address where test messages will be sent.
* **Description (Optional)**: Add any additional notes or details about the test device for reference.
3. Click **Save**.
4. After submitting the form, a verification code will be sent to the specified email address.
5. Enter the **verification code** you received into the **Verification Code** field shown in the dialog. Click **Verify** to confirm the device.
[Learn how to send a test email](/product/first-steps/start-with-your-project/test-your-integration#how-to-send-a-test-email)
## Test SMS device
You can register a test phone number to send and test SMS messages for formatting, delivery, and timing.
1. Go to **Settings → Test Devices** and click **Create test device → SMS**
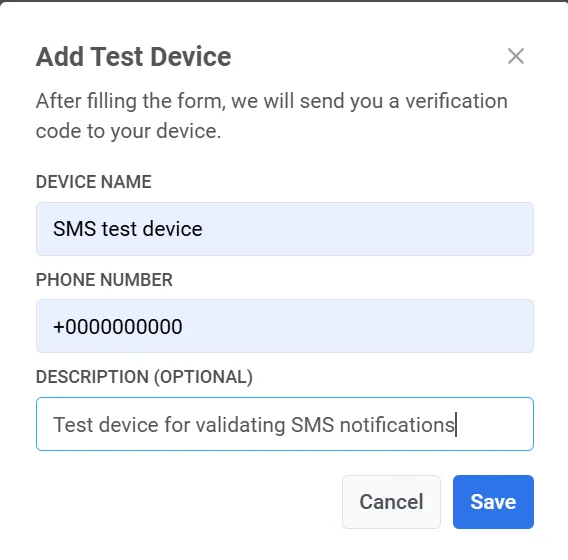
2. Fill in the form:
* **Device Name**: Enter a name to identify the test device (e.g., "Test SMS - QA Team").
* **Phone Number**: Enter the phone number where SMS test messages will be sent. Ensure the phone number is in the E.164 format (e.g., `+1234567890`).
* **Description (Optional)**: Provide additional information about the device, such as its purpose or assigned user (e.g., "For testing transactional SMS messages").
3. Click **Save** to submit the information.
4. A verification code will be sent to the phone number you entered.
5. Enter the code in the next step to confirm the device registration.
Once the device is verified, it will appear in the **Test Devices** list, ready for testing SMS campaigns.
 2. Click the **Create test device** dropdown button in the top-right corner.
3. Select the type of device you want to add:
* **Push**: Add a mobile or web push device.
* **Email**: Add an email address for testing email notifications.
* **SMS**: Add a phone number for testing SMS messages.
2. Click the **Create test device** dropdown button in the top-right corner.
3. Select the type of device you want to add:
* **Push**: Add a mobile or web push device.
* **Email**: Add an email address for testing email notifications.
* **SMS**: Add a phone number for testing SMS messages.
 ## Test push device
You can add a push test device in one of three ways:
* **QR code:** After a one-time setup in the app (deep links), anyone with the app installed can scan a QR code and register the device. [Learn more](#register-a-push-device-via-qr-code)
* **From the app:** The app registers the current device itself, without scanning or manual entry. [Learn more](#registering-a-test-device-from-the-app)
* **Manual:** Your developer gets the device Hardware ID (HWID) and enters it in **Create test device → Push**. Full steps are in the developer guide: [Adding test devices manually](/developer/first-steps/test-your-integration/test-devices/#adding-test-devices-manually).
### Register a push device via QR code
First, your developer needs to enable deep links for test devices in the app. This is a one-time setup, usually done when integrating the Pushwoosh SDK. See the [Implementation steps](/developer/first-steps/test-your-integration/test-devices/#implementation) for details.
After that, anyone with the app installed can register their device by scanning a QR code. No developer is needed for each new device, and this method doesn't depend on the registration window described below.
1. Open the **Test Devices** section and click **Create test device → Push**.
2. Scan the QR code from the popup with any QR scanner app. See the [QR code / deep link method](/developer/first-steps/test-your-integration/test-devices/#adding-test-devices-automatically) for details.
## Test push device
You can add a push test device in one of three ways:
* **QR code:** After a one-time setup in the app (deep links), anyone with the app installed can scan a QR code and register the device. [Learn more](#register-a-push-device-via-qr-code)
* **From the app:** The app registers the current device itself, without scanning or manual entry. [Learn more](#registering-a-test-device-from-the-app)
* **Manual:** Your developer gets the device Hardware ID (HWID) and enters it in **Create test device → Push**. Full steps are in the developer guide: [Adding test devices manually](/developer/first-steps/test-your-integration/test-devices/#adding-test-devices-manually).
### Register a push device via QR code
First, your developer needs to enable deep links for test devices in the app. This is a one-time setup, usually done when integrating the Pushwoosh SDK. See the [Implementation steps](/developer/first-steps/test-your-integration/test-devices/#implementation) for details.
After that, anyone with the app installed can register their device by scanning a QR code. No developer is needed for each new device, and this method doesn't depend on the registration window described below.
1. Open the **Test Devices** section and click **Create test device → Push**.
2. Scan the QR code from the popup with any QR scanner app. See the [QR code / deep link method](/developer/first-steps/test-your-integration/test-devices/#adding-test-devices-automatically) for details.
 [Learn how to send a test push notification](/product/first-steps/start-with-your-project/test-your-integration/#how-to-preview-your-first-push-notification-on-a-test-device)
### Registering a test device from the app
Independently of the QR code method above, the Pushwoosh SDK can register the current device as a test device on its own: send the app to the background and bring it back to the foreground 6 times within 30 seconds. No scanning or manual entry is needed.
To prevent unintentional registrations, this only works while the 1-hour registration window is open.
1. Open the **Test Devices** section.
2. In the page header, turn on **Add test devices from the app**. This opens the registration window for 1 hour. A countdown next to the toggle shows how much time is left.
[Learn how to send a test push notification](/product/first-steps/start-with-your-project/test-your-integration/#how-to-preview-your-first-push-notification-on-a-test-device)
### Registering a test device from the app
Independently of the QR code method above, the Pushwoosh SDK can register the current device as a test device on its own: send the app to the background and bring it back to the foreground 6 times within 30 seconds. No scanning or manual entry is needed.
To prevent unintentional registrations, this only works while the 1-hour registration window is open.
1. Open the **Test Devices** section.
2. In the page header, turn on **Add test devices from the app**. This opens the registration window for 1 hour. A countdown next to the toggle shows how much time is left.
 3. While the window is open, background and foreground the app 6 times within 30 seconds. The device appears in the **Test Devices** list.
When the hour ends, the window closes automatically and the toggle turns off. You can also close the window earlier by turning the toggle off yourself.
## Test email device
You can also register an email address as a test device to test your email campaigns before launch.
To add a test email device:
1. Go to **Settings → Test Devices** and click **Create test device → Email**
2. In the popup, fill in the required fields:
* **Device Name**: Enter a descriptive name for the test device (e.g., "Test Email - Marketing").
* **Email**: Enter the email address where test messages will be sent.
* **Description (Optional)**: Add any additional notes or details about the test device for reference.
3. While the window is open, background and foreground the app 6 times within 30 seconds. The device appears in the **Test Devices** list.
When the hour ends, the window closes automatically and the toggle turns off. You can also close the window earlier by turning the toggle off yourself.
## Test email device
You can also register an email address as a test device to test your email campaigns before launch.
To add a test email device:
1. Go to **Settings → Test Devices** and click **Create test device → Email**
2. In the popup, fill in the required fields:
* **Device Name**: Enter a descriptive name for the test device (e.g., "Test Email - Marketing").
* **Email**: Enter the email address where test messages will be sent.
* **Description (Optional)**: Add any additional notes or details about the test device for reference.
 3. Click **Save**.
4. After submitting the form, a verification code will be sent to the specified email address.
5. Enter the **verification code** you received into the **Verification Code** field shown in the dialog. Click **Verify** to confirm the device.
[Learn how to send a test email](/product/first-steps/start-with-your-project/test-your-integration#how-to-send-a-test-email)
## Test SMS device
You can register a test phone number to send and test SMS messages for formatting, delivery, and timing.
1. Go to **Settings → Test Devices** and click **Create test device → SMS**
2. Fill in the form:
* **Device Name**: Enter a name to identify the test device (e.g., "Test SMS - QA Team").
* **Phone Number**: Enter the phone number where SMS test messages will be sent. Ensure the phone number is in the E.164 format (e.g., `+1234567890`).
* **Description (Optional)**: Provide additional information about the device, such as its purpose or assigned user (e.g., "For testing transactional SMS messages").
3. Click **Save** to submit the information.
3. Click **Save**.
4. After submitting the form, a verification code will be sent to the specified email address.
5. Enter the **verification code** you received into the **Verification Code** field shown in the dialog. Click **Verify** to confirm the device.
[Learn how to send a test email](/product/first-steps/start-with-your-project/test-your-integration#how-to-send-a-test-email)
## Test SMS device
You can register a test phone number to send and test SMS messages for formatting, delivery, and timing.
1. Go to **Settings → Test Devices** and click **Create test device → SMS**
2. Fill in the form:
* **Device Name**: Enter a name to identify the test device (e.g., "Test SMS - QA Team").
* **Phone Number**: Enter the phone number where SMS test messages will be sent. Ensure the phone number is in the E.164 format (e.g., `+1234567890`).
* **Description (Optional)**: Provide additional information about the device, such as its purpose or assigned user (e.g., "For testing transactional SMS messages").
3. Click **Save** to submit the information.
 4. A verification code will be sent to the phone number you entered.
5. Enter the code in the next step to confirm the device registration.
Once the device is verified, it will appear in the **Test Devices** list, ready for testing SMS campaigns.
4. A verification code will be sent to the phone number you entered.
5. Enter the code in the next step to confirm the device registration.
Once the device is verified, it will appear in the **Test Devices** list, ready for testing SMS campaigns.