# Send a test communication
Pushwoosh provides several ways to send a test communication, most of which require platform configuration. However, you can still test Pushwoosh functionality even without a configured platform by using the **Test email** feature. This feature allows you to preview how your email content will appear in recipients' inboxes, ensuring everything looks perfect before finalizing your campaign.
## How to send a test email
Follow the steps below to send a test email:
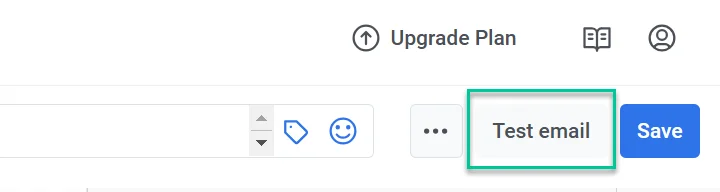
1. Navigate to the email content you wish to test and select the option to send a test email. If you prefer not to create new content, you can choose from the pre-designed email templates provided by Pushwoosh. In the email editor, click **Test Email** to proceed.
In the window that opens:
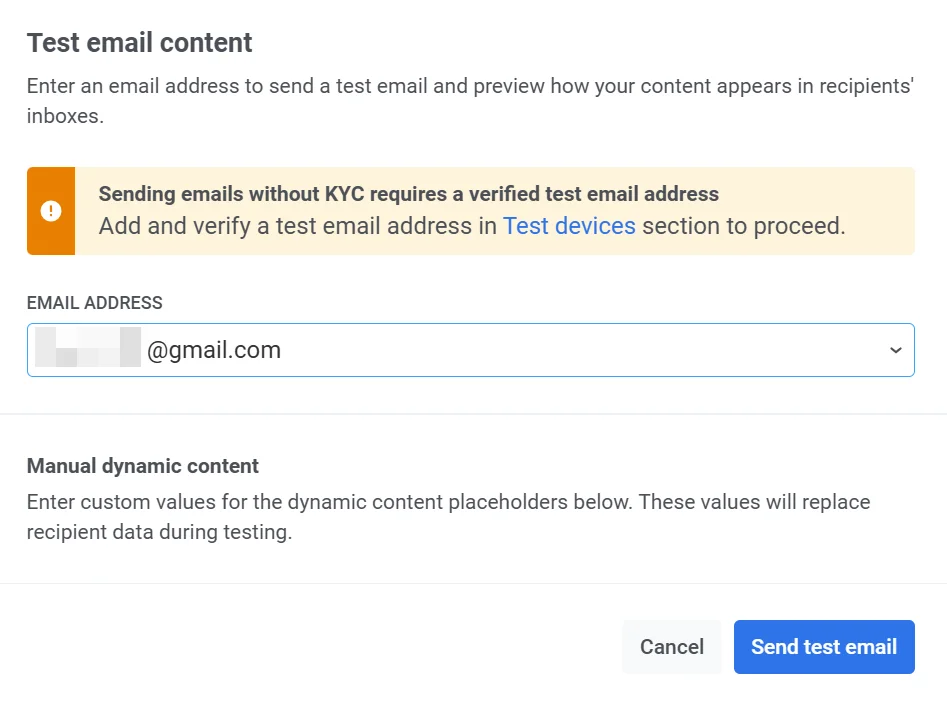
1. In the **Email address** field, enter the email address where you want to receive the test email.
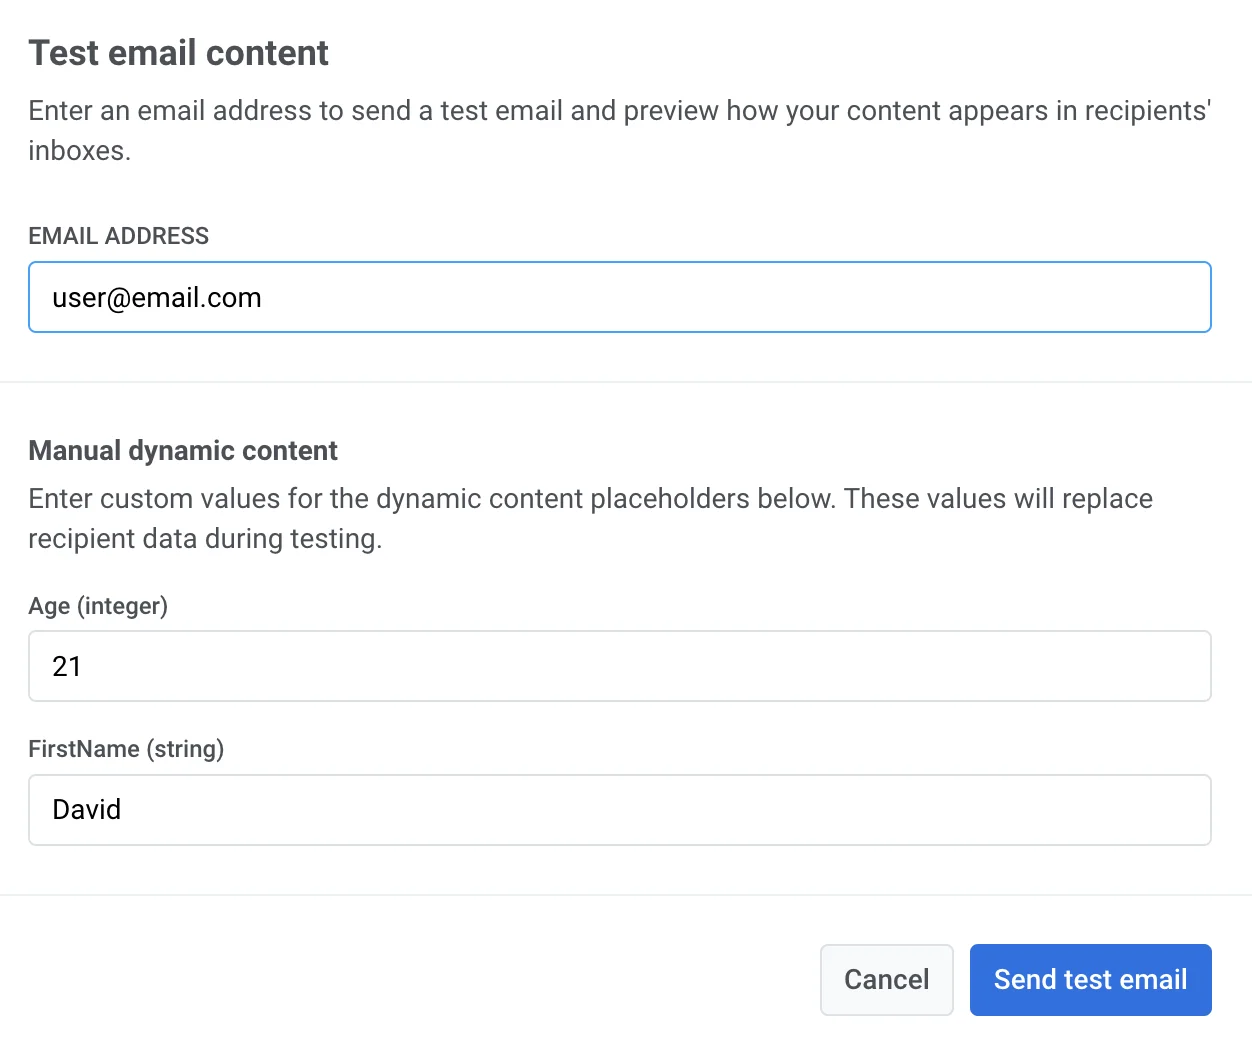
2. If your email contains dynamic content (placeholders for personalized data), add sample values for testing purposes.
For example:
* **Age (integer)**: Enter a number to represent the age placeholder (e.g., `21`).
* **FirstName (string)**: Enter a sample first name (e.g., `David`).
These values will replace actual recipient data in the test email, allowing you to verify how the dynamic content appears.
3. Once you've filled in the necessary details, click **Send test email** to send the test message to the provided email address.
## How to send a test email to a selected list of addresses
You can test email messages by sending them to a specific list of addresses. Follow these steps:
1. Make sure you've configured the email platform and [verified the email address and domain name](/product/first-steps/start-with-your-project/configure-platforms/email-verification/) from which you're going to send emails.
2. Prepare email content using [Drag & drop email editor](/product/content/email-content/drag-and-drop-email-editor) or [HTML code editor](/product/content/email-content/html-code-editor).
3. Go to **Campaigns → One-time messages** → **Email**.
4. Select email content you want to send. [Learn more](/product/messaging-channels/emails/sending-emails/send-one-time-emails/#select-or-create-email-content).
5. In the **Audience step**, select **Send to list of addresses**. Enter the email addresses you want to send your test communication to as a list, separated by commas. [Learn more](/product/messaging-channels/emails/sending-emails/send-one-time-emails/#send-to-list-of-addresses).
6. In the **Audit** step, run a pre-send deliverability and compliance check on your email. [Learn more](/product/messaging-channels/emails/sending-emails/send-one-time-emails/#audit-your-email).
7. In **Review**, check the preview and summaries for content, audience, and schedule. [Learn more](/product/messaging-channels/emails/sending-emails/send-one-time-emails/#review-and-edit-your-content).
8. Finish [setting up your email](/product/messaging-channels/emails/sending-emails/send-one-time-emails/#schedule-email) and launch it or schedule it.
## How to preview your first push notification on a test device
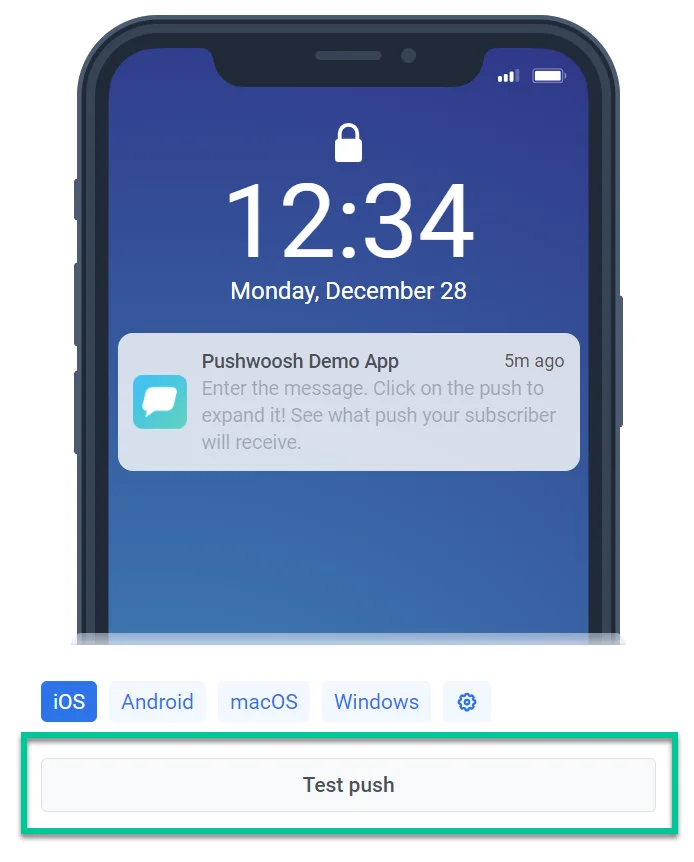
Push tests are intended to preview how push notifications look on a device before sending them to the app users. To test out your push notifications, first, register your device (with your app installed) as a Test Device.
Once test devices are configured, use the **Test push** button in the [Push Content](/product/content/push-presets) form.
## How to test a journey with a test segment
To accurately test a [journey](/product/customer-journey/pushwoosh-journey-overview/), you must first create a test Segment that includes users meeting specific conditions.
Steps to test a journey:
1. Create a **Segment** by either:
* Uploading a CSV file with the necessary conditions. [Learn more](/product/audience-data-and-segmentation/segmentation/create-segments/by-import)
* Asking your development team to assign a unique Tag value to your test devices by calling the [`/setTags`](/developer/api-reference/device-api#settags) API method. Then, [create a segment](/developer/api-reference/segmentation-filters-api/#createfilter) using this Tag value.
2. Navigate to **Campaigns → Create Campaign → Build a journey from scratch** or use one of the pre-built customer journey templates.
3. Add the [Audience-based entry element](/product/customer-journey/journey-elements/#audience-based-entry) to the canvas and select the **Segment** you created.
4. Add a message element such as [push](/product/customer-journey/journey-elements/#push), [SMS](/product/customer-journey/journey-elements/#sms), or [email](/product/customer-journey/journey-elements/#email).
5. Select content from previously created content or create custom content.
6. Configure the remaining journey elements as needed.
7. Click **Launch Campaign** to start the test.
 In the window that opens:
1. In the **Email address** field, enter the email address where you want to receive the test email.
In the window that opens:
1. In the **Email address** field, enter the email address where you want to receive the test email.
 2. If your email contains dynamic content (placeholders for personalized data), add sample values for testing purposes.
For example:
* **Age (integer)**: Enter a number to represent the age placeholder (e.g., `21`).
* **FirstName (string)**: Enter a sample first name (e.g., `David`).
These values will replace actual recipient data in the test email, allowing you to verify how the dynamic content appears.
3. Once you've filled in the necessary details, click **Send test email** to send the test message to the provided email address.
2. If your email contains dynamic content (placeholders for personalized data), add sample values for testing purposes.
For example:
* **Age (integer)**: Enter a number to represent the age placeholder (e.g., `21`).
* **FirstName (string)**: Enter a sample first name (e.g., `David`).
These values will replace actual recipient data in the test email, allowing you to verify how the dynamic content appears.
3. Once you've filled in the necessary details, click **Send test email** to send the test message to the provided email address.
 ## How to send a test email to a selected list of addresses
You can test email messages by sending them to a specific list of addresses. Follow these steps:
1. Make sure you've configured the email platform and [verified the email address and domain name](/product/first-steps/start-with-your-project/configure-platforms/email-verification/) from which you're going to send emails.
2. Prepare email content using [Drag & drop email editor](/product/content/email-content/drag-and-drop-email-editor) or [HTML code editor](/product/content/email-content/html-code-editor).
3. Go to **Campaigns → One-time messages** → **Email**.
4. Select email content you want to send. [Learn more](/product/messaging-channels/emails/sending-emails/send-one-time-emails/#select-or-create-email-content).
5. In the **Audience step**, select **Send to list of addresses**. Enter the email addresses you want to send your test communication to as a list, separated by commas. [Learn more](/product/messaging-channels/emails/sending-emails/send-one-time-emails/#send-to-list-of-addresses).
6. In the **Audit** step, run a pre-send deliverability and compliance check on your email. [Learn more](/product/messaging-channels/emails/sending-emails/send-one-time-emails/#audit-your-email).
7. In **Review**, check the preview and summaries for content, audience, and schedule. [Learn more](/product/messaging-channels/emails/sending-emails/send-one-time-emails/#review-and-edit-your-content).
8. Finish [setting up your email](/product/messaging-channels/emails/sending-emails/send-one-time-emails/#schedule-email) and launch it or schedule it.
## How to preview your first push notification on a test device
Push tests are intended to preview how push notifications look on a device before sending them to the app users. To test out your push notifications, first, register your device (with your app installed) as a Test Device.
Once test devices are configured, use the **Test push** button in the [Push Content](/product/content/push-presets) form.
## How to send a test email to a selected list of addresses
You can test email messages by sending them to a specific list of addresses. Follow these steps:
1. Make sure you've configured the email platform and [verified the email address and domain name](/product/first-steps/start-with-your-project/configure-platforms/email-verification/) from which you're going to send emails.
2. Prepare email content using [Drag & drop email editor](/product/content/email-content/drag-and-drop-email-editor) or [HTML code editor](/product/content/email-content/html-code-editor).
3. Go to **Campaigns → One-time messages** → **Email**.
4. Select email content you want to send. [Learn more](/product/messaging-channels/emails/sending-emails/send-one-time-emails/#select-or-create-email-content).
5. In the **Audience step**, select **Send to list of addresses**. Enter the email addresses you want to send your test communication to as a list, separated by commas. [Learn more](/product/messaging-channels/emails/sending-emails/send-one-time-emails/#send-to-list-of-addresses).
6. In the **Audit** step, run a pre-send deliverability and compliance check on your email. [Learn more](/product/messaging-channels/emails/sending-emails/send-one-time-emails/#audit-your-email).
7. In **Review**, check the preview and summaries for content, audience, and schedule. [Learn more](/product/messaging-channels/emails/sending-emails/send-one-time-emails/#review-and-edit-your-content).
8. Finish [setting up your email](/product/messaging-channels/emails/sending-emails/send-one-time-emails/#schedule-email) and launch it or schedule it.
## How to preview your first push notification on a test device
Push tests are intended to preview how push notifications look on a device before sending them to the app users. To test out your push notifications, first, register your device (with your app installed) as a Test Device.
Once test devices are configured, use the **Test push** button in the [Push Content](/product/content/push-presets) form.
 ## How to test a journey with a test segment
To accurately test a [journey](/product/customer-journey/pushwoosh-journey-overview/), you must first create a test Segment that includes users meeting specific conditions.
Steps to test a journey:
1. Create a **Segment** by either:
* Uploading a CSV file with the necessary conditions. [Learn more](/product/audience-data-and-segmentation/segmentation/create-segments/by-import)
* Asking your development team to assign a unique Tag value to your test devices by calling the [`/setTags`](/developer/api-reference/device-api#settags) API method. Then, [create a segment](/developer/api-reference/segmentation-filters-api/#createfilter) using this Tag value.
2. Navigate to **Campaigns → Create Campaign → Build a journey from scratch** or use one of the pre-built customer journey templates.
3. Add the [Audience-based entry element](/product/customer-journey/journey-elements/#audience-based-entry) to the canvas and select the **Segment** you created.
4. Add a message element such as [push](/product/customer-journey/journey-elements/#push), [SMS](/product/customer-journey/journey-elements/#sms), or [email](/product/customer-journey/journey-elements/#email).
5. Select content from previously created content or create custom content.
6. Configure the remaining journey elements as needed.
7. Click **Launch Campaign** to start the test.
## How to test a journey with a test segment
To accurately test a [journey](/product/customer-journey/pushwoosh-journey-overview/), you must first create a test Segment that includes users meeting specific conditions.
Steps to test a journey:
1. Create a **Segment** by either:
* Uploading a CSV file with the necessary conditions. [Learn more](/product/audience-data-and-segmentation/segmentation/create-segments/by-import)
* Asking your development team to assign a unique Tag value to your test devices by calling the [`/setTags`](/developer/api-reference/device-api#settags) API method. Then, [create a segment](/developer/api-reference/segmentation-filters-api/#createfilter) using this Tag value.
2. Navigate to **Campaigns → Create Campaign → Build a journey from scratch** or use one of the pre-built customer journey templates.
3. Add the [Audience-based entry element](/product/customer-journey/journey-elements/#audience-based-entry) to the canvas and select the **Segment** you created.
4. Add a message element such as [push](/product/customer-journey/journey-elements/#push), [SMS](/product/customer-journey/journey-elements/#sms), or [email](/product/customer-journey/journey-elements/#email).
5. Select content from previously created content or create custom content.
6. Configure the remaining journey elements as needed.
7. Click **Launch Campaign** to start the test.