# Email platform configuration
To start sending emails through Pushwoosh, you need to complete setup steps. These steps verify your account, configure sender details, and authenticate your domain. This process ensures secure, compliant email delivery and enables accurate tracking of engagement metrics.
## Verify your account
The first step is to verify your account. This is essential to ensure the reliable and secure delivery of your emails. Verification helps prevent platform misuse for spam or malicious activities and ensures compliance with regulations.
Follow these steps to complete the verification process:
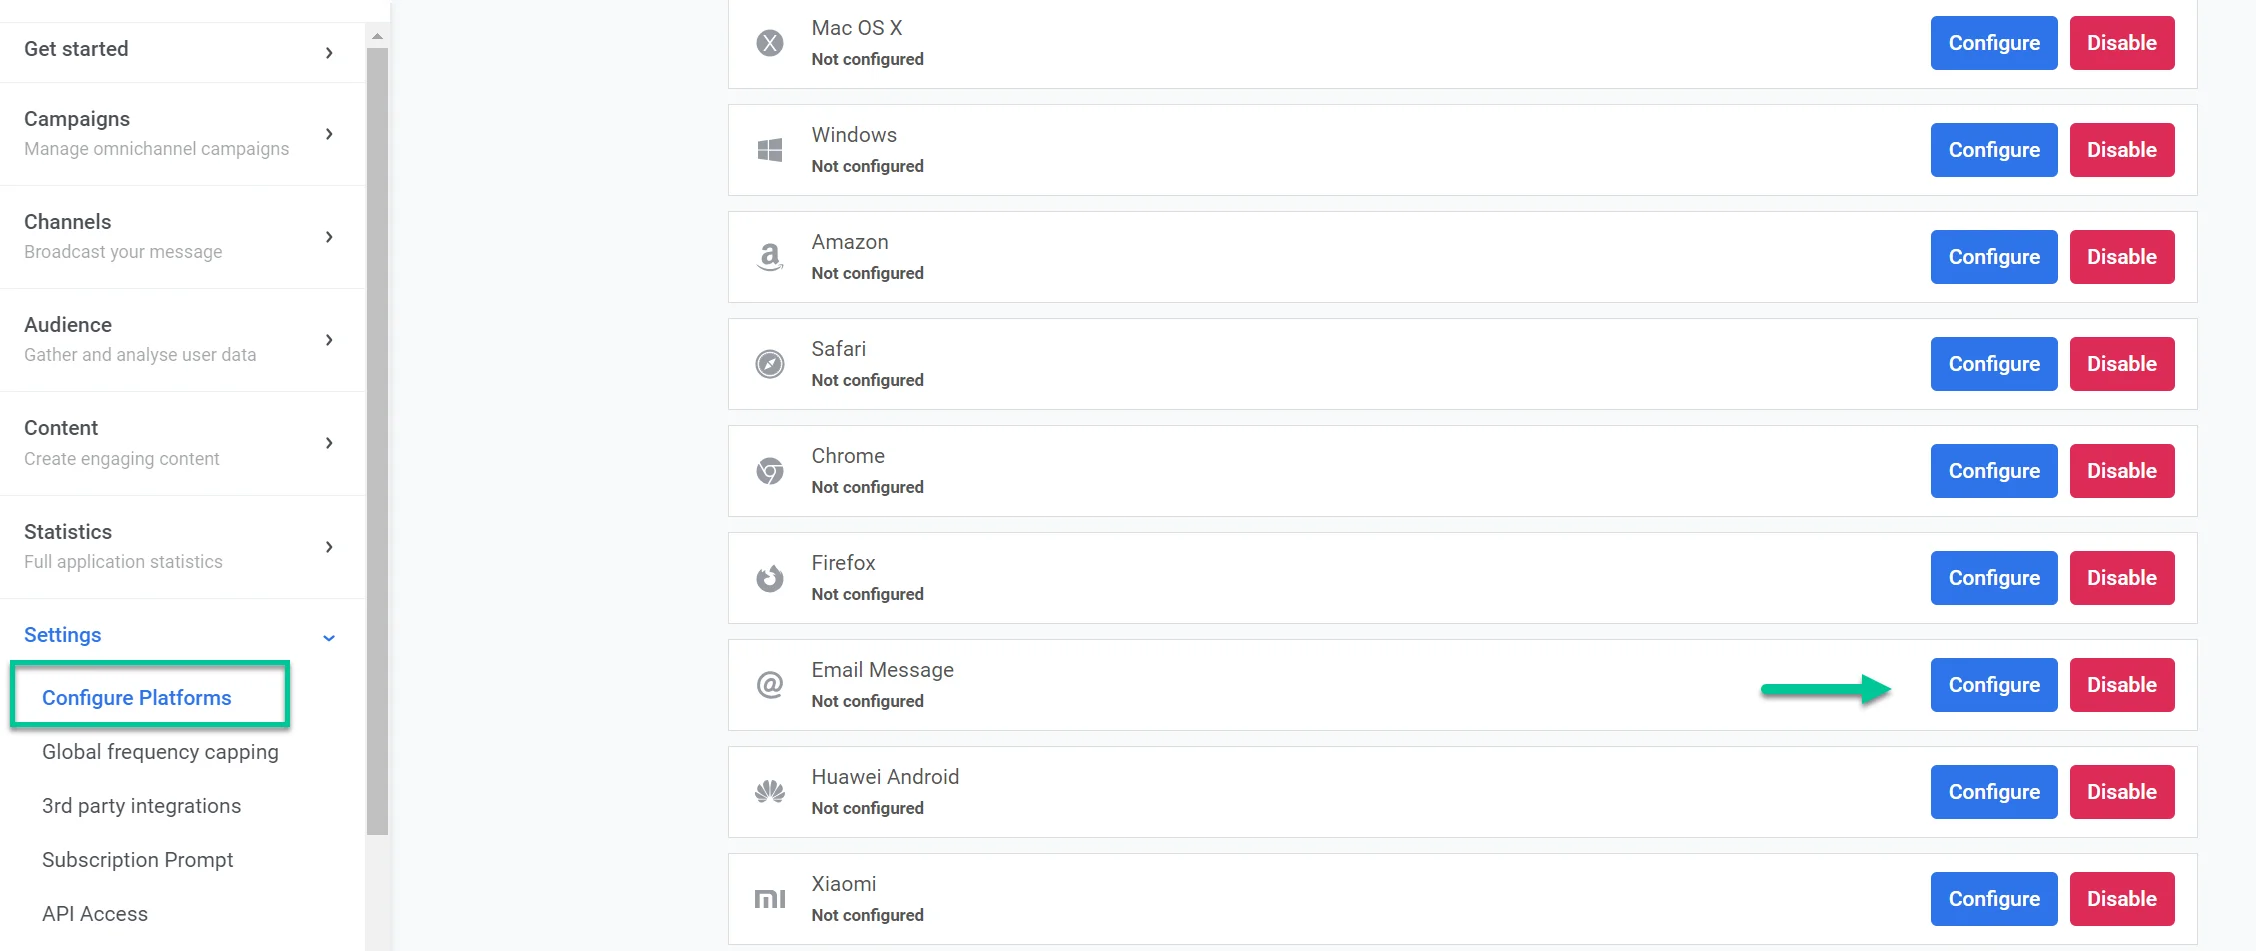
1. Navigate to **Settings > Configure platforms**.
2. Locate **Email message** and click **Configure**.
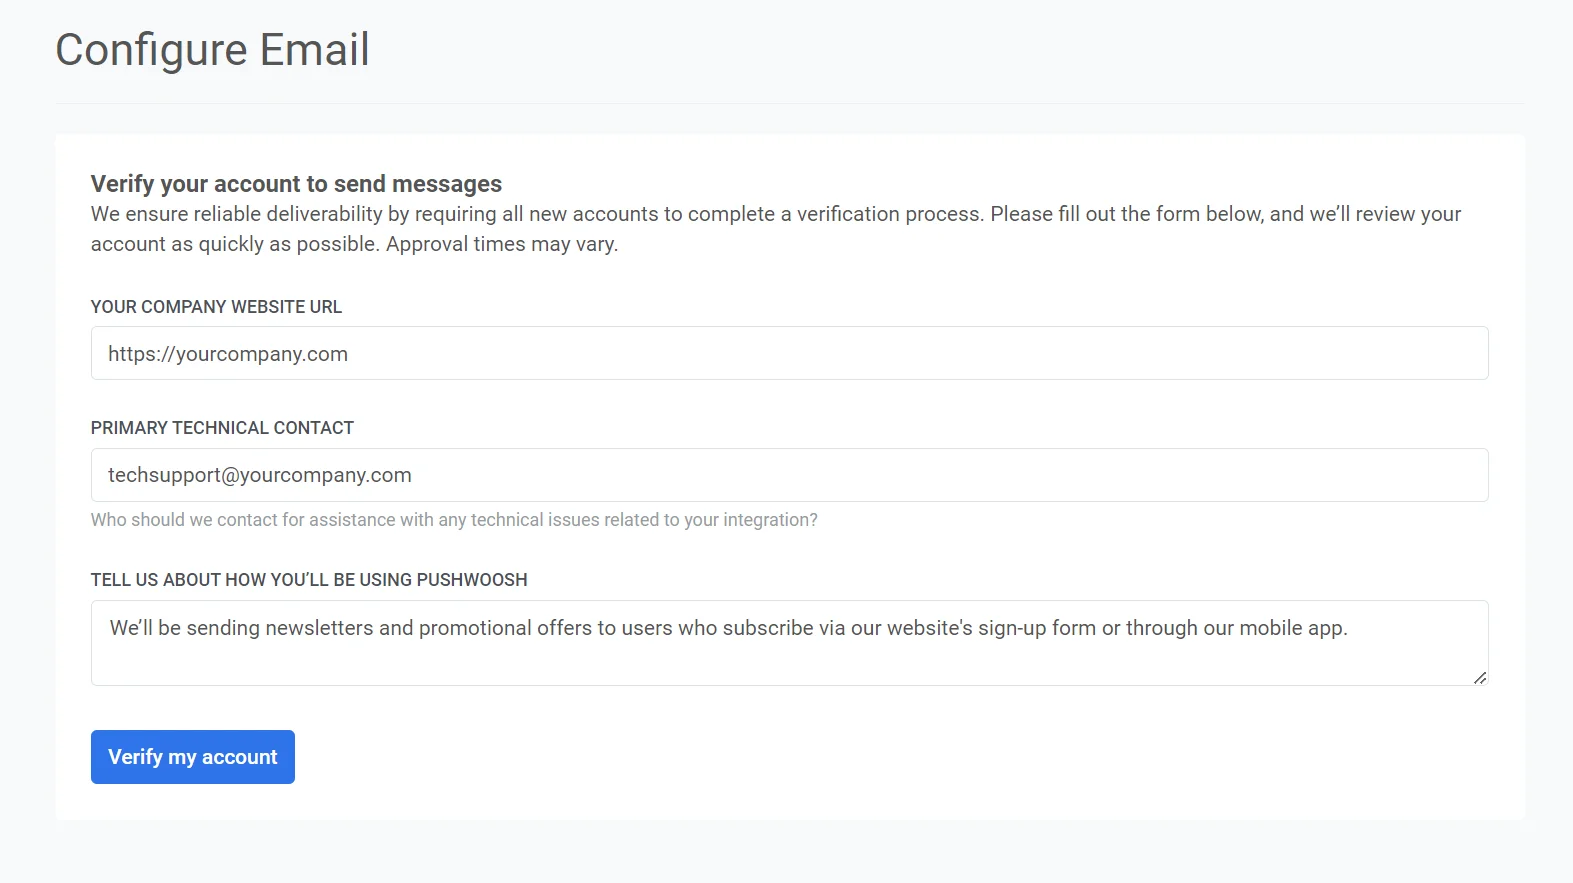
3. In the form that appears, provide the URL of your company's website in the **Your company website URL field** (e.g., https://example.com).
4. In the **Primary technical contact** field, enter the email address of the person who manages the technical aspects of your integration. This contact will be used for technical inquiries or issues.
5. In the **Tell us about how you’ll be using Pushwoosh** field, provide details on how you intend to use Pushwoosh for your email campaigns. Include information such as:
- The types of messages you plan to send (e.g., newsletters, promotional offers, etc).
- How your subscribers sign up to receive these messages (e.g., website form, mobile app registration).
After filling out all the information, click **Verify my account** to submit your request. Pushwoosh will review your details and respond as soon as possible.
After your account is verified, you will receive a confirmation email. You can then proceed to configure your email sender settings.
For this:
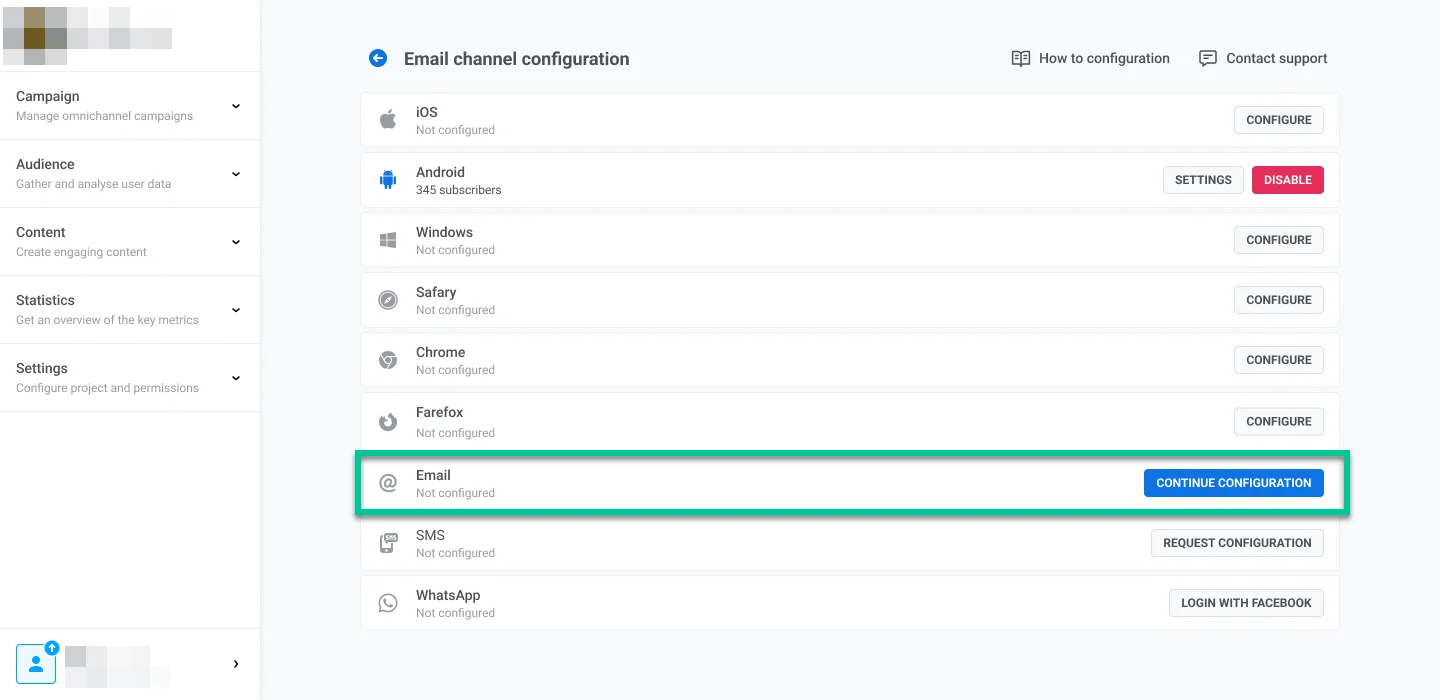
1. Go to **Settings**.
2. Select **Configure platforms**.
3. Click **Continue configuration** next to the email platform.
## Configure sender details
### Add a domain
To send emails with Pushwoosh, add and verify a domain.
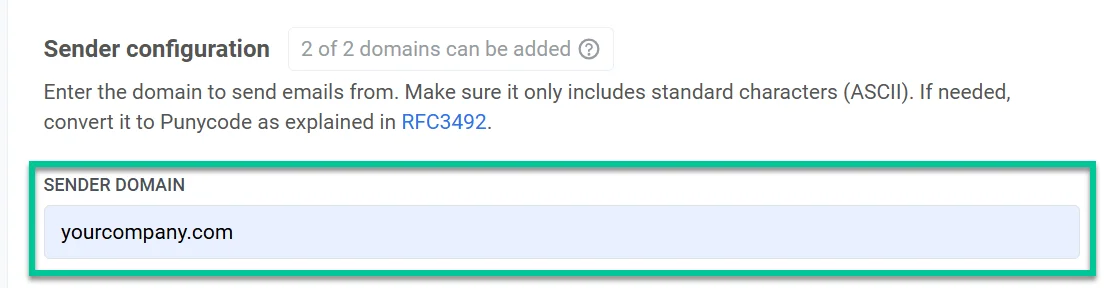
In the **Domain** field, enter the domain you wish to use for sending emails (e.g., yourcompany.com). This domain must be verified via DNS in the next step before it can be used in your email campaigns.
### Add default sender details
##### From address
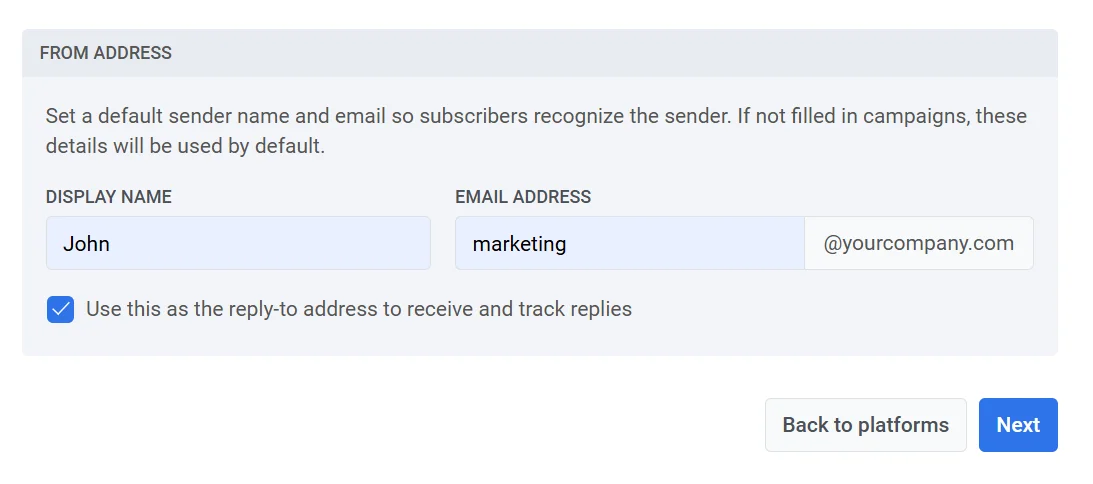
Set up a default sender name and email address that will appear in recipients' inboxes. This helps users recognize the sender and builds trust.
* **Name**: Enter the sender's name (e.g., John).
* **Email**: Enter the sender's email address before the "@" symbol. For example, for *marketing@yourcompany.com*, enter *marketing*.
Select **Use this as reply-to address to track replies** checkbox if you want replies from recipients to go directly to the sender’s email address.
##### Reply to address
To use a different reply-to address, leave the checkbox unchecked, and specify:
* **Reply-To name**: The name that will appear as the contact for replies.
* **Reply-To email**: The email address where replies should be sent.
If both fields are left blank, replies will be sent to the default sender’s email specified in the **From address** section.
After completing the required fields, click **Next** to proceed with domain verification.
## Configure DNS records
To authenticate your domain and enable email sending for your campaigns, configure the following DNS records in your hosting provider's DNS settings:
* **DKIM (Required)**. This record digitally signs your emails, allowing email providers to verify that an email originates from your domain and has not been altered in transit.
* **SPF (Required)**: This record specifies which mail servers are permitted to send emails on behalf of your domain, helping to prevent spoofing.
* **DMARC (Required)**: This record provides instructions for handling unauthenticated emails and reporting back to you, enhancing email security.
### DKIM records (required)
What are DKIM Records?
DKIM (DomainKeys Identified Mail) is an email authentication method that lets receiving servers verify that an email was sent by the stated domain and has not been altered in transit.
By adding DKIM records to your DNS settings, you apply a cryptographic signature to outgoing emails. This signature verifies that the message’s content remains unchanged and authenticates it as a legitimate message from your domain.
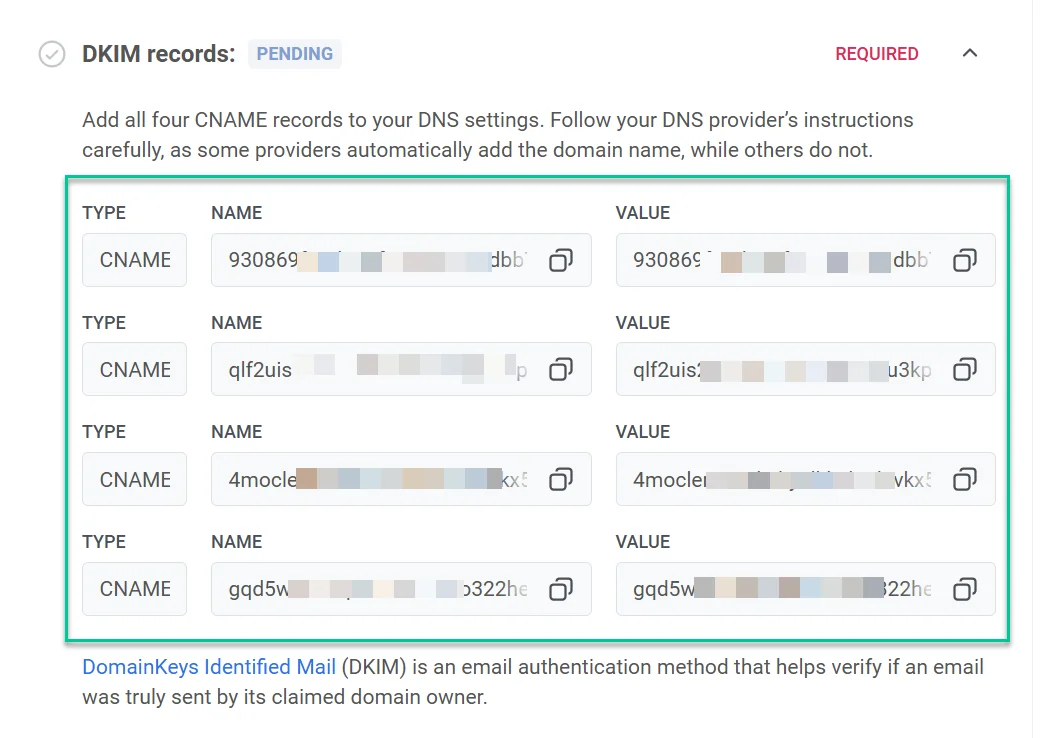
Copy the CNAME records and add them to your DNS settings.
To set up DKIM, you'll need to add **all four CNAME (Canonical Name) records** to your DNS settings. These records are essential for authenticating your domain and confirming that emails sent from your domain are authorized.
Once you’ve added the required DNS records, the domain verification process usually takes about 5 to 10 minutes, but it can take up to 24 hours in some cases. During this time, you won’t be able to send emails through Pushwoosh until the verification is complete. In the meantime, you can continue with other setup steps and return later to check the verification status.
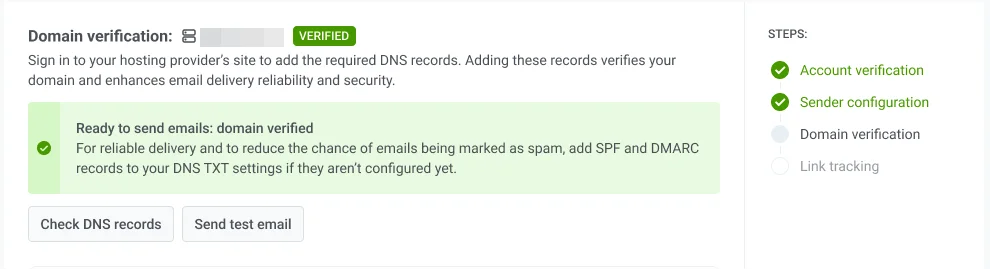
Click **Check DNS Records** to refresh the verification status after adding the DNS records. Once verification is successful, the Domain verification status will change to **Verified**.
#### Send a test email
Once your domain configuration and DKIM verification are complete, you can send a test email to ensure your email settings are functioning correctly and that emails will be successfully delivered to users once your campaign goes live.
To send a test email:
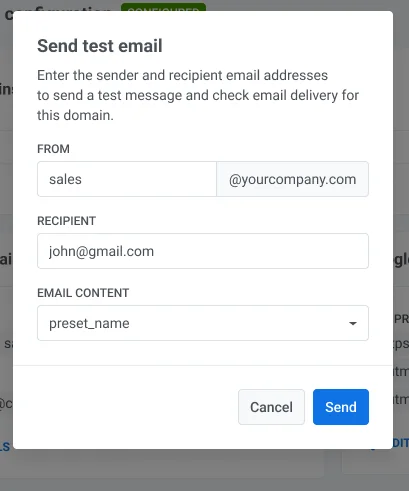
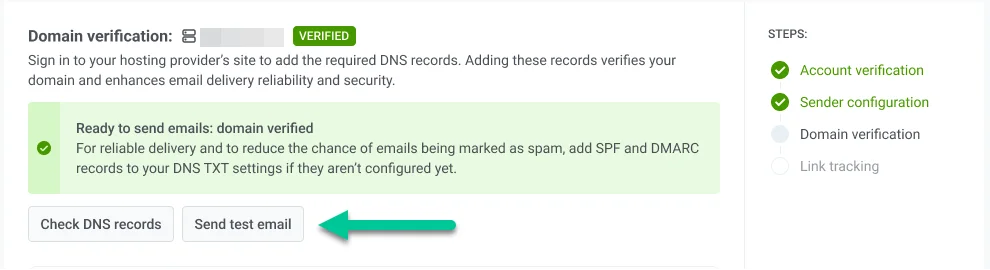
1. In the **Email Channel Configuration** section, click **Send test email**.
2. In the form that opens, enter Sender and Recipient details:
* **From**: The sender's email address you configured.
* **Recipient**: Enter the email address where you want to send the test email. By default, this field is pre-filled with the email of the logged-in user, but you can change it if needed.
3. Select the email content from the dropdown to include in the test email.
4. Click **Send**.
### SPF records (required)
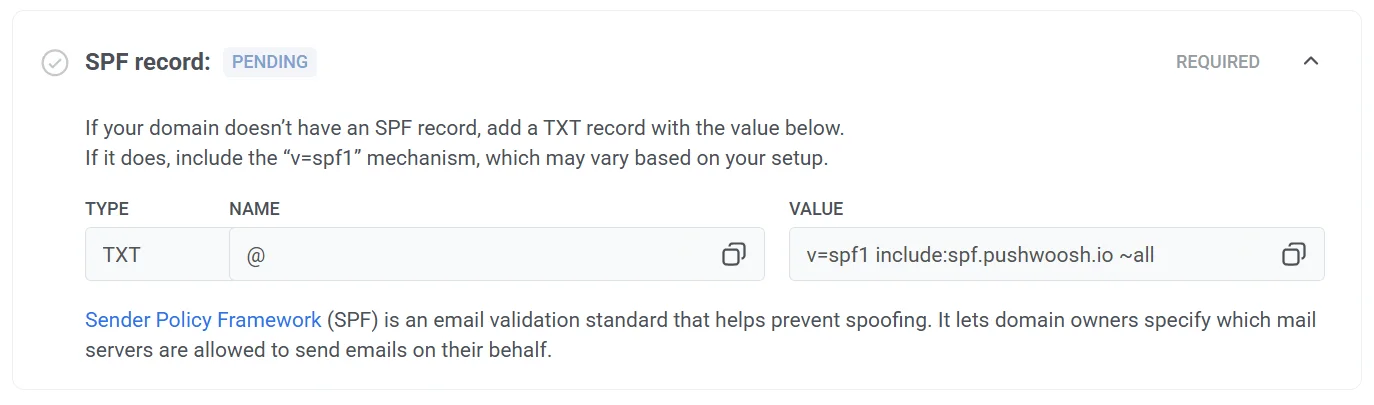
Pushwoosh requires setting up a **Sender Policy Framework (SPF) record** to authorize its mail servers to send emails on behalf of your domain. SPF is an email authentication protocol that helps prevent spoofing and improves email deliverability.
#### Adding a new SPF record
If your domain does not have an SPF record, add a new TXT record with the following value.
**SPF Value**
```
"v=spf1 include:spf.pushwoosh.io ~all"
```
Depending on your DNS provider, the name of the record may be either blank or set as @.
#### Adding to an existing SPF record
If your domain already has an SPF record, simply add the following SPF mechanism to your existing record to authorize Pushwoosh.
```
include:spf.pushwoosh.io
```
### DMARC verification (required)
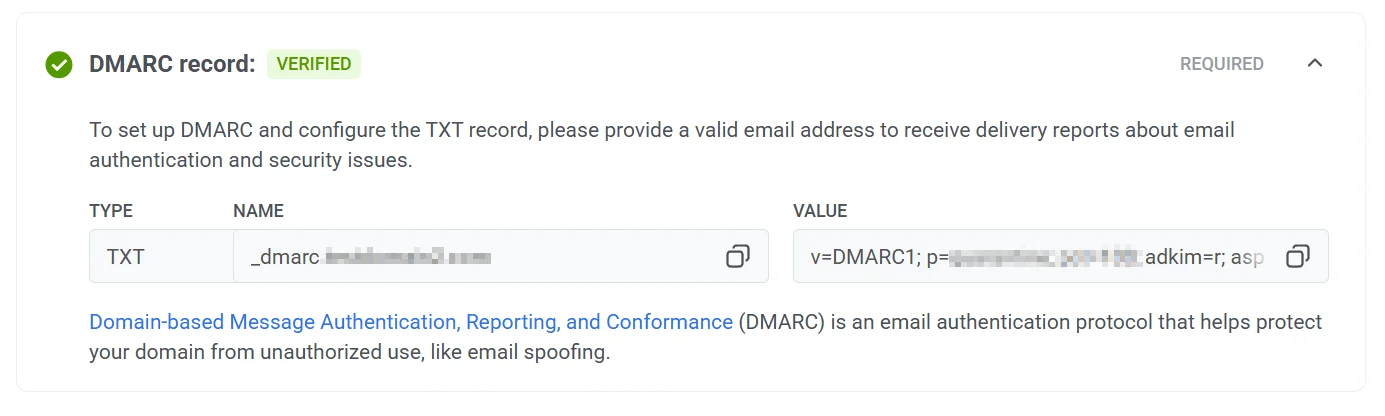
**DMARC** (Domain-based Message Authentication, Reporting, and Conformance) is an email authentication protocol. It helps protect your domain from unauthorized use, such as email spoofing.
Pushwoosh requires DMARC to be configured on your domain to ensure secure and authenticated email delivery. For more information on DMARC, see the [DMARC Protocol Documentation](https://dmarc.org/overview/).
To configure DMARC:
1. Copy the DMARC TXT record
2. Go to your DNS provider's settings and add the DMARC record to the DNS settings. Please, refer to your DNS provider’s documentation if you need help adding these records.
3. Enable reporting (optional). To receive reports on email authentication and security issues, add an email address in the
`rua` field within the **Value** parameter.
### Choosing a different domain
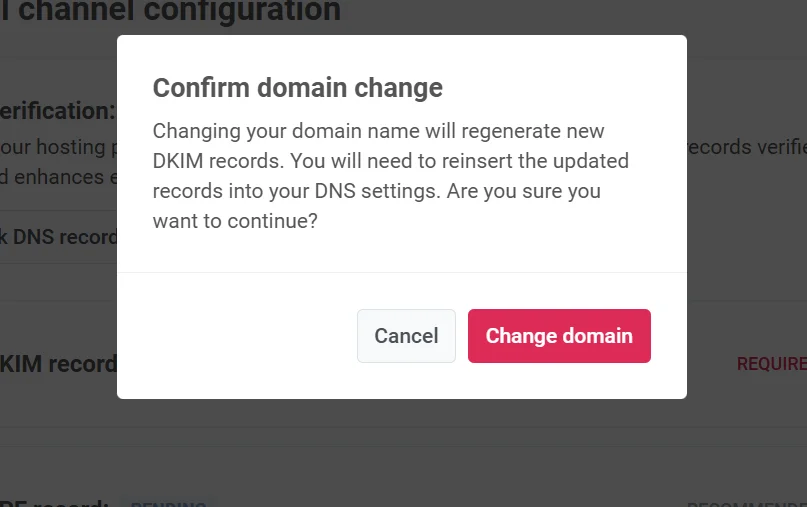
If you realize that you need to change your domain at this step, click **Choose different domain**. Then, you can add a new sender domain.
Keep in mind that changing your domain name will generate new DNS records. This ensures that the domain limit is tracked correctly and excludes any domains you no longer need.
## Configure link tracking
Link tracking helps you understand how your audience interacts with links in your emails by adding **UTM parameters**. With UTM tags, you can track email engagement directly in Google Analytics or any other analytics system that tracks UTM.
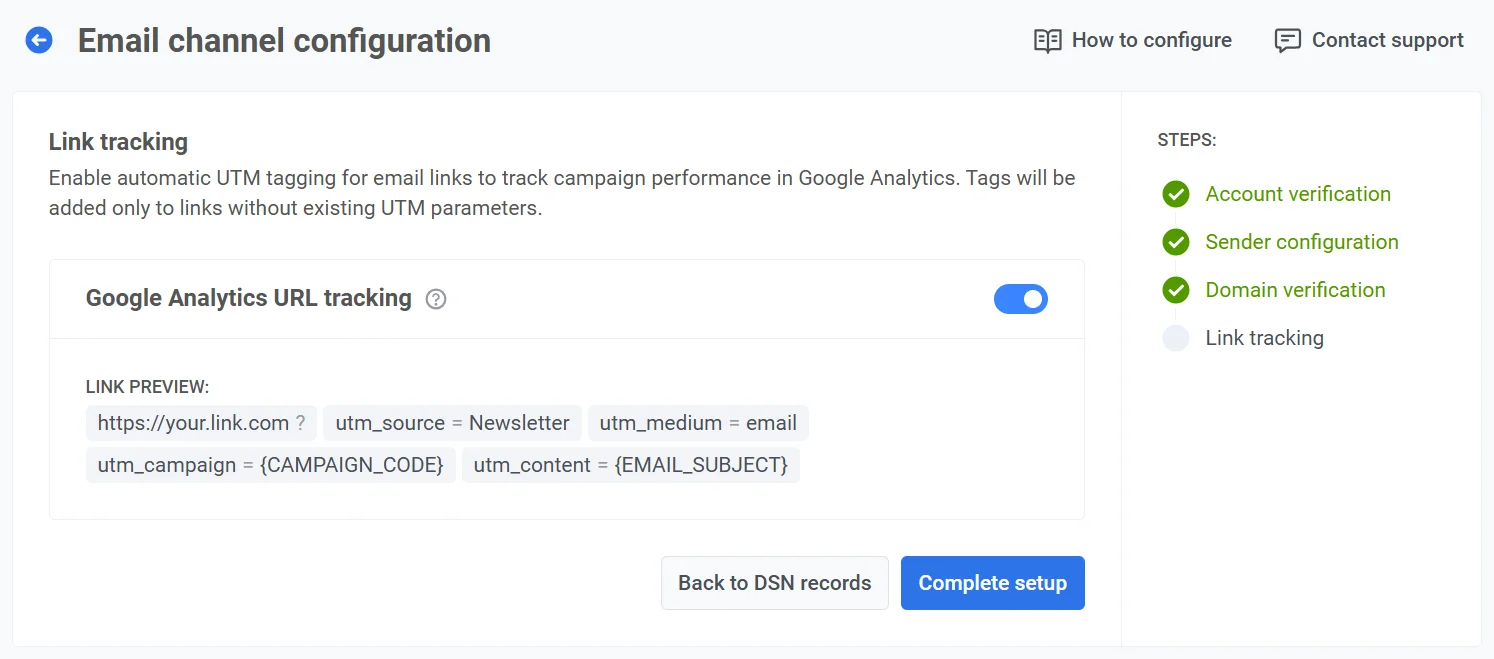
To enable link tracking, turn on the **Google Analytics URL tracking** toggle.
The following UTM parameters will be added to your links:
- **utm_source**: Identifies the traffic source.
- **utm_medium**: Specifies the marketing medium, which is set to "email" by default.
- **utm_campaign**: Adds the campaign code (e.g., campaign ID). This is inserted automatically.
- **utm_content**: Tracks the specific content within the email, such as the subject. This is inserted automatically.
The **Link Preview** shows an example of how your links will look with the selected UTM parameters.
3. Once you've configured the UTM parameters, click **Complete setup** to save your settings.
The UTM tags will be added automatically to every link in your email, allowing you to track the source, medium, campaign, and content performance directly in Google Analytics.
## Review and manage your email channel settings
Once your email channel is configured, the **Email channel configuration** dashboard provides an overview and allows you to manage key settings for sending emails, including sender domains, default sender details, and link tracking options.
### Configuration status
At the top, you can view the email platform status, which indicates whether it is configured. If the platform is not configured, it may be due to the following reasons:
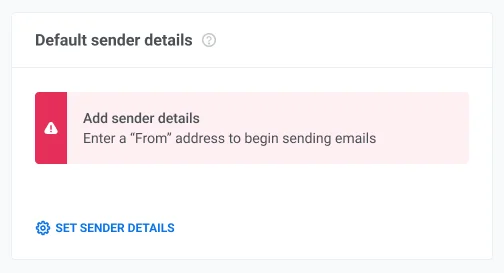
* **Default sender details** have not been specified. [Learn more about default sender details](/product/first-steps/start-with-your-project/configure-platforms/email-verification#add-default-sender-details).
* An **unverified domain** is set as the default sender. [Learn more about verifying your domain](/product/first-steps/start-with-your-project/configure-platforms/email-verification#configure-dns-records).
### Your sender domains
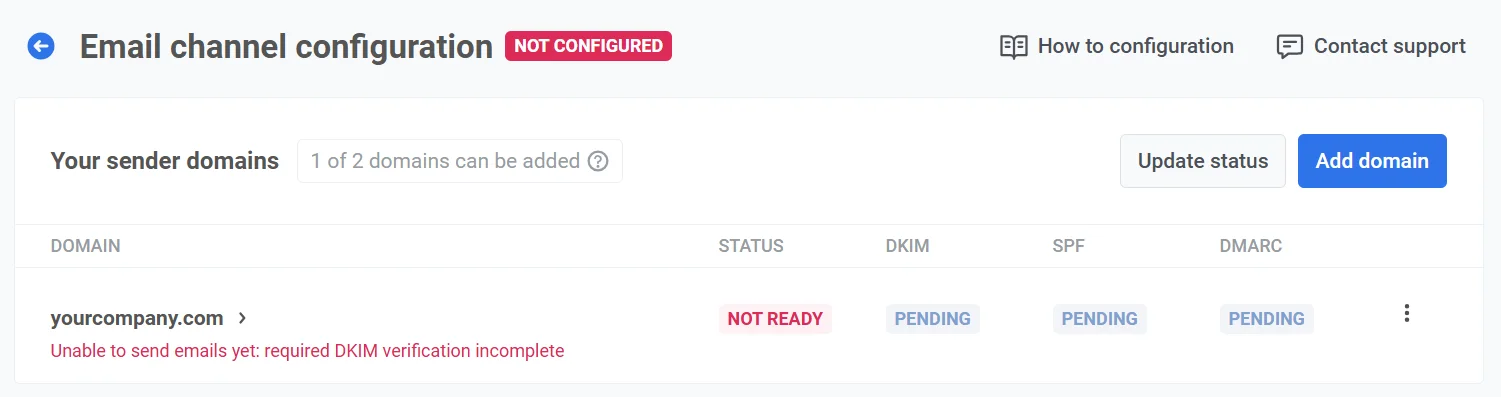
In the **Your sender domains** section, you can view and manage the domains you use for sending emails and the status of each domain:
* **READY**: The domain is configured and ready to send emails.
* **NOT READY**: The domain verification is incomplete, typically due to pending [DKIM verification](/product/first-steps/start-with-your-project/configure-platforms/email-verification/#dkim-records-required), which is required. Domains marked as **NOT READY** cannot send emails until all necessary verifications are completed. To complete the configuration, click on the domain name in the list.
Additionally, this section displays the status of each verification record (DKIM, SPF, DMARC) as **Verified** or **Pending**. **Pending** indicates that the record is either awaiting verification or has not yet been configured.
Click **Update status** to refresh the verification status for each domain.
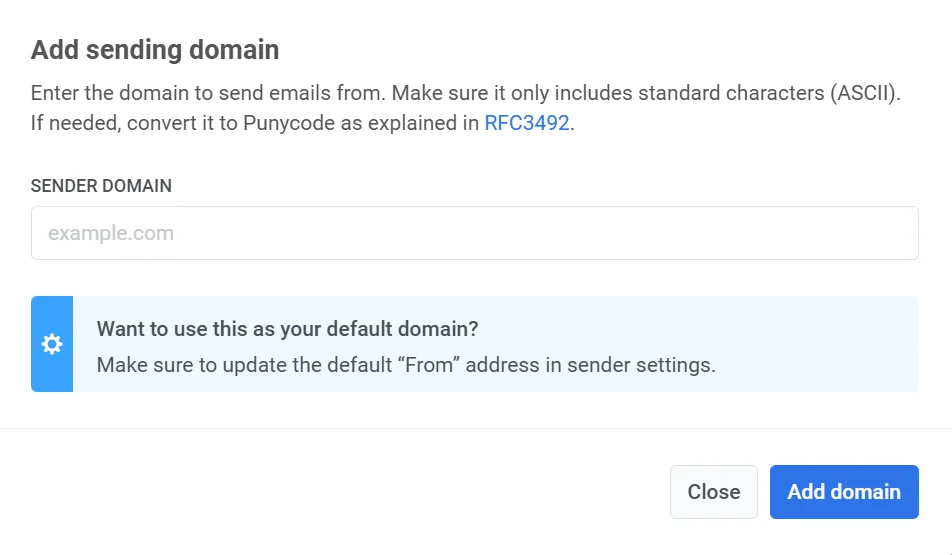
##### Adding a domain
To add additional domains, click **Add domain**. To increase this limit, please [contact support](https://help.pushwoosh.com/hc/en-us/requests/new).
##### Deleting a domain
To delete a domain:
1. In **Your Sender Domains**, locate the domain to delete.
2. Click the **three-dot menu** next to the domain name and select **Delete domain**.
3. Confirm deletion, or click **Cancel** to retain the domain.
**Note**: If a domain is set as the default ["From" address](/product/first-steps/start-with-your-project/configure-platforms/email-verification/#from-address) in any project, you cannot delete it until the sender information is updated in those projects. An error message will appear, along with a list of projects using this domain as the default sender. Update the "From" address in each project to a different verified domain, then try deleting the domain again.
##### Sending a test email
From the list of domains, you can also send a test email.
To do this, click the three-dot menu next to the configured domain and select **Send Test Email**. Note that this option is only available for domains that have been fully configured.
### Default sender details
In this section, you can view and manage the default sender details, including:
* **From Address**: The name and email address that will appear as the sender in emails.
* **Reply-To Address**: The default name and email for replies.
To make changes, click **Edit default sender details**.
### Google Analytics URL tracking
In this section, you can manage [**Link Tracking**](/product/first-steps/start-with-your-project/configure-platforms/email-verification/#configure-link-tracking) settings. To enable tracking, switch the toggle to **Enable**.
When enabled, UTM parameters are automatically added to email links, allowing you to track user engagement in Google Analytics. You’ll also see a **Link Preview** displaying how your URLs will appear with UTM tags.
## Configuring emails via Pushwoosh API
You can also set up the email platform using the Pushwoosh API. For this, you'll need assistance from your development team. Please share [this guide](/developer/api-reference/app-configuration#configureapplication-for-email) with them for detailed instructions.
## Set up the subscription preference center
Once the email platform is configured (domains verified and default sender details set), you can set up the [subscription preference center](/product/messaging-channels/emails/email-preferences/) so users can choose which email categories they receive.
## Set up a custom tracking domain
The **Click Tracking Domain (CTD)** is the domain part of a tracked link URL shown in an email message. It combines a subdomain with your main domain, for example, `click.yourdomain.com`. The subdomain is created in your domain's DNS settings with your domain provider, usually by adding a CNAME record. With a CTD, you can wrap email links for click tracking on your own subdomain and keep deliverability and deep links working as expected.
To set up a custom tracking domain:
1. Decide which subdomain you will use as your CTD (for example, `click.yourdomain.com`).
2. In Pushwoosh, open **Settings**, then select **Configure Platforms**.
3. On the **Email channel configuration** page, scroll to **Custom tracking domain** and select **Enable**.
4. Enter your CTD in the **Domain** field and select **Next**.
5. Outside Pushwoosh, open the service where you manage public DNS for the domain of your CTD (typically your domain registrar, a DNS host, or your hosting account). In its DNS or zone editor for that domain, add the **CNAME** Pushwoosh shows on this step so your CTD points to `api.pushwoosh.com`.
6. In Pushwoosh, select **Verify**.
7. When verification succeeds, select **Save**.
8. If you need to change the **Domain** or DNS record, select **Back** and adjust the earlier steps.
9. After you click **Save**, your CTD appears in the **Custom tracking domain** list in **Email channel configuration**.
To disable it later, select `...` next to your CTD, then select **Disable custom tracking domain**.
 3. In the form that appears, provide the URL of your company's website in the **Your company website URL field** (e.g., https://example.com).
 4. In the **Primary technical contact** field, enter the email address of the person who manages the technical aspects of your integration. This contact will be used for technical inquiries or issues.
5. In the **Tell us about how you’ll be using Pushwoosh** field, provide details on how you intend to use Pushwoosh for your email campaigns. Include information such as:
- The types of messages you plan to send (e.g., newsletters, promotional offers, etc).
- How your subscribers sign up to receive these messages (e.g., website form, mobile app registration).
After filling out all the information, click **Verify my account** to submit your request. Pushwoosh will review your details and respond as soon as possible.
After your account is verified, you will receive a confirmation email. You can then proceed to configure your email sender settings.
For this:
1. Go to **Settings**.
2. Select **Configure platforms**.
3. Click **Continue configuration** next to the email platform.
4. In the **Primary technical contact** field, enter the email address of the person who manages the technical aspects of your integration. This contact will be used for technical inquiries or issues.
5. In the **Tell us about how you’ll be using Pushwoosh** field, provide details on how you intend to use Pushwoosh for your email campaigns. Include information such as:
- The types of messages you plan to send (e.g., newsletters, promotional offers, etc).
- How your subscribers sign up to receive these messages (e.g., website form, mobile app registration).
After filling out all the information, click **Verify my account** to submit your request. Pushwoosh will review your details and respond as soon as possible.
After your account is verified, you will receive a confirmation email. You can then proceed to configure your email sender settings.
For this:
1. Go to **Settings**.
2. Select **Configure platforms**.
3. Click **Continue configuration** next to the email platform.
 ## Configure sender details
### Add a domain
To send emails with Pushwoosh, add and verify a domain.
In the **Domain** field, enter the domain you wish to use for sending emails (e.g., yourcompany.com). This domain must be verified via DNS in the next step before it can be used in your email campaigns.
## Configure sender details
### Add a domain
To send emails with Pushwoosh, add and verify a domain.
In the **Domain** field, enter the domain you wish to use for sending emails (e.g., yourcompany.com). This domain must be verified via DNS in the next step before it can be used in your email campaigns.
 ### Add default sender details
##### From address
Set up a default sender name and email address that will appear in recipients' inboxes. This helps users recognize the sender and builds trust.
* **Name**: Enter the sender's name (e.g., John).
* **Email**: Enter the sender's email address before the "@" symbol. For example, for *marketing@yourcompany.com*, enter *marketing*.
### Add default sender details
##### From address
Set up a default sender name and email address that will appear in recipients' inboxes. This helps users recognize the sender and builds trust.
* **Name**: Enter the sender's name (e.g., John).
* **Email**: Enter the sender's email address before the "@" symbol. For example, for *marketing@yourcompany.com*, enter *marketing*.
 Select **Use this as reply-to address to track replies** checkbox if you want replies from recipients to go directly to the sender’s email address.
##### Reply to address
To use a different reply-to address, leave the checkbox unchecked, and specify:
* **Reply-To name**: The name that will appear as the contact for replies.
* **Reply-To email**: The email address where replies should be sent.
Select **Use this as reply-to address to track replies** checkbox if you want replies from recipients to go directly to the sender’s email address.
##### Reply to address
To use a different reply-to address, leave the checkbox unchecked, and specify:
* **Reply-To name**: The name that will appear as the contact for replies.
* **Reply-To email**: The email address where replies should be sent.
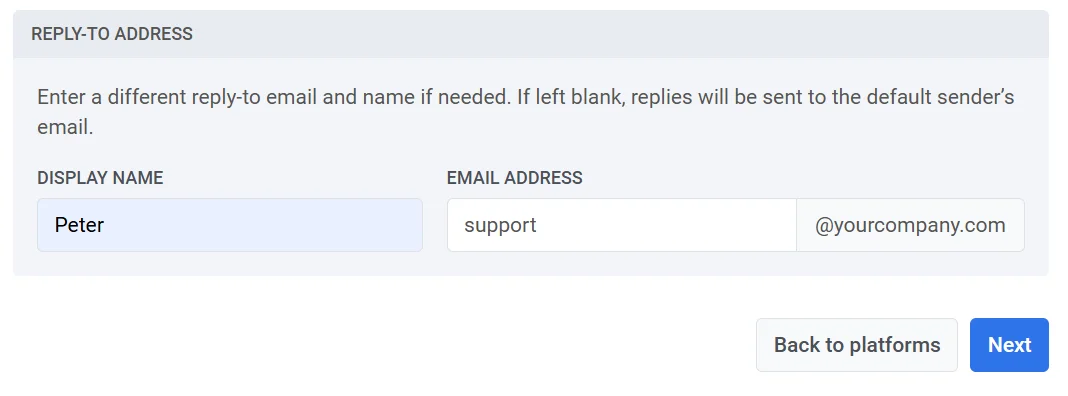 If both fields are left blank, replies will be sent to the default sender’s email specified in the **From address** section.
After completing the required fields, click **Next** to proceed with domain verification.
## Configure DNS records
To authenticate your domain and enable email sending for your campaigns, configure the following DNS records in your hosting provider's DNS settings:
* **DKIM (Required)**. This record digitally signs your emails, allowing email providers to verify that an email originates from your domain and has not been altered in transit.
* **SPF (Required)**: This record specifies which mail servers are permitted to send emails on behalf of your domain, helping to prevent spoofing.
* **DMARC (Required)**: This record provides instructions for handling unauthenticated emails and reporting back to you, enhancing email security.
### DKIM records (required)
If both fields are left blank, replies will be sent to the default sender’s email specified in the **From address** section.
After completing the required fields, click **Next** to proceed with domain verification.
## Configure DNS records
To authenticate your domain and enable email sending for your campaigns, configure the following DNS records in your hosting provider's DNS settings:
* **DKIM (Required)**. This record digitally signs your emails, allowing email providers to verify that an email originates from your domain and has not been altered in transit.
* **SPF (Required)**: This record specifies which mail servers are permitted to send emails on behalf of your domain, helping to prevent spoofing.
* **DMARC (Required)**: This record provides instructions for handling unauthenticated emails and reporting back to you, enhancing email security.
### DKIM records (required)
 Once you’ve added the required DNS records, the domain verification process usually takes about 5 to 10 minutes, but it can take up to 24 hours in some cases. During this time, you won’t be able to send emails through Pushwoosh until the verification is complete. In the meantime, you can continue with other setup steps and return later to check the verification status.
Click **Check DNS Records** to refresh the verification status after adding the DNS records. Once verification is successful, the Domain verification status will change to **Verified**.
Once you’ve added the required DNS records, the domain verification process usually takes about 5 to 10 minutes, but it can take up to 24 hours in some cases. During this time, you won’t be able to send emails through Pushwoosh until the verification is complete. In the meantime, you can continue with other setup steps and return later to check the verification status.
Click **Check DNS Records** to refresh the verification status after adding the DNS records. Once verification is successful, the Domain verification status will change to **Verified**.
 #### Send a test email
Once your domain configuration and DKIM verification are complete, you can send a test email to ensure your email settings are functioning correctly and that emails will be successfully delivered to users once your campaign goes live.
To send a test email:
1. In the **Email Channel Configuration** section, click **Send test email**.
#### Send a test email
Once your domain configuration and DKIM verification are complete, you can send a test email to ensure your email settings are functioning correctly and that emails will be successfully delivered to users once your campaign goes live.
To send a test email:
1. In the **Email Channel Configuration** section, click **Send test email**.
 2. In the form that opens, enter Sender and Recipient details:
* **From**: The sender's email address you configured.
* **Recipient**: Enter the email address where you want to send the test email. By default, this field is pre-filled with the email of the logged-in user, but you can change it if needed.
3. Select the email content from the dropdown to include in the test email.
4. Click **Send**.
2. In the form that opens, enter Sender and Recipient details:
* **From**: The sender's email address you configured.
* **Recipient**: Enter the email address where you want to send the test email. By default, this field is pre-filled with the email of the logged-in user, but you can change it if needed.
3. Select the email content from the dropdown to include in the test email.
4. Click **Send**.
 ### DMARC verification (required)
**DMARC** (Domain-based Message Authentication, Reporting, and Conformance) is an email authentication protocol. It helps protect your domain from unauthorized use, such as email spoofing.
Pushwoosh requires DMARC to be configured on your domain to ensure secure and authenticated email delivery. For more information on DMARC, see the [DMARC Protocol Documentation](https://dmarc.org/overview/).
To configure DMARC:
1. Copy the DMARC TXT record
### DMARC verification (required)
**DMARC** (Domain-based Message Authentication, Reporting, and Conformance) is an email authentication protocol. It helps protect your domain from unauthorized use, such as email spoofing.
Pushwoosh requires DMARC to be configured on your domain to ensure secure and authenticated email delivery. For more information on DMARC, see the [DMARC Protocol Documentation](https://dmarc.org/overview/).
To configure DMARC:
1. Copy the DMARC TXT record
 2. Go to your DNS provider's settings and add the DMARC record to the DNS settings. Please, refer to your DNS provider’s documentation if you need help adding these records.
3. Enable reporting (optional). To receive reports on email authentication and security issues, add an email address in the
`rua` field within the **Value** parameter.
### Choosing a different domain
If you realize that you need to change your domain at this step, click **Choose different domain**. Then, you can add a new sender domain.
Keep in mind that changing your domain name will generate new DNS records. This ensures that the domain limit is tracked correctly and excludes any domains you no longer need.
2. Go to your DNS provider's settings and add the DMARC record to the DNS settings. Please, refer to your DNS provider’s documentation if you need help adding these records.
3. Enable reporting (optional). To receive reports on email authentication and security issues, add an email address in the
`rua` field within the **Value** parameter.
### Choosing a different domain
If you realize that you need to change your domain at this step, click **Choose different domain**. Then, you can add a new sender domain.
Keep in mind that changing your domain name will generate new DNS records. This ensures that the domain limit is tracked correctly and excludes any domains you no longer need.
 ## Configure link tracking
Link tracking helps you understand how your audience interacts with links in your emails by adding **UTM parameters**. With UTM tags, you can track email engagement directly in Google Analytics or any other analytics system that tracks UTM.
To enable link tracking, turn on the **Google Analytics URL tracking** toggle.
The following UTM parameters will be added to your links:
- **utm_source**: Identifies the traffic source.
- **utm_medium**: Specifies the marketing medium, which is set to "email" by default.
- **utm_campaign**: Adds the campaign code (e.g., campaign ID). This is inserted automatically.
- **utm_content**: Tracks the specific content within the email, such as the subject. This is inserted automatically.
The **Link Preview** shows an example of how your links will look with the selected UTM parameters.
## Configure link tracking
Link tracking helps you understand how your audience interacts with links in your emails by adding **UTM parameters**. With UTM tags, you can track email engagement directly in Google Analytics or any other analytics system that tracks UTM.
To enable link tracking, turn on the **Google Analytics URL tracking** toggle.
The following UTM parameters will be added to your links:
- **utm_source**: Identifies the traffic source.
- **utm_medium**: Specifies the marketing medium, which is set to "email" by default.
- **utm_campaign**: Adds the campaign code (e.g., campaign ID). This is inserted automatically.
- **utm_content**: Tracks the specific content within the email, such as the subject. This is inserted automatically.
The **Link Preview** shows an example of how your links will look with the selected UTM parameters.
 3. Once you've configured the UTM parameters, click **Complete setup** to save your settings.
The UTM tags will be added automatically to every link in your email, allowing you to track the source, medium, campaign, and content performance directly in Google Analytics.
## Review and manage your email channel settings
Once your email channel is configured, the **Email channel configuration** dashboard provides an overview and allows you to manage key settings for sending emails, including sender domains, default sender details, and link tracking options.
### Configuration status
At the top, you can view the email platform status, which indicates whether it is configured. If the platform is not configured, it may be due to the following reasons:
* **Default sender details** have not been specified. [Learn more about default sender details](/product/first-steps/start-with-your-project/configure-platforms/email-verification#add-default-sender-details).
3. Once you've configured the UTM parameters, click **Complete setup** to save your settings.
The UTM tags will be added automatically to every link in your email, allowing you to track the source, medium, campaign, and content performance directly in Google Analytics.
## Review and manage your email channel settings
Once your email channel is configured, the **Email channel configuration** dashboard provides an overview and allows you to manage key settings for sending emails, including sender domains, default sender details, and link tracking options.
### Configuration status
At the top, you can view the email platform status, which indicates whether it is configured. If the platform is not configured, it may be due to the following reasons:
* **Default sender details** have not been specified. [Learn more about default sender details](/product/first-steps/start-with-your-project/configure-platforms/email-verification#add-default-sender-details).
 ### Your sender domains
In the **Your sender domains** section, you can view and manage the domains you use for sending emails and the status of each domain:
* **READY**: The domain is configured and ready to send emails.
* **NOT READY**: The domain verification is incomplete, typically due to pending [DKIM verification](/product/first-steps/start-with-your-project/configure-platforms/email-verification/#dkim-records-required), which is required. Domains marked as **NOT READY** cannot send emails until all necessary verifications are completed. To complete the configuration, click on the domain name in the list.
Additionally, this section displays the status of each verification record (DKIM, SPF, DMARC) as **Verified** or **Pending**. **Pending** indicates that the record is either awaiting verification or has not yet been configured.
Click **Update status** to refresh the verification status for each domain.
##### Adding a domain
To add additional domains, click **Add domain**. To increase this limit, please [contact support](https://help.pushwoosh.com/hc/en-us/requests/new).
### Your sender domains
In the **Your sender domains** section, you can view and manage the domains you use for sending emails and the status of each domain:
* **READY**: The domain is configured and ready to send emails.
* **NOT READY**: The domain verification is incomplete, typically due to pending [DKIM verification](/product/first-steps/start-with-your-project/configure-platforms/email-verification/#dkim-records-required), which is required. Domains marked as **NOT READY** cannot send emails until all necessary verifications are completed. To complete the configuration, click on the domain name in the list.
Additionally, this section displays the status of each verification record (DKIM, SPF, DMARC) as **Verified** or **Pending**. **Pending** indicates that the record is either awaiting verification or has not yet been configured.
Click **Update status** to refresh the verification status for each domain.
##### Adding a domain
To add additional domains, click **Add domain**. To increase this limit, please [contact support](https://help.pushwoosh.com/hc/en-us/requests/new).
 ##### Deleting a domain
To delete a domain:
1. In **Your Sender Domains**, locate the domain to delete.
2. Click the **three-dot menu** next to the domain name and select **Delete domain**.
3. Confirm deletion, or click **Cancel** to retain the domain.
**Note**: If a domain is set as the default ["From" address](/product/first-steps/start-with-your-project/configure-platforms/email-verification/#from-address) in any project, you cannot delete it until the sender information is updated in those projects. An error message will appear, along with a list of projects using this domain as the default sender. Update the "From" address in each project to a different verified domain, then try deleting the domain again.
##### Sending a test email
From the list of domains, you can also send a test email.
To do this, click the three-dot menu next to the configured domain and select **Send Test Email**. Note that this option is only available for domains that have been fully configured.
### Default sender details
In this section, you can view and manage the default sender details, including:
* **From Address**: The name and email address that will appear as the sender in emails.
* **Reply-To Address**: The default name and email for replies.
To make changes, click **Edit default sender details**.
### Google Analytics URL tracking
In this section, you can manage [**Link Tracking**](/product/first-steps/start-with-your-project/configure-platforms/email-verification/#configure-link-tracking) settings. To enable tracking, switch the toggle to **Enable**.
When enabled, UTM parameters are automatically added to email links, allowing you to track user engagement in Google Analytics. You’ll also see a **Link Preview** displaying how your URLs will appear with UTM tags.
## Configuring emails via Pushwoosh API
You can also set up the email platform using the Pushwoosh API. For this, you'll need assistance from your development team. Please share [this guide](/developer/api-reference/app-configuration#configureapplication-for-email) with them for detailed instructions.
## Set up the subscription preference center
Once the email platform is configured (domains verified and default sender details set), you can set up the [subscription preference center](/product/messaging-channels/emails/email-preferences/) so users can choose which email categories they receive.
## Set up a custom tracking domain
The **Click Tracking Domain (CTD)** is the domain part of a tracked link URL shown in an email message. It combines a subdomain with your main domain, for example, `click.yourdomain.com`. The subdomain is created in your domain's DNS settings with your domain provider, usually by adding a CNAME record. With a CTD, you can wrap email links for click tracking on your own subdomain and keep deliverability and deep links working as expected.
To set up a custom tracking domain:
1. Decide which subdomain you will use as your CTD (for example, `click.yourdomain.com`).
2. In Pushwoosh, open **Settings**, then select **Configure Platforms**.
3. On the **Email channel configuration** page, scroll to **Custom tracking domain** and select **Enable**.
##### Deleting a domain
To delete a domain:
1. In **Your Sender Domains**, locate the domain to delete.
2. Click the **three-dot menu** next to the domain name and select **Delete domain**.
3. Confirm deletion, or click **Cancel** to retain the domain.
**Note**: If a domain is set as the default ["From" address](/product/first-steps/start-with-your-project/configure-platforms/email-verification/#from-address) in any project, you cannot delete it until the sender information is updated in those projects. An error message will appear, along with a list of projects using this domain as the default sender. Update the "From" address in each project to a different verified domain, then try deleting the domain again.
##### Sending a test email
From the list of domains, you can also send a test email.
To do this, click the three-dot menu next to the configured domain and select **Send Test Email**. Note that this option is only available for domains that have been fully configured.
### Default sender details
In this section, you can view and manage the default sender details, including:
* **From Address**: The name and email address that will appear as the sender in emails.
* **Reply-To Address**: The default name and email for replies.
To make changes, click **Edit default sender details**.
### Google Analytics URL tracking
In this section, you can manage [**Link Tracking**](/product/first-steps/start-with-your-project/configure-platforms/email-verification/#configure-link-tracking) settings. To enable tracking, switch the toggle to **Enable**.
When enabled, UTM parameters are automatically added to email links, allowing you to track user engagement in Google Analytics. You’ll also see a **Link Preview** displaying how your URLs will appear with UTM tags.
## Configuring emails via Pushwoosh API
You can also set up the email platform using the Pushwoosh API. For this, you'll need assistance from your development team. Please share [this guide](/developer/api-reference/app-configuration#configureapplication-for-email) with them for detailed instructions.
## Set up the subscription preference center
Once the email platform is configured (domains verified and default sender details set), you can set up the [subscription preference center](/product/messaging-channels/emails/email-preferences/) so users can choose which email categories they receive.
## Set up a custom tracking domain
The **Click Tracking Domain (CTD)** is the domain part of a tracked link URL shown in an email message. It combines a subdomain with your main domain, for example, `click.yourdomain.com`. The subdomain is created in your domain's DNS settings with your domain provider, usually by adding a CNAME record. With a CTD, you can wrap email links for click tracking on your own subdomain and keep deliverability and deep links working as expected.
To set up a custom tracking domain:
1. Decide which subdomain you will use as your CTD (for example, `click.yourdomain.com`).
2. In Pushwoosh, open **Settings**, then select **Configure Platforms**.
3. On the **Email channel configuration** page, scroll to **Custom tracking domain** and select **Enable**.
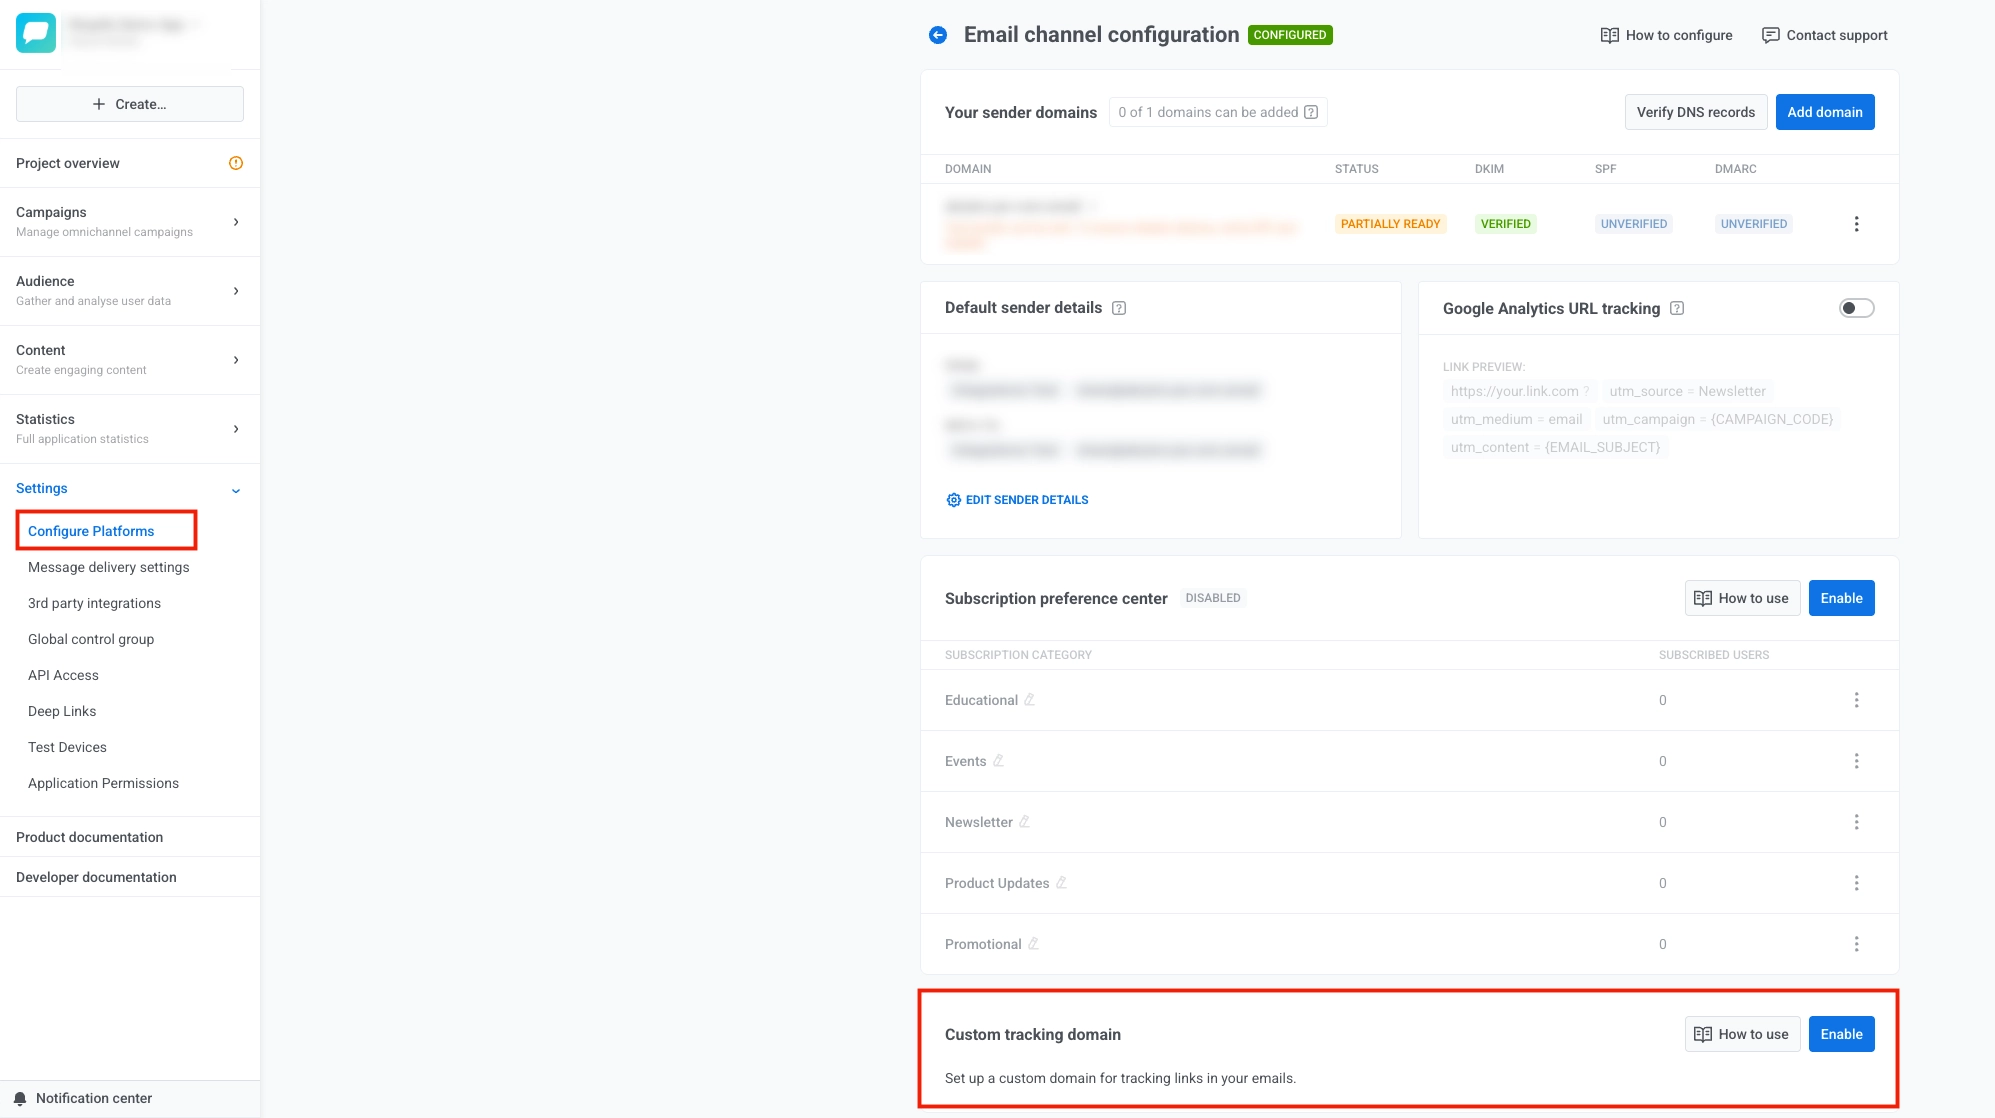 4. Enter your CTD in the **Domain** field and select **Next**.
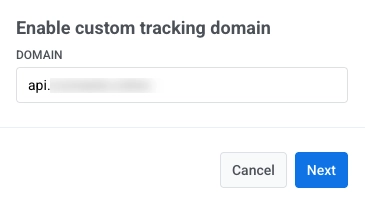 5. Outside Pushwoosh, open the service where you manage public DNS for the domain of your CTD (typically your domain registrar, a DNS host, or your hosting account). In its DNS or zone editor for that domain, add the **CNAME** Pushwoosh shows on this step so your CTD points to `api.pushwoosh.com`.
6. In Pushwoosh, select **Verify**.
5. Outside Pushwoosh, open the service where you manage public DNS for the domain of your CTD (typically your domain registrar, a DNS host, or your hosting account). In its DNS or zone editor for that domain, add the **CNAME** Pushwoosh shows on this step so your CTD points to `api.pushwoosh.com`.
6. In Pushwoosh, select **Verify**.
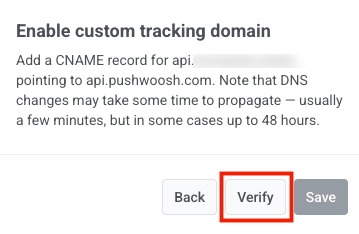 7. When verification succeeds, select **Save**.
8. If you need to change the **Domain** or DNS record, select **Back** and adjust the earlier steps.
9. After you click **Save**, your CTD appears in the **Custom tracking domain** list in **Email channel configuration**.
7. When verification succeeds, select **Save**.
8. If you need to change the **Domain** or DNS record, select **Back** and adjust the earlier steps.
9. After you click **Save**, your CTD appears in the **Custom tracking domain** list in **Email channel configuration**.
 To disable it later, select `...` next to your CTD, then select **Disable custom tracking domain**.