# Journeys list
## Campaigns list
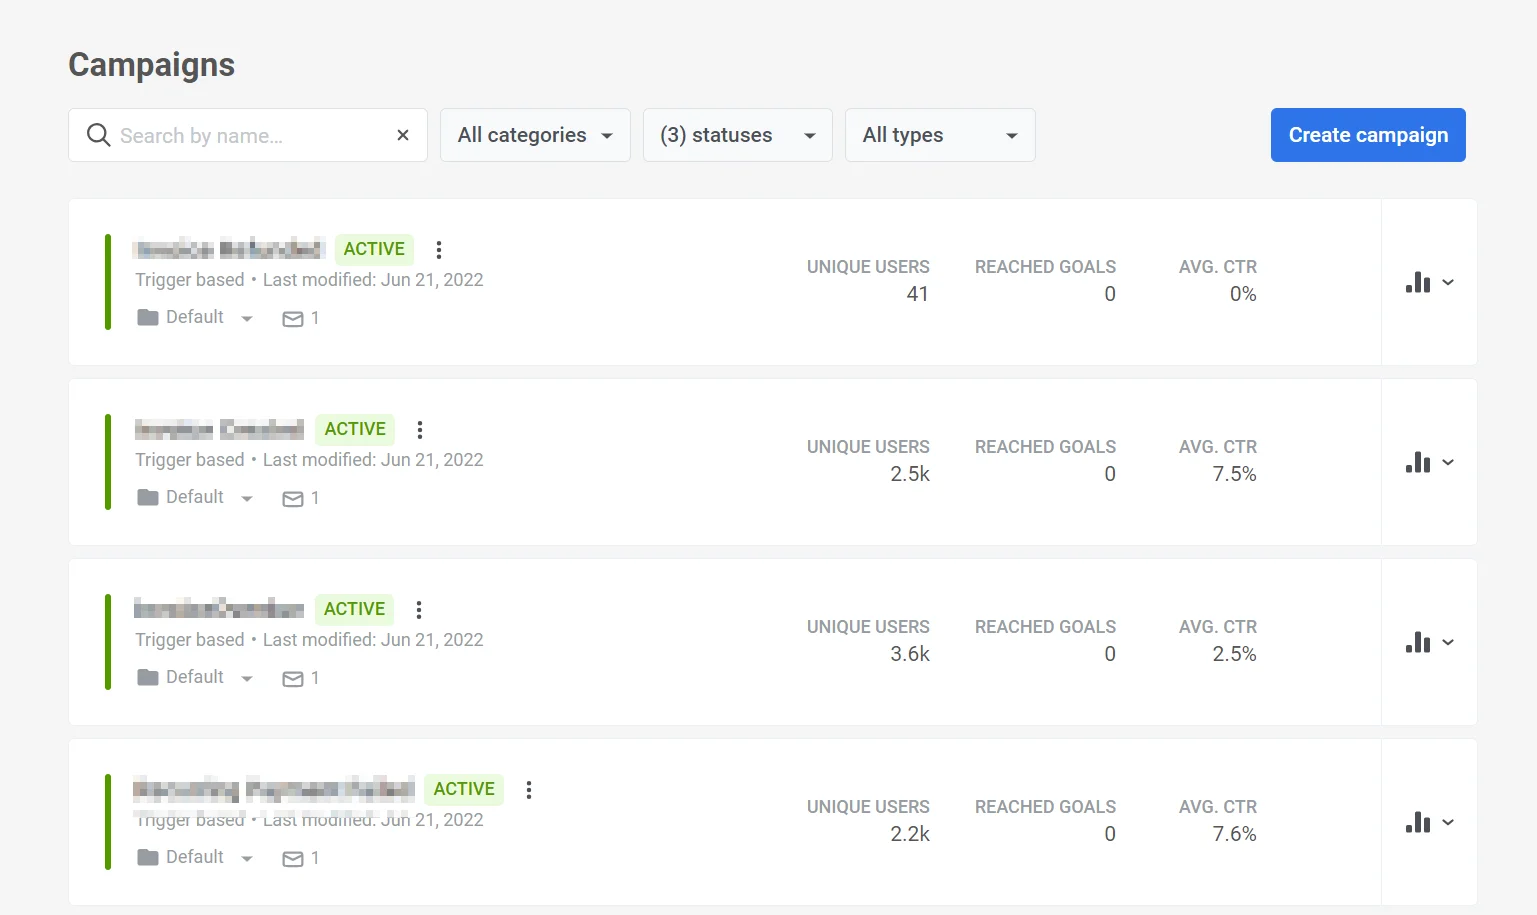
The **Campaigns** page gives you an overview of all customer journeys (campaigns) you have created. Use it to see status and performance at a glance and to manage campaigns.
At the top of the page you have:
* **Search by name:** search bar to find campaigns by name
* **Status filters:** tabs for All, Active, Inactive, Draft, Paused, Archived
* **Any category:** dropdown to filter by category
* **Show filters:** click to filter by Entry type, Launched date, or sort (e.g. by last modified).
* **Export statistics:** download campaign data for the selected date range as a CSV file (see [Export campaign statistics](#export-campaign-statistics))
* **Create campaign:** [add a new campaign](/product/customer-journey/create-a-customer-journey-for-your-project/)
### Campaign statuses
Use status filters to quickly find campaigns by lifecycle state:
* **Draft:** campaigns you have created but not launched yet. You can edit them and launch from the canvas.
* **Active:** campaigns that are currently running and can send messages. You can edit them, pause for editing, clone, or stop permanently.
* **Paused:** active campaigns you temporarily paused from the canvas using **Pause to edit**. You can safely edit settings and content while the campaign is paused, or stop it permanently from the campaigns list.
* **Inactive:** campaigns you stopped permanently using **Stop permanently**. You cannot reactivate them, but you can clone them if you want to run a similar campaign again.
* **Archived:** campaigns you moved out of the main list from the **Inactive** state to keep the list tidy. You can view them under the **Archived** filter and clone them when needed.
For more details on what you can do in each state, see [Actions with journeys](/product/customer-journey/journey-settings/#actions-with-journeys).
## Customer Journey card
Each campaign has its own dedicated Customer Journey card. This card acts as a one-stop shop for all relevant information, including:
* **Campaign overview** providing key details such as the journey’s name, status, type, and other relevant information.
* **Campaign performance metrics** to gauge the campaign’s effectiveness.
* **Detailed message statistics** to dive deeper into the performance of each message within the campaign.
### Campaign overview
Each campaign card shows:
* **Campaign name** at the top left
* **Status:** lifecycle state of the campaign (e.g. INACTIVE, DRAFT, ACTIVE, PAUSED, ARCHIVED)
* **Options menu** next to the status. Click it to open actions such as **Edit**, **Clone**, and **Stop permanently**
* **Last modified:** date and time and who made the change
* **Campaign type:** [Trigger based](/product/customer-journey/journey-elements/entry-elements/trigger-based-entry/), [Audience based](/product/customer-journey/journey-elements/entry-elements/audience-based-entry/), or [Mixed](/product/customer-journey/journey-elements/entry-elements/)
* **Category:** category name (e.g. DEFAULT, ONBOARDING) with a dropdown to change it
* **Message count:** the number of messages in the campaign
### Campaign performance metrics
Each card shows three metrics (as **TOTAL REACH**, **REACHED GOALS**, **AVG. CTR**). For draft or new campaigns they may show as `--` until there is data:
* **Total reach:** number of unique users who entered or were reached in the journey
* **Reached goals:** number of times journey goals were achieved
* **Avg. CTR:** average click-through rate for all messages in the journey (any channel)
### Detailed message statistics
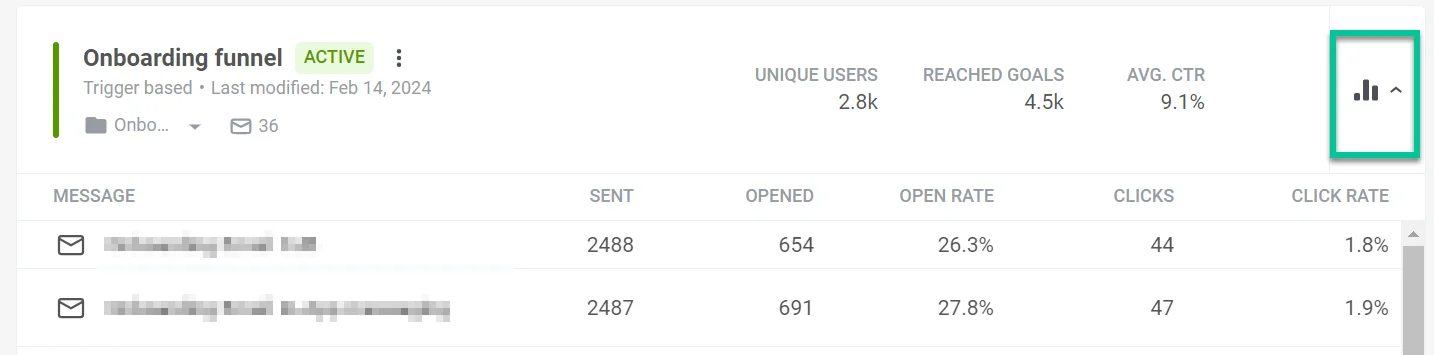
To see detailed statistics for each message in a campaign, click the **statistics** (bar chart) icon with the dropdown next to that campaign in the list. For more on journey metrics, see [Customer Journey statistics](/product/statistics-and-analytics/journey-statistics/).
This will reveal a detailed breakdown of each message's performance, including:
* The name of each message.
* How many times the message was sent or shown to users.
* The number of times the message was opened by recipients.
* The message open rate: the percentage of opens relative to the number of times the message was sent or shown.
* Clicks: the total number of times users engaged with the message content by clicking a link.
* Click rate: the percentage of users who took an action within the message relative to the total number who received it.
To ensure you're viewing the latest performance data, click the **Update Data** link. This will refresh the statistics and provide the most up-to-date insights into your message effectiveness.
## Manage your Customer Journeys
### Journey categories
With Pushwoosh, you can effortlessly organize your journeys by adding custom categories to the campaigns list. You have the flexibility to create up to 10 personalized categories tailored to your needs.
### Create Customer Journey categories
To create customer journey categories, follow these steps:
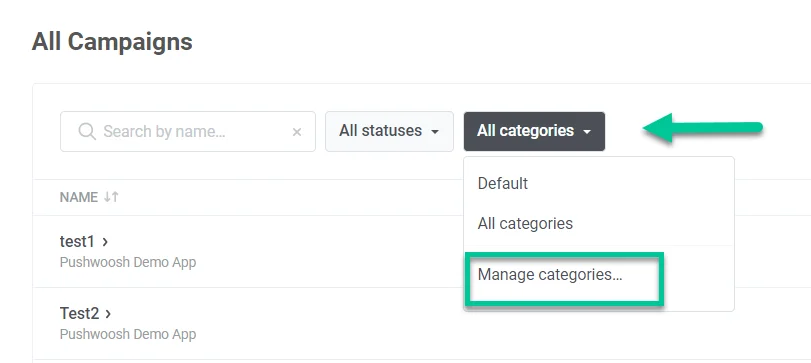
1. Navigate to the top of the category list and click **All categories**.
2. Select **Manage categories** from the drop-down list.
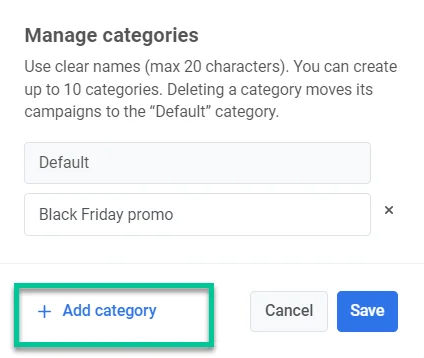
3. In the window that appears, click **Add category** and create a name for your category that is informative and within 20 characters.
4. You can also edit and remove your categories by selecting **Manage categories**.
### Assign Journeys to categories
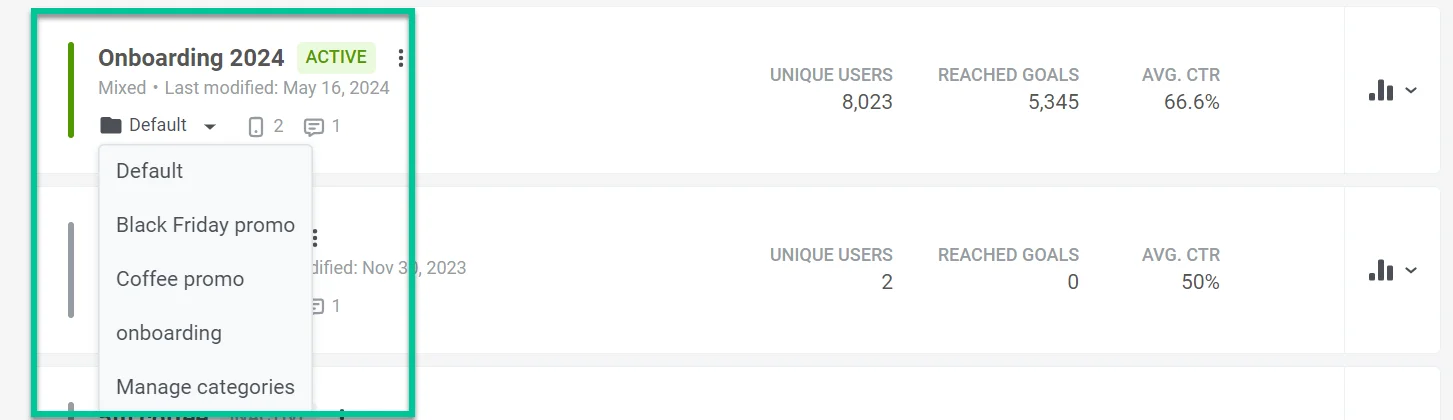
When you create a journey, it automatically lands in the **Default** category. To assign it to a different category, click on the dropdown menu labeled **Default** below the journey's name. Then, choose the desired category from the list that appears. If you need to create a new category, select **Manage categories**.
### Searching and filtering your customer journeys
* **Search:** use the "Search by name..." bar at the top to find campaigns by name.
* **Status:** use the tabs to show All, Active, Inactive, Draft, Paused, or Archived campaigns.
* **Category:** use the "Any category" dropdown to filter by category.
* **Show filters:** click to open more filter options.
### Journey actions
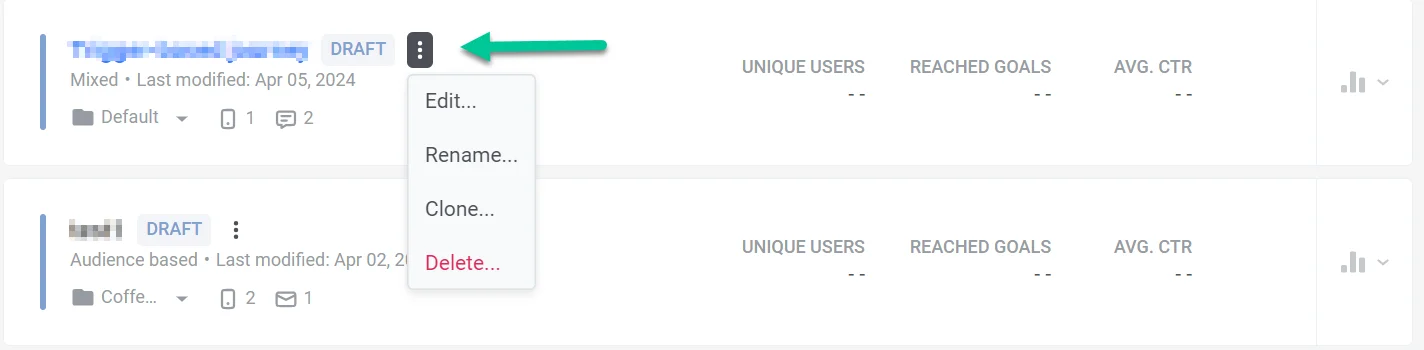
To manage a campaign from the list, click the **three vertical dots** (options menu) next to the campaign status. The menu includes:
* **Edit:** open the campaign canvas to change settings and content
* **Rename:** change the campaign name
* **Clone:** create a copy of the campaign with the same settings so you can change the copy without affecting the original
* **Stop permanently:** end an **Active** or **Paused** campaign. This action is irreversible.
Other actions (e.g. **View**, **Archive**) may also appear in the menu depending on the campaign state.
### Create a new customer journey
To create a new customer journey, click the **Create campaign** button at the top of the list.
Here, you have the flexibility to:
* Build a journey from scratch and tailor it to your specific scenarios. [Learn more](/product/customer-journey/create-a-customer-journey-for-your-project)
* Leverage pre-built journey templates for common customer journey scenarios. [Learn more](/product/customer-journey/create-a-customer-journey-for-your-project#build-a-customer-journey-with-ready-made-journey-templates)
### Export campaign statistics
Click **Export statistics** at the top of the Campaigns page. In the **Export campaign statistics** dialog, choose a date range and click **Export** to download campaign data in CSV format. You can use the file in spreadsheets or third-party tools to analyze and optimize future campaigns.
**What you get in the CSV**
* **Campaign info:** Title, Status, Created, Category, Type, UUID
* **Reach and users:** Total reach, Unique users, Users inside, Drop-off
* **Overall:** Total sends, Avg CTR, Goals
* **Per channel (push, email, SMS, WhatsApp, in-app):** sends, deliveries/opens, CTR, and channel-specific metrics (e.g. email clicks and unsubscribes, in-app shows and skips)
 ### Campaign statuses
Use status filters to quickly find campaigns by lifecycle state:
* **Draft:** campaigns you have created but not launched yet. You can edit them and launch from the canvas.
* **Active:** campaigns that are currently running and can send messages. You can edit them, pause for editing, clone, or stop permanently.
* **Paused:** active campaigns you temporarily paused from the canvas using **Pause to edit**. You can safely edit settings and content while the campaign is paused, or stop it permanently from the campaigns list.
* **Inactive:** campaigns you stopped permanently using **Stop permanently**. You cannot reactivate them, but you can clone them if you want to run a similar campaign again.
* **Archived:** campaigns you moved out of the main list from the **Inactive** state to keep the list tidy. You can view them under the **Archived** filter and clone them when needed.
For more details on what you can do in each state, see [Actions with journeys](/product/customer-journey/journey-settings/#actions-with-journeys).
## Customer Journey card
Each campaign has its own dedicated Customer Journey card. This card acts as a one-stop shop for all relevant information, including:
* **Campaign overview** providing key details such as the journey’s name, status, type, and other relevant information.
* **Campaign performance metrics** to gauge the campaign’s effectiveness.
* **Detailed message statistics** to dive deeper into the performance of each message within the campaign.
### Campaign overview
Each campaign card shows:
* **Campaign name** at the top left
* **Status:** lifecycle state of the campaign (e.g. INACTIVE, DRAFT, ACTIVE, PAUSED, ARCHIVED)
* **Options menu** next to the status. Click it to open actions such as **Edit**, **Clone**, and **Stop permanently**
* **Last modified:** date and time and who made the change
* **Campaign type:** [Trigger based](/product/customer-journey/journey-elements/entry-elements/trigger-based-entry/), [Audience based](/product/customer-journey/journey-elements/entry-elements/audience-based-entry/), or [Mixed](/product/customer-journey/journey-elements/entry-elements/)
* **Category:** category name (e.g. DEFAULT, ONBOARDING) with a dropdown to change it
* **Message count:** the number of messages in the campaign
### Campaign statuses
Use status filters to quickly find campaigns by lifecycle state:
* **Draft:** campaigns you have created but not launched yet. You can edit them and launch from the canvas.
* **Active:** campaigns that are currently running and can send messages. You can edit them, pause for editing, clone, or stop permanently.
* **Paused:** active campaigns you temporarily paused from the canvas using **Pause to edit**. You can safely edit settings and content while the campaign is paused, or stop it permanently from the campaigns list.
* **Inactive:** campaigns you stopped permanently using **Stop permanently**. You cannot reactivate them, but you can clone them if you want to run a similar campaign again.
* **Archived:** campaigns you moved out of the main list from the **Inactive** state to keep the list tidy. You can view them under the **Archived** filter and clone them when needed.
For more details on what you can do in each state, see [Actions with journeys](/product/customer-journey/journey-settings/#actions-with-journeys).
## Customer Journey card
Each campaign has its own dedicated Customer Journey card. This card acts as a one-stop shop for all relevant information, including:
* **Campaign overview** providing key details such as the journey’s name, status, type, and other relevant information.
* **Campaign performance metrics** to gauge the campaign’s effectiveness.
* **Detailed message statistics** to dive deeper into the performance of each message within the campaign.
### Campaign overview
Each campaign card shows:
* **Campaign name** at the top left
* **Status:** lifecycle state of the campaign (e.g. INACTIVE, DRAFT, ACTIVE, PAUSED, ARCHIVED)
* **Options menu** next to the status. Click it to open actions such as **Edit**, **Clone**, and **Stop permanently**
* **Last modified:** date and time and who made the change
* **Campaign type:** [Trigger based](/product/customer-journey/journey-elements/entry-elements/trigger-based-entry/), [Audience based](/product/customer-journey/journey-elements/entry-elements/audience-based-entry/), or [Mixed](/product/customer-journey/journey-elements/entry-elements/)
* **Category:** category name (e.g. DEFAULT, ONBOARDING) with a dropdown to change it
* **Message count:** the number of messages in the campaign
 ### Campaign performance metrics
Each card shows three metrics (as **TOTAL REACH**, **REACHED GOALS**, **AVG. CTR**). For draft or new campaigns they may show as `--` until there is data:
* **Total reach:** number of unique users who entered or were reached in the journey
* **Reached goals:** number of times journey goals were achieved
* **Avg. CTR:** average click-through rate for all messages in the journey (any channel)
### Campaign performance metrics
Each card shows three metrics (as **TOTAL REACH**, **REACHED GOALS**, **AVG. CTR**). For draft or new campaigns they may show as `--` until there is data:
* **Total reach:** number of unique users who entered or were reached in the journey
* **Reached goals:** number of times journey goals were achieved
* **Avg. CTR:** average click-through rate for all messages in the journey (any channel)
 ### Detailed message statistics
To see detailed statistics for each message in a campaign, click the **statistics** (bar chart) icon with the dropdown next to that campaign in the list. For more on journey metrics, see [Customer Journey statistics](/product/statistics-and-analytics/journey-statistics/).
### Detailed message statistics
To see detailed statistics for each message in a campaign, click the **statistics** (bar chart) icon with the dropdown next to that campaign in the list. For more on journey metrics, see [Customer Journey statistics](/product/statistics-and-analytics/journey-statistics/).
 This will reveal a detailed breakdown of each message's performance, including:
* The name of each message.
* How many times the message was sent or shown to users.
* The number of times the message was opened by recipients.
* The message open rate: the percentage of opens relative to the number of times the message was sent or shown.
* Clicks: the total number of times users engaged with the message content by clicking a link.
* Click rate: the percentage of users who took an action within the message relative to the total number who received it.
To ensure you're viewing the latest performance data, click the **Update Data** link. This will refresh the statistics and provide the most up-to-date insights into your message effectiveness.
## Manage your Customer Journeys
### Journey categories
With Pushwoosh, you can effortlessly organize your journeys by adding custom categories to the campaigns list. You have the flexibility to create up to 10 personalized categories tailored to your needs.
### Create Customer Journey categories
To create customer journey categories, follow these steps:
1. Navigate to the top of the category list and click **All categories**.
2. Select **Manage categories** from the drop-down list.
This will reveal a detailed breakdown of each message's performance, including:
* The name of each message.
* How many times the message was sent or shown to users.
* The number of times the message was opened by recipients.
* The message open rate: the percentage of opens relative to the number of times the message was sent or shown.
* Clicks: the total number of times users engaged with the message content by clicking a link.
* Click rate: the percentage of users who took an action within the message relative to the total number who received it.
To ensure you're viewing the latest performance data, click the **Update Data** link. This will refresh the statistics and provide the most up-to-date insights into your message effectiveness.
## Manage your Customer Journeys
### Journey categories
With Pushwoosh, you can effortlessly organize your journeys by adding custom categories to the campaigns list. You have the flexibility to create up to 10 personalized categories tailored to your needs.
### Create Customer Journey categories
To create customer journey categories, follow these steps:
1. Navigate to the top of the category list and click **All categories**.
2. Select **Manage categories** from the drop-down list.
 3. In the window that appears, click **Add category** and create a name for your category that is informative and within 20 characters.
 4. You can also edit and remove your categories by selecting **Manage categories**.
### Assign Journeys to categories
When you create a journey, it automatically lands in the **Default** category. To assign it to a different category, click on the dropdown menu labeled **Default** below the journey's name. Then, choose the desired category from the list that appears. If you need to create a new category, select **Manage categories**.
4. You can also edit and remove your categories by selecting **Manage categories**.
### Assign Journeys to categories
When you create a journey, it automatically lands in the **Default** category. To assign it to a different category, click on the dropdown menu labeled **Default** below the journey's name. Then, choose the desired category from the list that appears. If you need to create a new category, select **Manage categories**.
 ### Searching and filtering your customer journeys
* **Search:** use the "Search by name..." bar at the top to find campaigns by name.
* **Status:** use the tabs to show All, Active, Inactive, Draft, Paused, or Archived campaigns.
* **Category:** use the "Any category" dropdown to filter by category.
* **Show filters:** click to open more filter options.
### Journey actions
To manage a campaign from the list, click the **three vertical dots** (options menu) next to the campaign status. The menu includes:
* **Edit:** open the campaign canvas to change settings and content
* **Rename:** change the campaign name
* **Clone:** create a copy of the campaign with the same settings so you can change the copy without affecting the original
* **Stop permanently:** end an **Active** or **Paused** campaign. This action is irreversible.
Other actions (e.g. **View**, **Archive**) may also appear in the menu depending on the campaign state.
### Searching and filtering your customer journeys
* **Search:** use the "Search by name..." bar at the top to find campaigns by name.
* **Status:** use the tabs to show All, Active, Inactive, Draft, Paused, or Archived campaigns.
* **Category:** use the "Any category" dropdown to filter by category.
* **Show filters:** click to open more filter options.
### Journey actions
To manage a campaign from the list, click the **three vertical dots** (options menu) next to the campaign status. The menu includes:
* **Edit:** open the campaign canvas to change settings and content
* **Rename:** change the campaign name
* **Clone:** create a copy of the campaign with the same settings so you can change the copy without affecting the original
* **Stop permanently:** end an **Active** or **Paused** campaign. This action is irreversible.
Other actions (e.g. **View**, **Archive**) may also appear in the menu depending on the campaign state.
 ### Create a new customer journey
To create a new customer journey, click the **Create campaign** button at the top of the list.
### Create a new customer journey
To create a new customer journey, click the **Create campaign** button at the top of the list.
 Here, you have the flexibility to:
* Build a journey from scratch and tailor it to your specific scenarios. [Learn more](/product/customer-journey/create-a-customer-journey-for-your-project)
* Leverage pre-built journey templates for common customer journey scenarios. [Learn more](/product/customer-journey/create-a-customer-journey-for-your-project#build-a-customer-journey-with-ready-made-journey-templates)
### Export campaign statistics
Click **Export statistics** at the top of the Campaigns page. In the **Export campaign statistics** dialog, choose a date range and click **Export** to download campaign data in CSV format. You can use the file in spreadsheets or third-party tools to analyze and optimize future campaigns.
**What you get in the CSV**
* **Campaign info:** Title, Status, Created, Category, Type, UUID
* **Reach and users:** Total reach, Unique users, Users inside, Drop-off
* **Overall:** Total sends, Avg CTR, Goals
* **Per channel (push, email, SMS, WhatsApp, in-app):** sends, deliveries/opens, CTR, and channel-specific metrics (e.g. email clicks and unsubscribes, in-app shows and skips)
Here, you have the flexibility to:
* Build a journey from scratch and tailor it to your specific scenarios. [Learn more](/product/customer-journey/create-a-customer-journey-for-your-project)
* Leverage pre-built journey templates for common customer journey scenarios. [Learn more](/product/customer-journey/create-a-customer-journey-for-your-project#build-a-customer-journey-with-ready-made-journey-templates)
### Export campaign statistics
Click **Export statistics** at the top of the Campaigns page. In the **Export campaign statistics** dialog, choose a date range and click **Export** to download campaign data in CSV format. You can use the file in spreadsheets or third-party tools to analyze and optimize future campaigns.
**What you get in the CSV**
* **Campaign info:** Title, Status, Created, Category, Type, UUID
* **Reach and users:** Total reach, Unique users, Users inside, Drop-off
* **Overall:** Total sends, Avg CTR, Goals
* **Per channel (push, email, SMS, WhatsApp, in-app):** sends, deliveries/opens, CTR, and channel-specific metrics (e.g. email clicks and unsubscribes, in-app shows and skips)