# Journey settings
## Campaign settings
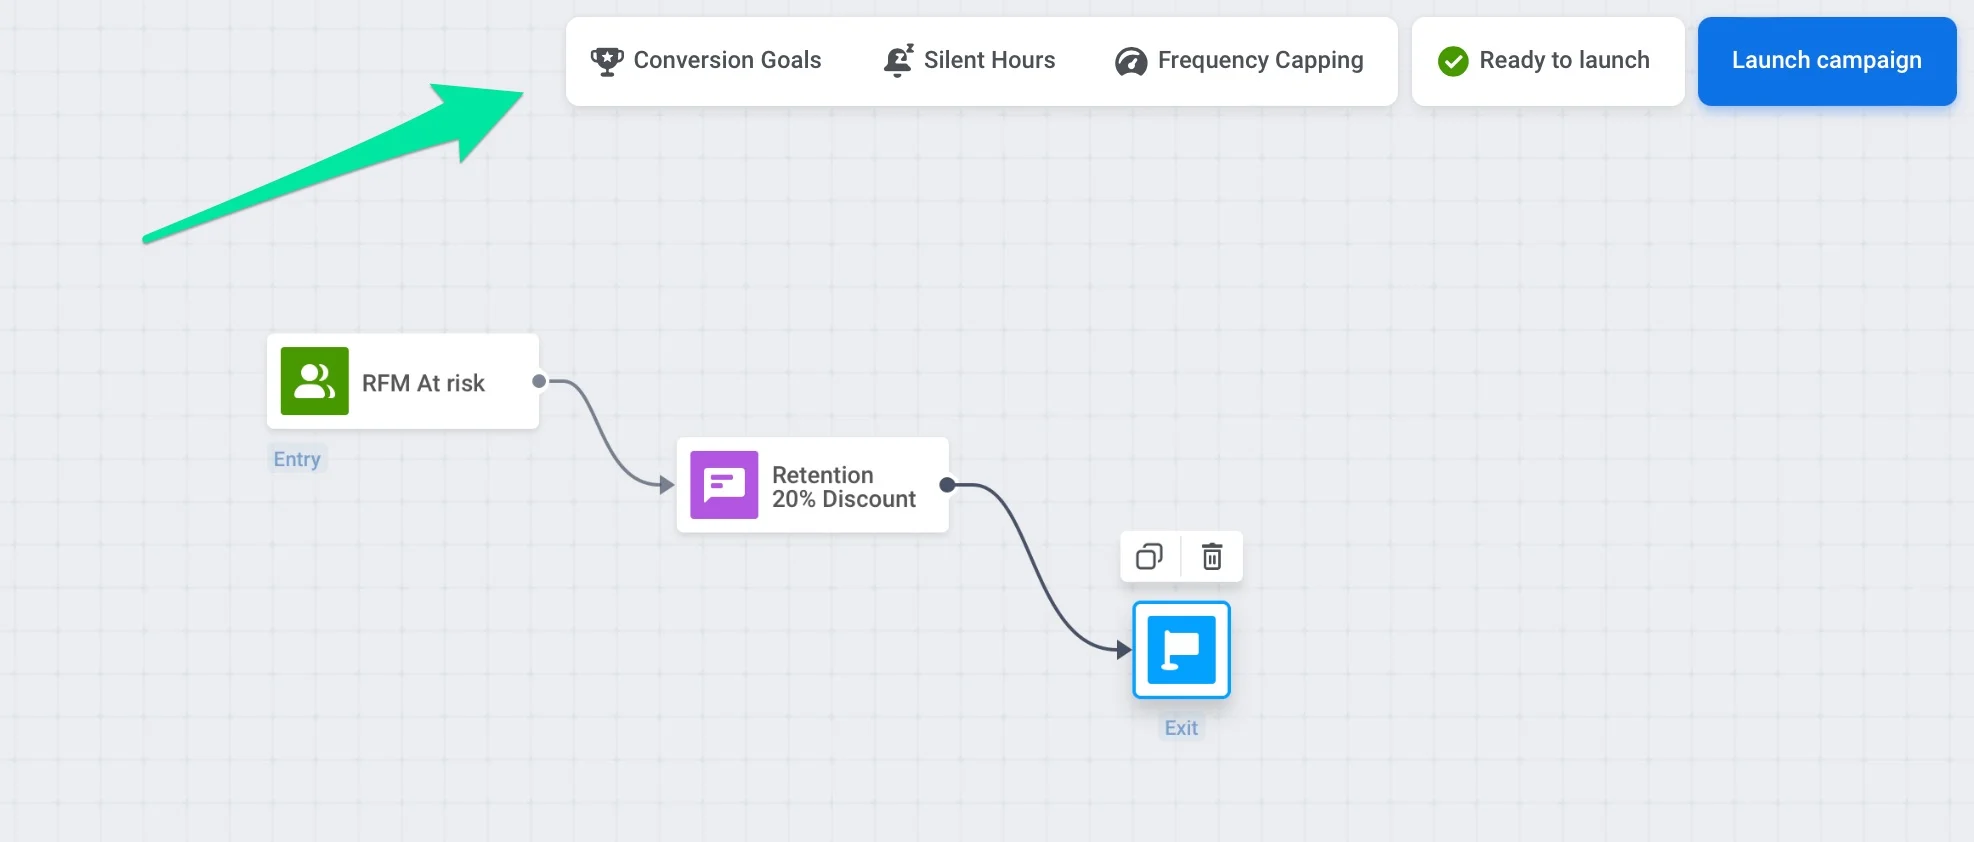
Campaign settings allow you to set rules that apply to the entire Journey. You can access these settings by clicking **Settings** on the journey canvas.
### Conversion goals
**Conversion Goals** let you measure the effectiveness of your customer journey. A Goal is a target [Event](/product/audience-data-and-segmentation/events/) indicating that the customer reaches the marketing objective you set.
To define the journey's goals, click **Settings** on the canvas and select **Conversion goals**.
💡 How conversion goals are calculated
Conversion Goals in Customer Journey are attributed to the specific message step that influenced the goal, whether directly (after opening a message) or indirectly (after receiving a message). This provides actionable insights into which steps in your journey drive user behavior.
##### Attribution logic
* A Conversion Goal is counted only if the user remains in the journey or within the defined conversion period. [Learn more](/product/customer-journey/journey-settings#specify-the-conversion-period)
* If the goal is achieved after the user opens a message (e.g., a push notification or email), it is attributed to the **last opened communication step** before the goal was achieved.
* If there were no message openings, the goal is attributed to the **last sent communication step** before the goal was achieved.
This logic ensures that Conversion Goals are attributed to the message steps that most significantly influenced the user’s behavior. By linking goals to the most impactful steps, you can better understand which parts of your journey drive conversions and use these insights to optimize your campaigns for maximum effectiveness. Additionally, this attribution method provides more actionable data by associating goals with the most relevant communication steps.
##### Example scenario
**Scenario A**
Sarah receives a push notification about a special offer. She opens the notification, visits the app, and completes a purchase, fulfilling the Conversion Goal.
**Attribution:** The Conversion Goal is tied to the **push notification step** since Sarah opened the message and it influenced her behavior.
**Scenario B**
John receives the same push notification but does not open it. Later, he independently visits the app and completes a purchase, fulfilling the Conversion Goal.
**Attribution:** The Conversion Goal is tied to the **push notification step** as the **last sent communication** before the goal was achieved.
#### Specify the conversion period
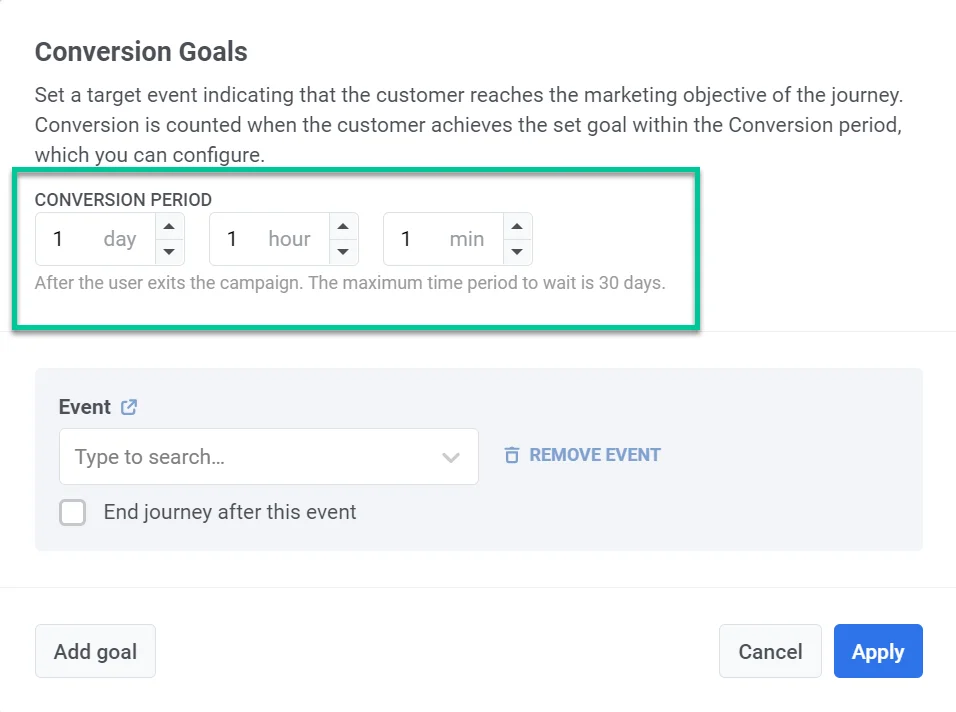
First, specify the **Conversion period**. This allows you to set the time window during which a customer must reach the target event after leaving the campaign. If the customer achieves the set goal within this period, it counts as a conversion. The maximum time period is 30 days.
The **Conversion period** is important for evaluating the effectiveness of a campaign. It goes beyond immediate clicks and actions by taking into account conversions that occur over time. This is crucial because users often need time to process campaign messages and take action after their initial interaction. By setting a conversion period, you can capture these delayed conversions.
#### Set the target event
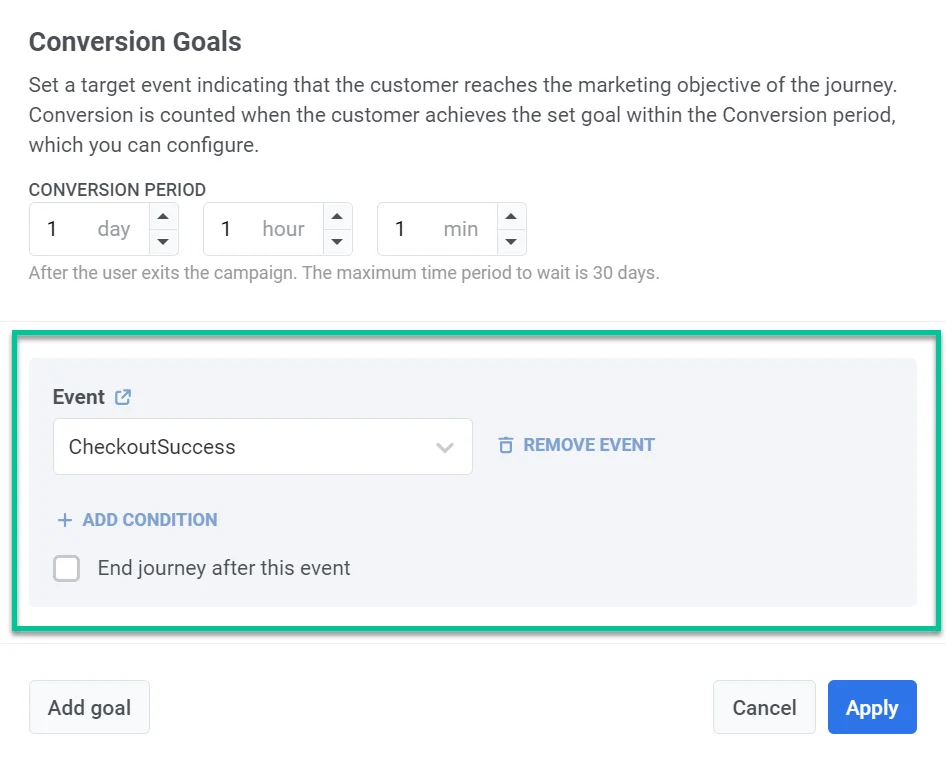
Then, choose the **Event** you consider the indicator of the journey's success.
To specify the Event's attributes, press the **Add condition** button. Choose an attribute, operator, and value(s).
To cancel remaining messages once a user reaches a Conversion Goal, check the **End journey after this event** checkbox. Messages that haven't been sent to the moment the goal is reached won't be sent to the customer who reached the goal.
Press **Apply** to save the goal setup.
When the journey is active, click **Settings** and select **Conversion goals** to see the stats.
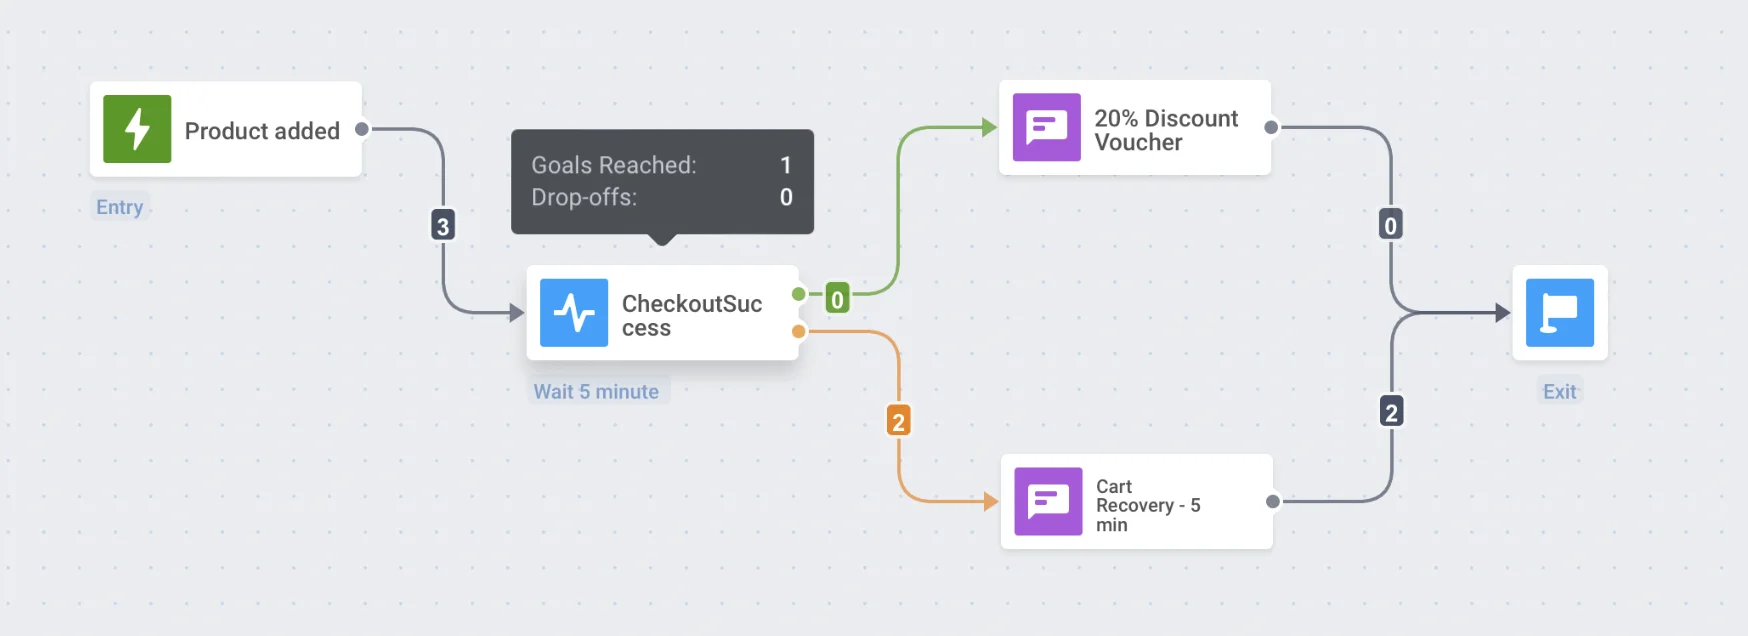
For each element users can reach the goal at, the count of goals reached is displayed in the element's statistics shown by hovering the journey element over.
### Silence period
To avoid sending messages at inconvenient times, set a **Silence period** to pause notifications, emails, and other messages for Customer Journey participants.
For this:
1. Click **Settings** on the canvas and select **Silence period**.
2. Toggle the switch next to the channel you want to apply the Silence period to (e.g., Push notifications, emails, SMS, WhatsApp, in-apps).
3. Set the time range for pausing message delivery. For example, 23:00 – 08:00 will stop messages from being sent during these hours. This period will repeat at the same time every day based on the subscriber’s device timezone.
4. You can also customize the schedule for each day. Select **Pause for entire day** next to a specific day to stop messaging for a full 24 hours. On other days, messages will be paused only during the defined time range.
5. Choose message behavior when Silence period ends:
- **Send after Silence Period ends:** Users will receive the message as soon as the Silence period ends.
- **Skip message and continue journey:** Users will not receive the message and will immediately move to the next step in the Customer Journey.
- **Skip message and wait until Silence Period ends:** Users will not receive the message, and their progress in the Customer Journey will be delayed until the Silence period ends.
6. Click **Save** to apply the changes.
### Campaign entry limit
As some Events that start journeys can repeat from time to time (even several times a day) and audience segments are updated regularly, you might consider not overwhelming users with messages sent through the journeys. Here, **Campaign entry limit** comes in handy – define how many times a particular person can enter the journey within a specified period.
Let's say a user has added a product to their cart, thus starting the journey. If no limit is applied, that same user will enter the journey again if they add another product after exiting the journey. To prevent users from entering the same active journey too often, set the **Campaign entry limit** rules.
To configure the entry limit, click **Settings** on the canvas and select **Campaign entry limit**.
Set **Campaign entry limit** to let users go through the journey:
* Once in a lifetime (user will enter the journey only once ever)
* Once a day (24 hours)
* Once a week (7 days)
* Once a month (30 days)
* Once in three months (90 days)
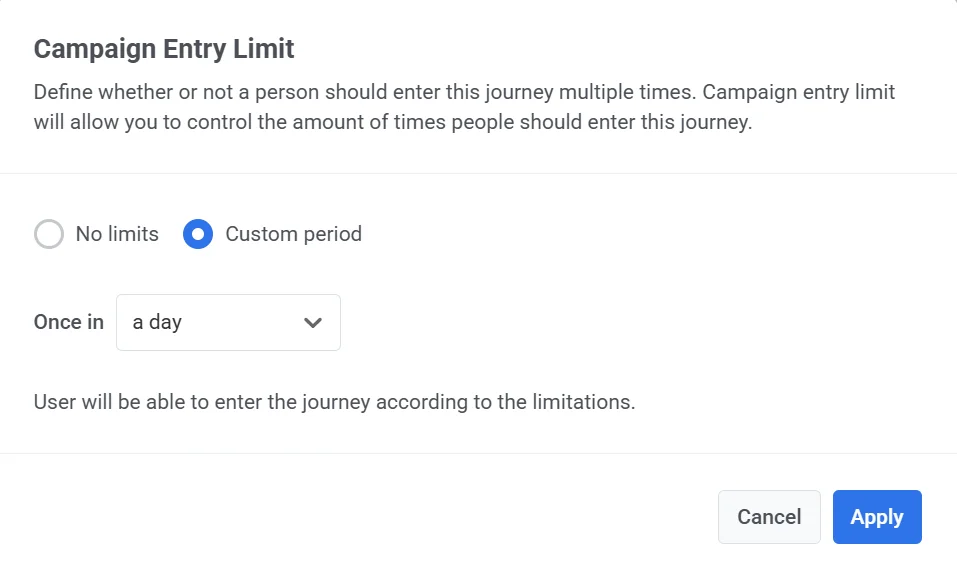
For example, a user gets in the journey when adding a product to their shopping cart. If they trigger the same Event within 24 hours after entering the journey, they will not re-enter.
### Multiple sessions
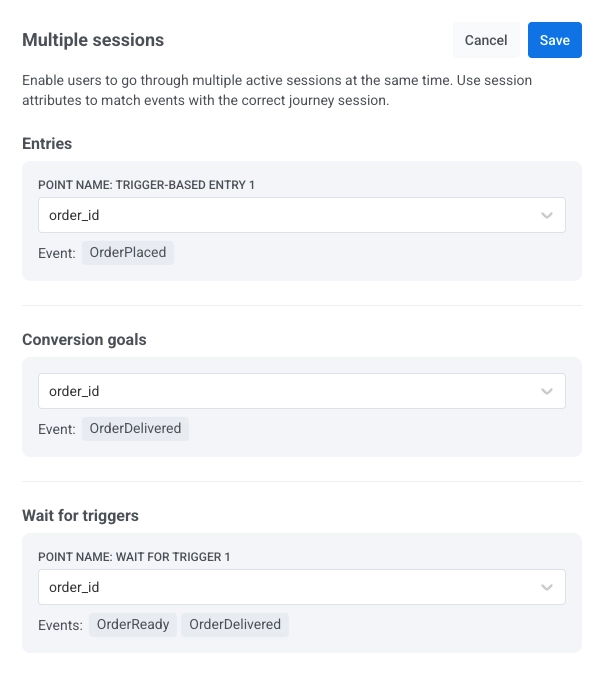
If a [Trigger-based Entry](/product/customer-journey/journey-elements/entry-elements/trigger-based-entry/) uses [multiple active sessions](/product/customer-journey/journey-elements/entry-elements/trigger-based-entry/#multiple-active-sessions-per-user), a **Multiple sessions** option appears on the journey canvas. Click **Settings** and select **Multiple sessions** to open a drawer that shows every point in the journey where a session-matching attribute is required, so you can review and adjust those attributes in one place.
The drawer consolidates information from:
* **[Trigger-based entry points](/product/customer-journey/journey-elements/entry-elements/trigger-based-entry/)**
* **[Wait for Trigger steps](/product/customer-journey/journey-elements/flow-controls/wait-for-trigger/)**
* **[Conversion goals](/product/customer-journey/journey-settings/#conversion-goals)**
For each point, you can:
* View the session-matching attribute currently used (e.g., `order_id`)
* Select a different attribute directly in the drawer
* See which events are associated with that point
### Cancel events: Remove users from a journey without counting a conversion
Cancel events are conditions that immediately remove users from a Journey without being counted as conversions. These events are used solely to exit users and do not impact your conversion statistics.
##### Use cases
Set up cancel events for actions that should stop further messaging but aren't considered a campaign success. For example, unsubscribing from emails or disabling push notifications.
These events help you maintain cleaner user flows and avoid counting technical or preference-based actions as conversions.
##### Set up Cancel events
To set up a Cancel event:
1. Open your campaign and go to **Settings > Cancel events**.
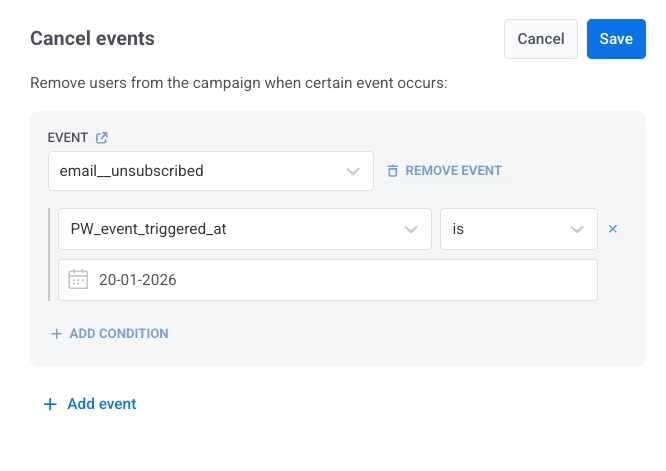
2. Select an event from the dropdown.
3. Add conditions if needed.
4. Click **Save** to apply the changes.
As soon as a user triggers any of the defined events and matches the conditions, they will be removed from the campaign.
To download a list of users who exited the campaign due to a cancel event, go to **Settings > Cancel events** on the Journey canvas. Click the **download icon** next to the event name. The CSV file will include user IDs and the cancel event that triggered their exit.
## Actions with journeys
### Launch
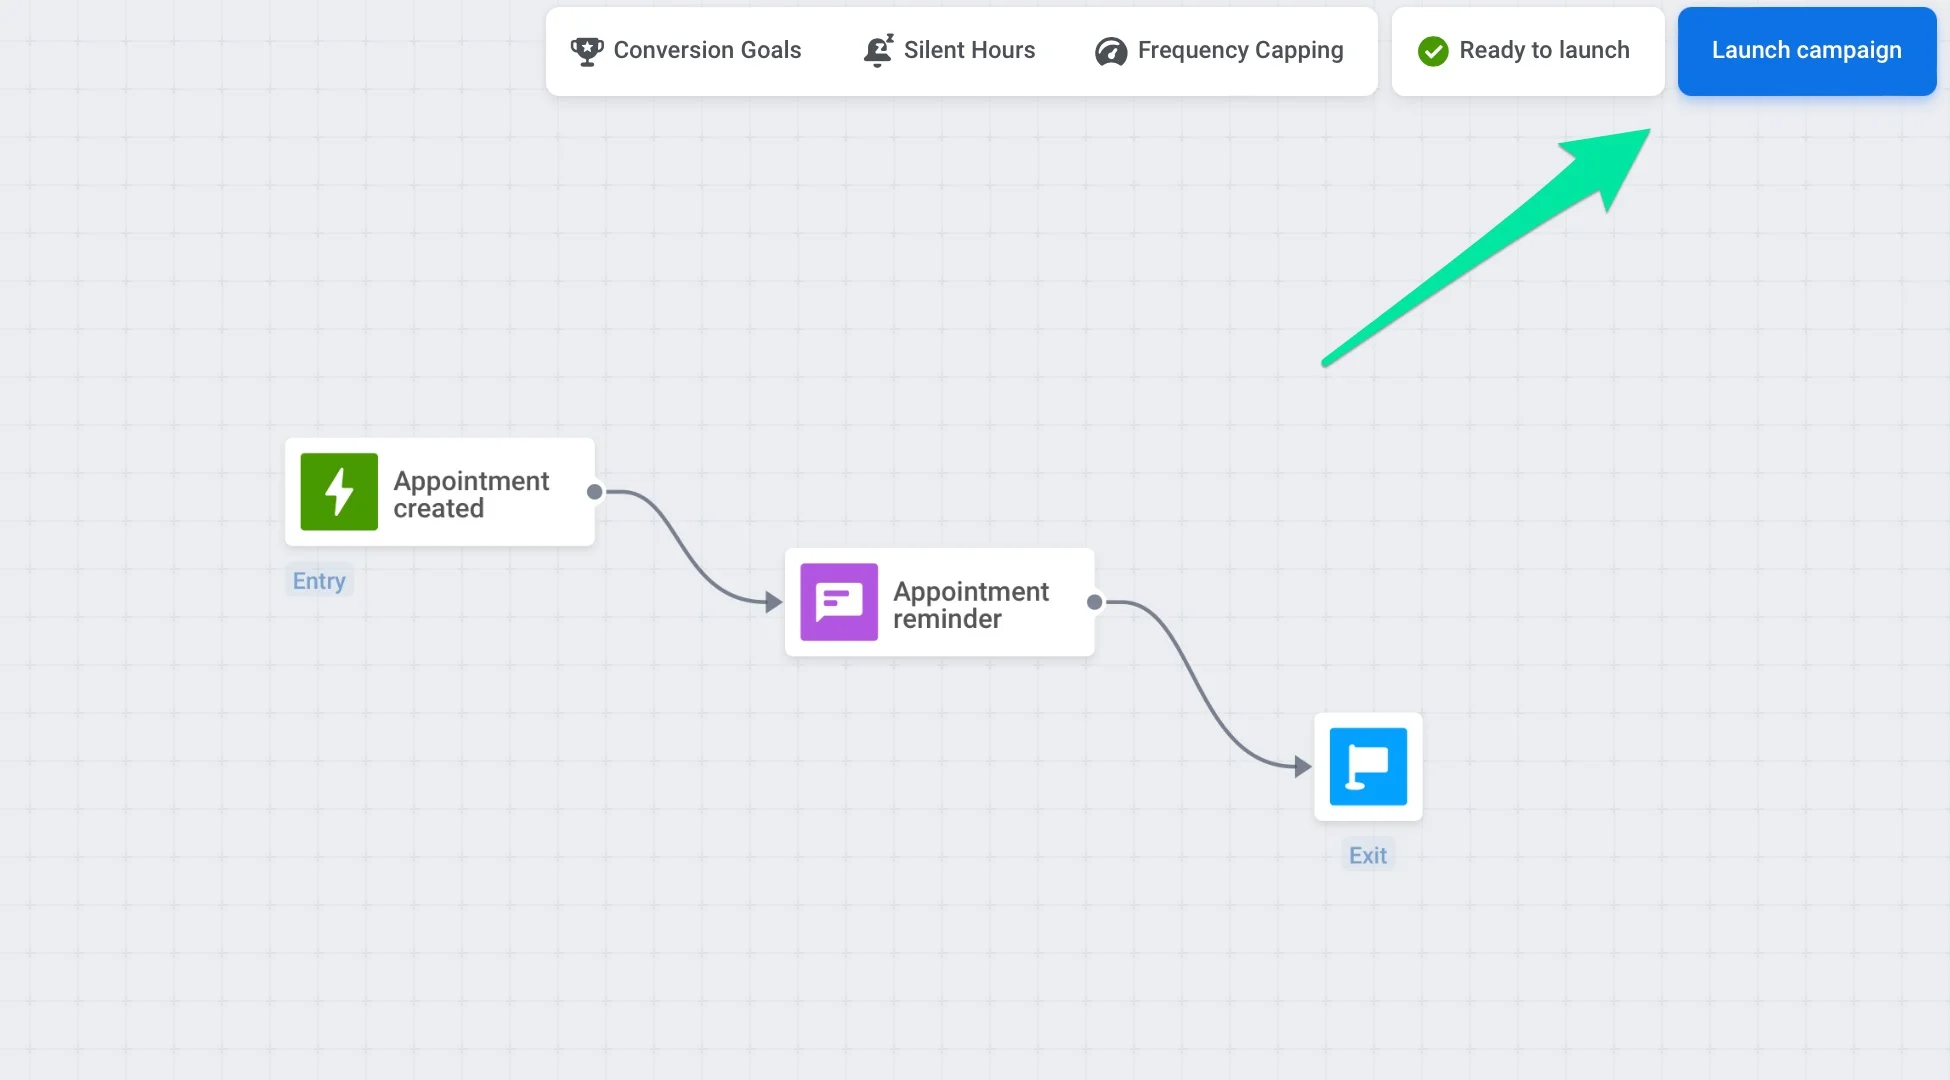
Once the journey is set up, press the **Launch campaign** button at the top right of the journey canvas. From that moment, the journey starts tracking users' behaviors and sending messages to them.
### Edit
Both draft and active journeys can be edited. You can update journey settings and content to test communication effectiveness, fix errors, or adapt your campaigns to special events, changing conditions, or new business needs.
[More about editing journeys](/product/customer-journey/journey-editing)
### Clone
You can duplicate an existing campaign within the same project or clone it to another project while keeping its structure, settings, selected events, segments, and content.
Cloning a journey is useful in the following cases:
* **Testing in a sandbox environment:** Before running a journey in a live app, you can clone it to a test app to check its logic, triggers, and messaging flow without affecting real users.
* **Transferring campaigns across projects:** If you manage multiple apps, cloning allows you to quickly move successful campaigns between projects, saving time and effort.
* **Reusing a template:** Create a sample journey that can be customized and reused for different goals or scenarios.
* **Restarting a deactivated journey:** Since deactivated journeys cannot be reactivated, you can clone them and launch the copy instead.
##### How to clone a campaign
1. You can clone a campaign from either the [**Campaigns list**](/product/customer-journey/journeys-list/) or the **journey canvas**.
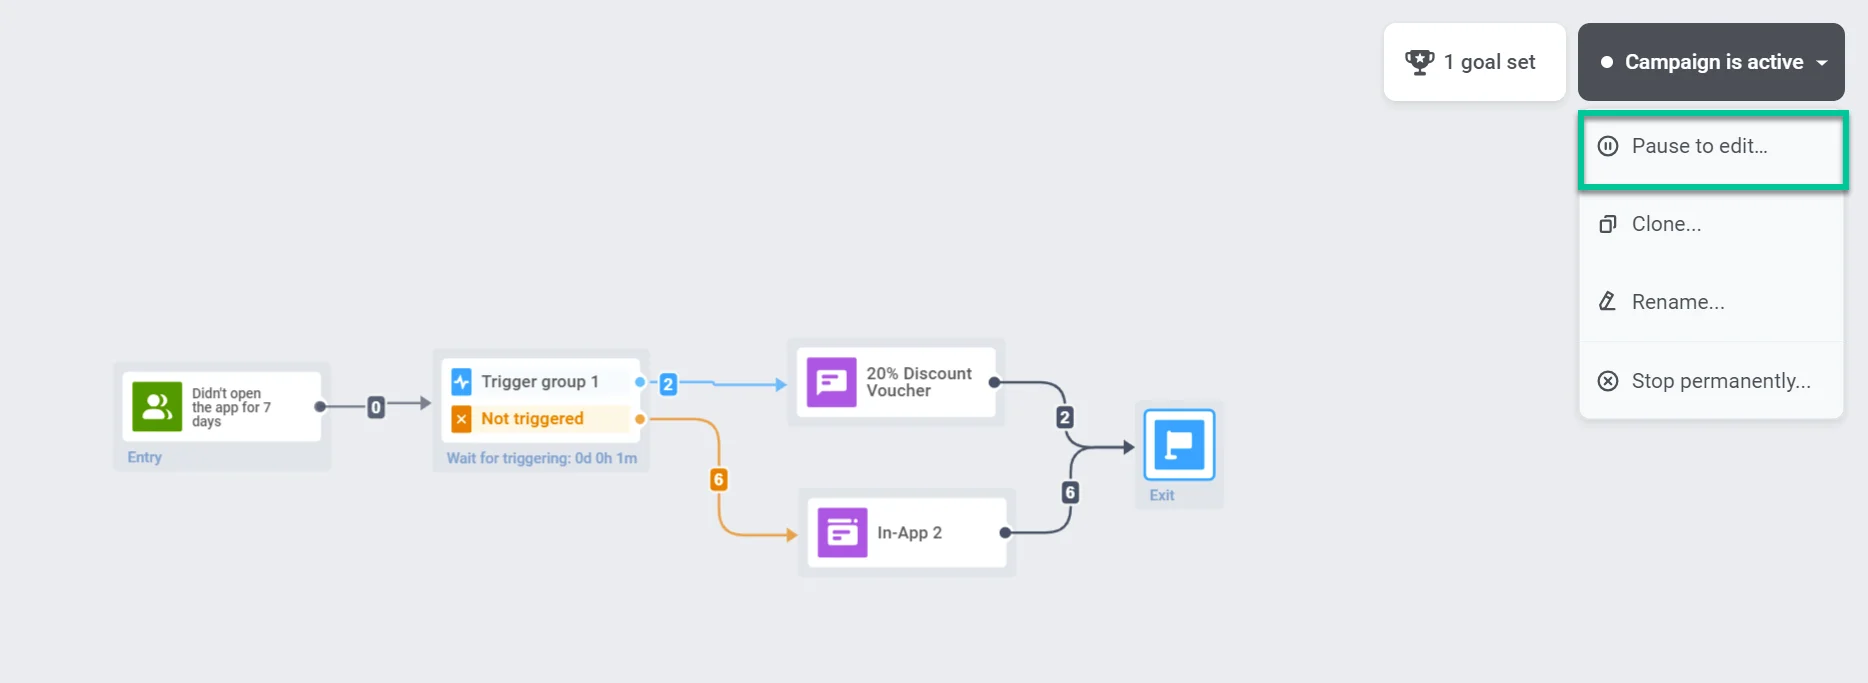
* **Journey canvas:** If the campaign is inactive, click the **Clone campaign** button. If the campaign is active, click the **Campaign is active** dropdown in the top-right corner and select **Clone** from the menu.
* **Campaigns list:** Click **Clone** next to the campaign name to open the cloning settings.
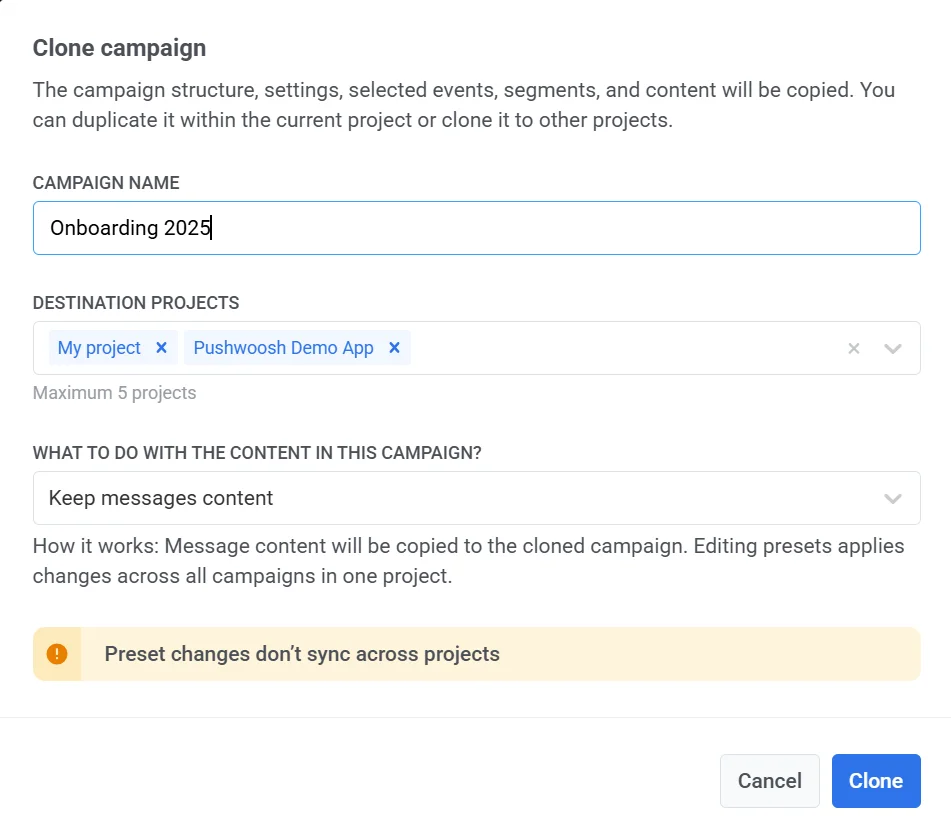
2. In the window that opens, enter a name for the cloned campaign.
3. Select up to 5 destination projects from the dropdown list. You can clone the journey within the same project or to other projects in your account.
4. Choose what to do with the message content:
* **Clear messages content:** Removes all message content from the cloned campaign. You will need to select an existing preset or create new content.
* **Keep messages content:** Copies the message content to the cloned campaign. Editing presets will apply changes across all campaigns within the same project.
5. Click **Clone** to create the duplicate campaign.
### Deactivate
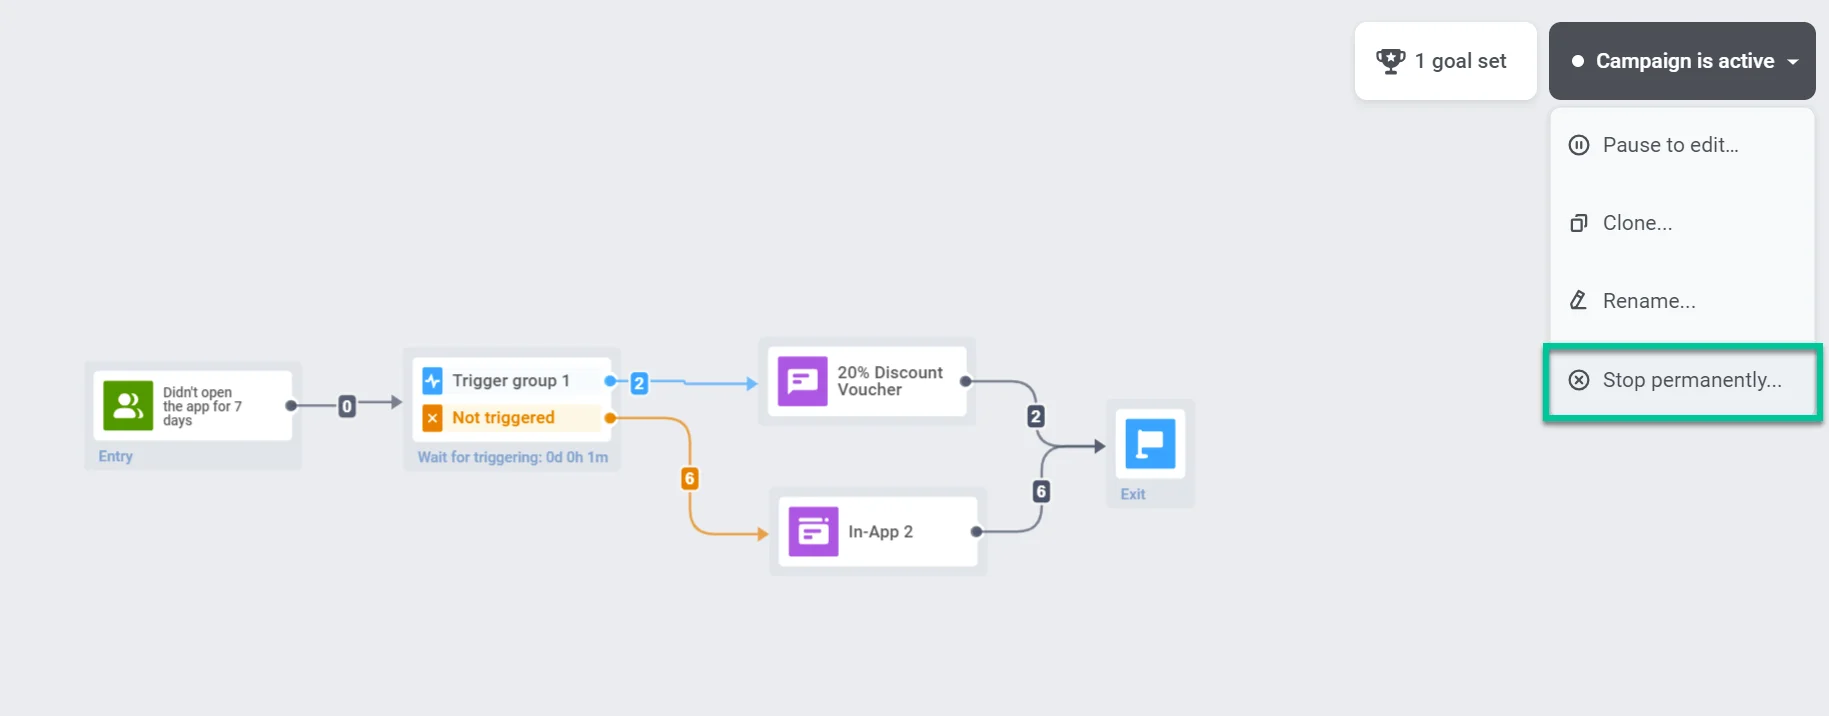
To stop a journey permanently and mark it as **Inactive**, select **Stop permanently**:
* **Campaigns list:** open the three-dot menu next to an **Active** or **Paused** campaign and select **Stop permanently**.
* **Journey canvas:** click the **Campaign status** dropdown in the upper-right corner and select **Stop permanently**.
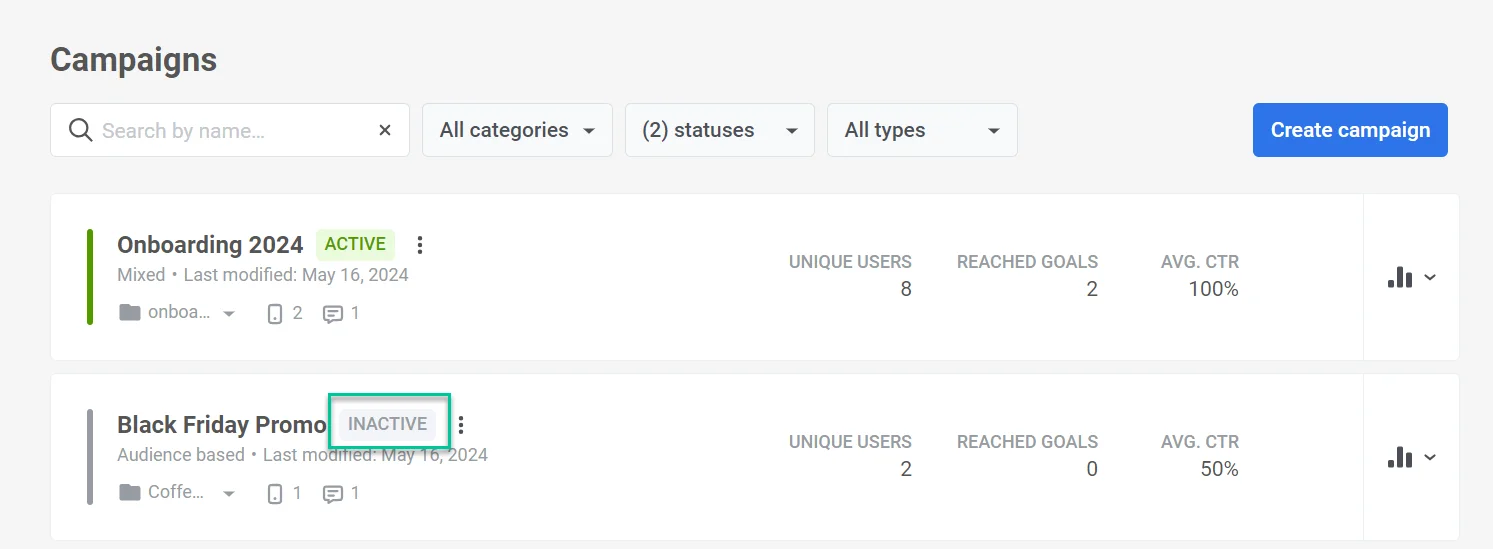
The campaign will be marked as **Inactive** in the [campaigns list](/product/customer-journey/journeys-list):
### Archive
If you have many inactive journeys, archive them to keep the list easy to navigate. Archived journeys can be cloned like campaigns from the main list.
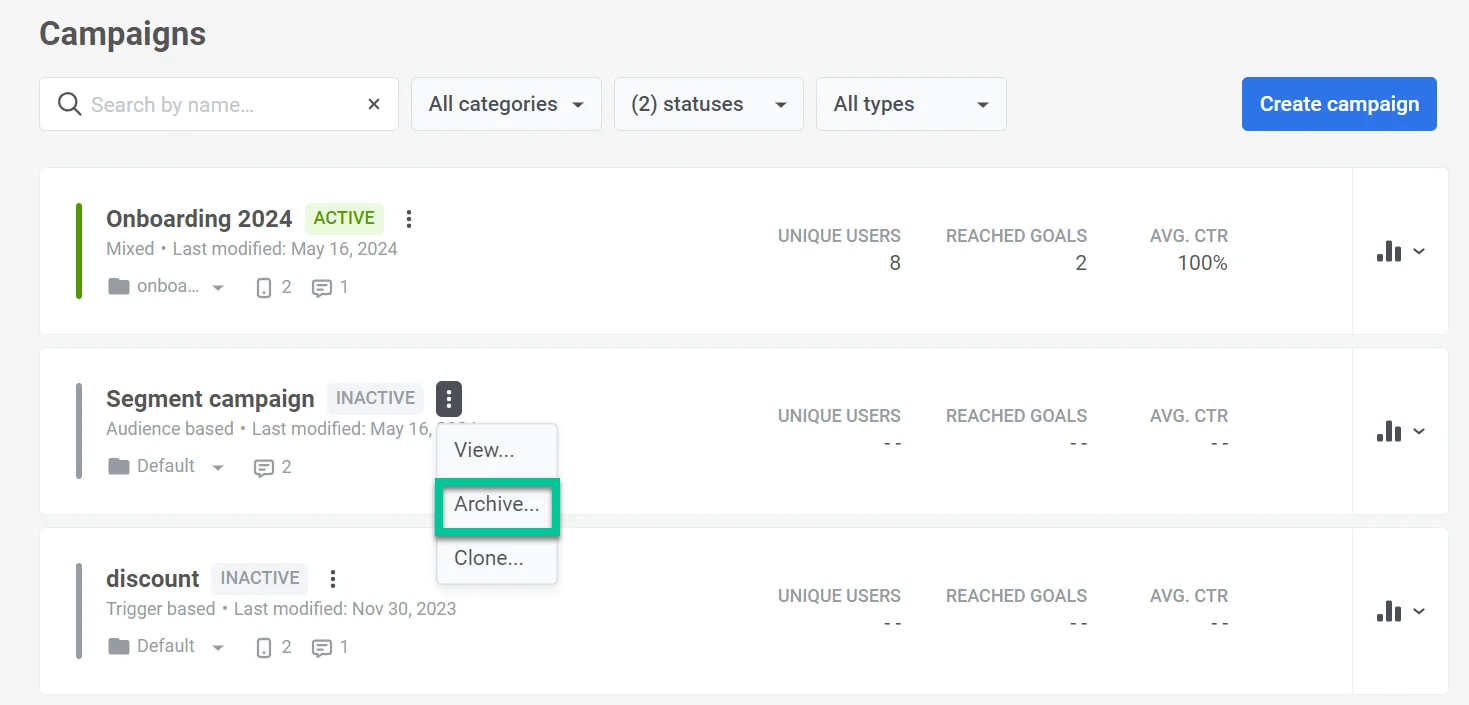
To archive a journey, go to the [campaigns list](/product/customer-journey/journeys-list), click the three-dot menu icon next to the inactive campaign, and select **Archive**.
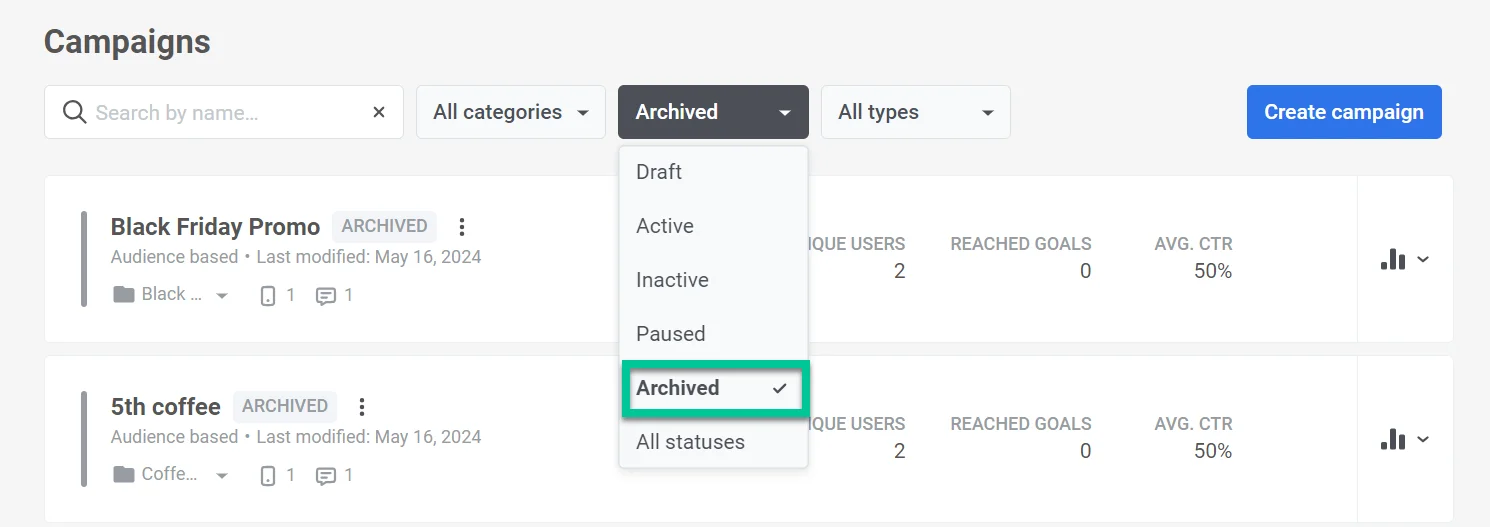
To view archived journeys, go to the campaigns list and click the **Archived** filter.
## Pre-launch check
Before launching a journey, use the **Pre-launch check** to see if the campaign is ready.
The panel shows the status **Campaign is not ready to launch** or **Campaign is ready to launch** and lists steps you need to complete:
* **Entry step added**: An entry element is on the canvas
* **Add some additional steps**: At least one step (e.g. message or flow control) is added
* **Don't forget to add Exit step**: An Exit element is added
* **Combine all the steps all together**: All elements are connected in the flow
* **Configure these steps correctly**: Each element is configured (e.g. content, audience, schedule)
Click **Run validation** to re-check after making changes.
When all steps are complete, the status shows **Campaign is ready to launch** and the **Start campaign** button appears at the bottom of the panel.
Click **Start campaign** to run validation and start sending. If validation finds issues (e.g. Email platform not enabled, default sender details missing), a **Validation** panel opens and lists the errors.
Fix the issues, then click **Revalidate** to run the check again. When validation passes, the journey starts.
 #### Set the target event
Then, choose the **Event** you consider the indicator of the journey's success.
#### Set the target event
Then, choose the **Event** you consider the indicator of the journey's success.
 To specify the Event's attributes, press the **Add condition** button. Choose an attribute, operator, and value(s).
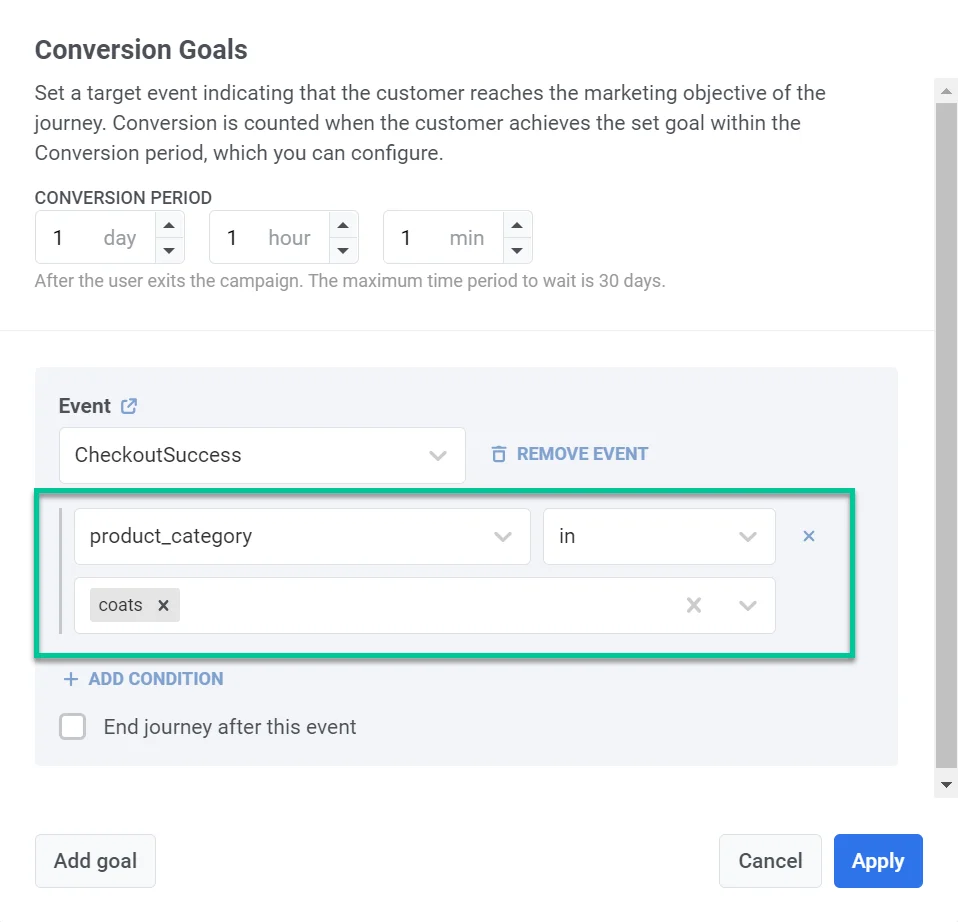 To cancel remaining messages once a user reaches a Conversion Goal, check the **End journey after this event** checkbox. Messages that haven't been sent to the moment the goal is reached won't be sent to the customer who reached the goal.
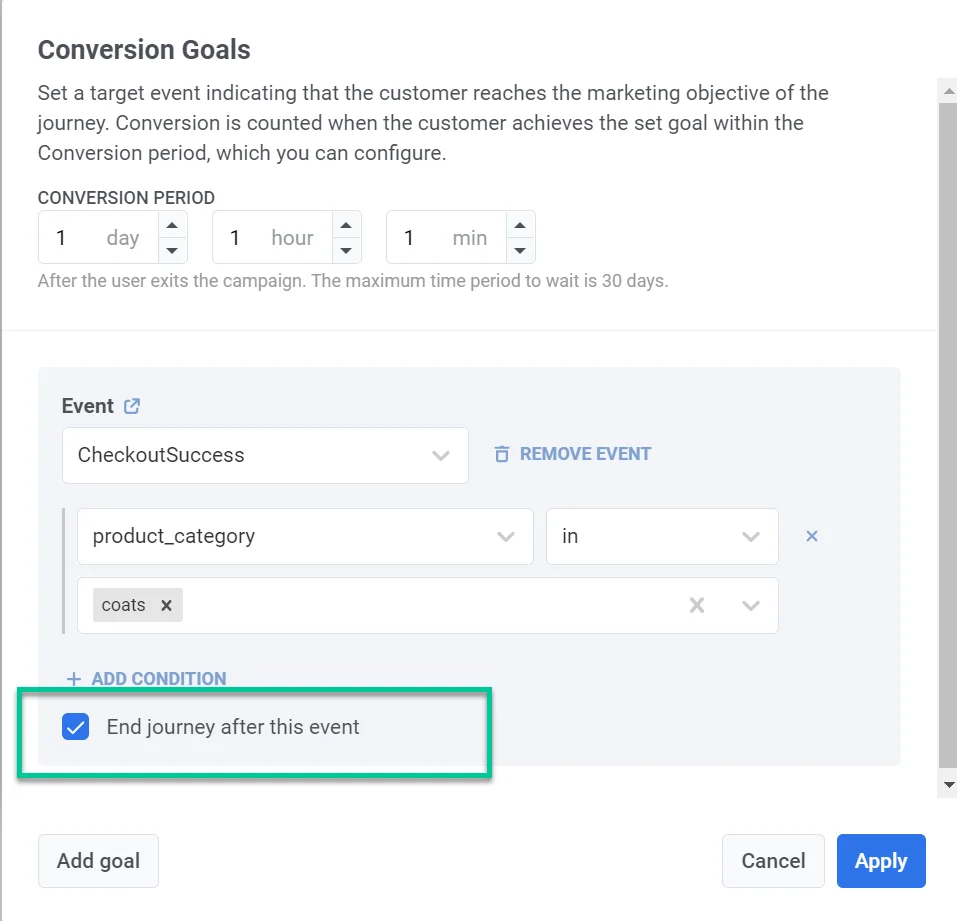 Press **Apply** to save the goal setup.
When the journey is active, click **Settings** and select **Conversion goals** to see the stats.
Press **Apply** to save the goal setup.
When the journey is active, click **Settings** and select **Conversion goals** to see the stats.
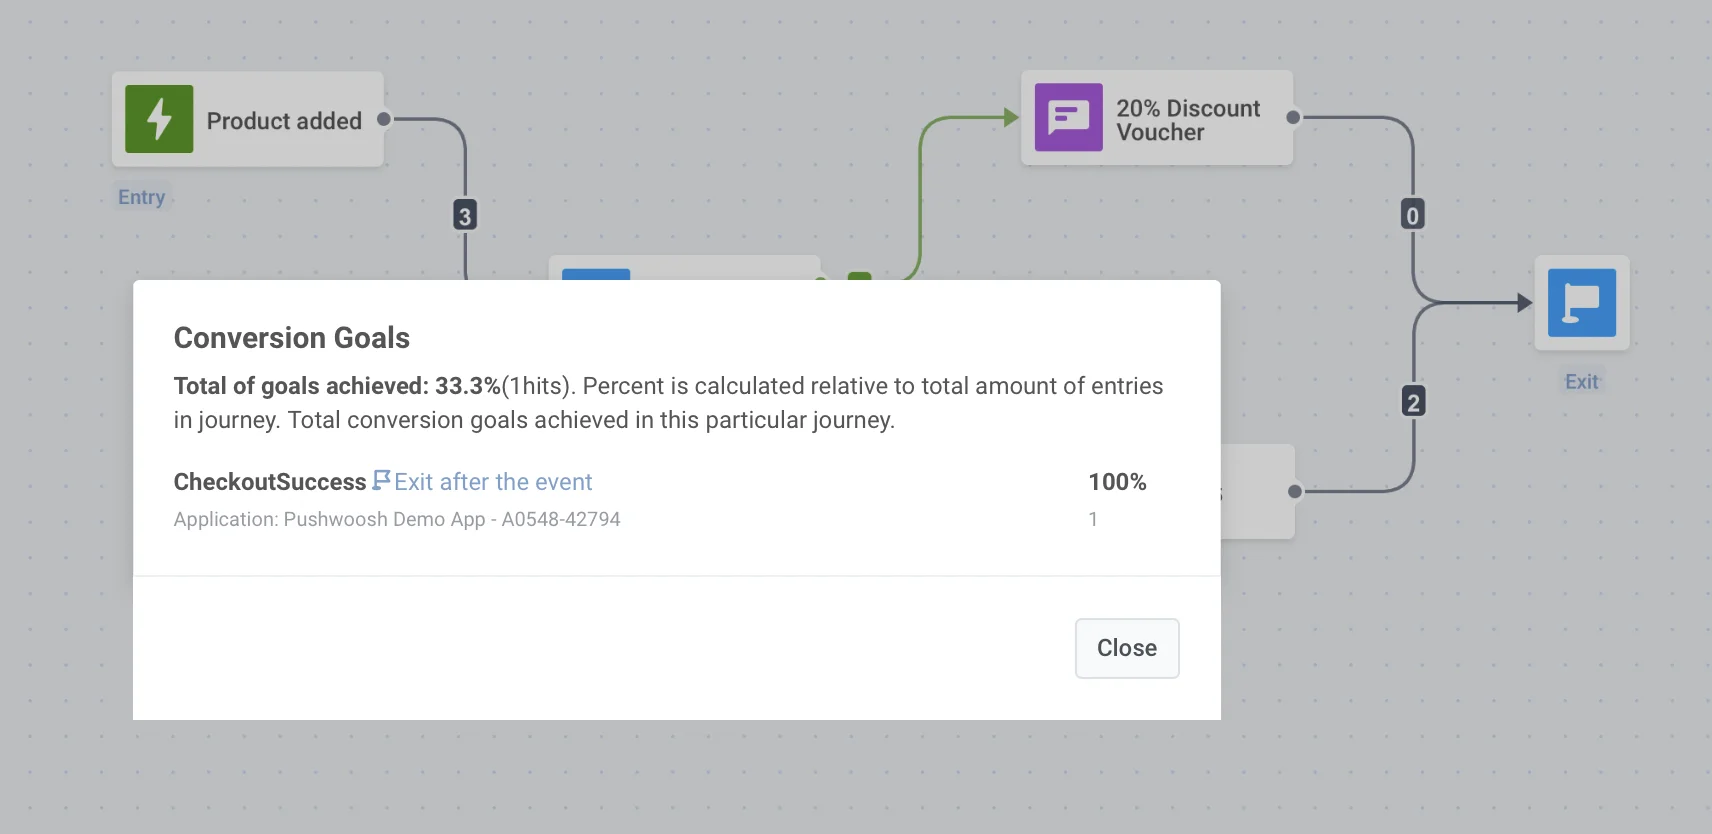 For each element users can reach the goal at, the count of goals reached is displayed in the element's statistics shown by hovering the journey element over.
 ### Silence period
To avoid sending messages at inconvenient times, set a **Silence period** to pause notifications, emails, and other messages for Customer Journey participants.
For this:
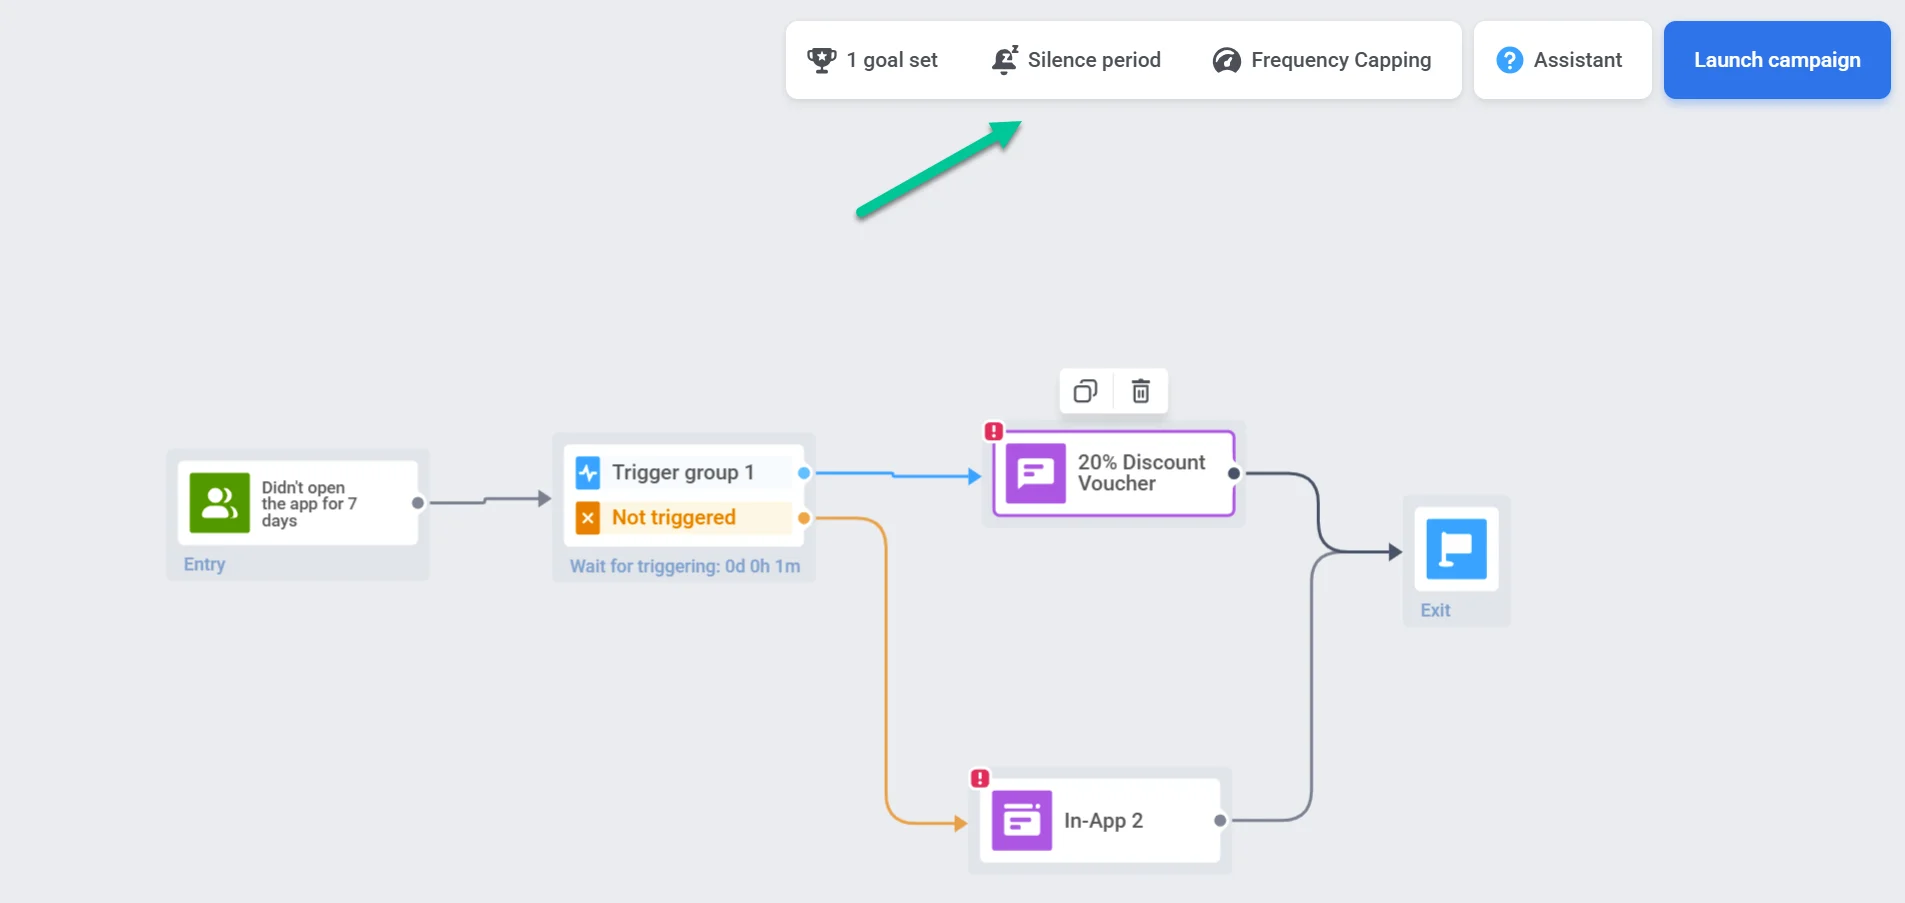
1. Click **Settings** on the canvas and select **Silence period**.
### Silence period
To avoid sending messages at inconvenient times, set a **Silence period** to pause notifications, emails, and other messages for Customer Journey participants.
For this:
1. Click **Settings** on the canvas and select **Silence period**.
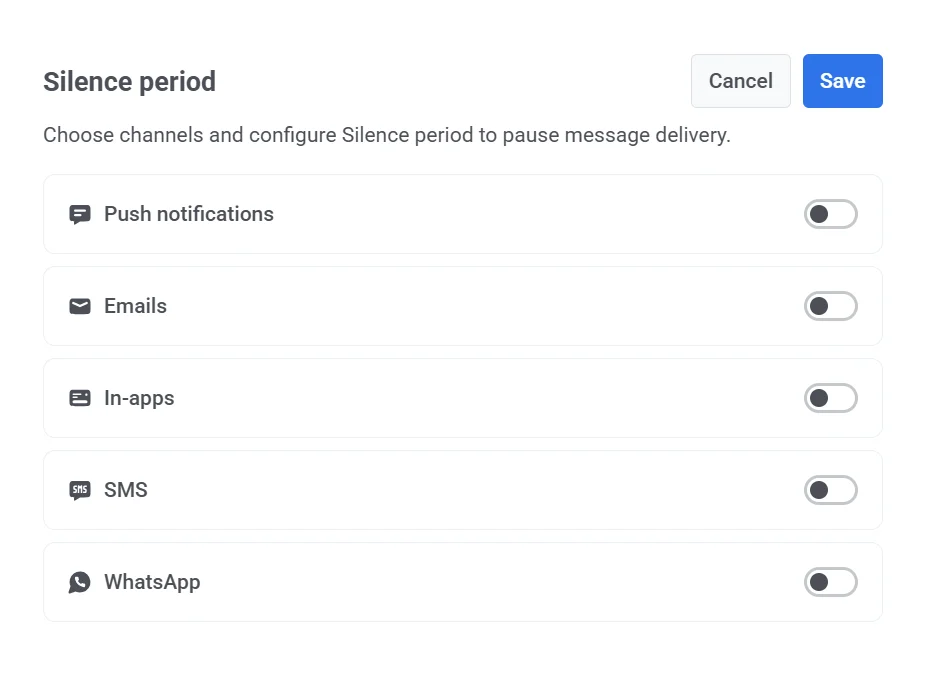
 2. Toggle the switch next to the channel you want to apply the Silence period to (e.g., Push notifications, emails, SMS, WhatsApp, in-apps).
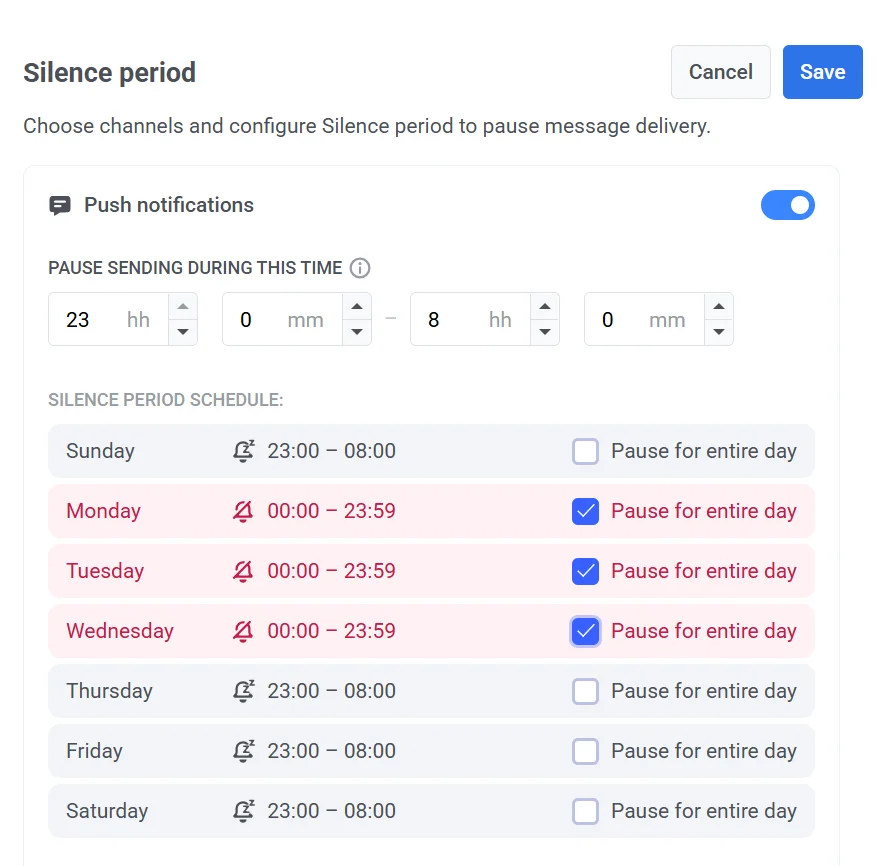
 3. Set the time range for pausing message delivery. For example, 23:00 – 08:00 will stop messages from being sent during these hours. This period will repeat at the same time every day based on the subscriber’s device timezone.
4. You can also customize the schedule for each day. Select **Pause for entire day** next to a specific day to stop messaging for a full 24 hours. On other days, messages will be paused only during the defined time range.
3. Set the time range for pausing message delivery. For example, 23:00 – 08:00 will stop messages from being sent during these hours. This period will repeat at the same time every day based on the subscriber’s device timezone.
4. You can also customize the schedule for each day. Select **Pause for entire day** next to a specific day to stop messaging for a full 24 hours. On other days, messages will be paused only during the defined time range.
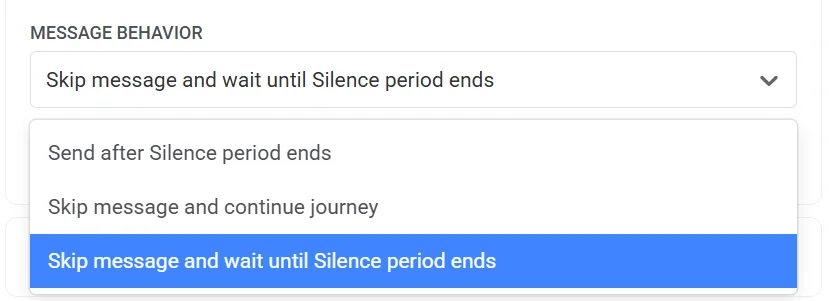
 5. Choose message behavior when Silence period ends:
- **Send after Silence Period ends:** Users will receive the message as soon as the Silence period ends.
- **Skip message and continue journey:** Users will not receive the message and will immediately move to the next step in the Customer Journey.
- **Skip message and wait until Silence Period ends:** Users will not receive the message, and their progress in the Customer Journey will be delayed until the Silence period ends.
5. Choose message behavior when Silence period ends:
- **Send after Silence Period ends:** Users will receive the message as soon as the Silence period ends.
- **Skip message and continue journey:** Users will not receive the message and will immediately move to the next step in the Customer Journey.
- **Skip message and wait until Silence Period ends:** Users will not receive the message, and their progress in the Customer Journey will be delayed until the Silence period ends.
 6. Click **Save** to apply the changes.
### Campaign entry limit
As some Events that start journeys can repeat from time to time (even several times a day) and audience segments are updated regularly, you might consider not overwhelming users with messages sent through the journeys. Here, **Campaign entry limit** comes in handy – define how many times a particular person can enter the journey within a specified period.
Let's say a user has added a product to their cart, thus starting the journey. If no limit is applied, that same user will enter the journey again if they add another product after exiting the journey. To prevent users from entering the same active journey too often, set the **Campaign entry limit** rules.
To configure the entry limit, click **Settings** on the canvas and select **Campaign entry limit**.
6. Click **Save** to apply the changes.
### Campaign entry limit
As some Events that start journeys can repeat from time to time (even several times a day) and audience segments are updated regularly, you might consider not overwhelming users with messages sent through the journeys. Here, **Campaign entry limit** comes in handy – define how many times a particular person can enter the journey within a specified period.
Let's say a user has added a product to their cart, thus starting the journey. If no limit is applied, that same user will enter the journey again if they add another product after exiting the journey. To prevent users from entering the same active journey too often, set the **Campaign entry limit** rules.
To configure the entry limit, click **Settings** on the canvas and select **Campaign entry limit**.
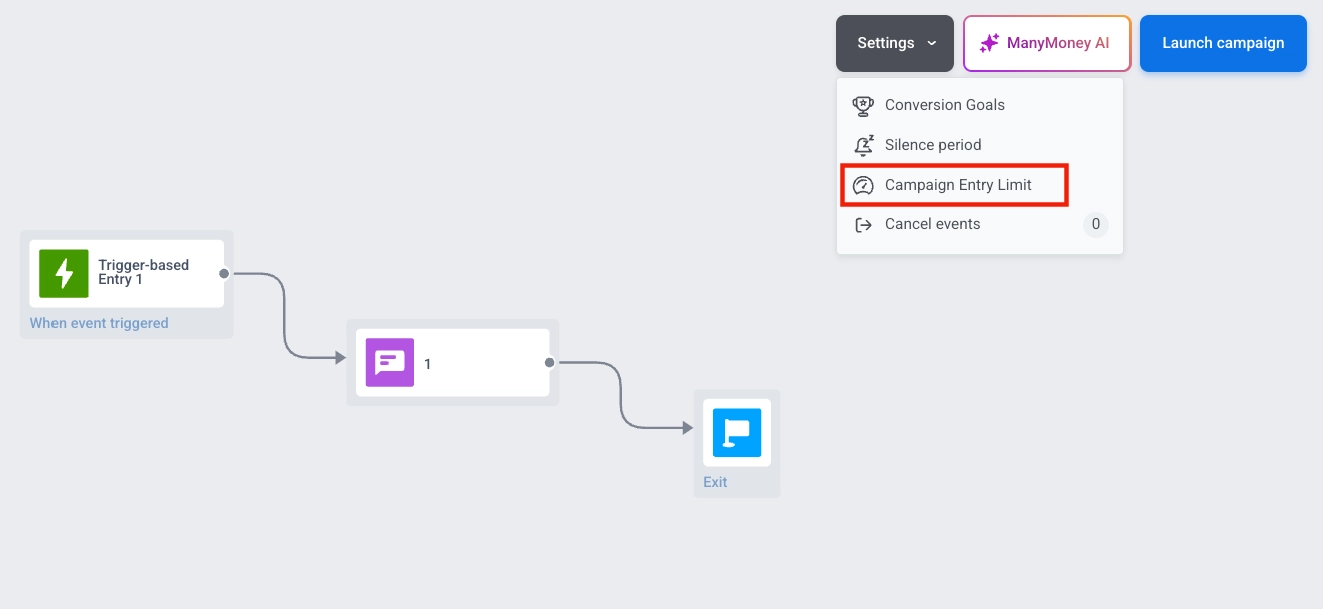 Set **Campaign entry limit** to let users go through the journey:
* Once in a lifetime (user will enter the journey only once ever)
* Once a day (24 hours)
* Once a week (7 days)
* Once a month (30 days)
* Once in three months (90 days)

For example, a user gets in the journey when adding a product to their shopping cart. If they trigger the same Event within 24 hours after entering the journey, they will not re-enter.
### Multiple sessions
If a [Trigger-based Entry](/product/customer-journey/journey-elements/entry-elements/trigger-based-entry/) uses [multiple active sessions](/product/customer-journey/journey-elements/entry-elements/trigger-based-entry/#multiple-active-sessions-per-user), a **Multiple sessions** option appears on the journey canvas. Click **Settings** and select **Multiple sessions** to open a drawer that shows every point in the journey where a session-matching attribute is required, so you can review and adjust those attributes in one place.
Set **Campaign entry limit** to let users go through the journey:
* Once in a lifetime (user will enter the journey only once ever)
* Once a day (24 hours)
* Once a week (7 days)
* Once a month (30 days)
* Once in three months (90 days)

For example, a user gets in the journey when adding a product to their shopping cart. If they trigger the same Event within 24 hours after entering the journey, they will not re-enter.
### Multiple sessions
If a [Trigger-based Entry](/product/customer-journey/journey-elements/entry-elements/trigger-based-entry/) uses [multiple active sessions](/product/customer-journey/journey-elements/entry-elements/trigger-based-entry/#multiple-active-sessions-per-user), a **Multiple sessions** option appears on the journey canvas. Click **Settings** and select **Multiple sessions** to open a drawer that shows every point in the journey where a session-matching attribute is required, so you can review and adjust those attributes in one place.
 The drawer consolidates information from:
* **[Trigger-based entry points](/product/customer-journey/journey-elements/entry-elements/trigger-based-entry/)**
* **[Wait for Trigger steps](/product/customer-journey/journey-elements/flow-controls/wait-for-trigger/)**
* **[Conversion goals](/product/customer-journey/journey-settings/#conversion-goals)**
The drawer consolidates information from:
* **[Trigger-based entry points](/product/customer-journey/journey-elements/entry-elements/trigger-based-entry/)**
* **[Wait for Trigger steps](/product/customer-journey/journey-elements/flow-controls/wait-for-trigger/)**
* **[Conversion goals](/product/customer-journey/journey-settings/#conversion-goals)**
 For each point, you can:
* View the session-matching attribute currently used (e.g., `order_id`)
* Select a different attribute directly in the drawer
* See which events are associated with that point
### Cancel events: Remove users from a journey without counting a conversion
Cancel events are conditions that immediately remove users from a Journey without being counted as conversions. These events are used solely to exit users and do not impact your conversion statistics.
##### Use cases
Set up cancel events for actions that should stop further messaging but aren't considered a campaign success. For example, unsubscribing from emails or disabling push notifications.
These events help you maintain cleaner user flows and avoid counting technical or preference-based actions as conversions.
##### Set up Cancel events
To set up a Cancel event:
1. Open your campaign and go to **Settings > Cancel events**.
For each point, you can:
* View the session-matching attribute currently used (e.g., `order_id`)
* Select a different attribute directly in the drawer
* See which events are associated with that point
### Cancel events: Remove users from a journey without counting a conversion
Cancel events are conditions that immediately remove users from a Journey without being counted as conversions. These events are used solely to exit users and do not impact your conversion statistics.
##### Use cases
Set up cancel events for actions that should stop further messaging but aren't considered a campaign success. For example, unsubscribing from emails or disabling push notifications.
These events help you maintain cleaner user flows and avoid counting technical or preference-based actions as conversions.
##### Set up Cancel events
To set up a Cancel event:
1. Open your campaign and go to **Settings > Cancel events**.
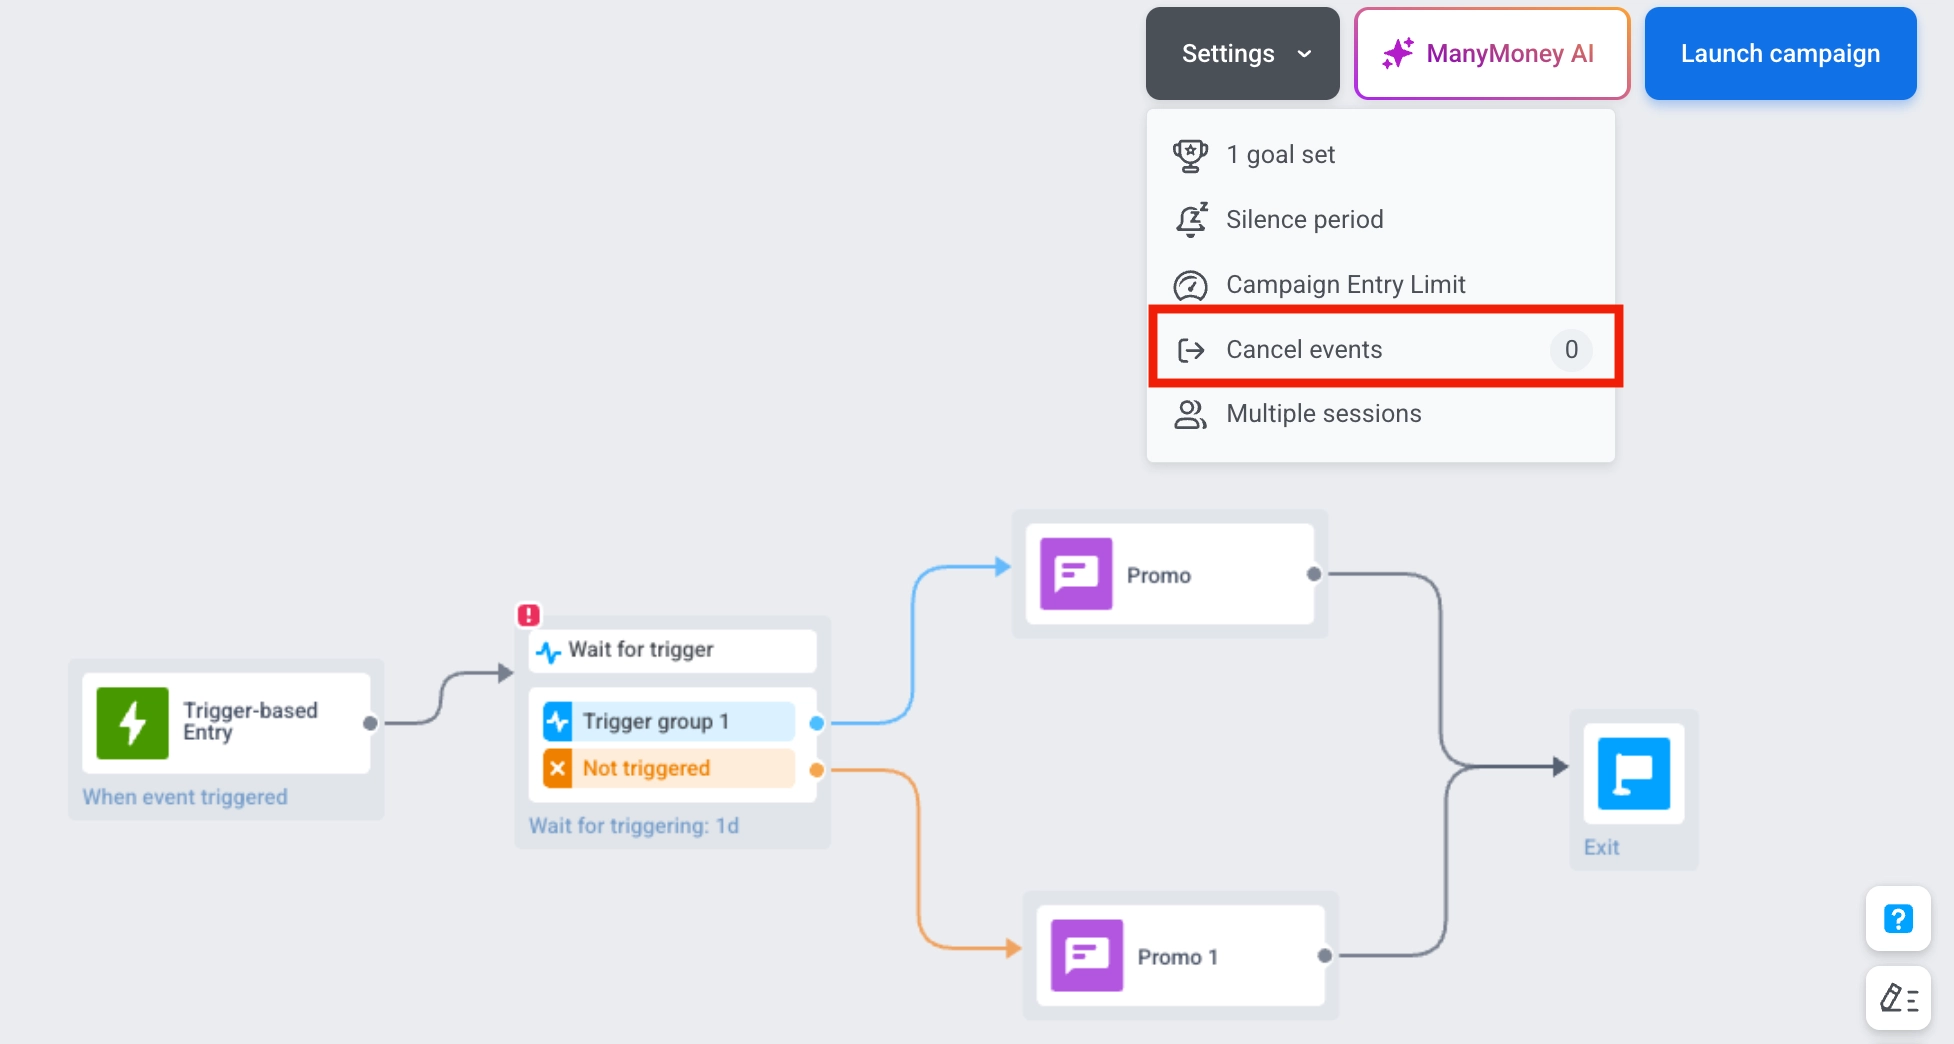 2. Select an event from the dropdown.
3. Add conditions if needed.
4. Click **Save** to apply the changes.
2. Select an event from the dropdown.
3. Add conditions if needed.
4. Click **Save** to apply the changes.
 As soon as a user triggers any of the defined events and matches the conditions, they will be removed from the campaign.
To download a list of users who exited the campaign due to a cancel event, go to **Settings > Cancel events** on the Journey canvas. Click the **download icon** next to the event name. The CSV file will include user IDs and the cancel event that triggered their exit.
## Actions with journeys
### Launch
Once the journey is set up, press the **Launch campaign** button at the top right of the journey canvas. From that moment, the journey starts tracking users' behaviors and sending messages to them.
As soon as a user triggers any of the defined events and matches the conditions, they will be removed from the campaign.
To download a list of users who exited the campaign due to a cancel event, go to **Settings > Cancel events** on the Journey canvas. Click the **download icon** next to the event name. The CSV file will include user IDs and the cancel event that triggered their exit.
## Actions with journeys
### Launch
Once the journey is set up, press the **Launch campaign** button at the top right of the journey canvas. From that moment, the journey starts tracking users' behaviors and sending messages to them.
 ### Edit
Both draft and active journeys can be edited. You can update journey settings and content to test communication effectiveness, fix errors, or adapt your campaigns to special events, changing conditions, or new business needs.
[More about editing journeys](/product/customer-journey/journey-editing)
### Edit
Both draft and active journeys can be edited. You can update journey settings and content to test communication effectiveness, fix errors, or adapt your campaigns to special events, changing conditions, or new business needs.
[More about editing journeys](/product/customer-journey/journey-editing)
 ### Clone
You can duplicate an existing campaign within the same project or clone it to another project while keeping its structure, settings, selected events, segments, and content.
Cloning a journey is useful in the following cases:
* **Testing in a sandbox environment:** Before running a journey in a live app, you can clone it to a test app to check its logic, triggers, and messaging flow without affecting real users.
* **Transferring campaigns across projects:** If you manage multiple apps, cloning allows you to quickly move successful campaigns between projects, saving time and effort.
* **Reusing a template:** Create a sample journey that can be customized and reused for different goals or scenarios.
* **Restarting a deactivated journey:** Since deactivated journeys cannot be reactivated, you can clone them and launch the copy instead.
##### How to clone a campaign
1. You can clone a campaign from either the [**Campaigns list**](/product/customer-journey/journeys-list/) or the **journey canvas**.
* **Journey canvas:** If the campaign is inactive, click the **Clone campaign** button. If the campaign is active, click the **Campaign is active** dropdown in the top-right corner and select **Clone** from the menu.
* **Campaigns list:** Click **Clone** next to the campaign name to open the cloning settings.
2. In the window that opens, enter a name for the cloned campaign.
3. Select up to 5 destination projects from the dropdown list. You can clone the journey within the same project or to other projects in your account.
4. Choose what to do with the message content:
* **Clear messages content:** Removes all message content from the cloned campaign. You will need to select an existing preset or create new content.
* **Keep messages content:** Copies the message content to the cloned campaign. Editing presets will apply changes across all campaigns within the same project.
5. Click **Clone** to create the duplicate campaign.
### Clone
You can duplicate an existing campaign within the same project or clone it to another project while keeping its structure, settings, selected events, segments, and content.
Cloning a journey is useful in the following cases:
* **Testing in a sandbox environment:** Before running a journey in a live app, you can clone it to a test app to check its logic, triggers, and messaging flow without affecting real users.
* **Transferring campaigns across projects:** If you manage multiple apps, cloning allows you to quickly move successful campaigns between projects, saving time and effort.
* **Reusing a template:** Create a sample journey that can be customized and reused for different goals or scenarios.
* **Restarting a deactivated journey:** Since deactivated journeys cannot be reactivated, you can clone them and launch the copy instead.
##### How to clone a campaign
1. You can clone a campaign from either the [**Campaigns list**](/product/customer-journey/journeys-list/) or the **journey canvas**.
* **Journey canvas:** If the campaign is inactive, click the **Clone campaign** button. If the campaign is active, click the **Campaign is active** dropdown in the top-right corner and select **Clone** from the menu.
* **Campaigns list:** Click **Clone** next to the campaign name to open the cloning settings.
2. In the window that opens, enter a name for the cloned campaign.
3. Select up to 5 destination projects from the dropdown list. You can clone the journey within the same project or to other projects in your account.
4. Choose what to do with the message content:
* **Clear messages content:** Removes all message content from the cloned campaign. You will need to select an existing preset or create new content.
* **Keep messages content:** Copies the message content to the cloned campaign. Editing presets will apply changes across all campaigns within the same project.
5. Click **Clone** to create the duplicate campaign.
 ### Deactivate
To stop a journey permanently and mark it as **Inactive**, select **Stop permanently**:
* **Campaigns list:** open the three-dot menu next to an **Active** or **Paused** campaign and select **Stop permanently**.
* **Journey canvas:** click the **Campaign status** dropdown in the upper-right corner and select **Stop permanently**.
### Deactivate
To stop a journey permanently and mark it as **Inactive**, select **Stop permanently**:
* **Campaigns list:** open the three-dot menu next to an **Active** or **Paused** campaign and select **Stop permanently**.
* **Journey canvas:** click the **Campaign status** dropdown in the upper-right corner and select **Stop permanently**.
 The campaign will be marked as **Inactive** in the [campaigns list](/product/customer-journey/journeys-list):
 ### Archive
If you have many inactive journeys, archive them to keep the list easy to navigate. Archived journeys can be cloned like campaigns from the main list.
To archive a journey, go to the [campaigns list](/product/customer-journey/journeys-list), click the three-dot menu icon next to the inactive campaign, and select **Archive**.
### Archive
If you have many inactive journeys, archive them to keep the list easy to navigate. Archived journeys can be cloned like campaigns from the main list.
To archive a journey, go to the [campaigns list](/product/customer-journey/journeys-list), click the three-dot menu icon next to the inactive campaign, and select **Archive**.
 To view archived journeys, go to the campaigns list and click the **Archived** filter.
 ## Pre-launch check
Before launching a journey, use the **Pre-launch check** to see if the campaign is ready.
## Pre-launch check
Before launching a journey, use the **Pre-launch check** to see if the campaign is ready.
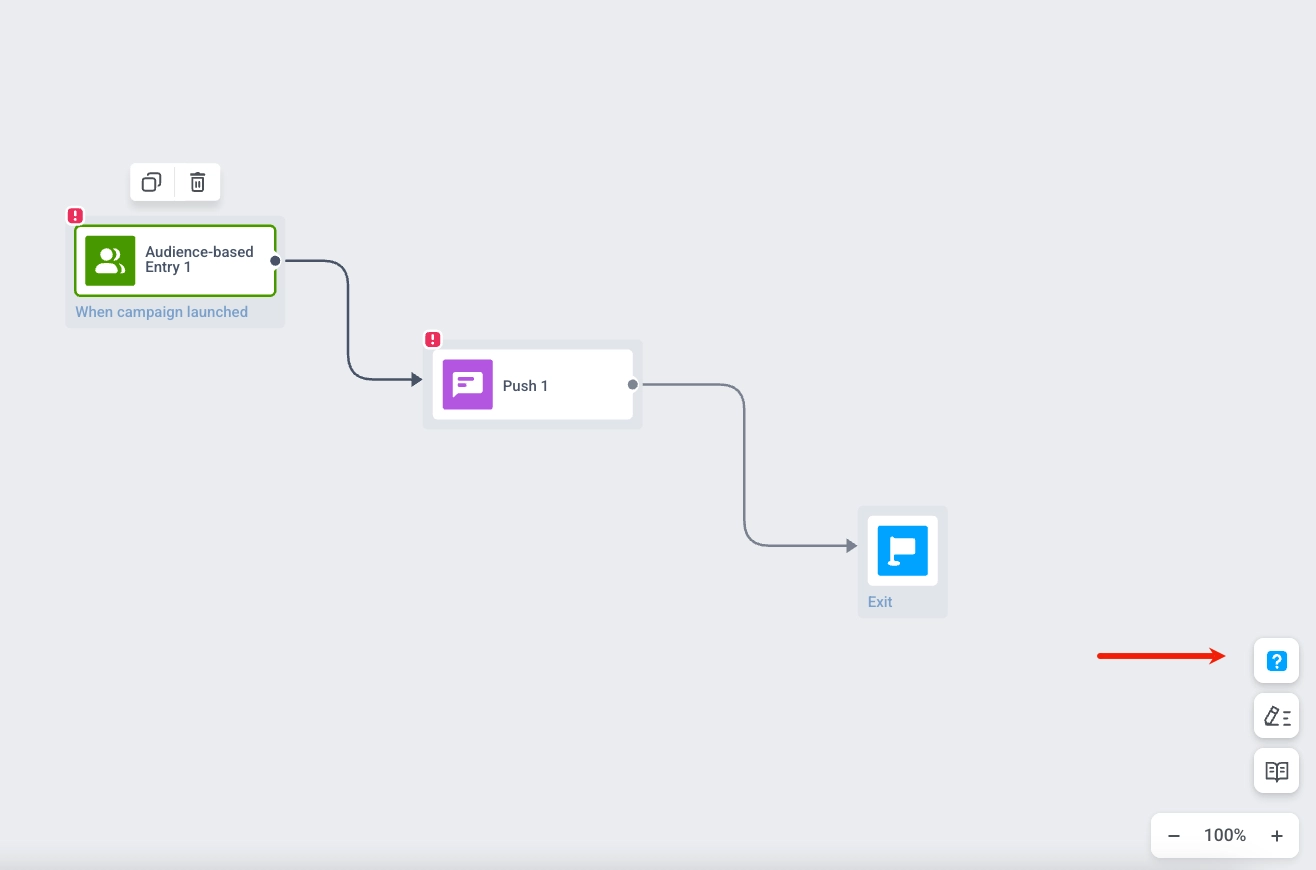 The panel shows the status **Campaign is not ready to launch** or **Campaign is ready to launch** and lists steps you need to complete:
* **Entry step added**: An entry element is on the canvas
* **Add some additional steps**: At least one step (e.g. message or flow control) is added
* **Don't forget to add Exit step**: An Exit element is added
* **Combine all the steps all together**: All elements are connected in the flow
* **Configure these steps correctly**: Each element is configured (e.g. content, audience, schedule)
Click **Run validation** to re-check after making changes.
When all steps are complete, the status shows **Campaign is ready to launch** and the **Start campaign** button appears at the bottom of the panel.
Click **Start campaign** to run validation and start sending. If validation finds issues (e.g. Email platform not enabled, default sender details missing), a **Validation** panel opens and lists the errors.
Fix the issues, then click **Revalidate** to run the check again. When validation passes, the journey starts.
The panel shows the status **Campaign is not ready to launch** or **Campaign is ready to launch** and lists steps you need to complete:
* **Entry step added**: An entry element is on the canvas
* **Add some additional steps**: At least one step (e.g. message or flow control) is added
* **Don't forget to add Exit step**: An Exit element is added
* **Combine all the steps all together**: All elements are connected in the flow
* **Configure these steps correctly**: Each element is configured (e.g. content, audience, schedule)
Click **Run validation** to re-check after making changes.
When all steps are complete, the status shows **Campaign is ready to launch** and the **Start campaign** button appears at the bottom of the panel.
Click **Start campaign** to run validation and start sending. If validation finds issues (e.g. Email platform not enabled, default sender details missing), a **Validation** panel opens and lists the errors.
Fix the issues, then click **Revalidate** to run the check again. When validation passes, the journey starts.