# Using webhook response data in your journey
## Overview
When you [map values from a webhook response](/product/customer-journey/journey-elements/channels/webhook/#map-webhook-response-data-to-variables), Pushwoosh stores them as variables you can use later in the journey, anywhere you'd otherwise use an [Event attribute](/product/audience-data-and-segmentation/events/#2-set-attributes).
## Save a webhook value as a Tag with Update user profile
A [**Webhook**](/product/customer-journey/journey-elements/channels/webhook/#map-webhook-response-data-to-variables) can return data from an external system, such as a CRM user ID or subscription status, that Pushwoosh does not store on the user profile yet. [**Update user profile**](/product/customer-journey/journey-elements/flow-controls/update-user-profile/#use-a-value-from-a-webhook-response) saves mapped values as [Tags](/product/audience-data-and-segmentation/user-data-tags/tags/) so you can use them in [segments](/product/audience-data-and-segmentation/segmentation/), [dynamic content](/product/personalization/dynamic-content/), and later journey steps.
### Example: save a CRM user ID as a Tag
A new user signs up in your app, and the journey creates a matching record in your CRM. Saving the returned CRM user ID as a Tag lets you reference or update the same CRM record later, for example from another journey or a follow-up Webhook call, instead of creating a duplicate record each time the user re-enters the journey.
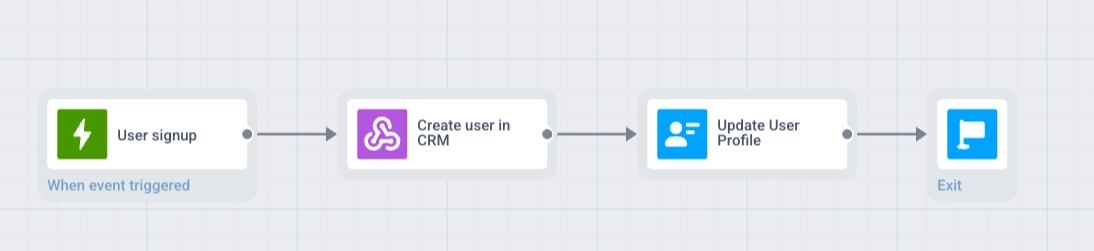
**Journey flow:** Trigger-based Entry → Webhook → Update user profile → Exit
1. Create a journey with **Trigger-based Entry** on the `SignUp` event.
2. Add a **Webhook** element after the entry step. Name it (for example, `Create user in CRM`) and set the request URL to your CRM create-user endpoint.
3. In **Response mapping**, set **Path** to the ID field in the response (for example, `data.user.id`) and **Attribute** to `crm_user_id`.
4. Add an **Update user profile** element after the **Webhook** step.
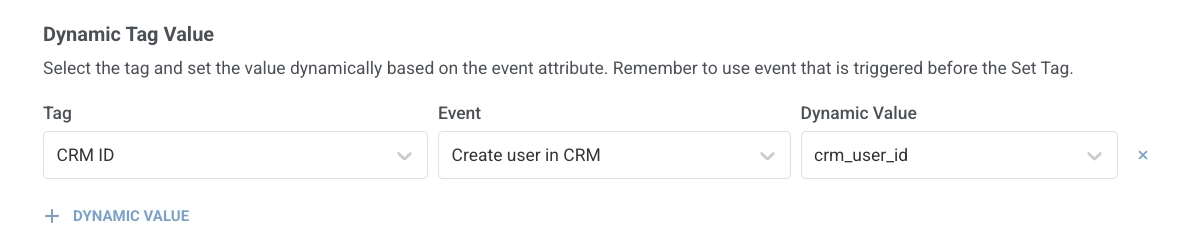
5. In **Dynamic Tag Value**, click **+ Dynamic Value**. In **Tag**, select the Tag that stores the CRM ID (create it in advance if needed). In **Event**, select the webhook step by the name you gave it (`Create user in CRM`). In **Dynamic Value**, select `crm_user_id`.
6. Add **Exit** at the end of the branch.
## Schedule a delay from a webhook value with Time Delay
Visit dates, renewal deadlines, and delivery windows often live in an external booking or billing system. After a [**Webhook**](/product/customer-journey/journey-elements/channels/webhook/#map-webhook-response-data-to-variables) maps the date from the API response, [**Time Delay**](/product/customer-journey/journey-elements/flow-controls/time-delay/#use-a-date-from-a-webhook-response) can pause the journey until that moment, for example 2 days before an appointment, so the next message goes out on time.
### Example: schedule a reminder from a date in the response
A user books an appointment in your app. The journey fetches the visit date from your booking system and sends a push reminder 2 days before the visit.
1. Create a journey with **Trigger-based Entry** on the `AppointmentBooked` event.
2. Add a **Webhook** element after the entry step. Name it (for example, `Get appointment details`) and set the request URL to your booking system API.
3. In **Response mapping**, set **Path** to the date field in the response (for example, `appointment.date`) and **Attribute** to `visit_date`.
4. Add a **Time Delay** element after the **Webhook** step. Select **Based on user/event data**, set **Get date from** to **Event**, set **Event** to the webhook step by the name you gave it (`Get appointment details`), set **Event value** to `visit_date`, and set the delay to **Before** `2` **Days**.
5. If users can book less than 2 days before the visit, enable **Split to branches if the date's in the past or date is empty** on the **Time Delay** element. This creates two branches, **In the past** and **In the future**. See [Split branches when the date is in the past or empty](/product/customer-journey/journey-elements/flow-controls/time-delay/#split-branches-when-the-date-is-in-the-past-or-empty).
6. Add a **Push** step with your reminder message. If split is enabled, add this **Push** in both branches: **In the past** (send immediately) and **In the future** (after **Time Delay**).
7. Add **Exit** at the end of each branch.
## Things to keep in mind
* **Path syntax:** use a dot-separated path (for example, `data.user.id`). Wildcards and filters are not supported. See [Webhook response mapping](/product/customer-journey/journey-elements/channels/webhook/#map-webhook-response-data-to-variables) for details.
* **Response size:** responses larger than 64 KB are not processed for mapping.
* **Testing:** run [**Test webhook**](/product/customer-journey/journey-elements/channels/webhook/#test-the-webhook) in the **Webhook** element before you use mapped values in a live journey.
 4. Add an **Update user profile** element after the **Webhook** step.
5. In **Dynamic Tag Value**, click **+ Dynamic Value**. In **Tag**, select the Tag that stores the CRM ID (create it in advance if needed). In **Event**, select the webhook step by the name you gave it (`Create user in CRM`). In **Dynamic Value**, select `crm_user_id`.
4. Add an **Update user profile** element after the **Webhook** step.
5. In **Dynamic Tag Value**, click **+ Dynamic Value**. In **Tag**, select the Tag that stores the CRM ID (create it in advance if needed). In **Event**, select the webhook step by the name you gave it (`Create user in CRM`). In **Dynamic Value**, select `crm_user_id`.
 6. Add **Exit** at the end of the branch.
 ## Schedule a delay from a webhook value with Time Delay
Visit dates, renewal deadlines, and delivery windows often live in an external booking or billing system. After a [**Webhook**](/product/customer-journey/journey-elements/channels/webhook/#map-webhook-response-data-to-variables) maps the date from the API response, [**Time Delay**](/product/customer-journey/journey-elements/flow-controls/time-delay/#use-a-date-from-a-webhook-response) can pause the journey until that moment, for example 2 days before an appointment, so the next message goes out on time.
### Example: schedule a reminder from a date in the response
A user books an appointment in your app. The journey fetches the visit date from your booking system and sends a push reminder 2 days before the visit.
1. Create a journey with **Trigger-based Entry** on the `AppointmentBooked` event.
2. Add a **Webhook** element after the entry step. Name it (for example, `Get appointment details`) and set the request URL to your booking system API.
3. In **Response mapping**, set **Path** to the date field in the response (for example, `appointment.date`) and **Attribute** to `visit_date`.
## Schedule a delay from a webhook value with Time Delay
Visit dates, renewal deadlines, and delivery windows often live in an external booking or billing system. After a [**Webhook**](/product/customer-journey/journey-elements/channels/webhook/#map-webhook-response-data-to-variables) maps the date from the API response, [**Time Delay**](/product/customer-journey/journey-elements/flow-controls/time-delay/#use-a-date-from-a-webhook-response) can pause the journey until that moment, for example 2 days before an appointment, so the next message goes out on time.
### Example: schedule a reminder from a date in the response
A user books an appointment in your app. The journey fetches the visit date from your booking system and sends a push reminder 2 days before the visit.
1. Create a journey with **Trigger-based Entry** on the `AppointmentBooked` event.
2. Add a **Webhook** element after the entry step. Name it (for example, `Get appointment details`) and set the request URL to your booking system API.
3. In **Response mapping**, set **Path** to the date field in the response (for example, `appointment.date`) and **Attribute** to `visit_date`.
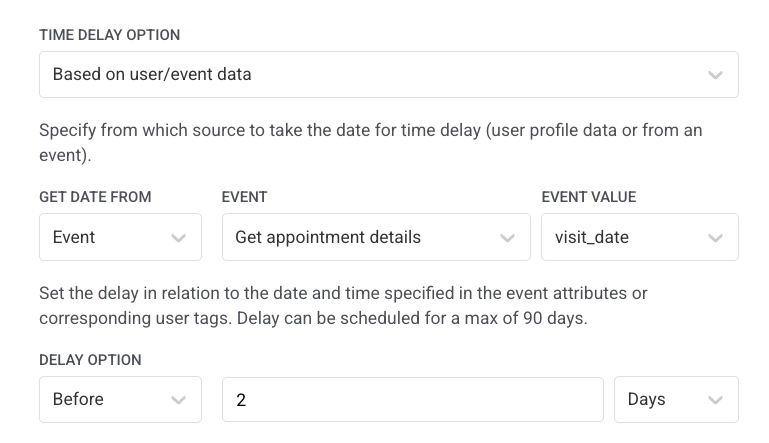
 4. Add a **Time Delay** element after the **Webhook** step. Select **Based on user/event data**, set **Get date from** to **Event**, set **Event** to the webhook step by the name you gave it (`Get appointment details`), set **Event value** to `visit_date`, and set the delay to **Before** `2` **Days**.
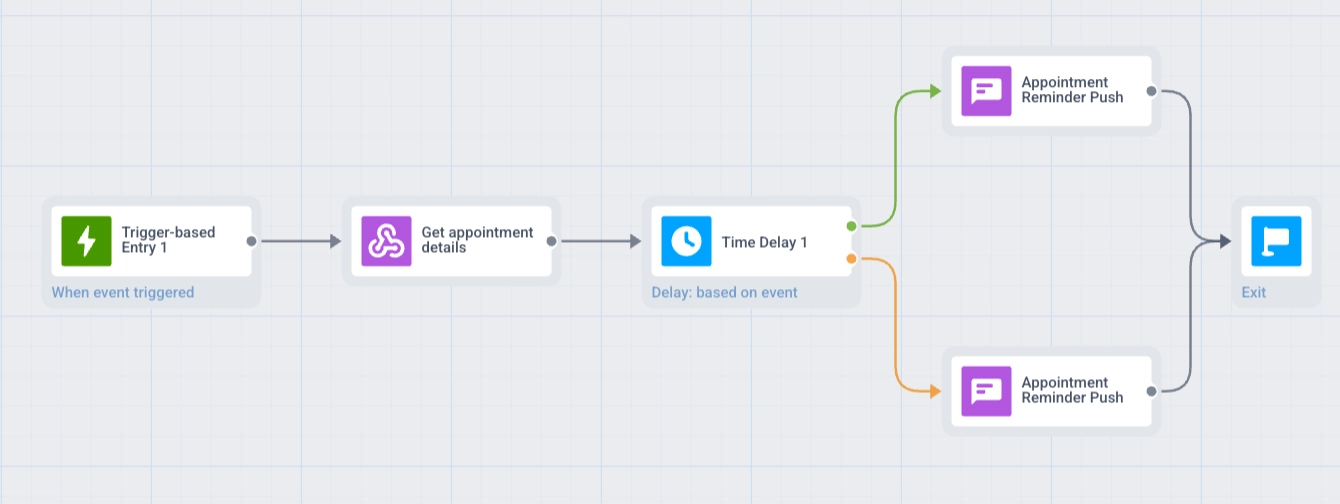
 5. If users can book less than 2 days before the visit, enable **Split to branches if the date's in the past or date is empty** on the **Time Delay** element. This creates two branches, **In the past** and **In the future**. See [Split branches when the date is in the past or empty](/product/customer-journey/journey-elements/flow-controls/time-delay/#split-branches-when-the-date-is-in-the-past-or-empty).
6. Add a **Push** step with your reminder message. If split is enabled, add this **Push** in both branches: **In the past** (send immediately) and **In the future** (after **Time Delay**).
7. Add **Exit** at the end of each branch.
5. If users can book less than 2 days before the visit, enable **Split to branches if the date's in the past or date is empty** on the **Time Delay** element. This creates two branches, **In the past** and **In the future**. See [Split branches when the date is in the past or empty](/product/customer-journey/journey-elements/flow-controls/time-delay/#split-branches-when-the-date-is-in-the-past-or-empty).
6. Add a **Push** step with your reminder message. If split is enabled, add this **Push** in both branches: **In the past** (send immediately) and **In the future** (after **Time Delay**).
7. Add **Exit** at the end of each branch.
 ## Things to keep in mind
* **Path syntax:** use a dot-separated path (for example, `data.user.id`). Wildcards and filters are not supported. See [Webhook response mapping](/product/customer-journey/journey-elements/channels/webhook/#map-webhook-response-data-to-variables) for details.
* **Response size:** responses larger than 64 KB are not processed for mapping.
* **Testing:** run [**Test webhook**](/product/customer-journey/journey-elements/channels/webhook/#test-the-webhook) in the **Webhook** element before you use mapped values in a live journey.
## Things to keep in mind
* **Path syntax:** use a dot-separated path (for example, `data.user.id`). Wildcards and filters are not supported. See [Webhook response mapping](/product/customer-journey/journey-elements/channels/webhook/#map-webhook-response-data-to-variables) for details.
* **Response size:** responses larger than 64 KB are not processed for mapping.
* **Testing:** run [**Test webhook**](/product/customer-journey/journey-elements/channels/webhook/#test-the-webhook) in the **Webhook** element before you use mapped values in a live journey.