# Wait for Trigger
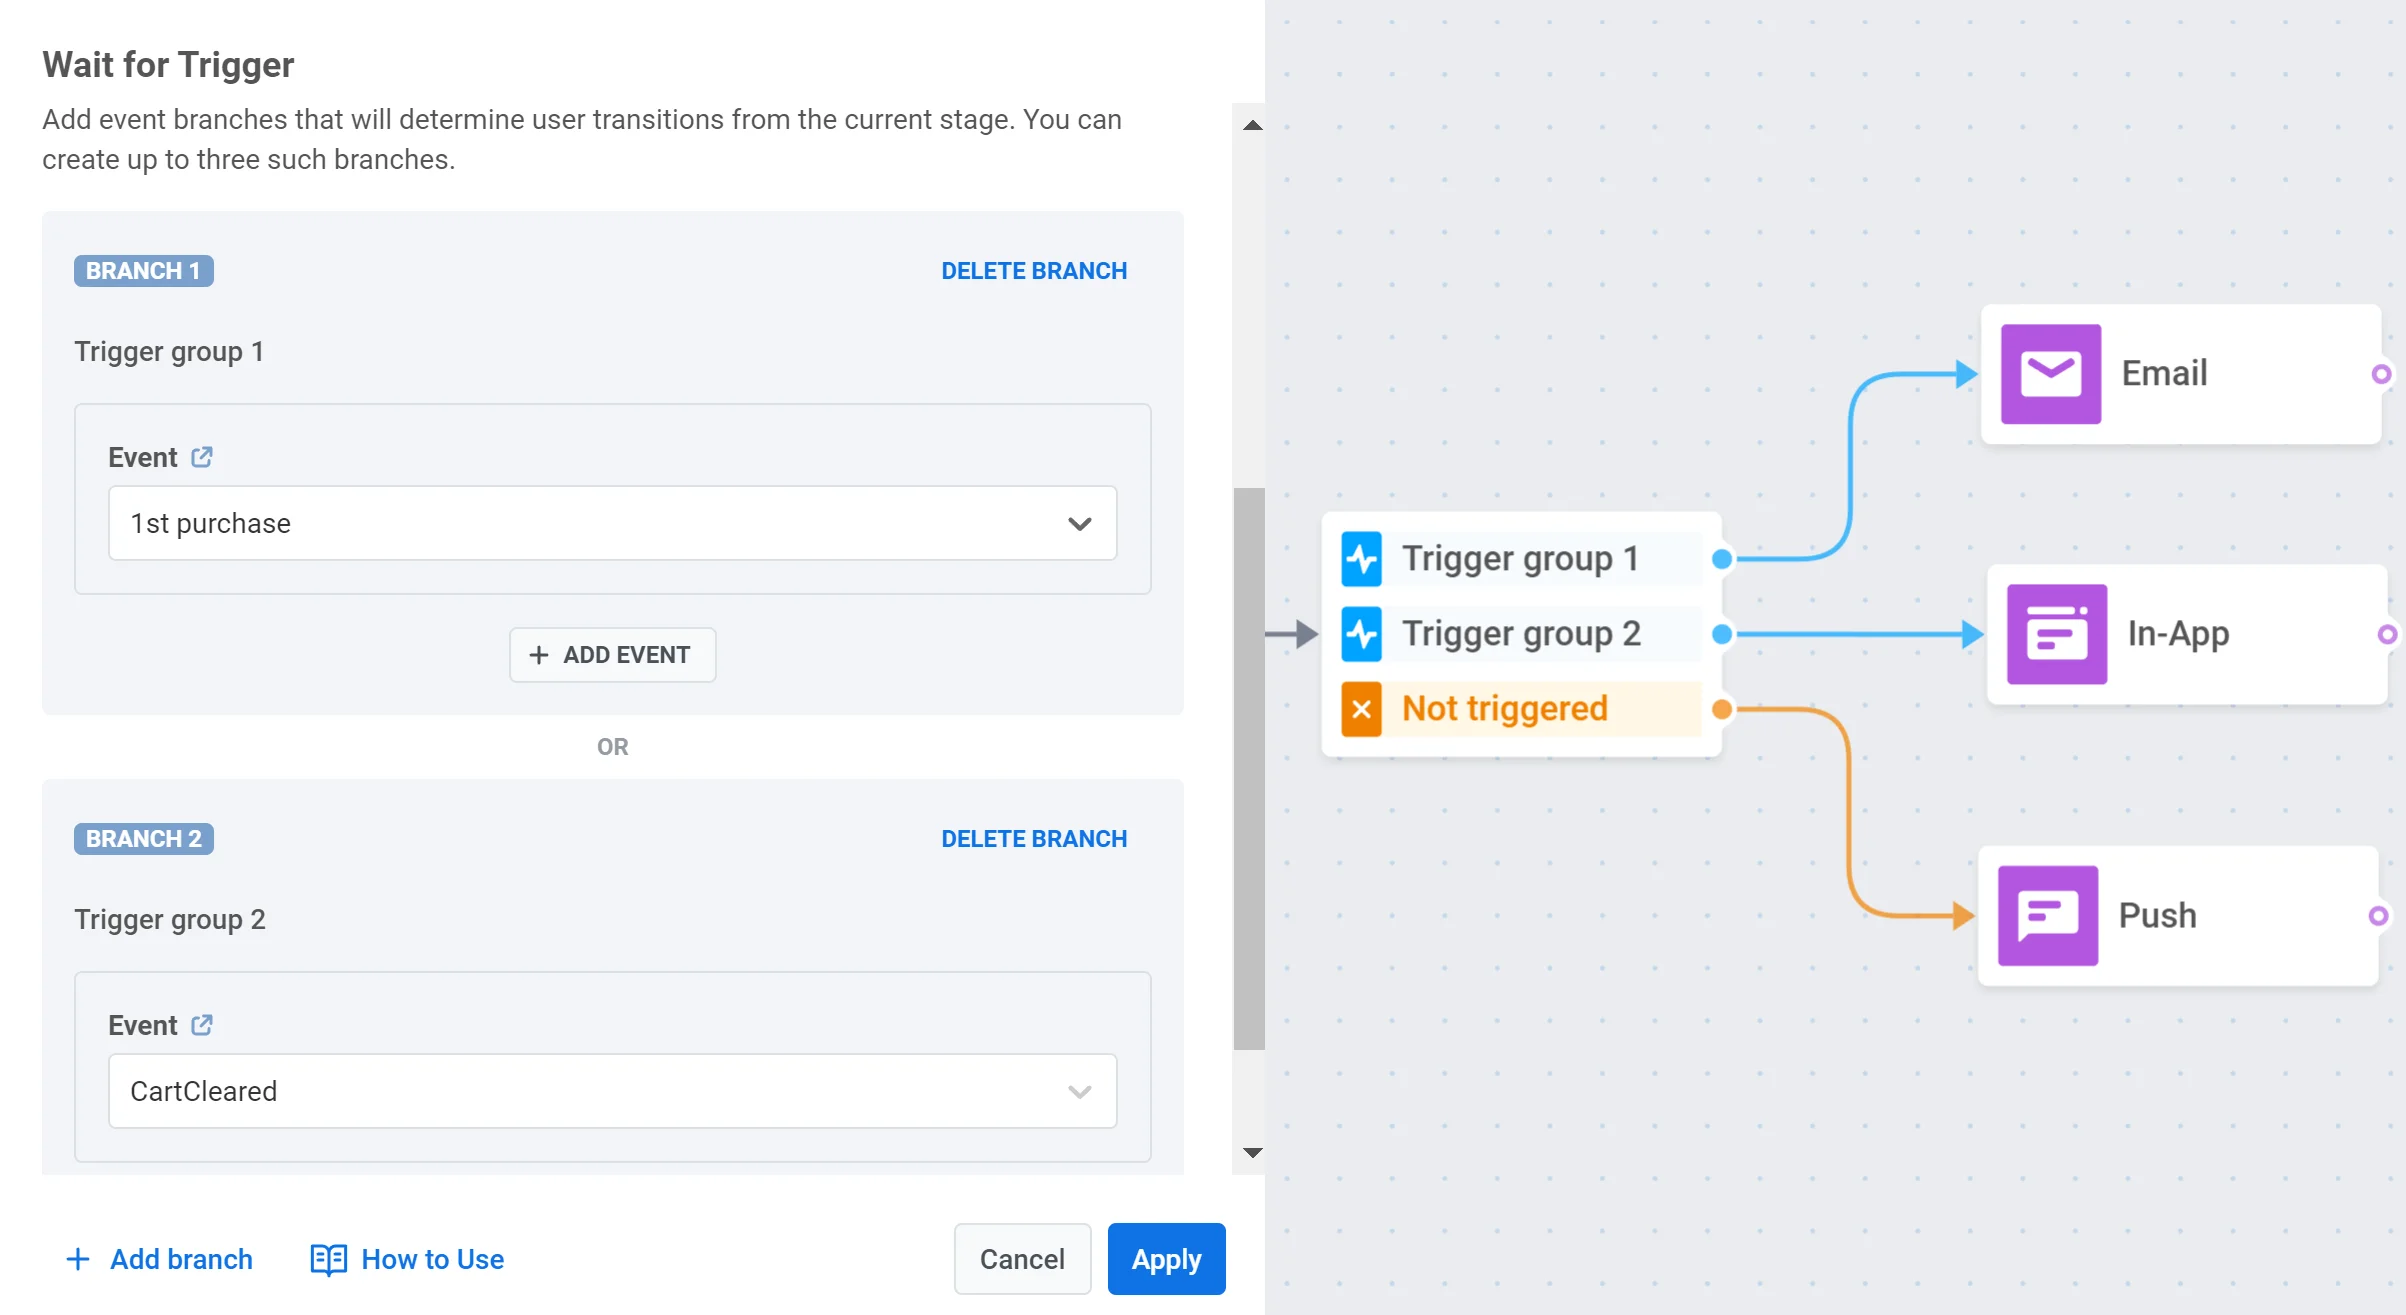
The **Wait for Trigger** element allows you to control how your journey flows based on whether a user triggers one or more specific events within a set timeframe (up to 90 days).
You can create up to three branches, each defined by a specific event or set of events. This allows you to design different communication paths based on which event(s) the user triggers. There is also an additional branch, called _Not triggered_, for users who don't meet the conditions of any other branch.
##### Use cases
- Sending a special discount to users who don't complete a purchase within a set period after adding items to cart.
- Creating separate communication paths based on which action a user takes after receiving a push notification: opening the notification, clicking a link in the notification, or taking no action.
- Setting up different follow-up messages depending on whether a user views a product, adds it to cart, or purchases it within a set timeframe.
## Set the waiting period
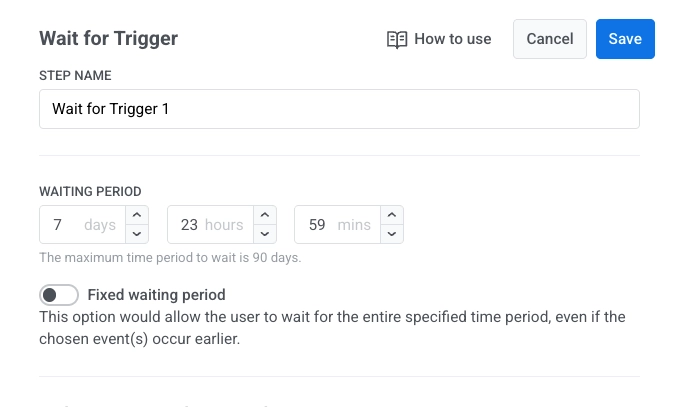
After adding the Wait for Trigger element, specify how long the system should wait for the user to trigger your chosen events.
You can set the waiting period for up to 90 days.
If none of the selected events are triggered within this timeframe, the user will continue down the **Not triggered** branch.
#### Fixed waiting period (optional)
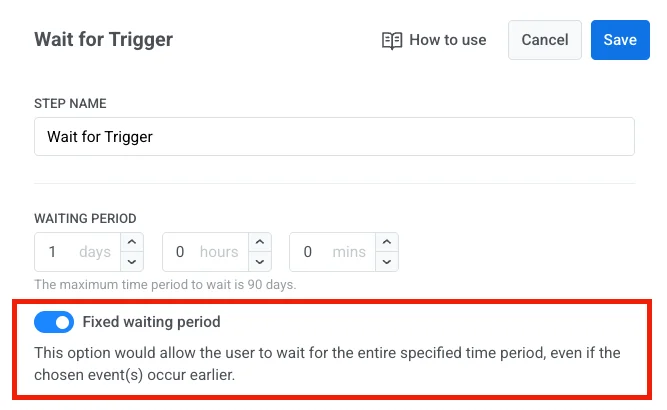
Enable **Fixed waiting period** if you want the user to always wait the full duration, even if their event happens earlier.
## Configure branches
Branches let you set up different outcome paths in the journey, depending on which events the user triggers. You can add up to three branches, plus there is always a **Not triggered** branch for users who don't match any event conditions.
To configure a branch:
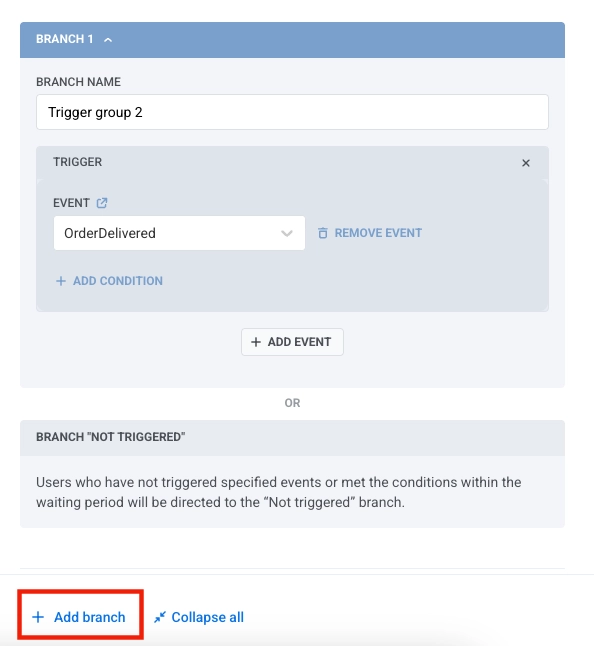
1. Enter a name for the branch in the **BRANCH NAME** field.
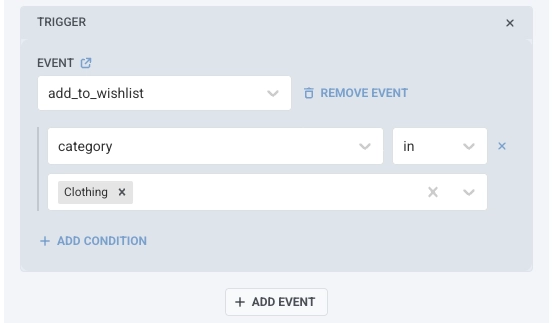
2. Add events to the branch by clicking **ADD EVENT** and selecting an event from the dropdown menu. You can add up to four events per branch.
3. For each event, you can add conditions by clicking **ADD CONDITION** to filter events by specific attributes. For the available operators, see [Tag operators by type](/product/audience-data-and-segmentation/segmentation/create-segments/by-tags/#tag-operators-by-type).
4. To remove an event from a branch, click **REMOVE EVENT**.
If a branch includes multiple events, you can choose how they're evaluated using one of the following logical operators:
- **AND:** The user must trigger all listed events to proceed along this branch.
- **OR:** The user needs to trigger at least one of the listed events to proceed.
This lets you tailor each branch to handle complex combinations of user actions in a clear and structured way.
To add a new branch, click **Add branch**.
### Set up multi session attribute matching
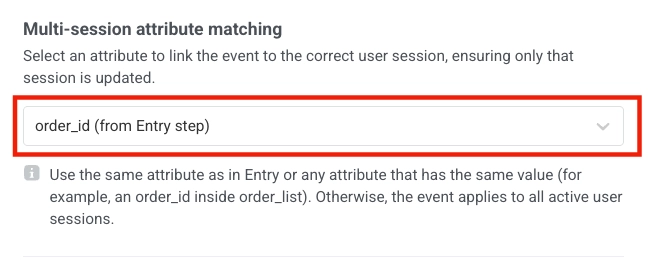
If your journey uses [**Multiple active sessions per user**](/product/customer-journey/journey-elements/entry-elements/trigger-based-entry/#multiple-active-sessions-per-user), this section appears automatically. Its purpose is to ensure that each incoming event is matched to the correct user session, rather than applied to every active session the user may have.
To configure session matching:
1. First, add an event to your branch (as described in the [Configure branches](#configure-branches) section above).
2. Then, select an attribute in the dropdown that identifies the session. The attribute you select must satisfy two conditions:
- It must match the identifier used in the Entry step (for example, `order_id`, `appointment_id`, `transaction_id`).
- It must also be present in the event you added to the branch.
##### Example
Your app allows users to book multiple appointments. Each booking starts a separate journey session identified by an attribute such as `appointment_id`.
Suppose a user books two appointments:
* Appointment **1001**
* Appointment **1002**
This creates two active sessions, one per appointment.
Later, the user triggers an event like `AppointmentConfirmed` that contains `appointment_id: 1001`.
The **Wait for Trigger** element compares this value to the session identifier and correctly applies the event only to the session for appointment **1001**. This ensures the right appointment flow continues.
> If the event does not include the session-matching attribute (in this case `appointment_id`), Pushwoosh cannot determine which session it belongs to. The event will then be applied to **all** active user sessions, leading to incorrect or duplicated flows.
## Example use cases
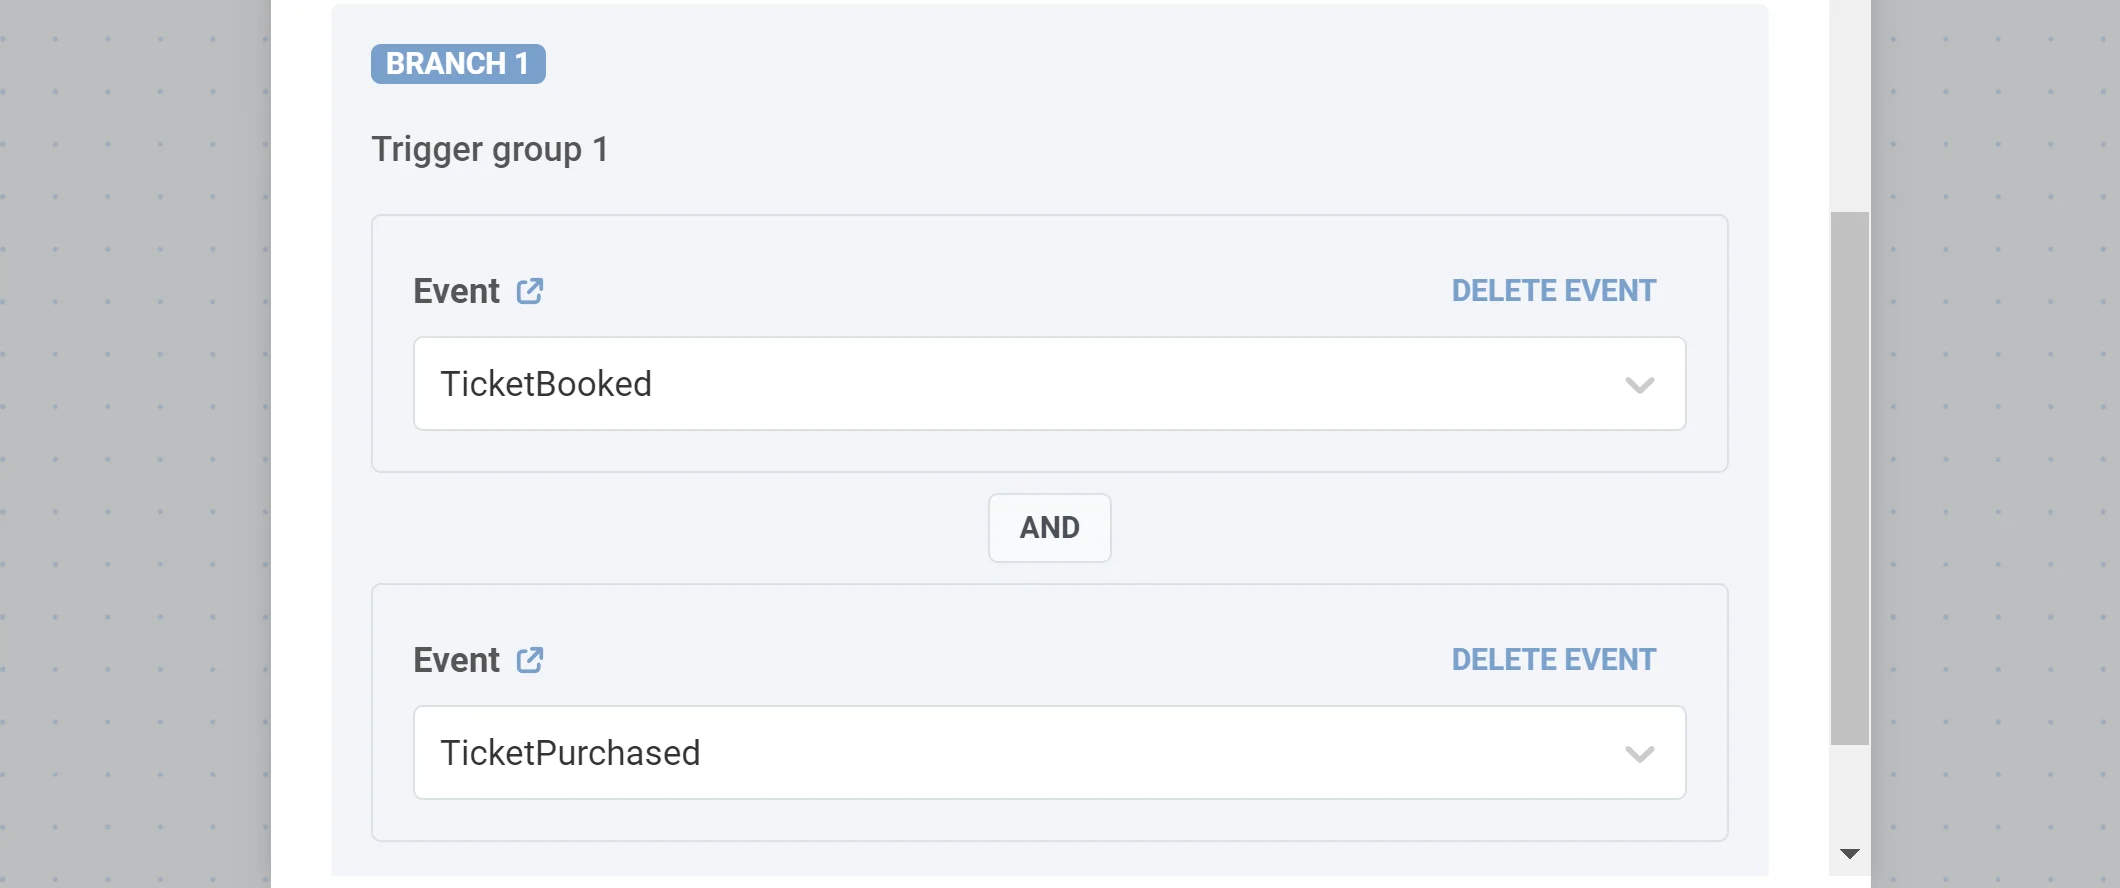
**1. Set up special communications for users who trigger one or several specific events.** Imagine you want to email customers who've booked and paid for a plane ticket. To do the job, add a Wait for Trigger step with one branch and specify two events in it: _TicketBooked_ and _TickedPurchased_ (assume you configured them before). Select the _AND_ logical operator so that only users who meet both conditions will proceed further.
**2. Split the flow depending on the type of product purchased.** Let's say you offer Basic and Premium subscriptions. When buying a subscription, users trigger the _SubscriptionPurchased_ event with the _type_ attribute that gets the _Basic_ or _Premium_ value. To split the journey flow depending on the subscription type, add a Wait for Trigger step with two branches. In the first branch, specify the _SubscriptionPurchased_ event with the _type is Basic_ condition; in the second, add the _SubscriptionPurchased_ event with the _type is Premium_ condition.
 ##### Use cases
- Sending a special discount to users who don't complete a purchase within a set period after adding items to cart.
- Creating separate communication paths based on which action a user takes after receiving a push notification: opening the notification, clicking a link in the notification, or taking no action.
- Setting up different follow-up messages depending on whether a user views a product, adds it to cart, or purchases it within a set timeframe.
## Set the waiting period
After adding the Wait for Trigger element, specify how long the system should wait for the user to trigger your chosen events.
You can set the waiting period for up to 90 days.
If none of the selected events are triggered within this timeframe, the user will continue down the **Not triggered** branch.
##### Use cases
- Sending a special discount to users who don't complete a purchase within a set period after adding items to cart.
- Creating separate communication paths based on which action a user takes after receiving a push notification: opening the notification, clicking a link in the notification, or taking no action.
- Setting up different follow-up messages depending on whether a user views a product, adds it to cart, or purchases it within a set timeframe.
## Set the waiting period
After adding the Wait for Trigger element, specify how long the system should wait for the user to trigger your chosen events.
You can set the waiting period for up to 90 days.
If none of the selected events are triggered within this timeframe, the user will continue down the **Not triggered** branch.
 #### Fixed waiting period (optional)
Enable **Fixed waiting period** if you want the user to always wait the full duration, even if their event happens earlier.
#### Fixed waiting period (optional)
Enable **Fixed waiting period** if you want the user to always wait the full duration, even if their event happens earlier.
 ## Configure branches
Branches let you set up different outcome paths in the journey, depending on which events the user triggers. You can add up to three branches, plus there is always a **Not triggered** branch for users who don't match any event conditions.
To configure a branch:
1. Enter a name for the branch in the **BRANCH NAME** field.
2. Add events to the branch by clicking **ADD EVENT** and selecting an event from the dropdown menu. You can add up to four events per branch.
3. For each event, you can add conditions by clicking **ADD CONDITION** to filter events by specific attributes. For the available operators, see [Tag operators by type](/product/audience-data-and-segmentation/segmentation/create-segments/by-tags/#tag-operators-by-type).
## Configure branches
Branches let you set up different outcome paths in the journey, depending on which events the user triggers. You can add up to three branches, plus there is always a **Not triggered** branch for users who don't match any event conditions.
To configure a branch:
1. Enter a name for the branch in the **BRANCH NAME** field.
2. Add events to the branch by clicking **ADD EVENT** and selecting an event from the dropdown menu. You can add up to four events per branch.
3. For each event, you can add conditions by clicking **ADD CONDITION** to filter events by specific attributes. For the available operators, see [Tag operators by type](/product/audience-data-and-segmentation/segmentation/create-segments/by-tags/#tag-operators-by-type).
 4. To remove an event from a branch, click **REMOVE EVENT**.
If a branch includes multiple events, you can choose how they're evaluated using one of the following logical operators:
- **AND:** The user must trigger all listed events to proceed along this branch.
- **OR:** The user needs to trigger at least one of the listed events to proceed.
This lets you tailor each branch to handle complex combinations of user actions in a clear and structured way.
To add a new branch, click **Add branch**.
4. To remove an event from a branch, click **REMOVE EVENT**.
If a branch includes multiple events, you can choose how they're evaluated using one of the following logical operators:
- **AND:** The user must trigger all listed events to proceed along this branch.
- **OR:** The user needs to trigger at least one of the listed events to proceed.
This lets you tailor each branch to handle complex combinations of user actions in a clear and structured way.
To add a new branch, click **Add branch**.
 ### Set up multi session attribute matching
If your journey uses [**Multiple active sessions per user**](/product/customer-journey/journey-elements/entry-elements/trigger-based-entry/#multiple-active-sessions-per-user), this section appears automatically. Its purpose is to ensure that each incoming event is matched to the correct user session, rather than applied to every active session the user may have.
To configure session matching:
1. First, add an event to your branch (as described in the [Configure branches](#configure-branches) section above).
2. Then, select an attribute in the dropdown that identifies the session. The attribute you select must satisfy two conditions:
- It must match the identifier used in the Entry step (for example, `order_id`, `appointment_id`, `transaction_id`).
- It must also be present in the event you added to the branch.
### Set up multi session attribute matching
If your journey uses [**Multiple active sessions per user**](/product/customer-journey/journey-elements/entry-elements/trigger-based-entry/#multiple-active-sessions-per-user), this section appears automatically. Its purpose is to ensure that each incoming event is matched to the correct user session, rather than applied to every active session the user may have.
To configure session matching:
1. First, add an event to your branch (as described in the [Configure branches](#configure-branches) section above).
2. Then, select an attribute in the dropdown that identifies the session. The attribute you select must satisfy two conditions:
- It must match the identifier used in the Entry step (for example, `order_id`, `appointment_id`, `transaction_id`).
- It must also be present in the event you added to the branch.
 ##### Example
Your app allows users to book multiple appointments. Each booking starts a separate journey session identified by an attribute such as `appointment_id`.
Suppose a user books two appointments:
* Appointment **1001**
* Appointment **1002**
This creates two active sessions, one per appointment.
Later, the user triggers an event like `AppointmentConfirmed` that contains `appointment_id: 1001`.
The **Wait for Trigger** element compares this value to the session identifier and correctly applies the event only to the session for appointment **1001**. This ensures the right appointment flow continues.
> If the event does not include the session-matching attribute (in this case `appointment_id`), Pushwoosh cannot determine which session it belongs to. The event will then be applied to **all** active user sessions, leading to incorrect or duplicated flows.
## Example use cases
**1. Set up special communications for users who trigger one or several specific events.** Imagine you want to email customers who've booked and paid for a plane ticket. To do the job, add a Wait for Trigger step with one branch and specify two events in it: _TicketBooked_ and _TickedPurchased_ (assume you configured them before). Select the _AND_ logical operator so that only users who meet both conditions will proceed further.
##### Example
Your app allows users to book multiple appointments. Each booking starts a separate journey session identified by an attribute such as `appointment_id`.
Suppose a user books two appointments:
* Appointment **1001**
* Appointment **1002**
This creates two active sessions, one per appointment.
Later, the user triggers an event like `AppointmentConfirmed` that contains `appointment_id: 1001`.
The **Wait for Trigger** element compares this value to the session identifier and correctly applies the event only to the session for appointment **1001**. This ensures the right appointment flow continues.
> If the event does not include the session-matching attribute (in this case `appointment_id`), Pushwoosh cannot determine which session it belongs to. The event will then be applied to **all** active user sessions, leading to incorrect or duplicated flows.
## Example use cases
**1. Set up special communications for users who trigger one or several specific events.** Imagine you want to email customers who've booked and paid for a plane ticket. To do the job, add a Wait for Trigger step with one branch and specify two events in it: _TicketBooked_ and _TickedPurchased_ (assume you configured them before). Select the _AND_ logical operator so that only users who meet both conditions will proceed further.
 **2. Split the flow depending on the type of product purchased.** Let's say you offer Basic and Premium subscriptions. When buying a subscription, users trigger the _SubscriptionPurchased_ event with the _type_ attribute that gets the _Basic_ or _Premium_ value. To split the journey flow depending on the subscription type, add a Wait for Trigger step with two branches. In the first branch, specify the _SubscriptionPurchased_ event with the _type is Basic_ condition; in the second, add the _SubscriptionPurchased_ event with the _type is Premium_ condition.