# Update user profile
The **Update user profile** element assigns Tag values to users as they move through a journey. You can set values manually or pull them from Event attributes or a [**Webhook**](#use-a-value-from-a-webhook-response) response.
## Update options
### Manual update
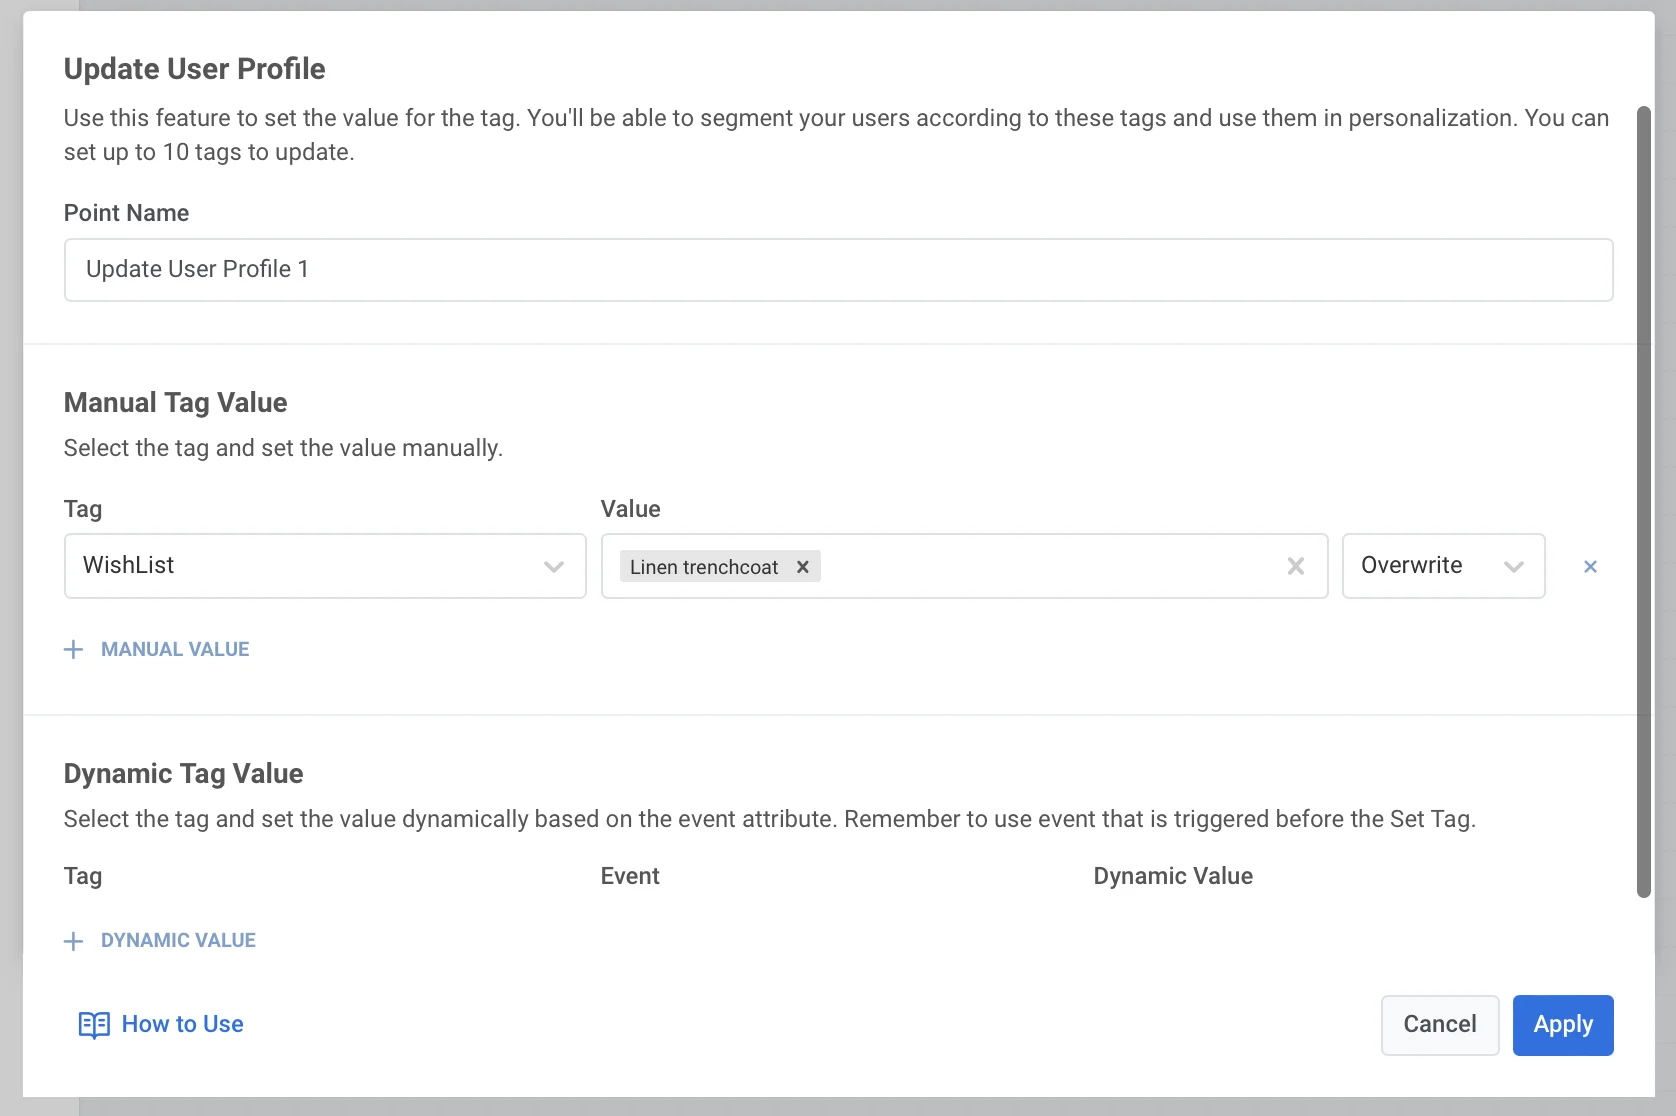
To assign Tag values to users within the journey manually:
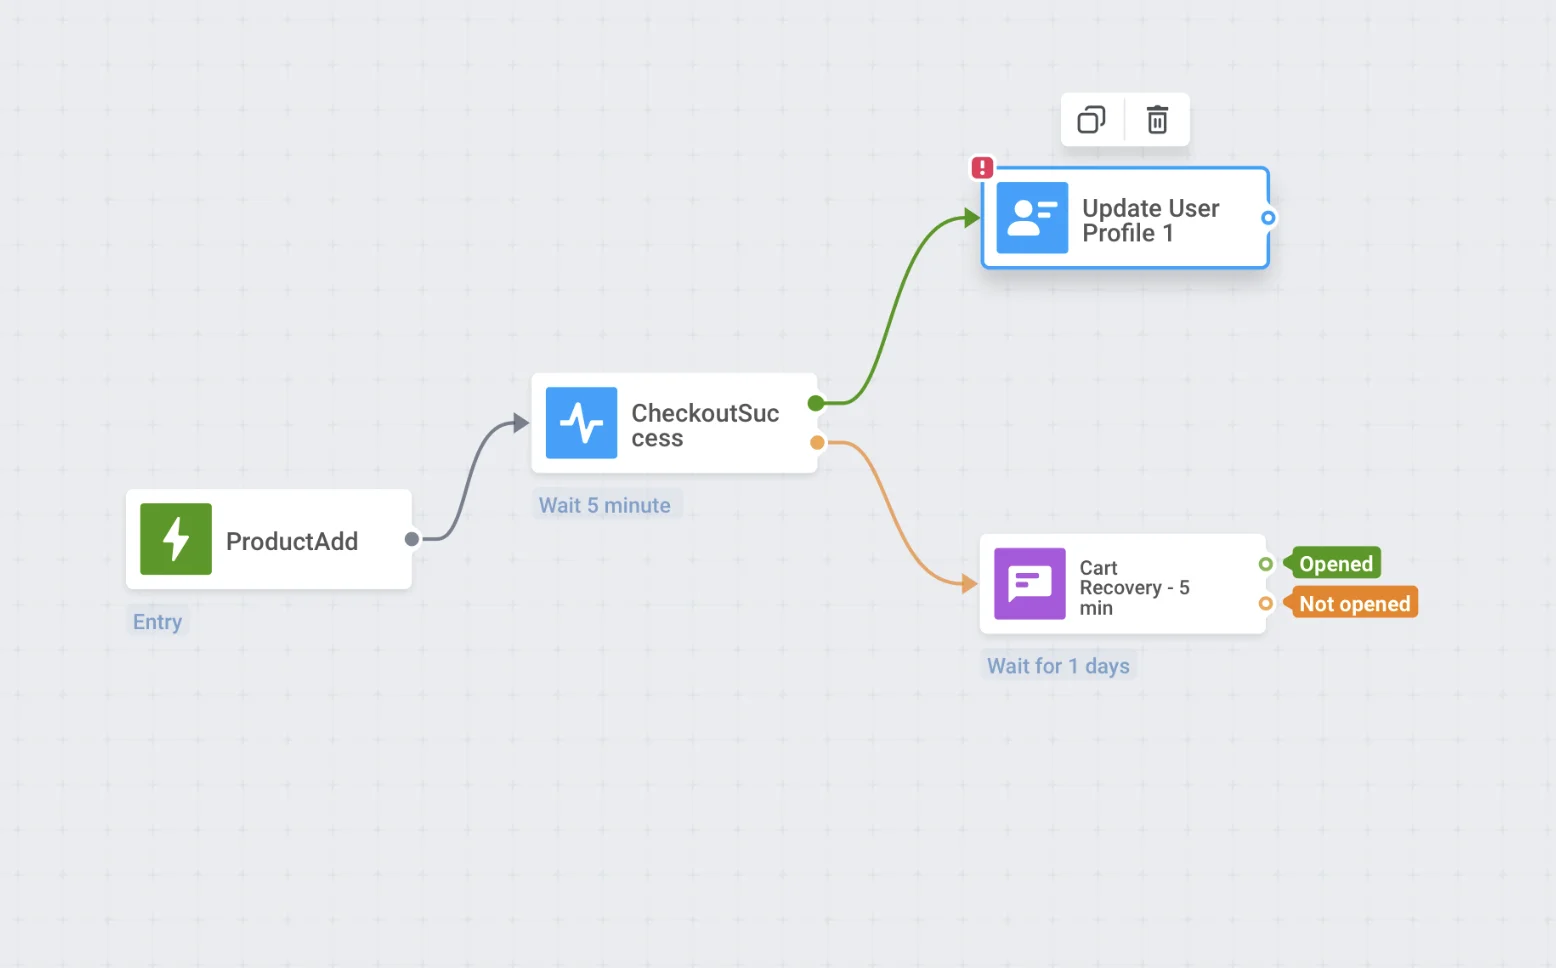
* Add the **Update user profile** element wherever you'd like on the canvas.
* Press **+ Manual value** and select a Tag from the drop-down list containing all the Tags created in your Pushwoosh account.
* Specify values for the Tag selected depending on its type.
You can set up to 10 Tags at once.
For user-specific Tags, values are assigned to all users' devices with the same user ID. For Tags that are not user-specific, values are assigned to a particular device a user is traveling the journey with.
As for use cases, there are plenty. For example, tagging users who reach a particular journey stage comes in handy when building further communications.
### Dynamic tag value
Dynamic update means Tag values are taken automatically from Event attributes that users trigger before they reach the **Update user profile** element. You can communicate to those users more personally and send them tailored offers.
To set dynamic Tag values from an Event:
1. Place the **Update user profile** element on the canvas after at least one trigger-based element (**Trigger-based Entry** or **Wait for Trigger**).
2. Double-click the element and press **+ Dynamic Value** in the **Dynamic Tag Value** section.
3. Select the Tag to set.
4. Choose an Event and the attribute that supplies the Tag value.
#### Use a value from a webhook response
If a [**Webhook**](/product/customer-journey/journey-elements/channels/webhook/#map-webhook-response-data-to-variables) element earlier in the journey has **Response mapping** configured, it appears in the **Event** dropdown by the webhook step name you set (for example, `Create user in CRM`), alongside regular Events. For a full journey example, see [Using webhook response data in your journey](/product/customer-journey/journey-elements/using-webhook-response-data-in-journeys/).
1. Place **Update user profile** after the **Webhook** step.
2. In **Dynamic Tag Value**, press **+ Dynamic Value**.
3. In **Tag**, select the Tag to update.
4. In **Event**, select the webhook step by the name you gave it (for example, `Create user in CRM`).
5. In **Dynamic Value**, select the mapped attribute (for example, `subscription_status`).
 ### Dynamic tag value
Dynamic update means Tag values are taken automatically from Event attributes that users trigger before they reach the **Update user profile** element. You can communicate to those users more personally and send them tailored offers.
To set dynamic Tag values from an Event:
1. Place the **Update user profile** element on the canvas after at least one trigger-based element (**Trigger-based Entry** or **Wait for Trigger**).
### Dynamic tag value
Dynamic update means Tag values are taken automatically from Event attributes that users trigger before they reach the **Update user profile** element. You can communicate to those users more personally and send them tailored offers.
To set dynamic Tag values from an Event:
1. Place the **Update user profile** element on the canvas after at least one trigger-based element (**Trigger-based Entry** or **Wait for Trigger**).
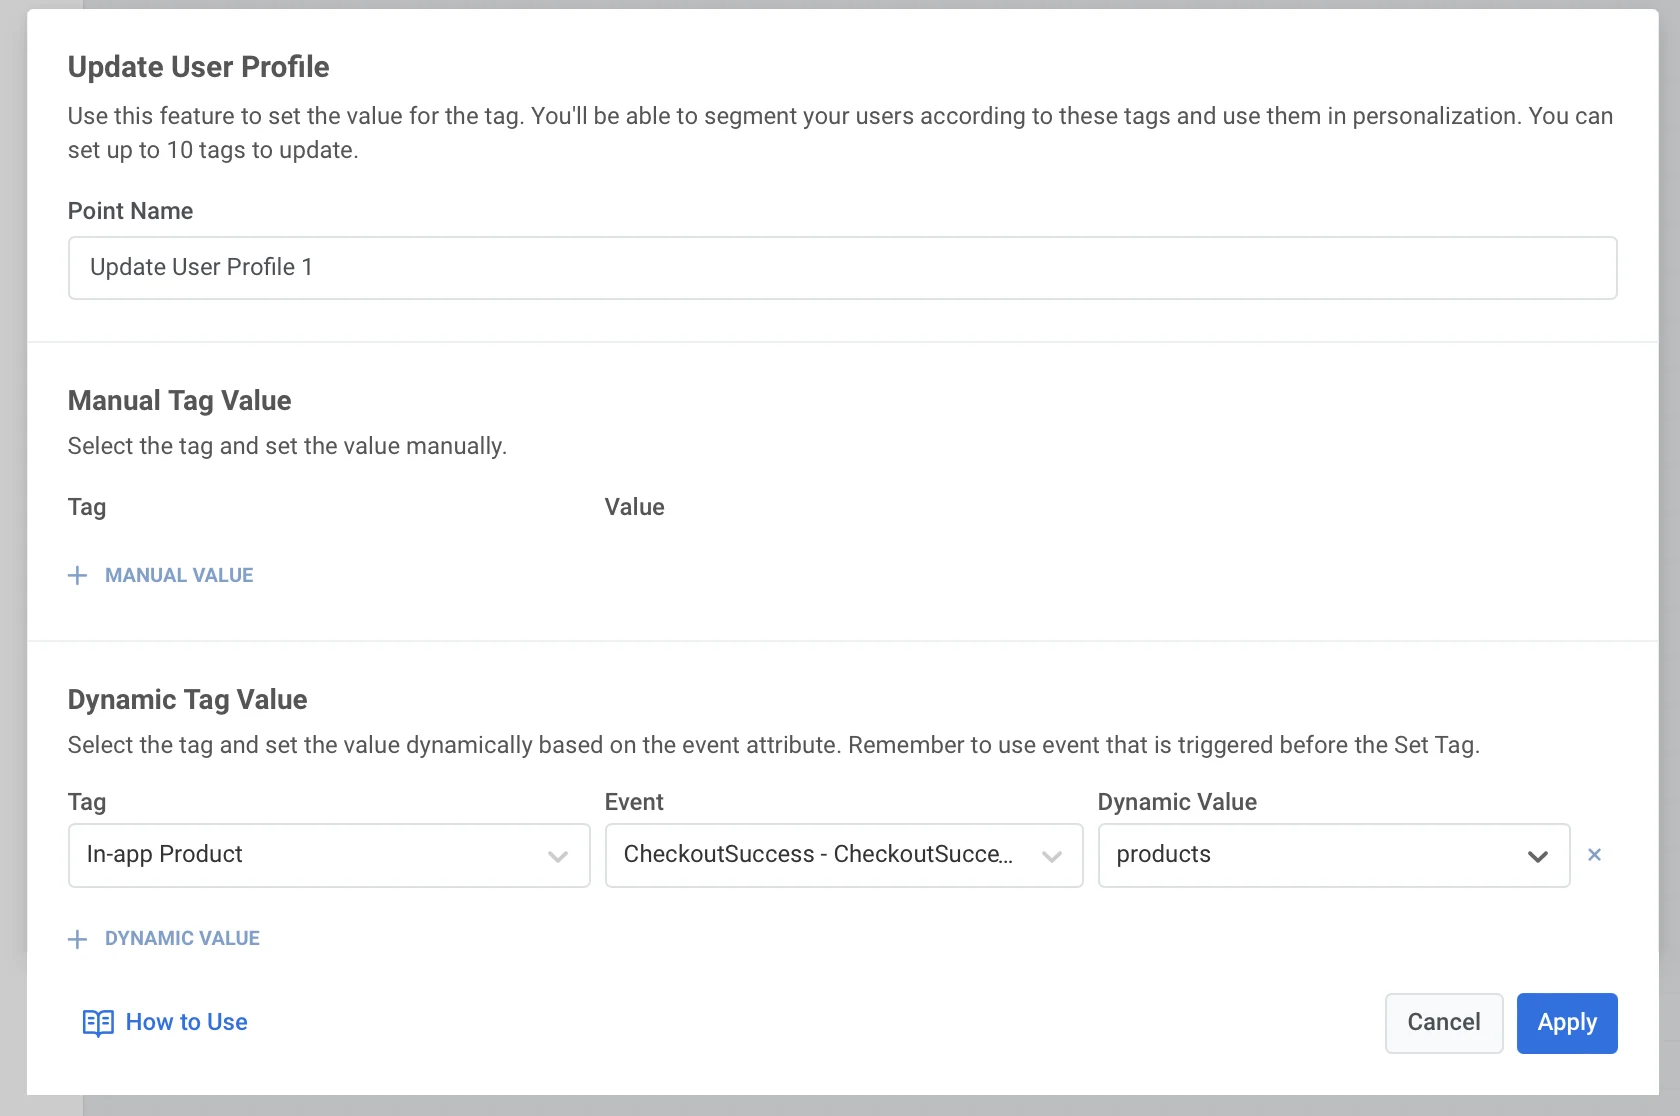
 2. Double-click the element and press **+ Dynamic Value** in the **Dynamic Tag Value** section.
3. Select the Tag to set.
4. Choose an Event and the attribute that supplies the Tag value.
2. Double-click the element and press **+ Dynamic Value** in the **Dynamic Tag Value** section.
3. Select the Tag to set.
4. Choose an Event and the attribute that supplies the Tag value.
 #### Use a value from a webhook response
If a [**Webhook**](/product/customer-journey/journey-elements/channels/webhook/#map-webhook-response-data-to-variables) element earlier in the journey has **Response mapping** configured, it appears in the **Event** dropdown by the webhook step name you set (for example, `Create user in CRM`), alongside regular Events. For a full journey example, see [Using webhook response data in your journey](/product/customer-journey/journey-elements/using-webhook-response-data-in-journeys/).
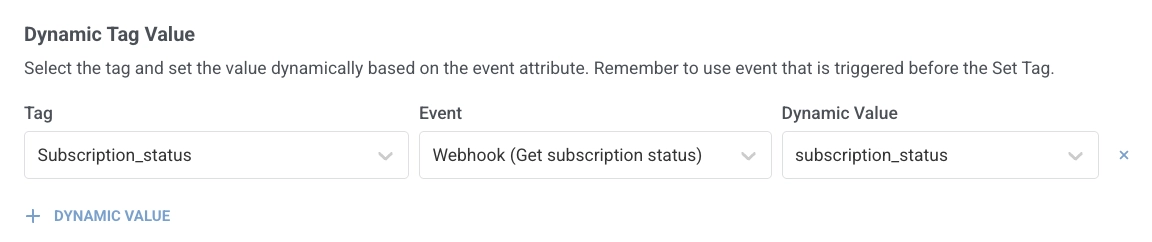
1. Place **Update user profile** after the **Webhook** step.
2. In **Dynamic Tag Value**, press **+ Dynamic Value**.
3. In **Tag**, select the Tag to update.
4. In **Event**, select the webhook step by the name you gave it (for example, `Create user in CRM`).
5. In **Dynamic Value**, select the mapped attribute (for example, `subscription_status`).
#### Use a value from a webhook response
If a [**Webhook**](/product/customer-journey/journey-elements/channels/webhook/#map-webhook-response-data-to-variables) element earlier in the journey has **Response mapping** configured, it appears in the **Event** dropdown by the webhook step name you set (for example, `Create user in CRM`), alongside regular Events. For a full journey example, see [Using webhook response data in your journey](/product/customer-journey/journey-elements/using-webhook-response-data-in-journeys/).
1. Place **Update user profile** after the **Webhook** step.
2. In **Dynamic Tag Value**, press **+ Dynamic Value**.
3. In **Tag**, select the Tag to update.
4. In **Event**, select the webhook step by the name you gave it (for example, `Create user in CRM`).
5. In **Dynamic Value**, select the mapped attribute (for example, `subscription_status`).