# A/B/n Split
Use the **A/B/n Split** element to test which message sequences perform best for your [Conversion Goals](/product/customer-journey/journey-settings#conversion-goals). Optimize communications by finding the most effective approach for your audience.
## Configure A/B/n split settings
After placing the **A/B/n Split** element on the canvas, double-click it to configure test settings.
### Set the number of branches
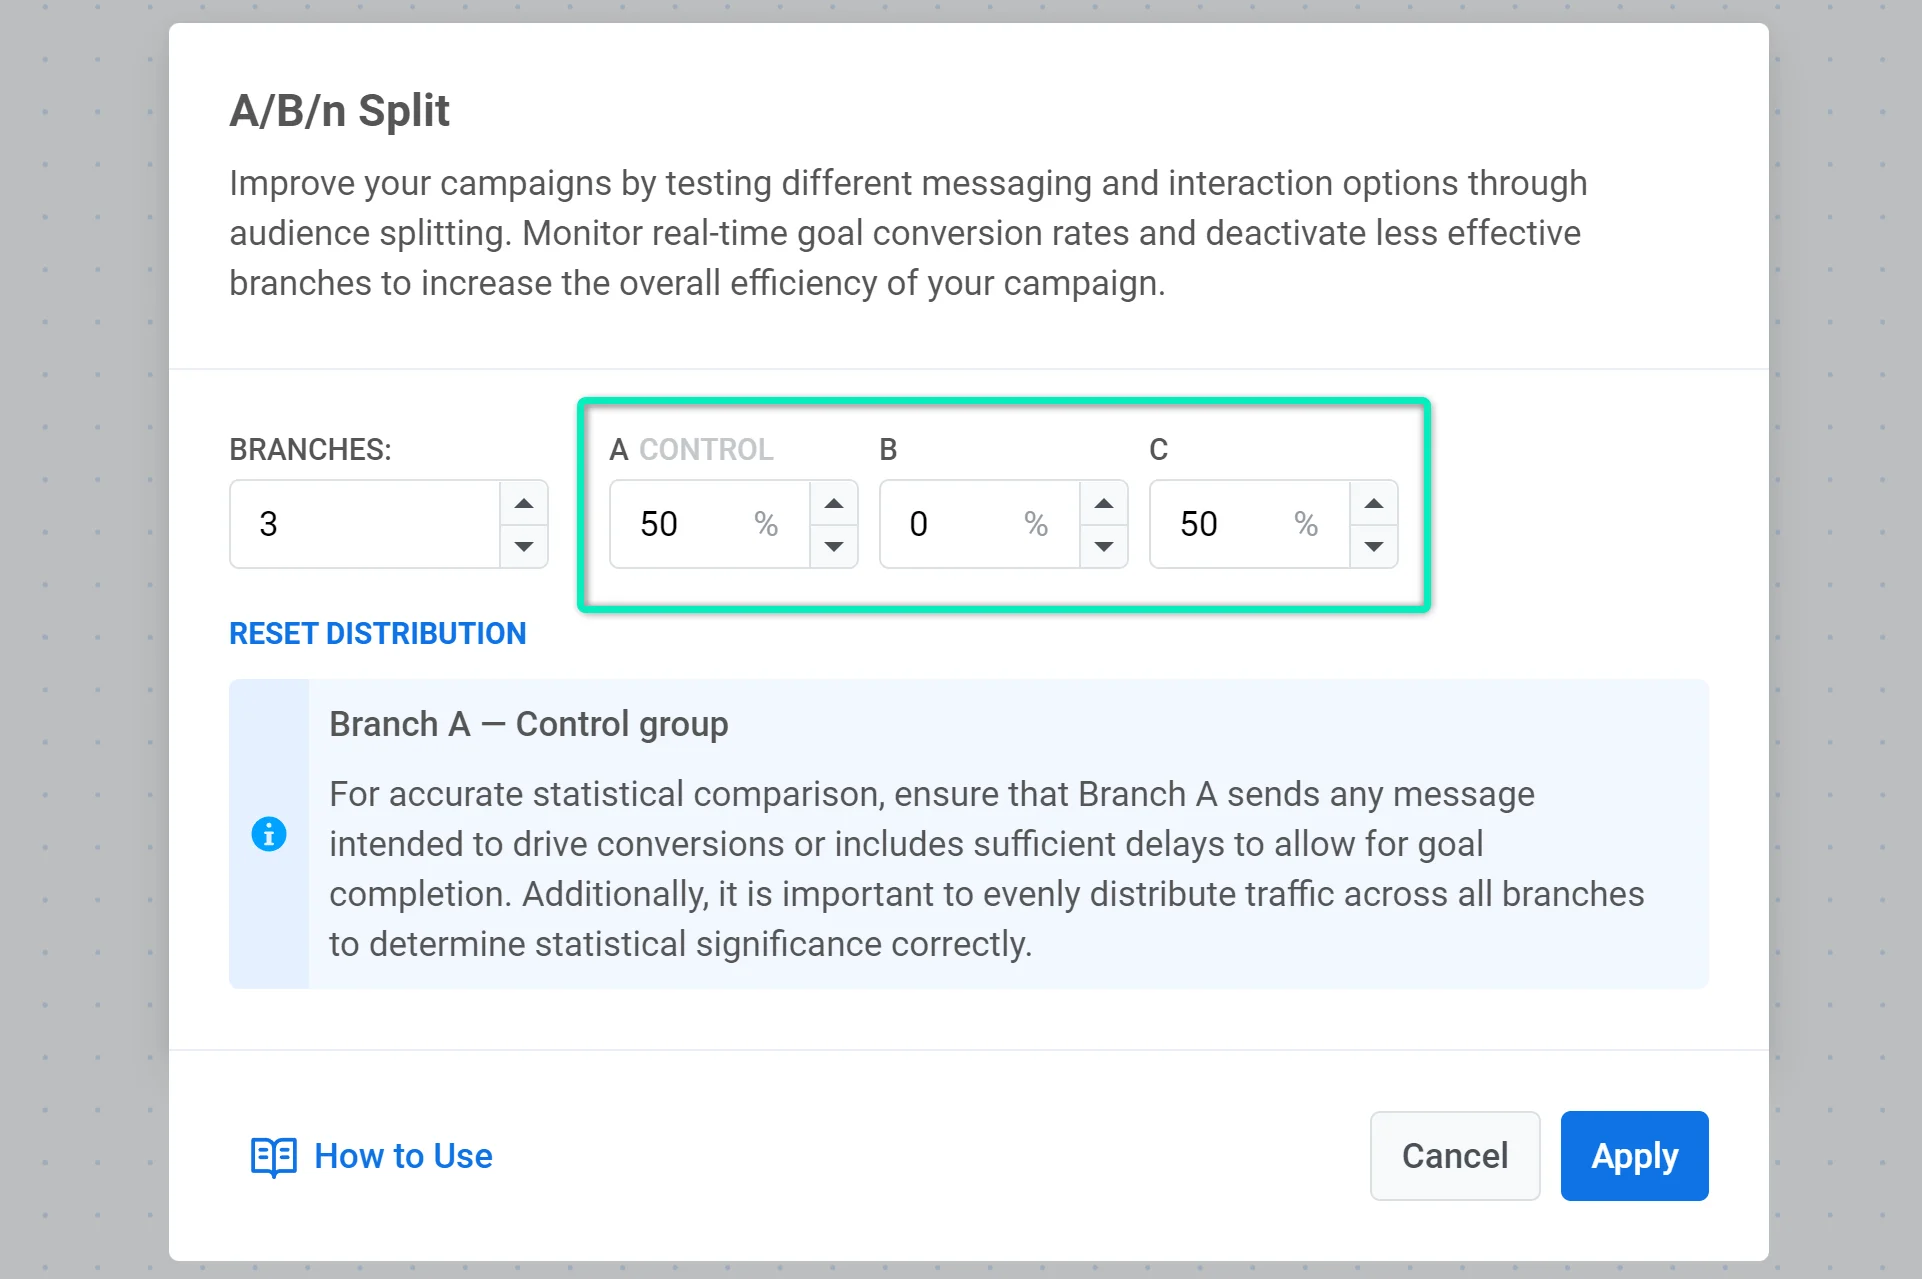
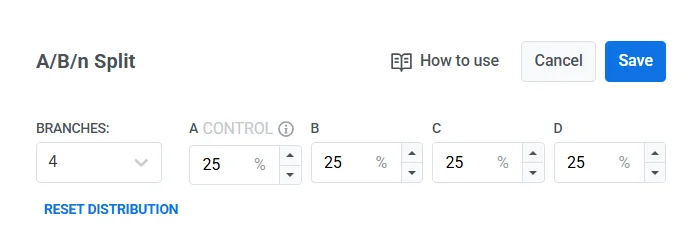
Use the **Branches** dropdown to choose how many variations you want to test (up to 4). By default, Branch A is the control group.
#### Define user distribution across branches
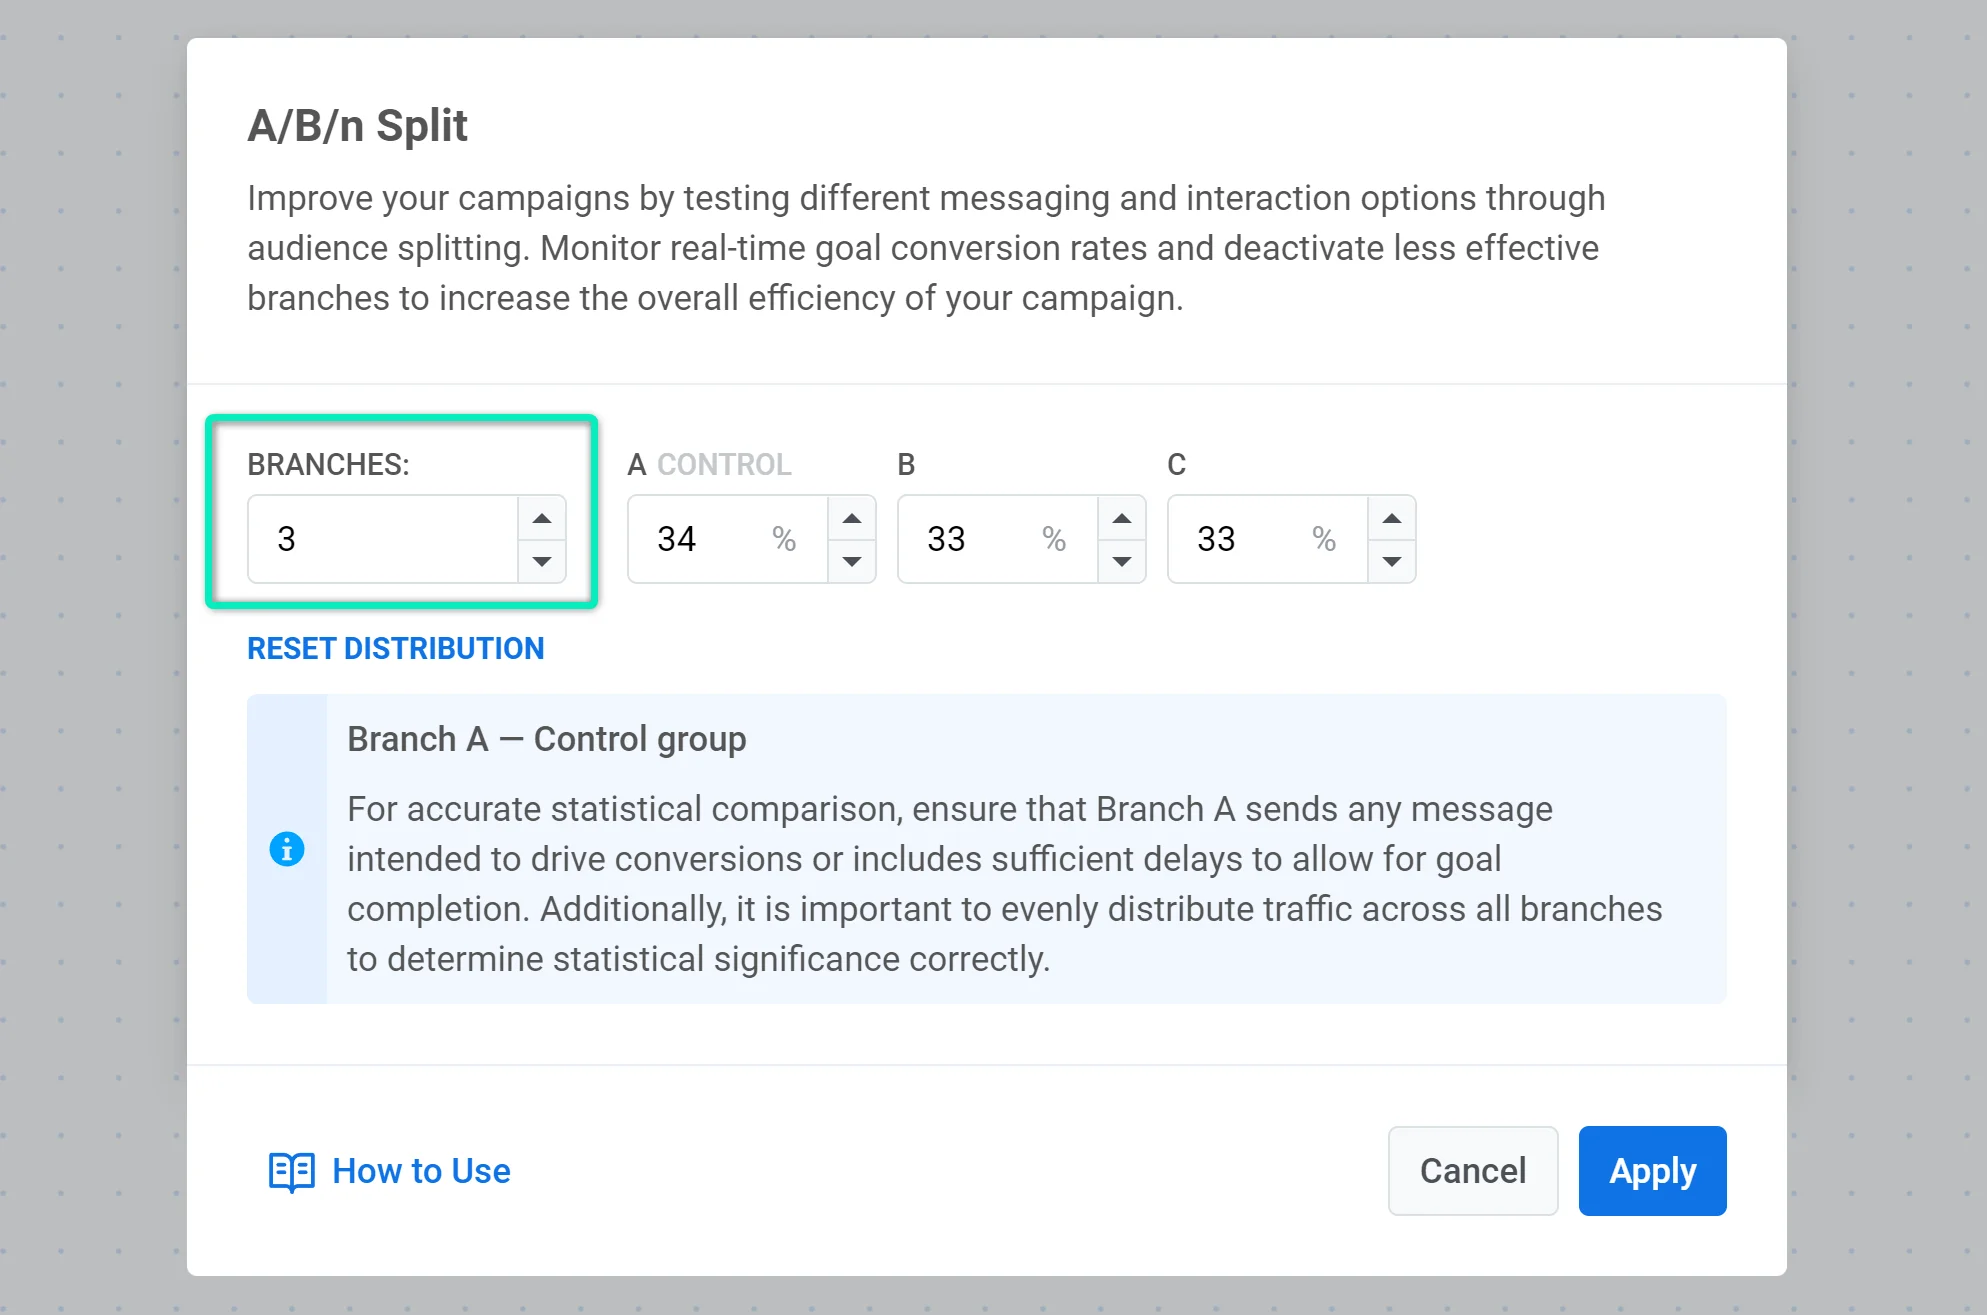
Set the percentage of users to be routed to each branch, ensuring the total adds up to 100%. To evenly split users between branches, click **Reset Distribution**.
### Choose how the winner will be selected
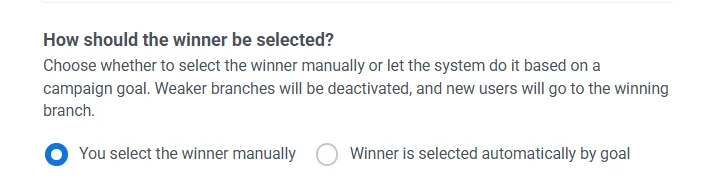
You have two options:
##### You select the winner manually
You will review results and manually choose the winning branch later. This requires ongoing monitoring and manual deactivation. [Learn more](/product/customer-journey/journey-elements/flow-controls/abn-split/#analyze-the-results)
##### The winner is selected automatically by goal
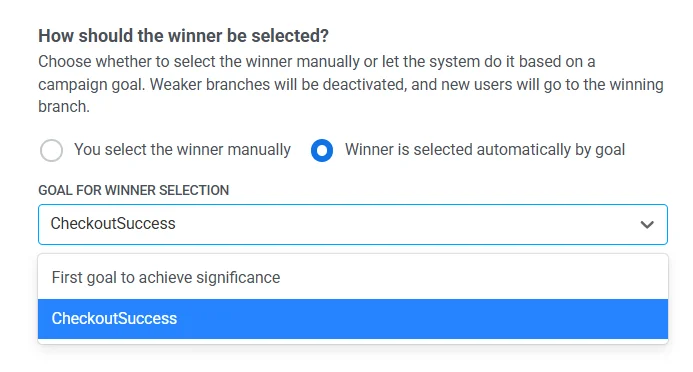
The system monitors the campaign goal and deactivates weaker branches once statistical significance is achieved. New users are then directed to the winning branch.
When automatic winner selection is enabled, choose how the system should evaluate the winner:
* **First goal to achieve significance**. The system monitors all assigned goals and selects the first to reach statistical significance.
* **Select a specific goal** (for example, `CheckoutSuccess`). This goal will be used to evaluate which branch performs best.
Once configured, click **Save** to apply your test settings.
## How to set up and run A/B/n tests
### Set up a test
#### Pause the journey
If you want to set up A/B/n testing in an active journey, pause it first. To learn more about editing an active journey, [read this article](/product/customer-journey/journey-editing/#editing-an-active-journey).
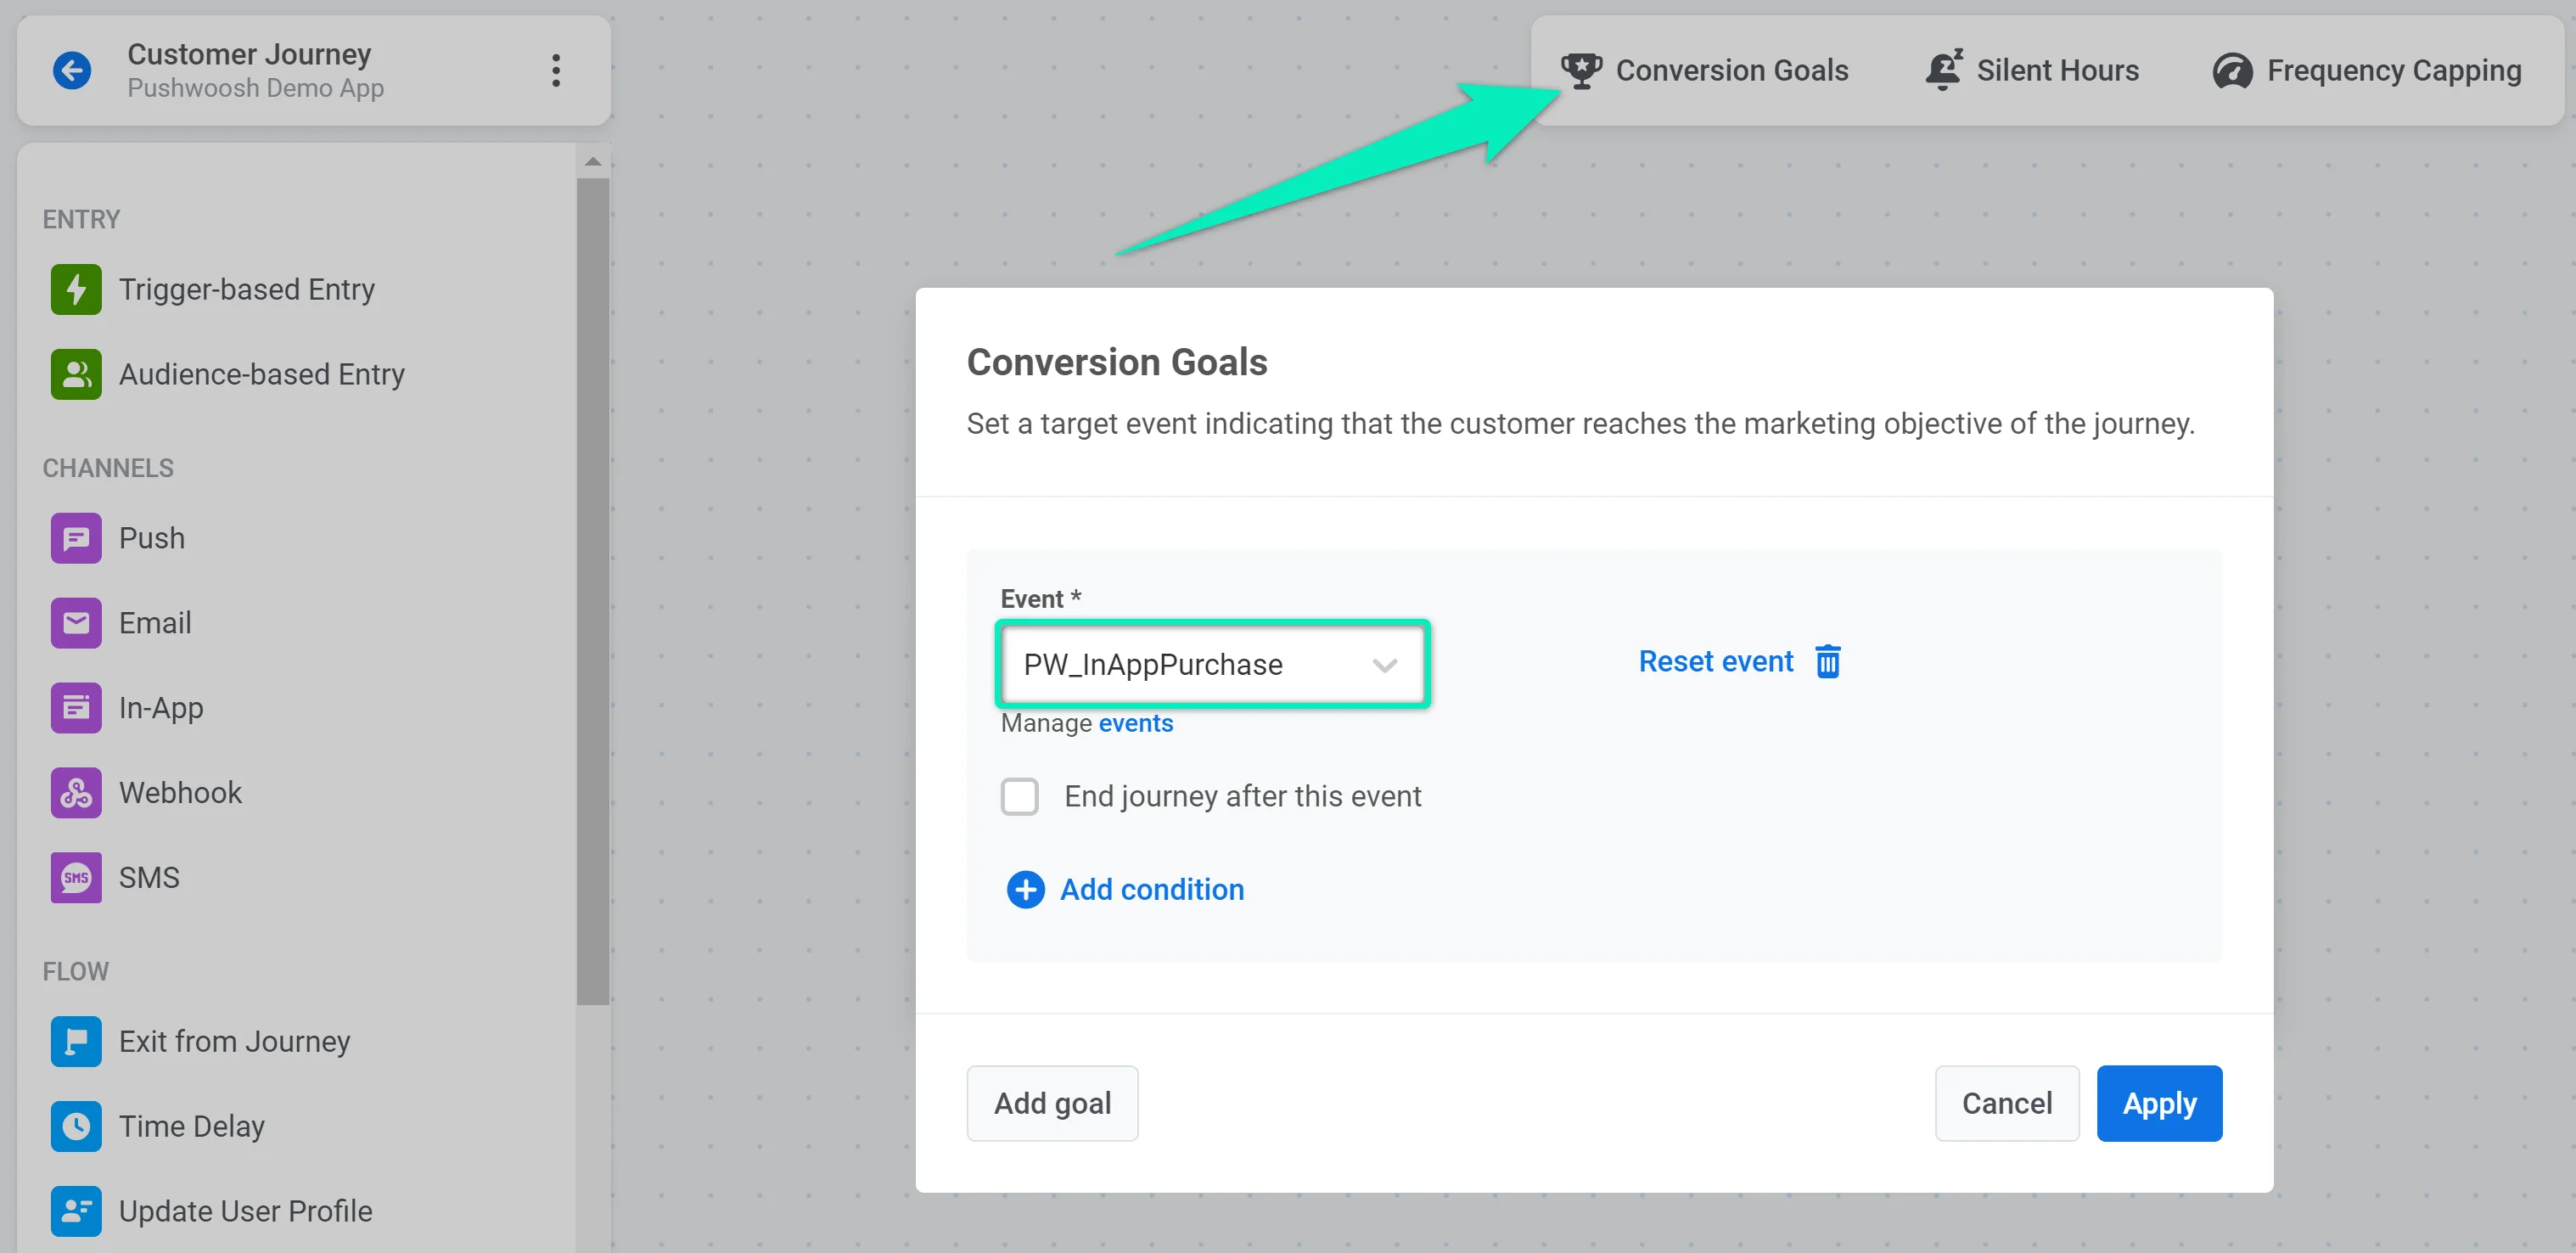
#### Define at least one Conversion Goal
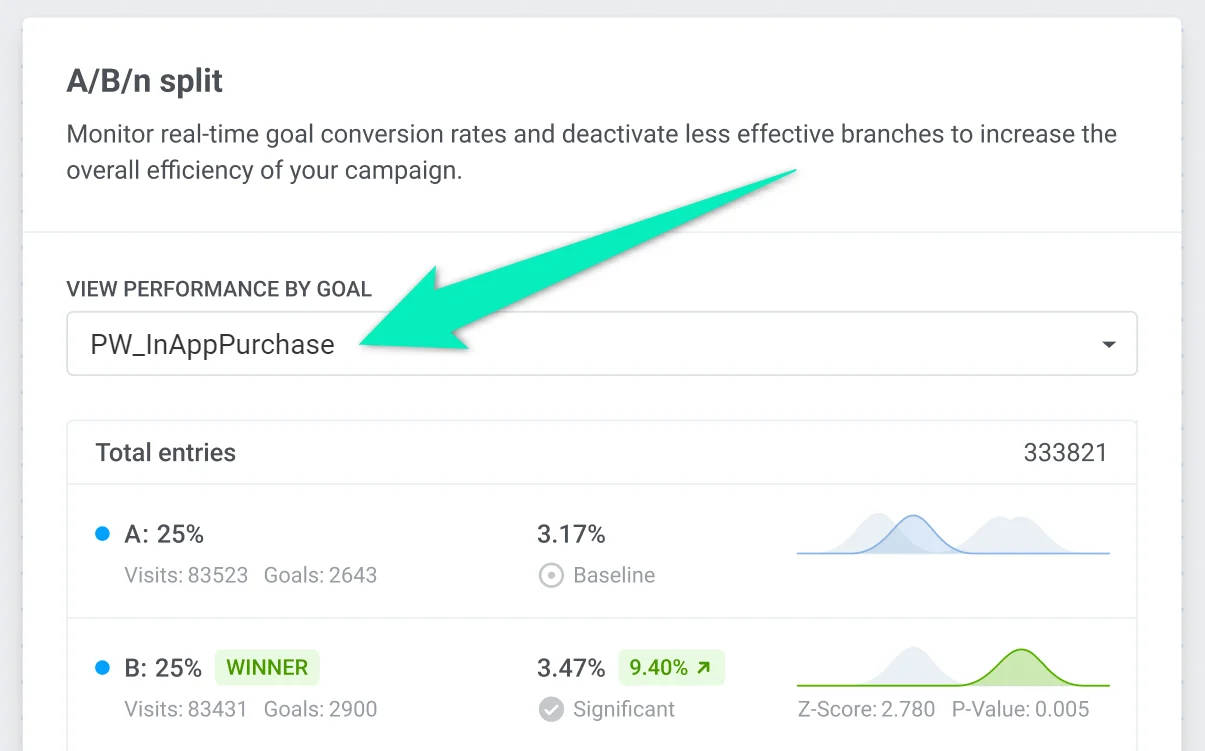
Set at least one Conversion Goal that will be used for calculating test results. For example, if you want to test which of two push notifications is the most effective, you can set the _PW\_InAppPurchase_ Event as the Conversion Goal.
If you specify several Conversion Goals, the results are calculated for each goal separately.
#### Add the A/B/n Split element
Place the **A/B/n Split** element to the canvas after any other element and double-click it to configure the test.
#### Set branches and user distribution
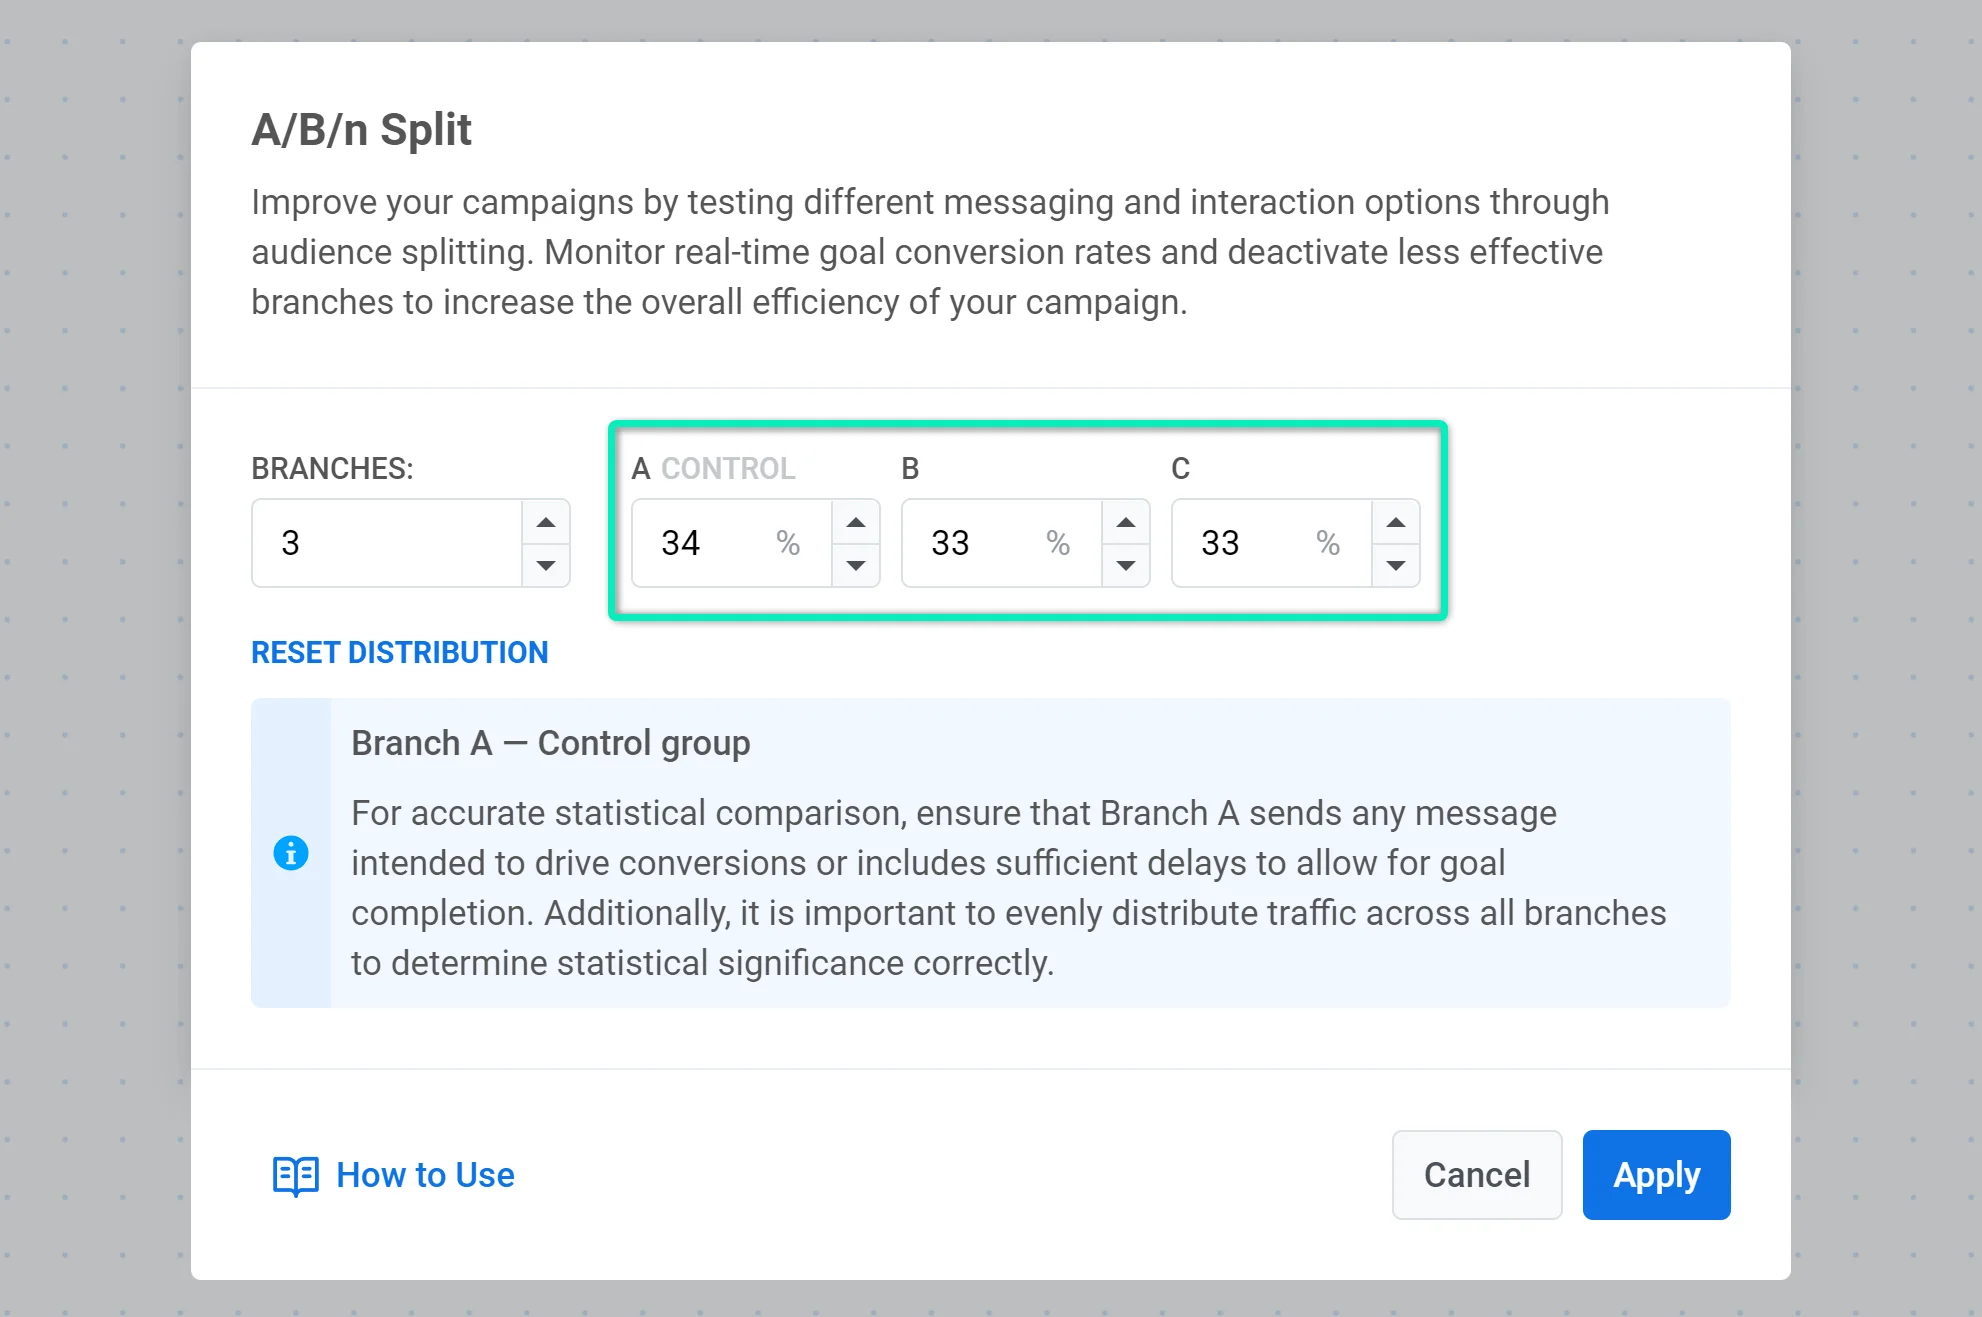
Select the number of branches. You can add up to four branches to your test. The first branch is always considered a control group against which results in other branches are compared. Keep following this guide to learn how to set up this branch depending on your needs.
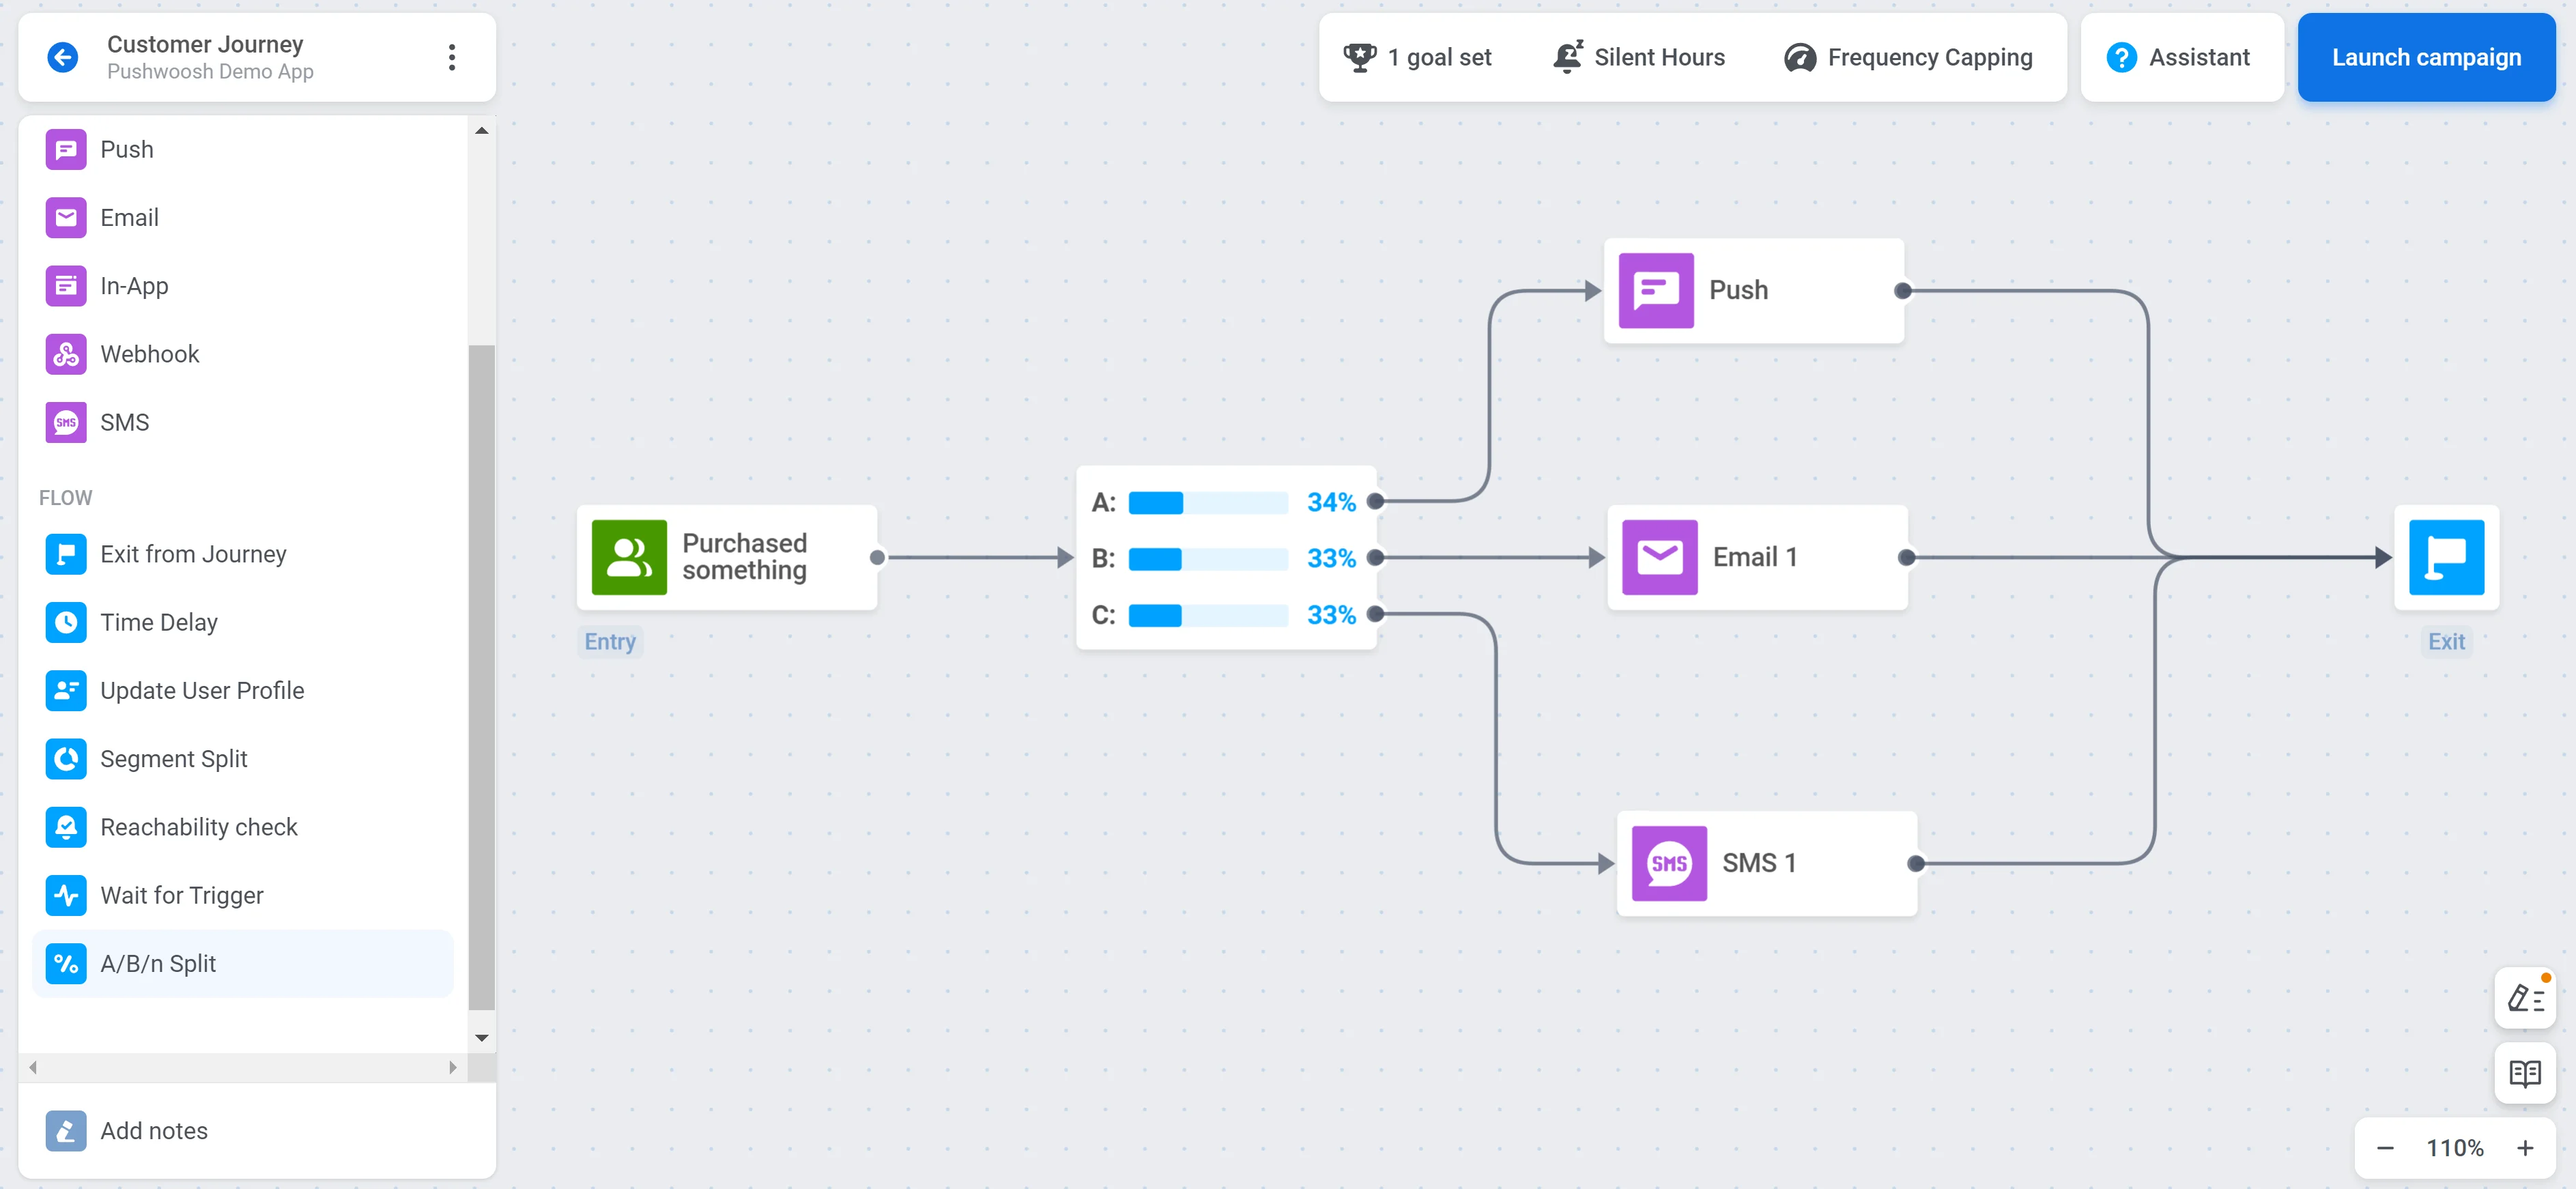
Next, set the percentage of users going to each branch. The total of all branches should be 100%. According to the percentage you set, users in the journey who reach this step will be split randomly into the specified number of branches.
Please note that users assigned to Branch A will be considered a control group against which results in other branches will be compared. The next step describes how to set up Branch A for different cases.
#### Select winner evaluation mode
Choose how the winner is determined:
- **Automatic selection by goal.** The system tracks a defined goal, detects the best-performing branch using statistical significance, and routes new users to the winner automatically.
- **Manual selection.** You will review the test results and manually decide which branch performs best. This option requires you to monitor the test and deactivate underperforming branches manually. [Learn more](/product/customer-journey/journey-elements/flow-controls/abn-split/#analyze-the-results)
#### Configure content for each branch
Now you can set up communication flows for each branch. Since Branch A is a control group, you need to configure it in a certain way depending on your case:
* **Test the existing communication flow against new versions.** In this case, the existing version should be in Branch A. Also, ensure the Conversion Goal can be completed in any branch, including Branch A.
* **Test only new versions against each other.** Since there is no old communication flow, one of the new versions will be marked as a control group (the one presented in Branch A). Make sure the Conversion Goal can be completed in all branches.
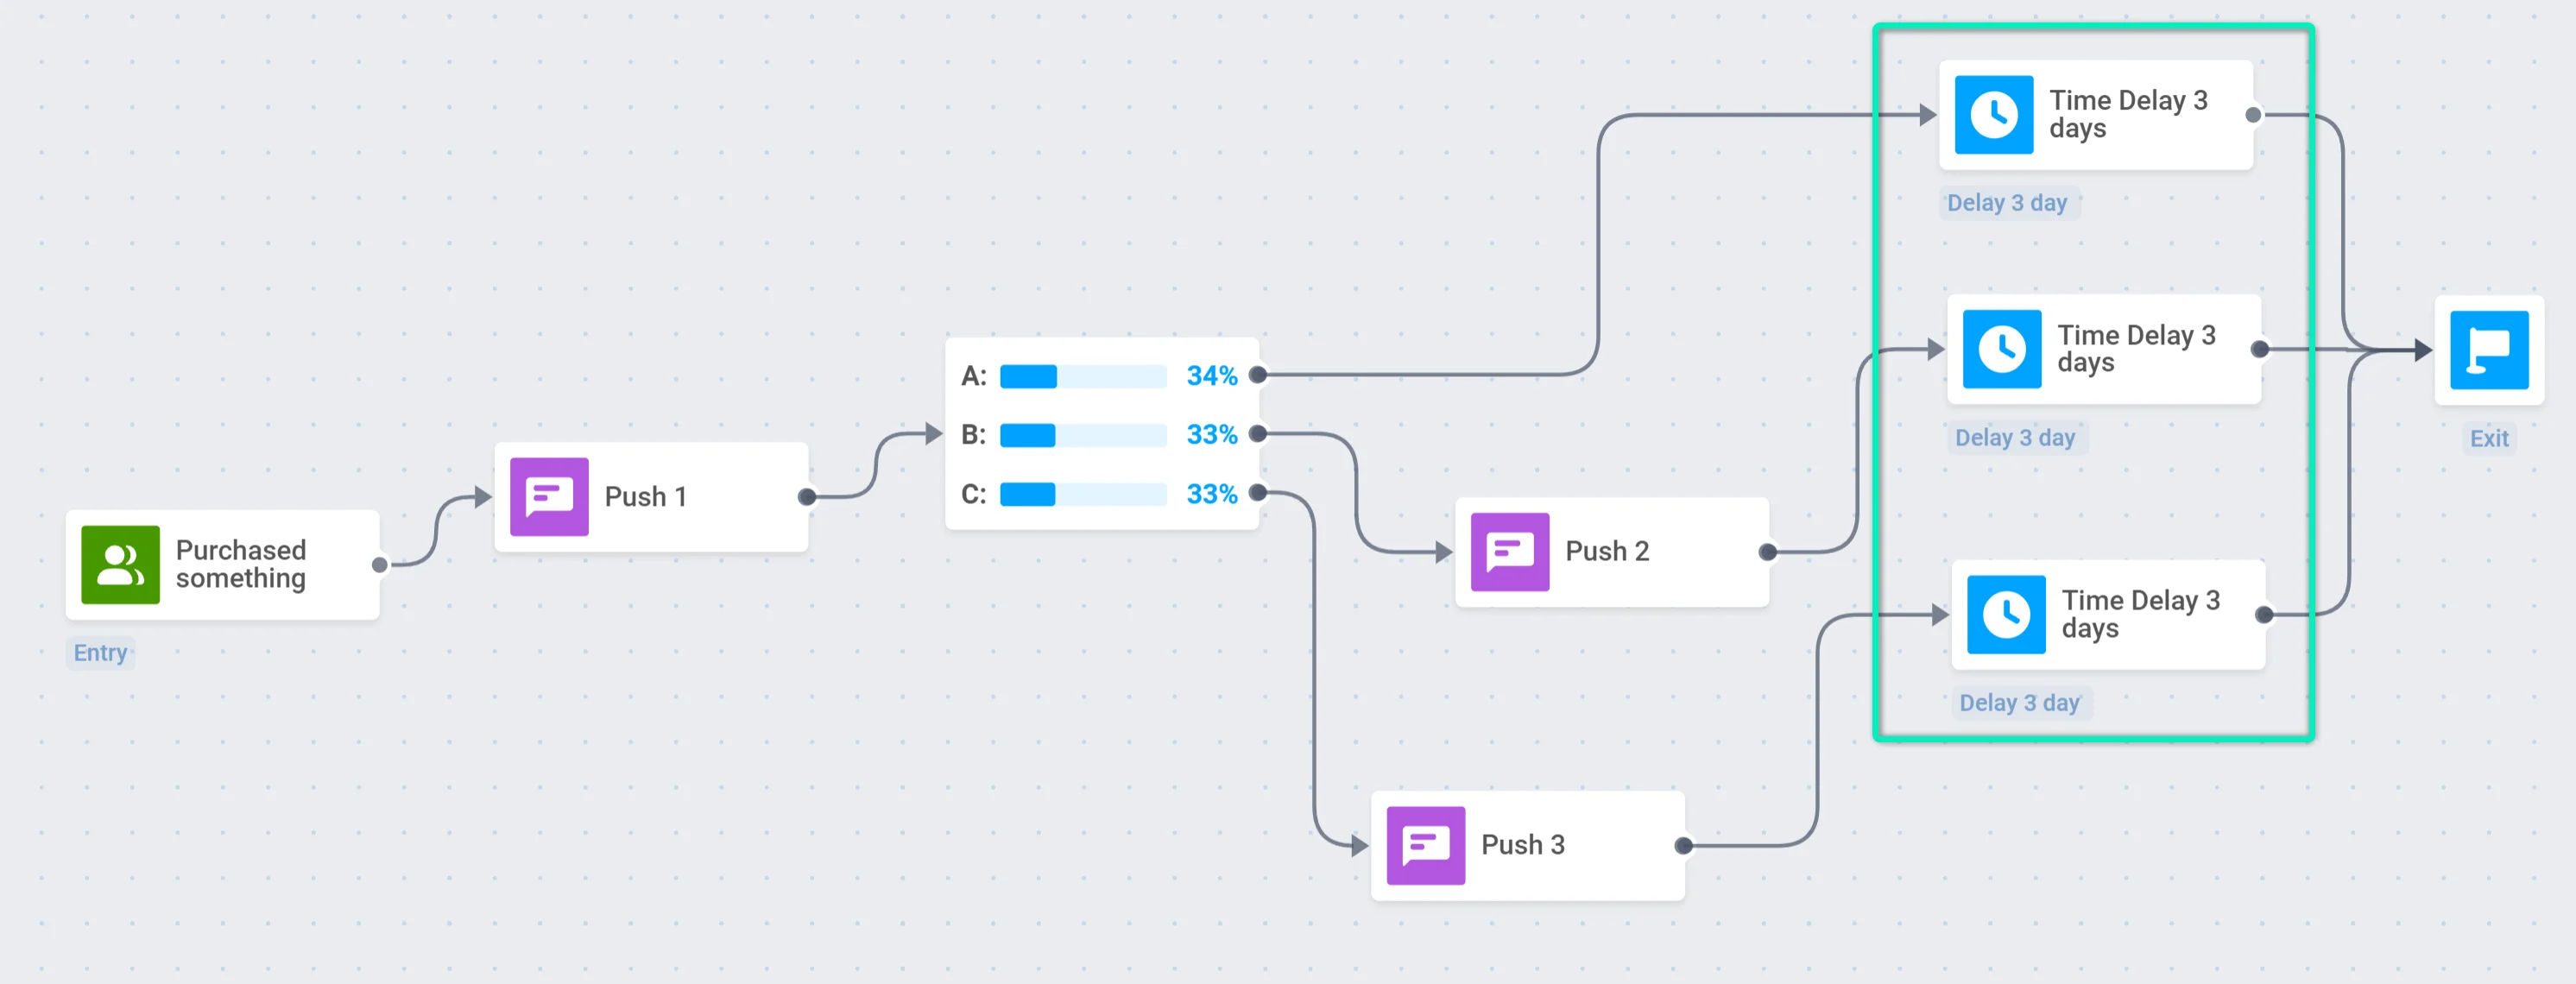
* **Test an existing version without any communication against new communication flows.** For example, you want to add one more push at the end of a journey to see if the campaign performance increases compared to the original version without this push. In this case, the ‘empty’ version should be presented in Branch A. To get reliable results, add an equal [Time Delay](/product/customer-journey/journey-elements/#time-delay) to each branch:
#### Launch the journey
If everything is ready, launch the journey.
### Analyze the results
As soon as the test is launched, you can see real-time statistics on it.
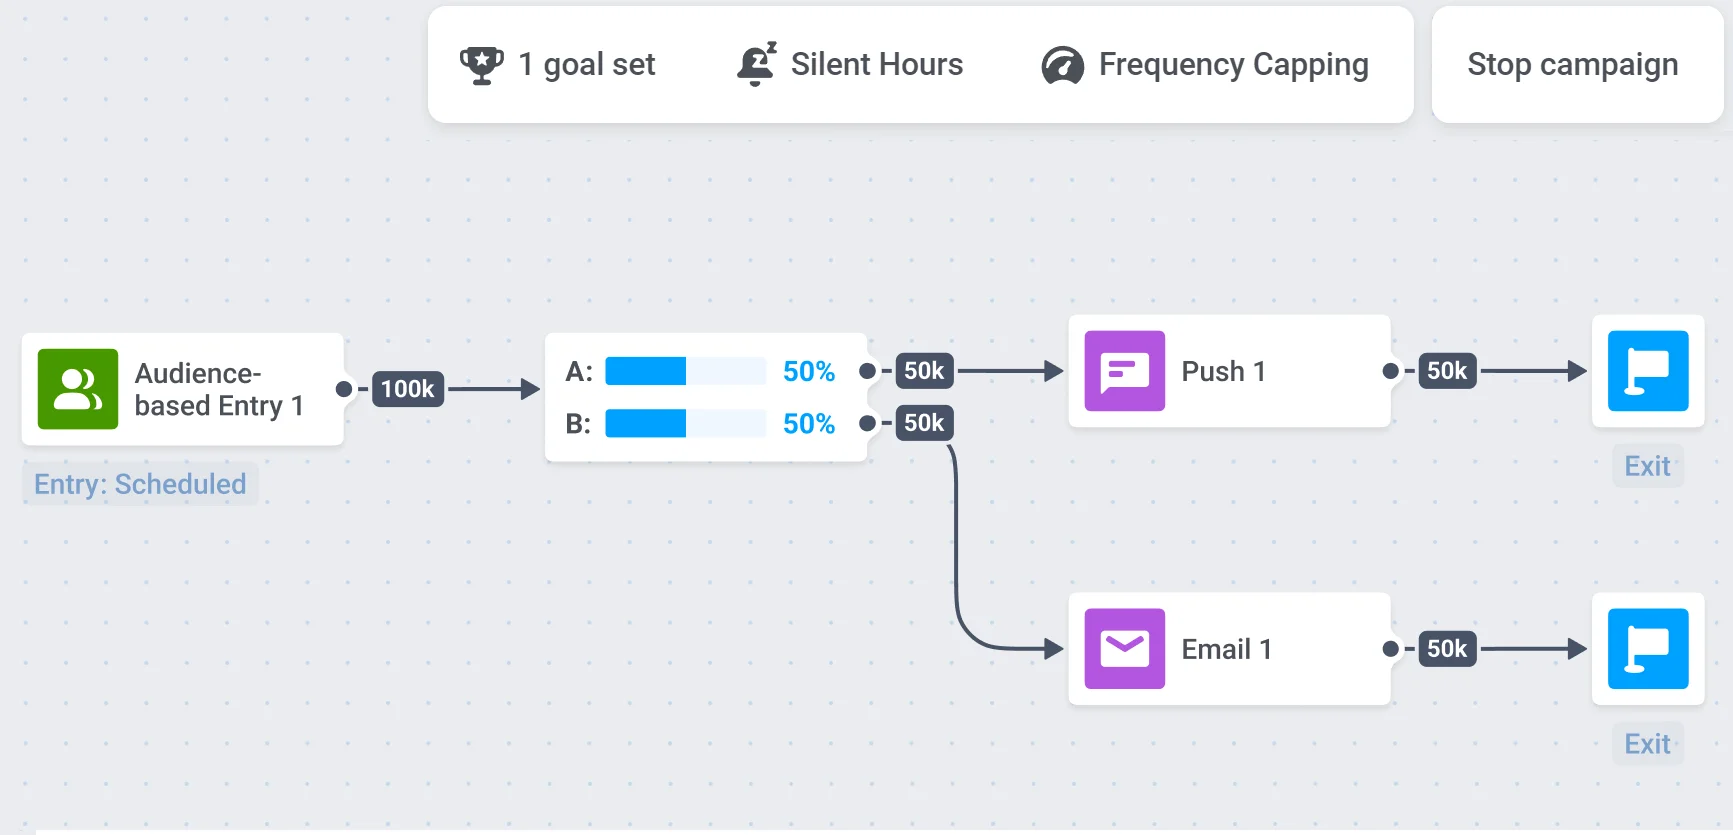
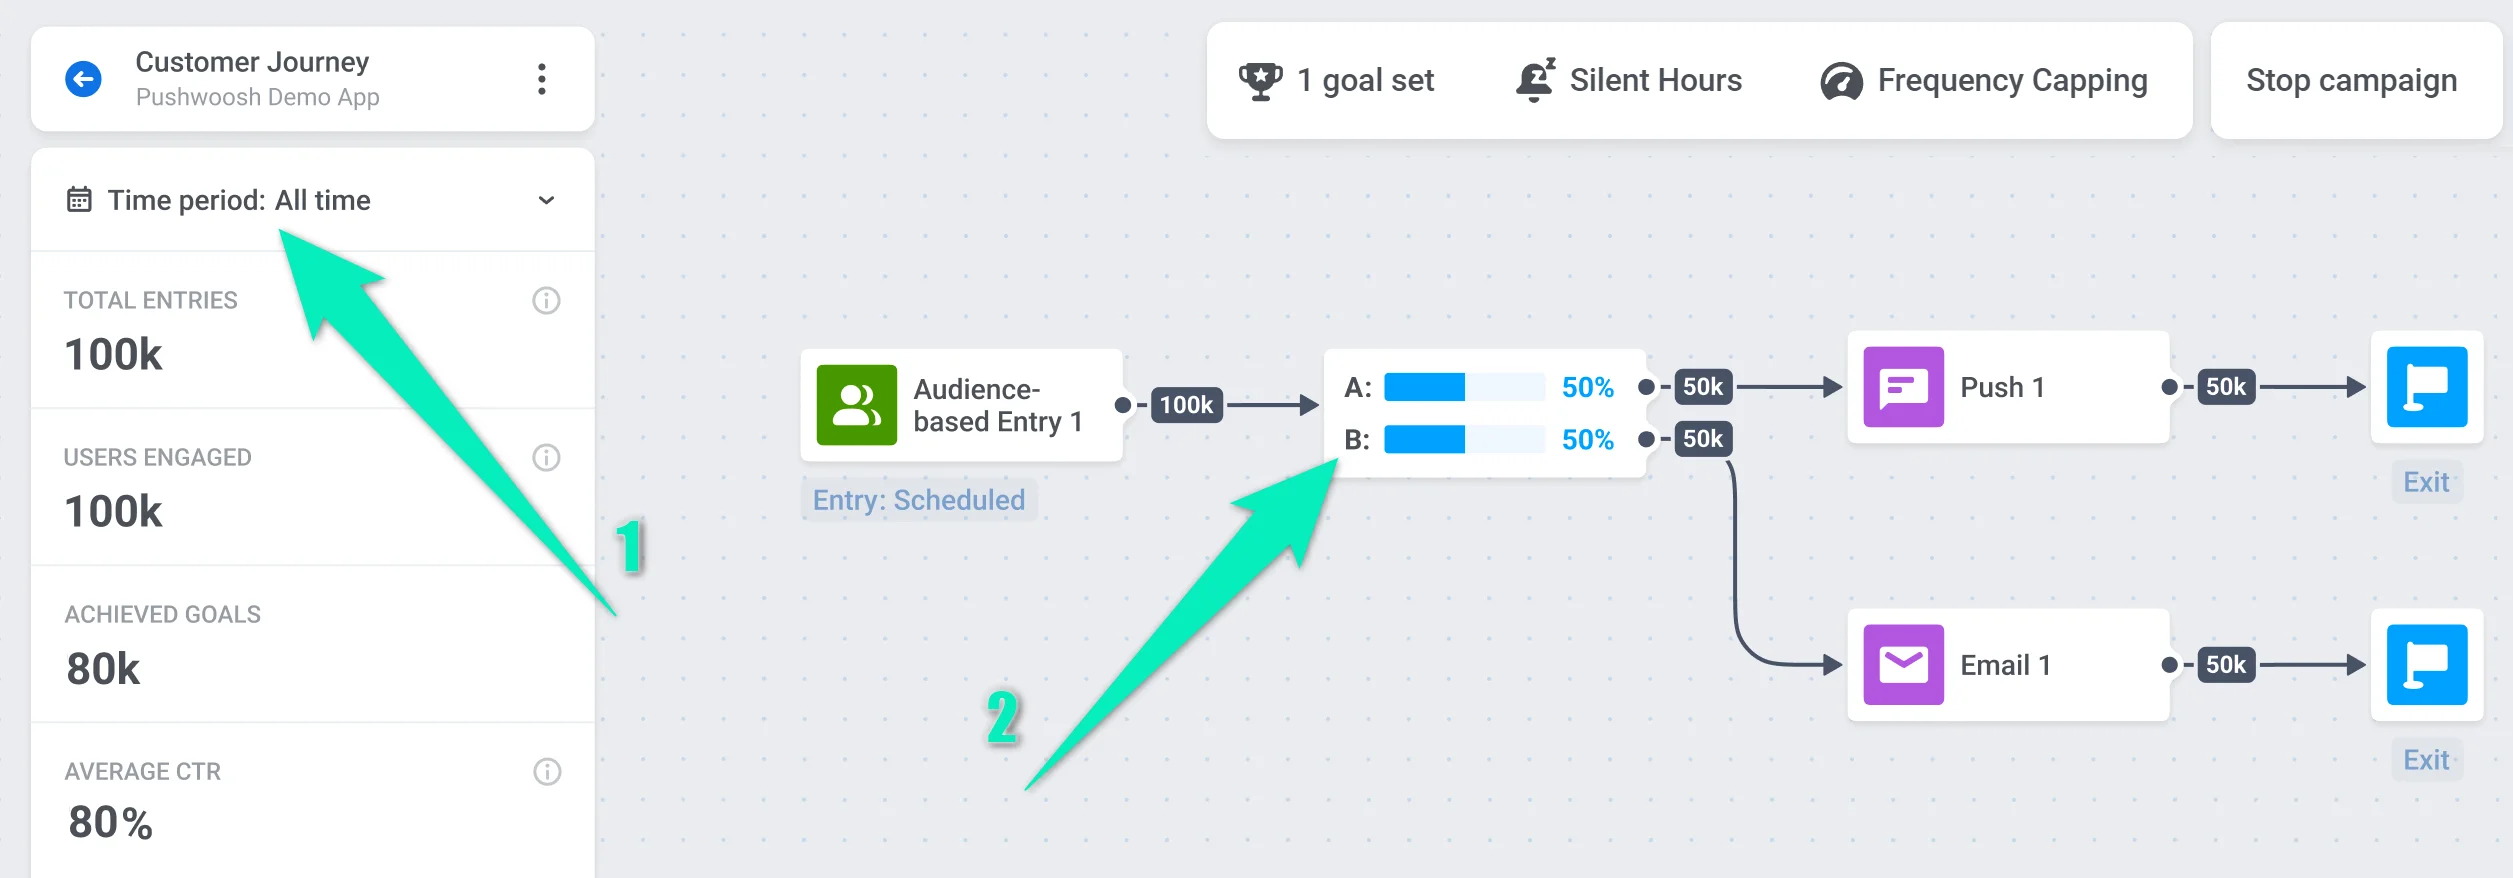
On the journey canvas, see the number of users who pass through each branch:
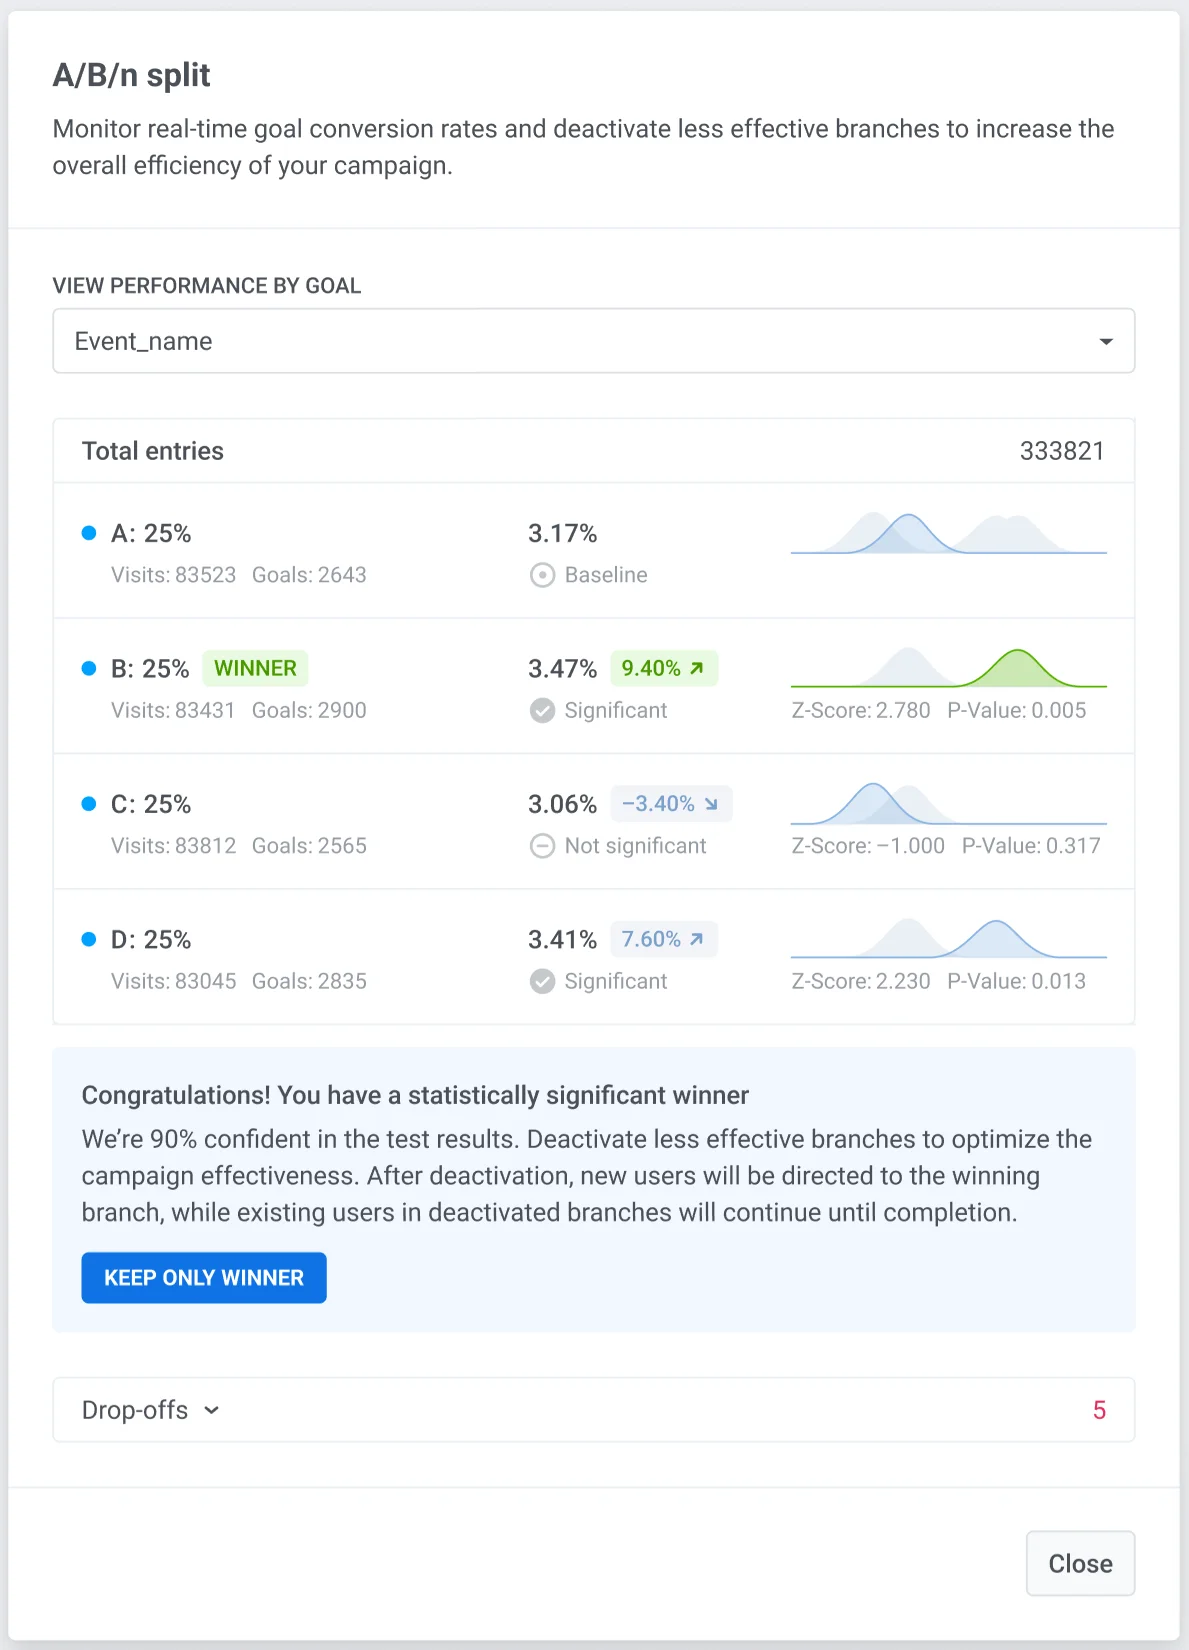
To view the test results, double-click on the **A/B/n Split** element. You will see the statistics for each branch, including the conversion to the selected goal and the metrics used to calculate statistical significance.
If you have set several Conversion Goals, you can view the results for each of them by selecting the required Goal from the list:
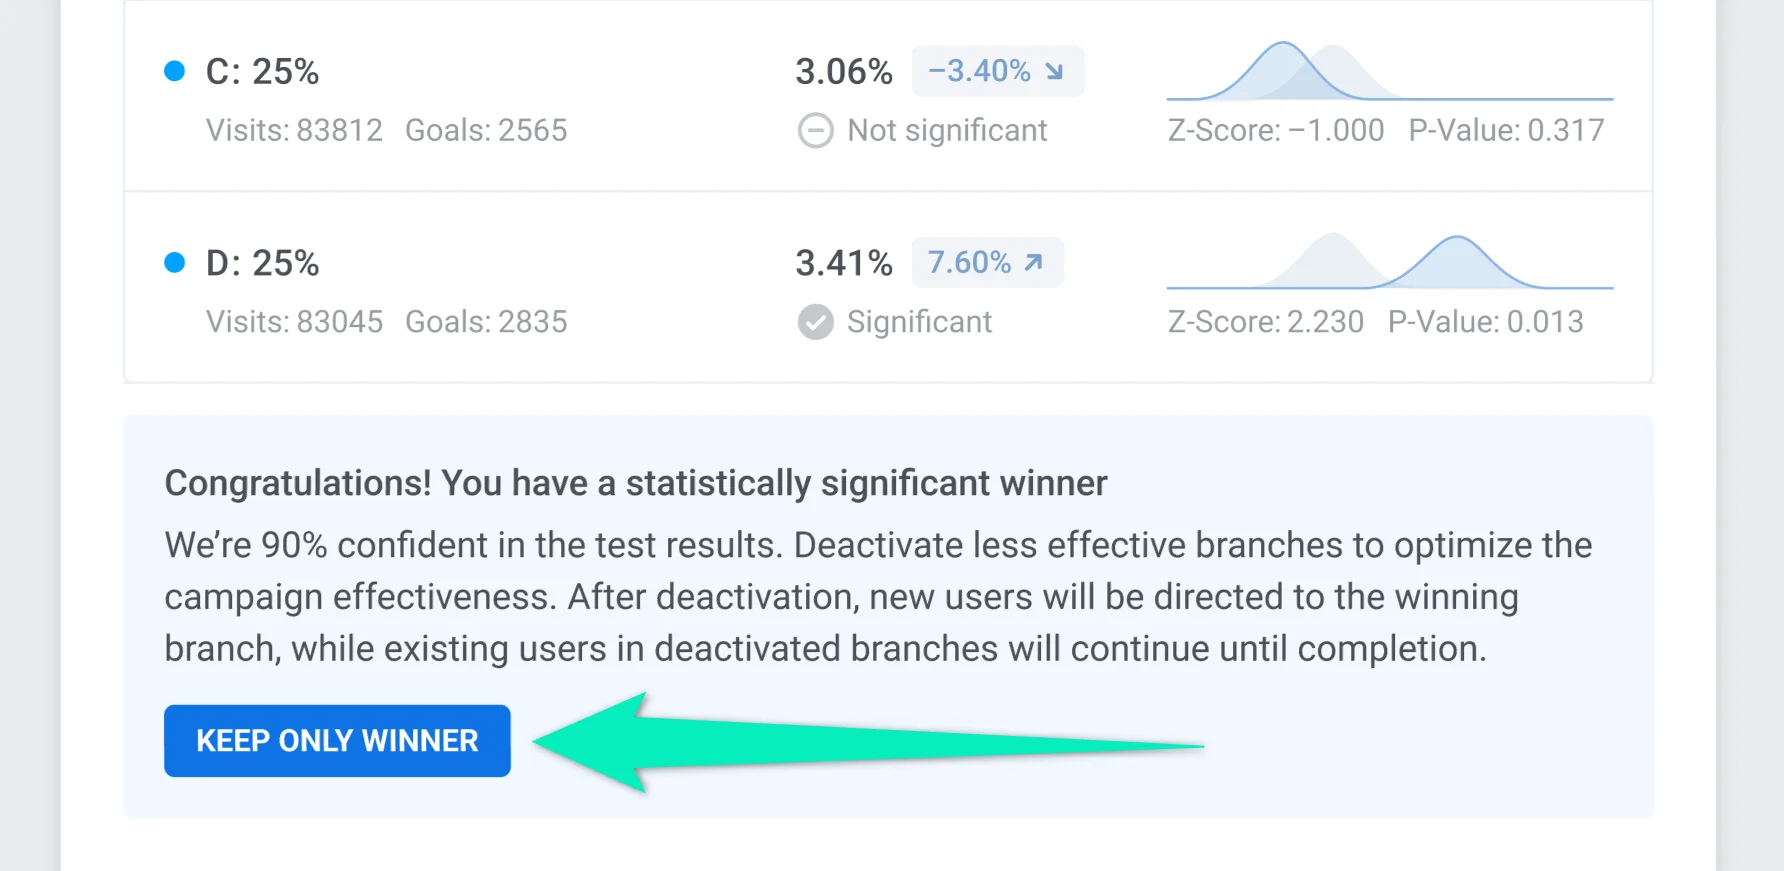
If your test has a statistically significant winner and you are using manual winner selection, you can instantly turn off less-performing branches by clicking **Keep only winner**. New users in the journey will be directed to the winning branch. Users who already went to deactivated branches will continue going through them until they complete the journey.
You can view test results for a specific period of time. To do this, select the desired period on the left panel and double-click on the **A/B/n Split** element. You will see the statistics for the specified time.
The test results are calculated as follows:
* The **conversion** is calculated based on the number of users in the branch and the Conversion Goals completed. Branch A will be marked as the Baseline, as it represents the control group.
* When calculating **statistical significance**, _Z-Score_ and _P-Value_ are taken into account. If the result is valid, it will be marked as _Significant_.
* A branch is considered the **winner** if it has the highest conversion, and this result is marked as _Significant_.
### Deactivate branches
If Pushwoosh has identified a statistically significant winner, you can instantly turn off less-performing branches by clicking **Keep only winner** in the test statistics window. In this case, you don't need to pause the journey.
If some branch performs poorly, you can deactivate it. New users will no longer get into the deactivated branch.
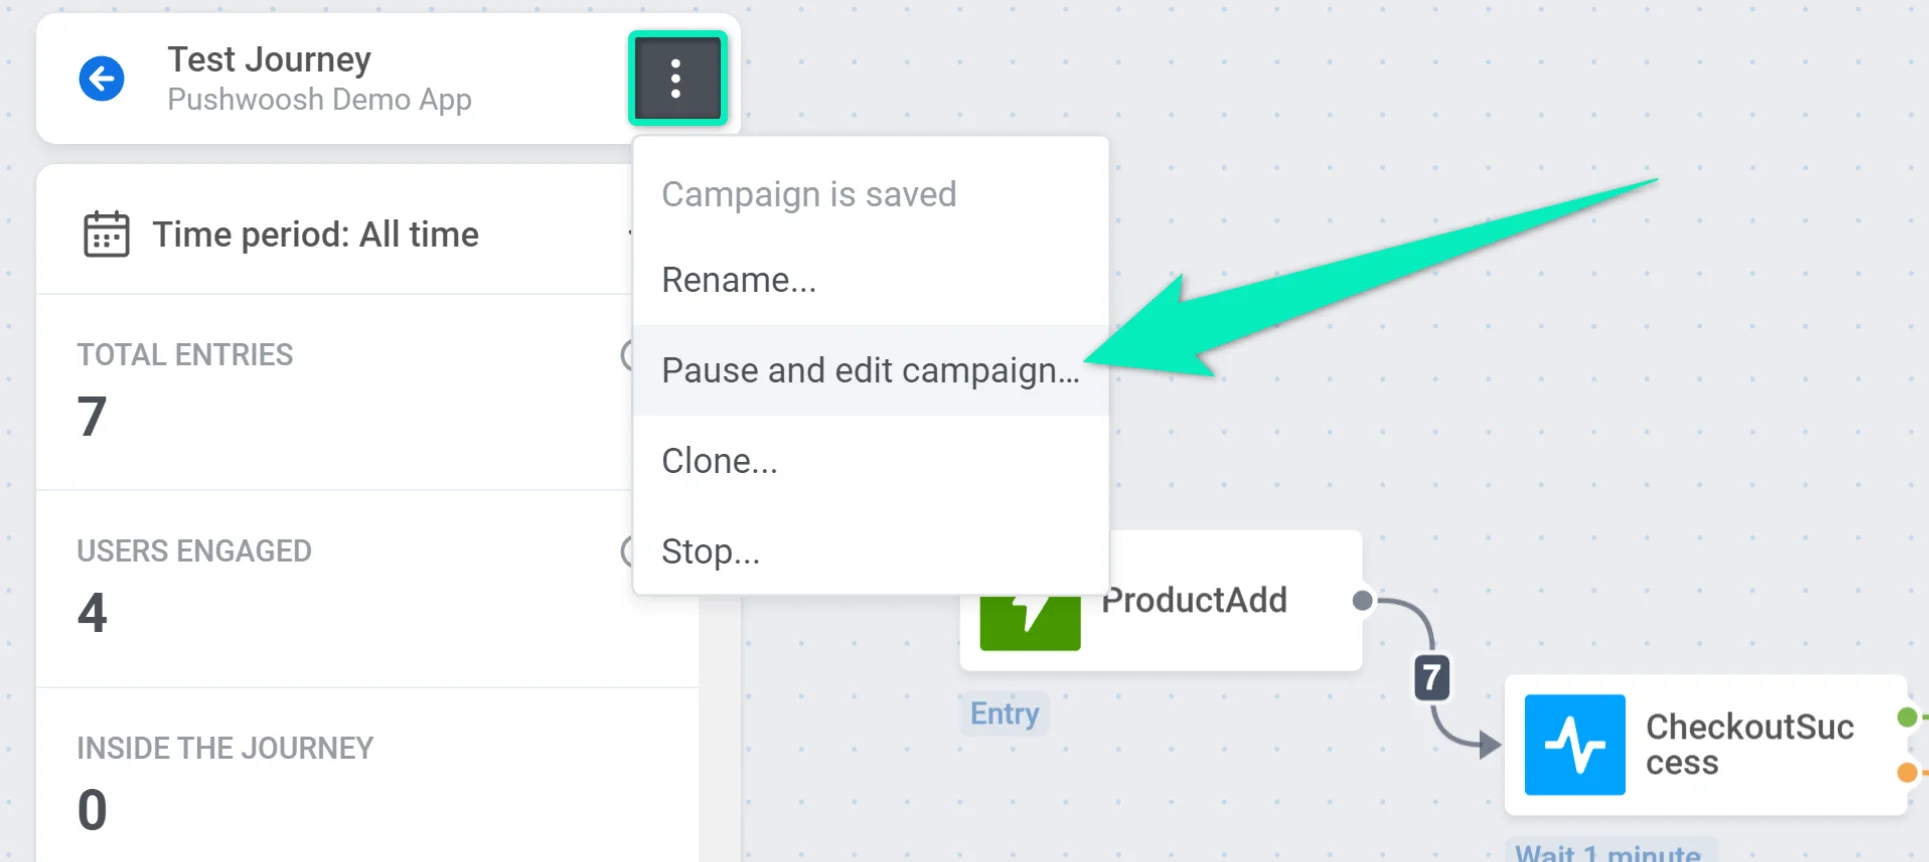
To deactivate a branch, pause the journey first:
After that, double-click the **A/B/n Split** element. Set 0% for this branch and redistribute the percentage of users going to the remaining branches:
 ## Configure A/B/n split settings
After placing the **A/B/n Split** element on the canvas, double-click it to configure test settings.
### Set the number of branches
Use the **Branches** dropdown to choose how many variations you want to test (up to 4). By default, Branch A is the control group.
#### Define user distribution across branches
Set the percentage of users to be routed to each branch, ensuring the total adds up to 100%. To evenly split users between branches, click **Reset Distribution**.
## Configure A/B/n split settings
After placing the **A/B/n Split** element on the canvas, double-click it to configure test settings.
### Set the number of branches
Use the **Branches** dropdown to choose how many variations you want to test (up to 4). By default, Branch A is the control group.
#### Define user distribution across branches
Set the percentage of users to be routed to each branch, ensuring the total adds up to 100%. To evenly split users between branches, click **Reset Distribution**.
 ### Choose how the winner will be selected
You have two options:
##### You select the winner manually
You will review results and manually choose the winning branch later. This requires ongoing monitoring and manual deactivation. [Learn more](/product/customer-journey/journey-elements/flow-controls/abn-split/#analyze-the-results)
### Choose how the winner will be selected
You have two options:
##### You select the winner manually
You will review results and manually choose the winning branch later. This requires ongoing monitoring and manual deactivation. [Learn more](/product/customer-journey/journey-elements/flow-controls/abn-split/#analyze-the-results)
 ##### The winner is selected automatically by goal
The system monitors the campaign goal and deactivates weaker branches once statistical significance is achieved. New users are then directed to the winning branch.
When automatic winner selection is enabled, choose how the system should evaluate the winner:
* **First goal to achieve significance**. The system monitors all assigned goals and selects the first to reach statistical significance.
* **Select a specific goal** (for example, `CheckoutSuccess`). This goal will be used to evaluate which branch performs best.
##### The winner is selected automatically by goal
The system monitors the campaign goal and deactivates weaker branches once statistical significance is achieved. New users are then directed to the winning branch.
When automatic winner selection is enabled, choose how the system should evaluate the winner:
* **First goal to achieve significance**. The system monitors all assigned goals and selects the first to reach statistical significance.
* **Select a specific goal** (for example, `CheckoutSuccess`). This goal will be used to evaluate which branch performs best.
 Once configured, click **Save** to apply your test settings.
## How to set up and run A/B/n tests
### Set up a test
#### Pause the journey
If you want to set up A/B/n testing in an active journey, pause it first. To learn more about editing an active journey, [read this article](/product/customer-journey/journey-editing/#editing-an-active-journey).
#### Define at least one Conversion Goal
Set at least one Conversion Goal that will be used for calculating test results. For example, if you want to test which of two push notifications is the most effective, you can set the _PW\_InAppPurchase_ Event as the Conversion Goal.
Once configured, click **Save** to apply your test settings.
## How to set up and run A/B/n tests
### Set up a test
#### Pause the journey
If you want to set up A/B/n testing in an active journey, pause it first. To learn more about editing an active journey, [read this article](/product/customer-journey/journey-editing/#editing-an-active-journey).
#### Define at least one Conversion Goal
Set at least one Conversion Goal that will be used for calculating test results. For example, if you want to test which of two push notifications is the most effective, you can set the _PW\_InAppPurchase_ Event as the Conversion Goal.
 If you specify several Conversion Goals, the results are calculated for each goal separately.
#### Add the A/B/n Split element
Place the **A/B/n Split** element to the canvas after any other element and double-click it to configure the test.
#### Set branches and user distribution
Select the number of branches. You can add up to four branches to your test. The first branch is always considered a control group against which results in other branches are compared. Keep following this guide to learn how to set up this branch depending on your needs.
If you specify several Conversion Goals, the results are calculated for each goal separately.
#### Add the A/B/n Split element
Place the **A/B/n Split** element to the canvas after any other element and double-click it to configure the test.
#### Set branches and user distribution
Select the number of branches. You can add up to four branches to your test. The first branch is always considered a control group against which results in other branches are compared. Keep following this guide to learn how to set up this branch depending on your needs.
 Next, set the percentage of users going to each branch. The total of all branches should be 100%. According to the percentage you set, users in the journey who reach this step will be split randomly into the specified number of branches.
Please note that users assigned to Branch A will be considered a control group against which results in other branches will be compared. The next step describes how to set up Branch A for different cases.
Next, set the percentage of users going to each branch. The total of all branches should be 100%. According to the percentage you set, users in the journey who reach this step will be split randomly into the specified number of branches.
Please note that users assigned to Branch A will be considered a control group against which results in other branches will be compared. The next step describes how to set up Branch A for different cases.
 #### Select winner evaluation mode
Choose how the winner is determined:
- **Automatic selection by goal.** The system tracks a defined goal, detects the best-performing branch using statistical significance, and routes new users to the winner automatically.
- **Manual selection.** You will review the test results and manually decide which branch performs best. This option requires you to monitor the test and deactivate underperforming branches manually. [Learn more](/product/customer-journey/journey-elements/flow-controls/abn-split/#analyze-the-results)
#### Configure content for each branch
Now you can set up communication flows for each branch. Since Branch A is a control group, you need to configure it in a certain way depending on your case:
* **Test the existing communication flow against new versions.** In this case, the existing version should be in Branch A. Also, ensure the Conversion Goal can be completed in any branch, including Branch A.
* **Test only new versions against each other.** Since there is no old communication flow, one of the new versions will be marked as a control group (the one presented in Branch A). Make sure the Conversion Goal can be completed in all branches.
* **Test an existing version without any communication against new communication flows.** For example, you want to add one more push at the end of a journey to see if the campaign performance increases compared to the original version without this push. In this case, the ‘empty’ version should be presented in Branch A. To get reliable results, add an equal [Time Delay](/product/customer-journey/journey-elements/#time-delay) to each branch:
#### Select winner evaluation mode
Choose how the winner is determined:
- **Automatic selection by goal.** The system tracks a defined goal, detects the best-performing branch using statistical significance, and routes new users to the winner automatically.
- **Manual selection.** You will review the test results and manually decide which branch performs best. This option requires you to monitor the test and deactivate underperforming branches manually. [Learn more](/product/customer-journey/journey-elements/flow-controls/abn-split/#analyze-the-results)
#### Configure content for each branch
Now you can set up communication flows for each branch. Since Branch A is a control group, you need to configure it in a certain way depending on your case:
* **Test the existing communication flow against new versions.** In this case, the existing version should be in Branch A. Also, ensure the Conversion Goal can be completed in any branch, including Branch A.
* **Test only new versions against each other.** Since there is no old communication flow, one of the new versions will be marked as a control group (the one presented in Branch A). Make sure the Conversion Goal can be completed in all branches.
* **Test an existing version without any communication against new communication flows.** For example, you want to add one more push at the end of a journey to see if the campaign performance increases compared to the original version without this push. In this case, the ‘empty’ version should be presented in Branch A. To get reliable results, add an equal [Time Delay](/product/customer-journey/journey-elements/#time-delay) to each branch:
 #### Launch the journey
If everything is ready, launch the journey.
### Analyze the results
As soon as the test is launched, you can see real-time statistics on it.
On the journey canvas, see the number of users who pass through each branch:
#### Launch the journey
If everything is ready, launch the journey.
### Analyze the results
As soon as the test is launched, you can see real-time statistics on it.
On the journey canvas, see the number of users who pass through each branch:
 To view the test results, double-click on the **A/B/n Split** element. You will see the statistics for each branch, including the conversion to the selected goal and the metrics used to calculate statistical significance.
 If you have set several Conversion Goals, you can view the results for each of them by selecting the required Goal from the list:
 If your test has a statistically significant winner and you are using manual winner selection, you can instantly turn off less-performing branches by clicking **Keep only winner**. New users in the journey will be directed to the winning branch. Users who already went to deactivated branches will continue going through them until they complete the journey.
 You can view test results for a specific period of time. To do this, select the desired period on the left panel and double-click on the **A/B/n Split** element. You will see the statistics for the specified time.
 The test results are calculated as follows:
* The **conversion** is calculated based on the number of users in the branch and the Conversion Goals completed. Branch A will be marked as the Baseline, as it represents the control group.
* When calculating **statistical significance**, _Z-Score_ and _P-Value_ are taken into account. If the result is valid, it will be marked as _Significant_.
* A branch is considered the **winner** if it has the highest conversion, and this result is marked as _Significant_.
### Deactivate branches
If Pushwoosh has identified a statistically significant winner, you can instantly turn off less-performing branches by clicking **Keep only winner** in the test statistics window. In this case, you don't need to pause the journey.
If some branch performs poorly, you can deactivate it. New users will no longer get into the deactivated branch.
To deactivate a branch, pause the journey first:
The test results are calculated as follows:
* The **conversion** is calculated based on the number of users in the branch and the Conversion Goals completed. Branch A will be marked as the Baseline, as it represents the control group.
* When calculating **statistical significance**, _Z-Score_ and _P-Value_ are taken into account. If the result is valid, it will be marked as _Significant_.
* A branch is considered the **winner** if it has the highest conversion, and this result is marked as _Significant_.
### Deactivate branches
If Pushwoosh has identified a statistically significant winner, you can instantly turn off less-performing branches by clicking **Keep only winner** in the test statistics window. In this case, you don't need to pause the journey.
If some branch performs poorly, you can deactivate it. New users will no longer get into the deactivated branch.
To deactivate a branch, pause the journey first:
 After that, double-click the **A/B/n Split** element. Set 0% for this branch and redistribute the percentage of users going to the remaining branches: