# Trigger-based entry
A **Trigger-based entry** starts the journey when a user performs a specific event (for example, takes a specific action).
To set up a Trigger-based entry, locate the entry element on the canvas and select the Event that will serve as the trigger.
> For more information on how to configure events, see [Events](/product/audience-data-and-segmentation/events/) documentation.
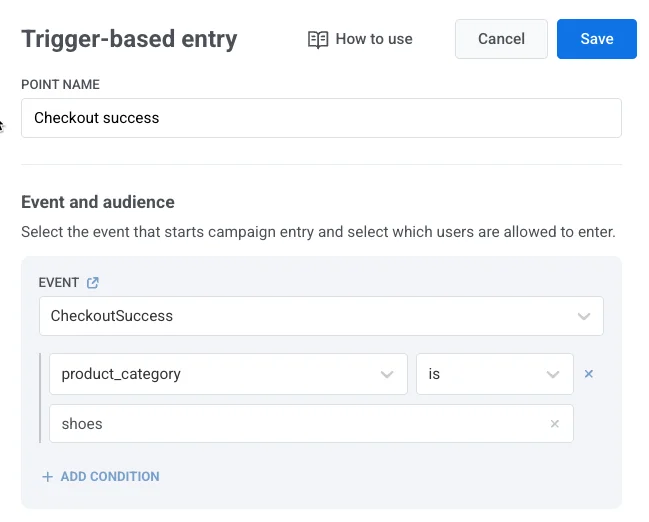
If the selected Event has attributes, you can narrow the entry conditions using those attributes. Click **Add condition** when editing the element, then choose an attribute from the drop-down list and define its operator and value.
> For the available operators, see [Tag operators by type](/product/audience-data-and-segmentation/segmentation/create-segments/by-tags/#tag-operators-by-type).
## Define who enters the campaign
Define which user(s) should enter the journey when a specific event occurs.
Use the **Who enters the campaign?** dropdown to choose between the two available modes:
### Users who perform the event (default)
The user who triggers the event is the one who enters the journey.
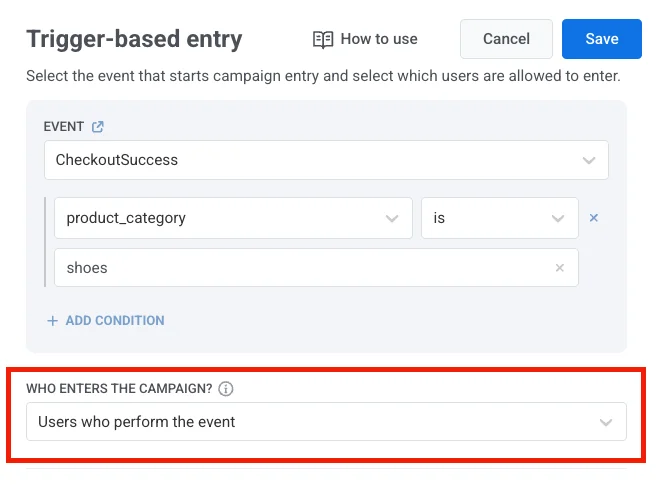
**Example**
A user completes a purchase (`CheckoutSuccess` event). That same user (e.g., `User ID: 123`) enters a post-purchase journey that includes a thank-you message, product recommendations, or a satisfaction survey.
### Users from an event attribute
Instead of enrolling the user who triggered the event, you can pass one or more [`User IDs`](/product/pushwoosh-knowledge-hub/users-userids/) in a custom event attribute. The users listed in that attribute will enter the journey.
For this, select **Users from an event attribute** and choose an attribute key (e.g., `recipient_ids`, `target_user_id`). This key should match your event payload structure.
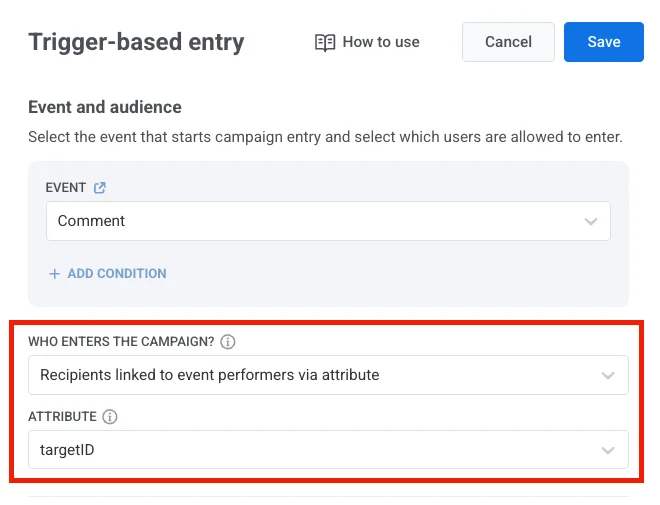
##### Example payload (single user)
```json
{
"application": "XXXXX-XXXXX",
"event": "invitation",
"attributes": {
"targetId": 321
},
"userId": 123
}
```
User `321` (from `targetId`) enters the journey.
##### Example payload (multiple users)
If you provide multiple user IDs, use a JSON array of strings.
```javascript
{
"application": "XXXXX-XXXXX",
"event": "invitation",
"attributes": {
"targetIds": [1,2,3,4]
},
"userId": 123
}
```
Users `1`, `2`, `3`, and `4` will enter the journey.
#### Use cases
**Comment notifications**
When someone comments on a user’s post, the post owner is notified.
**Example:** A comment event includes the post owner's ID in a `target_user_id` attribute. That user enters a journey to receive the notification.
**Referral programs**
When a referred user signs up or makes a purchase, the person who referred them is added to the journey.
**Example:** User `123` triggers the event, and the referrer `456` (from the `referrer_id` attribute) enters a reward campaign.
**Gift purchases**
When a user purchases a gift, the recipient is added to a journey using the `recipient_user_id` from the event payload.
**Example** User `123` buys a gift for user `456`, who then receives a notification, onboarding flow, or thank-you message.
## Set entry availability
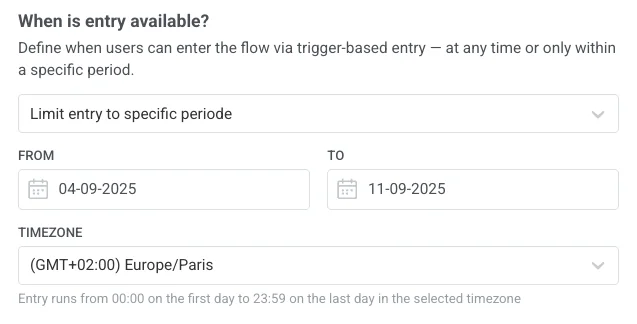
Control when users can enter a journey via a trigger-based entry. You have two options:
* **Allow entry at any time**: Users can enter the journey whenever the trigger event occurs.
* **Limit entry to a specific period**: Users can only enter the journey if the trigger event happens within the selected date range.
When limiting entry, select the **start date**, **end date**, and the **timezone**. The entry window begins at **00:00** on the start date and ends at **23:59** on the end date, based on the chosen timezone.
## Control how many sessions a user can have at the same time
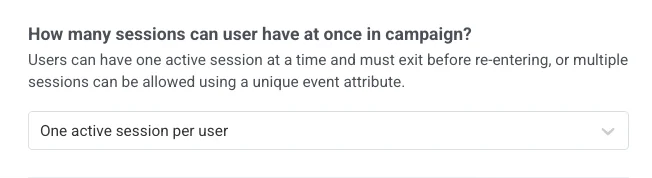
Decide whether each user can join only one journey at a time, or take part in several journeys in parallel.
Choose one of the following options from the dropdown:
* One active session per user
* Multiple active sessions per user
#### One active session per user
Each user can only have one active session in the campaign. They must complete or exit the current session before starting a new one.
##### Use cases
* **Onboarding flows** where a user should not restart until they finish the current journey
* **Subscription renewal reminders** where users should not receive overlapping notifications
* **Limited-time offers or trials** where only one active campaign run is allowed per user
* **Feedback collection campaigns** to ensure each user provides input once before re-entering
#### Multiple active sessions per user
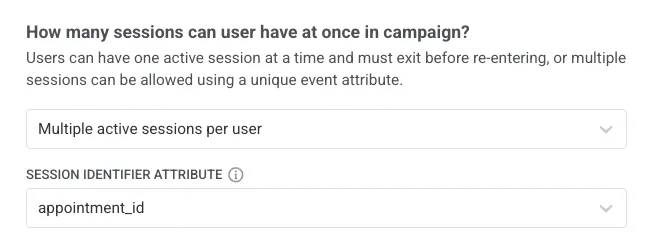
Users can have more than one active session in a campaign. Each session must be identified by a unique event attribute (e.g., `order_id`, `product_id`).
To set this up:
1. Select **Multiple active sessions per user** in the dropdown.
2. Choose a session identifier attribute (e.g., `order_id`, `product_id`). This attribute will distinguish one session from another.
**Example**
* `OrderPlaced` with `order_id = "1001"` → starts **Session 1**
* `OrderPlaced` with `order_id = "1002"` → starts **Session 2**
If an `OrderReady` event is sent without `order_id`, both Session 1 and Session 2 will be marked as “ready,” even if only one order actually is.
##### Use cases
* **E-commerce purchases**: each order starts its own journey, so multiple orders from one user can be tracked independently. *(attribute: `order_id`)*
* **Referral programs**: each referral creates a new session, allowing one user to refer multiple friends. *(attribute: `referral_id`)*
* **Loyalty programs**: track points or rewards from different transactions running in parallel. *(attribute: `transaction_id`)*
* **Ticket bookings**: each booking launches its own journey, so users can manage multiple tickets at once. *(attribute: `booking_id`)*
* **Appointment scheduling**: every appointment is handled as a separate session. *(attribute: `appointment_id`)*
## Control whether users can re-enter the campaign
Decide what happens when a user who is already in the journey triggers the entry event again.
Choose one of the following options from the dropdown:
* Do not allow re-entry (default)
* Allow re-entry
#### Do not allow re-entry
Users who are already in the journey will not re-enter it. If a user is in an active session and triggers the entry event again, the new trigger is ignored and the user continues their current session.
**Use cases**
* **Welcome and onboarding series** where a new user goes through the journey once from start to finish and keeps their place if they trigger the event again instead of being sent back to the beginning
* **One-time offers** where each customer should receive a promo or discount only once, even if they trigger the event multiple times
* **Educational and nurture flows** where subscribers keep moving through the content without restarting and getting the same emails again
#### Allow re-entry
Users who are already in the journey will be removed from their current session and re-entered with a new session. Each time a user triggers the entry event, their current session ends and a new one begins.
**Use cases**
* **Price-drop alerts** where the restart must pick up the new price, not keep notifying about the outdated price from the previous session
* **Win-back campaigns** where a returning inactive user should always start from the first message in the sequence
Once you've configured the entry element, click **Apply** to save the changes.
## Example scenario: E-commerce order journey with multiple sessions
Imagine you want to send notifications for every order a user places. Each order should have its own journey session. To do this, you’ll use the `OrderPlaced` event as the trigger and the attribute `order_id` as the session identifier.
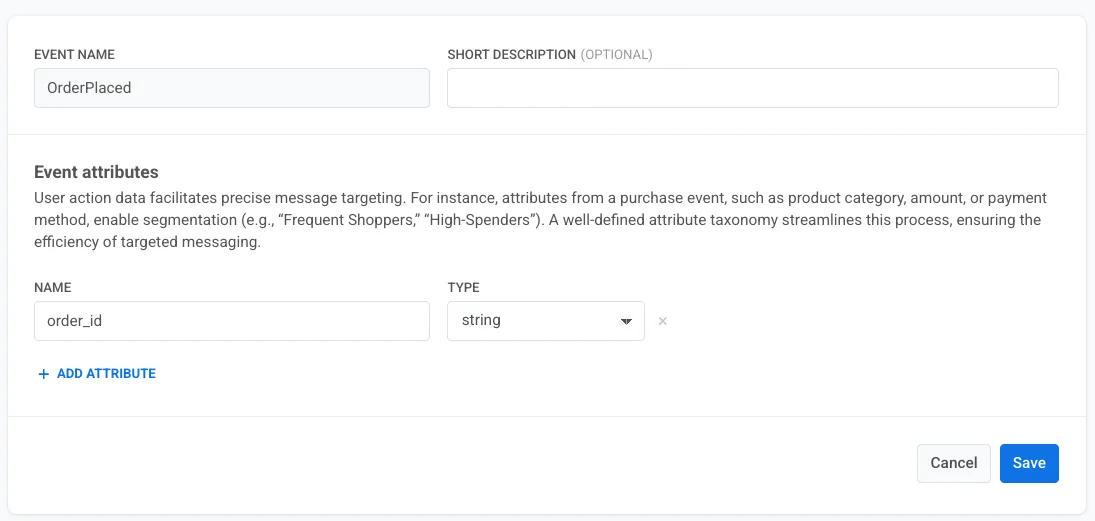
1. Create the event `OrderPlaced` and make sure it includes the attribute `order_id`. [Learn more about creating events](/product/audience-data-and-segmentation/events/#implementation)
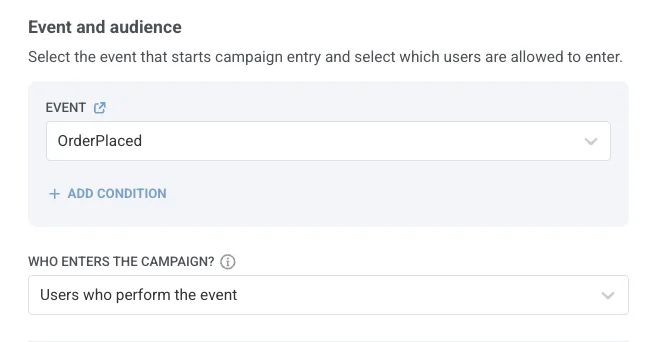
2. Set this event as the trigger for your journey.
3. In the session settings, select **Multiple active sessions per user** and choose `order_id` as the session identifier.
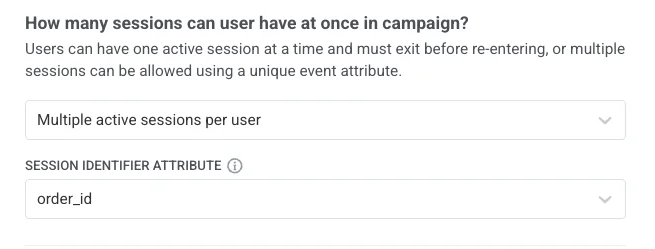
In this setup, each new order starts a separate journey session.
* `OrderPlaced` with `order_id = 1001` starts **Session 1**
* `OrderPlaced` with `order_id = 1002` starts **Session 2**
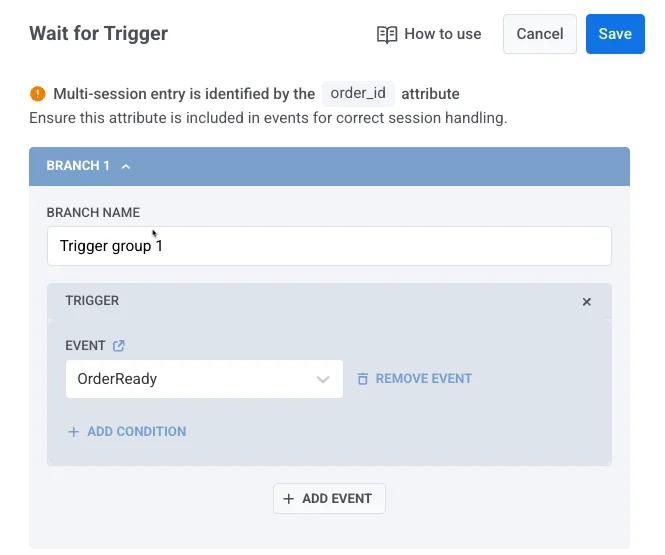
4. Next, add a [Wait for Trigger element](/product/customer-journey/journey-elements/flow-controls/wait-for-trigger/) to track when an order is ready for pickup or delivery. Use the event `OrderReady`, which must also include the same `order_id`.
This ensures that each order is updated in the correct session:
* `OrderReady` with `order_id = 1001` applies only to **Session 1**
* `OrderReady` with `order_id = 1002` applies only to **Session 2**
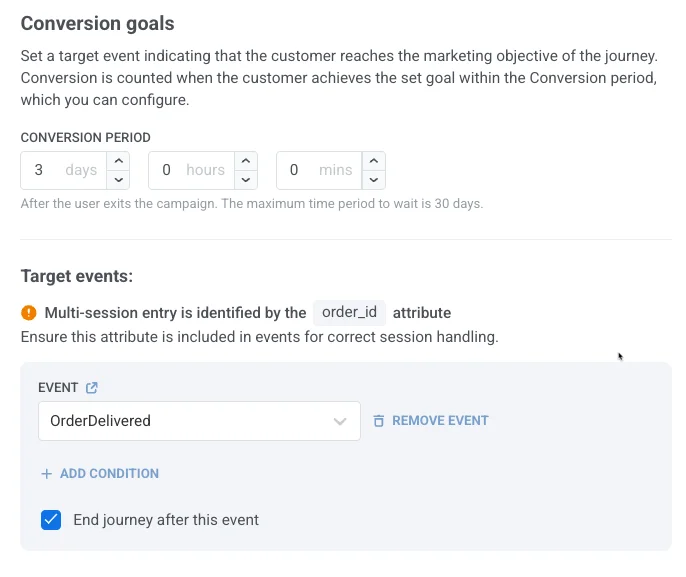
5. Finally, add a [conversion goal](/product/customer-journey/journey-settings/#conversion-goals), for example the `OrderDelivered` event. This event must also include the same `order_id` so it can be matched to the correct session.
* If `OrderDelivered` includes `order_id = "1001"`, it records a conversion for **Session 1**.
* If `OrderDelivered` includes `order_id = "1002"`, it records a conversion for **Session 2**.
 ## Define who enters the campaign
Define which user(s) should enter the journey when a specific event occurs.
Use the **Who enters the campaign?** dropdown to choose between the two available modes:
### Users who perform the event (default)
The user who triggers the event is the one who enters the journey.

**Example**
A user completes a purchase (`CheckoutSuccess` event). That same user (e.g., `User ID: 123`) enters a post-purchase journey that includes a thank-you message, product recommendations, or a satisfaction survey.
### Users from an event attribute
Instead of enrolling the user who triggered the event, you can pass one or more [`User IDs`](/product/pushwoosh-knowledge-hub/users-userids/) in a custom event attribute. The users listed in that attribute will enter the journey.
For this, select **Users from an event attribute** and choose an attribute key (e.g., `recipient_ids`, `target_user_id`). This key should match your event payload structure.

##### Example payload (single user)
```json
{
"application": "XXXXX-XXXXX",
"event": "invitation",
"attributes": {
"targetId": 321
},
"userId": 123
}
```
User `321` (from `targetId`) enters the journey.
##### Example payload (multiple users)
If you provide multiple user IDs, use a JSON array of strings.
```javascript
{
"application": "XXXXX-XXXXX",
"event": "invitation",
"attributes": {
"targetIds": [1,2,3,4]
},
"userId": 123
}
```
Users `1`, `2`, `3`, and `4` will enter the journey.
#### Use cases
**Comment notifications**
When someone comments on a user’s post, the post owner is notified.
**Example:** A comment event includes the post owner's ID in a `target_user_id` attribute. That user enters a journey to receive the notification.
**Referral programs**
When a referred user signs up or makes a purchase, the person who referred them is added to the journey.
**Example:** User `123` triggers the event, and the referrer `456` (from the `referrer_id` attribute) enters a reward campaign.
**Gift purchases**
When a user purchases a gift, the recipient is added to a journey using the `recipient_user_id` from the event payload.
**Example** User `123` buys a gift for user `456`, who then receives a notification, onboarding flow, or thank-you message.
## Set entry availability
Control when users can enter a journey via a trigger-based entry. You have two options:
* **Allow entry at any time**: Users can enter the journey whenever the trigger event occurs.
* **Limit entry to a specific period**: Users can only enter the journey if the trigger event happens within the selected date range.
When limiting entry, select the **start date**, **end date**, and the **timezone**. The entry window begins at **00:00** on the start date and ends at **23:59** on the end date, based on the chosen timezone.

## Control how many sessions a user can have at the same time
Decide whether each user can join only one journey at a time, or take part in several journeys in parallel.
Choose one of the following options from the dropdown:
* One active session per user
* Multiple active sessions per user
#### One active session per user
Each user can only have one active session in the campaign. They must complete or exit the current session before starting a new one.

##### Use cases
* **Onboarding flows** where a user should not restart until they finish the current journey
* **Subscription renewal reminders** where users should not receive overlapping notifications
* **Limited-time offers or trials** where only one active campaign run is allowed per user
* **Feedback collection campaigns** to ensure each user provides input once before re-entering
#### Multiple active sessions per user
Users can have more than one active session in a campaign. Each session must be identified by a unique event attribute (e.g., `order_id`, `product_id`).
To set this up:
1. Select **Multiple active sessions per user** in the dropdown.
2. Choose a session identifier attribute (e.g., `order_id`, `product_id`). This attribute will distinguish one session from another.

**Example**
* `OrderPlaced` with `order_id = "1001"` → starts **Session 1**
* `OrderPlaced` with `order_id = "1002"` → starts **Session 2**
If an `OrderReady` event is sent without `order_id`, both Session 1 and Session 2 will be marked as “ready,” even if only one order actually is.
##### Use cases
* **E-commerce purchases**: each order starts its own journey, so multiple orders from one user can be tracked independently. *(attribute: `order_id`)*
* **Referral programs**: each referral creates a new session, allowing one user to refer multiple friends. *(attribute: `referral_id`)*
* **Loyalty programs**: track points or rewards from different transactions running in parallel. *(attribute: `transaction_id`)*
* **Ticket bookings**: each booking launches its own journey, so users can manage multiple tickets at once. *(attribute: `booking_id`)*
* **Appointment scheduling**: every appointment is handled as a separate session. *(attribute: `appointment_id`)*
## Control whether users can re-enter the campaign
Decide what happens when a user who is already in the journey triggers the entry event again.
Choose one of the following options from the dropdown:
* Do not allow re-entry (default)
* Allow re-entry
#### Do not allow re-entry
Users who are already in the journey will not re-enter it. If a user is in an active session and triggers the entry event again, the new trigger is ignored and the user continues their current session.
**Use cases**
* **Welcome and onboarding series** where a new user goes through the journey once from start to finish and keeps their place if they trigger the event again instead of being sent back to the beginning
* **One-time offers** where each customer should receive a promo or discount only once, even if they trigger the event multiple times
* **Educational and nurture flows** where subscribers keep moving through the content without restarting and getting the same emails again
#### Allow re-entry
Users who are already in the journey will be removed from their current session and re-entered with a new session. Each time a user triggers the entry event, their current session ends and a new one begins.
**Use cases**
* **Price-drop alerts** where the restart must pick up the new price, not keep notifying about the outdated price from the previous session
* **Win-back campaigns** where a returning inactive user should always start from the first message in the sequence
Once you've configured the entry element, click **Apply** to save the changes.
## Example scenario: E-commerce order journey with multiple sessions
Imagine you want to send notifications for every order a user places. Each order should have its own journey session. To do this, you’ll use the `OrderPlaced` event as the trigger and the attribute `order_id` as the session identifier.
1. Create the event `OrderPlaced` and make sure it includes the attribute `order_id`. [Learn more about creating events](/product/audience-data-and-segmentation/events/#implementation)

2. Set this event as the trigger for your journey.

3. In the session settings, select **Multiple active sessions per user** and choose `order_id` as the session identifier.

In this setup, each new order starts a separate journey session.
* `OrderPlaced` with `order_id = 1001` starts **Session 1**
* `OrderPlaced` with `order_id = 1002` starts **Session 2**
4. Next, add a [Wait for Trigger element](/product/customer-journey/journey-elements/flow-controls/wait-for-trigger/) to track when an order is ready for pickup or delivery. Use the event `OrderReady`, which must also include the same `order_id`.
This ensures that each order is updated in the correct session:
* `OrderReady` with `order_id = 1001` applies only to **Session 1**
* `OrderReady` with `order_id = 1002` applies only to **Session 2**

5. Finally, add a [conversion goal](/product/customer-journey/journey-settings/#conversion-goals), for example the `OrderDelivered` event. This event must also include the same `order_id` so it can be matched to the correct session.
* If `OrderDelivered` includes `order_id = "1001"`, it records a conversion for **Session 1**.
* If `OrderDelivered` includes `order_id = "1002"`, it records a conversion for **Session 2**.

## Define who enters the campaign
Define which user(s) should enter the journey when a specific event occurs.
Use the **Who enters the campaign?** dropdown to choose between the two available modes:
### Users who perform the event (default)
The user who triggers the event is the one who enters the journey.

**Example**
A user completes a purchase (`CheckoutSuccess` event). That same user (e.g., `User ID: 123`) enters a post-purchase journey that includes a thank-you message, product recommendations, or a satisfaction survey.
### Users from an event attribute
Instead of enrolling the user who triggered the event, you can pass one or more [`User IDs`](/product/pushwoosh-knowledge-hub/users-userids/) in a custom event attribute. The users listed in that attribute will enter the journey.
For this, select **Users from an event attribute** and choose an attribute key (e.g., `recipient_ids`, `target_user_id`). This key should match your event payload structure.

##### Example payload (single user)
```json
{
"application": "XXXXX-XXXXX",
"event": "invitation",
"attributes": {
"targetId": 321
},
"userId": 123
}
```
User `321` (from `targetId`) enters the journey.
##### Example payload (multiple users)
If you provide multiple user IDs, use a JSON array of strings.
```javascript
{
"application": "XXXXX-XXXXX",
"event": "invitation",
"attributes": {
"targetIds": [1,2,3,4]
},
"userId": 123
}
```
Users `1`, `2`, `3`, and `4` will enter the journey.
#### Use cases
**Comment notifications**
When someone comments on a user’s post, the post owner is notified.
**Example:** A comment event includes the post owner's ID in a `target_user_id` attribute. That user enters a journey to receive the notification.
**Referral programs**
When a referred user signs up or makes a purchase, the person who referred them is added to the journey.
**Example:** User `123` triggers the event, and the referrer `456` (from the `referrer_id` attribute) enters a reward campaign.
**Gift purchases**
When a user purchases a gift, the recipient is added to a journey using the `recipient_user_id` from the event payload.
**Example** User `123` buys a gift for user `456`, who then receives a notification, onboarding flow, or thank-you message.
## Set entry availability
Control when users can enter a journey via a trigger-based entry. You have two options:
* **Allow entry at any time**: Users can enter the journey whenever the trigger event occurs.
* **Limit entry to a specific period**: Users can only enter the journey if the trigger event happens within the selected date range.
When limiting entry, select the **start date**, **end date**, and the **timezone**. The entry window begins at **00:00** on the start date and ends at **23:59** on the end date, based on the chosen timezone.

## Control how many sessions a user can have at the same time
Decide whether each user can join only one journey at a time, or take part in several journeys in parallel.
Choose one of the following options from the dropdown:
* One active session per user
* Multiple active sessions per user
#### One active session per user
Each user can only have one active session in the campaign. They must complete or exit the current session before starting a new one.

##### Use cases
* **Onboarding flows** where a user should not restart until they finish the current journey
* **Subscription renewal reminders** where users should not receive overlapping notifications
* **Limited-time offers or trials** where only one active campaign run is allowed per user
* **Feedback collection campaigns** to ensure each user provides input once before re-entering
#### Multiple active sessions per user
Users can have more than one active session in a campaign. Each session must be identified by a unique event attribute (e.g., `order_id`, `product_id`).
To set this up:
1. Select **Multiple active sessions per user** in the dropdown.
2. Choose a session identifier attribute (e.g., `order_id`, `product_id`). This attribute will distinguish one session from another.

**Example**
* `OrderPlaced` with `order_id = "1001"` → starts **Session 1**
* `OrderPlaced` with `order_id = "1002"` → starts **Session 2**
If an `OrderReady` event is sent without `order_id`, both Session 1 and Session 2 will be marked as “ready,” even if only one order actually is.
##### Use cases
* **E-commerce purchases**: each order starts its own journey, so multiple orders from one user can be tracked independently. *(attribute: `order_id`)*
* **Referral programs**: each referral creates a new session, allowing one user to refer multiple friends. *(attribute: `referral_id`)*
* **Loyalty programs**: track points or rewards from different transactions running in parallel. *(attribute: `transaction_id`)*
* **Ticket bookings**: each booking launches its own journey, so users can manage multiple tickets at once. *(attribute: `booking_id`)*
* **Appointment scheduling**: every appointment is handled as a separate session. *(attribute: `appointment_id`)*
## Control whether users can re-enter the campaign
Decide what happens when a user who is already in the journey triggers the entry event again.
Choose one of the following options from the dropdown:
* Do not allow re-entry (default)
* Allow re-entry
#### Do not allow re-entry
Users who are already in the journey will not re-enter it. If a user is in an active session and triggers the entry event again, the new trigger is ignored and the user continues their current session.
**Use cases**
* **Welcome and onboarding series** where a new user goes through the journey once from start to finish and keeps their place if they trigger the event again instead of being sent back to the beginning
* **One-time offers** where each customer should receive a promo or discount only once, even if they trigger the event multiple times
* **Educational and nurture flows** where subscribers keep moving through the content without restarting and getting the same emails again
#### Allow re-entry
Users who are already in the journey will be removed from their current session and re-entered with a new session. Each time a user triggers the entry event, their current session ends and a new one begins.
**Use cases**
* **Price-drop alerts** where the restart must pick up the new price, not keep notifying about the outdated price from the previous session
* **Win-back campaigns** where a returning inactive user should always start from the first message in the sequence
Once you've configured the entry element, click **Apply** to save the changes.
## Example scenario: E-commerce order journey with multiple sessions
Imagine you want to send notifications for every order a user places. Each order should have its own journey session. To do this, you’ll use the `OrderPlaced` event as the trigger and the attribute `order_id` as the session identifier.
1. Create the event `OrderPlaced` and make sure it includes the attribute `order_id`. [Learn more about creating events](/product/audience-data-and-segmentation/events/#implementation)

2. Set this event as the trigger for your journey.

3. In the session settings, select **Multiple active sessions per user** and choose `order_id` as the session identifier.

In this setup, each new order starts a separate journey session.
* `OrderPlaced` with `order_id = 1001` starts **Session 1**
* `OrderPlaced` with `order_id = 1002` starts **Session 2**
4. Next, add a [Wait for Trigger element](/product/customer-journey/journey-elements/flow-controls/wait-for-trigger/) to track when an order is ready for pickup or delivery. Use the event `OrderReady`, which must also include the same `order_id`.
This ensures that each order is updated in the correct session:
* `OrderReady` with `order_id = 1001` applies only to **Session 1**
* `OrderReady` with `order_id = 1002` applies only to **Session 2**

5. Finally, add a [conversion goal](/product/customer-journey/journey-settings/#conversion-goals), for example the `OrderDelivered` event. This event must also include the same `order_id` so it can be matched to the correct session.
* If `OrderDelivered` includes `order_id = "1001"`, it records a conversion for **Session 1**.
* If `OrderDelivered` includes `order_id = "1002"`, it records a conversion for **Session 2**.
