Audience-based entry
Audience-based entry launches a journey for a pre-built segment of your app’s users. A segment includes subscribers who meet specific conditions.
For more information on Audience segments, refer to the Segments guide.
To set up the Audience-based entry, drag the Audience-based entry element onto the canvas and select an Audience Source (i.e., a pre-built segment of app subscribers).
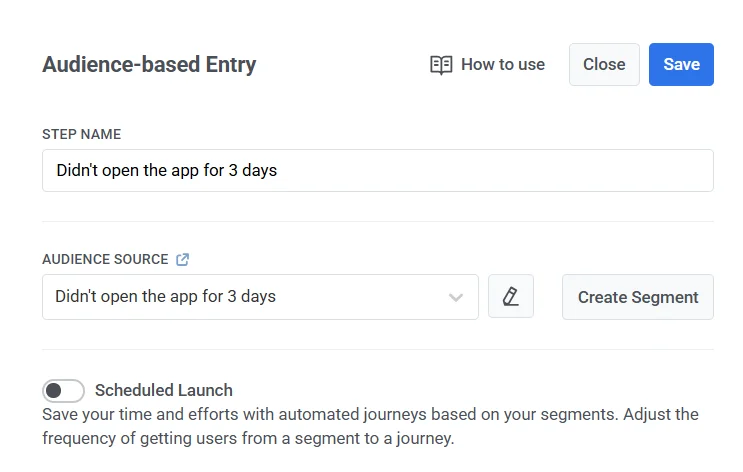
You can manage segments directly from this element:
- To edit the selected segment, click the Edit icon next to the Audience Source dropdown.
- To create a new segment, click Create Segment.
You can also upload a CSV file to create a segment and then start a journey for it. Learn more
Once the journey is activated, all users from the segment selected will enter the journey.
Entry schedule
Anchor link toEntry schedule defines how users enter the journey.
In the element configuration, choose between two entry types:
- One-time entry: users enter the journey once – at launch or on a scheduled date.
- Recurring entry: users enter the journey repeatedly based on the selected schedule.
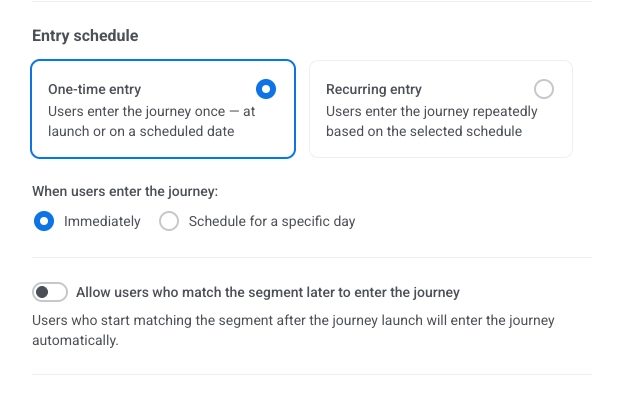
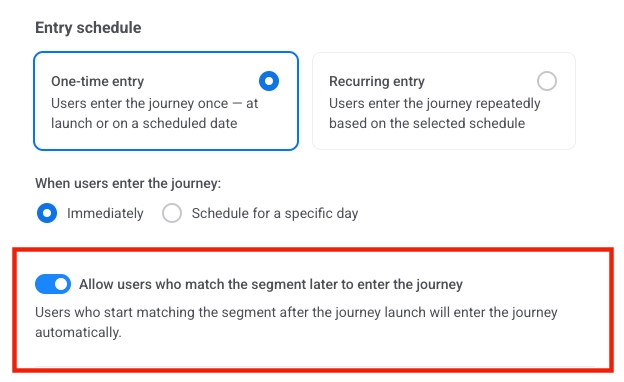
One-time entry
Anchor link toWhen One-time entry is selected, choose when users enter the journey:
- Immediately: users enter as soon as the journey is activated.
- Schedule for a specific day: users enter on the date and time you set.
Immediately
Anchor link toUsers enter the journey as soon as it is activated.
Schedule for a specific day
Anchor link toIf you choose Schedule for a specific day, set the date, time, and timezone.
Timezone options:
Anchor link to- Subscriber’s device timezone (default): entry uses each subscriber’s device timezone. If timezone is missing, a fallback (e.g. GMT+01:00) is used. Click Change fallback to change it.
- Specific timezone: pick a timezone from the dropdown for a fixed entry time.

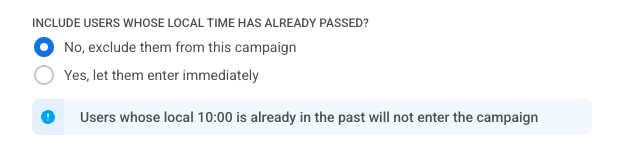
Choose what happens when a user’s scheduled time has already passed
Anchor link toChoose what happens when a user’s scheduled entry time (in their local timezone) has already passed:
- No, exclude them from this campaign: the user will not enter the journey. An informational message reminds you that users whose local time (e.g. 10:00) is already in the past will not enter the campaign.
- Yes, let them enter immediately: the user is added to the campaign right away.
Add users when they start matching the segment later
Anchor link toEnable Allow users who match the segment later to enter the journey if you want users who start matching the segment after the journey is activated to enter automatically. Users will be added when their attributes or tags match the segment criteria, even while the journey is running.
Use cases
Anchor link to- Welcome series. Build a segment on tag
Registered(set when the user completes registration). With dynamic entry, everyone who gets the tag after the journey is live enters and gets the welcome sequence. - Win-back. Build a segment on tag
Returned(set when the user opens the app again after a period of inactivity). With dynamic entry, they enter the win-back journey as soon as the tag is set. - Post-purchase. Build a segment on tag
FirstPurchase. With dynamic entry, anyone who gets the tag after the journey start enters and gets the follow-up (e.g. review request, cross-sell).
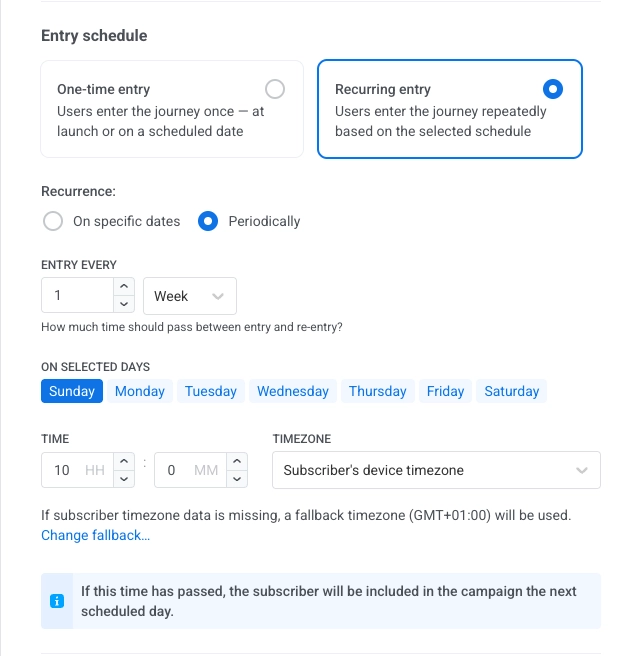
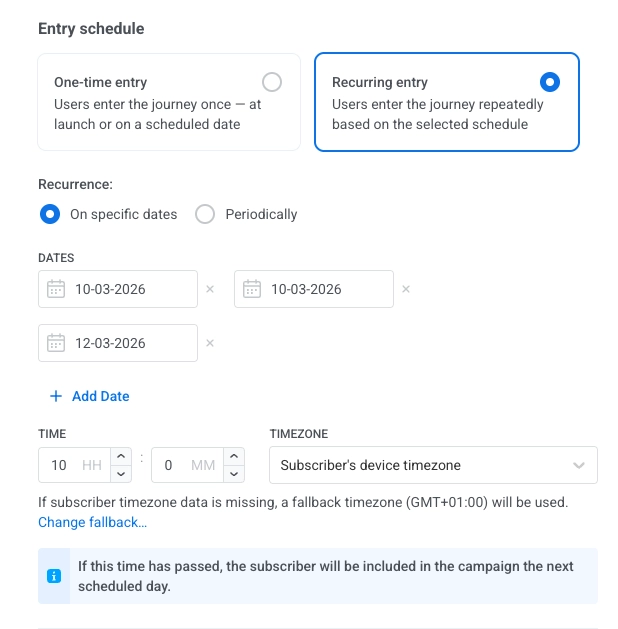
Recurring entry
Anchor link toWhen Recurring entry is selected, users enter the journey repeatedly.
Choose the schedule:
- On specific dates: users enter on the dates you pick.
- Periodically: users enter at a fixed interval (e.g. every 1 day).
On specific dates
Anchor link toUsers enter the same journey on the dates you choose (e.g. the same reminder or signup flow runs on each scheduled webinar or training date).
- Select On specific dates and pick the dates in the calendar. Click + Add Date to add more dates.
- Set the time.
- Set the timezone the same way as for Schedule for a specific day.
If a subscriber’s scheduled time has already passed, they are included on the next scheduled date.
Periodically
Anchor link toUsers enter the journey at a fixed interval on the days you choose (e.g. a fitness app runs the same daily 8 AM reminder journey every day).
- Select Periodically.
- In ENTRY EVERY, set the interval (e.g. every 1 day, every 2 weeks).
- Pick the days (of the week or month, depending on the interval).
- Set the time and the timezone the same way as for Schedule for a specific day.
If a subscriber’s scheduled time has already passed, they are included on the next scheduled day.