# API-based entry
## How it works
API-based entry allows you to launch a customer journey the moment a specific business event occurs. To start a campaign, you have to send a special API request.
Here are a few use cases for an API-based entry:
* Inform customers when products are back in stock
* Tell users a popular product’s price has decreased
* Notify subscribers when a new podcast episode is out
Unlike regular Events, all these business events may occur outside the app. For example, a product's availability can only be checked in an external database. This is where an API-based entry comes in handy: you can set up sending a request to launch a journey whenever certain changes occur outside of the app (for example, in your external database).
It works as follows:
1. Create a journey with an API-based entry. In the entry settings, you will find the template of the request that launches the journey.
2. Add segmentation conditions to the request using [Segmentation language](/developer/api-reference/segmentation-filters-api/segmentation-language). You can also add content placeholders to the request to change message content depending on the context.
3. Automate the request if needed. For example, information about a price change can be immediately sent from the database to the webhook. Once this happens, the webhook should automatically send the request to launch the journey. You can also send the request manually if you don't need automation.
You can send the request an unlimited number of times to change segmentation conditions or the message content.
For more details, follow the instructions below.
## Set up a journey with API-based entry
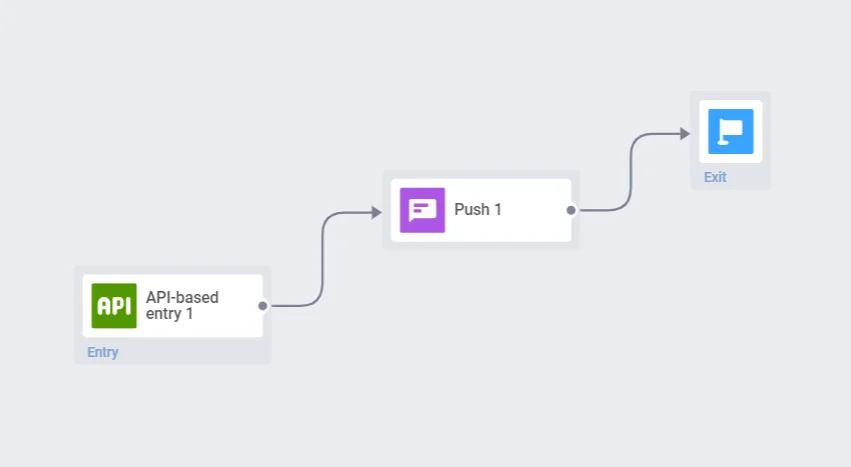
1. Create a journey with an API-based entry:
2. Double-click on the API-based entry step. The entry configuration window will open.
3. You can modify the push and email content every time the journey is launched by using content placeholders. The value of each placeholder can be changed in the request. If you don't need this option, you can skip this step.
> For example, you are creating a journey to notify subscribers when a new podcast episode is released. Using a content placeholder, you can change the podcast title every time you launch the journey.
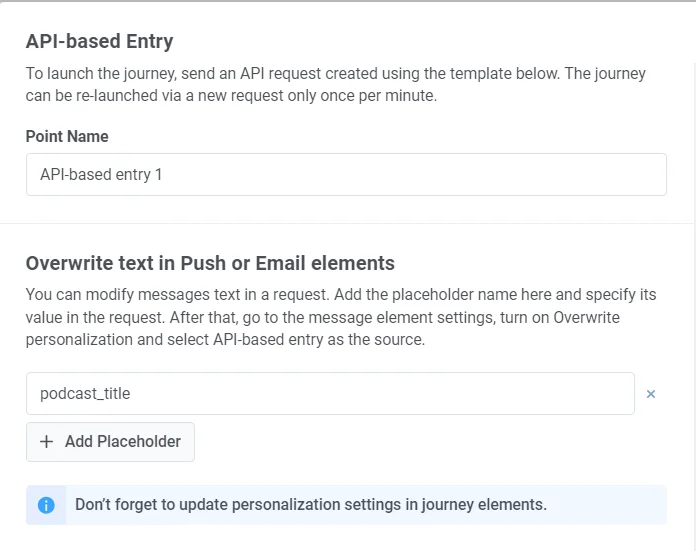
First, add placeholder names in the API-based entry setup window. You can use any names that are convenient for you.
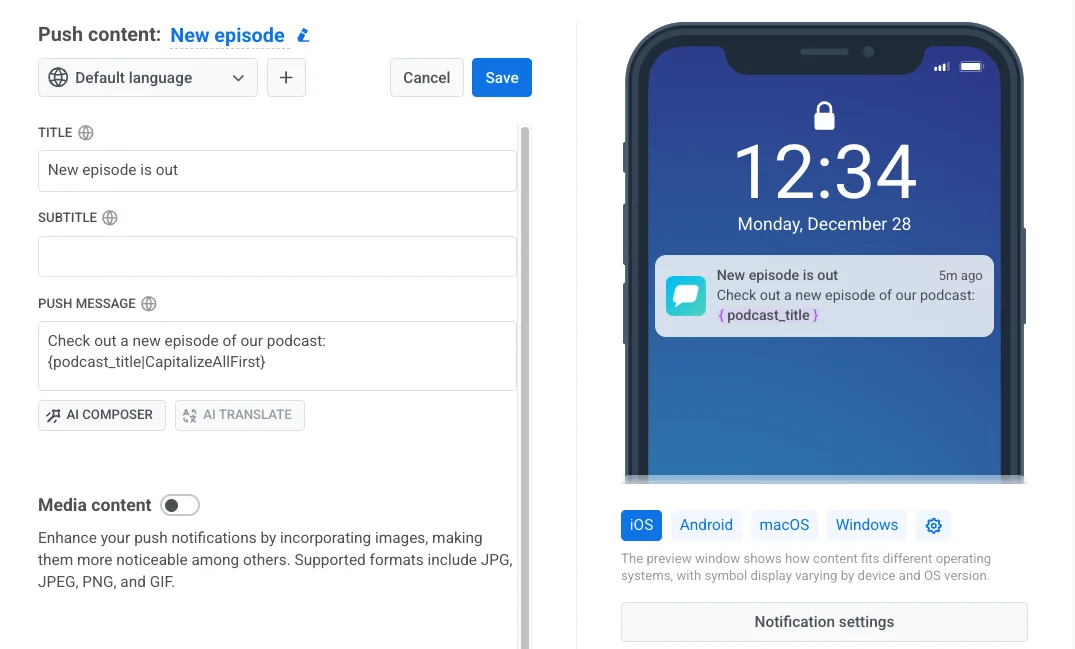
Now, create a [push preset](/product/content/push-presets) or [email content](/product/content/email-content/) and insert the placeholder instead of the text you want to modify. The placeholder must be in one of the following formats depending on your needs:
* `{placeholder_name|format_modifier|}` – if the placeholder value is not specified when launching the campaign, users will see empty space in its place.
* `{placeholder_name|format_modifier}` – if the placeholder value is not specified and has not been already assigned to a user (in case you used a Tag as a placeholder), the message will not be sent.
Format modifiers
* **CapitalizeFirst** – capitalizes the first letter in a placeholder value
* **CapitalizeAllFirst** – capitalizes the first letters in all words in a placeholder value
* **UPPERCASE** – switches all letters to uppercase
* **lowercase** – switches all letters to lowercase
* **regular** – inserts a placeholder value exactly as specified in the request
When configuring the Push or Email element in your journey, select the created preset and turn on the **Personalize message with event attributes** option.
Select the placeholders you want to modify in the request when launching the journey. Choose the **API-based entry entry** as the source and the placeholder name as the dynamic attribute:
Click **Apply** to save changes.
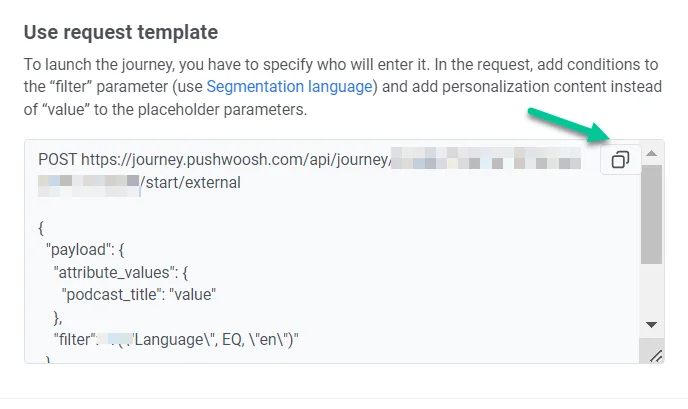
4. In the entry configuration window, copy the request template to modify it:
5. Add audience filters to the `"filter"` parameter using [Segmentation language](/developer/api-reference/segmentation-filters-api/segmentation-language) or [copy the segmentation language](/product/audience-data-and-segmentation/segmentation/#copy-segment-logic) from your segments. Set up the necessary [Tags](/product/audience-data-and-segmentation/user-data-tags/tags) in advance.
For example, to target users who added the _Socks_ item to their _Wishlist_, the `"filter"` value must look as follows:
`"filter": "A(\"12345-12345\") * "T(\"Wishlist\", EQ, \"Socks\")"`
In this example, you must have a _Wishlist_ Tag configured in your app.
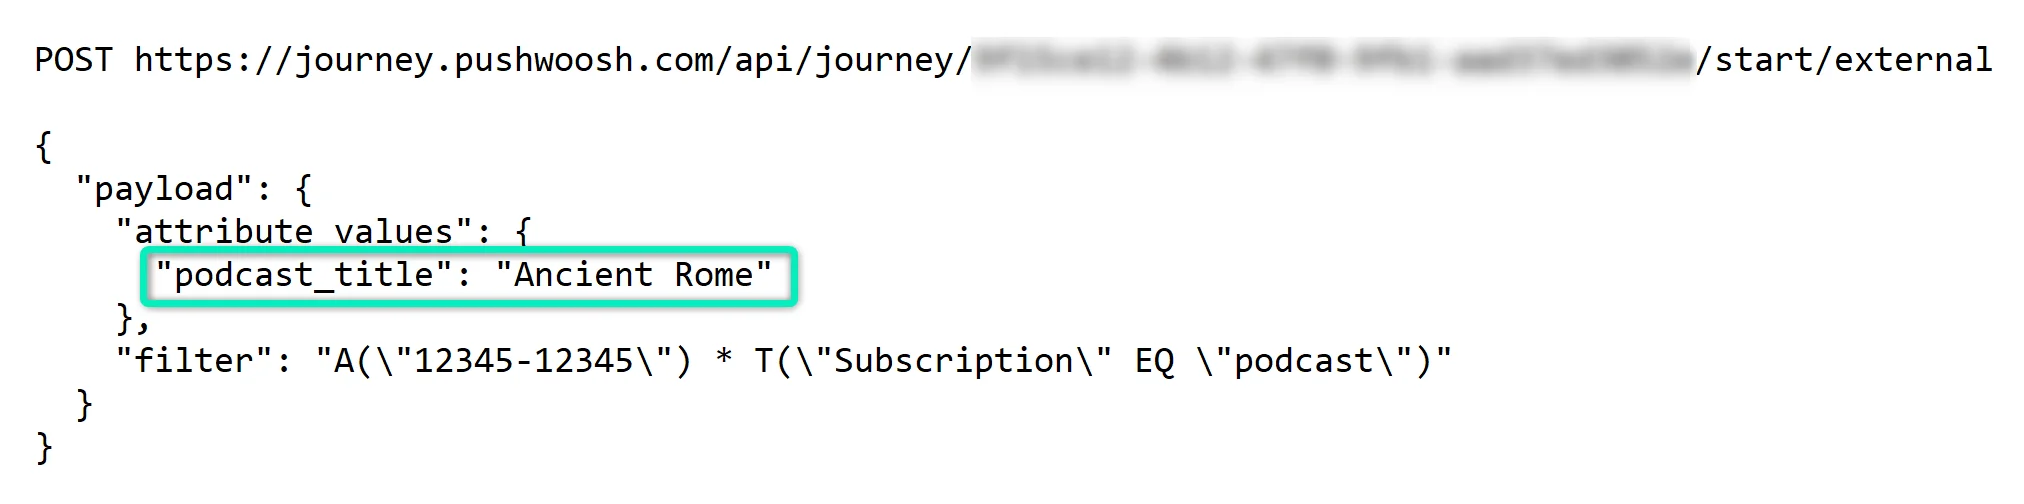
6. If you’ve set up placeholders, specify the desired content as their values:
7. If you plan to restart your campaign frequently and don't want the same users to enter the journey multiple times, set [Campaign entry limits](/product/customer-journey/journey-settings#campaign-entry-limit).
> For example, you’ve created a campaign to notify users about a price reduction for a specific product. You want to re-launch the journey a few times by sending several requests with different audience filters. In this case, you can add Campaign entry limits so that the notification is not sent repeatedly to users that match multiple filters.
8. If you want a journey to launch whenever a certain business event happens, automate the request using the webhook. Once the event occurs, the webhook should automatically send the request to start the journey.
You can also send the request manually if you don't need automation.
 It works as follows:
1. Create a journey with an API-based entry. In the entry settings, you will find the template of the request that launches the journey.
2. Add segmentation conditions to the request using [Segmentation language](/developer/api-reference/segmentation-filters-api/segmentation-language). You can also add content placeholders to the request to change message content depending on the context.
3. Automate the request if needed. For example, information about a price change can be immediately sent from the database to the webhook. Once this happens, the webhook should automatically send the request to launch the journey. You can also send the request manually if you don't need automation.
You can send the request an unlimited number of times to change segmentation conditions or the message content.
For more details, follow the instructions below.
## Set up a journey with API-based entry
1. Create a journey with an API-based entry:
2. Double-click on the API-based entry step. The entry configuration window will open.
3. You can modify the push and email content every time the journey is launched by using content placeholders. The value of each placeholder can be changed in the request. If you don't need this option, you can skip this step.
> For example, you are creating a journey to notify subscribers when a new podcast episode is released. Using a content placeholder, you can change the podcast title every time you launch the journey.
First, add placeholder names in the API-based entry setup window. You can use any names that are convenient for you.
It works as follows:
1. Create a journey with an API-based entry. In the entry settings, you will find the template of the request that launches the journey.
2. Add segmentation conditions to the request using [Segmentation language](/developer/api-reference/segmentation-filters-api/segmentation-language). You can also add content placeholders to the request to change message content depending on the context.
3. Automate the request if needed. For example, information about a price change can be immediately sent from the database to the webhook. Once this happens, the webhook should automatically send the request to launch the journey. You can also send the request manually if you don't need automation.
You can send the request an unlimited number of times to change segmentation conditions or the message content.
For more details, follow the instructions below.
## Set up a journey with API-based entry
1. Create a journey with an API-based entry:
2. Double-click on the API-based entry step. The entry configuration window will open.
3. You can modify the push and email content every time the journey is launched by using content placeholders. The value of each placeholder can be changed in the request. If you don't need this option, you can skip this step.
> For example, you are creating a journey to notify subscribers when a new podcast episode is released. Using a content placeholder, you can change the podcast title every time you launch the journey.
First, add placeholder names in the API-based entry setup window. You can use any names that are convenient for you.
 Now, create a [push preset](/product/content/push-presets) or [email content](/product/content/email-content/) and insert the placeholder instead of the text you want to modify. The placeholder must be in one of the following formats depending on your needs:
* `{placeholder_name|format_modifier|}` – if the placeholder value is not specified when launching the campaign, users will see empty space in its place.
* `{placeholder_name|format_modifier}` – if the placeholder value is not specified and has not been already assigned to a user (in case you used a Tag as a placeholder), the message will not be sent.
Now, create a [push preset](/product/content/push-presets) or [email content](/product/content/email-content/) and insert the placeholder instead of the text you want to modify. The placeholder must be in one of the following formats depending on your needs:
* `{placeholder_name|format_modifier|}` – if the placeholder value is not specified when launching the campaign, users will see empty space in its place.
* `{placeholder_name|format_modifier}` – if the placeholder value is not specified and has not been already assigned to a user (in case you used a Tag as a placeholder), the message will not be sent.
 When configuring the Push or Email element in your journey, select the created preset and turn on the **Personalize message with event attributes** option.
Select the placeholders you want to modify in the request when launching the journey. Choose the **API-based entry entry** as the source and the placeholder name as the dynamic attribute:
Click **Apply** to save changes.
4. In the entry configuration window, copy the request template to modify it:
When configuring the Push or Email element in your journey, select the created preset and turn on the **Personalize message with event attributes** option.
Select the placeholders you want to modify in the request when launching the journey. Choose the **API-based entry entry** as the source and the placeholder name as the dynamic attribute:
Click **Apply** to save changes.
4. In the entry configuration window, copy the request template to modify it:
 5. Add audience filters to the `"filter"` parameter using [Segmentation language](/developer/api-reference/segmentation-filters-api/segmentation-language) or [copy the segmentation language](/product/audience-data-and-segmentation/segmentation/#copy-segment-logic) from your segments. Set up the necessary [Tags](/product/audience-data-and-segmentation/user-data-tags/tags) in advance.
For example, to target users who added the _Socks_ item to their _Wishlist_, the `"filter"` value must look as follows:
`"filter": "A(\"12345-12345\") * "T(\"Wishlist\", EQ, \"Socks\")"`
In this example, you must have a _Wishlist_ Tag configured in your app.
6. If you’ve set up placeholders, specify the desired content as their values:
5. Add audience filters to the `"filter"` parameter using [Segmentation language](/developer/api-reference/segmentation-filters-api/segmentation-language) or [copy the segmentation language](/product/audience-data-and-segmentation/segmentation/#copy-segment-logic) from your segments. Set up the necessary [Tags](/product/audience-data-and-segmentation/user-data-tags/tags) in advance.
For example, to target users who added the _Socks_ item to their _Wishlist_, the `"filter"` value must look as follows:
`"filter": "A(\"12345-12345\") * "T(\"Wishlist\", EQ, \"Socks\")"`
In this example, you must have a _Wishlist_ Tag configured in your app.
6. If you’ve set up placeholders, specify the desired content as their values:
 7. If you plan to restart your campaign frequently and don't want the same users to enter the journey multiple times, set [Campaign entry limits](/product/customer-journey/journey-settings#campaign-entry-limit).
> For example, you’ve created a campaign to notify users about a price reduction for a specific product. You want to re-launch the journey a few times by sending several requests with different audience filters. In this case, you can add Campaign entry limits so that the notification is not sent repeatedly to users that match multiple filters.
8. If you want a journey to launch whenever a certain business event happens, automate the request using the webhook. Once the event occurs, the webhook should automatically send the request to start the journey.
You can also send the request manually if you don't need automation.
7. If you plan to restart your campaign frequently and don't want the same users to enter the journey multiple times, set [Campaign entry limits](/product/customer-journey/journey-settings#campaign-entry-limit).
> For example, you’ve created a campaign to notify users about a price reduction for a specific product. You want to re-launch the journey a few times by sending several requests with different audience filters. In this case, you can add Campaign entry limits so that the notification is not sent repeatedly to users that match multiple filters.
8. If you want a journey to launch whenever a certain business event happens, automate the request using the webhook. Once the event occurs, the webhook should automatically send the request to start the journey.
You can also send the request manually if you don't need automation.