# Viber
The **Viber element** allows you to send Viber messages to users as part of your Customer Journey. Drag the **Viber** element to the canvas and set it up.
## Select message content
Choose how to define the message content:
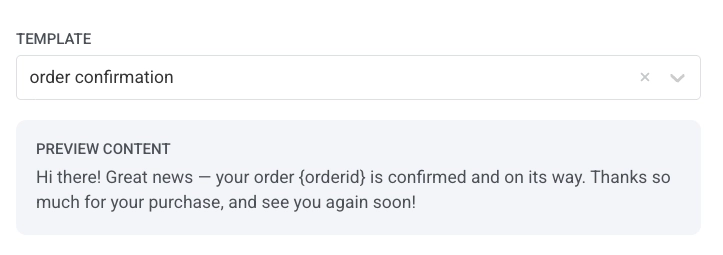
* **Template**
Select an approved Viber message template. Viber templates are created and approved directly by **Rakuten Viber**, not in Pushwoosh. Messages sent with an approved template are billed at the lower **Transactional** rate.
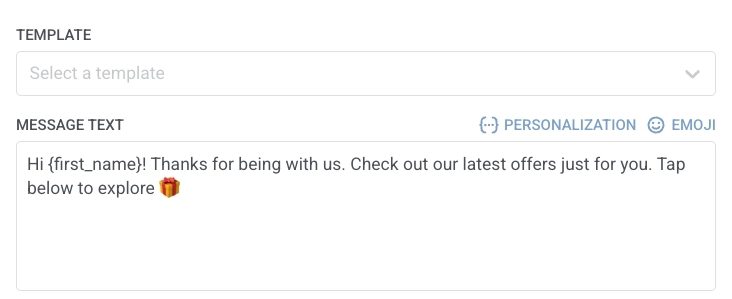
* **Freeform**
Enter plain-text content directly into the message field. Freeform messages don't require template approval, but are billed at the **Promotional** rate.
## Personalise message with event attributes
Viber templates can include placeholders for dynamic values, such as an order ID or a verification code. Personalization fills each placeholder with data from an event attribute or API-based entry, so each recipient sees their own values instead of static text.
When your **Template** includes placeholders, for each placeholder, select the **Source event** and **Dynamic attribute** that supply the value. [Learn more](/product/customer-journey/journey-elements/dynamic-content-and-liquid-templates-in-journeys/)
## Set message type
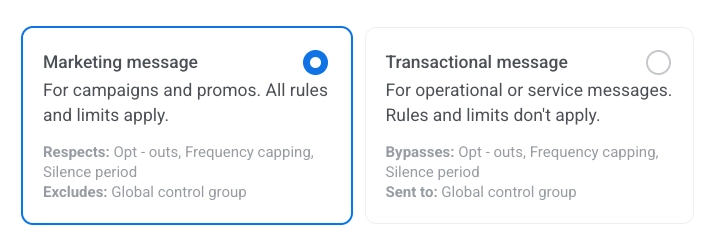
Choose **Marketing message** or **Transactional message**:
* **Marketing message**: For campaigns and promos. All rules and limits apply. Respects: Opt-outs, Frequency capping, and Silence period. Excludes: the [global control group](/product/audience-data-and-segmentation/global-control-group/).
* **Transactional message**: For operational or service messages. Rules and limits don't apply. Bypasses: Opt-outs, Frequency capping, and Silence period. Sent to: the [global control group](/product/audience-data-and-segmentation/global-control-group/).
[Learn how message type affects delivery](/product/messaging-channels/marketing-vs-transactional/).
## Split flow by delivery status
To split the journey by Viber delivery status:
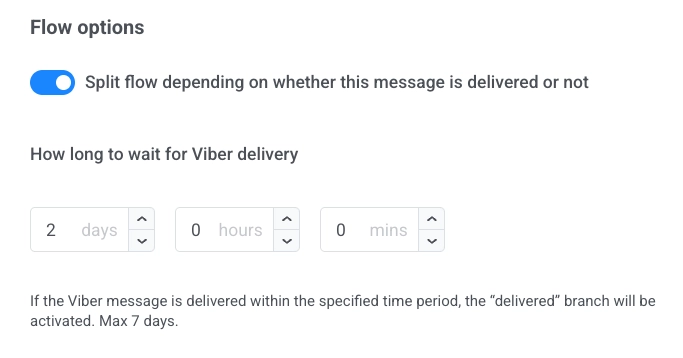
1. Enable **Split flow depending on whether this message is delivered or not**.
2. Set how long to wait for delivery (maximum 7 days).
If the message is delivered within the wait period, users follow the **delivered** branch. Otherwise, they follow the **not delivered** branch.
## Set frequency capping
Use [**Frequency capping**](/product/messaging-channels/global-frequency-capping/#enable-global-frequency-capping) to limit how often users receive Viber messages, preventing over-messaging and reducing churn. Choose one of the following options:
* **Use Global frequency capping settings**
Apply the project-wide limits configured in your [Global frequency capping settings](/product/messaging-channels/global-frequency-capping/#enable-global-frequency-capping).
For example, if the global limit is set to 3 Viber messages in 9 days, additional messages exceeding this limit will be skipped.
* **Ignore Global frequency capping**
The user will receive this message even if they've exceeded the channel's message limits. Use this option with caution to avoid over-messaging.
* **Use custom frequency capping**
Set a custom message limit for this message. If the user exceeds this custom cap, the message will be skipped, and the user will proceed to the next step.
> **Important:** Custom frequency capping does not isolate the message from **Global frequency capping**. All messages sent on the same channel, including those from other journeys or campaigns, are still counted toward the global cap.
[Learn more](/product/messaging-channels/global-frequency-capping/#customize-capping-for-specific-messages)
## Use vouchers
You can personalize Viber messages by including a unique voucher code from a predefined pool. This is ideal for delivering promotions, discounts, or loyalty incentives through one-on-one communication.
To use vouchers in your Viber message:
1. Ensure your Viber message content includes the placeholder `{{voucher}}`.
2. In the Viber message step, toggle **Vouchers** to ON.
3. Select the appropriate **Voucher Pool** that contains your voucher codes. Make sure the pool is created in advance.
4. (Optional) Use the **Assign Tag** field to apply a tag to users who receive a voucher. This helps with segmentation and reporting.
[Learn more about vouchers](/product/content/vouchers/)
After configuring the Viber element, click **Save** to apply your settings.
 * **Freeform**
Enter plain-text content directly into the message field. Freeform messages don't require template approval, but are billed at the **Promotional** rate.
* **Freeform**
Enter plain-text content directly into the message field. Freeform messages don't require template approval, but are billed at the **Promotional** rate.
 ## Personalise message with event attributes
Viber templates can include placeholders for dynamic values, such as an order ID or a verification code. Personalization fills each placeholder with data from an event attribute or API-based entry, so each recipient sees their own values instead of static text.
When your **Template** includes placeholders, for each placeholder, select the **Source event** and **Dynamic attribute** that supply the value. [Learn more](/product/customer-journey/journey-elements/dynamic-content-and-liquid-templates-in-journeys/)
## Set message type
Choose **Marketing message** or **Transactional message**:
* **Marketing message**: For campaigns and promos. All rules and limits apply. Respects: Opt-outs, Frequency capping, and Silence period. Excludes: the [global control group](/product/audience-data-and-segmentation/global-control-group/).
* **Transactional message**: For operational or service messages. Rules and limits don't apply. Bypasses: Opt-outs, Frequency capping, and Silence period. Sent to: the [global control group](/product/audience-data-and-segmentation/global-control-group/).
## Personalise message with event attributes
Viber templates can include placeholders for dynamic values, such as an order ID or a verification code. Personalization fills each placeholder with data from an event attribute or API-based entry, so each recipient sees their own values instead of static text.
When your **Template** includes placeholders, for each placeholder, select the **Source event** and **Dynamic attribute** that supply the value. [Learn more](/product/customer-journey/journey-elements/dynamic-content-and-liquid-templates-in-journeys/)
## Set message type
Choose **Marketing message** or **Transactional message**:
* **Marketing message**: For campaigns and promos. All rules and limits apply. Respects: Opt-outs, Frequency capping, and Silence period. Excludes: the [global control group](/product/audience-data-and-segmentation/global-control-group/).
* **Transactional message**: For operational or service messages. Rules and limits don't apply. Bypasses: Opt-outs, Frequency capping, and Silence period. Sent to: the [global control group](/product/audience-data-and-segmentation/global-control-group/).
 [Learn how message type affects delivery](/product/messaging-channels/marketing-vs-transactional/).
## Split flow by delivery status
To split the journey by Viber delivery status:
1. Enable **Split flow depending on whether this message is delivered or not**.
2. Set how long to wait for delivery (maximum 7 days).
If the message is delivered within the wait period, users follow the **delivered** branch. Otherwise, they follow the **not delivered** branch.
[Learn how message type affects delivery](/product/messaging-channels/marketing-vs-transactional/).
## Split flow by delivery status
To split the journey by Viber delivery status:
1. Enable **Split flow depending on whether this message is delivered or not**.
2. Set how long to wait for delivery (maximum 7 days).
If the message is delivered within the wait period, users follow the **delivered** branch. Otherwise, they follow the **not delivered** branch.
 ## Set frequency capping
Use [**Frequency capping**](/product/messaging-channels/global-frequency-capping/#enable-global-frequency-capping) to limit how often users receive Viber messages, preventing over-messaging and reducing churn. Choose one of the following options:
* **Use Global frequency capping settings**
Apply the project-wide limits configured in your [Global frequency capping settings](/product/messaging-channels/global-frequency-capping/#enable-global-frequency-capping).
For example, if the global limit is set to 3 Viber messages in 9 days, additional messages exceeding this limit will be skipped.
* **Ignore Global frequency capping**
The user will receive this message even if they've exceeded the channel's message limits. Use this option with caution to avoid over-messaging.
* **Use custom frequency capping**
Set a custom message limit for this message. If the user exceeds this custom cap, the message will be skipped, and the user will proceed to the next step.
> **Important:** Custom frequency capping does not isolate the message from **Global frequency capping**. All messages sent on the same channel, including those from other journeys or campaigns, are still counted toward the global cap.
[Learn more](/product/messaging-channels/global-frequency-capping/#customize-capping-for-specific-messages)
## Use vouchers
You can personalize Viber messages by including a unique voucher code from a predefined pool. This is ideal for delivering promotions, discounts, or loyalty incentives through one-on-one communication.
To use vouchers in your Viber message:
1. Ensure your Viber message content includes the placeholder `{{voucher}}`.
2. In the Viber message step, toggle **Vouchers** to ON.
3. Select the appropriate **Voucher Pool** that contains your voucher codes. Make sure the pool is created in advance.
4. (Optional) Use the **Assign Tag** field to apply a tag to users who receive a voucher. This helps with segmentation and reporting.
[Learn more about vouchers](/product/content/vouchers/)
After configuring the Viber element, click **Save** to apply your settings.
## Set frequency capping
Use [**Frequency capping**](/product/messaging-channels/global-frequency-capping/#enable-global-frequency-capping) to limit how often users receive Viber messages, preventing over-messaging and reducing churn. Choose one of the following options:
* **Use Global frequency capping settings**
Apply the project-wide limits configured in your [Global frequency capping settings](/product/messaging-channels/global-frequency-capping/#enable-global-frequency-capping).
For example, if the global limit is set to 3 Viber messages in 9 days, additional messages exceeding this limit will be skipped.
* **Ignore Global frequency capping**
The user will receive this message even if they've exceeded the channel's message limits. Use this option with caution to avoid over-messaging.
* **Use custom frequency capping**
Set a custom message limit for this message. If the user exceeds this custom cap, the message will be skipped, and the user will proceed to the next step.
> **Important:** Custom frequency capping does not isolate the message from **Global frequency capping**. All messages sent on the same channel, including those from other journeys or campaigns, are still counted toward the global cap.
[Learn more](/product/messaging-channels/global-frequency-capping/#customize-capping-for-specific-messages)
## Use vouchers
You can personalize Viber messages by including a unique voucher code from a predefined pool. This is ideal for delivering promotions, discounts, or loyalty incentives through one-on-one communication.
To use vouchers in your Viber message:
1. Ensure your Viber message content includes the placeholder `{{voucher}}`.
2. In the Viber message step, toggle **Vouchers** to ON.
3. Select the appropriate **Voucher Pool** that contains your voucher codes. Make sure the pool is created in advance.
4. (Optional) Use the **Assign Tag** field to apply a tag to users who receive a voucher. This helps with segmentation and reporting.
[Learn more about vouchers](/product/content/vouchers/)
After configuring the Viber element, click **Save** to apply your settings.