# Push
Push element indicates a point to communicate to a customer with a push notification.
To send a push message at the right moment in the journey, add the Push element after the event or condition that should trigger the message.
## Select or create push content
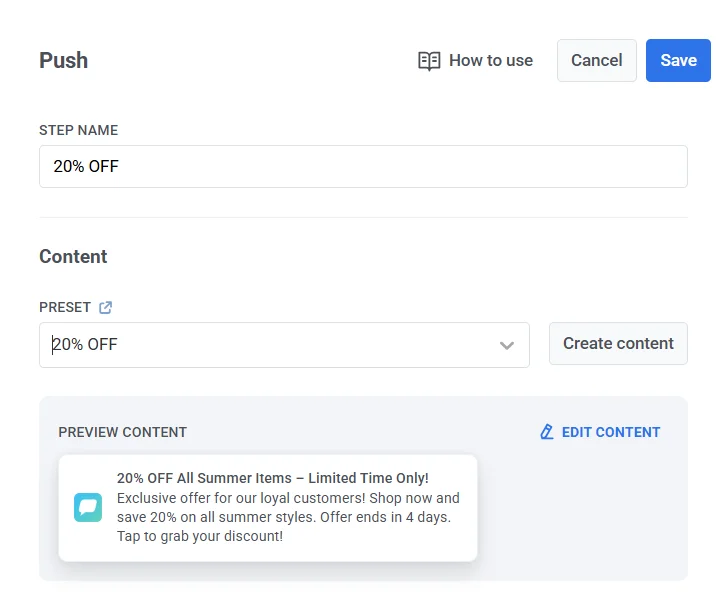
Then, select a preset from your Pushwoosh account or create one. [Learn more about creating push presets](/product/content/push-presets/).
## Set message type
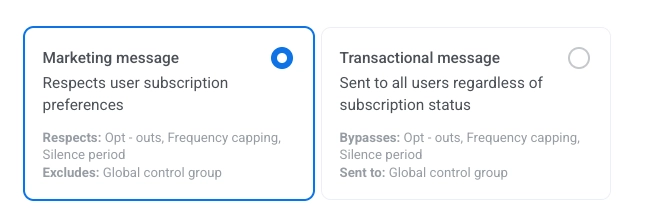
Choose **Marketing message** or **Transactional message**:
* **Marketing message**: For campaigns and promos. All rules and limits apply. Respects: opt-outs, frequency capping, and the silence period. Excludes: the [global control group](/product/audience-data-and-segmentation/global-control-group/) users.
* **Transactional message**: For operational or service messages. Rules and limits don't apply. Bypasses: opt-outs, frequency capping, and the silence period. Sent to: the [global control group](/product/audience-data-and-segmentation/global-control-group/) users.
[Learn how message type affects delivery](/product/messaging-channels/marketing-vs-transactional/).
## Personalize messages with Dynamic Content and Liquid Templates
For greater relevance of your messages to users in the journey, you can add personalized content based on users' behavior. For example, when sending an Abandoned Cart push, add the product name for better conversion. That reminds users of what they wanted to purchase and makes your message more convincing.
[Learn more about personalization of journey messages](/product/customer-journey/journey-elements/dynamic-content-and-liquid-templates-in-journeys/)
## Use vouchers
You can personalize push notifications by attaching a voucher code from a predefined pool. This is useful for promotions, discounts, and loyalty incentives.
For this, create a push preset that includes the placeholder ``{{voucher}}`` in advance.
To include a voucher:
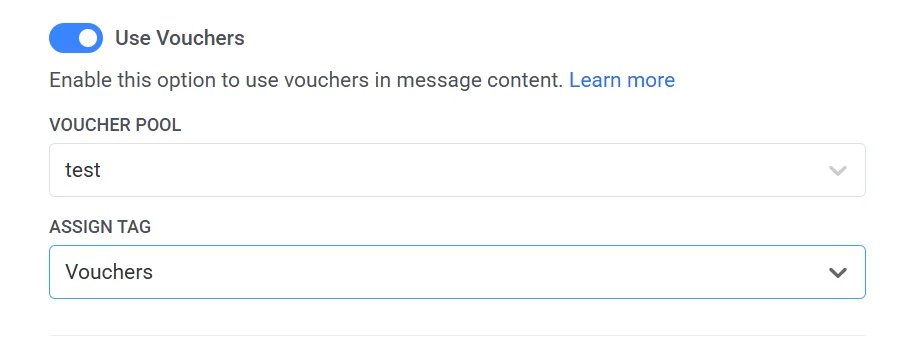
1. Toggle **Vouchers** to ON.
2. In the **Voucher Pool** field, select the pool containing your available voucher codes. Make sure to add the pool of vouchers in advance.
3. (Optional) Use the **Assign Tag** field to apply a tag to users who receive a voucher. This tag can be used for segmentation or reporting.
[Learn more about vouchers](/product/content/vouchers/)
## Save to inbox
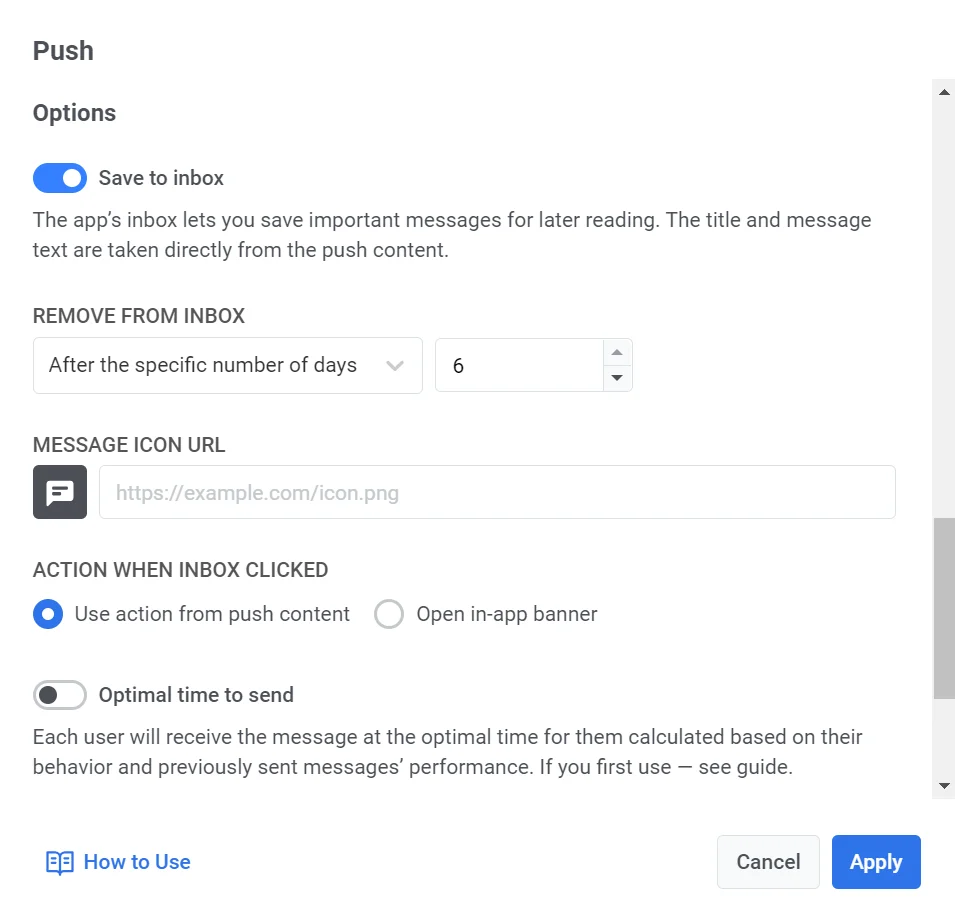
The **Save to Inbox** option lets you store push notifications in the app’s inbox, so users can access and review messages whenever it's convenient for them. This helps ensure that important notifications aren't missed and can be checked later, making it easier for users to stay engaged.
To save a message to the inbox, simply toggle the **Save to Inbox** option and set it up.
1. Choose how long the message stays in the inbox.
2. Customize the message icon, if needed. You can choose a different icon for the message to help it stand out in the inbox.
3. Define what happens when the user clicks the message.
[Learn more about setting up the inbox](/product/messaging-channels/message-inbox/mobile-message-inbox)
## Configure message delivery settings
### Set time to live for push delivery
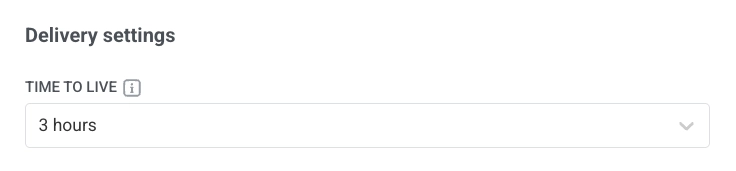
Use **Time to live** in **Delivery settings** to control how long Pushwoosh retains a push notification for delivery if the recipient is offline at the time of the send attempt.
In **Time to live**, choose a preset period for how long Pushwoosh keeps this message available for delivery, from 1 hour to 3 weeks.
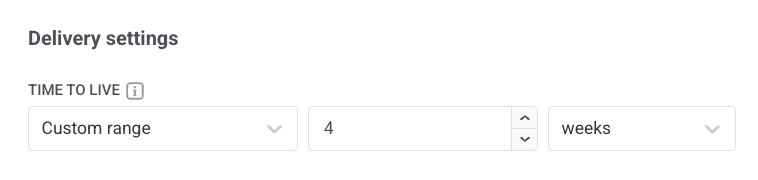
You can also choose **Custom range** and enter a specific number of hours, days, or weeks. The maximum period is 4 weeks.
> **Note:** The **Time to live** value set in the push element overrides the expiration time defined in the [push preset legacy form](/product/content/push-presets/push-preset-legacy-form/#ios). For example, if the preset TTL is 2 weeks but the push element TTL is 1 week, the push expires after 1 week.
### Set frequency capping
Use [**Frequency capping**](/product/messaging-channels/global-frequency-capping/#enable-global-frequency-capping) to limit how often users receive push messages, preventing over-messaging and reducing churn. In the Push element settings, choose one of the following options:
* **Use Global frequency capping settings**
Apply the project-wide limits configured in your [Global frequency capping settings](/product/messaging-channels/global-frequency-capping/#enable-global-frequency-capping).
For example, if the global limit is set to 3 messages in 9 days, additional messages exceeding this limit will be skipped.
* **Ignore Global frequency capping**
The user will receive this message even if they’ve exceeded the channel’s message limits. Use this option with caution to avoid over-messaging.
* **Use custom frequency capping**
Set a custom message limit for this message. If the user exceeds this custom cap, the message will be skipped, and the user will proceed to the next step.
> **Important:** Custom frequency capping does not isolate the message from **Global frequency capping**. All messages sent on the same channel, including those from other journeys or campaigns, are still counted toward the global cap. If the user has already received 3 push messages this week from other sources, this message may still be blocked, even if the custom capping would allow it.
[Learn more](/product/messaging-channels/global-frequency-capping/#customize-capping-for-specific-messages)
### Set send rate limits
The **Send rate** setting controls how quickly messages are delivered to your audience. Adjusting the send rate helps you manage delivery speed, prevent backend overload, and improve overall deliverability.
Choose one of the following options:
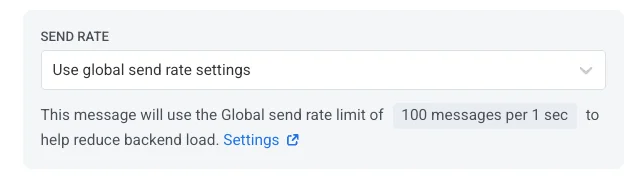
* **Use global send rate settings**
Applies the send rate limits configured in your project’s message delivery settings. If no limits are set, all messages will be sent immediately. Use this option when you want delivery speed to follow your project’s default rules. [Learn more about global send rate limits](/product/messaging-channels/global-frequency-capping/#set-send-rate-limits)
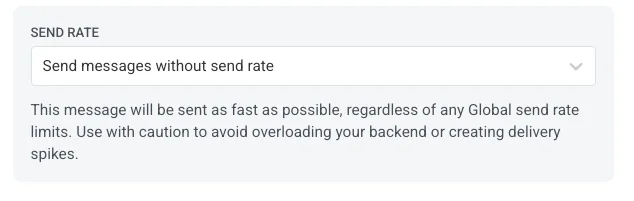
* **Send messages without send rate**
Sends messages as fast as possible, ignoring any global send rate limits. Use with caution to avoid overloading your backend or creating delivery spikes.
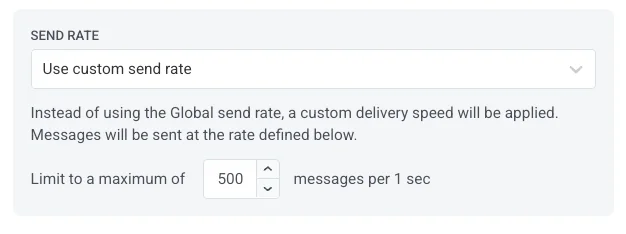
* **Use custom send rate**
Overrides the global send rate for this message only. Allows you to specify the number of messages sent per minute, giving you full control over delivery speed. Messages will be sent at the custom rate you define in the message element.
## Enable Best time to send
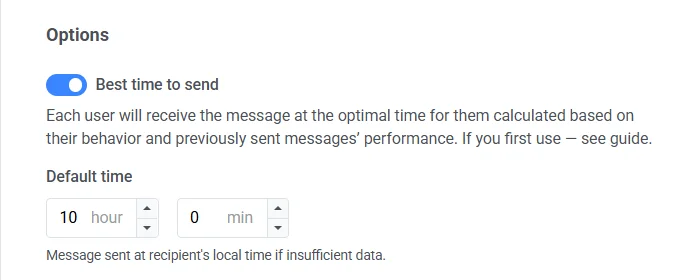
If you want each user to receive a push notification when they are most likely to interact with pushes, enable the **Best time to send** option. The time for sending the message to each user will be calculated based on their behavior and previously sent messages' performance.
The accuracy of calculating the best time for each user depends on how many pushes you sent to this user earlier.
If there is not enough data on the user, they will receive a push at the **Default time** you specify according to their timezone.
## Send by User ID
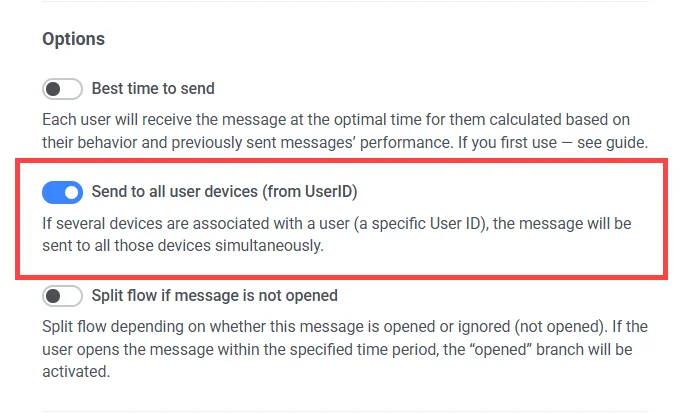
When enabled, the message will be sent to all the devices associated with an ID of a user who reaches this journey element. Thus, if a user has several devices, all associated with a single userID, that user will receive several messages, one per device.
## Send to last active device
Enable **Send to last active device**. The message will be sent only to the device with the most recent app open under the user's ID.
This option is mutually exclusive with **Send by User ID**. When you turn one on, the other turns off.
## Split flow after a push
Use **Flow options** in the Push element to branch the journey when users open the push, when the push is delivered to the device, or when you use both checks.
### Split flow by opens or ignores
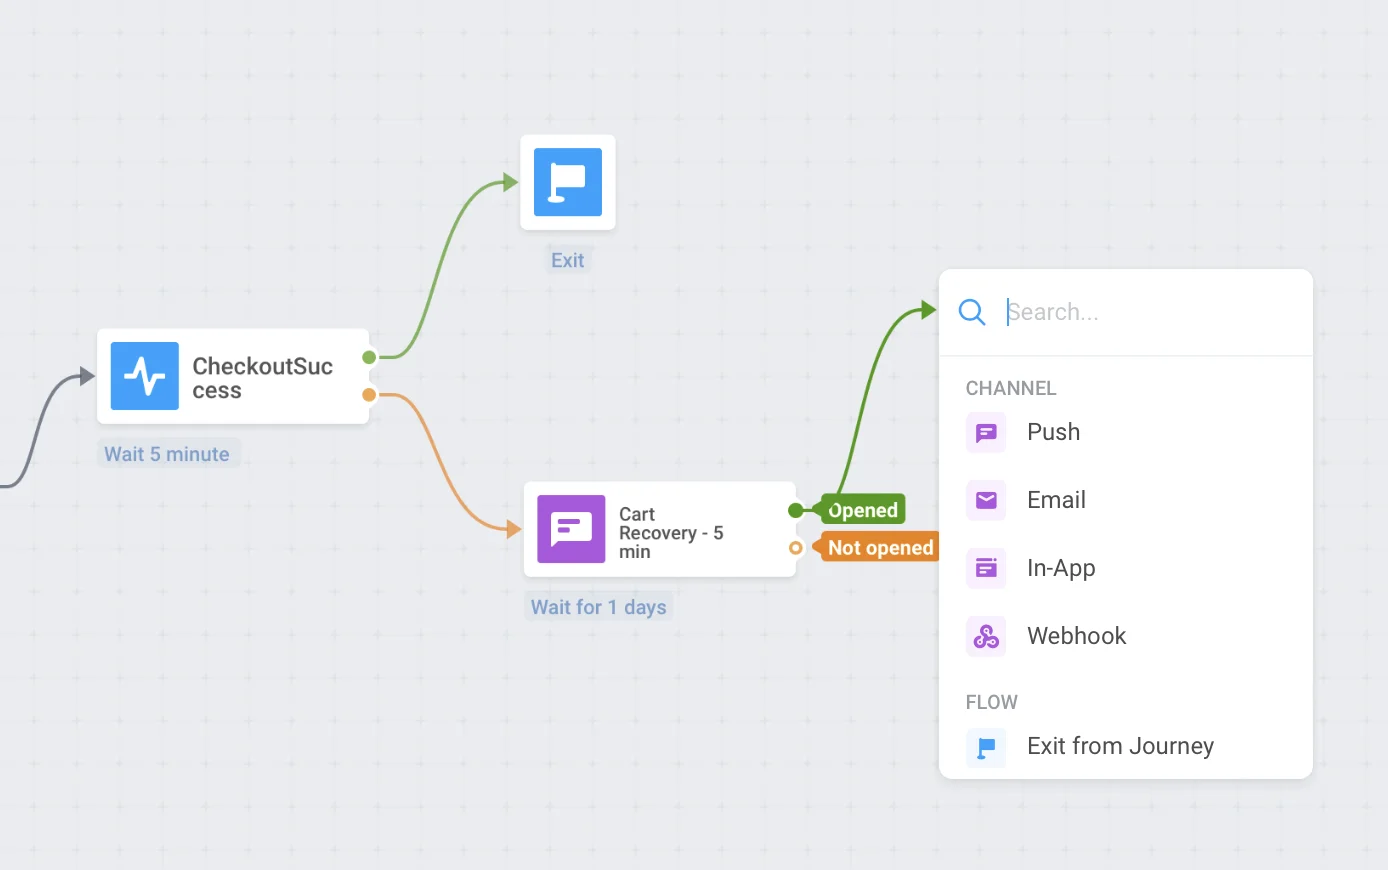
Split the remaining journey flow based on whether this push is opened or ignored. For example, email users who don’t open pushes or send another push to those who did.
To set it up:
1. Turn on **Split flow if message is opened**. The canvas adds the **Opened** and **Not opened** branches.
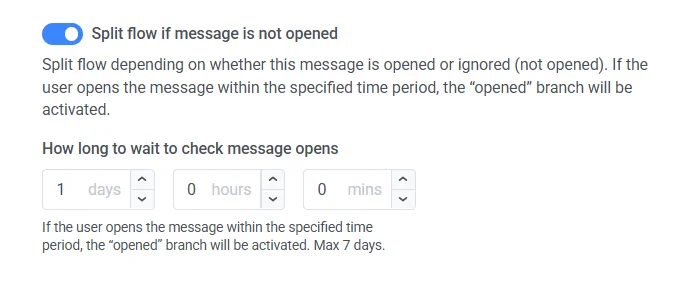
2. Set **How long to wait to check message opens** using **days**, **hours**, and **mins**. The maximum wait time is 7 days.
3. On the canvas, connect **Opened** and **Not opened** to the next elements in your journey.
### Split flow by message delivery
This flow option depends on whether Pushwoosh can confirm that this push was delivered to the user’s device. Send users on the **Not delivered** branch to a fallback channel such as SMS, email, or in-app messaging so they still get your message.
To set it up:
1. Turn on **Split flow if message is delivered**. The canvas adds the **Delivered** and **Not delivered** branches.
2. Set **How long to wait to check message delivery** using days, hours, and mins. Use the same pattern as for the open split. The maximum wait time is 7 days.
3. On the canvas, connect **Delivered** and **Not delivered** to the next elements in your journey (for example a fallback message on **Not delivered**).
Delivery split results appear in journey analytics on the canvas, including user counts and the percentage on each branch.
### When both delivery and open splits are enabled
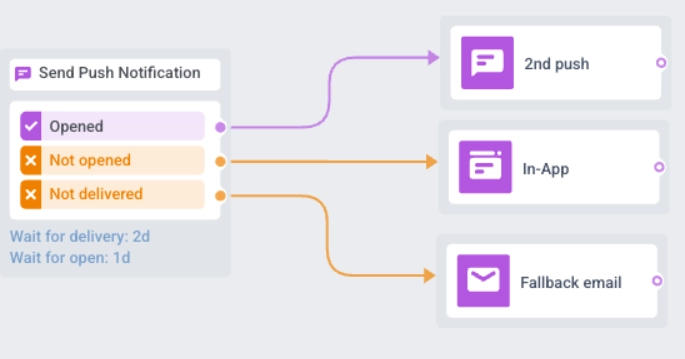
If both splits are enabled, devices with delivered pushes proceed to either the **Opened** or **Not opened** branch. Devices whose pushes are not delivered proceed to the **Not delivered** branch.
When you finish configuring this Push element, click **Save**.
 [Learn how message type affects delivery](/product/messaging-channels/marketing-vs-transactional/).
## Personalize messages with Dynamic Content and Liquid Templates
For greater relevance of your messages to users in the journey, you can add personalized content based on users' behavior. For example, when sending an Abandoned Cart push, add the product name for better conversion. That reminds users of what they wanted to purchase and makes your message more convincing.
[Learn more about personalization of journey messages](/product/customer-journey/journey-elements/dynamic-content-and-liquid-templates-in-journeys/)
## Use vouchers
You can personalize push notifications by attaching a voucher code from a predefined pool. This is useful for promotions, discounts, and loyalty incentives.
For this, create a push preset that includes the placeholder ``{{voucher}}`` in advance.
To include a voucher:
1. Toggle **Vouchers** to ON.
2. In the **Voucher Pool** field, select the pool containing your available voucher codes. Make sure to add the pool of vouchers in advance.
3. (Optional) Use the **Assign Tag** field to apply a tag to users who receive a voucher. This tag can be used for segmentation or reporting.

[Learn more about vouchers](/product/content/vouchers/)
## Save to inbox
The **Save to Inbox** option lets you store push notifications in the app’s inbox, so users can access and review messages whenever it's convenient for them. This helps ensure that important notifications aren't missed and can be checked later, making it easier for users to stay engaged.
[Learn how message type affects delivery](/product/messaging-channels/marketing-vs-transactional/).
## Personalize messages with Dynamic Content and Liquid Templates
For greater relevance of your messages to users in the journey, you can add personalized content based on users' behavior. For example, when sending an Abandoned Cart push, add the product name for better conversion. That reminds users of what they wanted to purchase and makes your message more convincing.
[Learn more about personalization of journey messages](/product/customer-journey/journey-elements/dynamic-content-and-liquid-templates-in-journeys/)
## Use vouchers
You can personalize push notifications by attaching a voucher code from a predefined pool. This is useful for promotions, discounts, and loyalty incentives.
For this, create a push preset that includes the placeholder ``{{voucher}}`` in advance.
To include a voucher:
1. Toggle **Vouchers** to ON.
2. In the **Voucher Pool** field, select the pool containing your available voucher codes. Make sure to add the pool of vouchers in advance.
3. (Optional) Use the **Assign Tag** field to apply a tag to users who receive a voucher. This tag can be used for segmentation or reporting.

[Learn more about vouchers](/product/content/vouchers/)
## Save to inbox
The **Save to Inbox** option lets you store push notifications in the app’s inbox, so users can access and review messages whenever it's convenient for them. This helps ensure that important notifications aren't missed and can be checked later, making it easier for users to stay engaged.
 To save a message to the inbox, simply toggle the **Save to Inbox** option and set it up.
1. Choose how long the message stays in the inbox.
2. Customize the message icon, if needed. You can choose a different icon for the message to help it stand out in the inbox.
3. Define what happens when the user clicks the message.
[Learn more about setting up the inbox](/product/messaging-channels/message-inbox/mobile-message-inbox)
## Configure message delivery settings
### Set time to live for push delivery
Use **Time to live** in **Delivery settings** to control how long Pushwoosh retains a push notification for delivery if the recipient is offline at the time of the send attempt.
In **Time to live**, choose a preset period for how long Pushwoosh keeps this message available for delivery, from 1 hour to 3 weeks.
To save a message to the inbox, simply toggle the **Save to Inbox** option and set it up.
1. Choose how long the message stays in the inbox.
2. Customize the message icon, if needed. You can choose a different icon for the message to help it stand out in the inbox.
3. Define what happens when the user clicks the message.
[Learn more about setting up the inbox](/product/messaging-channels/message-inbox/mobile-message-inbox)
## Configure message delivery settings
### Set time to live for push delivery
Use **Time to live** in **Delivery settings** to control how long Pushwoosh retains a push notification for delivery if the recipient is offline at the time of the send attempt.
In **Time to live**, choose a preset period for how long Pushwoosh keeps this message available for delivery, from 1 hour to 3 weeks.
 You can also choose **Custom range** and enter a specific number of hours, days, or weeks. The maximum period is 4 weeks.
 > **Note:** The **Time to live** value set in the push element overrides the expiration time defined in the [push preset legacy form](/product/content/push-presets/push-preset-legacy-form/#ios). For example, if the preset TTL is 2 weeks but the push element TTL is 1 week, the push expires after 1 week.
### Set frequency capping
Use [**Frequency capping**](/product/messaging-channels/global-frequency-capping/#enable-global-frequency-capping) to limit how often users receive push messages, preventing over-messaging and reducing churn. In the Push element settings, choose one of the following options:
* **Use Global frequency capping settings**
Apply the project-wide limits configured in your [Global frequency capping settings](/product/messaging-channels/global-frequency-capping/#enable-global-frequency-capping).
For example, if the global limit is set to 3 messages in 9 days, additional messages exceeding this limit will be skipped.
* **Ignore Global frequency capping**
The user will receive this message even if they’ve exceeded the channel’s message limits. Use this option with caution to avoid over-messaging.
* **Use custom frequency capping**
Set a custom message limit for this message. If the user exceeds this custom cap, the message will be skipped, and the user will proceed to the next step.
> **Important:** Custom frequency capping does not isolate the message from **Global frequency capping**. All messages sent on the same channel, including those from other journeys or campaigns, are still counted toward the global cap. If the user has already received 3 push messages this week from other sources, this message may still be blocked, even if the custom capping would allow it.
[Learn more](/product/messaging-channels/global-frequency-capping/#customize-capping-for-specific-messages)
### Set send rate limits
The **Send rate** setting controls how quickly messages are delivered to your audience. Adjusting the send rate helps you manage delivery speed, prevent backend overload, and improve overall deliverability.
Choose one of the following options:
* **Use global send rate settings**
Applies the send rate limits configured in your project’s message delivery settings. If no limits are set, all messages will be sent immediately. Use this option when you want delivery speed to follow your project’s default rules. [Learn more about global send rate limits](/product/messaging-channels/global-frequency-capping/#set-send-rate-limits)

* **Send messages without send rate**
Sends messages as fast as possible, ignoring any global send rate limits. Use with caution to avoid overloading your backend or creating delivery spikes.

* **Use custom send rate**
Overrides the global send rate for this message only. Allows you to specify the number of messages sent per minute, giving you full control over delivery speed. Messages will be sent at the custom rate you define in the message element.

## Enable Best time to send
If you want each user to receive a push notification when they are most likely to interact with pushes, enable the **Best time to send** option. The time for sending the message to each user will be calculated based on their behavior and previously sent messages' performance.
> **Note:** The **Time to live** value set in the push element overrides the expiration time defined in the [push preset legacy form](/product/content/push-presets/push-preset-legacy-form/#ios). For example, if the preset TTL is 2 weeks but the push element TTL is 1 week, the push expires after 1 week.
### Set frequency capping
Use [**Frequency capping**](/product/messaging-channels/global-frequency-capping/#enable-global-frequency-capping) to limit how often users receive push messages, preventing over-messaging and reducing churn. In the Push element settings, choose one of the following options:
* **Use Global frequency capping settings**
Apply the project-wide limits configured in your [Global frequency capping settings](/product/messaging-channels/global-frequency-capping/#enable-global-frequency-capping).
For example, if the global limit is set to 3 messages in 9 days, additional messages exceeding this limit will be skipped.
* **Ignore Global frequency capping**
The user will receive this message even if they’ve exceeded the channel’s message limits. Use this option with caution to avoid over-messaging.
* **Use custom frequency capping**
Set a custom message limit for this message. If the user exceeds this custom cap, the message will be skipped, and the user will proceed to the next step.
> **Important:** Custom frequency capping does not isolate the message from **Global frequency capping**. All messages sent on the same channel, including those from other journeys or campaigns, are still counted toward the global cap. If the user has already received 3 push messages this week from other sources, this message may still be blocked, even if the custom capping would allow it.
[Learn more](/product/messaging-channels/global-frequency-capping/#customize-capping-for-specific-messages)
### Set send rate limits
The **Send rate** setting controls how quickly messages are delivered to your audience. Adjusting the send rate helps you manage delivery speed, prevent backend overload, and improve overall deliverability.
Choose one of the following options:
* **Use global send rate settings**
Applies the send rate limits configured in your project’s message delivery settings. If no limits are set, all messages will be sent immediately. Use this option when you want delivery speed to follow your project’s default rules. [Learn more about global send rate limits](/product/messaging-channels/global-frequency-capping/#set-send-rate-limits)

* **Send messages without send rate**
Sends messages as fast as possible, ignoring any global send rate limits. Use with caution to avoid overloading your backend or creating delivery spikes.

* **Use custom send rate**
Overrides the global send rate for this message only. Allows you to specify the number of messages sent per minute, giving you full control over delivery speed. Messages will be sent at the custom rate you define in the message element.

## Enable Best time to send
If you want each user to receive a push notification when they are most likely to interact with pushes, enable the **Best time to send** option. The time for sending the message to each user will be calculated based on their behavior and previously sent messages' performance.
 The accuracy of calculating the best time for each user depends on how many pushes you sent to this user earlier.
If there is not enough data on the user, they will receive a push at the **Default time** you specify according to their timezone.
## Send by User ID
When enabled, the message will be sent to all the devices associated with an ID of a user who reaches this journey element. Thus, if a user has several devices, all associated with a single userID, that user will receive several messages, one per device.
The accuracy of calculating the best time for each user depends on how many pushes you sent to this user earlier.
If there is not enough data on the user, they will receive a push at the **Default time** you specify according to their timezone.
## Send by User ID
When enabled, the message will be sent to all the devices associated with an ID of a user who reaches this journey element. Thus, if a user has several devices, all associated with a single userID, that user will receive several messages, one per device.
 ## Send to last active device
Enable **Send to last active device**. The message will be sent only to the device with the most recent app open under the user's ID.
## Send to last active device
Enable **Send to last active device**. The message will be sent only to the device with the most recent app open under the user's ID.
 This option is mutually exclusive with **Send by User ID**. When you turn one on, the other turns off.
## Split flow after a push
Use **Flow options** in the Push element to branch the journey when users open the push, when the push is delivered to the device, or when you use both checks.
### Split flow by opens or ignores
Split the remaining journey flow based on whether this push is opened or ignored. For example, email users who don’t open pushes or send another push to those who did.
This option is mutually exclusive with **Send by User ID**. When you turn one on, the other turns off.
## Split flow after a push
Use **Flow options** in the Push element to branch the journey when users open the push, when the push is delivered to the device, or when you use both checks.
### Split flow by opens or ignores
Split the remaining journey flow based on whether this push is opened or ignored. For example, email users who don’t open pushes or send another push to those who did.
 To set it up:
1. Turn on **Split flow if message is opened**. The canvas adds the **Opened** and **Not opened** branches.
2. Set **How long to wait to check message opens** using **days**, **hours**, and **mins**. The maximum wait time is 7 days.
3. On the canvas, connect **Opened** and **Not opened** to the next elements in your journey.
To set it up:
1. Turn on **Split flow if message is opened**. The canvas adds the **Opened** and **Not opened** branches.
2. Set **How long to wait to check message opens** using **days**, **hours**, and **mins**. The maximum wait time is 7 days.
3. On the canvas, connect **Opened** and **Not opened** to the next elements in your journey.
 ### Split flow by message delivery
This flow option depends on whether Pushwoosh can confirm that this push was delivered to the user’s device. Send users on the **Not delivered** branch to a fallback channel such as SMS, email, or in-app messaging so they still get your message.
To set it up:
1. Turn on **Split flow if message is delivered**. The canvas adds the **Delivered** and **Not delivered** branches.
2. Set **How long to wait to check message delivery** using days, hours, and mins. Use the same pattern as for the open split. The maximum wait time is 7 days.
### Split flow by message delivery
This flow option depends on whether Pushwoosh can confirm that this push was delivered to the user’s device. Send users on the **Not delivered** branch to a fallback channel such as SMS, email, or in-app messaging so they still get your message.
To set it up:
1. Turn on **Split flow if message is delivered**. The canvas adds the **Delivered** and **Not delivered** branches.
2. Set **How long to wait to check message delivery** using days, hours, and mins. Use the same pattern as for the open split. The maximum wait time is 7 days.
 3. On the canvas, connect **Delivered** and **Not delivered** to the next elements in your journey (for example a fallback message on **Not delivered**).
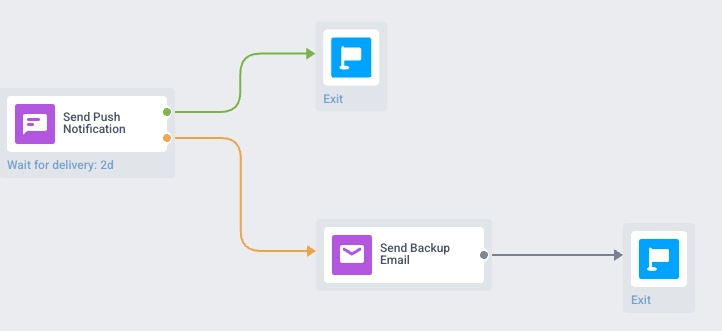 Delivery split results appear in journey analytics on the canvas, including user counts and the percentage on each branch.
### When both delivery and open splits are enabled
If both splits are enabled, devices with delivered pushes proceed to either the **Opened** or **Not opened** branch. Devices whose pushes are not delivered proceed to the **Not delivered** branch.
Delivery split results appear in journey analytics on the canvas, including user counts and the percentage on each branch.
### When both delivery and open splits are enabled
If both splits are enabled, devices with delivered pushes proceed to either the **Opened** or **Not opened** branch. Devices whose pushes are not delivered proceed to the **Not delivered** branch.
 When you finish configuring this Push element, click **Save**.