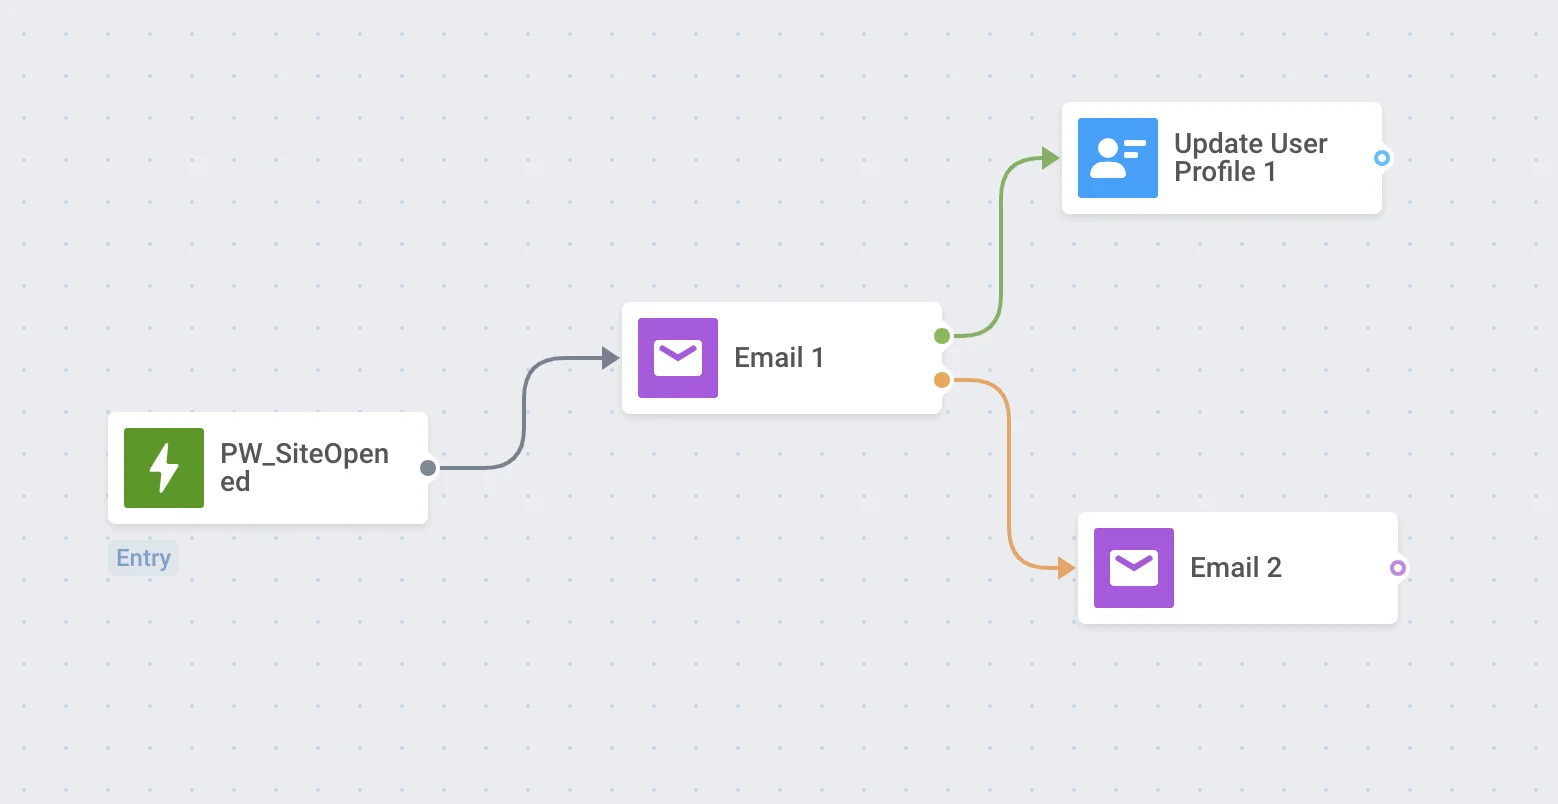
# Email
**Email** element indicates a point to communicate to a customer with an email message.
To send an email at some moment of the customer journey, add the **Email** element to the canvas following the element you consider to be the appropriate basis for communication.
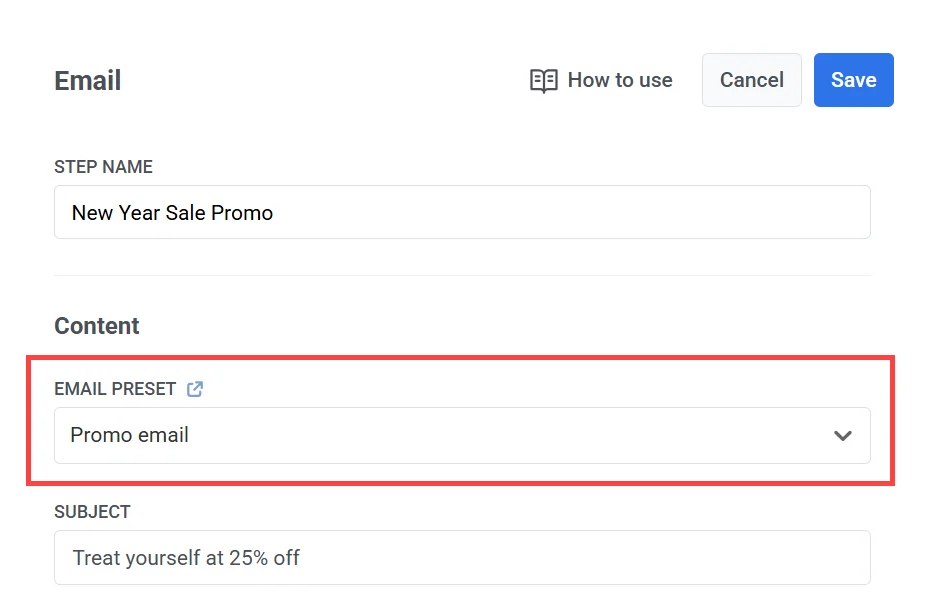
## Select email content
Choose the [**email content**](/product/content/email-content) you'd like to use.
## Set message type
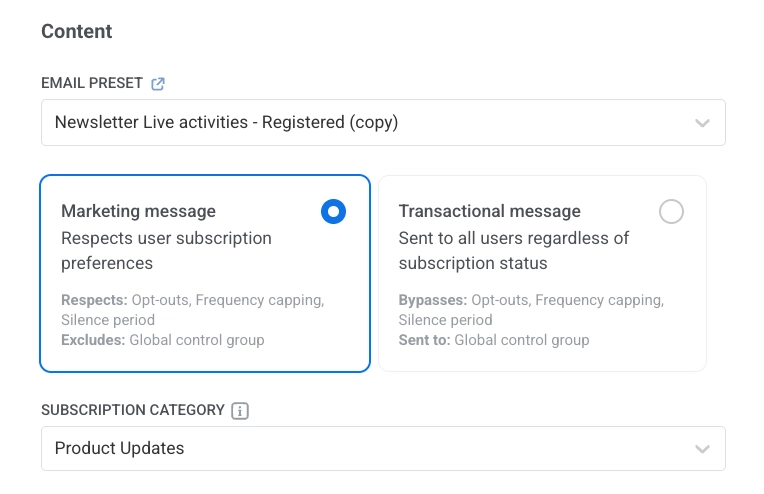
Choose **Marketing message** or **Transactional message**:
* **Marketing message**: Respects subscription preferences, opt-outs, and frequency capping. Not sent to the [global control group](/product/audience-data-and-segmentation/global-control-group/). If you choose this, select a subscription category (e.g. Product Updates, Newsletter) from the dropdown so the message aligns with [subscriber preferences](/product/messaging-channels/emails/email-preferences/).
* **Transactional message**: Sent to all users regardless of subscription status. Delivered to the control group. [Learn how message type affects delivery](/product/messaging-channels/marketing-vs-transactional/)
### Select subscription category
If you chose **Marketing message**, pick a category from the dropdown (e.g. Product Updates, Newsletter, Promotional) so the message aligns with your subscribers' preferences.
Categories are defined in the [subscription preference center](/product/messaging-channels/emails/email-preferences/).
## Set the subject line
In **Subject line**, choose how the subject is set for this step:
* **Custom**: Type a subject in the **Subject** field. The field is pre-filled with the subject from the preset, but you can edit it. A custom subject overrides the preset and applies to all emails from this step.
* **From preset**: Use the subject saved in the selected email preset. If you update the subject in the preset later, the change applies automatically. If the preset has no subject, add one to the preset first.
Keep your subject line short, clear, and engaging. It's the first thing recipients see in their inbox.
## Define sender details and reply address
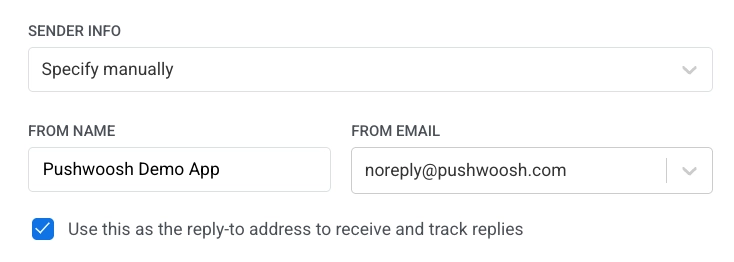
In **Sender info**, choose how sender details are set:
* **Specify manually**: Type the sender details directly in this step. Once set, these values apply to all emails from this step and do not sync with the preset.
* **From preset**: Use sender details saved in the selected email preset. If you update the details in the preset later, the change applies automatically.
##### To set sender details manually:
1. Enter the sender address in the **From Email** field (e.g., `marketing@testdomain.com`).
2. Enter the sender name in the **From Name** field.
3. (Optional) Enable **Use this as the reply-to address to receive and track replies** if you want replies to go to the same address.
> **Note:** The email address must belong to a verified domain in your Pushwoosh project. See the [Email configuration guide](/product/first-steps/start-with-your-project/configure-platforms/email-verification/) for details.
## Configure message delivery settings
### Set frequency capping
Use [**Frequency capping**](/product/messaging-channels/global-frequency-capping/#enable-global-frequency-capping) to control how often users receive email messages, helping to prevent over-messaging and reduce unsubscribes.
Choose one of the following options:
* **Use global frequency capping settings**. Apply the project-wide email limits set in your [Global frequency capping settings](/product/messaging-channels/global-frequency-capping/#enable-global-frequency-capping).
*Example:* If the limit is 3 emails in 9 days, any additional emails during that period will be skipped.
* **Ignore global frequency capping**. Send the email regardless of how many messages the user has already received. Use this with caution to avoid overwhelming recipients.
* **Use custom frequency capping**. Override global settings with a custom limit for this email step.
If the user exceeds your custom limit, the email will not be sent, and they will move to the next step in the journey. [Learn more](/product/messaging-channels/global-frequency-capping/#customize-capping-for-specific-messages)
### Set send rate limits
The **Send rate** setting controls how quickly messages are delivered to your audience. Adjusting the send rate helps you manage delivery speed, prevent backend overload, and improve overall deliverability.
Choose one of the following options:
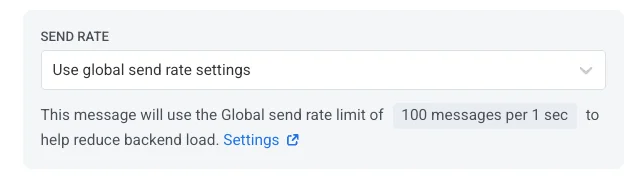
* **Use global send rate settings**
Applies the send rate limits configured in your project’s message delivery settings. If no limits are set, all messages will be sent immediately. Use this option when you want delivery speed to follow your project’s default rules. [Learn more about global send rate limits](/product/messaging-channels/global-frequency-capping/#set-send-rate-limits)
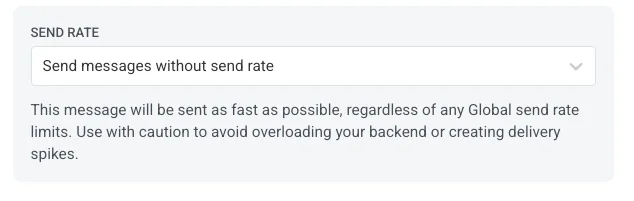
* **Send messages without send rate**
Sends messages as fast as possible, ignoring any global send rate limits. Use with caution to avoid overloading your backend or creating delivery spikes.
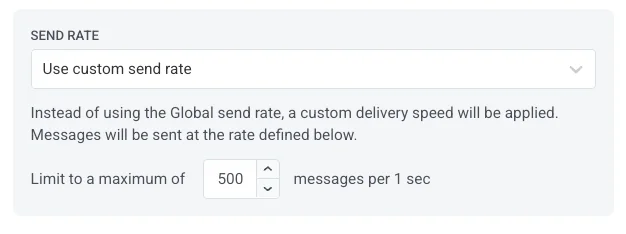
* **Use custom send rate**
Overrides the global send rate for this message only. Allows you to specify the number of messages sent per minute, giving you full control over delivery speed. Messages will be sent at the custom rate you define in the message element.
## Enable Best time to send
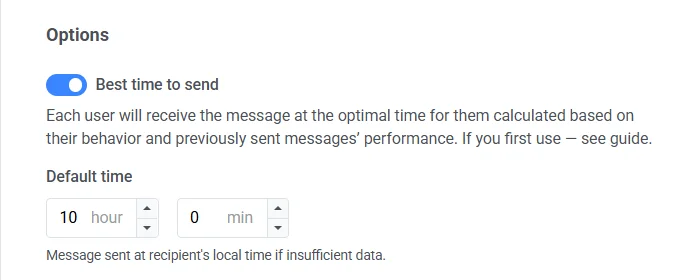
If you want each user to receive an email when they are most likely to open and engage with it, enable the **Best time to send** option. The optimal delivery time for each user is calculated based on their past behavior and the performance of previously sent emails.
The accuracy of **Best time to send** depends on how much historical engagement data is available for each recipient. If there is not enough data on the user, they will receive an email at the **Default time** you specify according to their timezone.
## Turn on BCC (Blind Carbon Copy)
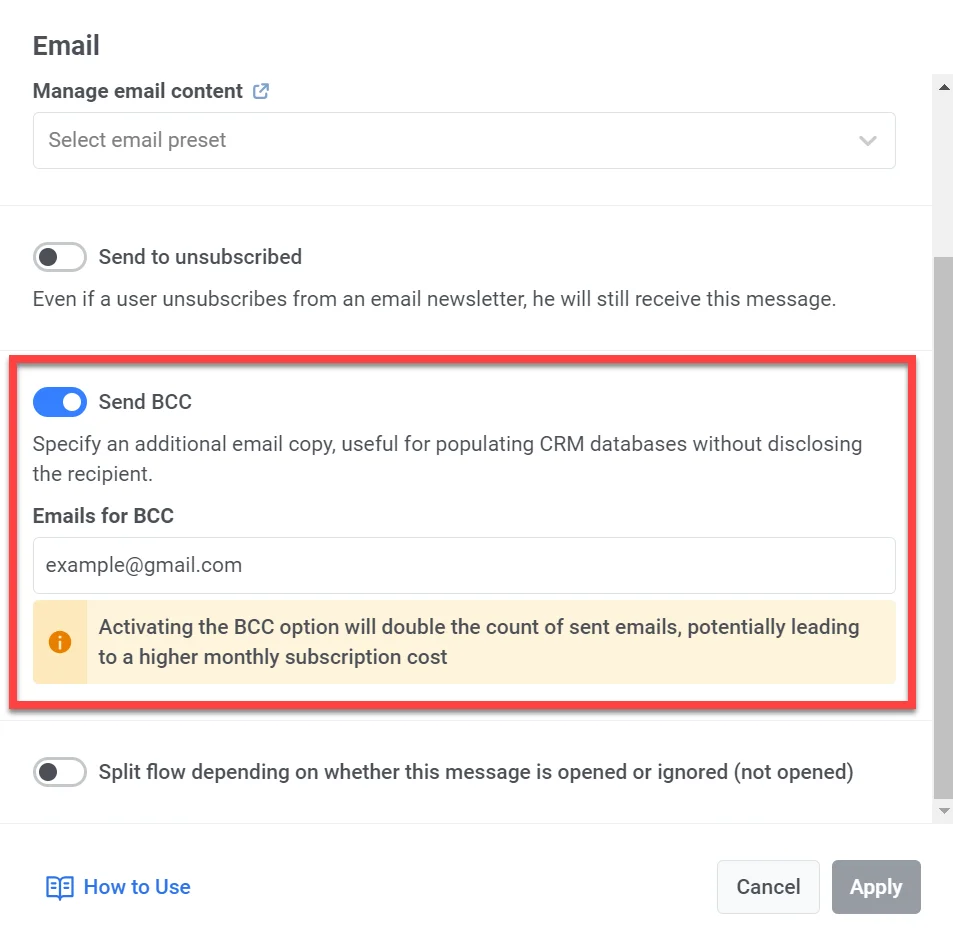
You can turn on the BCC (Blind Carbon Copy) option when sending emails in a customer journey. BCC allows you to send a copy of the email to an additional recipient without revealing their address to the main recipient(s).
This feature allows you to:
* Keep a record of customer interactions in your CRM system for better customer service.
* Ensure internal teams (e.g. compliance and sales managers) receive copies for reference.
##### How to enable BCC
1. In the Email element, toggle the **Send BCC** switch.
2. Enter the email addresses you want to receive the BCC copy. You can add multiple addresses.
3. Click **Apply**.
## Use vouchers
You can personalize email messages by attaching a unique voucher code from a predefined pool. This is useful for promotions, discounts, and loyalty campaigns.
Before starting, ensure your email content includes the ``{{voucher}}`` placeholder where the code should appear.
To include a voucher in the email:
1. Toggle **Use Vouchers** to ON.
2. In the **Voucher Pool** field, select the pool containing your available voucher codes. The pool must be created in advance.
3. (Optional) In the **Assign Tag** field, specify a tag to be applied to users who receive a voucher. This can help with segmentation and reporting.
[Learn more about vouchers](/product/content/vouchers/)
## Split flow depending on whether this message is opened or ignored
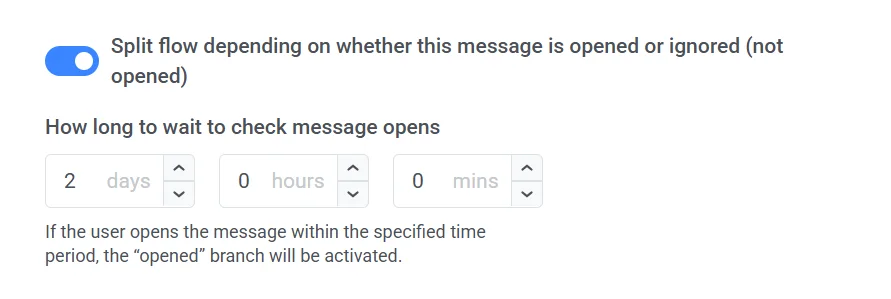
You can split the remaining journey flow based on whether the email is opened or ignored. For example, it might be helpful to try reaching out to users via pushes or In-Apps or send one more email delivering more value.
Set the period to wait after the email is sent – after that period, all users who open the email will go to the **Opened** journey branch, and others will pass through the **Not opened** branch.
Waiting period can be set to up to 7 days.
 ## Set message type
Choose **Marketing message** or **Transactional message**:
* **Marketing message**: Respects subscription preferences, opt-outs, and frequency capping. Not sent to the [global control group](/product/audience-data-and-segmentation/global-control-group/). If you choose this, select a subscription category (e.g. Product Updates, Newsletter) from the dropdown so the message aligns with [subscriber preferences](/product/messaging-channels/emails/email-preferences/).
* **Transactional message**: Sent to all users regardless of subscription status. Delivered to the control group. [Learn how message type affects delivery](/product/messaging-channels/marketing-vs-transactional/)
## Set message type
Choose **Marketing message** or **Transactional message**:
* **Marketing message**: Respects subscription preferences, opt-outs, and frequency capping. Not sent to the [global control group](/product/audience-data-and-segmentation/global-control-group/). If you choose this, select a subscription category (e.g. Product Updates, Newsletter) from the dropdown so the message aligns with [subscriber preferences](/product/messaging-channels/emails/email-preferences/).
* **Transactional message**: Sent to all users regardless of subscription status. Delivered to the control group. [Learn how message type affects delivery](/product/messaging-channels/marketing-vs-transactional/)
 ### Select subscription category
If you chose **Marketing message**, pick a category from the dropdown (e.g. Product Updates, Newsletter, Promotional) so the message aligns with your subscribers' preferences.
Categories are defined in the [subscription preference center](/product/messaging-channels/emails/email-preferences/).
## Set the subject line
In **Subject line**, choose how the subject is set for this step:
* **Custom**: Type a subject in the **Subject** field. The field is pre-filled with the subject from the preset, but you can edit it. A custom subject overrides the preset and applies to all emails from this step.
### Select subscription category
If you chose **Marketing message**, pick a category from the dropdown (e.g. Product Updates, Newsletter, Promotional) so the message aligns with your subscribers' preferences.
Categories are defined in the [subscription preference center](/product/messaging-channels/emails/email-preferences/).
## Set the subject line
In **Subject line**, choose how the subject is set for this step:
* **Custom**: Type a subject in the **Subject** field. The field is pre-filled with the subject from the preset, but you can edit it. A custom subject overrides the preset and applies to all emails from this step.
 * **From preset**: Use the subject saved in the selected email preset. If you update the subject in the preset later, the change applies automatically. If the preset has no subject, add one to the preset first.
 Keep your subject line short, clear, and engaging. It's the first thing recipients see in their inbox.
## Define sender details and reply address
In **Sender info**, choose how sender details are set:
* **Specify manually**: Type the sender details directly in this step. Once set, these values apply to all emails from this step and do not sync with the preset.
* **From preset**: Use sender details saved in the selected email preset. If you update the details in the preset later, the change applies automatically.
##### To set sender details manually:
1. Enter the sender address in the **From Email** field (e.g., `marketing@testdomain.com`).
2. Enter the sender name in the **From Name** field.
3. (Optional) Enable **Use this as the reply-to address to receive and track replies** if you want replies to go to the same address.
Keep your subject line short, clear, and engaging. It's the first thing recipients see in their inbox.
## Define sender details and reply address
In **Sender info**, choose how sender details are set:
* **Specify manually**: Type the sender details directly in this step. Once set, these values apply to all emails from this step and do not sync with the preset.
* **From preset**: Use sender details saved in the selected email preset. If you update the details in the preset later, the change applies automatically.
##### To set sender details manually:
1. Enter the sender address in the **From Email** field (e.g., `marketing@testdomain.com`).
2. Enter the sender name in the **From Name** field.
3. (Optional) Enable **Use this as the reply-to address to receive and track replies** if you want replies to go to the same address.
 > **Note:** The email address must belong to a verified domain in your Pushwoosh project. See the [Email configuration guide](/product/first-steps/start-with-your-project/configure-platforms/email-verification/) for details.
## Configure message delivery settings
### Set frequency capping
Use [**Frequency capping**](/product/messaging-channels/global-frequency-capping/#enable-global-frequency-capping) to control how often users receive email messages, helping to prevent over-messaging and reduce unsubscribes.
Choose one of the following options:
* **Use global frequency capping settings**. Apply the project-wide email limits set in your [Global frequency capping settings](/product/messaging-channels/global-frequency-capping/#enable-global-frequency-capping).
*Example:* If the limit is 3 emails in 9 days, any additional emails during that period will be skipped.
* **Ignore global frequency capping**. Send the email regardless of how many messages the user has already received. Use this with caution to avoid overwhelming recipients.
* **Use custom frequency capping**. Override global settings with a custom limit for this email step.
If the user exceeds your custom limit, the email will not be sent, and they will move to the next step in the journey. [Learn more](/product/messaging-channels/global-frequency-capping/#customize-capping-for-specific-messages)
### Set send rate limits
The **Send rate** setting controls how quickly messages are delivered to your audience. Adjusting the send rate helps you manage delivery speed, prevent backend overload, and improve overall deliverability.
Choose one of the following options:
* **Use global send rate settings**
Applies the send rate limits configured in your project’s message delivery settings. If no limits are set, all messages will be sent immediately. Use this option when you want delivery speed to follow your project’s default rules. [Learn more about global send rate limits](/product/messaging-channels/global-frequency-capping/#set-send-rate-limits)

* **Send messages without send rate**
Sends messages as fast as possible, ignoring any global send rate limits. Use with caution to avoid overloading your backend or creating delivery spikes.

* **Use custom send rate**
Overrides the global send rate for this message only. Allows you to specify the number of messages sent per minute, giving you full control over delivery speed. Messages will be sent at the custom rate you define in the message element.

## Enable Best time to send
If you want each user to receive an email when they are most likely to open and engage with it, enable the **Best time to send** option. The optimal delivery time for each user is calculated based on their past behavior and the performance of previously sent emails.
> **Note:** The email address must belong to a verified domain in your Pushwoosh project. See the [Email configuration guide](/product/first-steps/start-with-your-project/configure-platforms/email-verification/) for details.
## Configure message delivery settings
### Set frequency capping
Use [**Frequency capping**](/product/messaging-channels/global-frequency-capping/#enable-global-frequency-capping) to control how often users receive email messages, helping to prevent over-messaging and reduce unsubscribes.
Choose one of the following options:
* **Use global frequency capping settings**. Apply the project-wide email limits set in your [Global frequency capping settings](/product/messaging-channels/global-frequency-capping/#enable-global-frequency-capping).
*Example:* If the limit is 3 emails in 9 days, any additional emails during that period will be skipped.
* **Ignore global frequency capping**. Send the email regardless of how many messages the user has already received. Use this with caution to avoid overwhelming recipients.
* **Use custom frequency capping**. Override global settings with a custom limit for this email step.
If the user exceeds your custom limit, the email will not be sent, and they will move to the next step in the journey. [Learn more](/product/messaging-channels/global-frequency-capping/#customize-capping-for-specific-messages)
### Set send rate limits
The **Send rate** setting controls how quickly messages are delivered to your audience. Adjusting the send rate helps you manage delivery speed, prevent backend overload, and improve overall deliverability.
Choose one of the following options:
* **Use global send rate settings**
Applies the send rate limits configured in your project’s message delivery settings. If no limits are set, all messages will be sent immediately. Use this option when you want delivery speed to follow your project’s default rules. [Learn more about global send rate limits](/product/messaging-channels/global-frequency-capping/#set-send-rate-limits)

* **Send messages without send rate**
Sends messages as fast as possible, ignoring any global send rate limits. Use with caution to avoid overloading your backend or creating delivery spikes.

* **Use custom send rate**
Overrides the global send rate for this message only. Allows you to specify the number of messages sent per minute, giving you full control over delivery speed. Messages will be sent at the custom rate you define in the message element.

## Enable Best time to send
If you want each user to receive an email when they are most likely to open and engage with it, enable the **Best time to send** option. The optimal delivery time for each user is calculated based on their past behavior and the performance of previously sent emails.
 The accuracy of **Best time to send** depends on how much historical engagement data is available for each recipient. If there is not enough data on the user, they will receive an email at the **Default time** you specify according to their timezone.
## Turn on BCC (Blind Carbon Copy)
You can turn on the BCC (Blind Carbon Copy) option when sending emails in a customer journey. BCC allows you to send a copy of the email to an additional recipient without revealing their address to the main recipient(s).
This feature allows you to:
* Keep a record of customer interactions in your CRM system for better customer service.
* Ensure internal teams (e.g. compliance and sales managers) receive copies for reference.
##### How to enable BCC
1. In the Email element, toggle the **Send BCC** switch.
2. Enter the email addresses you want to receive the BCC copy. You can add multiple addresses.
3. Click **Apply**.
The accuracy of **Best time to send** depends on how much historical engagement data is available for each recipient. If there is not enough data on the user, they will receive an email at the **Default time** you specify according to their timezone.
## Turn on BCC (Blind Carbon Copy)
You can turn on the BCC (Blind Carbon Copy) option when sending emails in a customer journey. BCC allows you to send a copy of the email to an additional recipient without revealing their address to the main recipient(s).
This feature allows you to:
* Keep a record of customer interactions in your CRM system for better customer service.
* Ensure internal teams (e.g. compliance and sales managers) receive copies for reference.
##### How to enable BCC
1. In the Email element, toggle the **Send BCC** switch.
2. Enter the email addresses you want to receive the BCC copy. You can add multiple addresses.
3. Click **Apply**.
 ## Use vouchers
You can personalize email messages by attaching a unique voucher code from a predefined pool. This is useful for promotions, discounts, and loyalty campaigns.
Before starting, ensure your email content includes the ``{{voucher}}`` placeholder where the code should appear.
To include a voucher in the email:
1. Toggle **Use Vouchers** to ON.
2. In the **Voucher Pool** field, select the pool containing your available voucher codes. The pool must be created in advance.
3. (Optional) In the **Assign Tag** field, specify a tag to be applied to users who receive a voucher. This can help with segmentation and reporting.
[Learn more about vouchers](/product/content/vouchers/)
## Split flow depending on whether this message is opened or ignored
You can split the remaining journey flow based on whether the email is opened or ignored. For example, it might be helpful to try reaching out to users via pushes or In-Apps or send one more email delivering more value.
## Use vouchers
You can personalize email messages by attaching a unique voucher code from a predefined pool. This is useful for promotions, discounts, and loyalty campaigns.
Before starting, ensure your email content includes the ``{{voucher}}`` placeholder where the code should appear.
To include a voucher in the email:
1. Toggle **Use Vouchers** to ON.
2. In the **Voucher Pool** field, select the pool containing your available voucher codes. The pool must be created in advance.
3. (Optional) In the **Assign Tag** field, specify a tag to be applied to users who receive a voucher. This can help with segmentation and reporting.
[Learn more about vouchers](/product/content/vouchers/)
## Split flow depending on whether this message is opened or ignored
You can split the remaining journey flow based on whether the email is opened or ignored. For example, it might be helpful to try reaching out to users via pushes or In-Apps or send one more email delivering more value.
 Set the period to wait after the email is sent – after that period, all users who open the email will go to the **Opened** journey branch, and others will pass through the **Not opened** branch.
Waiting period can be set to up to 7 days.
Set the period to wait after the email is sent – after that period, all users who open the email will go to the **Opened** journey branch, and others will pass through the **Not opened** branch.
Waiting period can be set to up to 7 days.