# Create a test journey
You can play around with Pushwoosh Customer Journey Builder and learn its core functionality before creating journeys for real users. To do this, use the **Push On** mobile app we developed specifically for testing Pushwoosh features.
Follow the steps below to learn how to create your first test journey for mobile users.
### 1. Install the Push On demo app
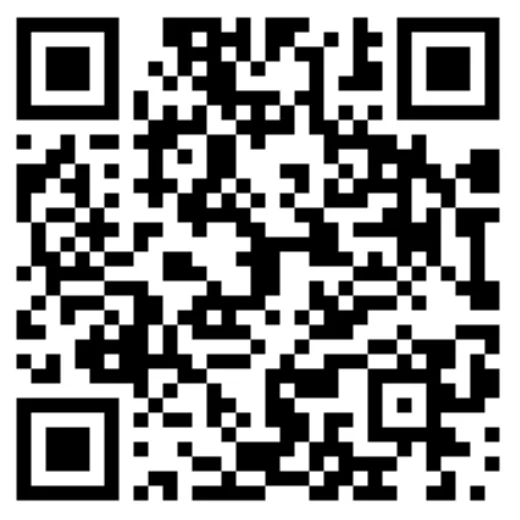
1. Download the app by scanning QR code or clicking the link below:
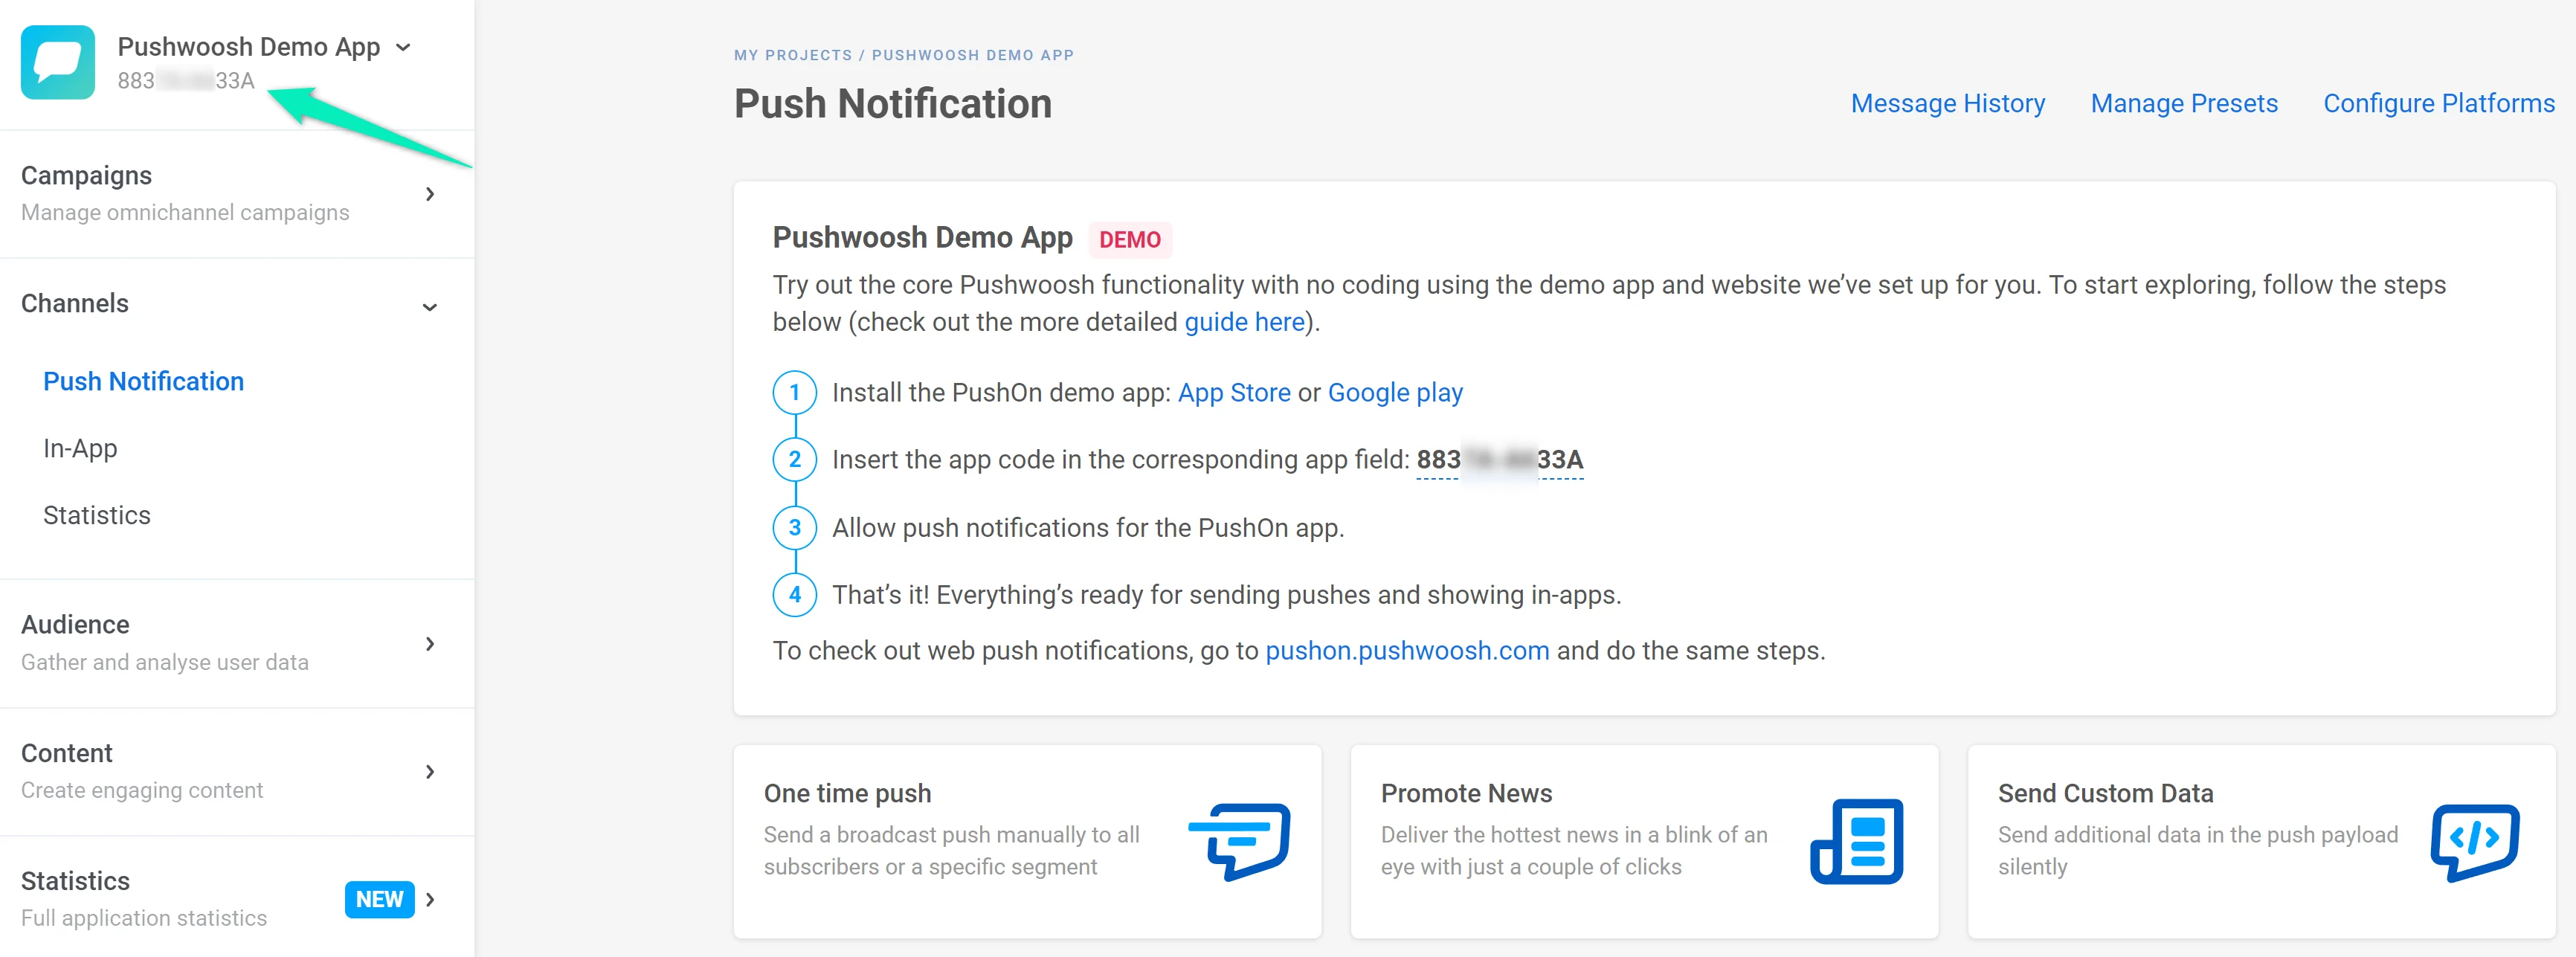
2. In your Pushwoosh account, open the default **Pushwoosh Demo App** and find your **Application code** at the top left corner of the Control Panel.
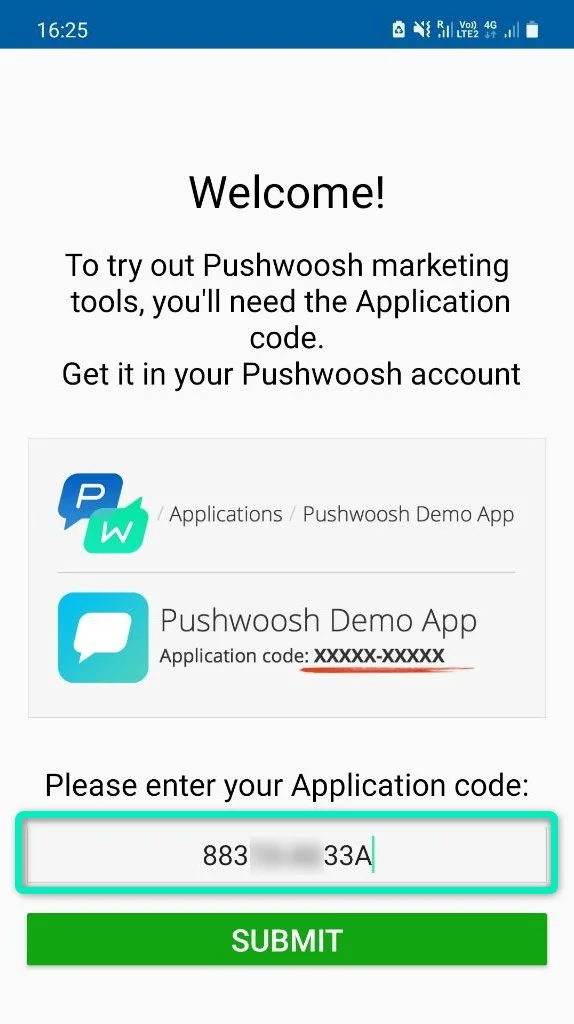
3. Open the Push On app. If you see a pop-up about sending pushes, confirm your permission. After that, enter your **Application code** and click **Submit**:
4. Make sure the Push On app is allowed to send push notifications.
### 2. Create a journey
Let's say you have a shopping app, and you are going to convert your app users into buyers. A user comes to your app and adds some products to their shopping cart but does not complete the purchase for some reason. It's time to send a push notification reminding them that the shopping cart is waiting for their return! Your marketing goal in this case is a purchase successfully completed by the user.
The steps below describe creating a customer journey for our example case.
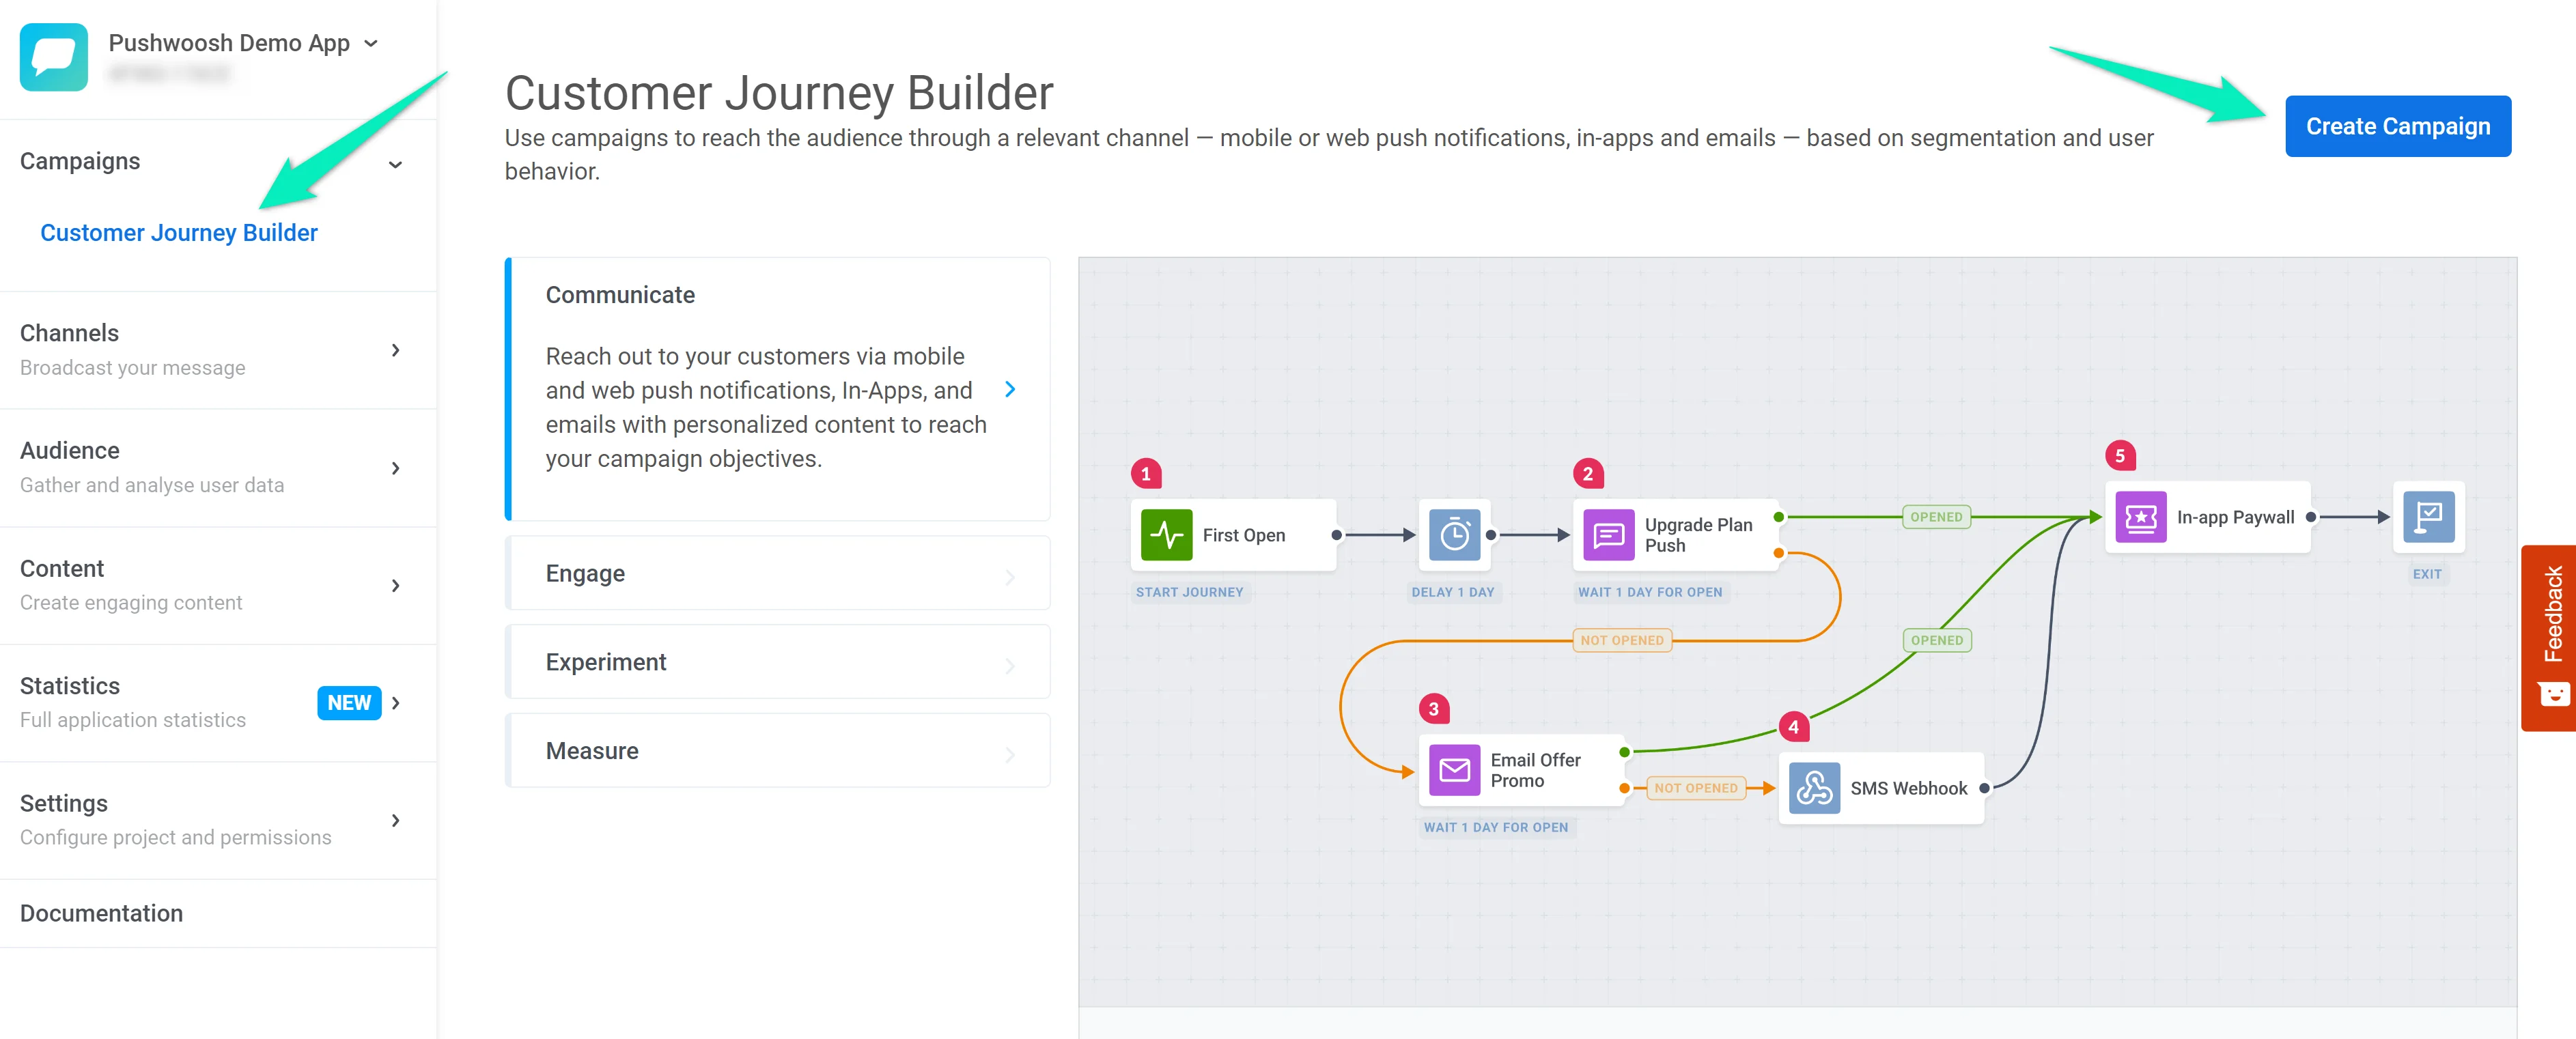
1. In your Pushwoosh account, go to the **Pushwoosh Demo App**. Open the **Customer Journey Builder** section and click **Create Campaign**:
2. We want the journey to start once a user adds an item to the cart. For this purpose, we will use a **Trigger-based Entry**, which is added automatically when creating a new campaign.
Double-click on the Entry element and select the **ProductAdd** Event:
3. Now let's divide users into those who have completed the checkout process and those who have abandoned their cart. To do this, add the **Wait for Trigger** element, choose the **CheckoutSuccess** Event, and set the element to wait for 1 minute:
If a user completes the checkout within 1 minute after adding something to a cart, they will go to the **Triggered** branch. Otherwise, they will go to the **Not triggered** branch.
4. Let's send a push notification to users from the **Not triggered** branch to encourage them to return to shopping:
5. Add one more **Wait for Trigger** element to track the efficiency of your communication – check out whether users complete their purchases after your push notification. This time let's wait for 5 minutes after sending the first push:
6. If a user does not complete the purchase within 5 minutes, send another push to recover the abandoned cart:
7. End the journey with the **Exit** element:
8. Track your results with **Conversion Goals** – set up the **CheckoutSuccess** Event as an indicator of your journey's success and check out how many users reach this goal within the journey:
9. Use the [Pre-launch check](/product/customer-journey/journey-settings/#pre-launch-check) to see if the journey is ready. When all steps pass, click **Start campaign** to launch.
### 3. Test your journey
You can now test the journey using the Push On app.
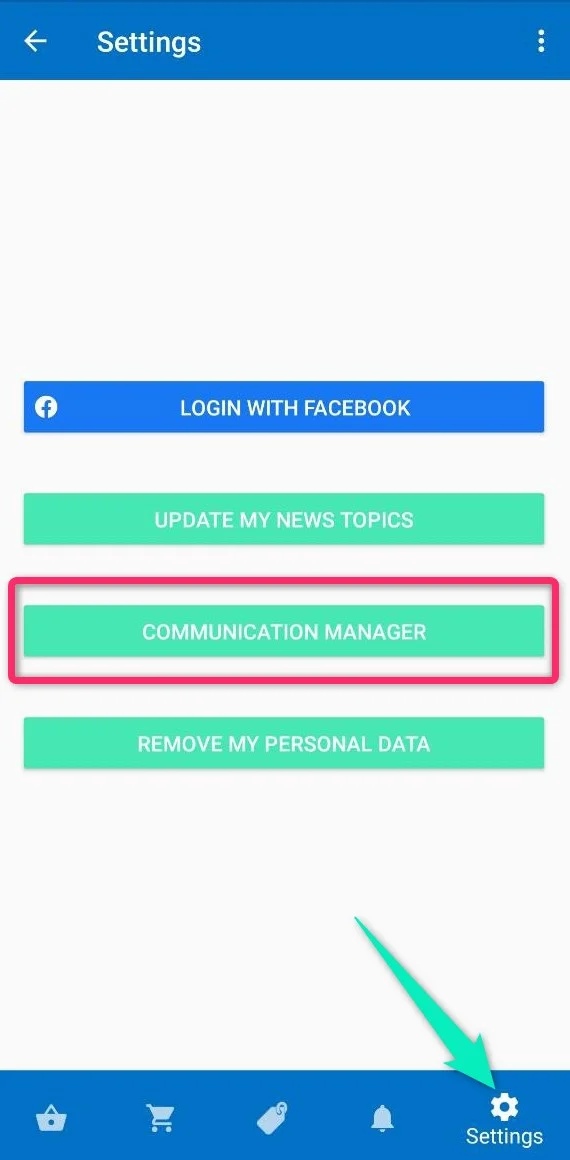
1. If you haven't seen the pop-up about sending pushes yet, go to the **Settings** section and click the **Communication manager** button:
Check the box to enable push notifications and click **Confirm**.
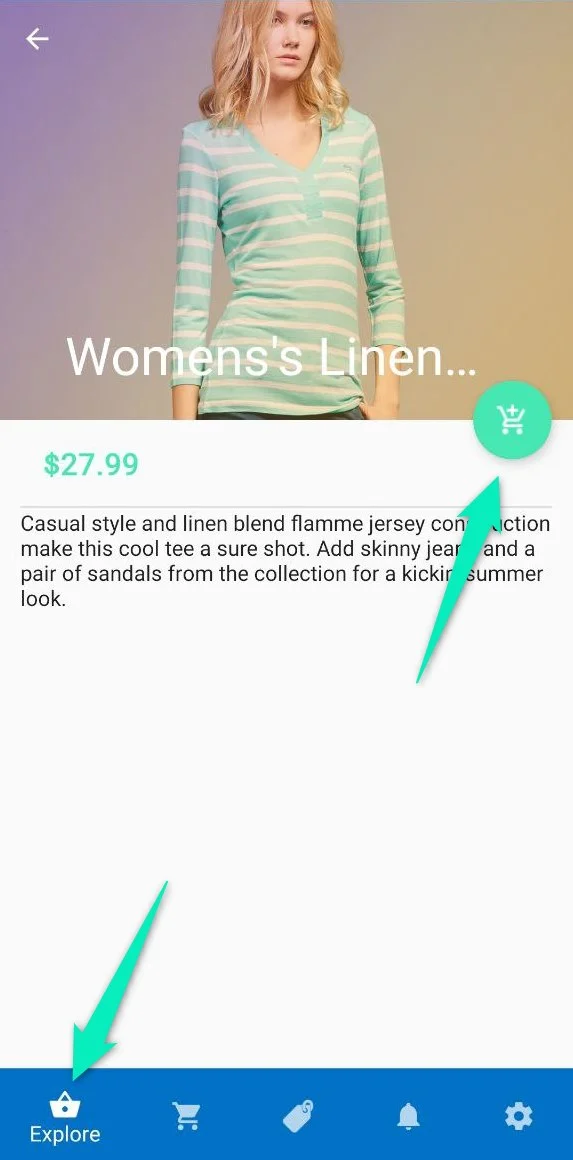
2. Go to the **Explore** section and add any item to the cart:
3. Open the **Cart**, click **Checkout**, and select **Continue as guest**. This will trigger the **ProductAdd** Event.
* If you do nothing else, after a minute you will receive the first push notification. If you wait another 5 minutes, you will receive the second push notification.
* If you click **Proceed**, you will trigger the **CheckoutSuccess** Event and may not receive push notifications depending on the time passed after triggering the **ProductAdd** Event.
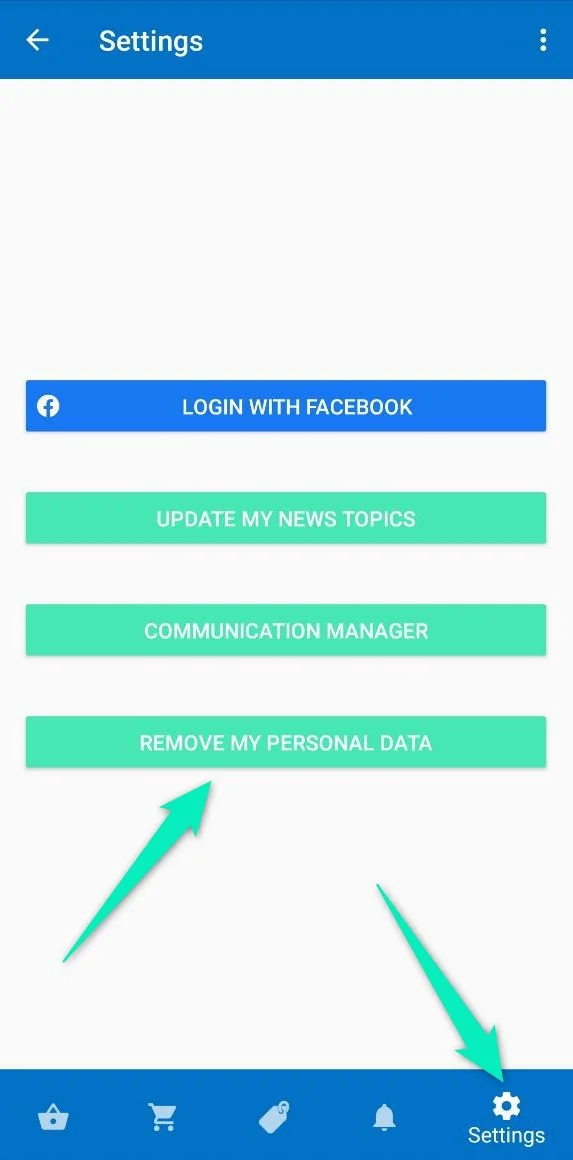
4. If you want to go through the journey steps again as a different user, go to the **Settings** section and click **Remove my personal data**. After that, you can start the journey as a new user (don't forget to enable push notifications again, as described in step 1).
### Next steps
Now you can start creating a journey for real users. The following articles will help you:
* [Journey elements](/product/customer-journey/journey-elements/)
* [Journey settings](/product/customer-journey/journey-settings/)
You can also check out examples of journeys for each stage of the user lifecycle:
* [Onboarding](/product/how-to-guides/lifecycle-marketing-campaigns/how-to-onboard-users-with-pushwoosh/)
* [Activation](/product/how-to-guides/lifecycle-marketing-campaigns/how-to-set-up-a-user-activation-campaign-with-pushwoosh/)
* [Engagement](/product/how-to-guides/lifecycle-marketing-campaigns/how-to-set-up-a-user-engagement-campaign-in-pushwoosh/)
* [Retention](/product/how-to-guides/lifecycle-marketing-campaigns/how-to-set-up-a-retention-campaign-in-pushwoosh/)
* [Re-engagement](/product/how-to-guides/lifecycle-marketing-campaigns/how-to-create-a-re-engagement-campaign-in-pushwoosh/)
 3. Open the Push On app. If you see a pop-up about sending pushes, confirm your permission. After that, enter your **Application code** and click **Submit**:
 4. Make sure the Push On app is allowed to send push notifications.
### 2. Create a journey
Let's say you have a shopping app, and you are going to convert your app users into buyers. A user comes to your app and adds some products to their shopping cart but does not complete the purchase for some reason. It's time to send a push notification reminding them that the shopping cart is waiting for their return! Your marketing goal in this case is a purchase successfully completed by the user.
The steps below describe creating a customer journey for our example case.
1. In your Pushwoosh account, go to the **Pushwoosh Demo App**. Open the **Customer Journey Builder** section and click **Create Campaign**:
4. Make sure the Push On app is allowed to send push notifications.
### 2. Create a journey
Let's say you have a shopping app, and you are going to convert your app users into buyers. A user comes to your app and adds some products to their shopping cart but does not complete the purchase for some reason. It's time to send a push notification reminding them that the shopping cart is waiting for their return! Your marketing goal in this case is a purchase successfully completed by the user.
The steps below describe creating a customer journey for our example case.
1. In your Pushwoosh account, go to the **Pushwoosh Demo App**. Open the **Customer Journey Builder** section and click **Create Campaign**:
 2. We want the journey to start once a user adds an item to the cart. For this purpose, we will use a **Trigger-based Entry**, which is added automatically when creating a new campaign.
Double-click on the Entry element and select the **ProductAdd** Event:
3. Now let's divide users into those who have completed the checkout process and those who have abandoned their cart. To do this, add the **Wait for Trigger** element, choose the **CheckoutSuccess** Event, and set the element to wait for 1 minute:
If a user completes the checkout within 1 minute after adding something to a cart, they will go to the **Triggered** branch. Otherwise, they will go to the **Not triggered** branch.
4. Let's send a push notification to users from the **Not triggered** branch to encourage them to return to shopping:
5. Add one more **Wait for Trigger** element to track the efficiency of your communication – check out whether users complete their purchases after your push notification. This time let's wait for 5 minutes after sending the first push:
6. If a user does not complete the purchase within 5 minutes, send another push to recover the abandoned cart:
7. End the journey with the **Exit** element:
8. Track your results with **Conversion Goals** – set up the **CheckoutSuccess** Event as an indicator of your journey's success and check out how many users reach this goal within the journey:
9. Use the [Pre-launch check](/product/customer-journey/journey-settings/#pre-launch-check) to see if the journey is ready. When all steps pass, click **Start campaign** to launch.
### 3. Test your journey
You can now test the journey using the Push On app.
1. If you haven't seen the pop-up about sending pushes yet, go to the **Settings** section and click the **Communication manager** button:
2. We want the journey to start once a user adds an item to the cart. For this purpose, we will use a **Trigger-based Entry**, which is added automatically when creating a new campaign.
Double-click on the Entry element and select the **ProductAdd** Event:
3. Now let's divide users into those who have completed the checkout process and those who have abandoned their cart. To do this, add the **Wait for Trigger** element, choose the **CheckoutSuccess** Event, and set the element to wait for 1 minute:
If a user completes the checkout within 1 minute after adding something to a cart, they will go to the **Triggered** branch. Otherwise, they will go to the **Not triggered** branch.
4. Let's send a push notification to users from the **Not triggered** branch to encourage them to return to shopping:
5. Add one more **Wait for Trigger** element to track the efficiency of your communication – check out whether users complete their purchases after your push notification. This time let's wait for 5 minutes after sending the first push:
6. If a user does not complete the purchase within 5 minutes, send another push to recover the abandoned cart:
7. End the journey with the **Exit** element:
8. Track your results with **Conversion Goals** – set up the **CheckoutSuccess** Event as an indicator of your journey's success and check out how many users reach this goal within the journey:
9. Use the [Pre-launch check](/product/customer-journey/journey-settings/#pre-launch-check) to see if the journey is ready. When all steps pass, click **Start campaign** to launch.
### 3. Test your journey
You can now test the journey using the Push On app.
1. If you haven't seen the pop-up about sending pushes yet, go to the **Settings** section and click the **Communication manager** button:
 Check the box to enable push notifications and click **Confirm**.
2. Go to the **Explore** section and add any item to the cart:
Check the box to enable push notifications and click **Confirm**.
2. Go to the **Explore** section and add any item to the cart:
 3. Open the **Cart**, click **Checkout**, and select **Continue as guest**. This will trigger the **ProductAdd** Event.
* If you do nothing else, after a minute you will receive the first push notification. If you wait another 5 minutes, you will receive the second push notification.
* If you click **Proceed**, you will trigger the **CheckoutSuccess** Event and may not receive push notifications depending on the time passed after triggering the **ProductAdd** Event.
4. If you want to go through the journey steps again as a different user, go to the **Settings** section and click **Remove my personal data**. After that, you can start the journey as a new user (don't forget to enable push notifications again, as described in step 1).
3. Open the **Cart**, click **Checkout**, and select **Continue as guest**. This will trigger the **ProductAdd** Event.
* If you do nothing else, after a minute you will receive the first push notification. If you wait another 5 minutes, you will receive the second push notification.
* If you click **Proceed**, you will trigger the **CheckoutSuccess** Event and may not receive push notifications depending on the time passed after triggering the **ProductAdd** Event.
4. If you want to go through the journey steps again as a different user, go to the **Settings** section and click **Remove my personal data**. After that, you can start the journey as a new user (don't forget to enable push notifications again, as described in step 1).
 ### Next steps
Now you can start creating a journey for real users. The following articles will help you:
* [Journey elements](/product/customer-journey/journey-elements/)
* [Journey settings](/product/customer-journey/journey-settings/)
You can also check out examples of journeys for each stage of the user lifecycle:
* [Onboarding](/product/how-to-guides/lifecycle-marketing-campaigns/how-to-onboard-users-with-pushwoosh/)
* [Activation](/product/how-to-guides/lifecycle-marketing-campaigns/how-to-set-up-a-user-activation-campaign-with-pushwoosh/)
* [Engagement](/product/how-to-guides/lifecycle-marketing-campaigns/how-to-set-up-a-user-engagement-campaign-in-pushwoosh/)
* [Retention](/product/how-to-guides/lifecycle-marketing-campaigns/how-to-set-up-a-retention-campaign-in-pushwoosh/)
* [Re-engagement](/product/how-to-guides/lifecycle-marketing-campaigns/how-to-create-a-re-engagement-campaign-in-pushwoosh/)
### Next steps
Now you can start creating a journey for real users. The following articles will help you:
* [Journey elements](/product/customer-journey/journey-elements/)
* [Journey settings](/product/customer-journey/journey-settings/)
You can also check out examples of journeys for each stage of the user lifecycle:
* [Onboarding](/product/how-to-guides/lifecycle-marketing-campaigns/how-to-onboard-users-with-pushwoosh/)
* [Activation](/product/how-to-guides/lifecycle-marketing-campaigns/how-to-set-up-a-user-activation-campaign-with-pushwoosh/)
* [Engagement](/product/how-to-guides/lifecycle-marketing-campaigns/how-to-set-up-a-user-engagement-campaign-in-pushwoosh/)
* [Retention](/product/how-to-guides/lifecycle-marketing-campaigns/how-to-set-up-a-retention-campaign-in-pushwoosh/)
* [Re-engagement](/product/how-to-guides/lifecycle-marketing-campaigns/how-to-create-a-re-engagement-campaign-in-pushwoosh/)