# SMS presets
**SMS presets** enable you to create reusable and customizable SMS messages to fit a variety of campaign needs.
Pushwoosh allows you to:
* Easily adapt your messages for a global audience by translating and personalizing content in multiple languages. This ensures your messages stay relevant and tailored to your audience’s cultural context.
* Include long URLs in your SMS messages without worrying about space limitations. Pushwoosh automatically shortens links, keeping your message concise while tracking link performance to enhance conversion rates.
## Create SMS content
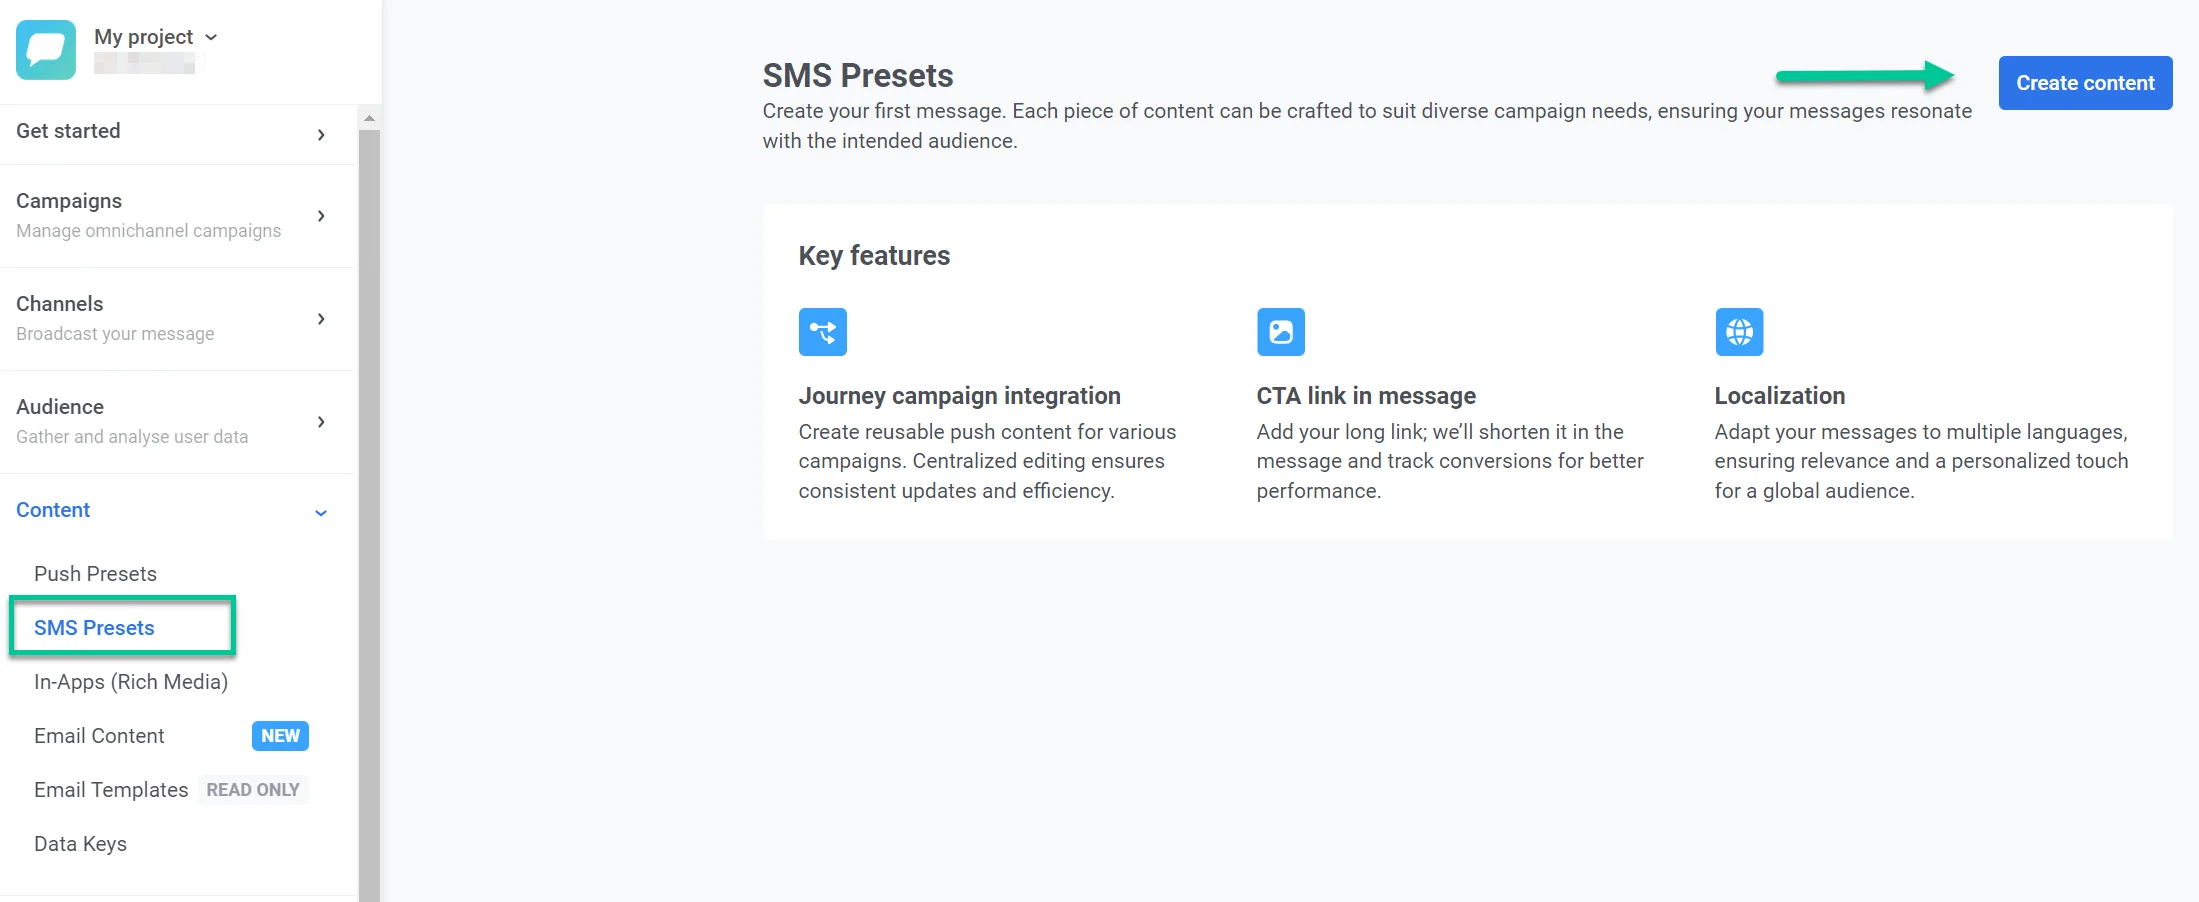
To start creating your SMS preset, navigate to **Content > SMS Presets > Create content.**
Ensure your SMS content has a clear and descriptive name for easy identification.
## Define the languages you want to use in your SMS
Start by creating your default message, which will be sent to all users unless a more specific language version is available.
Then add additional languages to personalize SMS content for users based on their language preferences.
You can include:
* Languages currently in use by your audience
* New languages to support future expansion into new regions
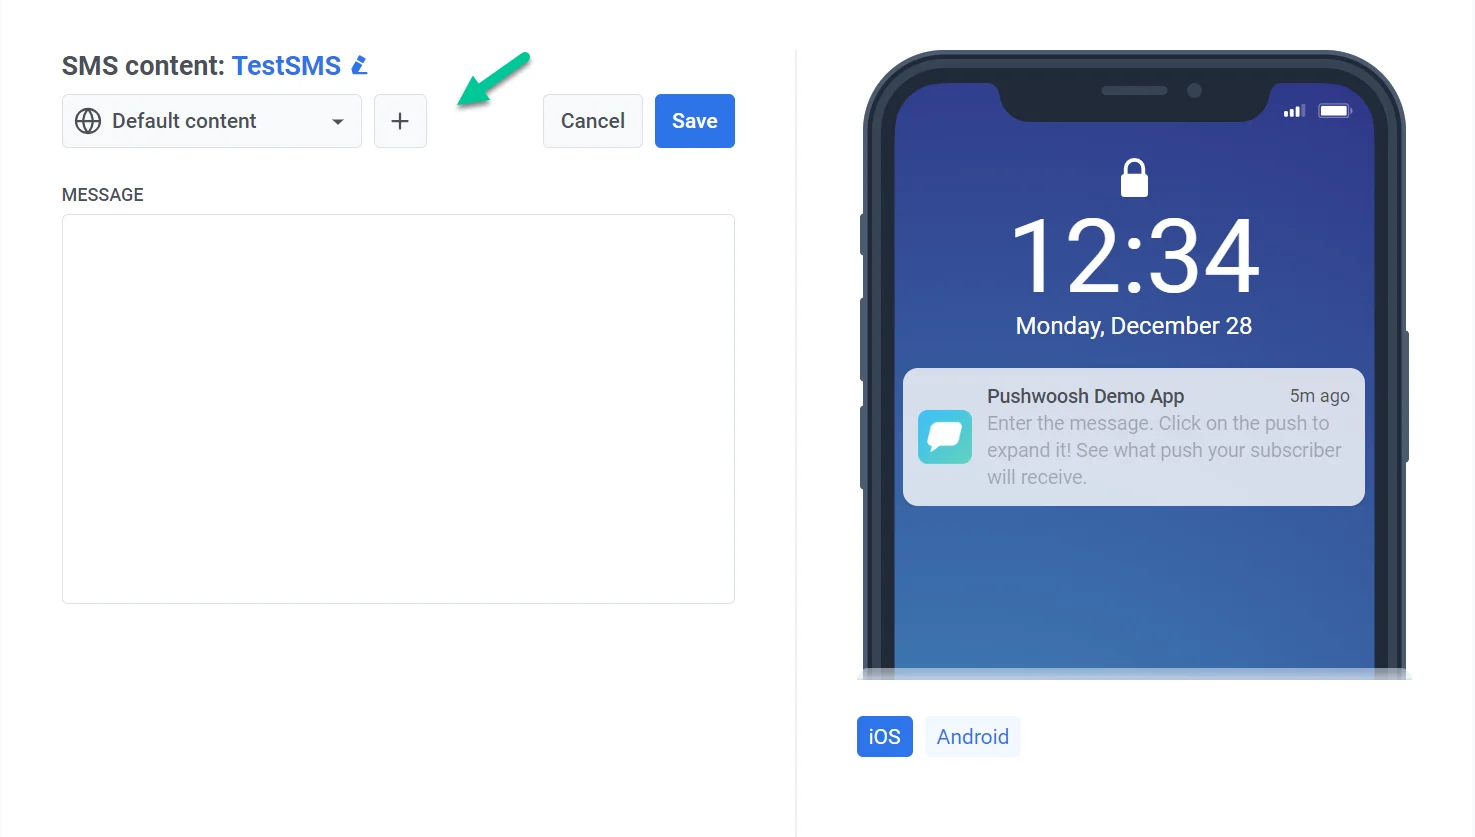
To add additional languages, click the **Plus** (+) sign at the top of the editor. A list of available languages will appear, allowing you to select the ones you need for your SMS messages.
*For example, if your default language is English but you also want to target Spanish and German speakers, simply add those languages to your SMS message. Users with Spanish or German phone settings will receive the message in their preferred language, while others will receive it in the default English version.*
## Compose your message
In the **Message** field, type the content of your SMS. You can include emojis with the **Emoji** button and add personalized data using the **Personalization** option.
### Personalize SMS content
Pushwoosh allows you to personalize SMS content and tailor it to individual users for a more engaging experience. Follow these steps to personalize your messages:
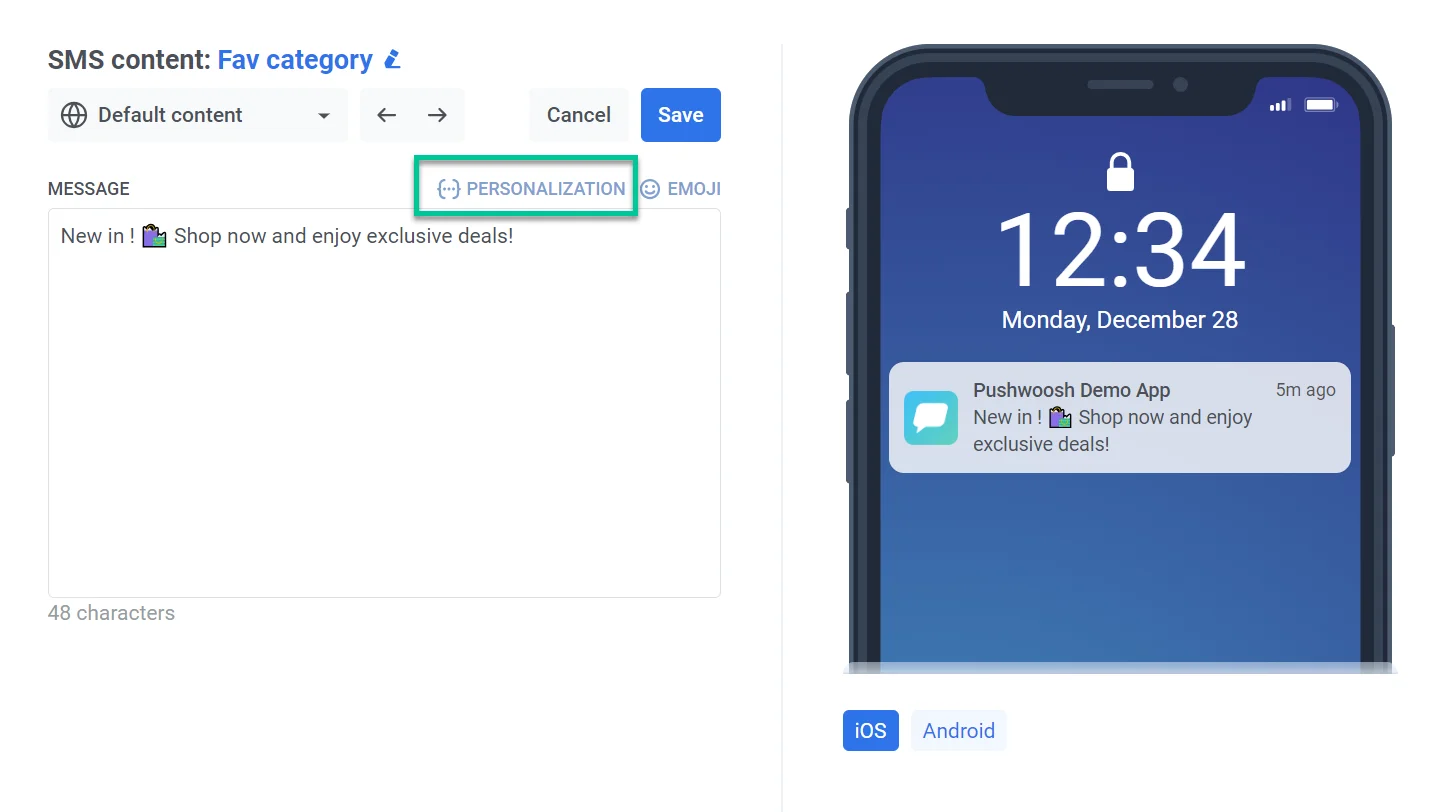
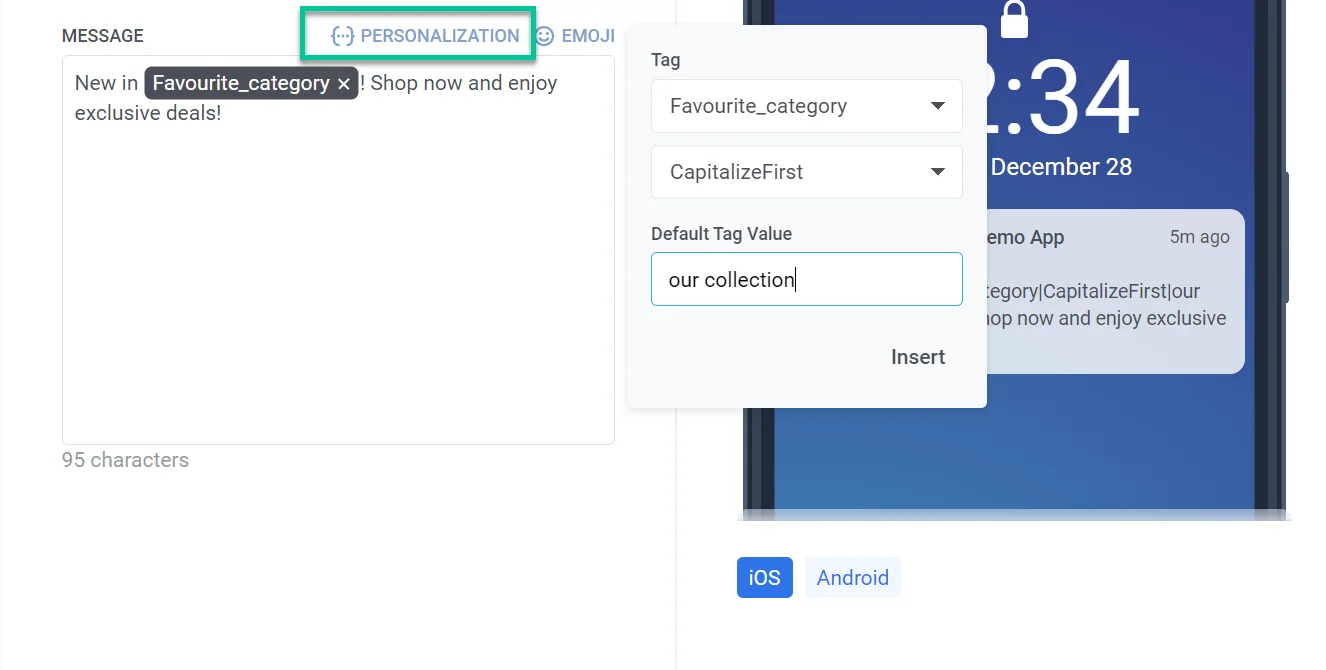
1. Click on the **Personalization** link above the message field. A dropdown menu will appear, displaying available user data tags. Select the tag that aligns with your personalization goal (e.g., user name, city, etc.). Keep in mind that available tags depend on the user data you’ve collected. [Learn more about tags](/product/audience-data-and-segmentation/user-data-tags/tags)
2. Select one of the following format modifiers to control how the tag’s value appears:
* **CapitalizeFirst.** The first letter of the tag’s value will be written in uppercase and the rest will appear in lowercase. For example: "john doe" becomes "John doe".
* **CapitalizeAllFirst.** The first letter of each word in the tag’s value will be written in uppercase. For example: "john doe" becomes "John Doe".
* **UPPERCASE.** Converts all letters in the tag’s value to uppercase. For example: "john doe" becomes "JOHN DOE".
* **Lowercase.** Converts all letters in the tag’s value to lowercase. For example: "JOHN DOE" becomes "john doe".
* **Regular.** Keeps the text formatting as it is in the original data. For example, if a user chose to indicate their name as "john doe" in your app's account settings, it will remain "john doe" in the personalized push copy.
3. In the **Default Tag Value** field, enter the text that should be used if the tag data is not available for a user. For instance, if the tag is `{City}`, you might enter "your city" as the default value.
4. Click **Insert.**
Here’s an example using the **FavoriteCategory** tag for an e-commerce SMS message with the default tag value set to "our collection":
* **If FavoriteCategory data is available**:
"New in \[FavoriteCategory\]\! Shop now and enjoy exclusive deals\!"
* **If FavoriteCategory data is not available**:
"New in our collection\! Shop now and enjoy exclusive deals\!"
## Create a dedicated copy in all languages you’ve selected
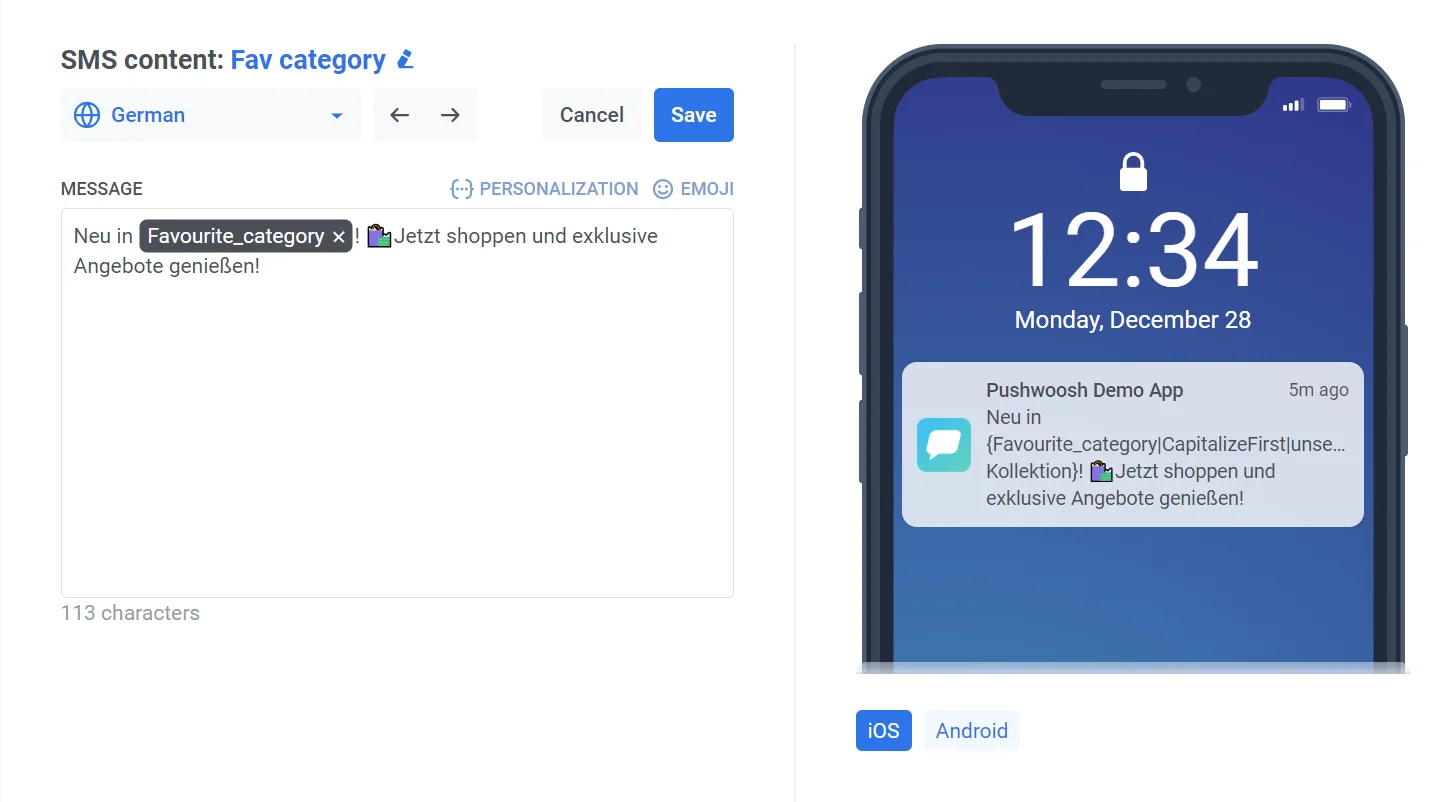
If you plan to send SMS content in multiple languages, you'll need to create a separate message for each language.
Select a language from the dropdown menu and compose the message content as outlined above.
## Add a link to your SMS message
The **SMS content editor** allows you to automatically shorten links and track user clicks, ensuring your messages stay within the SMS character limit while providing insights into engagement. To do this, paste your URL into the **Link below message** section.
Pushwoosh will automatically shorten the link, keeping your message concise. The shortened link will also track user clicks, helping you monitor engagement and campaign performance.
If you prefer not to shorten or track the link, paste the original URL directly into the main message field.
## Add MMS attachments
In the **MMS attachments** section, you can attach up to 3 images to turn the message into an MMS. Attachments are set per language, the same as the message text.
* **Subject.** Optional, but requires at least one image — a subject without an attachment is rejected. Up to 40 characters if the subject is plain ASCII, or 13 characters if it contains any non-ASCII character (e.g. Cyrillic, CJK, most emoji). A counter under the field shows the current length against the limit for what you typed.
* **Images.** Click **Add image** to pick a file from your project's media library. Only JPG and GIF files are offered — AbleMobile, the only MMS-capable provider, can't decode PNG or JPEG. A file over 200 KB is still selectable, but the warning says AbleMobile will reject the whole send.
* **Show text after.** Once you've added a second image, choose which image the message text should appear after (**Image 1**, **Image 2**, …). With a single image, the text is shown after it automatically.
Leaving the attachments empty sends a regular SMS — there's no separate MMS toggle.
## Preview and save SMS content
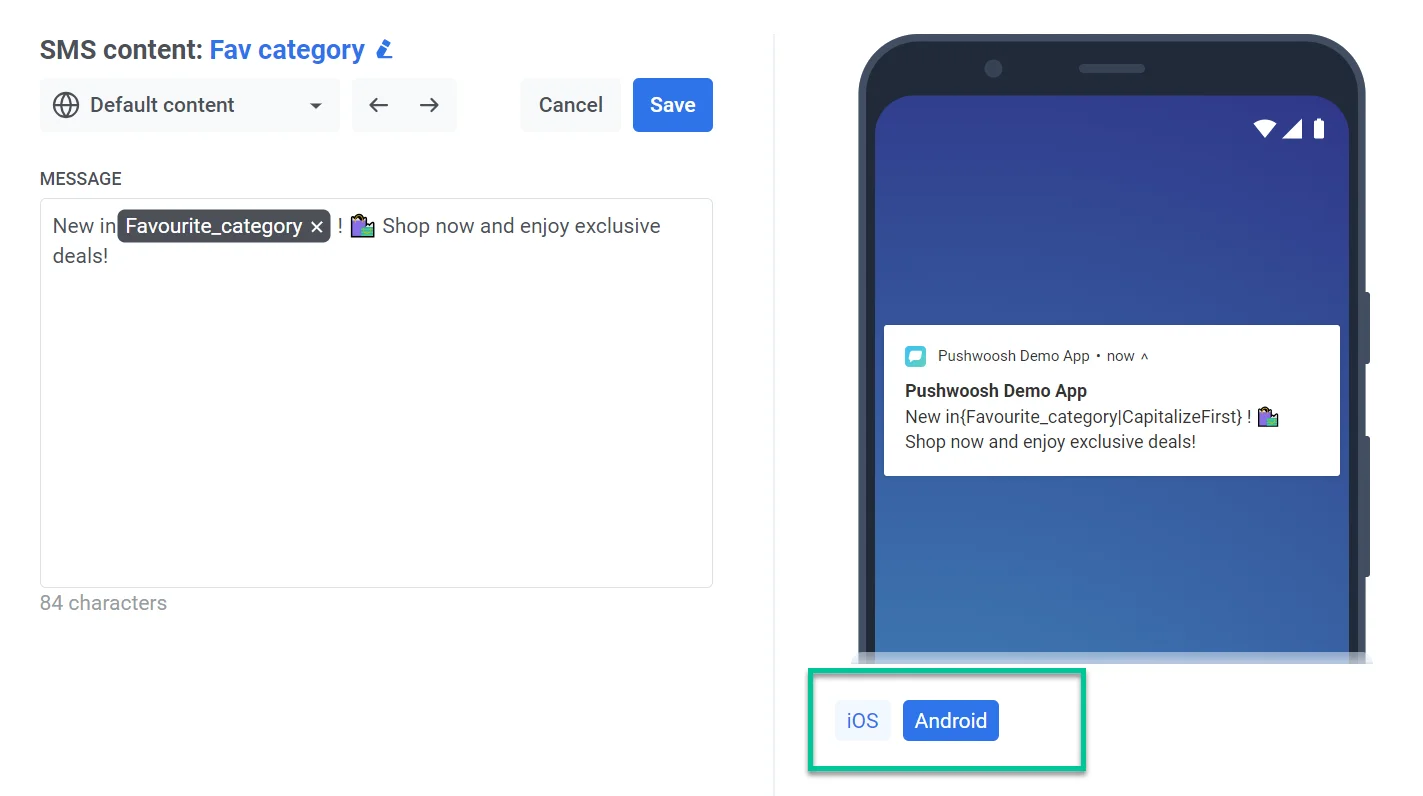
The SMS content editor allows you to easily preview how your message will look on recipient devices. Simply select the target platform for the preview.
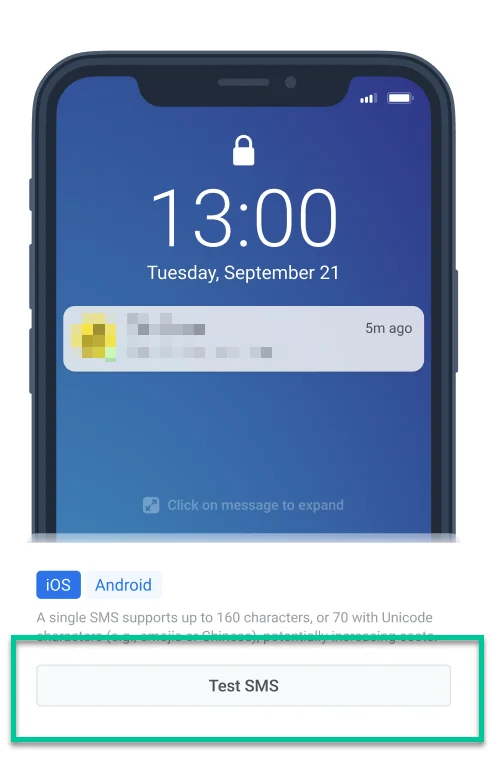
To send your SMS message to a test device, click the **Test SMS** button. This will enable you to review the message exactly as it will appear to recipients before launching your campaign.
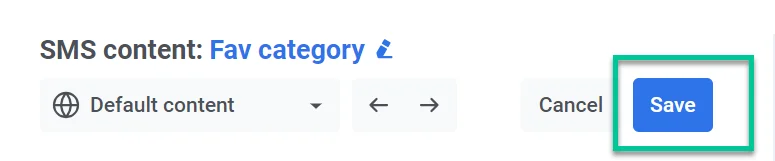
After finalizing your content, don’t forget to click the **Save** button at the top of the editor.
Once you've created and saved an SMS preset, you can use it to send SMS messages through the Customer Journey Builder. [Learn more](/product/messaging-channels/sms)
## Manage your SMS content
Once saved, your SMS content will be added to the list of available SMS presets, making it easy to access and use in future campaigns.
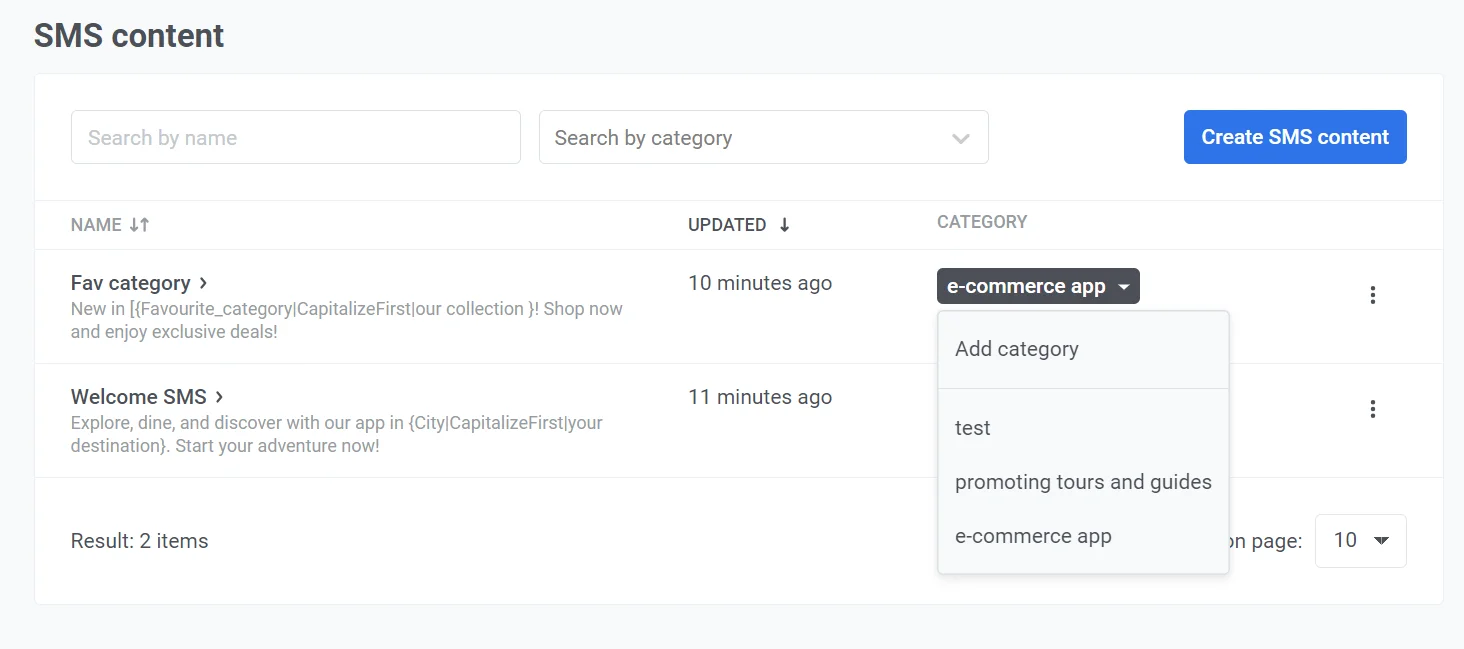
To view your list of SMS presets, go to **Content > SMS Presets**. Here, you’ll find all the SMS messages you’ve created, including their title, category, and the date they were last updated. Also, you can search for specific SMS content by name or category using the search bars at the top. In this section, you can also edit, delete, or create new SMS content as needed.
#### SMS categories
Each SMS message is assigned a category, which is shown in the **Category** column. To change the category of an SMS message:
1. Click the current category next to the SMS title.
2. A dropdown menu will appear with available categories, allowing you to select a different one or create a new category.
 Ensure your SMS content has a clear and descriptive name for easy identification.
## Define the languages you want to use in your SMS
Start by creating your default message, which will be sent to all users unless a more specific language version is available.
Then add additional languages to personalize SMS content for users based on their language preferences.
You can include:
* Languages currently in use by your audience
* New languages to support future expansion into new regions
To add additional languages, click the **Plus** (+) sign at the top of the editor. A list of available languages will appear, allowing you to select the ones you need for your SMS messages.
Ensure your SMS content has a clear and descriptive name for easy identification.
## Define the languages you want to use in your SMS
Start by creating your default message, which will be sent to all users unless a more specific language version is available.
Then add additional languages to personalize SMS content for users based on their language preferences.
You can include:
* Languages currently in use by your audience
* New languages to support future expansion into new regions
To add additional languages, click the **Plus** (+) sign at the top of the editor. A list of available languages will appear, allowing you to select the ones you need for your SMS messages.
 *For example, if your default language is English but you also want to target Spanish and German speakers, simply add those languages to your SMS message. Users with Spanish or German phone settings will receive the message in their preferred language, while others will receive it in the default English version.*
## Compose your message
In the **Message** field, type the content of your SMS. You can include emojis with the **Emoji** button and add personalized data using the **Personalization** option.
### Personalize SMS content
Pushwoosh allows you to personalize SMS content and tailor it to individual users for a more engaging experience. Follow these steps to personalize your messages:
1. Click on the **Personalization** link above the message field. A dropdown menu will appear, displaying available user data tags. Select the tag that aligns with your personalization goal (e.g., user name, city, etc.). Keep in mind that available tags depend on the user data you’ve collected. [Learn more about tags](/product/audience-data-and-segmentation/user-data-tags/tags)
*For example, if your default language is English but you also want to target Spanish and German speakers, simply add those languages to your SMS message. Users with Spanish or German phone settings will receive the message in their preferred language, while others will receive it in the default English version.*
## Compose your message
In the **Message** field, type the content of your SMS. You can include emojis with the **Emoji** button and add personalized data using the **Personalization** option.
### Personalize SMS content
Pushwoosh allows you to personalize SMS content and tailor it to individual users for a more engaging experience. Follow these steps to personalize your messages:
1. Click on the **Personalization** link above the message field. A dropdown menu will appear, displaying available user data tags. Select the tag that aligns with your personalization goal (e.g., user name, city, etc.). Keep in mind that available tags depend on the user data you’ve collected. [Learn more about tags](/product/audience-data-and-segmentation/user-data-tags/tags)
 2. Select one of the following format modifiers to control how the tag’s value appears:
* **CapitalizeFirst.** The first letter of the tag’s value will be written in uppercase and the rest will appear in lowercase. For example: "john doe" becomes "John doe".
* **CapitalizeAllFirst.** The first letter of each word in the tag’s value will be written in uppercase. For example: "john doe" becomes "John Doe".
* **UPPERCASE.** Converts all letters in the tag’s value to uppercase. For example: "john doe" becomes "JOHN DOE".
* **Lowercase.** Converts all letters in the tag’s value to lowercase. For example: "JOHN DOE" becomes "john doe".
* **Regular.** Keeps the text formatting as it is in the original data. For example, if a user chose to indicate their name as "john doe" in your app's account settings, it will remain "john doe" in the personalized push copy.
3. In the **Default Tag Value** field, enter the text that should be used if the tag data is not available for a user. For instance, if the tag is `{City}`, you might enter "your city" as the default value.
4. Click **Insert.**
Here’s an example using the **FavoriteCategory** tag for an e-commerce SMS message with the default tag value set to "our collection":
* **If FavoriteCategory data is available**:
"New in \[FavoriteCategory\]\! Shop now and enjoy exclusive deals\!"
* **If FavoriteCategory data is not available**:
"New in our collection\! Shop now and enjoy exclusive deals\!"
2. Select one of the following format modifiers to control how the tag’s value appears:
* **CapitalizeFirst.** The first letter of the tag’s value will be written in uppercase and the rest will appear in lowercase. For example: "john doe" becomes "John doe".
* **CapitalizeAllFirst.** The first letter of each word in the tag’s value will be written in uppercase. For example: "john doe" becomes "John Doe".
* **UPPERCASE.** Converts all letters in the tag’s value to uppercase. For example: "john doe" becomes "JOHN DOE".
* **Lowercase.** Converts all letters in the tag’s value to lowercase. For example: "JOHN DOE" becomes "john doe".
* **Regular.** Keeps the text formatting as it is in the original data. For example, if a user chose to indicate their name as "john doe" in your app's account settings, it will remain "john doe" in the personalized push copy.
3. In the **Default Tag Value** field, enter the text that should be used if the tag data is not available for a user. For instance, if the tag is `{City}`, you might enter "your city" as the default value.
4. Click **Insert.**
Here’s an example using the **FavoriteCategory** tag for an e-commerce SMS message with the default tag value set to "our collection":
* **If FavoriteCategory data is available**:
"New in \[FavoriteCategory\]\! Shop now and enjoy exclusive deals\!"
* **If FavoriteCategory data is not available**:
"New in our collection\! Shop now and enjoy exclusive deals\!"
 ## Create a dedicated copy in all languages you’ve selected
If you plan to send SMS content in multiple languages, you'll need to create a separate message for each language.
Select a language from the dropdown menu and compose the message content as outlined above.
## Create a dedicated copy in all languages you’ve selected
If you plan to send SMS content in multiple languages, you'll need to create a separate message for each language.
Select a language from the dropdown menu and compose the message content as outlined above.
 ## Add a link to your SMS message
The **SMS content editor** allows you to automatically shorten links and track user clicks, ensuring your messages stay within the SMS character limit while providing insights into engagement. To do this, paste your URL into the **Link below message** section.
Pushwoosh will automatically shorten the link, keeping your message concise. The shortened link will also track user clicks, helping you monitor engagement and campaign performance.
If you prefer not to shorten or track the link, paste the original URL directly into the main message field.
## Add MMS attachments
In the **MMS attachments** section, you can attach up to 3 images to turn the message into an MMS. Attachments are set per language, the same as the message text.
* **Subject.** Optional, but requires at least one image — a subject without an attachment is rejected. Up to 40 characters if the subject is plain ASCII, or 13 characters if it contains any non-ASCII character (e.g. Cyrillic, CJK, most emoji). A counter under the field shows the current length against the limit for what you typed.
* **Images.** Click **Add image** to pick a file from your project's media library. Only JPG and GIF files are offered — AbleMobile, the only MMS-capable provider, can't decode PNG or JPEG. A file over 200 KB is still selectable, but the warning says AbleMobile will reject the whole send.
* **Show text after.** Once you've added a second image, choose which image the message text should appear after (**Image 1**, **Image 2**, …). With a single image, the text is shown after it automatically.
Leaving the attachments empty sends a regular SMS — there's no separate MMS toggle.
## Preview and save SMS content
The SMS content editor allows you to easily preview how your message will look on recipient devices. Simply select the target platform for the preview.
## Add a link to your SMS message
The **SMS content editor** allows you to automatically shorten links and track user clicks, ensuring your messages stay within the SMS character limit while providing insights into engagement. To do this, paste your URL into the **Link below message** section.
Pushwoosh will automatically shorten the link, keeping your message concise. The shortened link will also track user clicks, helping you monitor engagement and campaign performance.
If you prefer not to shorten or track the link, paste the original URL directly into the main message field.
## Add MMS attachments
In the **MMS attachments** section, you can attach up to 3 images to turn the message into an MMS. Attachments are set per language, the same as the message text.
* **Subject.** Optional, but requires at least one image — a subject without an attachment is rejected. Up to 40 characters if the subject is plain ASCII, or 13 characters if it contains any non-ASCII character (e.g. Cyrillic, CJK, most emoji). A counter under the field shows the current length against the limit for what you typed.
* **Images.** Click **Add image** to pick a file from your project's media library. Only JPG and GIF files are offered — AbleMobile, the only MMS-capable provider, can't decode PNG or JPEG. A file over 200 KB is still selectable, but the warning says AbleMobile will reject the whole send.
* **Show text after.** Once you've added a second image, choose which image the message text should appear after (**Image 1**, **Image 2**, …). With a single image, the text is shown after it automatically.
Leaving the attachments empty sends a regular SMS — there's no separate MMS toggle.
## Preview and save SMS content
The SMS content editor allows you to easily preview how your message will look on recipient devices. Simply select the target platform for the preview.
 To send your SMS message to a test device, click the **Test SMS** button. This will enable you to review the message exactly as it will appear to recipients before launching your campaign.
 After finalizing your content, don’t forget to click the **Save** button at the top of the editor.
 Once you've created and saved an SMS preset, you can use it to send SMS messages through the Customer Journey Builder. [Learn more](/product/messaging-channels/sms)
## Manage your SMS content
Once saved, your SMS content will be added to the list of available SMS presets, making it easy to access and use in future campaigns.
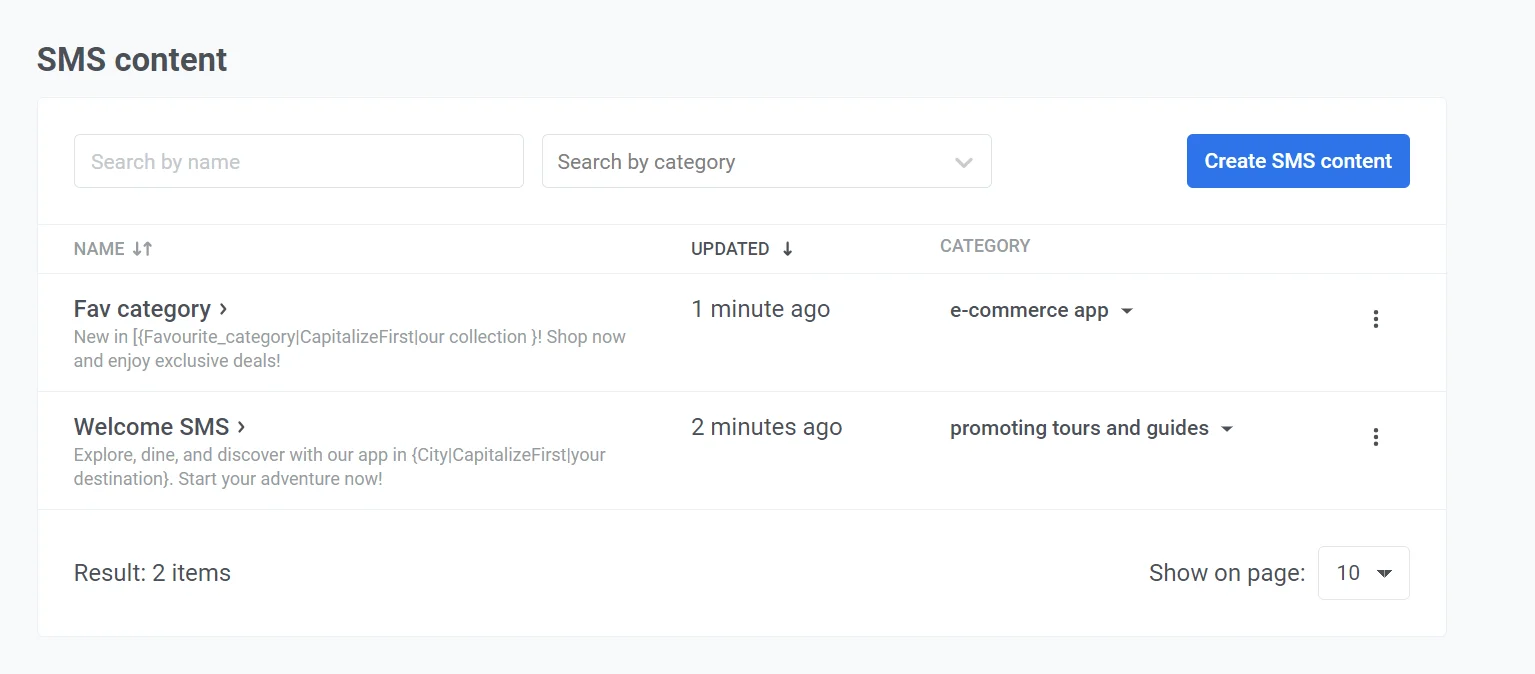
To view your list of SMS presets, go to **Content > SMS Presets**. Here, you’ll find all the SMS messages you’ve created, including their title, category, and the date they were last updated. Also, you can search for specific SMS content by name or category using the search bars at the top. In this section, you can also edit, delete, or create new SMS content as needed.
Once you've created and saved an SMS preset, you can use it to send SMS messages through the Customer Journey Builder. [Learn more](/product/messaging-channels/sms)
## Manage your SMS content
Once saved, your SMS content will be added to the list of available SMS presets, making it easy to access and use in future campaigns.
To view your list of SMS presets, go to **Content > SMS Presets**. Here, you’ll find all the SMS messages you’ve created, including their title, category, and the date they were last updated. Also, you can search for specific SMS content by name or category using the search bars at the top. In this section, you can also edit, delete, or create new SMS content as needed.
 #### SMS categories
Each SMS message is assigned a category, which is shown in the **Category** column. To change the category of an SMS message:
1. Click the current category next to the SMS title.
2. A dropdown menu will appear with available categories, allowing you to select a different one or create a new category.
#### SMS categories
Each SMS message is assigned a category, which is shown in the **Category** column. To change the category of an SMS message:
1. Click the current category next to the SMS title.
2. A dropdown menu will appear with available categories, allowing you to select a different one or create a new category.