# Legacy push preset form
The legacy push preset form is a template you create and save once to send a push immediately or edit and reuse later. Use it when you need [silent push notifications](/product/messaging-channels/push-notifications/advanced-push-features/silent-push-notifications), [save messages to a user's inbox](/product/content/push-presets#save-to-inbox), or platform-specific settings (custom sounds, badges, expiration time, iOS interruption levels). The current push content editor and one-time push form do not expose these options. In the legacy preset you define **content and platform-related settings** of your push. To [send it to your users](/product/messaging-channels/push-notifications/send-push-notifications/one-time-push), use the one-time push form or Pushwoosh Journey.
## Create presets
Go to **Content > Presets** and click **Add new preset**.
### Content elements
All presets consist of content (the **Message** tab) and additional push settings (the **Action** tab).
### Message tab
[Push Title](#push-title)
[Subtitle](#subtitle)
[Push message](#push-message)
[Multi-language](#multi-language)
[Personalization](#personalization)
[AI composer](#ai-composer)
[Platforms](#platforms)
[Platform settings (iOS, Android, Safari, and more)](#platform-settings)
### Action tab
[Custom Action](#custom-action)
[Rich Media](#rich-media)
[Deep links](#deep-link)
[Send custom data](#custom-data)
[Save to Inbox](#save-to-inbox)
#### Push Title
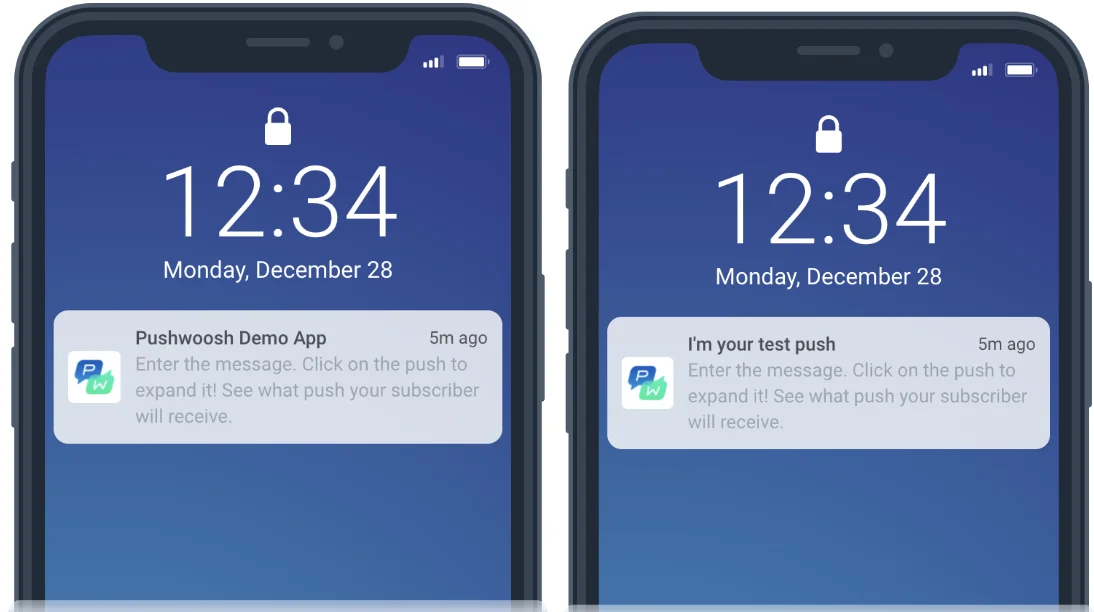
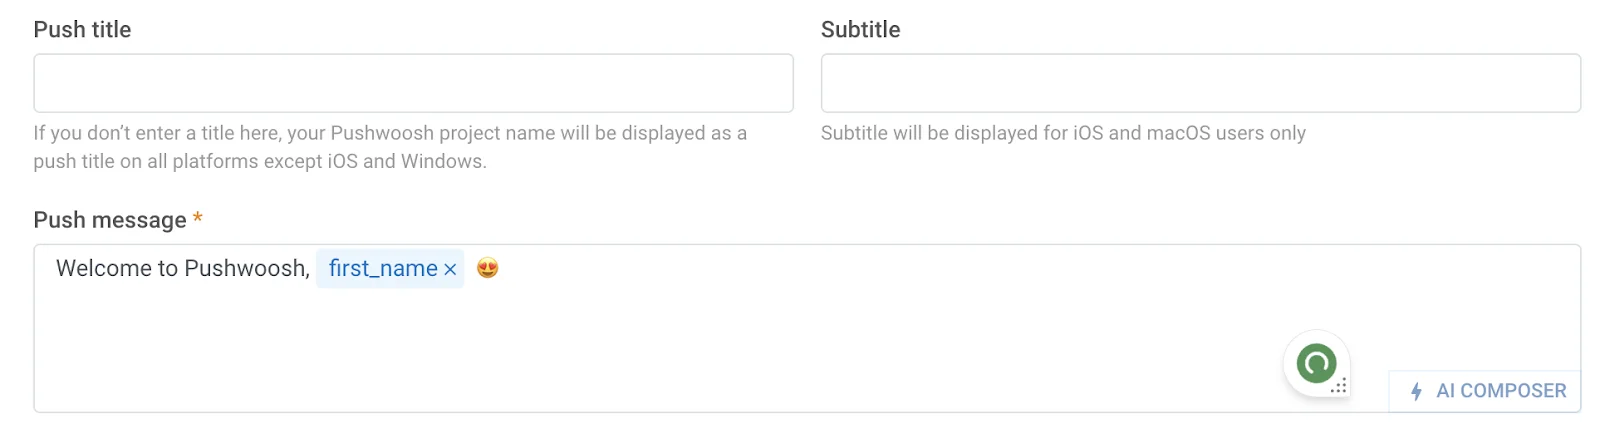
Titles are optional. Add one if you want your title to appear instead of your app name.
#### Subtitle
Subtitle works only for iOS apps. If you add it to Android or any other platform, it will not be visible to your users.
#### Push message
This is the message your users will receive in your push notification. Here, you can enter text and emoji, create a message with our [AI composer](/product/content/push-presets/push-ai-composer), add personalization (such as a greeting with the first name) and localized versions of your message in different languages.
#### Multi-language
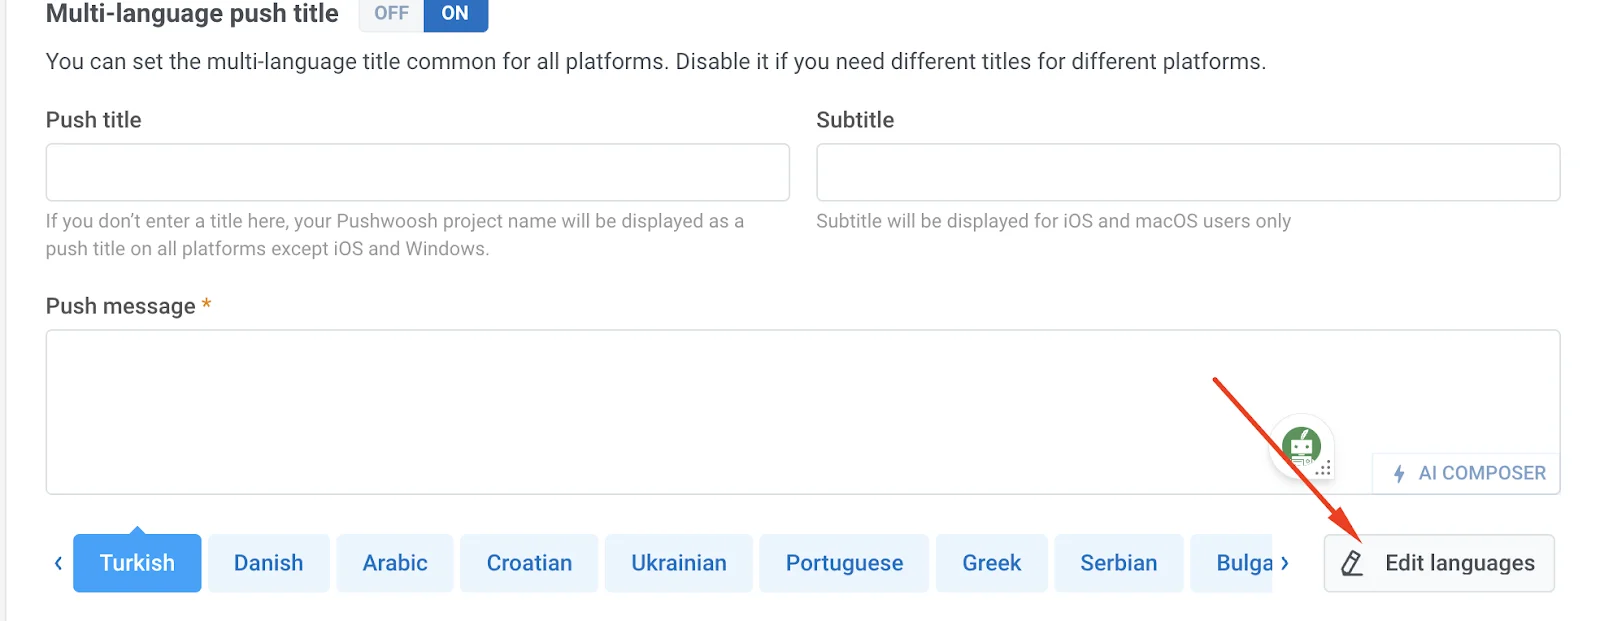
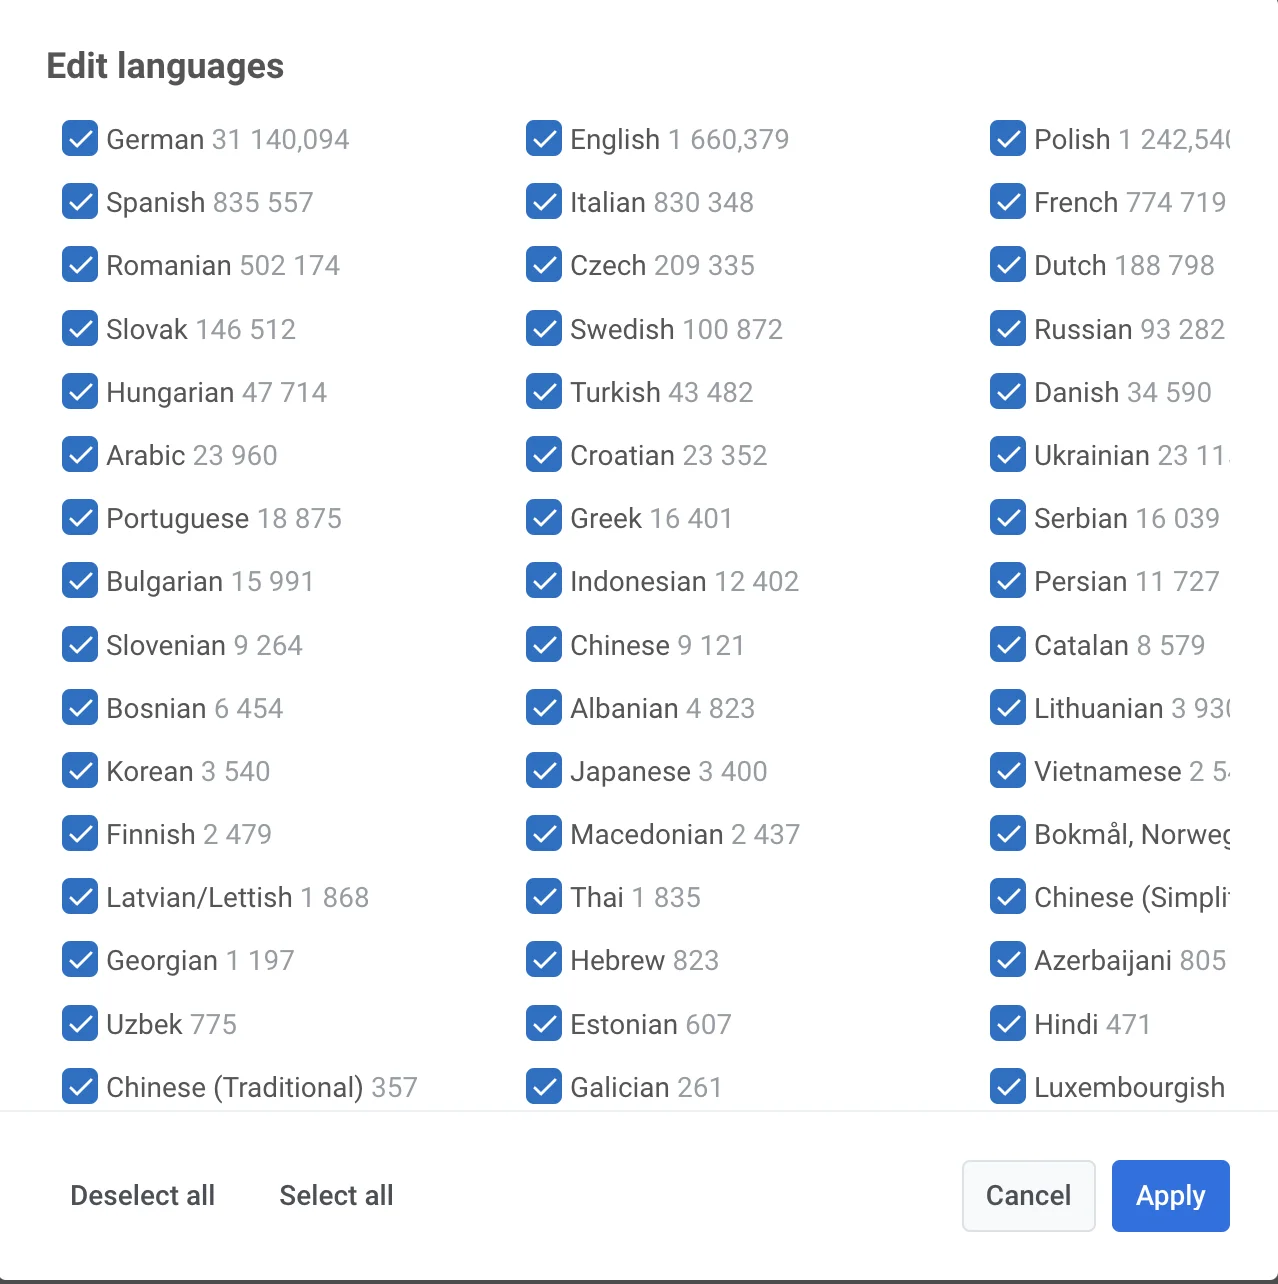
Pushwoosh knows the languages that are set on your users' devices. The language that most subscribers have on their phones is the default one. If you want to send a push in different languages, click **Edit languages** to view all available languages as well as the number of devices next to them.
By default, all languages are selected. Tick off the boxes if you do not want to translate your push into them. Then click **Apply**.
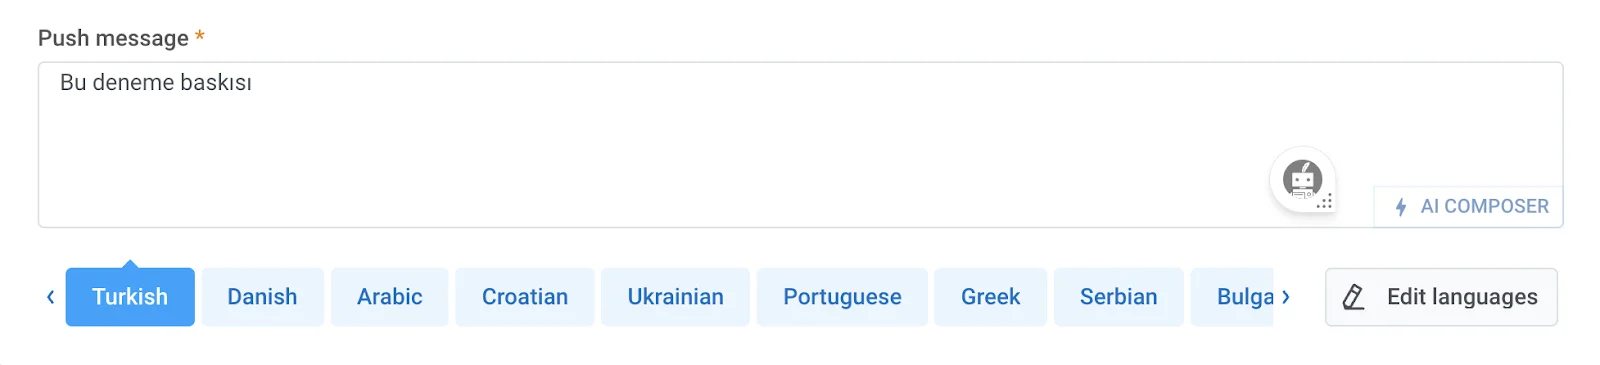
To add a translation to your push notification, choose a language and copy-paste your message in the selected language.
[More about multi-language](/product/personalization/multi-language/).
#### Personalization
Personalization works in push titles, subtitles, messages, headers, icons, and root params. You can customize the Name tag (first name, email ID, city, etc.) and a format modifier ("alexander" or "Alexander").
[Read more about personalization](/product/personalization/dynamic-content#how-to-personalize-the-push).
#### AI composer
Click on the [**AI Composer**](/product/content/push-presets/push-ai-composer) button to quickly generate content for your push message. You only need to enter keywords, and AI will craft a message around them. Click **Copy Content** to insert it into your message and edit if needed.
#### Platforms
In **Targeted platforms**, you define where your push will be sent:
Mobile: iOS, Android, Huawei
Web: Chrome, Firefox, Safari, Windows
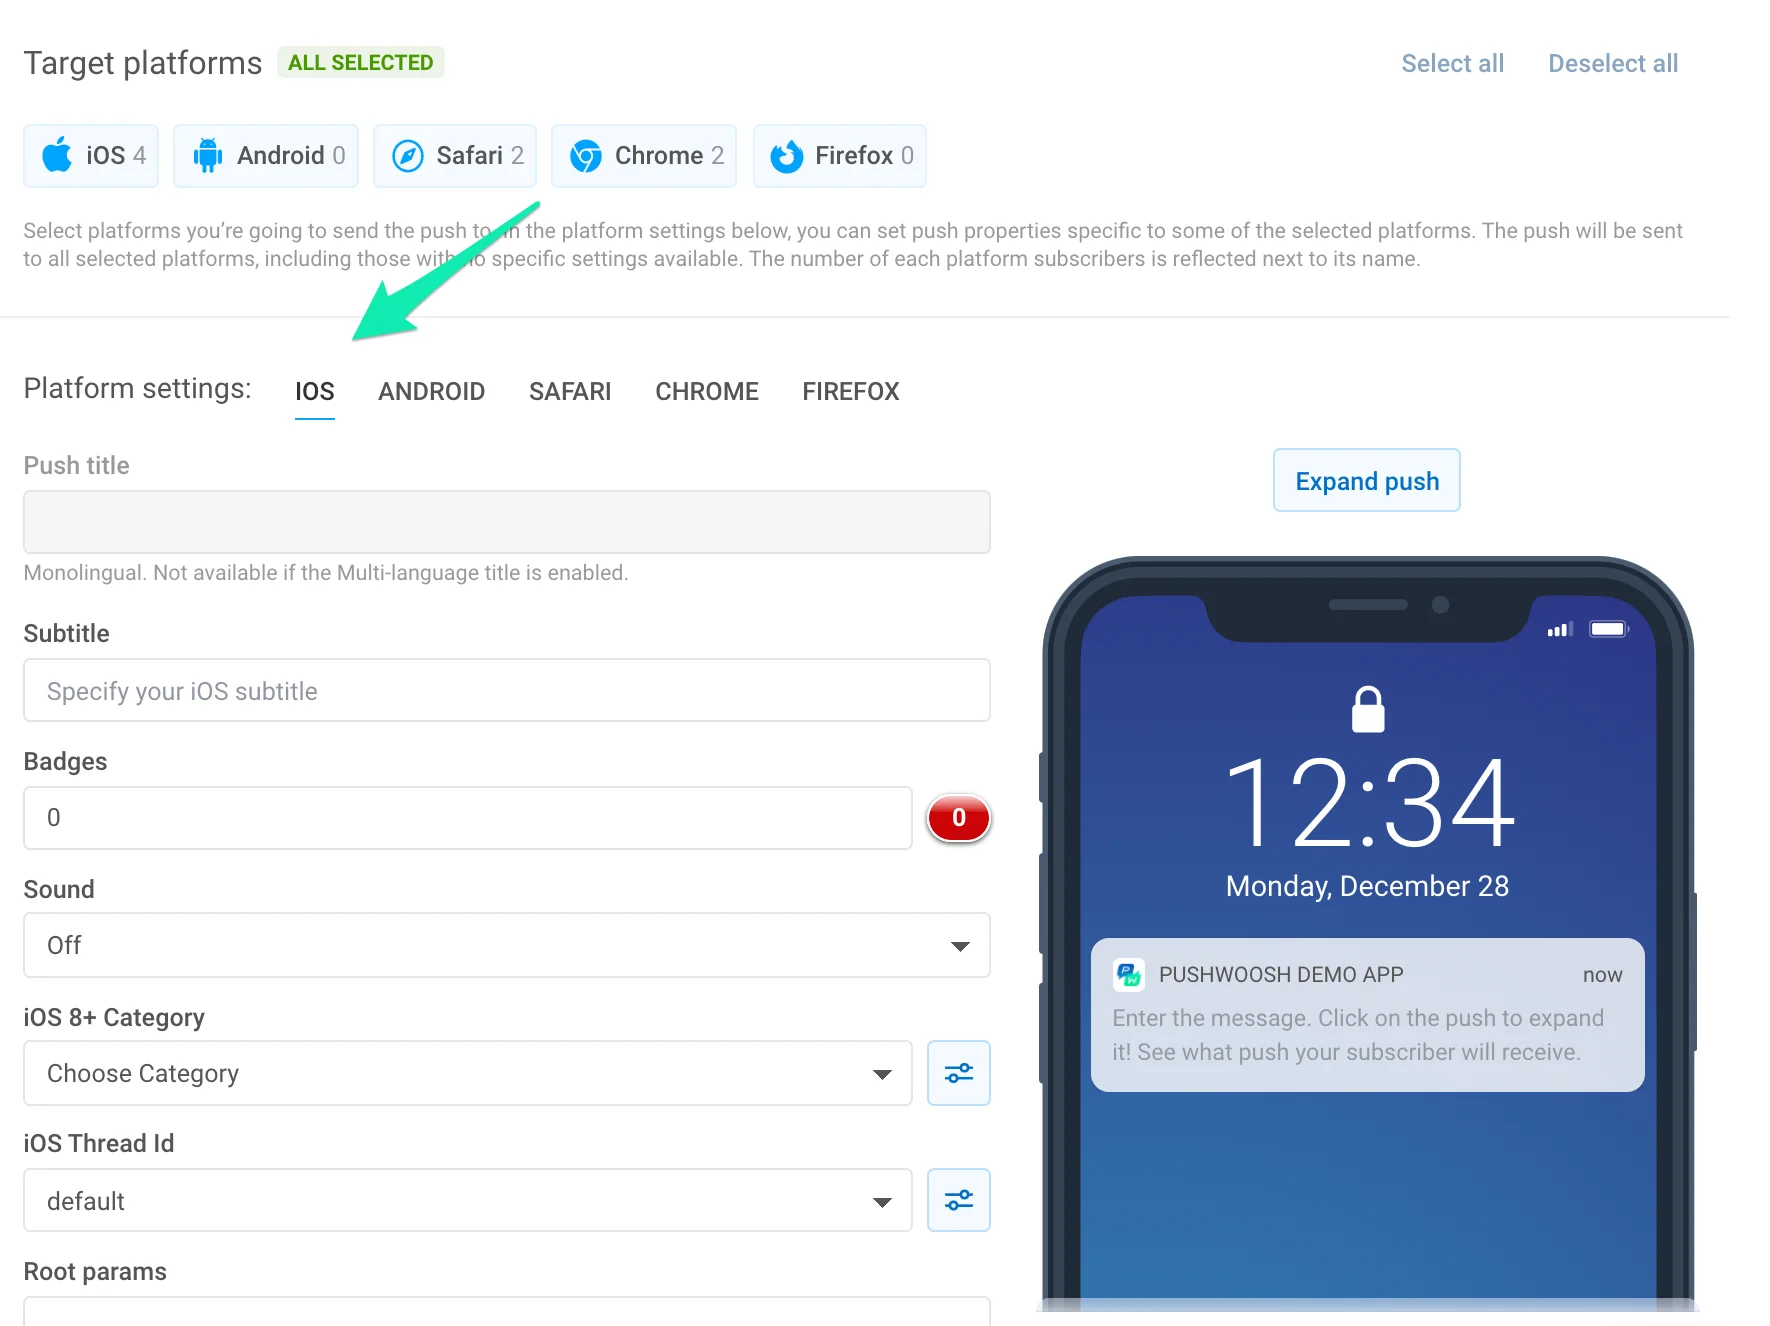
By default, all platforms are selected. To disable sending pushes to a specific platform, click on the name of the platform.
The number next to the platform icon indicates how many devices are configured on this platform. In our example, 2 next to iOS means that the app has 2 iOS users added as subscribers in Pushwoosh.
### Platform settings
Platform-specific options below are available only in this legacy form. The current push content editor does not expose these fields.
#### iOS
**Title.** Specify the custom title of a push notification different from the app name. To boost open rates, personalize the message's title by using the [Dynamic Content](/product/personalization/dynamic-content/). Please note the title is the same for all languages your push is translated to. If you need a multi-language title, enable it in the Message section; the multi-language title is the same for all platforms.
**Subtitle**. Specify the subtitle for the iOS push notification. It'll be displayed between the title and the text of push message. Subtitles can be personalized with the [Dynamic Content](/product/personalization/dynamic-content/) placeholders.
**Badges**. Set the iOS badge number to be sent with your push. Use +n / -n to increment / decrement the current badge value. Sending 0 clears badge from your app's icon.
**Sound**. Specify the custom sound from the main bundle of your application. Make sure to locate the audio file to the root of your iOS project.
**iOS8 Category**. Select a Category with the set of buttons for iOS8.
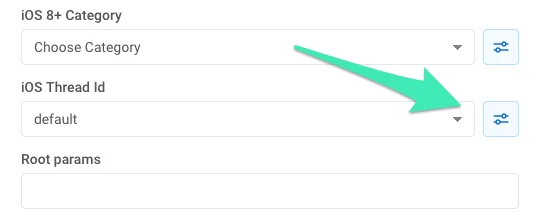
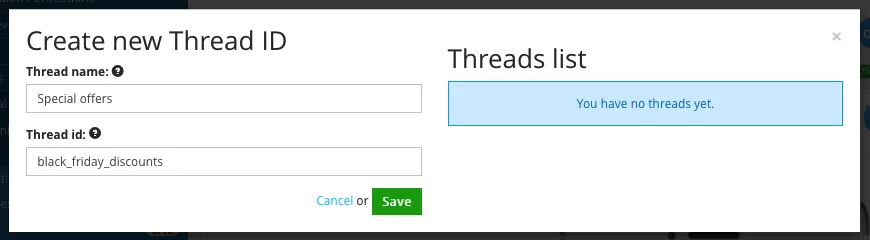
**iOS Thread ID**. Identifier to group related notifications by threads. Messages with the same thread ID are grouped on the lock screen and in the Notification Center. To create a thread ID, click **Edit**.
Enter the name and ID in the window opened, then click **Save**.
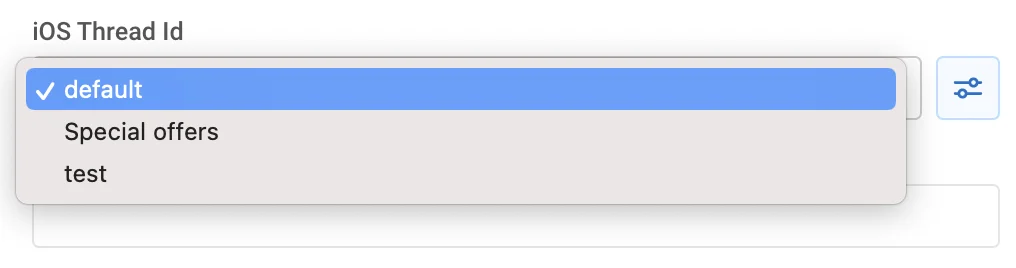
Select the thread ID from the drop-down list:
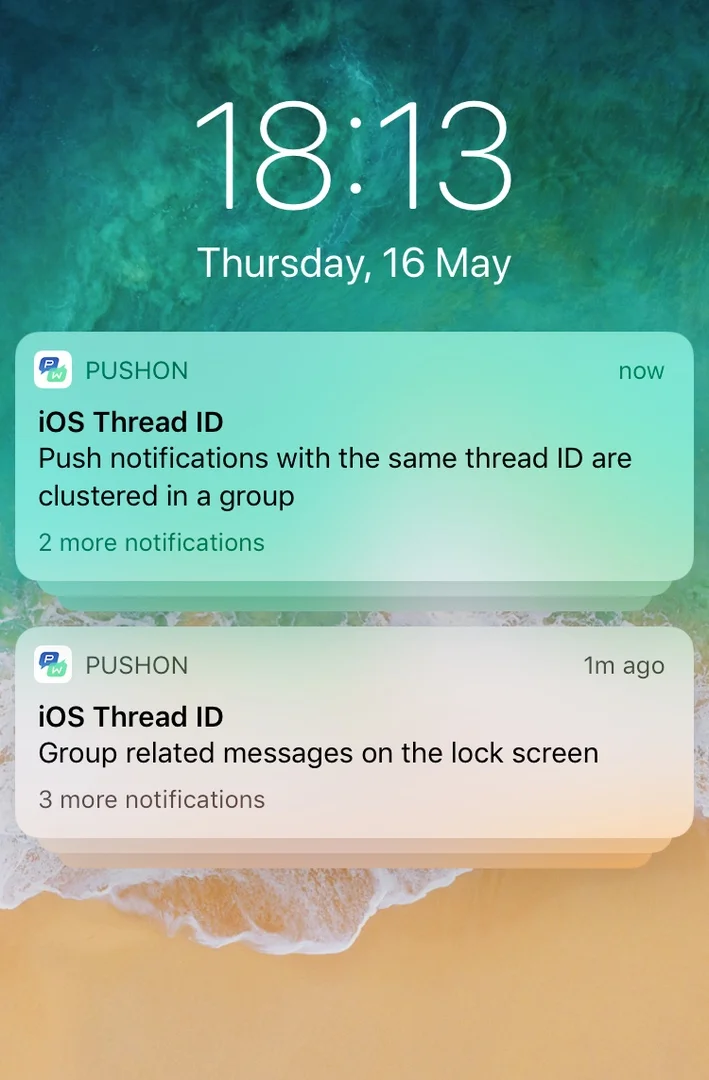
Take a look at how grouped push notifications with two different thread IDs look on a device:
**iOS Root Params**. Root level parameters to the APS dictionary.
**iOS10+ Media attachment**. URL to any video, audio, picture or GIF for iOS rich notification. See [**this guide**](/developer/pushwoosh-sdk/ios-sdk/ios-rich-notifications-integration) for more details on iOS 10 Rich Notifications.
**Send silent notification**. Allows to send a silent push with `content-available` property. When a silent push arrives, iOS wakes up your app in the background, so you can get new data from your server or do background information processing.
**Critical Push**. Stands for iOS critical alerts playing a sound even if Do Not Disturb is on or iPhone is muted. Critical alerts are allowed only for apps entitled by Apple. To enable critical alerts for your app, submit the [**entitlement request at Apple Developer Portal**](https://developer.apple.com/contact/request/notifications-critical-alerts-entitlement/).
**Expiration time**. Sets the period after which the push won't be delivered if the device was offline.
###### iOS 15 notification interruption levels
Starting from iOS 15, the Focus modes are managing notifications interruption levels on users' devices. Using Focus modes, iPhone users can customize their notification preferences in various ways, including setting their own Work, Sleep, and Personal notification modes. These modes can allow notifications from particular apps the user chooses and block others from sending pushes while the mode is enabled. For example, a user might set the Work mode to allow notifications from the work-related apps only.
There are four interruption level options introduced in iOS 15:
###### Active Pushes (default)
Active pushes behave as regular notifications used to behave before iOS 15: the notification is presented immediately when it's received, the screen lights up upon receiving the push, and sounds and vibrations can be played. If the Focus mode blocks the app's notifications, Active Pushes won't break through this mode.
###### Passive Pushes
As for Passive Pushes, the system adds them to the notification list without lighting up the screen or playing a sound. That type of pushes is used for notifications that do not require immediate user's attention, for example, personal recommendations, offers, or updates. These notifications won't break through Focus modes.
###### Time Sensitive Pushes
Time-sensitive interruption level allows for displaying pushes upon delivery even when the Focus mode blocks the app's notifications. These notifications are displayed with a yellow Time-Sensitive banner. However, the user can turn off the ability for time-sensitive notification interruptions. Time Sensitive interruption level should be used for notifications that require immediate user's attention, such as account security or package delivery alerts.
###### Critical Pushes
Critical interruption level pushes are displayed by the system immediately, even when Do Not Disturb is active. These pushes light up the screen and bypass the mute switch to play a sound. Critical pushes should be used for critical cases such as severe weather or safety alerts and require an approved entitlement.
#### Android
**Push title**. Specify your Android notification title here. Personalize the title with the [Dynamic Content](/product/personalization/dynamic-content/) placeholders. Please note the title is the same for all languages your push is translated to. If you need a multi-language title, enable it in the Message section; the multi-language title is the same for all platforms.
**Badges**. Specify the badge value; use +n to increment.
**Sound**. Specify the custom sound filename in the "res/raw" folder of your application. Omit the file extension.
**LED**. Choose LED color, the device will do its best approximation.
**Image Background Color**. Icon background color on Android Lollipop.
**Force Vibration**. Vibrate on arrival; use for urgent messages only.
**Icon**. Path to the notification icon. Insert the [Dynamic Content](/product/personalization/dynamic-content/) placeholders to personalize the icon.
**Banner**. Enter image URL here. Image must be ≤ 450px wide, \~2:1 aspect, and it will be center-cropped. Insert the [Dynamic Content](/product/personalization/dynamic-content/) placeholders to personalize the banner.
**Android root params**. Root level parameters for the Android payload, custom key-value object.
**Delivery priority**. Enables notification's delivery when the device is in the power saving mode. Notifications with **high** delivery priority will be delivered nevertheless, while **normal** delivery priority means that the notification will be delivered after the power saving mode is turned off.
**Importance level**. Sets the "importance" parameter for devices with Android 8.0 and higher, as well as the "priority" parameter for devices with Android 7.1 and lower. This parameter with valid values from -2 to 2 establishes the interruption level of a notification channel or a particular notification.
* Urgent importance level (1-2) - the notification makes a sound and appears as a heads-up notification
* High importance level (0) - the notification makes a sound and appears in the status bar
* Medium importance level (-1) - the notification makes no sound but still appears in the status bar
* Low importance level (-2) - the notification makes no sound and does not appear in the status bar
**Expiration time**. Set the period after which the push won't be delivered if the device was offline.
**Notifications Channels**. Starting from Android 8.0, you can create [Notification Channels](/developer/pushwoosh-sdk/android-sdk/notification-channels). To create a channel, there are two steps you need to do:
1. Set up the channel's configuration. Specify all required parameters, such as sound, vibration, LED, and priority;
2. Specify channel's name by adding the following key-value pair to Android root params:
```json
{"pw_channel":"NAME OF CHANNEL"}
```
To send a notification to an existing channel, you need to specify the very same key-value pair in Android root params.
It is not possible to change the channel's parameters after it's created on the device.
#### Safari
**Title**. Specify your Safari notification title here. This field is required, otherwise the push will not be sent. Personalizing the Safari push title with [Dynamic Content](/product/personalization/dynamic-content/), you boost open rates and increase audience loyalty levels.
Please note the title is the same for all languages your push is translated to. If you need a multi-language title, enable it in the Message section; the multi-language title is the same for all platforms.
**Action button label (optional)**. Specify custom action button label here. If not set, "Show" will be displayed as a default.
**URL field**. Replace placeholder with part of URL you specified in the app's Safari configuration. Users will be redirected to this URL in Safari upon opening your notification.
**Expiration time**. Set the period after which the push won't be delivered if the device was offline.
#### Chrome
**Icon**. Specify icon name from your extension resources or full path URL. Personalizable with [Dynamic Content](/product/personalization/dynamic-content/) placeholders.
**Title**. Specify Chrome notification title. Personalizable with [Dynamic Content](/product/personalization/dynamic-content/) placeholders.
Please note the title is the same for all languages your push is translated to. If you need a multi-language title, enable it in the Message section; the multi-language title is the same for all platforms.
**Large image**. Add a large image to your notification by specifying the full path URL to the image.
**Chrome root params**. Set parameters specific for pushes sent to Chrome. For example, to send a regular link to Chrome platform in parallel with a [Deep Link](/product/messaging-channels/push-notifications/advanced-push-features/deep-linking/) sent to mobile devices, enter the link here as follows:
```json
{"l": "http://example.com"}
```
Chrome root params are prioritized over general push parameters for push notifications sent to Chrome. So Chrome subscribers will get the link you specify here while users with mobile devices will get the Deep Link.
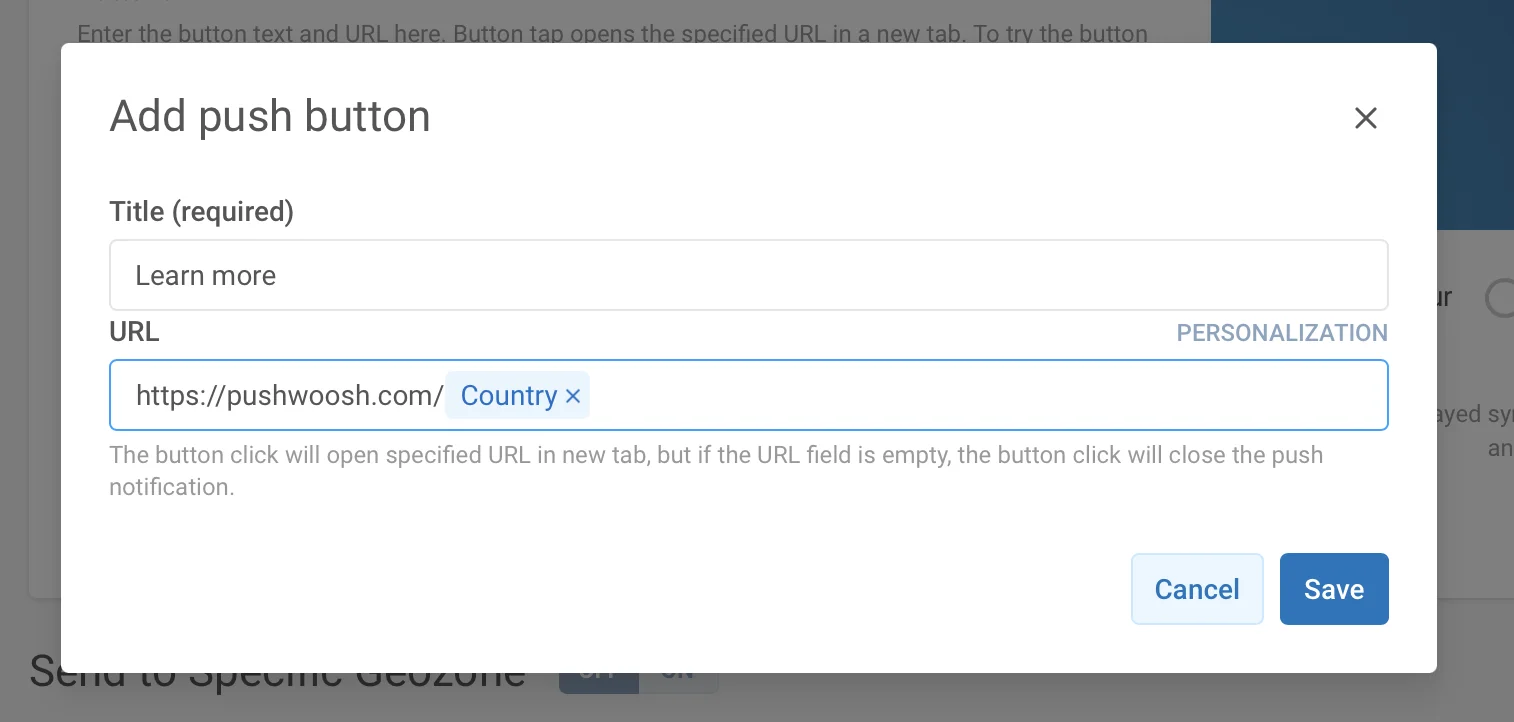
**Buttons**. Create custom buttons for your pushes. Specify the button Title and the URL to be opened (it's optional). If URL is omitted, the button being pressed closes the push.
For button URLs, personalization is available for greater relevance to your users' interests, preferences, and activities. The dynamic data (Tag values assigned to a device) is inserted into the URL just as any Dynamic Content.
While entering the URL, click the **Personalization** button next to the input field.
Next, select a tag you'd like to use for personalizing the page the user will go to once pressing the button. For example, to take a user to your site's section based on where they're from, add the Country tag to the URL. Thus, for instance, a user from the United States who presses the Learn more button will go to https://www.pushwoosh.com.
**Duration**. Specify time for push to be displayed. Set to infinity, if you would like to display notification until user interacts with it.
**Expiration time**. Set the period after which the push won't be delivered if the device was offline.
#### Firefox
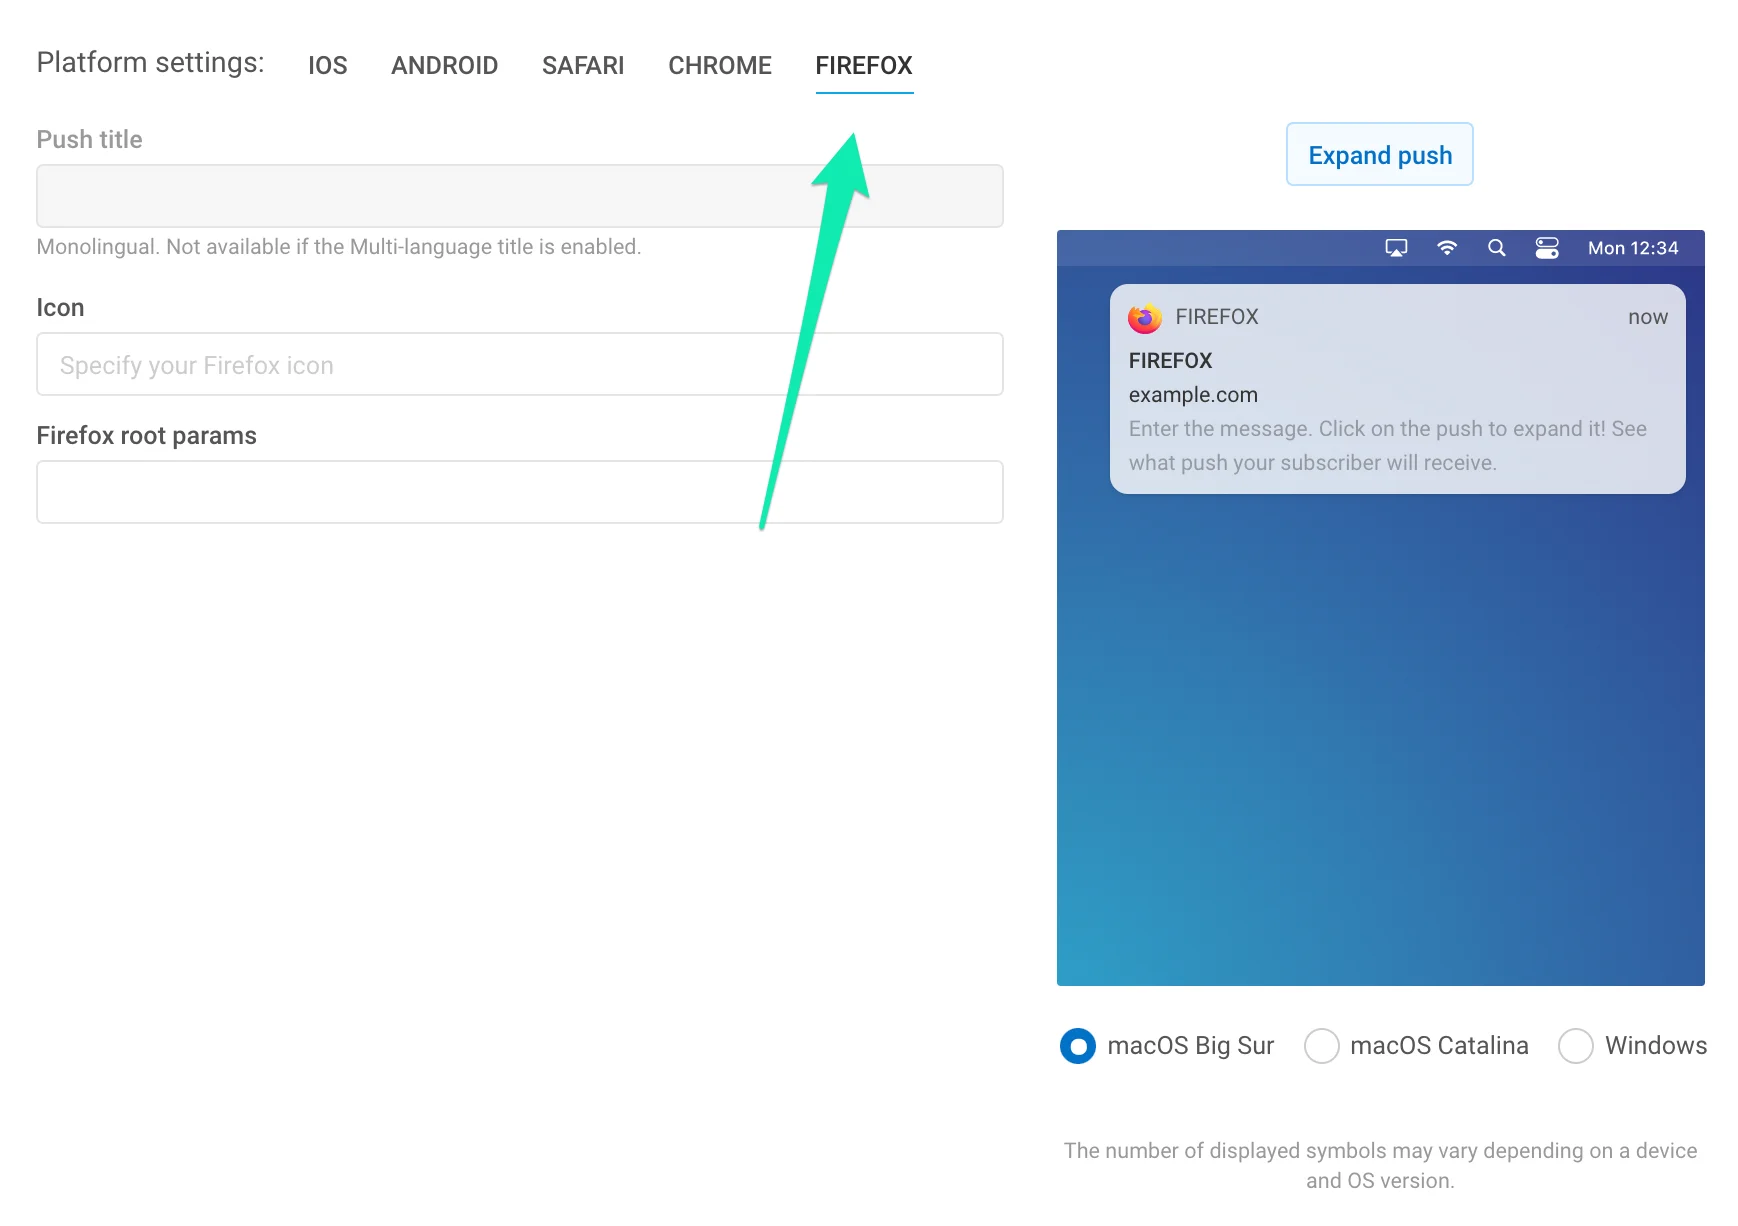
**Icon**. Specify the icon name in the resources of your extension, or the full path URL. Personalizable with [Dynamic Content](/product/personalization/dynamic-content/) placeholders.
**Title**. Specify Firefox notification title. Personalizable with [Dynamic Content](/product/personalization/dynamic-content/) placeholders.
Please note the title is the same for all languages your push is translated to. If you need a multi-language title, enable it in the Message section; the multi-language title is the same for all platforms.
**Firefox root params**. Set parameters specific for pushes sent to Firefox. For example, to send a regular link to Firefox platform in parallel with a Deep Link sent to mobile devices, enter the link here as follows:
```json
{l: "http://example.com"}
```
Firefox root params are prioritized over general push parameters for push notifications sent to Firefox. So Firefox subscribers will get the link you specify here while users with mobile devices will get the Deep Link.
#### Windows 8, 10
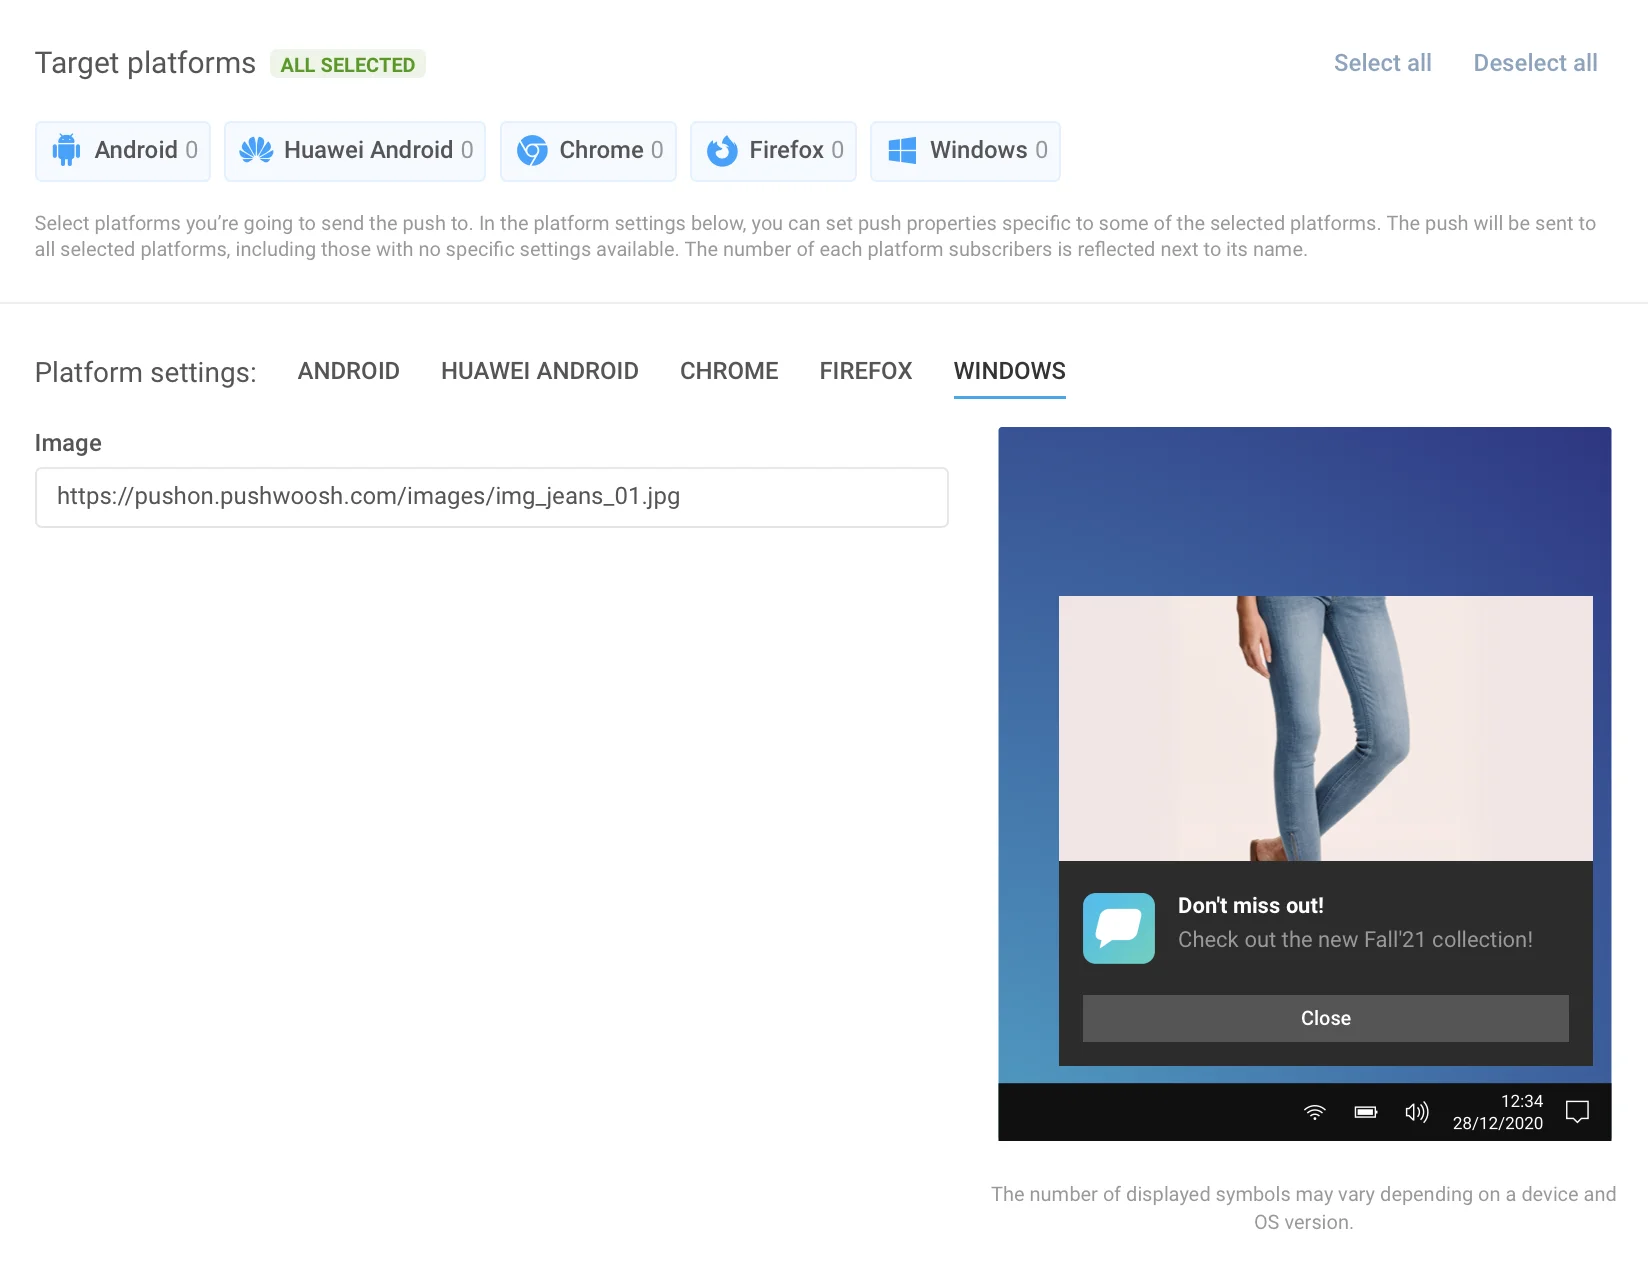
Windows 8 provides over 60 toast, tile, raw and badge templates, so we added only toast templates to our GUI since they're the most popular. Tile, raw and badge templates are available via Remote API only.
**First, choose the template from the list on the right** to unlock corresponding inputs. Then you can input content for all languages you need. The number of fields in Windows 8 push templates differs, so we had to separate it from all other platforms. It has its own set of language tabs, used just like the general language tabs.
#### Amazon
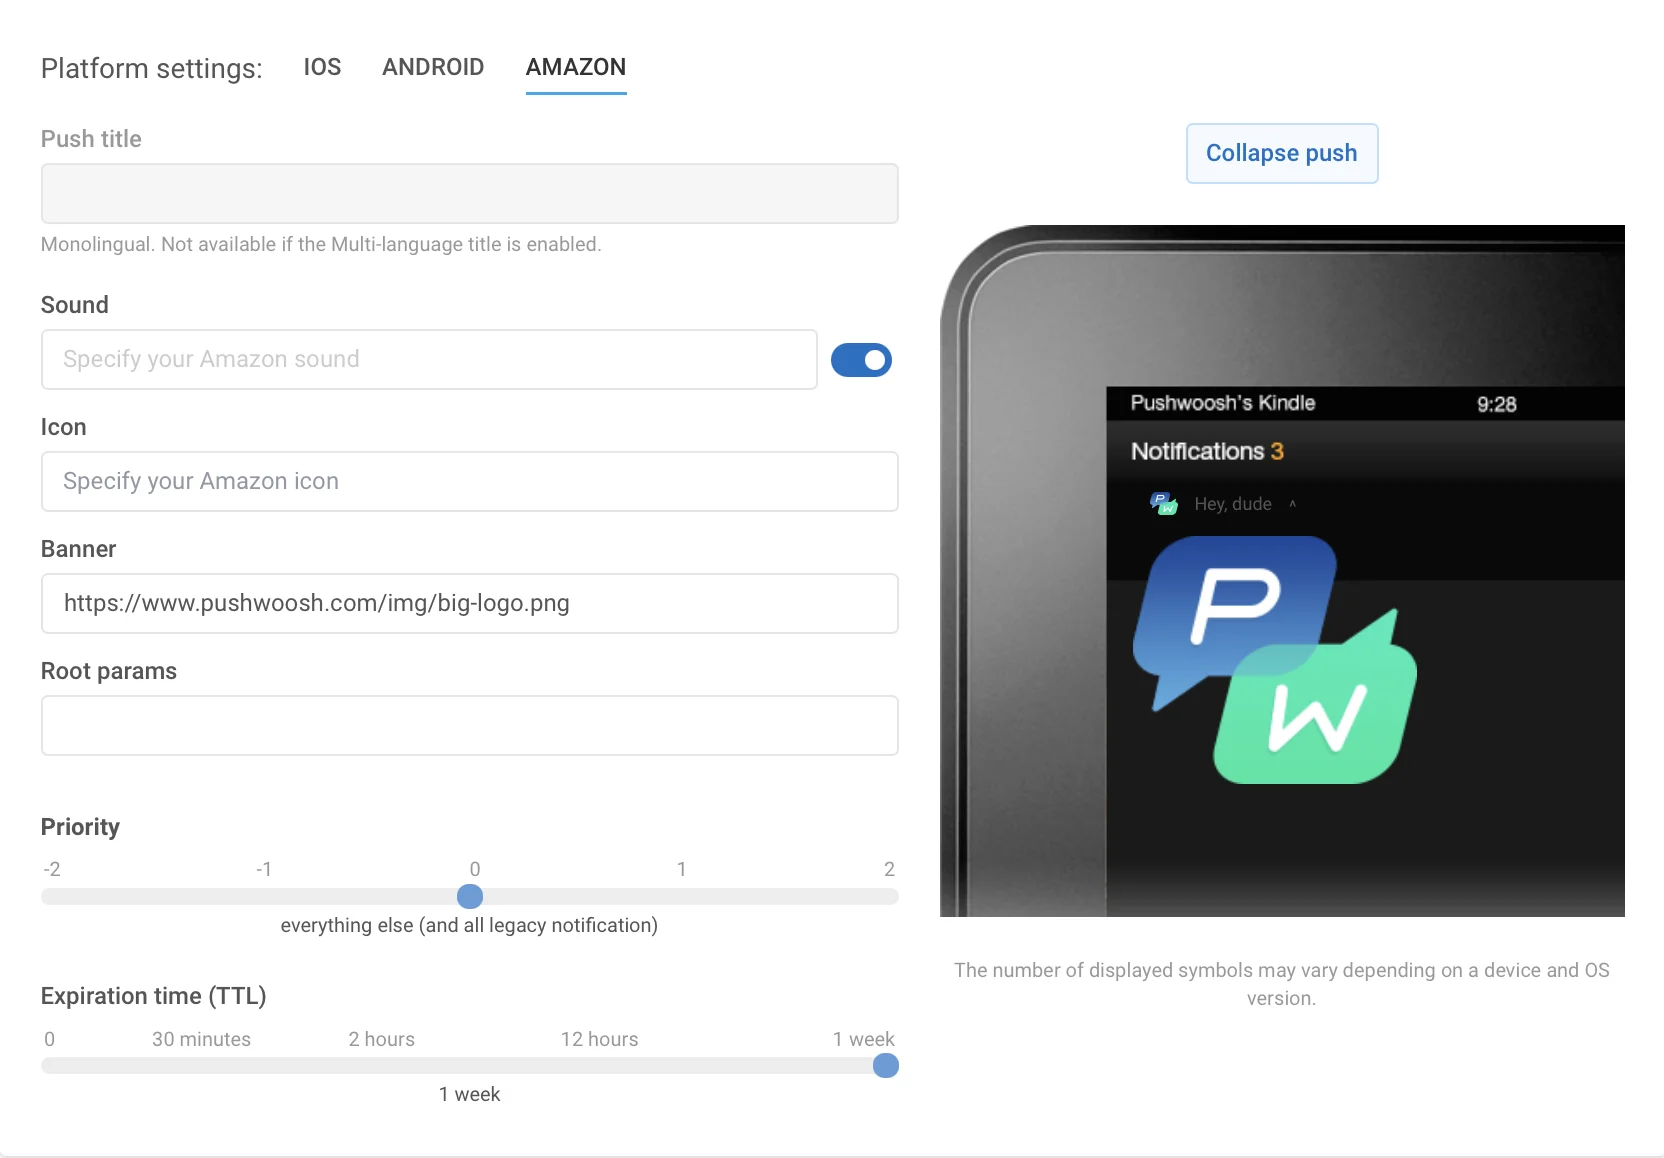
**Header**. Specify your Amazon notification header here.
**Sound**. Specify custom sound filename in the "res/raw" folder of your application. Omit the file extension.
**Icon**. Path to notification icon.
**Banner**. Full path to notification banner.
**Expiration time**. Period after which the push won't be delivered if the device was offline.
### Action tab
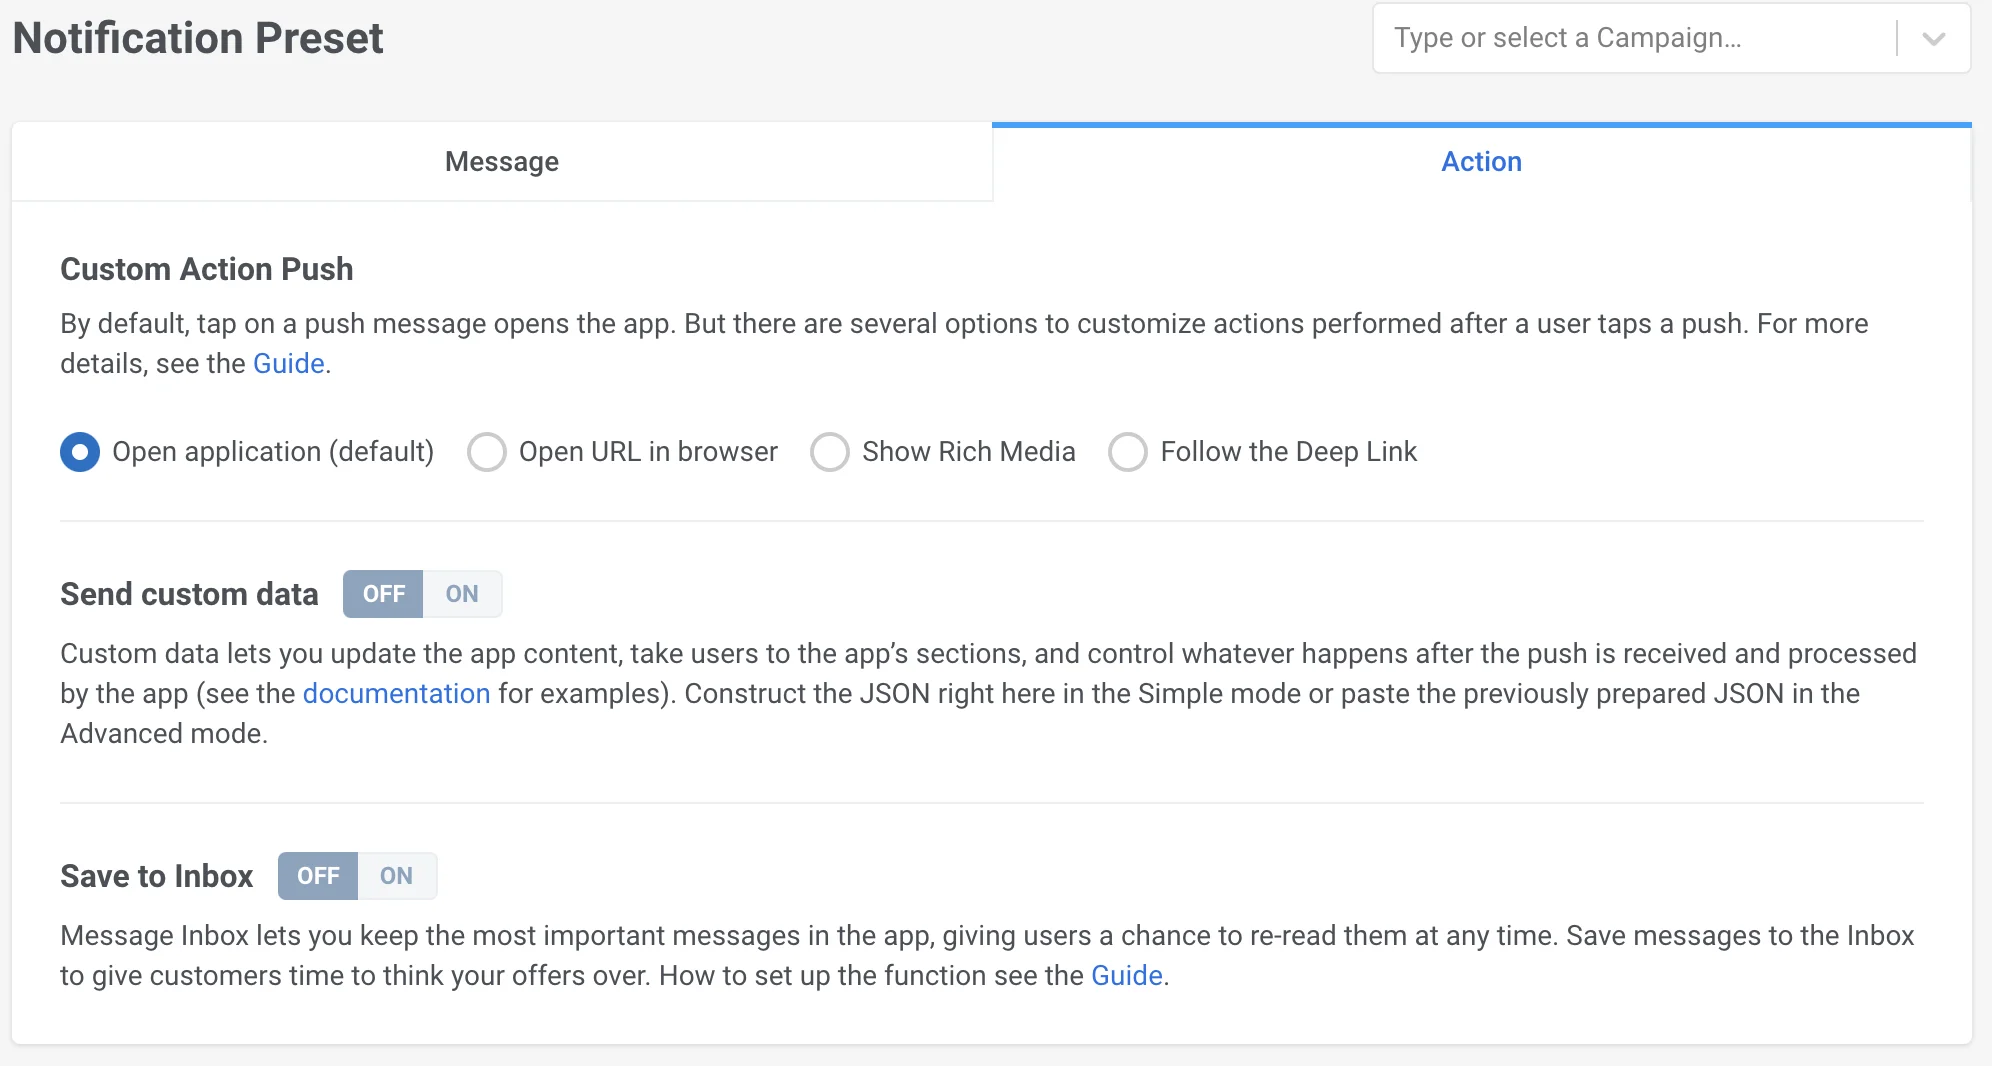
By default, tap on a push message opens the app. You can customize actions performed after a user taps a push:
* Open a URL in the user's browser,
* Take users directly to specific in-app pages,
* Or catch their attention with rich content.
#### Custom Action
**URL**
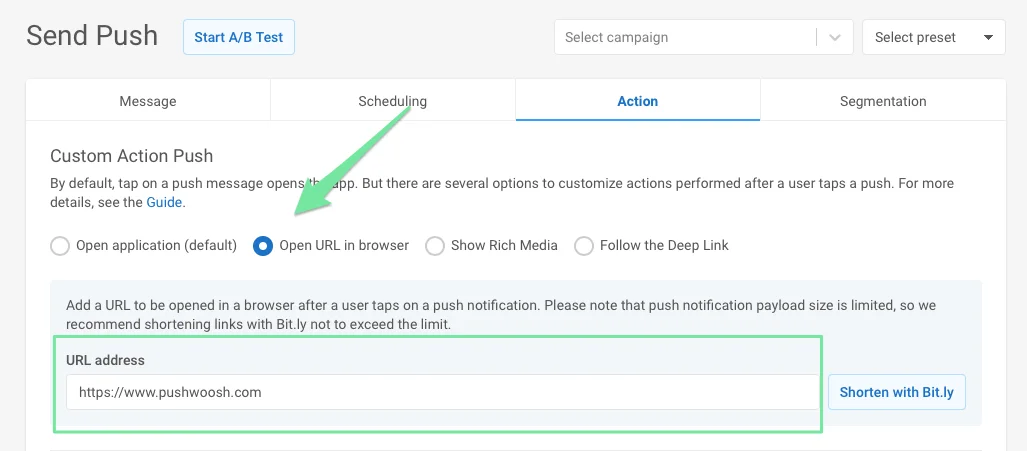
Add a link that will open in a browser after a user taps a push notification. Choose the URL option and insert a URL in the corresponding field. Please note that push notification payload size is limited, so consider using a URL shortener to stay within the limit.
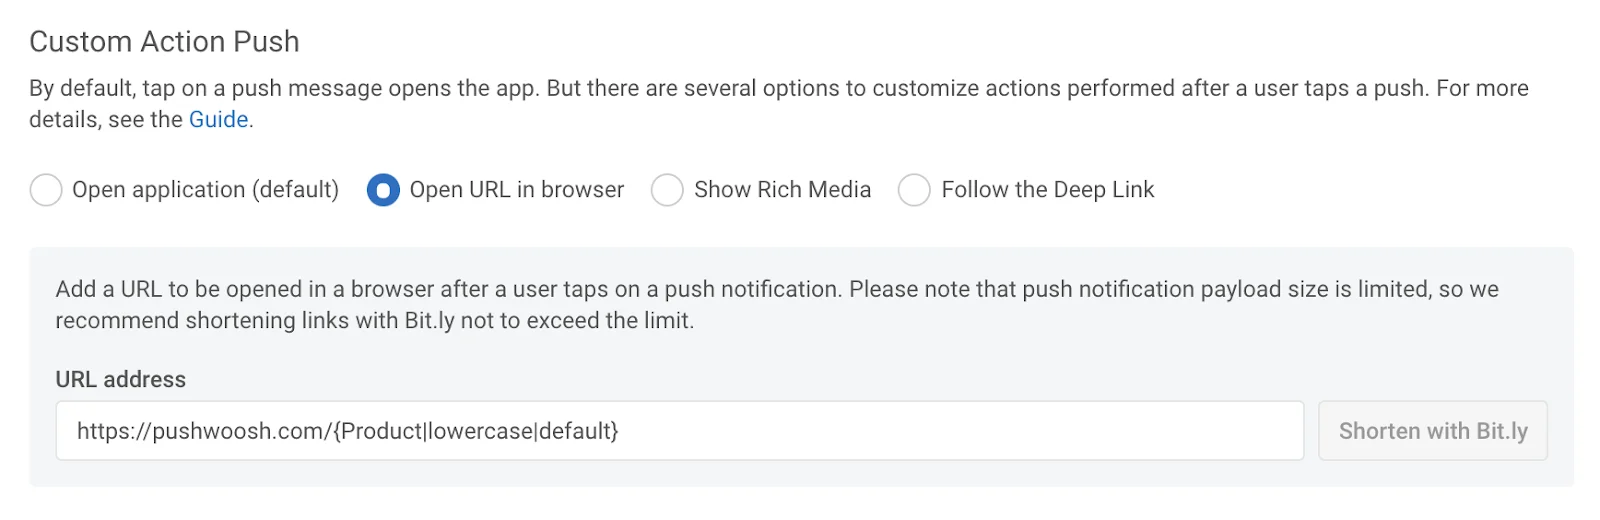
For URL, dynamic linking is available. You can add Dynamic Content to the web address you specify in the URL field so that the web page opens when a user taps on a push, taking into account the user's Tag values. For example, you can show a special offer based on the last product a user bought or take them to a feed of news similar to what they have read recently.
To add a dynamic URL to your push message, place the Dynamic Content at the end of the URL (the part after the / sign):
```text
https://example.com/{TagName|lowercase|default}
```
Use the same syntax as for Dynamic Content in push text, title, etc.:
```text
{Tag|format_modifier|default_value}
```
Refer to the [Dynamic Content](/product/personalization/dynamic-content/) guide for details.
#### Rich Media
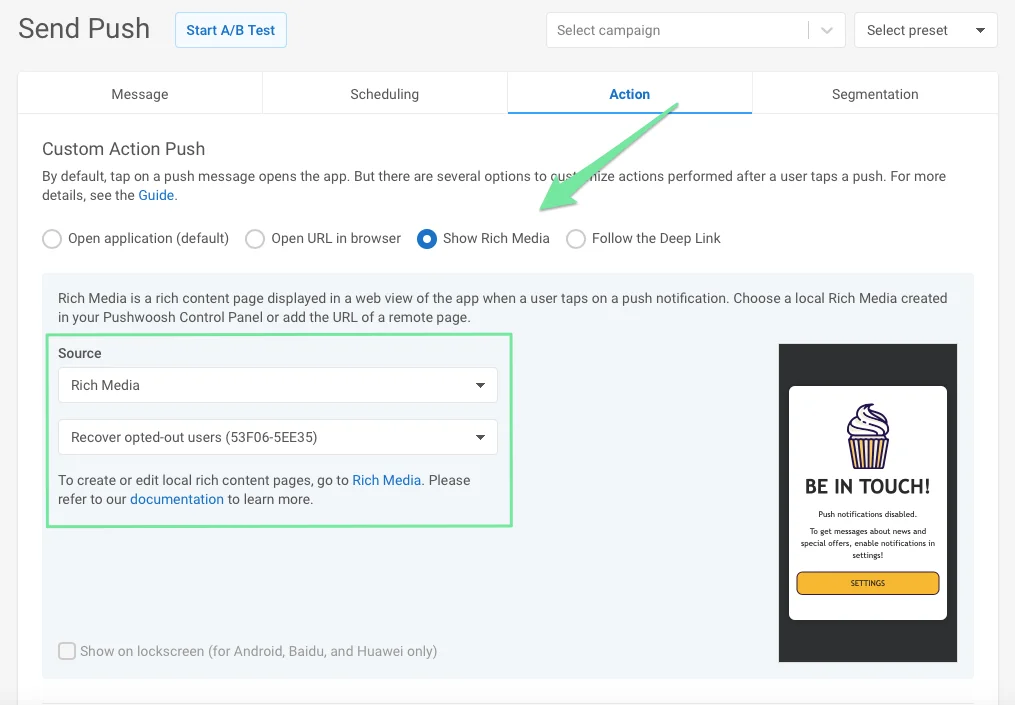
Rich Media is the content displayed while users are in the app. It can contain images, videos, fillable forms, and other elements. If users click on it, it opens to attach images, videos, CTAs, or other interactive forms. To learn more about creating and editing Rich Media, refer to [this guide](/product/content/rich-media/).
To open one of the Rich Media pages created in your account, select the **Show Rich Media** option and choose a Rich Media to be shown. To open a remote rich content page, select the **Remote Page** source and insert the rich page URL.
For Android devices, you can toggle the **Show on lockscreen** option to display Rich Media right on the lock screen of the user's device.
#### Deep Link
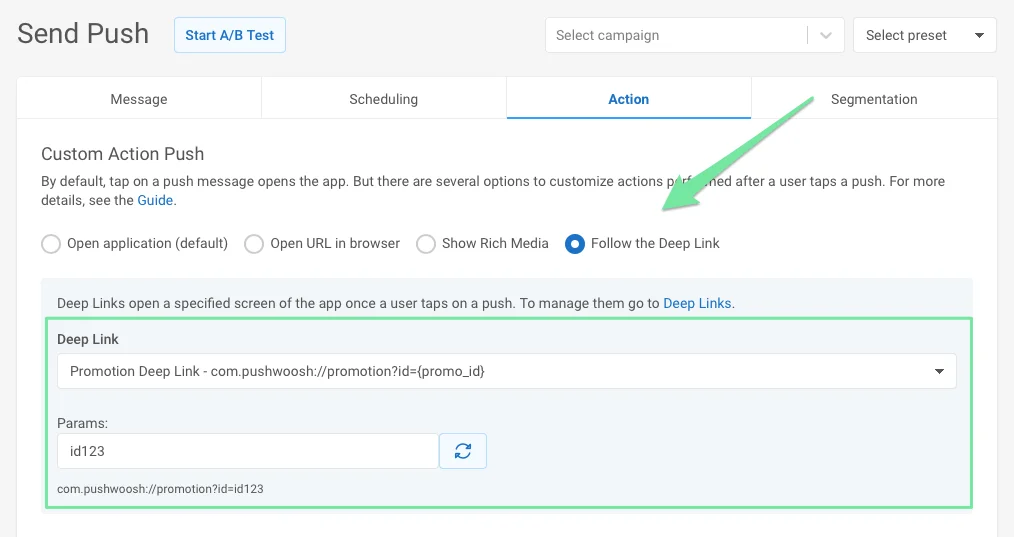
With Deep Links, you can take users directly to new in-app content, promo pages, special offers, etc. In Presets, you can only add deep links you configured in settings.
[Please follow the guide to set up Deep Links](/product/messaging-channels/push-notifications/advanced-push-features/deep-linking).
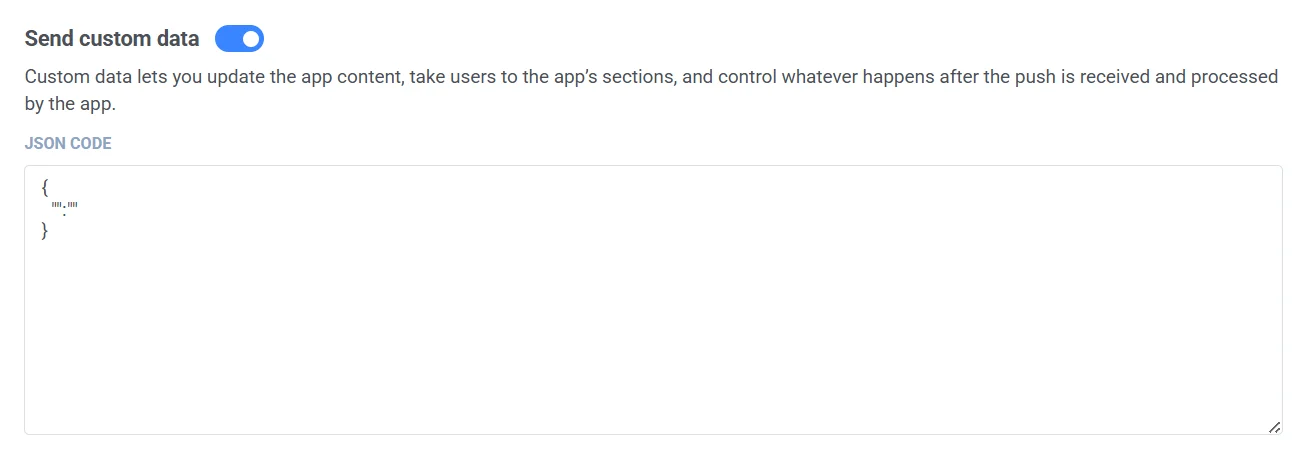
#### Custom Data
Custom Data is a JSON object describing actions to be performed, for example:
```json
{"key": "value"}
```
You can add Custom Data to your push message to specify additional push parameters.
Toggle **Send custom Data** on. Insert JSON data into the **JSON Code** field.
To learn more about Custom Data, refer to our [guide](/product/messaging-channels/push-notifications/advanced-push-features/using-custom-data/).
#### Save to Inbox
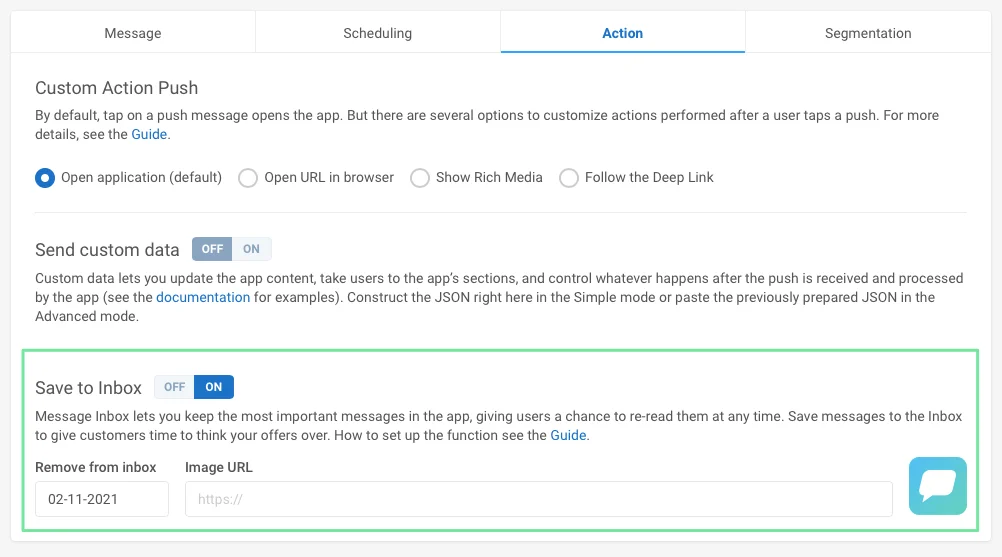
To keep the message in users' inbox, mark the checkbox and set the date to remove the push. By default, messages are removed from inbox on the next day after they are sent. To set an icon to be shown next to the message in the inbox, specify the image URL in the corresponding field.
Message will be removed from Inbox at 00:00:01 UTC of the date specified, so the previous date is the last day a user can see the message in their Inbox.
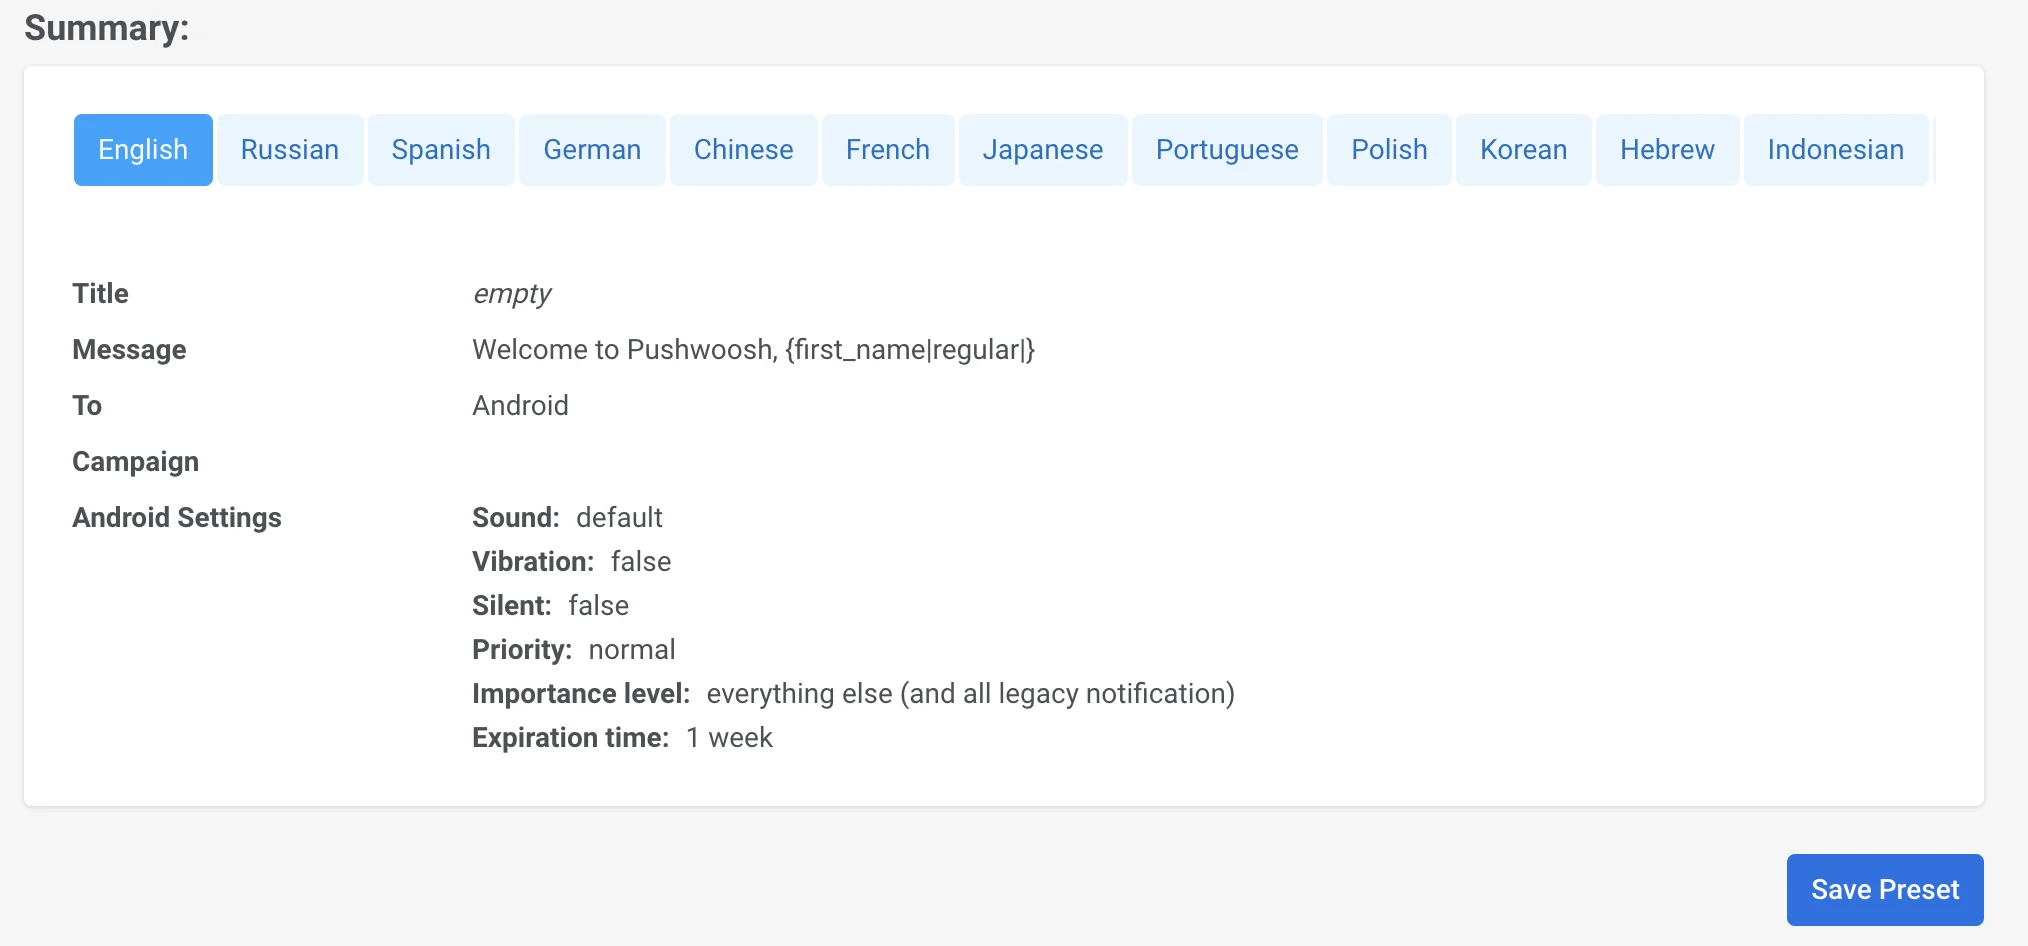
Once you have configured all the parameters, click **Save Preset**.
You can then [send your push to the audience](/product/messaging-channels/push-notifications/send-push-notifications/one-time-push).
 ### Message tab
[Push Title](#push-title)
[Subtitle](#subtitle)
[Push message](#push-message)
[Multi-language](#multi-language)
[Personalization](#personalization)
[AI composer](#ai-composer)
[Platforms](#platforms)
[Platform settings (iOS, Android, Safari, and more)](#platform-settings)
### Action tab
[Custom Action](#custom-action)
[Rich Media](#rich-media)
[Deep links](#deep-link)
[Send custom data](#custom-data)
[Save to Inbox](#save-to-inbox)
#### Push Title
Titles are optional. Add one if you want your title to appear instead of your app name.
### Message tab
[Push Title](#push-title)
[Subtitle](#subtitle)
[Push message](#push-message)
[Multi-language](#multi-language)
[Personalization](#personalization)
[AI composer](#ai-composer)
[Platforms](#platforms)
[Platform settings (iOS, Android, Safari, and more)](#platform-settings)
### Action tab
[Custom Action](#custom-action)
[Rich Media](#rich-media)
[Deep links](#deep-link)
[Send custom data](#custom-data)
[Save to Inbox](#save-to-inbox)
#### Push Title
Titles are optional. Add one if you want your title to appear instead of your app name.
 #### Subtitle
Subtitle works only for iOS apps. If you add it to Android or any other platform, it will not be visible to your users.
#### Push message
This is the message your users will receive in your push notification. Here, you can enter text and emoji, create a message with our [AI composer](/product/content/push-presets/push-ai-composer), add personalization (such as a greeting with the first name) and localized versions of your message in different languages.
#### Subtitle
Subtitle works only for iOS apps. If you add it to Android or any other platform, it will not be visible to your users.
#### Push message
This is the message your users will receive in your push notification. Here, you can enter text and emoji, create a message with our [AI composer](/product/content/push-presets/push-ai-composer), add personalization (such as a greeting with the first name) and localized versions of your message in different languages.
 #### Multi-language
Pushwoosh knows the languages that are set on your users' devices. The language that most subscribers have on their phones is the default one. If you want to send a push in different languages, click **Edit languages** to view all available languages as well as the number of devices next to them.
#### Multi-language
Pushwoosh knows the languages that are set on your users' devices. The language that most subscribers have on their phones is the default one. If you want to send a push in different languages, click **Edit languages** to view all available languages as well as the number of devices next to them.
 By default, all languages are selected. Tick off the boxes if you do not want to translate your push into them. Then click **Apply**.
 To add a translation to your push notification, choose a language and copy-paste your message in the selected language.
 [More about multi-language](/product/personalization/multi-language/).
#### Personalization
Personalization works in push titles, subtitles, messages, headers, icons, and root params. You can customize the Name tag (first name, email ID, city, etc.) and a format modifier ("alexander" or "Alexander").
[Read more about personalization](/product/personalization/dynamic-content#how-to-personalize-the-push).
#### AI composer
Click on the [**AI Composer**](/product/content/push-presets/push-ai-composer) button to quickly generate content for your push message. You only need to enter keywords, and AI will craft a message around them. Click **Copy Content** to insert it into your message and edit if needed.
#### Platforms
In **Targeted platforms**, you define where your push will be sent:
Mobile: iOS, Android, Huawei
Web: Chrome, Firefox, Safari, Windows
By default, all platforms are selected. To disable sending pushes to a specific platform, click on the name of the platform.
The number next to the platform icon indicates how many devices are configured on this platform. In our example, 2 next to iOS means that the app has 2 iOS users added as subscribers in Pushwoosh.
### Platform settings
Platform-specific options below are available only in this legacy form. The current push content editor does not expose these fields.
#### iOS
[More about multi-language](/product/personalization/multi-language/).
#### Personalization
Personalization works in push titles, subtitles, messages, headers, icons, and root params. You can customize the Name tag (first name, email ID, city, etc.) and a format modifier ("alexander" or "Alexander").
[Read more about personalization](/product/personalization/dynamic-content#how-to-personalize-the-push).
#### AI composer
Click on the [**AI Composer**](/product/content/push-presets/push-ai-composer) button to quickly generate content for your push message. You only need to enter keywords, and AI will craft a message around them. Click **Copy Content** to insert it into your message and edit if needed.
#### Platforms
In **Targeted platforms**, you define where your push will be sent:
Mobile: iOS, Android, Huawei
Web: Chrome, Firefox, Safari, Windows
By default, all platforms are selected. To disable sending pushes to a specific platform, click on the name of the platform.
The number next to the platform icon indicates how many devices are configured on this platform. In our example, 2 next to iOS means that the app has 2 iOS users added as subscribers in Pushwoosh.
### Platform settings
Platform-specific options below are available only in this legacy form. The current push content editor does not expose these fields.
#### iOS
 **Title.** Specify the custom title of a push notification different from the app name. To boost open rates, personalize the message's title by using the [Dynamic Content](/product/personalization/dynamic-content/). Please note the title is the same for all languages your push is translated to. If you need a multi-language title, enable it in the Message section; the multi-language title is the same for all platforms.
**Subtitle**. Specify the subtitle for the iOS push notification. It'll be displayed between the title and the text of push message. Subtitles can be personalized with the [Dynamic Content](/product/personalization/dynamic-content/) placeholders.
**Badges**. Set the iOS badge number to be sent with your push. Use +n / -n to increment / decrement the current badge value. Sending 0 clears badge from your app's icon.
**Sound**. Specify the custom sound from the main bundle of your application. Make sure to locate the audio file to the root of your iOS project.
**iOS8 Category**. Select a Category with the set of buttons for iOS8.
**iOS Thread ID**. Identifier to group related notifications by threads. Messages with the same thread ID are grouped on the lock screen and in the Notification Center. To create a thread ID, click **Edit**.
**Title.** Specify the custom title of a push notification different from the app name. To boost open rates, personalize the message's title by using the [Dynamic Content](/product/personalization/dynamic-content/). Please note the title is the same for all languages your push is translated to. If you need a multi-language title, enable it in the Message section; the multi-language title is the same for all platforms.
**Subtitle**. Specify the subtitle for the iOS push notification. It'll be displayed between the title and the text of push message. Subtitles can be personalized with the [Dynamic Content](/product/personalization/dynamic-content/) placeholders.
**Badges**. Set the iOS badge number to be sent with your push. Use +n / -n to increment / decrement the current badge value. Sending 0 clears badge from your app's icon.
**Sound**. Specify the custom sound from the main bundle of your application. Make sure to locate the audio file to the root of your iOS project.
**iOS8 Category**. Select a Category with the set of buttons for iOS8.
**iOS Thread ID**. Identifier to group related notifications by threads. Messages with the same thread ID are grouped on the lock screen and in the Notification Center. To create a thread ID, click **Edit**.
 Enter the name and ID in the window opened, then click **Save**.
 Select the thread ID from the drop-down list:
 Take a look at how grouped push notifications with two different thread IDs look on a device:
 **iOS Root Params**. Root level parameters to the APS dictionary.
**iOS10+ Media attachment**. URL to any video, audio, picture or GIF for iOS rich notification. See [**this guide**](/developer/pushwoosh-sdk/ios-sdk/ios-rich-notifications-integration) for more details on iOS 10 Rich Notifications.
**Send silent notification**. Allows to send a silent push with `content-available` property. When a silent push arrives, iOS wakes up your app in the background, so you can get new data from your server or do background information processing.
**Critical Push**. Stands for iOS critical alerts playing a sound even if Do Not Disturb is on or iPhone is muted. Critical alerts are allowed only for apps entitled by Apple. To enable critical alerts for your app, submit the [**entitlement request at Apple Developer Portal**](https://developer.apple.com/contact/request/notifications-critical-alerts-entitlement/).
**Expiration time**. Sets the period after which the push won't be delivered if the device was offline.
###### iOS 15 notification interruption levels
Starting from iOS 15, the Focus modes are managing notifications interruption levels on users' devices. Using Focus modes, iPhone users can customize their notification preferences in various ways, including setting their own Work, Sleep, and Personal notification modes. These modes can allow notifications from particular apps the user chooses and block others from sending pushes while the mode is enabled. For example, a user might set the Work mode to allow notifications from the work-related apps only.
There are four interruption level options introduced in iOS 15:
###### Active Pushes (default)
Active pushes behave as regular notifications used to behave before iOS 15: the notification is presented immediately when it's received, the screen lights up upon receiving the push, and sounds and vibrations can be played. If the Focus mode blocks the app's notifications, Active Pushes won't break through this mode.
###### Passive Pushes
As for Passive Pushes, the system adds them to the notification list without lighting up the screen or playing a sound. That type of pushes is used for notifications that do not require immediate user's attention, for example, personal recommendations, offers, or updates. These notifications won't break through Focus modes.
###### Time Sensitive Pushes
Time-sensitive interruption level allows for displaying pushes upon delivery even when the Focus mode blocks the app's notifications. These notifications are displayed with a yellow Time-Sensitive banner. However, the user can turn off the ability for time-sensitive notification interruptions. Time Sensitive interruption level should be used for notifications that require immediate user's attention, such as account security or package delivery alerts.
###### Critical Pushes
Critical interruption level pushes are displayed by the system immediately, even when Do Not Disturb is active. These pushes light up the screen and bypass the mute switch to play a sound. Critical pushes should be used for critical cases such as severe weather or safety alerts and require an approved entitlement.
#### Android
**iOS Root Params**. Root level parameters to the APS dictionary.
**iOS10+ Media attachment**. URL to any video, audio, picture or GIF for iOS rich notification. See [**this guide**](/developer/pushwoosh-sdk/ios-sdk/ios-rich-notifications-integration) for more details on iOS 10 Rich Notifications.
**Send silent notification**. Allows to send a silent push with `content-available` property. When a silent push arrives, iOS wakes up your app in the background, so you can get new data from your server or do background information processing.
**Critical Push**. Stands for iOS critical alerts playing a sound even if Do Not Disturb is on or iPhone is muted. Critical alerts are allowed only for apps entitled by Apple. To enable critical alerts for your app, submit the [**entitlement request at Apple Developer Portal**](https://developer.apple.com/contact/request/notifications-critical-alerts-entitlement/).
**Expiration time**. Sets the period after which the push won't be delivered if the device was offline.
###### iOS 15 notification interruption levels
Starting from iOS 15, the Focus modes are managing notifications interruption levels on users' devices. Using Focus modes, iPhone users can customize their notification preferences in various ways, including setting their own Work, Sleep, and Personal notification modes. These modes can allow notifications from particular apps the user chooses and block others from sending pushes while the mode is enabled. For example, a user might set the Work mode to allow notifications from the work-related apps only.
There are four interruption level options introduced in iOS 15:
###### Active Pushes (default)
Active pushes behave as regular notifications used to behave before iOS 15: the notification is presented immediately when it's received, the screen lights up upon receiving the push, and sounds and vibrations can be played. If the Focus mode blocks the app's notifications, Active Pushes won't break through this mode.
###### Passive Pushes
As for Passive Pushes, the system adds them to the notification list without lighting up the screen or playing a sound. That type of pushes is used for notifications that do not require immediate user's attention, for example, personal recommendations, offers, or updates. These notifications won't break through Focus modes.
###### Time Sensitive Pushes
Time-sensitive interruption level allows for displaying pushes upon delivery even when the Focus mode blocks the app's notifications. These notifications are displayed with a yellow Time-Sensitive banner. However, the user can turn off the ability for time-sensitive notification interruptions. Time Sensitive interruption level should be used for notifications that require immediate user's attention, such as account security or package delivery alerts.
###### Critical Pushes
Critical interruption level pushes are displayed by the system immediately, even when Do Not Disturb is active. These pushes light up the screen and bypass the mute switch to play a sound. Critical pushes should be used for critical cases such as severe weather or safety alerts and require an approved entitlement.
#### Android
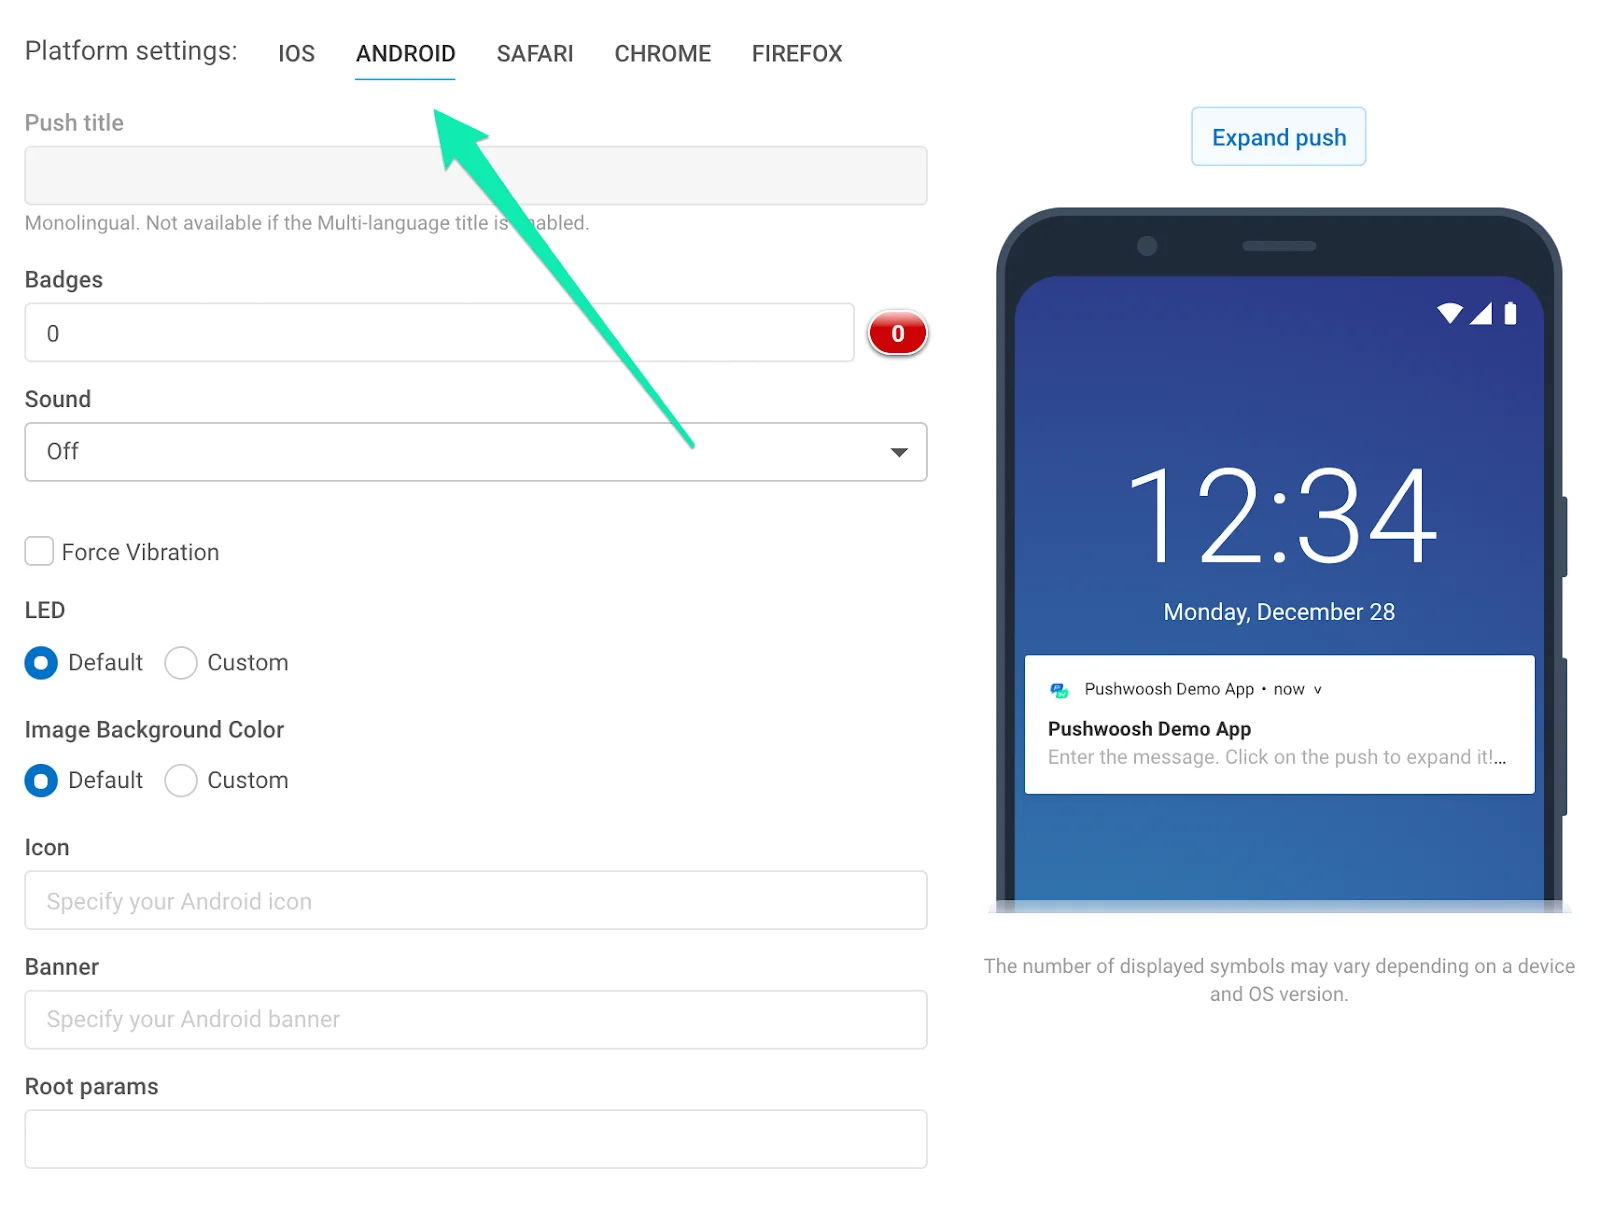 **Push title**. Specify your Android notification title here. Personalize the title with the [Dynamic Content](/product/personalization/dynamic-content/) placeholders. Please note the title is the same for all languages your push is translated to. If you need a multi-language title, enable it in the Message section; the multi-language title is the same for all platforms.
**Badges**. Specify the badge value; use +n to increment.
**Sound**. Specify the custom sound filename in the "res/raw" folder of your application. Omit the file extension.
**LED**. Choose LED color, the device will do its best approximation.
**Image Background Color**. Icon background color on Android Lollipop.
**Force Vibration**. Vibrate on arrival; use for urgent messages only.
**Icon**. Path to the notification icon. Insert the [Dynamic Content](/product/personalization/dynamic-content/) placeholders to personalize the icon.
**Banner**. Enter image URL here. Image must be ≤ 450px wide, \~2:1 aspect, and it will be center-cropped. Insert the [Dynamic Content](/product/personalization/dynamic-content/) placeholders to personalize the banner.
**Android root params**. Root level parameters for the Android payload, custom key-value object.
**Push title**. Specify your Android notification title here. Personalize the title with the [Dynamic Content](/product/personalization/dynamic-content/) placeholders. Please note the title is the same for all languages your push is translated to. If you need a multi-language title, enable it in the Message section; the multi-language title is the same for all platforms.
**Badges**. Specify the badge value; use +n to increment.
**Sound**. Specify the custom sound filename in the "res/raw" folder of your application. Omit the file extension.
**LED**. Choose LED color, the device will do its best approximation.
**Image Background Color**. Icon background color on Android Lollipop.
**Force Vibration**. Vibrate on arrival; use for urgent messages only.
**Icon**. Path to the notification icon. Insert the [Dynamic Content](/product/personalization/dynamic-content/) placeholders to personalize the icon.
**Banner**. Enter image URL here. Image must be ≤ 450px wide, \~2:1 aspect, and it will be center-cropped. Insert the [Dynamic Content](/product/personalization/dynamic-content/) placeholders to personalize the banner.
**Android root params**. Root level parameters for the Android payload, custom key-value object.
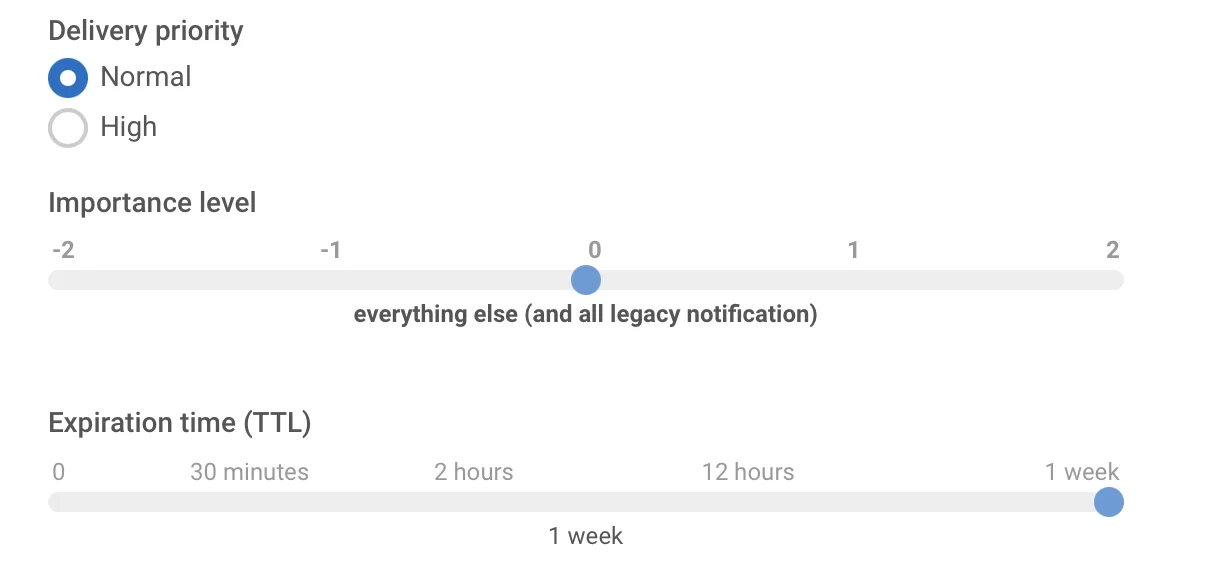 **Delivery priority**. Enables notification's delivery when the device is in the power saving mode. Notifications with **high** delivery priority will be delivered nevertheless, while **normal** delivery priority means that the notification will be delivered after the power saving mode is turned off.
**Importance level**. Sets the "importance" parameter for devices with Android 8.0 and higher, as well as the "priority" parameter for devices with Android 7.1 and lower. This parameter with valid values from -2 to 2 establishes the interruption level of a notification channel or a particular notification.
* Urgent importance level (1-2) - the notification makes a sound and appears as a heads-up notification
* High importance level (0) - the notification makes a sound and appears in the status bar
* Medium importance level (-1) - the notification makes no sound but still appears in the status bar
* Low importance level (-2) - the notification makes no sound and does not appear in the status bar
**Expiration time**. Set the period after which the push won't be delivered if the device was offline.
**Notifications Channels**. Starting from Android 8.0, you can create [Notification Channels](/developer/pushwoosh-sdk/android-sdk/notification-channels). To create a channel, there are two steps you need to do:
1. Set up the channel's configuration. Specify all required parameters, such as sound, vibration, LED, and priority;
2. Specify channel's name by adding the following key-value pair to Android root params:
```json
{"pw_channel":"NAME OF CHANNEL"}
```
To send a notification to an existing channel, you need to specify the very same key-value pair in Android root params.
It is not possible to change the channel's parameters after it's created on the device.
#### Safari
**Delivery priority**. Enables notification's delivery when the device is in the power saving mode. Notifications with **high** delivery priority will be delivered nevertheless, while **normal** delivery priority means that the notification will be delivered after the power saving mode is turned off.
**Importance level**. Sets the "importance" parameter for devices with Android 8.0 and higher, as well as the "priority" parameter for devices with Android 7.1 and lower. This parameter with valid values from -2 to 2 establishes the interruption level of a notification channel or a particular notification.
* Urgent importance level (1-2) - the notification makes a sound and appears as a heads-up notification
* High importance level (0) - the notification makes a sound and appears in the status bar
* Medium importance level (-1) - the notification makes no sound but still appears in the status bar
* Low importance level (-2) - the notification makes no sound and does not appear in the status bar
**Expiration time**. Set the period after which the push won't be delivered if the device was offline.
**Notifications Channels**. Starting from Android 8.0, you can create [Notification Channels](/developer/pushwoosh-sdk/android-sdk/notification-channels). To create a channel, there are two steps you need to do:
1. Set up the channel's configuration. Specify all required parameters, such as sound, vibration, LED, and priority;
2. Specify channel's name by adding the following key-value pair to Android root params:
```json
{"pw_channel":"NAME OF CHANNEL"}
```
To send a notification to an existing channel, you need to specify the very same key-value pair in Android root params.
It is not possible to change the channel's parameters after it's created on the device.
#### Safari
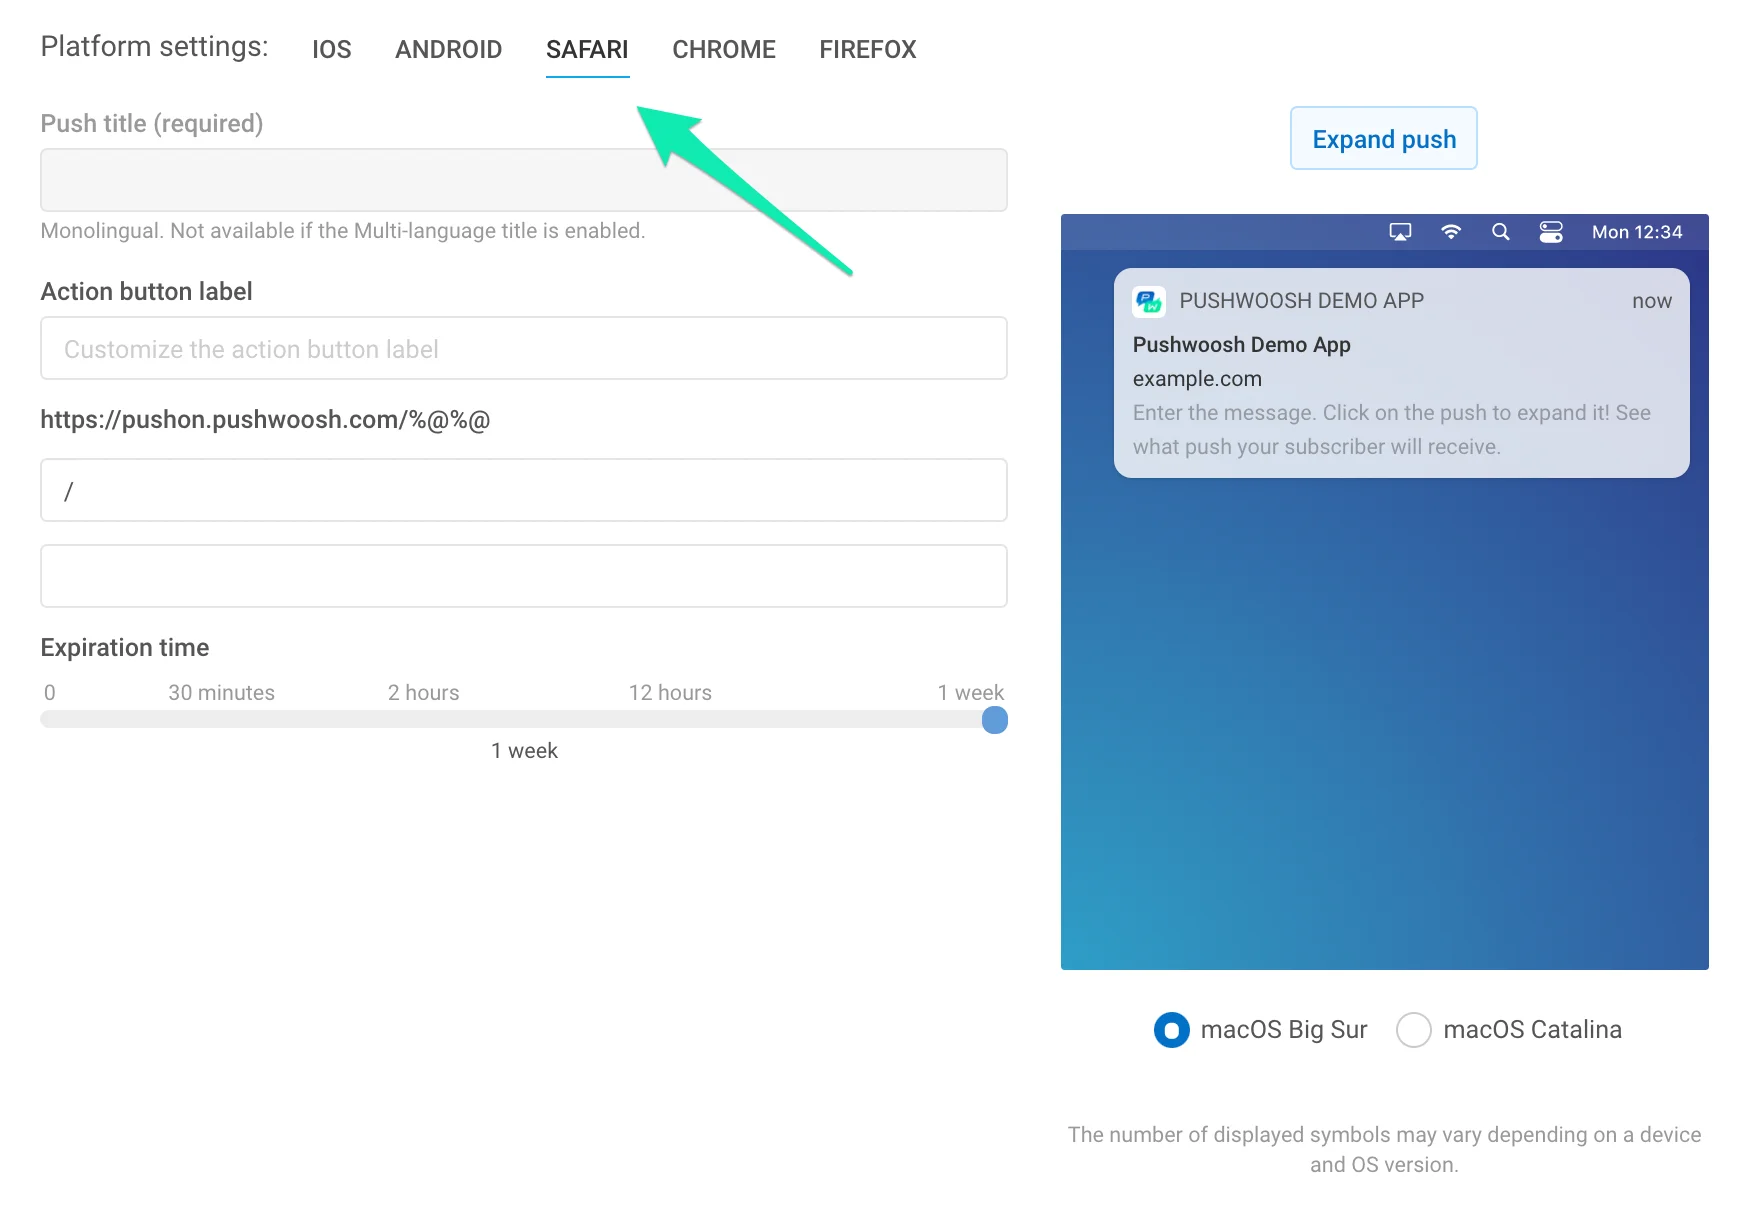 **Title**. Specify your Safari notification title here. This field is required, otherwise the push will not be sent. Personalizing the Safari push title with [Dynamic Content](/product/personalization/dynamic-content/), you boost open rates and increase audience loyalty levels.
Please note the title is the same for all languages your push is translated to. If you need a multi-language title, enable it in the Message section; the multi-language title is the same for all platforms.
**Action button label (optional)**. Specify custom action button label here. If not set, "Show" will be displayed as a default.
**URL field**. Replace placeholder with part of URL you specified in the app's Safari configuration. Users will be redirected to this URL in Safari upon opening your notification.
**Expiration time**. Set the period after which the push won't be delivered if the device was offline.
#### Chrome
**Title**. Specify your Safari notification title here. This field is required, otherwise the push will not be sent. Personalizing the Safari push title with [Dynamic Content](/product/personalization/dynamic-content/), you boost open rates and increase audience loyalty levels.
Please note the title is the same for all languages your push is translated to. If you need a multi-language title, enable it in the Message section; the multi-language title is the same for all platforms.
**Action button label (optional)**. Specify custom action button label here. If not set, "Show" will be displayed as a default.
**URL field**. Replace placeholder with part of URL you specified in the app's Safari configuration. Users will be redirected to this URL in Safari upon opening your notification.
**Expiration time**. Set the period after which the push won't be delivered if the device was offline.
#### Chrome
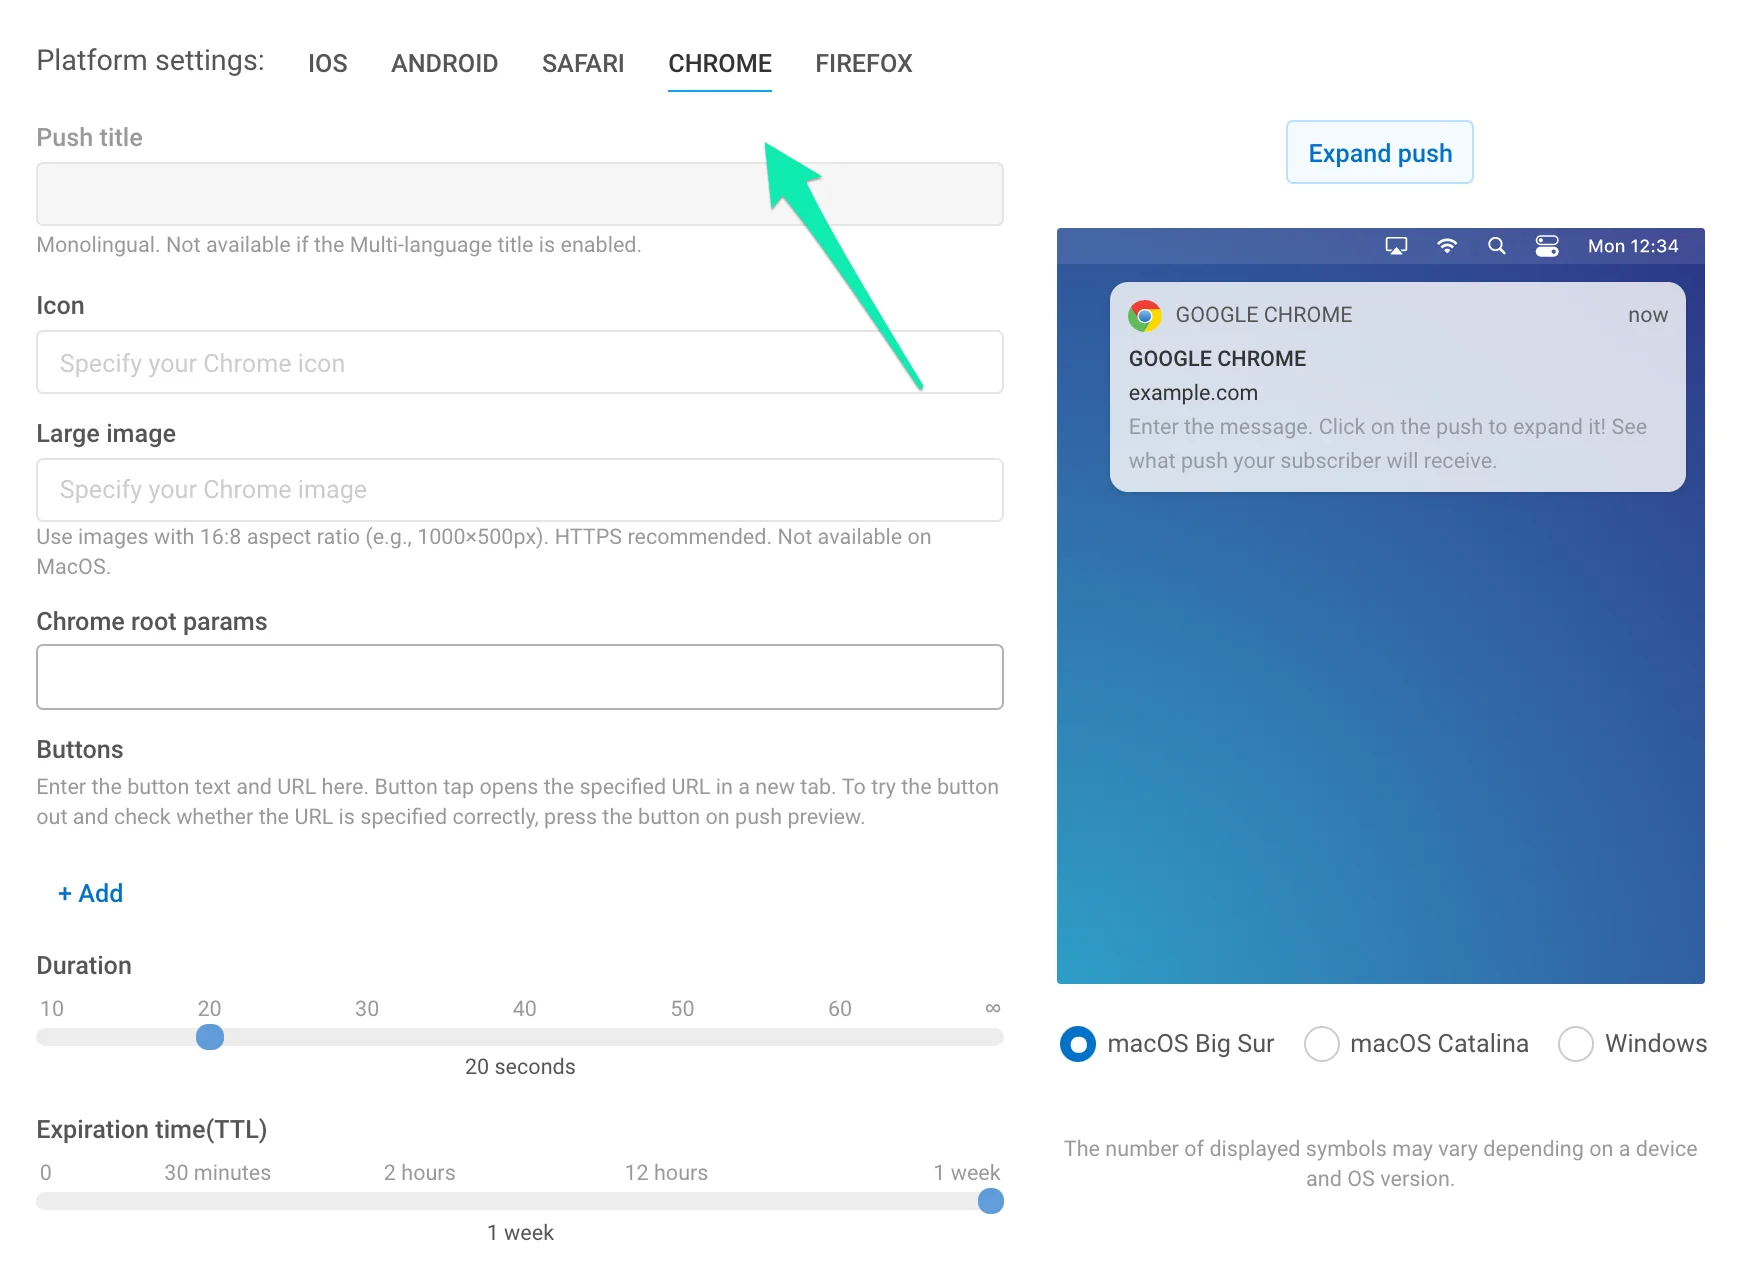 **Icon**. Specify icon name from your extension resources or full path URL. Personalizable with [Dynamic Content](/product/personalization/dynamic-content/) placeholders.
**Title**. Specify Chrome notification title. Personalizable with [Dynamic Content](/product/personalization/dynamic-content/) placeholders.
Please note the title is the same for all languages your push is translated to. If you need a multi-language title, enable it in the Message section; the multi-language title is the same for all platforms.
**Large image**. Add a large image to your notification by specifying the full path URL to the image.
**Chrome root params**. Set parameters specific for pushes sent to Chrome. For example, to send a regular link to Chrome platform in parallel with a [Deep Link](/product/messaging-channels/push-notifications/advanced-push-features/deep-linking/) sent to mobile devices, enter the link here as follows:
```json
{"l": "http://example.com"}
```
Chrome root params are prioritized over general push parameters for push notifications sent to Chrome. So Chrome subscribers will get the link you specify here while users with mobile devices will get the Deep Link.
**Buttons**. Create custom buttons for your pushes. Specify the button Title and the URL to be opened (it's optional). If URL is omitted, the button being pressed closes the push.
For button URLs, personalization is available for greater relevance to your users' interests, preferences, and activities. The dynamic data (Tag values assigned to a device) is inserted into the URL just as any Dynamic Content.
While entering the URL, click the **Personalization** button next to the input field.
**Icon**. Specify icon name from your extension resources or full path URL. Personalizable with [Dynamic Content](/product/personalization/dynamic-content/) placeholders.
**Title**. Specify Chrome notification title. Personalizable with [Dynamic Content](/product/personalization/dynamic-content/) placeholders.
Please note the title is the same for all languages your push is translated to. If you need a multi-language title, enable it in the Message section; the multi-language title is the same for all platforms.
**Large image**. Add a large image to your notification by specifying the full path URL to the image.
**Chrome root params**. Set parameters specific for pushes sent to Chrome. For example, to send a regular link to Chrome platform in parallel with a [Deep Link](/product/messaging-channels/push-notifications/advanced-push-features/deep-linking/) sent to mobile devices, enter the link here as follows:
```json
{"l": "http://example.com"}
```
Chrome root params are prioritized over general push parameters for push notifications sent to Chrome. So Chrome subscribers will get the link you specify here while users with mobile devices will get the Deep Link.
**Buttons**. Create custom buttons for your pushes. Specify the button Title and the URL to be opened (it's optional). If URL is omitted, the button being pressed closes the push.
For button URLs, personalization is available for greater relevance to your users' interests, preferences, and activities. The dynamic data (Tag values assigned to a device) is inserted into the URL just as any Dynamic Content.
While entering the URL, click the **Personalization** button next to the input field.
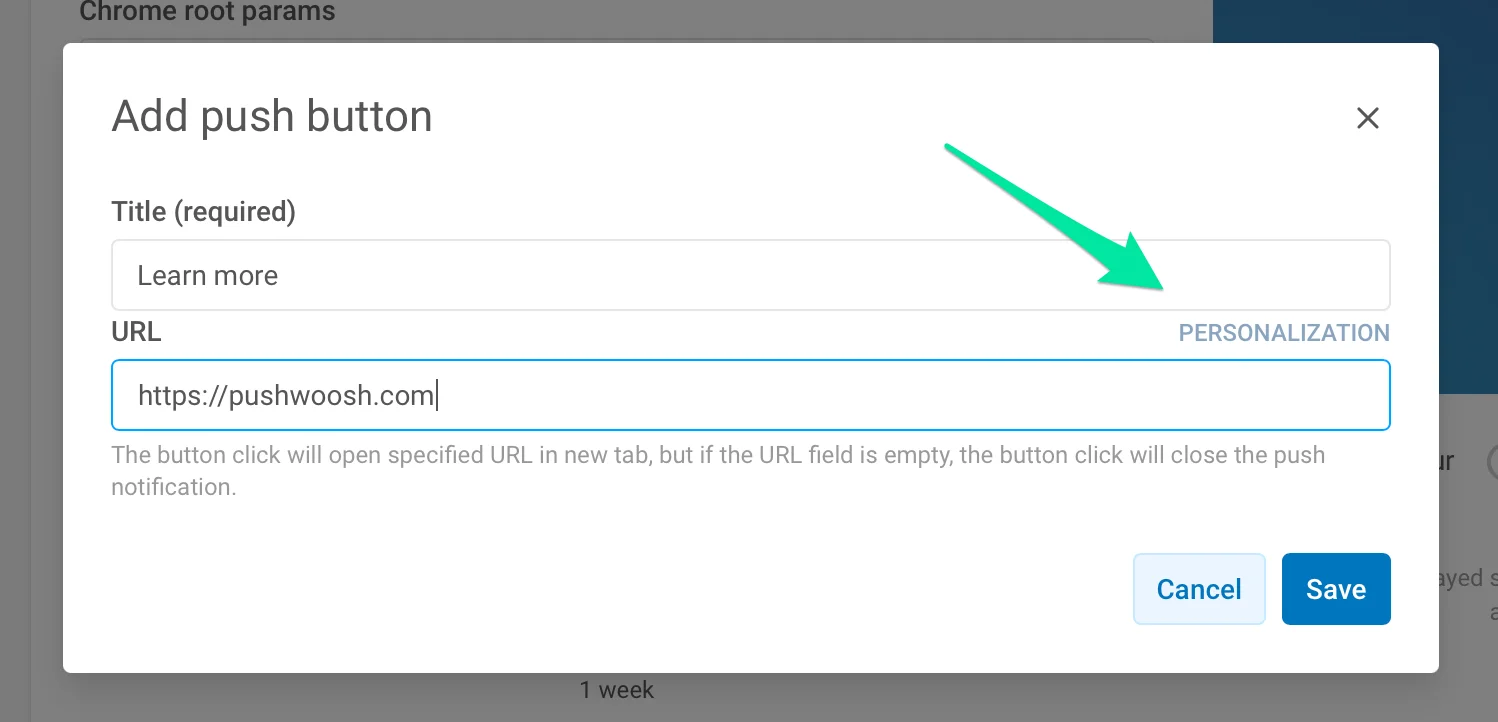 Next, select a tag you'd like to use for personalizing the page the user will go to once pressing the button. For example, to take a user to your site's section based on where they're from, add the Country tag to the URL. Thus, for instance, a user from the United States who presses the Learn more button will go to https://www.pushwoosh.com.
 **Duration**. Specify time for push to be displayed. Set to infinity, if you would like to display notification until user interacts with it.
**Expiration time**. Set the period after which the push won't be delivered if the device was offline.
#### Firefox
**Duration**. Specify time for push to be displayed. Set to infinity, if you would like to display notification until user interacts with it.
**Expiration time**. Set the period after which the push won't be delivered if the device was offline.
#### Firefox
 **Icon**. Specify the icon name in the resources of your extension, or the full path URL. Personalizable with [Dynamic Content](/product/personalization/dynamic-content/) placeholders.
**Title**. Specify Firefox notification title. Personalizable with [Dynamic Content](/product/personalization/dynamic-content/) placeholders.
Please note the title is the same for all languages your push is translated to. If you need a multi-language title, enable it in the Message section; the multi-language title is the same for all platforms.
**Firefox root params**. Set parameters specific for pushes sent to Firefox. For example, to send a regular link to Firefox platform in parallel with a Deep Link sent to mobile devices, enter the link here as follows:
```json
{l: "http://example.com"}
```
Firefox root params are prioritized over general push parameters for push notifications sent to Firefox. So Firefox subscribers will get the link you specify here while users with mobile devices will get the Deep Link.
#### Windows 8, 10
**Icon**. Specify the icon name in the resources of your extension, or the full path URL. Personalizable with [Dynamic Content](/product/personalization/dynamic-content/) placeholders.
**Title**. Specify Firefox notification title. Personalizable with [Dynamic Content](/product/personalization/dynamic-content/) placeholders.
Please note the title is the same for all languages your push is translated to. If you need a multi-language title, enable it in the Message section; the multi-language title is the same for all platforms.
**Firefox root params**. Set parameters specific for pushes sent to Firefox. For example, to send a regular link to Firefox platform in parallel with a Deep Link sent to mobile devices, enter the link here as follows:
```json
{l: "http://example.com"}
```
Firefox root params are prioritized over general push parameters for push notifications sent to Firefox. So Firefox subscribers will get the link you specify here while users with mobile devices will get the Deep Link.
#### Windows 8, 10
 Windows 8 provides over 60 toast, tile, raw and badge templates, so we added only toast templates to our GUI since they're the most popular. Tile, raw and badge templates are available via Remote API only.
**First, choose the template from the list on the right** to unlock corresponding inputs. Then you can input content for all languages you need. The number of fields in Windows 8 push templates differs, so we had to separate it from all other platforms. It has its own set of language tabs, used just like the general language tabs.
#### Amazon
Windows 8 provides over 60 toast, tile, raw and badge templates, so we added only toast templates to our GUI since they're the most popular. Tile, raw and badge templates are available via Remote API only.
**First, choose the template from the list on the right** to unlock corresponding inputs. Then you can input content for all languages you need. The number of fields in Windows 8 push templates differs, so we had to separate it from all other platforms. It has its own set of language tabs, used just like the general language tabs.
#### Amazon
 **Header**. Specify your Amazon notification header here.
**Sound**. Specify custom sound filename in the "res/raw" folder of your application. Omit the file extension.
**Icon**. Path to notification icon.
**Banner**. Full path to notification banner.
**Expiration time**. Period after which the push won't be delivered if the device was offline.
### Action tab
By default, tap on a push message opens the app. You can customize actions performed after a user taps a push:
* Open a URL in the user's browser,
* Take users directly to specific in-app pages,
* Or catch their attention with rich content.
#### Custom Action
**URL**
Add a link that will open in a browser after a user taps a push notification. Choose the URL option and insert a URL in the corresponding field. Please note that push notification payload size is limited, so consider using a URL shortener to stay within the limit.
**Header**. Specify your Amazon notification header here.
**Sound**. Specify custom sound filename in the "res/raw" folder of your application. Omit the file extension.
**Icon**. Path to notification icon.
**Banner**. Full path to notification banner.
**Expiration time**. Period after which the push won't be delivered if the device was offline.
### Action tab
By default, tap on a push message opens the app. You can customize actions performed after a user taps a push:
* Open a URL in the user's browser,
* Take users directly to specific in-app pages,
* Or catch their attention with rich content.
#### Custom Action
**URL**
Add a link that will open in a browser after a user taps a push notification. Choose the URL option and insert a URL in the corresponding field. Please note that push notification payload size is limited, so consider using a URL shortener to stay within the limit.
 For URL, dynamic linking is available. You can add Dynamic Content to the web address you specify in the URL field so that the web page opens when a user taps on a push, taking into account the user's Tag values. For example, you can show a special offer based on the last product a user bought or take them to a feed of news similar to what they have read recently.
To add a dynamic URL to your push message, place the Dynamic Content at the end of the URL (the part after the / sign):
```text
https://example.com/{TagName|lowercase|default}
```
For URL, dynamic linking is available. You can add Dynamic Content to the web address you specify in the URL field so that the web page opens when a user taps on a push, taking into account the user's Tag values. For example, you can show a special offer based on the last product a user bought or take them to a feed of news similar to what they have read recently.
To add a dynamic URL to your push message, place the Dynamic Content at the end of the URL (the part after the / sign):
```text
https://example.com/{TagName|lowercase|default}
```
 Use the same syntax as for Dynamic Content in push text, title, etc.:
```text
{Tag|format_modifier|default_value}
```
Refer to the [Dynamic Content](/product/personalization/dynamic-content/) guide for details.
#### Rich Media
Rich Media is the content displayed while users are in the app. It can contain images, videos, fillable forms, and other elements. If users click on it, it opens to attach images, videos, CTAs, or other interactive forms. To learn more about creating and editing Rich Media, refer to [this guide](/product/content/rich-media/).
To open one of the Rich Media pages created in your account, select the **Show Rich Media** option and choose a Rich Media to be shown. To open a remote rich content page, select the **Remote Page** source and insert the rich page URL.
Use the same syntax as for Dynamic Content in push text, title, etc.:
```text
{Tag|format_modifier|default_value}
```
Refer to the [Dynamic Content](/product/personalization/dynamic-content/) guide for details.
#### Rich Media
Rich Media is the content displayed while users are in the app. It can contain images, videos, fillable forms, and other elements. If users click on it, it opens to attach images, videos, CTAs, or other interactive forms. To learn more about creating and editing Rich Media, refer to [this guide](/product/content/rich-media/).
To open one of the Rich Media pages created in your account, select the **Show Rich Media** option and choose a Rich Media to be shown. To open a remote rich content page, select the **Remote Page** source and insert the rich page URL.
 For Android devices, you can toggle the **Show on lockscreen** option to display Rich Media right on the lock screen of the user's device.
#### Deep Link
With Deep Links, you can take users directly to new in-app content, promo pages, special offers, etc. In Presets, you can only add deep links you configured in settings.
[Please follow the guide to set up Deep Links](/product/messaging-channels/push-notifications/advanced-push-features/deep-linking).
For Android devices, you can toggle the **Show on lockscreen** option to display Rich Media right on the lock screen of the user's device.
#### Deep Link
With Deep Links, you can take users directly to new in-app content, promo pages, special offers, etc. In Presets, you can only add deep links you configured in settings.
[Please follow the guide to set up Deep Links](/product/messaging-channels/push-notifications/advanced-push-features/deep-linking).
 #### Custom Data
Custom Data is a JSON object describing actions to be performed, for example:
```json
{"key": "value"}
```
You can add Custom Data to your push message to specify additional push parameters.
Toggle **Send custom Data** on. Insert JSON data into the **JSON Code** field.
To learn more about Custom Data, refer to our [guide](/product/messaging-channels/push-notifications/advanced-push-features/using-custom-data/).
#### Custom Data
Custom Data is a JSON object describing actions to be performed, for example:
```json
{"key": "value"}
```
You can add Custom Data to your push message to specify additional push parameters.
Toggle **Send custom Data** on. Insert JSON data into the **JSON Code** field.
To learn more about Custom Data, refer to our [guide](/product/messaging-channels/push-notifications/advanced-push-features/using-custom-data/).
 #### Save to Inbox
To keep the message in users' inbox, mark the checkbox and set the date to remove the push. By default, messages are removed from inbox on the next day after they are sent. To set an icon to be shown next to the message in the inbox, specify the image URL in the corresponding field.
Message will be removed from Inbox at 00:00:01 UTC of the date specified, so the previous date is the last day a user can see the message in their Inbox.
#### Save to Inbox
To keep the message in users' inbox, mark the checkbox and set the date to remove the push. By default, messages are removed from inbox on the next day after they are sent. To set an icon to be shown next to the message in the inbox, specify the image URL in the corresponding field.
Message will be removed from Inbox at 00:00:01 UTC of the date specified, so the previous date is the last day a user can see the message in their Inbox.
 Once you have configured all the parameters, click **Save Preset**.
 You can then [send your push to the audience](/product/messaging-channels/push-notifications/send-push-notifications/one-time-push).