# Create push presets
Pushwoosh empowers you to create reusable push content. You can craft the text and configure settings using our push content editor. You can then either send the push notification immediately or save it for future campaigns.
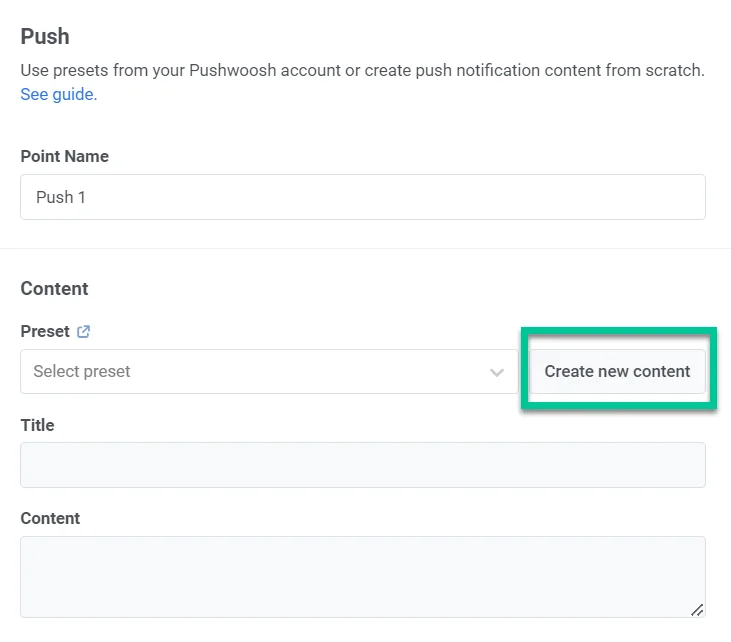
To create your push content, simply navigate to **Content > Push content > Create new content**. You can also use the **Create new content** option within a push Journey element.
## Define the languages you want to use in your push
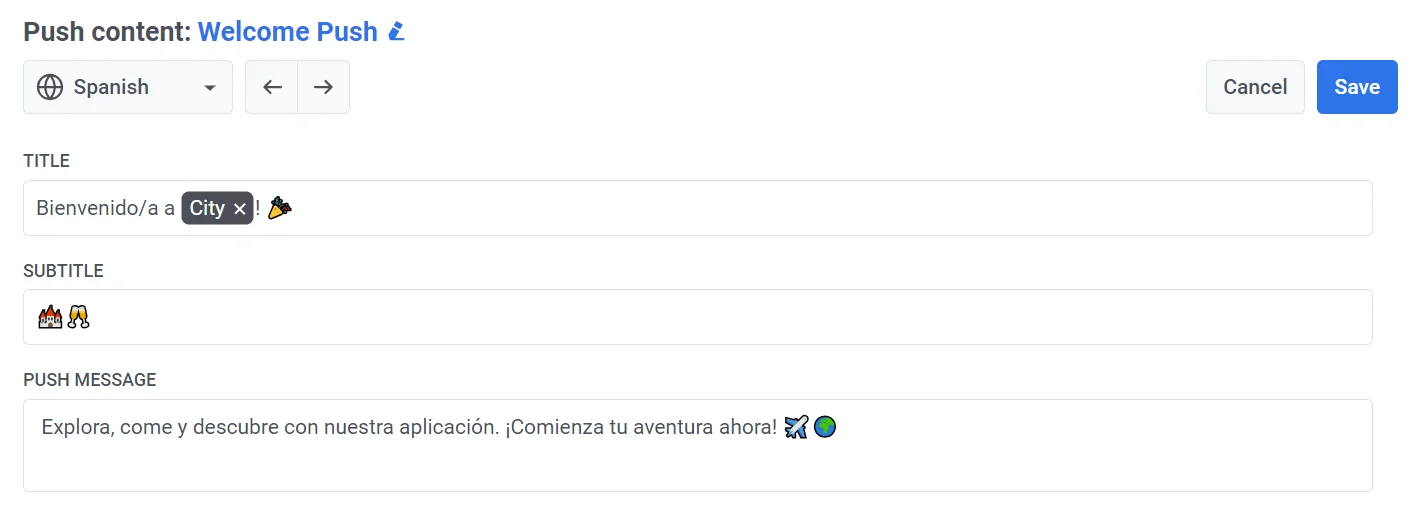
Start by creating the default message content, which is sent to all users unless a more specific language version is provided. You can then add content for additional languages to tailor the message to users' device language settings.
To add additional languages, click the **Plus** sign at the top of the editor. A list of languages will appear, allowing you to choose the ones you need for your push notification.
_For example, if your default language is English but you want to reach Spanish and German speakers as well, add those languages to your push notification. Users with Spanish or German phone settings will then receive the message in their preferred language, while others will see the default English version._
## Create push content
Next, begin creating your push content.
### Add a push title
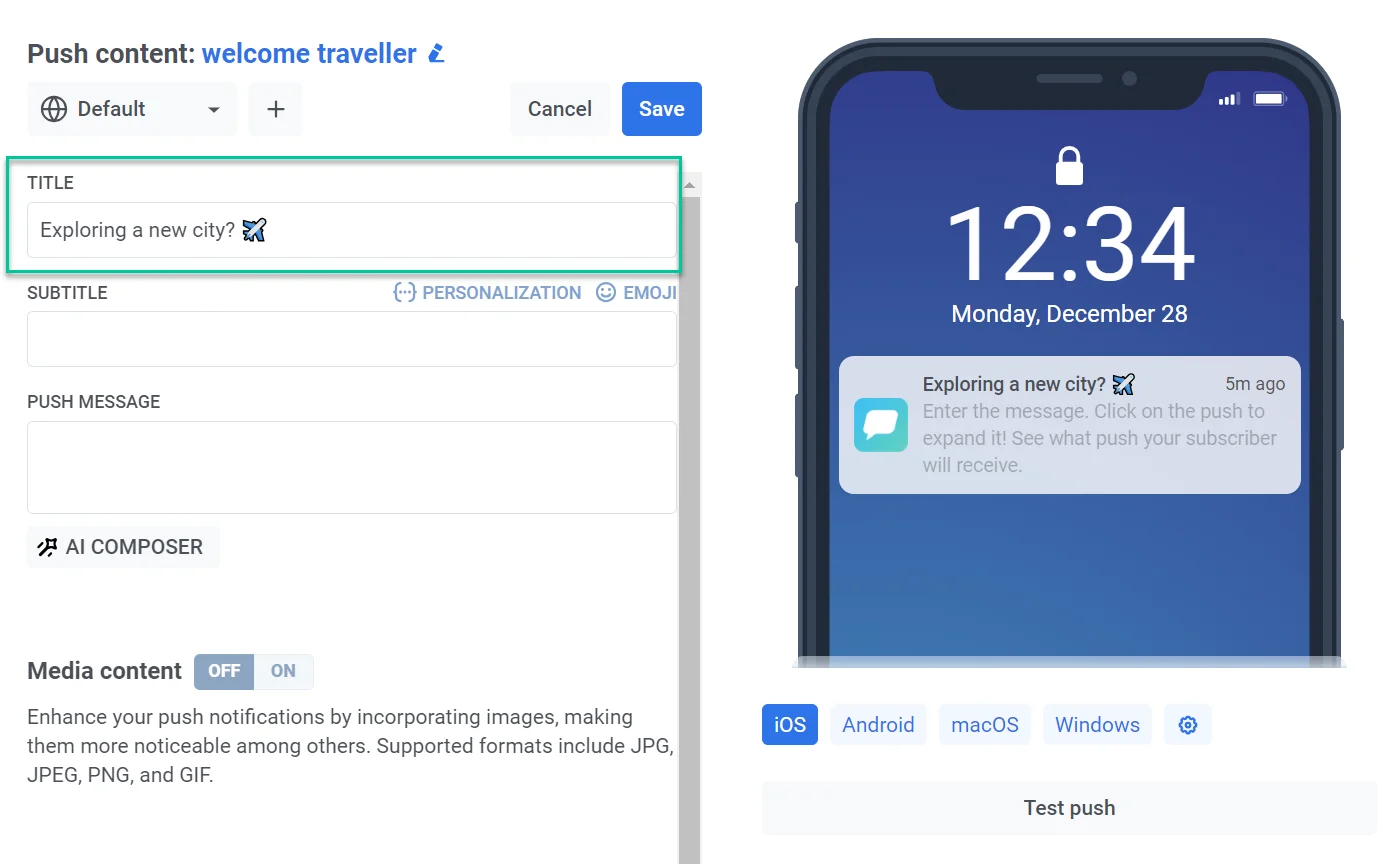
Push titles are not required, but you can use them if you prefer to display a unique phrase instead of your app’s name in every push.
To add a title, simply enter the text in the designated field. You can also add [personalization](#personalize-push-content) and emojis.
### Add a subtitle
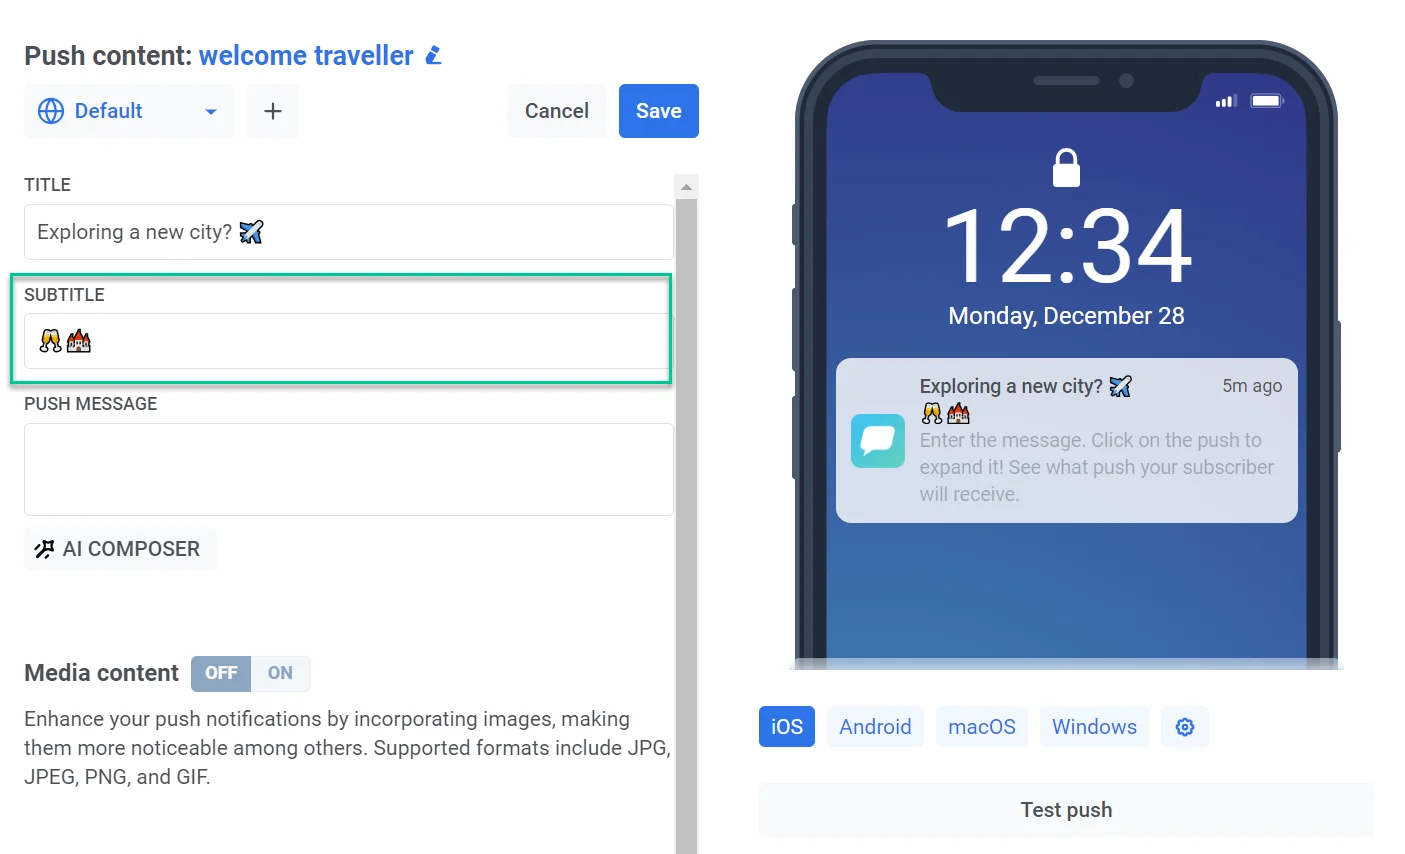
Enter the subtitle text to provide extra context, details, or make your notification more engaging. Please note that subtitle functionality is currently limited to iOS devices. If a push notification containing subtitles is received on an Android device or any other platform, the subtitles won't be displayed.
### Add a push message
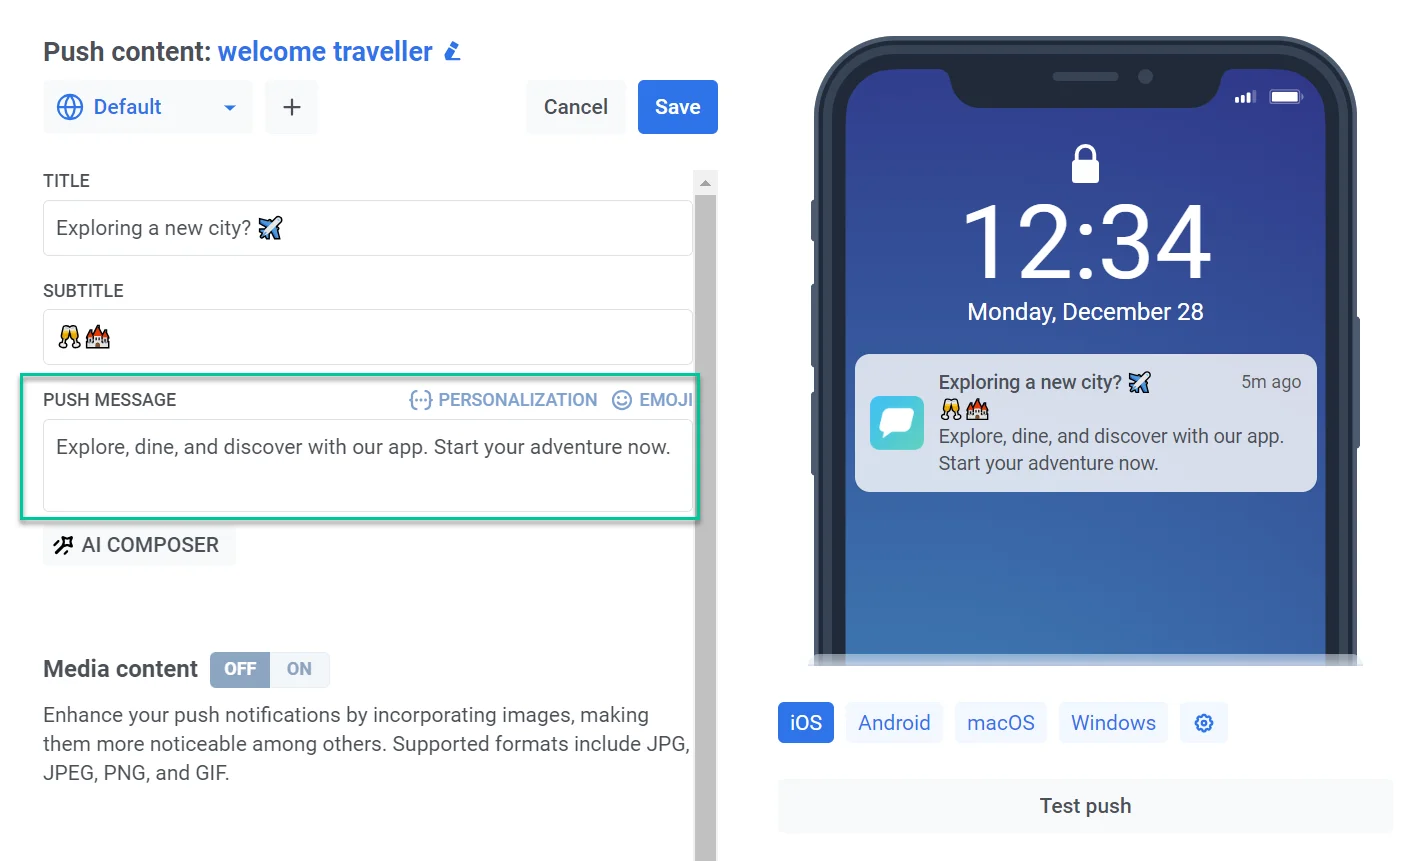
Enter the text you want your users to see in the push notification. This is the primary content they will receive on their devices. You can also add emojis and incorporate [personalization](#personalize-push-content) elements to make your message more relevant to each user. The preview helps ensure your text displays fully on different devices.
### Personalize push content
Pushwoosh allows you to personalize push notification elements like titles, subtitles, and messages. This means you can tailor your content to individual users for a more engaging experience. For this:
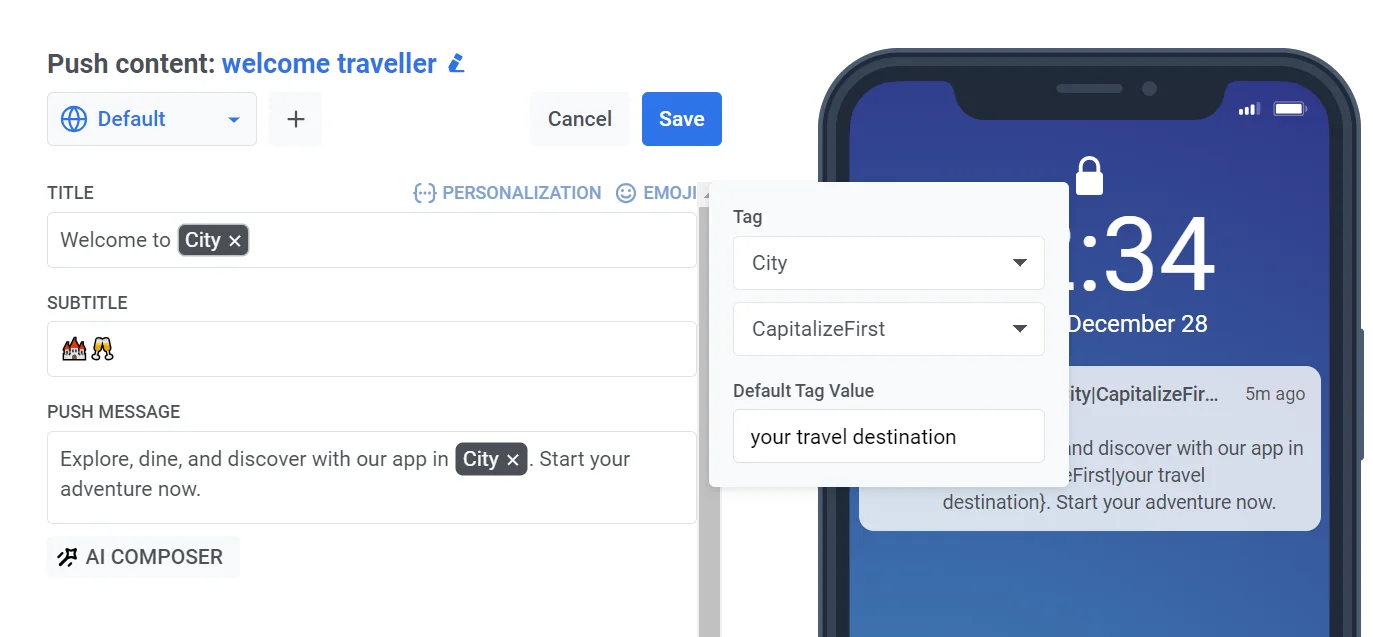
1. Click on the **Personalize** link above the title, subtitle, or message field you want to personalize.
2. A dropdown menu will appear, displaying available user data tags. Select the tag that best suits your personalization goal (e.g., user name, city, etc).
3. Choose the desired format modifier:
* **CapitalizeFirst.** The first letter of the tag’s value will be written in uppercase and the rest will appear in lowercase. For example: "_john doe_" becomes "_John doe_".
* **CapitalizeAllFirst.** The first letter of each word in the tag’s value will be written in uppercase. For example: "_john doe_" becomes "_John Doe_".
* **UPPERCASE.** Converts all letters in the tag’s value to uppercase. For example: "_john doe_" becomes "_JOHN DOE_".
* **Lowercase.** Converts all letters in the tag’s value to lowercase. For example: "_JOHN DOE_" becomes "_john doe_".
* **Regular.** Keeps the text formatting as it is in the original data. For example, if a user chose to indicate their name as "_john doe_" in your app's account settings, it will remain "_john doe_" in the personalized push copy.
4. In the **Default Tag Value** field, enter the text that should be used if the tag data is not available for a user. For instance, for a `City` tag you might enter "your travel destination" as the default value.
5. Click **Insert**.
_For example, imagine you run a travel app and want to target users exploring a new city with a push notification promoting tours and guides. To personalize the message, select the City tag and apply the **CapitalizeFirst** format modifier._
Remember, available tags depend on the user data you collect. [Learn more about tags ](/product/audience-data-and-segmentation/user-data-tags/tags)
### Validate Liquid syntax
If you use [Liquid templates](/product/personalization/liquid-templates/) in your push title, subtitle, or message, you can check them for syntax errors before saving. This helps you catch issues like unclosed tags or typos early, so your personalization renders correctly when the push is sent.
To run the check, click the **Validate Liquid Syntax** button.
Pushwoosh checks the title, subtitle, and message in every language you’ve added. If it finds a syntax error, a notification appears indicating the issue.
### Create dedicated copy in all languages you’ve selected
If you want to send push content in multiple languages, you'll need to create content for each language you've chosen.
Select a language from the dropdown menu and fill in all the fields as described above.
### Add media content
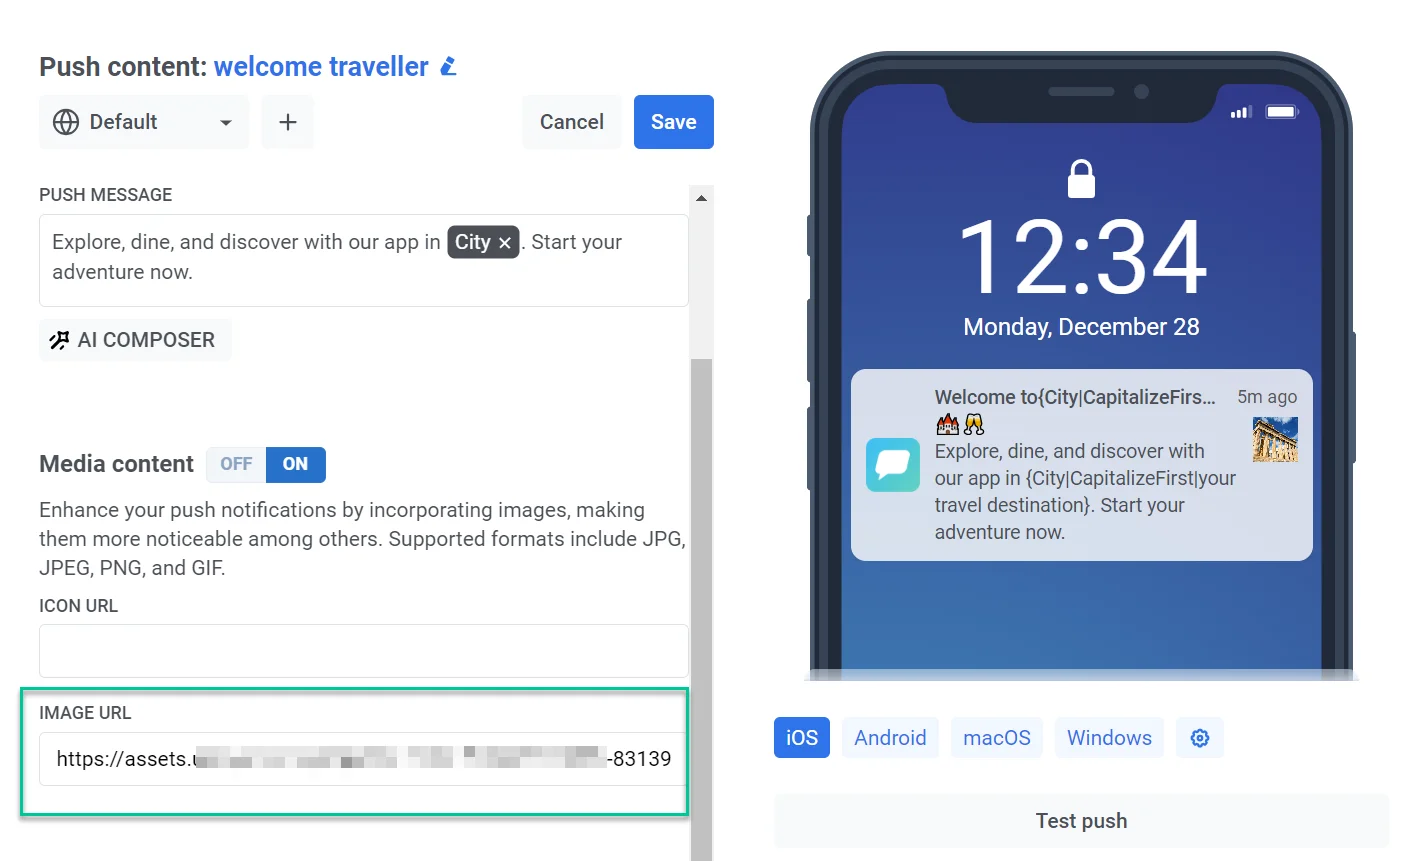
You can optionally add images to your push notifications to improve their visual appeal and potentially increase user engagement. Supported formats include JPG, JPEG, PNG, and GIF.
To add media content, enable the **Media content** toggle. You can paste an icon URL or an image URL directly, or click the image icon next to the field to open the [Media store](/product/content/media-store/) and select an image you have already uploaded.
### Define the next step for users who click on the notification
By default, when users click on push notifications, they are directed to the main screen of your app or the home page of your website. However, you can customize the notification to redirect users to a specific page within your app or in their browser.
To do this, follow these steps:
1. Navigate to the **On-click Actions** section of the Push preset.
2. Choose a link type:
* Deep link in application.
* Link to web page for web subscribers.
#### Link to web page
To open a webpage in the browser, simply add the desired link to the Web page URL field. Optionally, provide a **Safari-specific URL**.
#### Deep link in application
1. Choose the target platforms:
* For all platforms
* Only for iOS
* Only for Android
* Only for Huawei
2. Enter the deep link URL. There are 2 ways to do it:
* **Manually.** Input the specific deep link URL for the page or feature you want users to access within your app.
* **Using deep-link presets.** If you have predefined deep link presets, you can select one from the available list. Presets can be managed in **Settings \> Deep Links** if needed. [Learn more](/product/messaging-channels/push-notifications/advanced-push-features/deep-linking)
### Add Custom Data
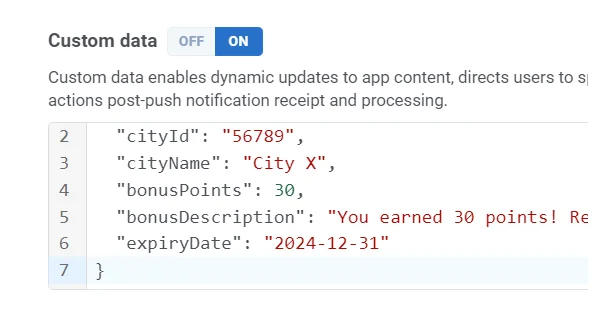
**Custom Data** allows you to include additional information within your push notifications. This information is structured as a JSON object, containing key-value pairs. By using Custom Data, you can dynamically update your app's content, direct users to specific sections within the app, and manage actions after push notification receipt and processing. [Learn more](/product/messaging-channels/push-notifications/advanced-push-features/using-custom-data)
To include Custom Data in your push notification, simply toggle **Custom Data** on and insert your JSON data into the Custom data field.
## Configure notification settings
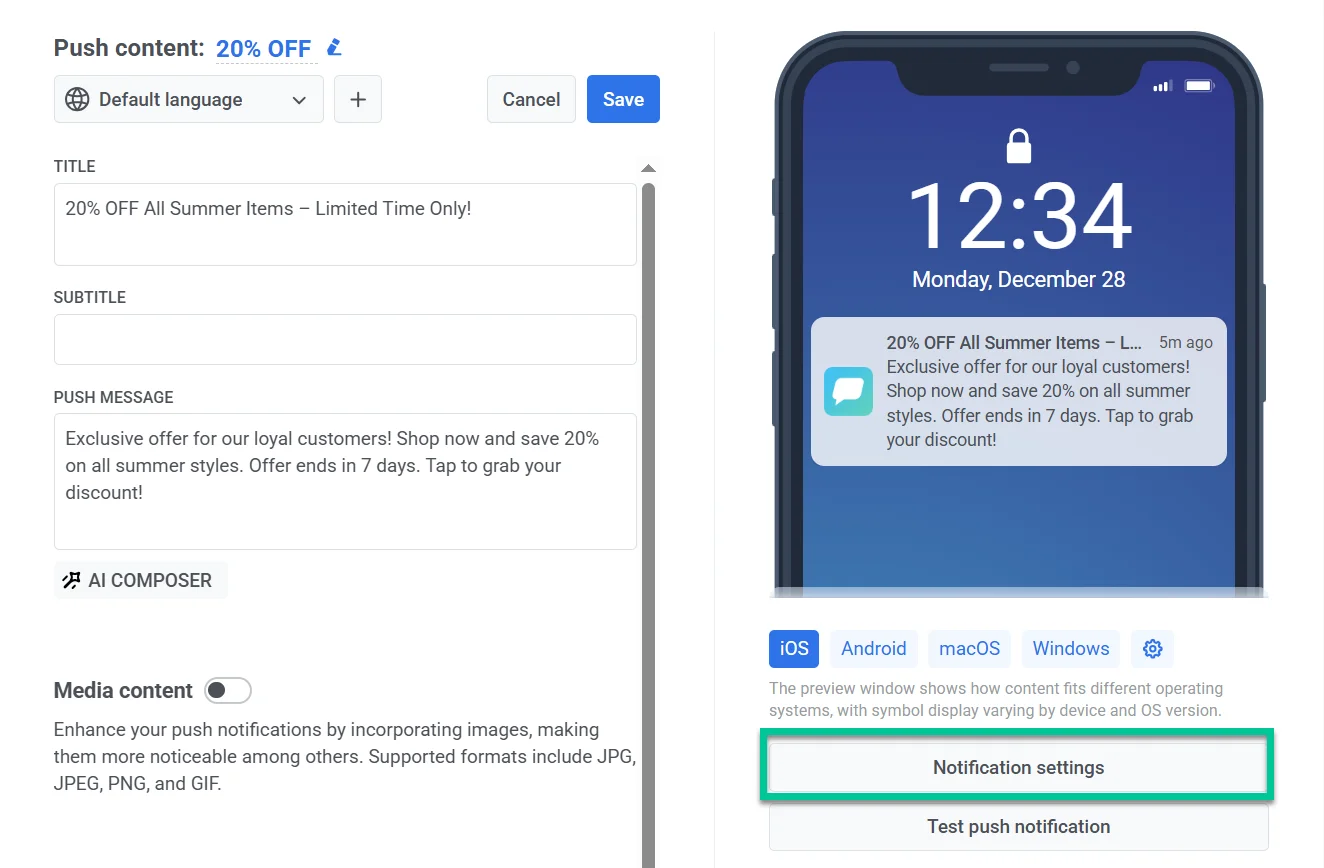
Notification settings in Push presets allow you to customize how users receive and interact with notifications. You can define badge count, sound preferences, and delivery priority to align notifications with your app’s requirements.
To configure these settings, click **Notification settings** under the push preview.
### Set badge count
The badge count is the number displayed on an app icon, typically indicating unread messages or notifications. Using badge count in Push Presets ensures that notifications consistently update the app icon badge, helping users keep track of unread messages, tasks, or alerts.
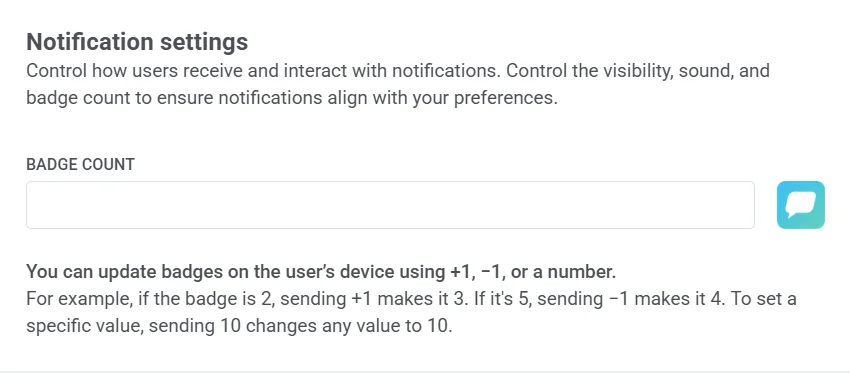
**Increase (+1):** Adds 1 to the current badge count.
*Example:* A push notification for a new message increases the badge count from 2 to 3, indicating 3 unread messages.
**Decrease (-1):** Subtracts 1 from the current badge count.
*Example:* A push notification confirms a completed task, reducing the badge count from 5 to 4, showing 4 pending tasks.
**Set a specific number:** Assigns an exact badge count.
*Example:* A push notification from a news app sets the badge count to 10 when 10 unread articles are available.
### Platform-specific settings
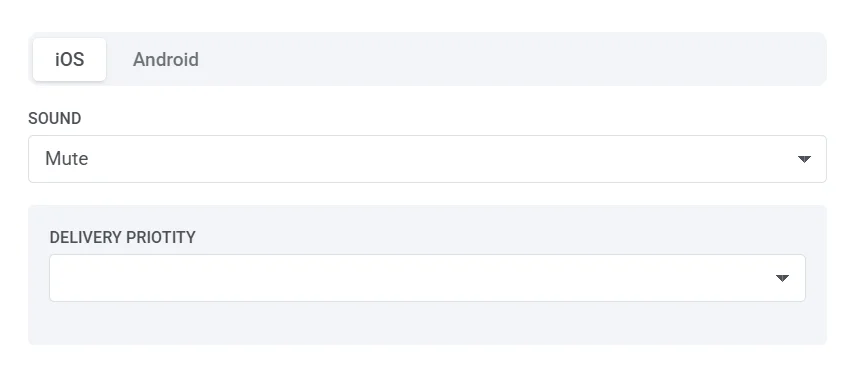
You can configure notification settings separately for **iOS** and **Android** platforms by switching between the respective tabs.
#### iOS notification settings
##### Sound
Select a notification sound from the dropdown menu.
* **Default**: Plays the system’s default notification sound.
* **Mute**: Disables sound for this notification.
* **bubble.wav**.
##### Delivery priority
Delivery priority determines how push notifications are handled on the user's device, ensuring important messages are delivered appropriately based on urgency. You can select from the following priority levels:
* **Critical**: Delivered immediately, even when Do Not Disturb is enabled. These notifications light up the screen, bypass the mute switch, and play a sound. Requires Apple-approved entitlement and should be used for emergency alerts (e.g., severe weather, safety warnings).
* **Active**: Standard push notifications that appear instantly, light up the screen, and play sounds or vibrations. Blocked by Focus mode, meaning users won’t receive them if their device settings restrict notifications. Best for chat messages or important updates.
* **Time-sensitive**: Delivered immediately even if Focus mode is enabled, with a yellow "Time-Sensitive" banner. Users can disable this interruption level. Ideal for urgent alerts like account security warnings or package delivery updates.
* **Passive**: Added to the notification center without lighting up the screen or playing a sound. These notifications do not bypass Focus mode and are best for non-urgent updates, recommendations, or promotional offers.
#### Android notification settings
##### Sound settings
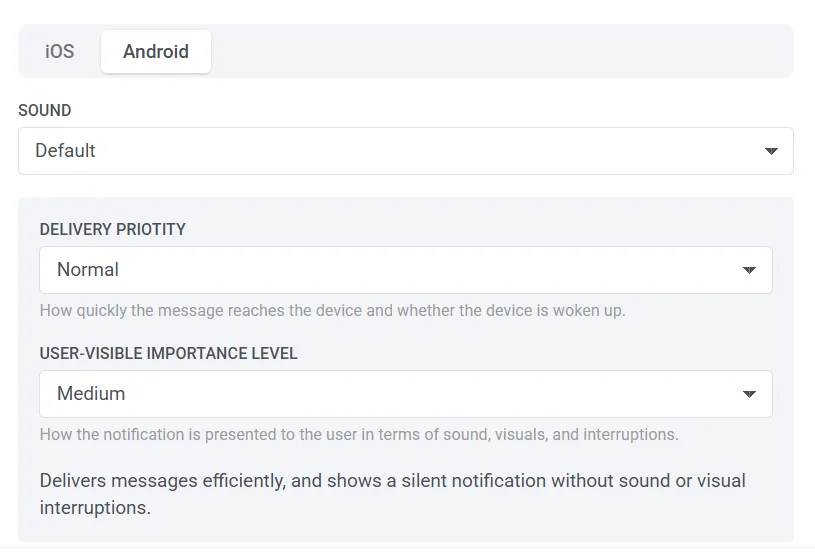
Choose how notifications play sounds when received:
* **Default**: Uses the system’s default notification sound.
* **Mute**: Delivers the notification silently without sound.
##### Delivery priority
Delivery priority determines how push notifications are handled on the user's device, ensuring important messages are delivered appropriately based on urgency. You can select from the following priority levels:
* **High**: Ensures the notification is delivered immediately with sound and visual alerts. Suitable for time-sensitive messages like chat notifications or alerts.
* **Normal**: Delivers notifications efficiently without overriding system settings. Standard priority for most notifications.
##### User-visible importance level
The user-visible importance level controls how notifications appear to users, including sound, visuals, and interruptions. Choose the appropriate level to match the urgency of your notifications:
* **None**: Delivered silently with no sound or visual alerts.
* **Low**: No sound; does not appear in the status bar.
* **Medium**: No sound; appears in the status bar.
* **High**: Plays a sound and appears in the status bar.
* **Urgent**: Plays a sound and appears as a heads-up notification.
## Preview and save push content
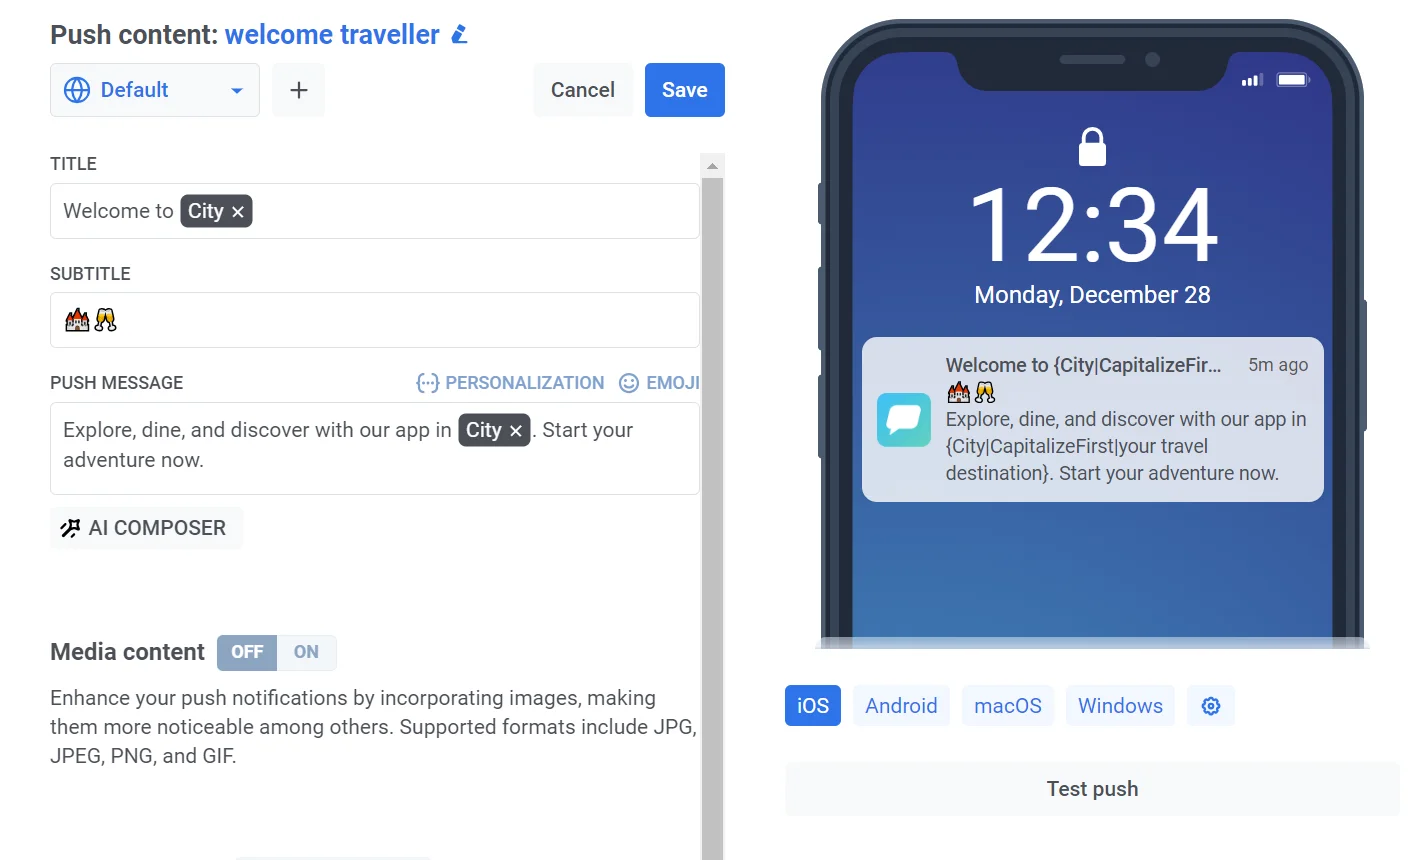
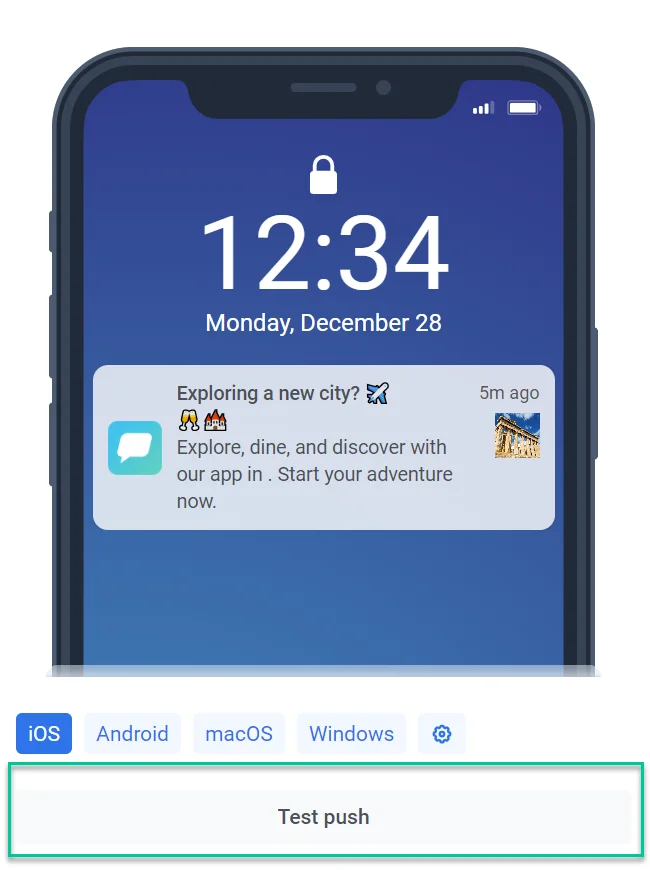
The push content editor provides a convenient way to visualize how your notification will appear on recipient devices. Simply choose the target platform you'd like to preview the notification for (e.g., Android, iOS).
To ensure that your push notifications are configured correctly and display as expected, send a test push to a dedicated device using the **Test push** feature. [Learn more about test devices](/developer/first-steps/test-your-integration/test-devices/)
Once you've finalized your push notification content, be sure to click the **Save** button located at the top of the editor.
Upon saving, your push notification will be added to the list of available push content. You can then easily access and utilize it within your future campaigns. [Learn more ](/product/messaging-channels/push-notifications)
## Understanding push content behavior in cloned Journey points
When you clone a push journey element, its content remains shared between the original and the copy. Any changes made to the content in one point will automatically update the other.
If you need unique content for the new point, create new push content instead of modifying the existing one.
## Push Preset (legacy)
For the legacy push preset form, including the Message and Action tabs and platform-specific settings for all platforms, see [Push preset (legacy form)](/product/content/push-presets/push-preset-legacy-form/).
 ## Define the languages you want to use in your push
Start by creating the default message content, which is sent to all users unless a more specific language version is provided. You can then add content for additional languages to tailor the message to users' device language settings.
To add additional languages, click the **Plus** sign at the top of the editor. A list of languages will appear, allowing you to choose the ones you need for your push notification.
## Define the languages you want to use in your push
Start by creating the default message content, which is sent to all users unless a more specific language version is provided. You can then add content for additional languages to tailor the message to users' device language settings.
To add additional languages, click the **Plus** sign at the top of the editor. A list of languages will appear, allowing you to choose the ones you need for your push notification.
 _For example, if your default language is English but you want to reach Spanish and German speakers as well, add those languages to your push notification. Users with Spanish or German phone settings will then receive the message in their preferred language, while others will see the default English version._
## Create push content
Next, begin creating your push content.
### Add a push title
Push titles are not required, but you can use them if you prefer to display a unique phrase instead of your app’s name in every push.
To add a title, simply enter the text in the designated field. You can also add [personalization](#personalize-push-content) and emojis.
_For example, if your default language is English but you want to reach Spanish and German speakers as well, add those languages to your push notification. Users with Spanish or German phone settings will then receive the message in their preferred language, while others will see the default English version._
## Create push content
Next, begin creating your push content.
### Add a push title
Push titles are not required, but you can use them if you prefer to display a unique phrase instead of your app’s name in every push.
To add a title, simply enter the text in the designated field. You can also add [personalization](#personalize-push-content) and emojis.
 ### Add a subtitle
Enter the subtitle text to provide extra context, details, or make your notification more engaging. Please note that subtitle functionality is currently limited to iOS devices. If a push notification containing subtitles is received on an Android device or any other platform, the subtitles won't be displayed.
### Add a subtitle
Enter the subtitle text to provide extra context, details, or make your notification more engaging. Please note that subtitle functionality is currently limited to iOS devices. If a push notification containing subtitles is received on an Android device or any other platform, the subtitles won't be displayed.
 ### Add a push message
Enter the text you want your users to see in the push notification. This is the primary content they will receive on their devices. You can also add emojis and incorporate [personalization](#personalize-push-content) elements to make your message more relevant to each user. The preview helps ensure your text displays fully on different devices.
### Add a push message
Enter the text you want your users to see in the push notification. This is the primary content they will receive on their devices. You can also add emojis and incorporate [personalization](#personalize-push-content) elements to make your message more relevant to each user. The preview helps ensure your text displays fully on different devices.
 ### Personalize push content
Pushwoosh allows you to personalize push notification elements like titles, subtitles, and messages. This means you can tailor your content to individual users for a more engaging experience. For this:
1. Click on the **Personalize** link above the title, subtitle, or message field you want to personalize.
2. A dropdown menu will appear, displaying available user data tags. Select the tag that best suits your personalization goal (e.g., user name, city, etc).
3. Choose the desired format modifier:
* **CapitalizeFirst.** The first letter of the tag’s value will be written in uppercase and the rest will appear in lowercase. For example: "_john doe_" becomes "_John doe_".
* **CapitalizeAllFirst.** The first letter of each word in the tag’s value will be written in uppercase. For example: "_john doe_" becomes "_John Doe_".
* **UPPERCASE.** Converts all letters in the tag’s value to uppercase. For example: "_john doe_" becomes "_JOHN DOE_".
* **Lowercase.** Converts all letters in the tag’s value to lowercase. For example: "_JOHN DOE_" becomes "_john doe_".
* **Regular.** Keeps the text formatting as it is in the original data. For example, if a user chose to indicate their name as "_john doe_" in your app's account settings, it will remain "_john doe_" in the personalized push copy.
4. In the **Default Tag Value** field, enter the text that should be used if the tag data is not available for a user. For instance, for a `City` tag you might enter "your travel destination" as the default value.
5. Click **Insert**.
### Personalize push content
Pushwoosh allows you to personalize push notification elements like titles, subtitles, and messages. This means you can tailor your content to individual users for a more engaging experience. For this:
1. Click on the **Personalize** link above the title, subtitle, or message field you want to personalize.
2. A dropdown menu will appear, displaying available user data tags. Select the tag that best suits your personalization goal (e.g., user name, city, etc).
3. Choose the desired format modifier:
* **CapitalizeFirst.** The first letter of the tag’s value will be written in uppercase and the rest will appear in lowercase. For example: "_john doe_" becomes "_John doe_".
* **CapitalizeAllFirst.** The first letter of each word in the tag’s value will be written in uppercase. For example: "_john doe_" becomes "_John Doe_".
* **UPPERCASE.** Converts all letters in the tag’s value to uppercase. For example: "_john doe_" becomes "_JOHN DOE_".
* **Lowercase.** Converts all letters in the tag’s value to lowercase. For example: "_JOHN DOE_" becomes "_john doe_".
* **Regular.** Keeps the text formatting as it is in the original data. For example, if a user chose to indicate their name as "_john doe_" in your app's account settings, it will remain "_john doe_" in the personalized push copy.
4. In the **Default Tag Value** field, enter the text that should be used if the tag data is not available for a user. For instance, for a `City` tag you might enter "your travel destination" as the default value.
5. Click **Insert**.
 _For example, imagine you run a travel app and want to target users exploring a new city with a push notification promoting tours and guides. To personalize the message, select the City tag and apply the **CapitalizeFirst** format modifier._
Remember, available tags depend on the user data you collect. [Learn more about tags ](/product/audience-data-and-segmentation/user-data-tags/tags)
_For example, imagine you run a travel app and want to target users exploring a new city with a push notification promoting tours and guides. To personalize the message, select the City tag and apply the **CapitalizeFirst** format modifier._
Remember, available tags depend on the user data you collect. [Learn more about tags ](/product/audience-data-and-segmentation/user-data-tags/tags)
 ### Validate Liquid syntax
If you use [Liquid templates](/product/personalization/liquid-templates/) in your push title, subtitle, or message, you can check them for syntax errors before saving. This helps you catch issues like unclosed tags or typos early, so your personalization renders correctly when the push is sent.
To run the check, click the **Validate Liquid Syntax** button.
Pushwoosh checks the title, subtitle, and message in every language you’ve added. If it finds a syntax error, a notification appears indicating the issue.
### Create dedicated copy in all languages you’ve selected
If you want to send push content in multiple languages, you'll need to create content for each language you've chosen.
Select a language from the dropdown menu and fill in all the fields as described above.
### Validate Liquid syntax
If you use [Liquid templates](/product/personalization/liquid-templates/) in your push title, subtitle, or message, you can check them for syntax errors before saving. This helps you catch issues like unclosed tags or typos early, so your personalization renders correctly when the push is sent.
To run the check, click the **Validate Liquid Syntax** button.
Pushwoosh checks the title, subtitle, and message in every language you’ve added. If it finds a syntax error, a notification appears indicating the issue.
### Create dedicated copy in all languages you’ve selected
If you want to send push content in multiple languages, you'll need to create content for each language you've chosen.
Select a language from the dropdown menu and fill in all the fields as described above.
 ### Add media content
You can optionally add images to your push notifications to improve their visual appeal and potentially increase user engagement. Supported formats include JPG, JPEG, PNG, and GIF.
To add media content, enable the **Media content** toggle. You can paste an icon URL or an image URL directly, or click the image icon next to the field to open the [Media store](/product/content/media-store/) and select an image you have already uploaded.
### Add media content
You can optionally add images to your push notifications to improve their visual appeal and potentially increase user engagement. Supported formats include JPG, JPEG, PNG, and GIF.
To add media content, enable the **Media content** toggle. You can paste an icon URL or an image URL directly, or click the image icon next to the field to open the [Media store](/product/content/media-store/) and select an image you have already uploaded.
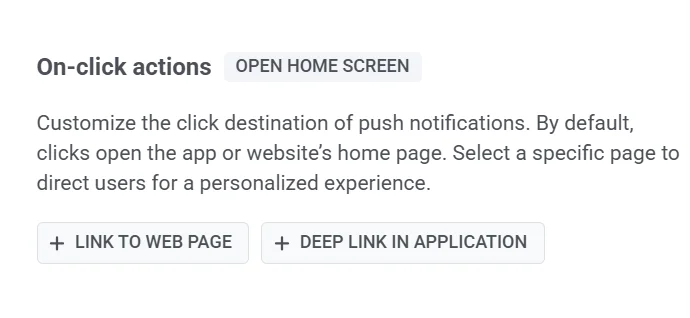
 ### Define the next step for users who click on the notification
By default, when users click on push notifications, they are directed to the main screen of your app or the home page of your website. However, you can customize the notification to redirect users to a specific page within your app or in their browser.
To do this, follow these steps:
1. Navigate to the **On-click Actions** section of the Push preset.
2. Choose a link type:
* Deep link in application.
* Link to web page for web subscribers.
### Define the next step for users who click on the notification
By default, when users click on push notifications, they are directed to the main screen of your app or the home page of your website. However, you can customize the notification to redirect users to a specific page within your app or in their browser.
To do this, follow these steps:
1. Navigate to the **On-click Actions** section of the Push preset.
2. Choose a link type:
* Deep link in application.
* Link to web page for web subscribers.
 #### Link to web page
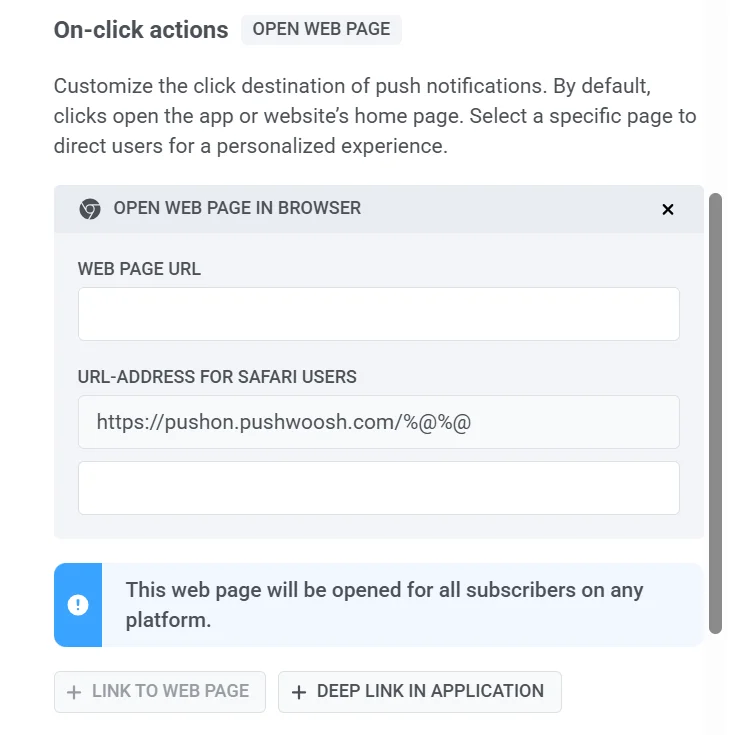
To open a webpage in the browser, simply add the desired link to the Web page URL field. Optionally, provide a **Safari-specific URL**.
#### Link to web page
To open a webpage in the browser, simply add the desired link to the Web page URL field. Optionally, provide a **Safari-specific URL**.
 #### Deep link in application
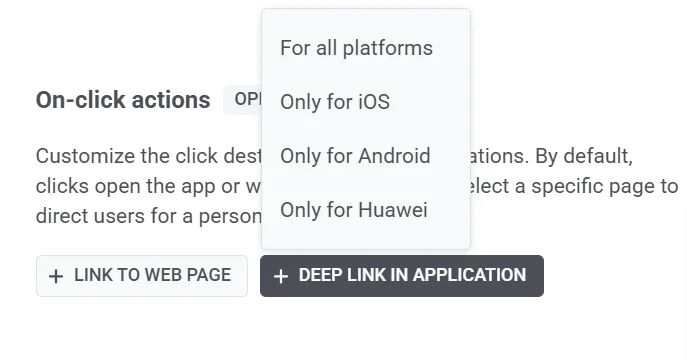
1. Choose the target platforms:
* For all platforms
* Only for iOS
* Only for Android
* Only for Huawei
#### Deep link in application
1. Choose the target platforms:
* For all platforms
* Only for iOS
* Only for Android
* Only for Huawei
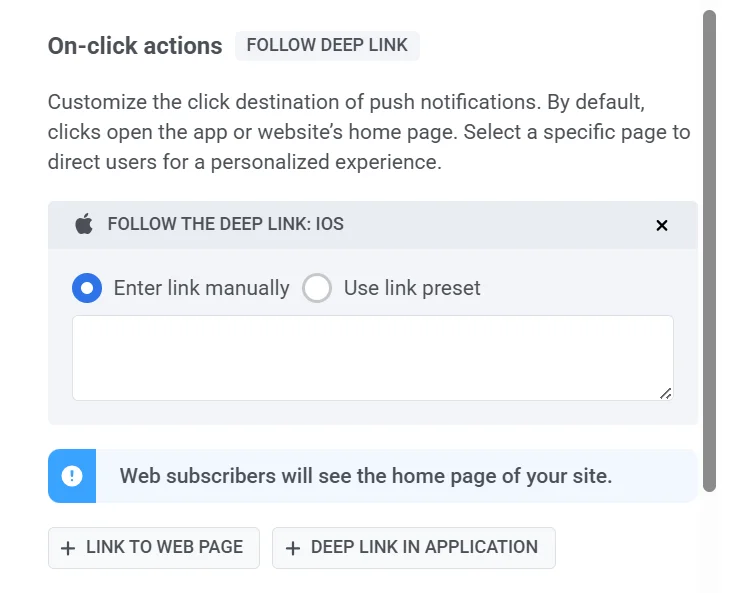
 2. Enter the deep link URL. There are 2 ways to do it:
* **Manually.** Input the specific deep link URL for the page or feature you want users to access within your app.
* **Using deep-link presets.** If you have predefined deep link presets, you can select one from the available list. Presets can be managed in **Settings \> Deep Links** if needed. [Learn more](/product/messaging-channels/push-notifications/advanced-push-features/deep-linking)
2. Enter the deep link URL. There are 2 ways to do it:
* **Manually.** Input the specific deep link URL for the page or feature you want users to access within your app.
* **Using deep-link presets.** If you have predefined deep link presets, you can select one from the available list. Presets can be managed in **Settings \> Deep Links** if needed. [Learn more](/product/messaging-channels/push-notifications/advanced-push-features/deep-linking)
 ### Add Custom Data
**Custom Data** allows you to include additional information within your push notifications. This information is structured as a JSON object, containing key-value pairs. By using Custom Data, you can dynamically update your app's content, direct users to specific sections within the app, and manage actions after push notification receipt and processing. [Learn more](/product/messaging-channels/push-notifications/advanced-push-features/using-custom-data)
To include Custom Data in your push notification, simply toggle **Custom Data** on and insert your JSON data into the Custom data field.
### Add Custom Data
**Custom Data** allows you to include additional information within your push notifications. This information is structured as a JSON object, containing key-value pairs. By using Custom Data, you can dynamically update your app's content, direct users to specific sections within the app, and manage actions after push notification receipt and processing. [Learn more](/product/messaging-channels/push-notifications/advanced-push-features/using-custom-data)
To include Custom Data in your push notification, simply toggle **Custom Data** on and insert your JSON data into the Custom data field.
 ## Configure notification settings
Notification settings in Push presets allow you to customize how users receive and interact with notifications. You can define badge count, sound preferences, and delivery priority to align notifications with your app’s requirements.
To configure these settings, click **Notification settings** under the push preview.

### Set badge count
The badge count is the number displayed on an app icon, typically indicating unread messages or notifications. Using badge count in Push Presets ensures that notifications consistently update the app icon badge, helping users keep track of unread messages, tasks, or alerts.

**Increase (+1):** Adds 1 to the current badge count.
*Example:* A push notification for a new message increases the badge count from 2 to 3, indicating 3 unread messages.
**Decrease (-1):** Subtracts 1 from the current badge count.
*Example:* A push notification confirms a completed task, reducing the badge count from 5 to 4, showing 4 pending tasks.
**Set a specific number:** Assigns an exact badge count.
*Example:* A push notification from a news app sets the badge count to 10 when 10 unread articles are available.
### Platform-specific settings
You can configure notification settings separately for **iOS** and **Android** platforms by switching between the respective tabs.
#### iOS notification settings

##### Sound
Select a notification sound from the dropdown menu.
* **Default**: Plays the system’s default notification sound.
* **Mute**: Disables sound for this notification.
* **bubble.wav**.
##### Delivery priority
Delivery priority determines how push notifications are handled on the user's device, ensuring important messages are delivered appropriately based on urgency. You can select from the following priority levels:
* **Critical**: Delivered immediately, even when Do Not Disturb is enabled. These notifications light up the screen, bypass the mute switch, and play a sound. Requires Apple-approved entitlement and should be used for emergency alerts (e.g., severe weather, safety warnings).
* **Active**: Standard push notifications that appear instantly, light up the screen, and play sounds or vibrations. Blocked by Focus mode, meaning users won’t receive them if their device settings restrict notifications. Best for chat messages or important updates.
* **Time-sensitive**: Delivered immediately even if Focus mode is enabled, with a yellow "Time-Sensitive" banner. Users can disable this interruption level. Ideal for urgent alerts like account security warnings or package delivery updates.
* **Passive**: Added to the notification center without lighting up the screen or playing a sound. These notifications do not bypass Focus mode and are best for non-urgent updates, recommendations, or promotional offers.
#### Android notification settings

##### Sound settings
Choose how notifications play sounds when received:
* **Default**: Uses the system’s default notification sound.
* **Mute**: Delivers the notification silently without sound.
##### Delivery priority
Delivery priority determines how push notifications are handled on the user's device, ensuring important messages are delivered appropriately based on urgency. You can select from the following priority levels:
* **High**: Ensures the notification is delivered immediately with sound and visual alerts. Suitable for time-sensitive messages like chat notifications or alerts.
* **Normal**: Delivers notifications efficiently without overriding system settings. Standard priority for most notifications.
##### User-visible importance level
The user-visible importance level controls how notifications appear to users, including sound, visuals, and interruptions. Choose the appropriate level to match the urgency of your notifications:
* **None**: Delivered silently with no sound or visual alerts.
* **Low**: No sound; does not appear in the status bar.
* **Medium**: No sound; appears in the status bar.
* **High**: Plays a sound and appears in the status bar.
* **Urgent**: Plays a sound and appears as a heads-up notification.
## Preview and save push content
The push content editor provides a convenient way to visualize how your notification will appear on recipient devices. Simply choose the target platform you'd like to preview the notification for (e.g., Android, iOS).
To ensure that your push notifications are configured correctly and display as expected, send a test push to a dedicated device using the **Test push** feature. [Learn more about test devices](/developer/first-steps/test-your-integration/test-devices/)
## Configure notification settings
Notification settings in Push presets allow you to customize how users receive and interact with notifications. You can define badge count, sound preferences, and delivery priority to align notifications with your app’s requirements.
To configure these settings, click **Notification settings** under the push preview.

### Set badge count
The badge count is the number displayed on an app icon, typically indicating unread messages or notifications. Using badge count in Push Presets ensures that notifications consistently update the app icon badge, helping users keep track of unread messages, tasks, or alerts.

**Increase (+1):** Adds 1 to the current badge count.
*Example:* A push notification for a new message increases the badge count from 2 to 3, indicating 3 unread messages.
**Decrease (-1):** Subtracts 1 from the current badge count.
*Example:* A push notification confirms a completed task, reducing the badge count from 5 to 4, showing 4 pending tasks.
**Set a specific number:** Assigns an exact badge count.
*Example:* A push notification from a news app sets the badge count to 10 when 10 unread articles are available.
### Platform-specific settings
You can configure notification settings separately for **iOS** and **Android** platforms by switching between the respective tabs.
#### iOS notification settings

##### Sound
Select a notification sound from the dropdown menu.
* **Default**: Plays the system’s default notification sound.
* **Mute**: Disables sound for this notification.
* **bubble.wav**.
##### Delivery priority
Delivery priority determines how push notifications are handled on the user's device, ensuring important messages are delivered appropriately based on urgency. You can select from the following priority levels:
* **Critical**: Delivered immediately, even when Do Not Disturb is enabled. These notifications light up the screen, bypass the mute switch, and play a sound. Requires Apple-approved entitlement and should be used for emergency alerts (e.g., severe weather, safety warnings).
* **Active**: Standard push notifications that appear instantly, light up the screen, and play sounds or vibrations. Blocked by Focus mode, meaning users won’t receive them if their device settings restrict notifications. Best for chat messages or important updates.
* **Time-sensitive**: Delivered immediately even if Focus mode is enabled, with a yellow "Time-Sensitive" banner. Users can disable this interruption level. Ideal for urgent alerts like account security warnings or package delivery updates.
* **Passive**: Added to the notification center without lighting up the screen or playing a sound. These notifications do not bypass Focus mode and are best for non-urgent updates, recommendations, or promotional offers.
#### Android notification settings

##### Sound settings
Choose how notifications play sounds when received:
* **Default**: Uses the system’s default notification sound.
* **Mute**: Delivers the notification silently without sound.
##### Delivery priority
Delivery priority determines how push notifications are handled on the user's device, ensuring important messages are delivered appropriately based on urgency. You can select from the following priority levels:
* **High**: Ensures the notification is delivered immediately with sound and visual alerts. Suitable for time-sensitive messages like chat notifications or alerts.
* **Normal**: Delivers notifications efficiently without overriding system settings. Standard priority for most notifications.
##### User-visible importance level
The user-visible importance level controls how notifications appear to users, including sound, visuals, and interruptions. Choose the appropriate level to match the urgency of your notifications:
* **None**: Delivered silently with no sound or visual alerts.
* **Low**: No sound; does not appear in the status bar.
* **Medium**: No sound; appears in the status bar.
* **High**: Plays a sound and appears in the status bar.
* **Urgent**: Plays a sound and appears as a heads-up notification.
## Preview and save push content
The push content editor provides a convenient way to visualize how your notification will appear on recipient devices. Simply choose the target platform you'd like to preview the notification for (e.g., Android, iOS).
To ensure that your push notifications are configured correctly and display as expected, send a test push to a dedicated device using the **Test push** feature. [Learn more about test devices](/developer/first-steps/test-your-integration/test-devices/)
 Once you've finalized your push notification content, be sure to click the **Save** button located at the top of the editor.
 Upon saving, your push notification will be added to the list of available push content. You can then easily access and utilize it within your future campaigns. [Learn more ](/product/messaging-channels/push-notifications)
## Understanding push content behavior in cloned Journey points
When you clone a push journey element, its content remains shared between the original and the copy. Any changes made to the content in one point will automatically update the other.
If you need unique content for the new point, create new push content instead of modifying the existing one.
## Push Preset (legacy)
For the legacy push preset form, including the Message and Action tabs and platform-specific settings for all platforms, see [Push preset (legacy form)](/product/content/push-presets/push-preset-legacy-form/).
Upon saving, your push notification will be added to the list of available push content. You can then easily access and utilize it within your future campaigns. [Learn more ](/product/messaging-channels/push-notifications)
## Understanding push content behavior in cloned Journey points
When you clone a push journey element, its content remains shared between the original and the copy. Any changes made to the content in one point will automatically update the other.
If you need unique content for the new point, create new push content instead of modifying the existing one.
## Push Preset (legacy)
For the legacy push preset form, including the Message and Action tabs and platform-specific settings for all platforms, see [Push preset (legacy form)](/product/content/push-presets/push-preset-legacy-form/).