# Media store
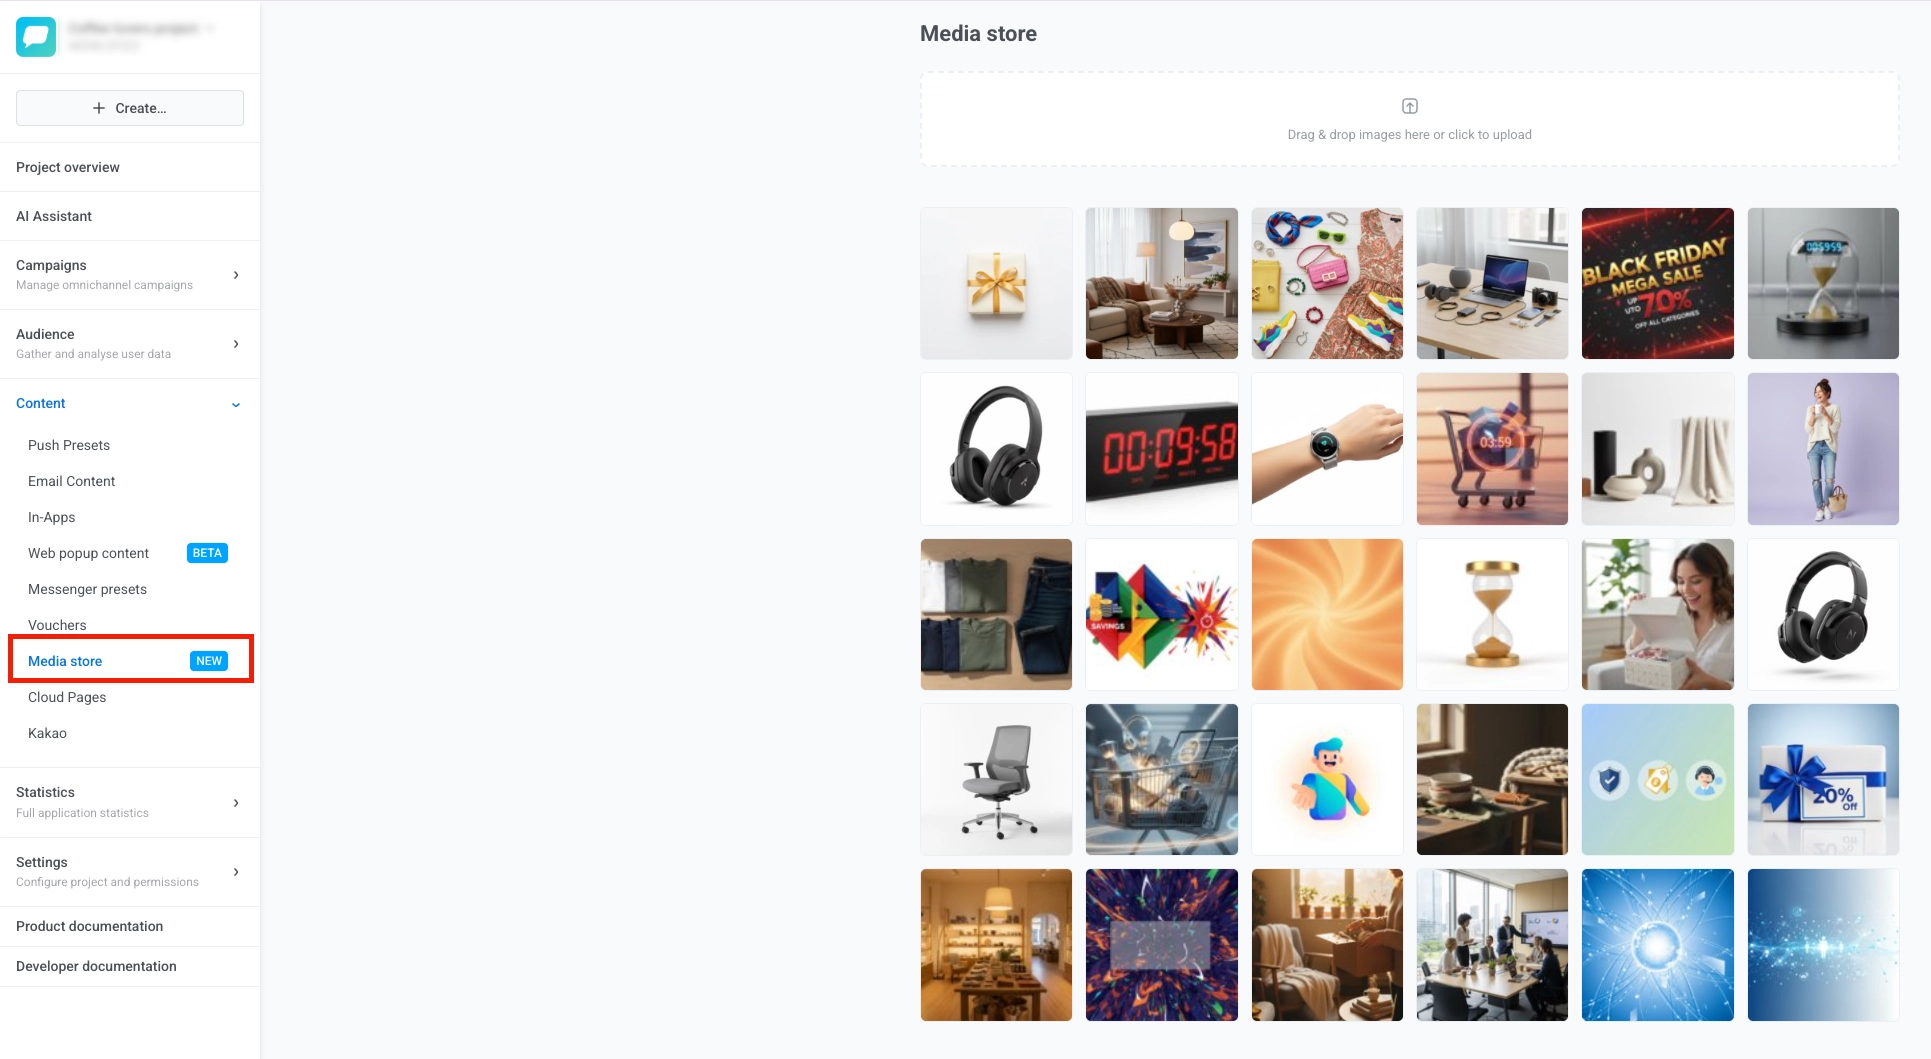
The Media store is your project's built-in image library. Upload images once and reuse them across push notifications, web push, emails, in-app messages, Cloud Pages, and other content, directly in the editor or via a stable URL.
To open the Media store, go to **Content > Media store** in the Pushwoosh Control Panel.
## Upload images
To upload images to the Media store:
* **Drag and drop** one or more image files onto the upload area.
* **Click the upload area** to open the file picker and select images from your device.
When the upload finishes, your images appear in the grid below with the most recent first, and you can click **Previous** or **Next** to browse older pages if needed.
## Create image variants
A **variant** is a resized, cropped copy of an original image at a specific aspect ratio. Variants are useful when the same image needs different proportions for different channels or placements.
To create a variant:
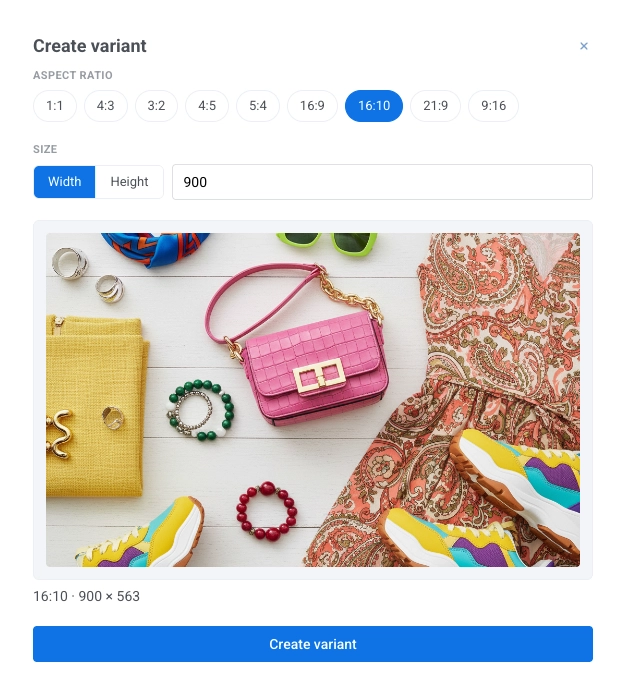
1. Hover over an image and click the **Edit** button. The **Create variant** panel opens.
2. Choose an **Aspect ratio** to set the shape of the cropped image so it fits the placement where you will use it.
3. Set the **Size**. Choose whether your value defines the **Width** or the **Height**, then enter the number of pixels. Pushwoosh calculates the other dimension from the selected aspect ratio.
4. For JPEG images, set the **JPEG quality** value from 1 to 100. A higher value keeps more detail but produces a larger file.
5. Click **Create variant**.
The new variant is saved alongside the original. You can create one variant per aspect ratio for each image. If a variant with the selected ratio already exists, Pushwoosh lets you know so you do not create a duplicate.
## Delete images
You can delete images you no longer need, either an original together with all of its variants, or a single variant on its own.
#### Delete an original image
1. Hover over the image in the grid and click the **Delete** icon.
2. In the confirmation window, click **Delete**.
#### Delete a single variant without removing the original
1. Hover over the image and click the **Edit** button to open the **Create variant** panel.
2. In the list of existing variants, find the one you want to remove and click its **Delete** button.
3. In the confirmation window, click **Delete**.
## Use images in your content
How you add a Media store image depends on the content type.
### Select an image in the editor
Some content types let you pick a Media store image directly in the editor, without copying a URL. The steps differ by content type:
* **Push notifications and web push content:** See [Add media content](/product/content/push-presets/#add-media-content) in Push presets.
* **Web popups:** See [Images](/product/content/web-popups-content/#images) in Web popup content.
* **Emails created with AI Email Builder**
### Copy an image URL
Copy a URL from the Media store and paste it into your content editor.
To copy the URL:
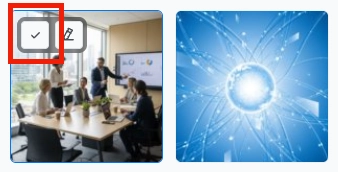
1. Hover over the image you want in the Media store grid.
2. Click the **Select** button (the checkmark icon) on the image.
Once the URL is copied to your clipboard, paste it into the editor you are using.
Where you paste it depends on the editor:
* **Image URL field:** [Drag & drop editor — Image block](/product/content/email-content/drag-and-drop-email-editor/blocks/#image), [in-app editor](/product/content/in-apps/no-code-in-app-editor/built-in-editor-blocks-reference/#image), or [Cloud Page editor](/product/content/cloud-pages/create-and-publish-a-cloud-page/#add-images)
* **HTML `src` attribute:** See [Add images](/product/content/email-content/html-code-editor/#add-images) in the HTML code editor
#### Select an original or a variant
To copy the URL of an original or a variant:
1. Hover over the image in the grid. If it has variants, its tile shows a badge with the count (for example, **2 var.**).
2. Click the **Select** button to open the menu.
3. Choose **Original** to copy the URL of the full-size image, or choose a variant listed by its aspect ratio to copy that variant's URL.
 ## Upload images
To upload images to the Media store:
* **Drag and drop** one or more image files onto the upload area.
* **Click the upload area** to open the file picker and select images from your device.
## Upload images
To upload images to the Media store:
* **Drag and drop** one or more image files onto the upload area.
* **Click the upload area** to open the file picker and select images from your device.
 When the upload finishes, your images appear in the grid below with the most recent first, and you can click **Previous** or **Next** to browse older pages if needed.
## Create image variants
A **variant** is a resized, cropped copy of an original image at a specific aspect ratio. Variants are useful when the same image needs different proportions for different channels or placements.
To create a variant:
1. Hover over an image and click the **Edit** button. The **Create variant** panel opens.
2. Choose an **Aspect ratio** to set the shape of the cropped image so it fits the placement where you will use it.
3. Set the **Size**. Choose whether your value defines the **Width** or the **Height**, then enter the number of pixels. Pushwoosh calculates the other dimension from the selected aspect ratio.
4. For JPEG images, set the **JPEG quality** value from 1 to 100. A higher value keeps more detail but produces a larger file.
5. Click **Create variant**.
When the upload finishes, your images appear in the grid below with the most recent first, and you can click **Previous** or **Next** to browse older pages if needed.
## Create image variants
A **variant** is a resized, cropped copy of an original image at a specific aspect ratio. Variants are useful when the same image needs different proportions for different channels or placements.
To create a variant:
1. Hover over an image and click the **Edit** button. The **Create variant** panel opens.
2. Choose an **Aspect ratio** to set the shape of the cropped image so it fits the placement where you will use it.
3. Set the **Size**. Choose whether your value defines the **Width** or the **Height**, then enter the number of pixels. Pushwoosh calculates the other dimension from the selected aspect ratio.
4. For JPEG images, set the **JPEG quality** value from 1 to 100. A higher value keeps more detail but produces a larger file.
5. Click **Create variant**.
 The new variant is saved alongside the original. You can create one variant per aspect ratio for each image. If a variant with the selected ratio already exists, Pushwoosh lets you know so you do not create a duplicate.
## Delete images
You can delete images you no longer need, either an original together with all of its variants, or a single variant on its own.
#### Delete an original image
1. Hover over the image in the grid and click the **Delete** icon.
2. In the confirmation window, click **Delete**.
#### Delete a single variant without removing the original
1. Hover over the image and click the **Edit** button to open the **Create variant** panel.
2. In the list of existing variants, find the one you want to remove and click its **Delete** button.
3. In the confirmation window, click **Delete**.
## Use images in your content
How you add a Media store image depends on the content type.
### Select an image in the editor
Some content types let you pick a Media store image directly in the editor, without copying a URL. The steps differ by content type:
* **Push notifications and web push content:** See [Add media content](/product/content/push-presets/#add-media-content) in Push presets.
* **Web popups:** See [Images](/product/content/web-popups-content/#images) in Web popup content.
* **Emails created with AI Email Builder**
### Copy an image URL
Copy a URL from the Media store and paste it into your content editor.
To copy the URL:
1. Hover over the image you want in the Media store grid.
2. Click the **Select** button (the checkmark icon) on the image.
The new variant is saved alongside the original. You can create one variant per aspect ratio for each image. If a variant with the selected ratio already exists, Pushwoosh lets you know so you do not create a duplicate.
## Delete images
You can delete images you no longer need, either an original together with all of its variants, or a single variant on its own.
#### Delete an original image
1. Hover over the image in the grid and click the **Delete** icon.
2. In the confirmation window, click **Delete**.
#### Delete a single variant without removing the original
1. Hover over the image and click the **Edit** button to open the **Create variant** panel.
2. In the list of existing variants, find the one you want to remove and click its **Delete** button.
3. In the confirmation window, click **Delete**.
## Use images in your content
How you add a Media store image depends on the content type.
### Select an image in the editor
Some content types let you pick a Media store image directly in the editor, without copying a URL. The steps differ by content type:
* **Push notifications and web push content:** See [Add media content](/product/content/push-presets/#add-media-content) in Push presets.
* **Web popups:** See [Images](/product/content/web-popups-content/#images) in Web popup content.
* **Emails created with AI Email Builder**
### Copy an image URL
Copy a URL from the Media store and paste it into your content editor.
To copy the URL:
1. Hover over the image you want in the Media store grid.
2. Click the **Select** button (the checkmark icon) on the image.
 Once the URL is copied to your clipboard, paste it into the editor you are using.
Where you paste it depends on the editor:
* **Image URL field:** [Drag & drop editor — Image block](/product/content/email-content/drag-and-drop-email-editor/blocks/#image), [in-app editor](/product/content/in-apps/no-code-in-app-editor/built-in-editor-blocks-reference/#image), or [Cloud Page editor](/product/content/cloud-pages/create-and-publish-a-cloud-page/#add-images)
* **HTML `src` attribute:** See [Add images](/product/content/email-content/html-code-editor/#add-images) in the HTML code editor
#### Select an original or a variant
To copy the URL of an original or a variant:
1. Hover over the image in the grid. If it has variants, its tile shows a badge with the count (for example, **2 var.**).
2. Click the **Select** button to open the menu.
3. Choose **Original** to copy the URL of the full-size image, or choose a variant listed by its aspect ratio to copy that variant's URL.
Once the URL is copied to your clipboard, paste it into the editor you are using.
Where you paste it depends on the editor:
* **Image URL field:** [Drag & drop editor — Image block](/product/content/email-content/drag-and-drop-email-editor/blocks/#image), [in-app editor](/product/content/in-apps/no-code-in-app-editor/built-in-editor-blocks-reference/#image), or [Cloud Page editor](/product/content/cloud-pages/create-and-publish-a-cloud-page/#add-images)
* **HTML `src` attribute:** See [Add images](/product/content/email-content/html-code-editor/#add-images) in the HTML code editor
#### Select an original or a variant
To copy the URL of an original or a variant:
1. Hover over the image in the grid. If it has variants, its tile shows a badge with the count (for example, **2 var.**).
2. Click the **Select** button to open the menu.
3. Choose **Original** to copy the URL of the full-size image, or choose a variant listed by its aspect ratio to copy that variant's URL.