# Kakao templates
Kakao templates let you create and manage reusable KakaoTalk message templates directly in the Pushwoosh Control Panel. You can personalize messages with variables, choose from multiple template types, and submit templates for approval.
Once created and approved, you can use these templates in campaigns to reach users via KakaoTalk.
## Available template types
| | |
| ---- | ---- |
| **Basic (BA)** | Text-only template with optional highlight section. Best for simple notifications and straightforward messages. [Learn more](#basic-ba-template) |
| **Additional Information (EX)** | Template with main message and additional info section for structured data (like appointment time, location, or order details). Best for delivery notifications, order confirmations, and messages that require extra context. [Learn more](#additional-information-ex-template) |
| **Channel Addition (AD)** | Template with exactly one Add Channel button that redirects users to your KakaoTalk Channel. Best for growing your Kakao Channel audience and enabling future communications. [Learn more](#channel-addition-ad-template) |
| **Combined (MI)** | Template with Add Channel button plus up to 4 additional action buttons (up to 5 total). Best for interactive, service-related messages that require users to respond, confirm, reschedule, or access support. [Learn more](#combined-mi-template) |
## Approval statuses
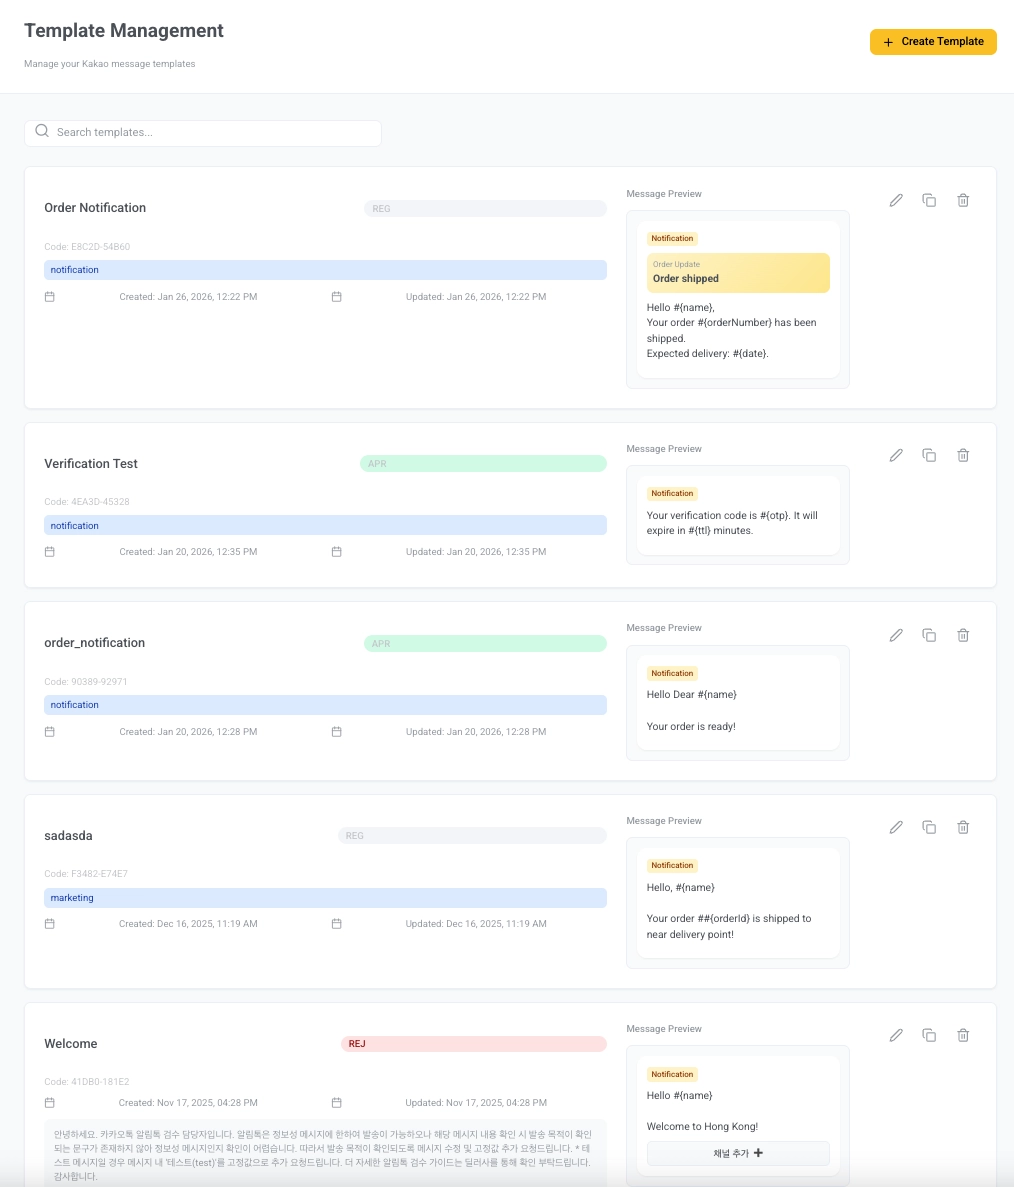
After you submit a KakaoTalk template, it goes through review before it can be used in campaigns. You can see each template's status in the **Template Management** list:
| | |
| ---- | ---- |
| **REG (Registered)** | The template is saved in the system but has not yet been submitted for review. You can continue editing it and submit it when ready. |
| **REQ (Requested)** | The template has been sent for review and is currently being reviewed by Kakao. |
| **APR (Approved)** | The template is approved and can be used in campaigns and one‑time sends. |
| **REJ (Rejected)** | The template was declined. Review the rejection notes, update the content to meet guidelines, and resubmit. |
## Creating templates
### Basic (BA) template
1. Go to **Content > Kakao** and click **Create Template**.
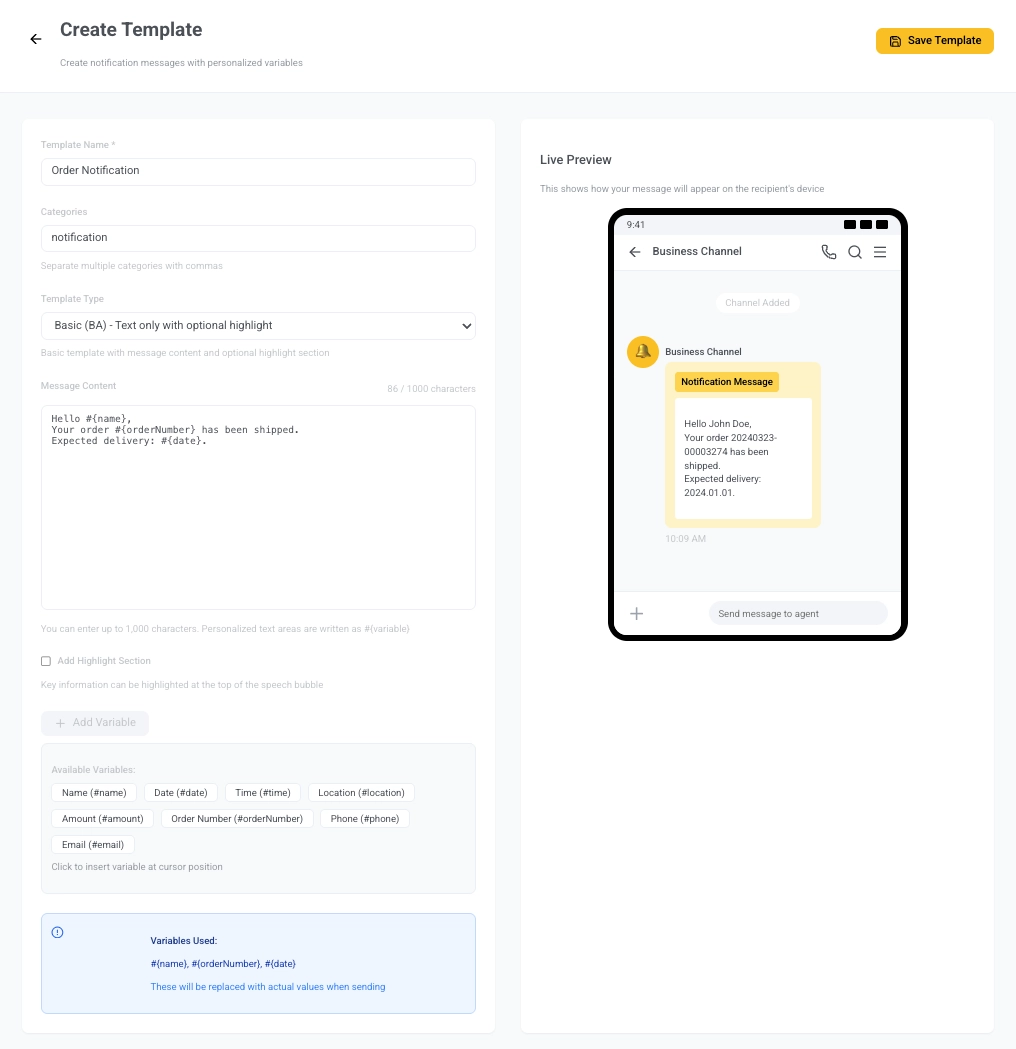
2. From the **Template Type** dropdown, choose **Basic (BA) – Text only with optional highlight.**
3. Fill in template details:
* **Template Name:** Enter a name to identify this template internally (e.g., *Order Notification*).
* **Categories:** Enter one or more categories for this template (e.g., `notification`). Separate multiple categories with commas.
4. In the **Message Content** field, enter the body of your message. You can use up to 1,000 characters.
You can personalize it with variables. For this, insert variables by clicking **+ Add Variable** and selecting from the available list, or type them directly in the format `#{variable}`.
*Example:*
```
Hello #{name},
Your order #{orderNumber} has been shipped.
Expected delivery: #{date}.
```
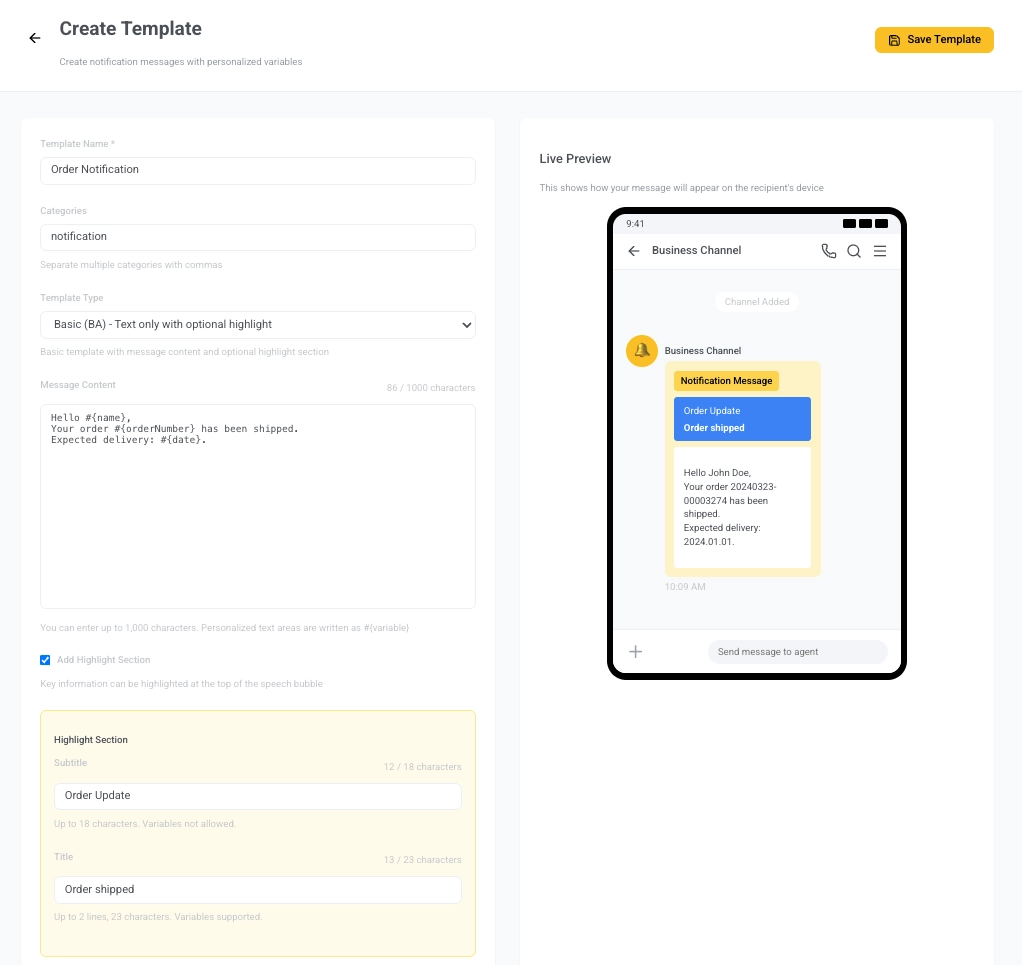
5. (Optional) Add a highlight section to emphasize key information at the top of the message bubble:
* **Subtitle**: Up to 18 characters. Variables are not allowed.
* **Title**: Up to 23 characters (2 lines). Variables are allowed and must be from the available list.
6. Check the **Live Preview** panel on the right to see how your message will appear to recipients.
7. Click **Save Template** in the top right. The template will be saved in REG (Registered) status.
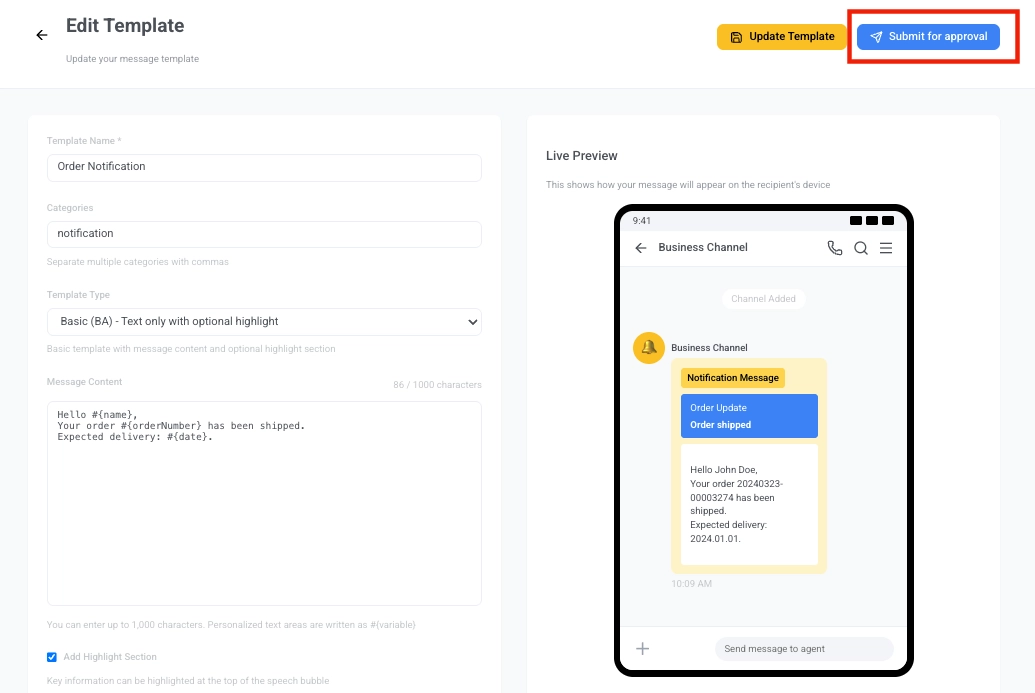
8. Once you're ready, navigate back to the **Template Management** list (**Content > Kakao**).
Select your newly created template to open the **Edit Template** view. Click the blue **Submit for approval** button.
### Additional information (EX) template
The Additional Information (EX) template includes a structured main message and an optional additional info section. It's ideal for sharing details like delivery status, order info, or instructions below the main message.
You can add up to 5 buttons (Add Channel buttons are not allowed).
Follow steps 1–5 from [Basic (BA) template](#basic-ba-template) to set up the template name, categories, main message, variables, and highlight section. Then continue with the steps below:
1. Add supporting details below the main message. Variables are not allowed here. Max 500 characters.
*Example:*
```
Items in your order:
- 1x Bluetooth headphones
- 1x Protective case
Questions? Contact support@example.com
```
2. Add up to 5 action buttons. Click **Add Button** and provide:
* **Title**: the button text
* **Action/URL**: where the button leads (e.g., order tracking page)
3. Use the **Live Preview** panel to see how your message will appear.
4. When you're done, click **Save Template**. The template is saved in REG (Registered) status and not yet submitted.
5. Go to the **Template Management** page and click **Submit for approval** when you're ready.
### Channel addition (AD) template
The Channel Addition (AD) template is used when your goal is to prompt users to follow your KakaoTalk channel. This type of template is required to include exactly one Add Channel button. This template type is ideal for onboarding flows or opt-in requests, where channel subscription is the main CTA.
Follow steps 1–5 from [Basic (BA) template](#basic-ba-template) to set up the template type, name, categories, main message, variables, and highlight section. Then continue with the steps below:
1. Click **Add Button** in the Buttons section and enter a **Button Name** (up to 14 characters).
*Example:* `Follow`
The **Link Type** is set to `AC – Add Channel` by default.
2. Use the **Live Preview** on the right to check how the message will appear.
3. Click **Save Template** to save it in REG (Registered) status. When ready, go to the **Template Management** page and click **Submit for approval**.
### Combined (MI) template
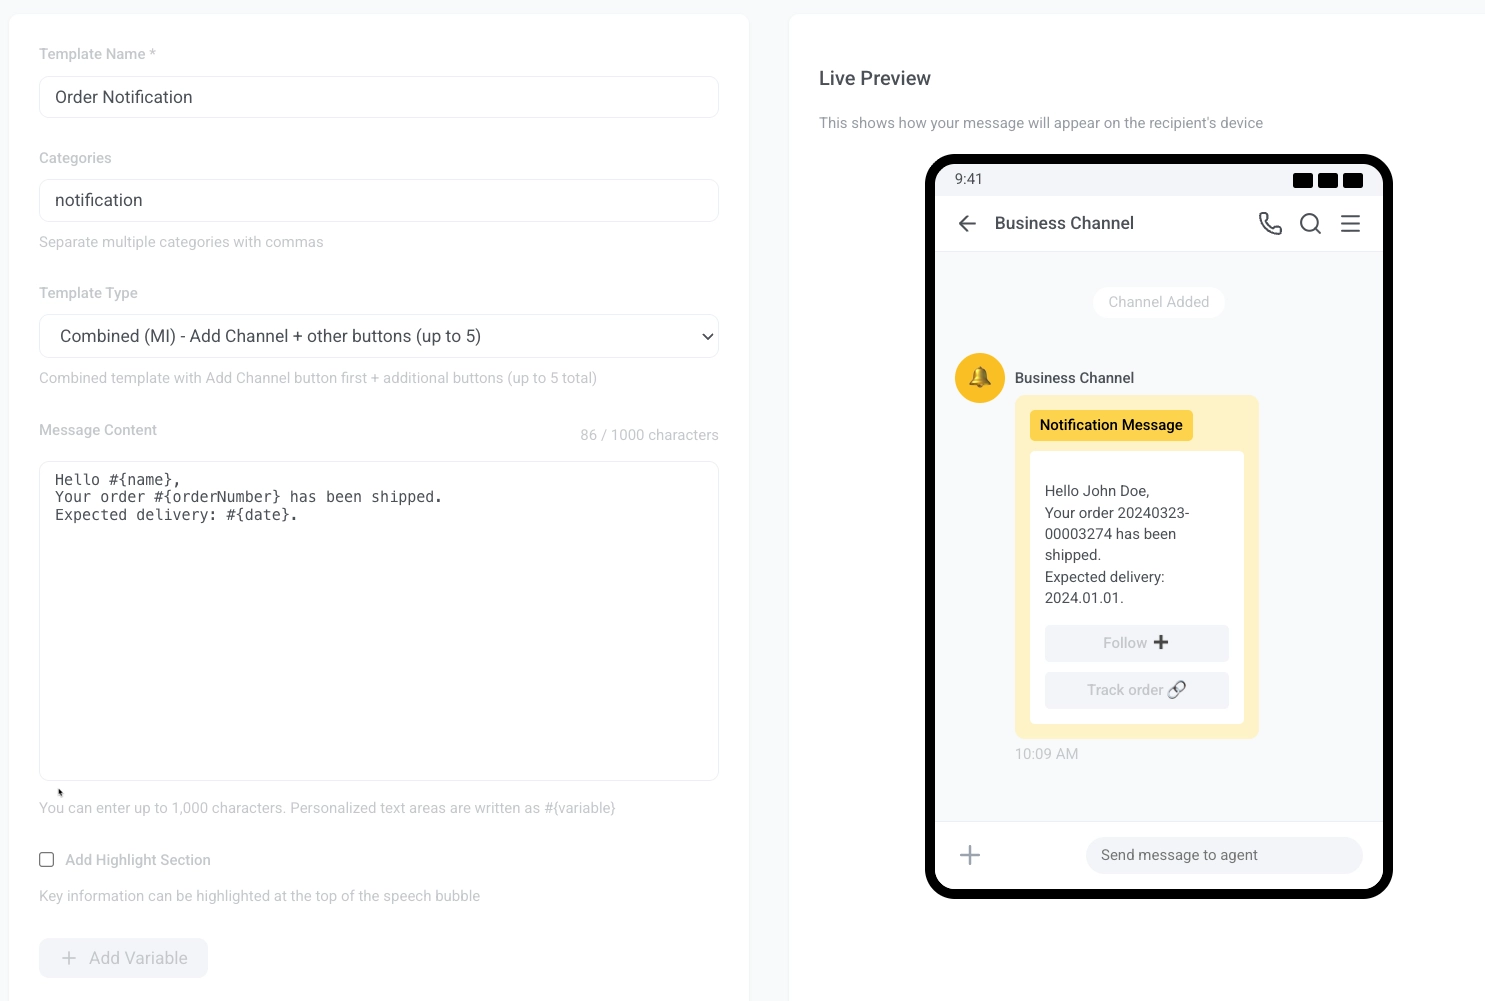
The Combined (MI) template lets you include an Add Channel button first, followed by up to 4 additional action buttons. This type is useful when you want users to follow your KakaoTalk channel *and* offer extra links for related actions (like tracking, help pages, surveys, etc.).
Follow steps 1–5 from [Basic (BA) template](#basic-ba-template) to set up the template type, name, categories, main message, variables, and highlight section. Then continue with the steps below:
1. (Optional) Add supporting details below the main message. Variables are not allowed here. Max 500 characters.
*Example:*
```
Items in your order:
- 1x Bluetooth headphones
- 1x Protective case
Questions? Contact support@example.com
```
2. Click **Add Button** and set the **Button Name** (max 14 characters), e.g. `Follow` or `Subscribe`.
3. Add up to four more buttons after the Add Channel button.
Each additional button must include:
* **Button Name**: e.g., `Track Order`, `Help`, `Shop Now`.
* **Link Type**: choose from `WL – Web Link`, `AL – App/Web Link`, or `AC – Add Channel`.
* **Mobile URL**: required.
* **PC URL**: optional.
*Example:*
| Field | Value |
| :---- | :---- |
| Button Name | `Track Order` |
| Link Type | `WL – Web Link` |
| Mobile URL | `https://example.com/track/#{orderNumber}` |
| PC URL | `https://example.com/track/#{orderNumber}` *(optional)* |
4. Use the **Live Preview** panel to see how your message will appear.
5. Click **Save Template**. The template is saved in REG (Registered) status and not yet submitted.
6. Go to the **Template Management** page and click **Submit for approval** when you're ready.
 ## Creating templates
### Basic (BA) template
1. Go to **Content > Kakao** and click **Create Template**.
2. From the **Template Type** dropdown, choose **Basic (BA) – Text only with optional highlight.**
3. Fill in template details:
* **Template Name:** Enter a name to identify this template internally (e.g., *Order Notification*).
* **Categories:** Enter one or more categories for this template (e.g., `notification`). Separate multiple categories with commas.
4. In the **Message Content** field, enter the body of your message. You can use up to 1,000 characters.
You can personalize it with variables. For this, insert variables by clicking **+ Add Variable** and selecting from the available list, or type them directly in the format `#{variable}`.
*Example:*
```
Hello #{name},
Your order #{orderNumber} has been shipped.
Expected delivery: #{date}.
```
## Creating templates
### Basic (BA) template
1. Go to **Content > Kakao** and click **Create Template**.
2. From the **Template Type** dropdown, choose **Basic (BA) – Text only with optional highlight.**
3. Fill in template details:
* **Template Name:** Enter a name to identify this template internally (e.g., *Order Notification*).
* **Categories:** Enter one or more categories for this template (e.g., `notification`). Separate multiple categories with commas.
4. In the **Message Content** field, enter the body of your message. You can use up to 1,000 characters.
You can personalize it with variables. For this, insert variables by clicking **+ Add Variable** and selecting from the available list, or type them directly in the format `#{variable}`.
*Example:*
```
Hello #{name},
Your order #{orderNumber} has been shipped.
Expected delivery: #{date}.
```
 5. (Optional) Add a highlight section to emphasize key information at the top of the message bubble:
* **Subtitle**: Up to 18 characters. Variables are not allowed.
* **Title**: Up to 23 characters (2 lines). Variables are allowed and must be from the available list.
5. (Optional) Add a highlight section to emphasize key information at the top of the message bubble:
* **Subtitle**: Up to 18 characters. Variables are not allowed.
* **Title**: Up to 23 characters (2 lines). Variables are allowed and must be from the available list.
 6. Check the **Live Preview** panel on the right to see how your message will appear to recipients.
7. Click **Save Template** in the top right. The template will be saved in REG (Registered) status.
8. Once you're ready, navigate back to the **Template Management** list (**Content > Kakao**).
Select your newly created template to open the **Edit Template** view. Click the blue **Submit for approval** button.
6. Check the **Live Preview** panel on the right to see how your message will appear to recipients.
7. Click **Save Template** in the top right. The template will be saved in REG (Registered) status.
8. Once you're ready, navigate back to the **Template Management** list (**Content > Kakao**).
Select your newly created template to open the **Edit Template** view. Click the blue **Submit for approval** button.
 ### Additional information (EX) template
The Additional Information (EX) template includes a structured main message and an optional additional info section. It's ideal for sharing details like delivery status, order info, or instructions below the main message.
You can add up to 5 buttons (Add Channel buttons are not allowed).
Follow steps 1–5 from [Basic (BA) template](#basic-ba-template) to set up the template name, categories, main message, variables, and highlight section. Then continue with the steps below:
1. Add supporting details below the main message. Variables are not allowed here. Max 500 characters.
*Example:*
```
Items in your order:
- 1x Bluetooth headphones
- 1x Protective case
Questions? Contact support@example.com
```
2. Add up to 5 action buttons. Click **Add Button** and provide:
* **Title**: the button text
* **Action/URL**: where the button leads (e.g., order tracking page)
3. Use the **Live Preview** panel to see how your message will appear.
### Additional information (EX) template
The Additional Information (EX) template includes a structured main message and an optional additional info section. It's ideal for sharing details like delivery status, order info, or instructions below the main message.
You can add up to 5 buttons (Add Channel buttons are not allowed).
Follow steps 1–5 from [Basic (BA) template](#basic-ba-template) to set up the template name, categories, main message, variables, and highlight section. Then continue with the steps below:
1. Add supporting details below the main message. Variables are not allowed here. Max 500 characters.
*Example:*
```
Items in your order:
- 1x Bluetooth headphones
- 1x Protective case
Questions? Contact support@example.com
```
2. Add up to 5 action buttons. Click **Add Button** and provide:
* **Title**: the button text
* **Action/URL**: where the button leads (e.g., order tracking page)
3. Use the **Live Preview** panel to see how your message will appear.
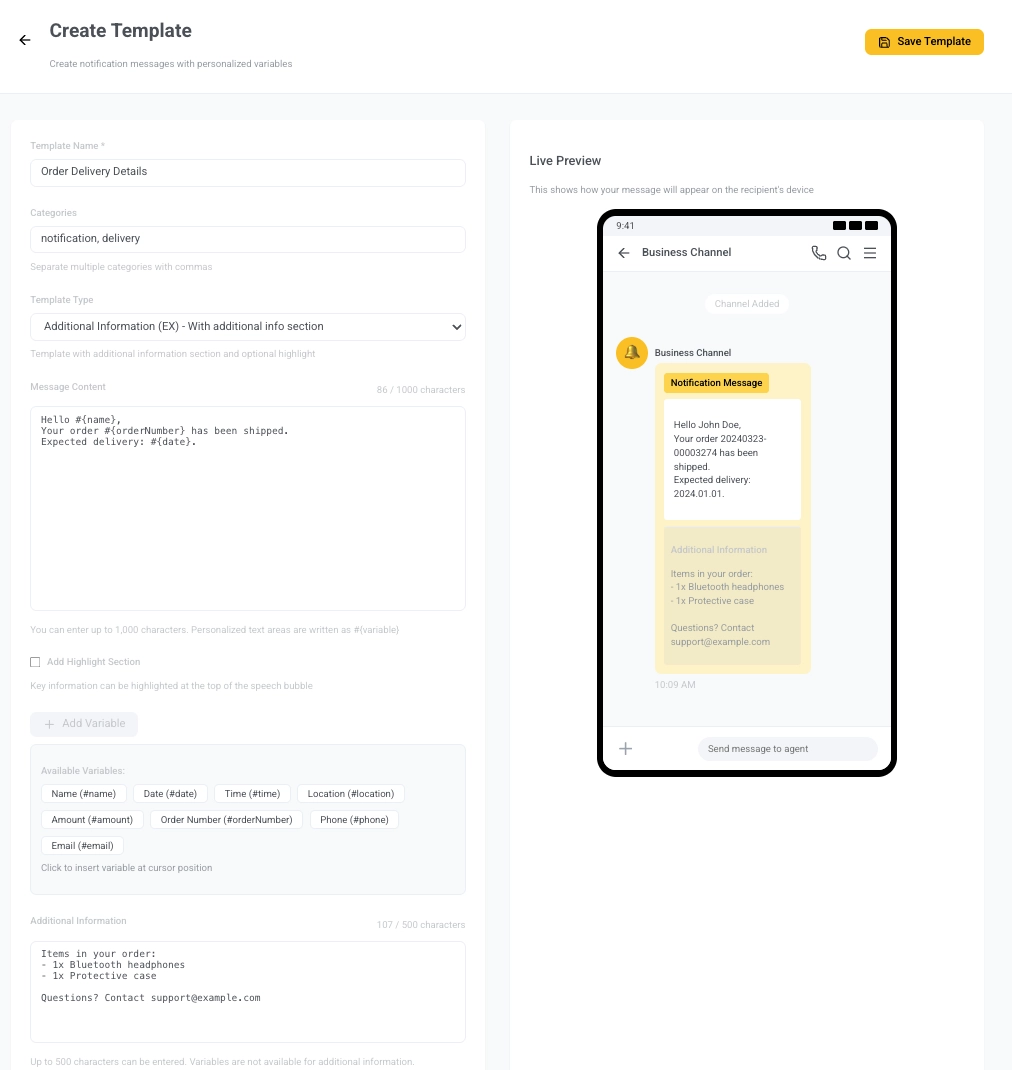 4. When you're done, click **Save Template**. The template is saved in REG (Registered) status and not yet submitted.
5. Go to the **Template Management** page and click **Submit for approval** when you're ready.
### Channel addition (AD) template
The Channel Addition (AD) template is used when your goal is to prompt users to follow your KakaoTalk channel. This type of template is required to include exactly one Add Channel button. This template type is ideal for onboarding flows or opt-in requests, where channel subscription is the main CTA.
Follow steps 1–5 from [Basic (BA) template](#basic-ba-template) to set up the template type, name, categories, main message, variables, and highlight section. Then continue with the steps below:
1. Click **Add Button** in the Buttons section and enter a **Button Name** (up to 14 characters).
*Example:* `Follow`
The **Link Type** is set to `AC – Add Channel` by default.
4. When you're done, click **Save Template**. The template is saved in REG (Registered) status and not yet submitted.
5. Go to the **Template Management** page and click **Submit for approval** when you're ready.
### Channel addition (AD) template
The Channel Addition (AD) template is used when your goal is to prompt users to follow your KakaoTalk channel. This type of template is required to include exactly one Add Channel button. This template type is ideal for onboarding flows or opt-in requests, where channel subscription is the main CTA.
Follow steps 1–5 from [Basic (BA) template](#basic-ba-template) to set up the template type, name, categories, main message, variables, and highlight section. Then continue with the steps below:
1. Click **Add Button** in the Buttons section and enter a **Button Name** (up to 14 characters).
*Example:* `Follow`
The **Link Type** is set to `AC – Add Channel` by default.
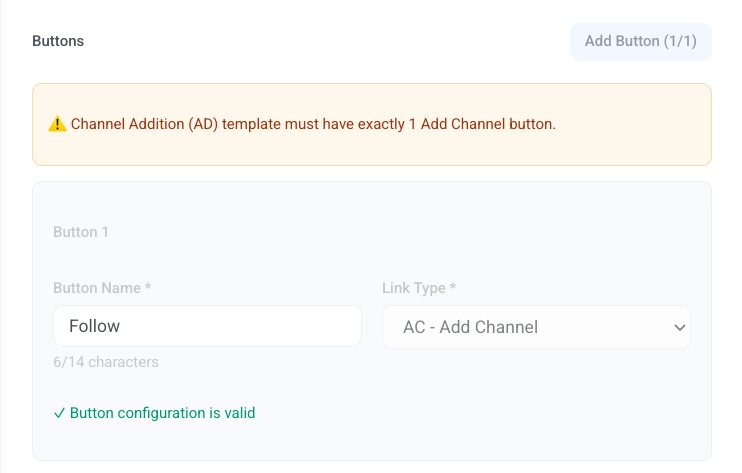 2. Use the **Live Preview** on the right to check how the message will appear.
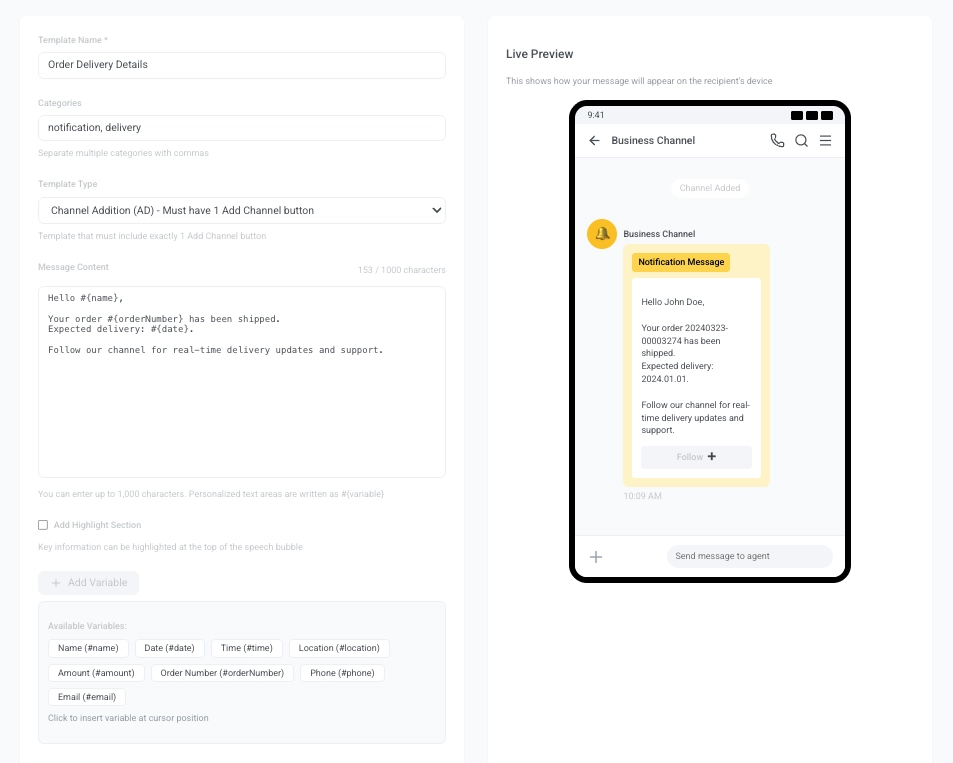 3. Click **Save Template** to save it in REG (Registered) status. When ready, go to the **Template Management** page and click **Submit for approval**.
### Combined (MI) template
The Combined (MI) template lets you include an Add Channel button first, followed by up to 4 additional action buttons. This type is useful when you want users to follow your KakaoTalk channel *and* offer extra links for related actions (like tracking, help pages, surveys, etc.).
Follow steps 1–5 from [Basic (BA) template](#basic-ba-template) to set up the template type, name, categories, main message, variables, and highlight section. Then continue with the steps below:
1. (Optional) Add supporting details below the main message. Variables are not allowed here. Max 500 characters.
*Example:*
```
Items in your order:
- 1x Bluetooth headphones
- 1x Protective case
Questions? Contact support@example.com
```
2. Click **Add Button** and set the **Button Name** (max 14 characters), e.g. `Follow` or `Subscribe`.
3. Add up to four more buttons after the Add Channel button.
Each additional button must include:
* **Button Name**: e.g., `Track Order`, `Help`, `Shop Now`.
* **Link Type**: choose from `WL – Web Link`, `AL – App/Web Link`, or `AC – Add Channel`.
* **Mobile URL**: required.
* **PC URL**: optional.
*Example:*
| Field | Value |
| :---- | :---- |
| Button Name | `Track Order` |
| Link Type | `WL – Web Link` |
| Mobile URL | `https://example.com/track/#{orderNumber}` |
| PC URL | `https://example.com/track/#{orderNumber}` *(optional)* |
3. Click **Save Template** to save it in REG (Registered) status. When ready, go to the **Template Management** page and click **Submit for approval**.
### Combined (MI) template
The Combined (MI) template lets you include an Add Channel button first, followed by up to 4 additional action buttons. This type is useful when you want users to follow your KakaoTalk channel *and* offer extra links for related actions (like tracking, help pages, surveys, etc.).
Follow steps 1–5 from [Basic (BA) template](#basic-ba-template) to set up the template type, name, categories, main message, variables, and highlight section. Then continue with the steps below:
1. (Optional) Add supporting details below the main message. Variables are not allowed here. Max 500 characters.
*Example:*
```
Items in your order:
- 1x Bluetooth headphones
- 1x Protective case
Questions? Contact support@example.com
```
2. Click **Add Button** and set the **Button Name** (max 14 characters), e.g. `Follow` or `Subscribe`.
3. Add up to four more buttons after the Add Channel button.
Each additional button must include:
* **Button Name**: e.g., `Track Order`, `Help`, `Shop Now`.
* **Link Type**: choose from `WL – Web Link`, `AL – App/Web Link`, or `AC – Add Channel`.
* **Mobile URL**: required.
* **PC URL**: optional.
*Example:*
| Field | Value |
| :---- | :---- |
| Button Name | `Track Order` |
| Link Type | `WL – Web Link` |
| Mobile URL | `https://example.com/track/#{orderNumber}` |
| PC URL | `https://example.com/track/#{orderNumber}` *(optional)* |
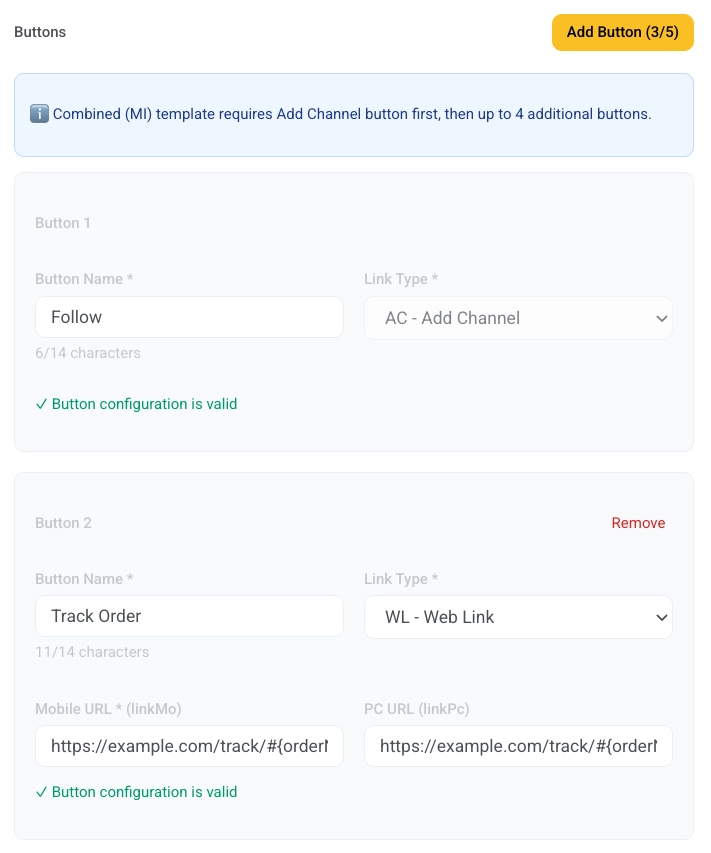 4. Use the **Live Preview** panel to see how your message will appear.
 5. Click **Save Template**. The template is saved in REG (Registered) status and not yet submitted.
6. Go to the **Template Management** page and click **Submit for approval** when you're ready.
5. Click **Save Template**. The template is saved in REG (Registered) status and not yet submitted.
6. Go to the **Template Management** page and click **Submit for approval** when you're ready.