# Create opt-in and opt-out popups
In-app messages are crucial in obtaining user consent to send push notifications. You can also use them to recover those unsubscribed from your push notifications for whatever reason. Re-engaging these users can help improve overall user retention and increase their lifetime value to your business.
[Pushwoosh In-App Editor](/product/content/in-apps/no-code-in-app-editor/create-rich-media-in-the-built-in-editor/) allows you to create in-apps easily, without developer and designer skills required. You can add headers, texts, images (including AI-generated pictures and stock photos), buttons, forms, and other elements to the canvas and customize them in just a few clicks. You can incorporate in-app messages in an omnichannel customer journey to get the most out of your user communications.
## Build opt-in & opt-out recovery templates in Pushwoosh In-App Editor
It's up to you whether to create separate in-apps for opt-in and opt-out recovery requests or use the same one. Here is an example of a popup that can help you achieve both goals depending on the context:
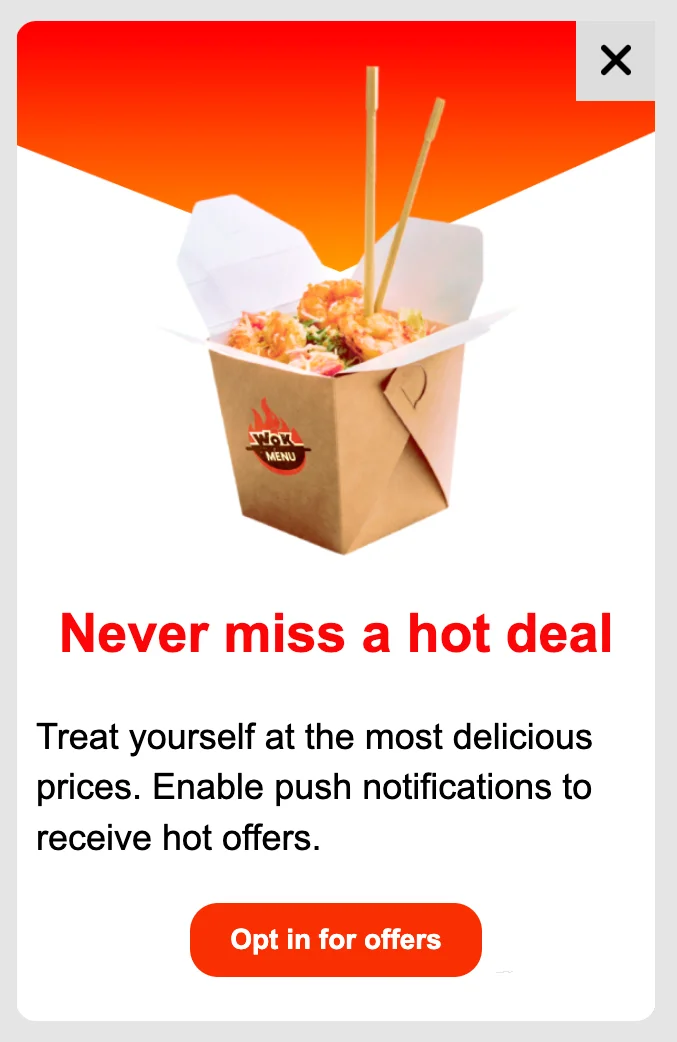 [Create a part-screen popup in the In-App Editor](/product/content/in-apps/no-code-in-app-editor/configure-in-app-template-settings/#configure-how-the-in-app-looks-on-device), then return here to automate when it appears in your app.
## Automate the display of your in-app message in Customer Journey Builder
After creating your in-app message, you also have to configure its display in the app so that users see it at the right moment. To set up **opt-in** and **opt-out recovery** popups, you need to create two separate campaigns in Pushwoosh [Customer Journey Builder](/product/customer-journey/journey-elements).
### Opt-in popup
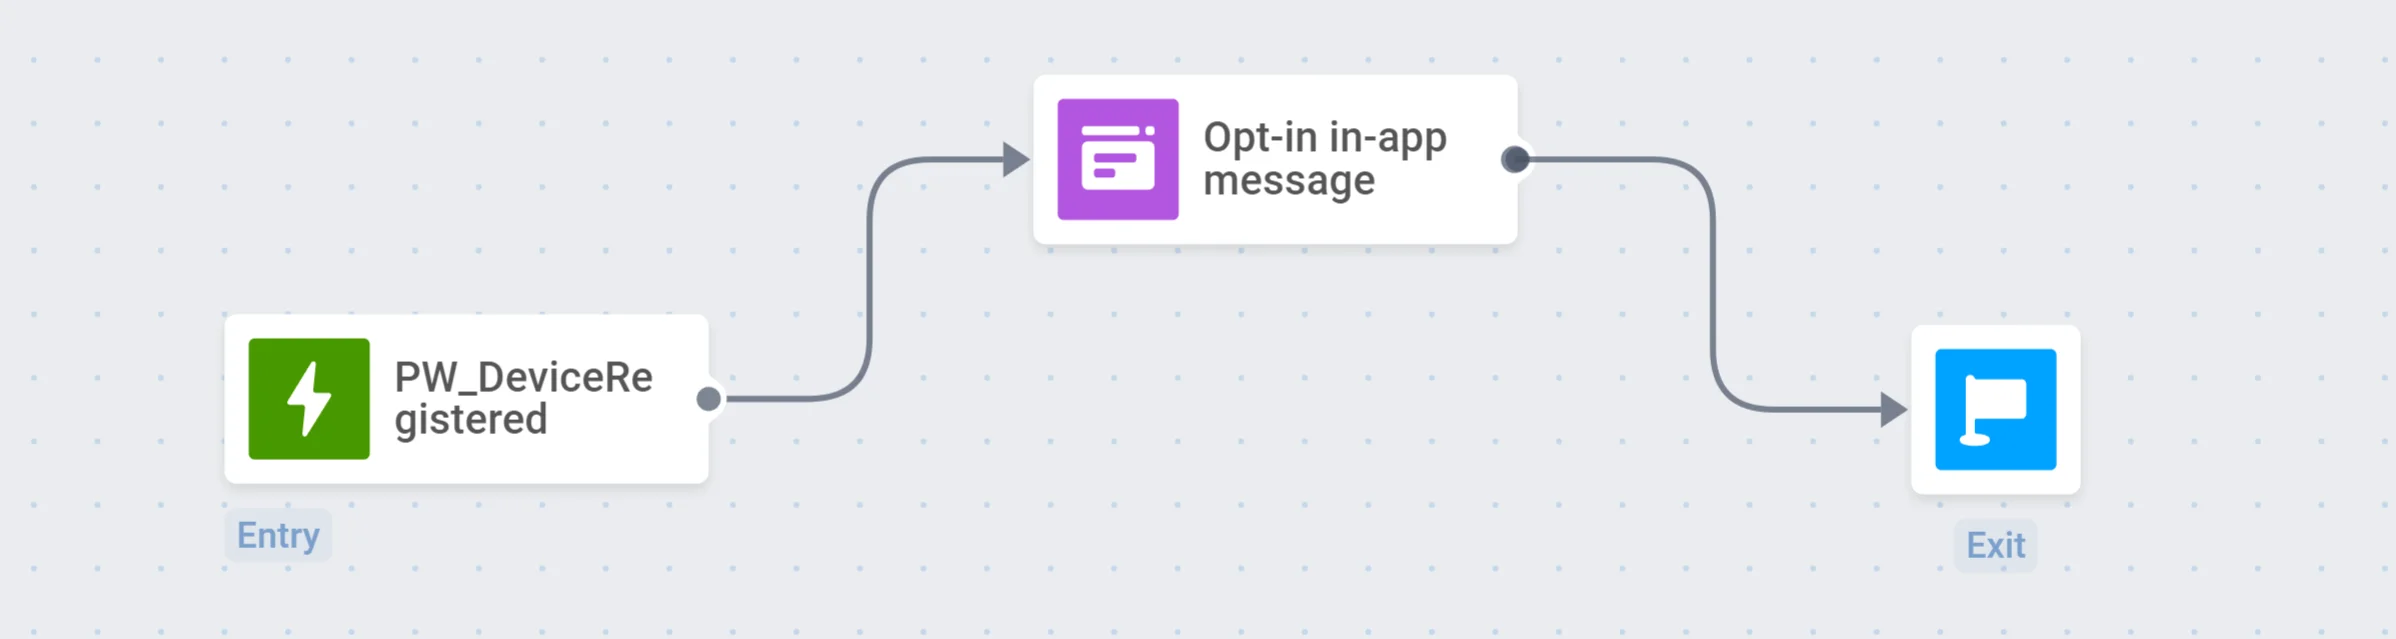
To automate showing the opt-in popup, you can build a customer journey starting with the [Trigger-based Entry](/product/customer-journey/journey-elements/#trigger-based-entry). The default [PW\_DeviceRegistered](/product/audience-data-and-segmentation/events/default-events/#pw_deviceregistered) Event is perfect for setting up an opt-in campaign, as it fires when a user launches the app for the first time.
In the example below, users will see the opt-in popup immediately after the first launch of the app:
[Create a part-screen popup in the In-App Editor](/product/content/in-apps/no-code-in-app-editor/configure-in-app-template-settings/#configure-how-the-in-app-looks-on-device), then return here to automate when it appears in your app.
## Automate the display of your in-app message in Customer Journey Builder
After creating your in-app message, you also have to configure its display in the app so that users see it at the right moment. To set up **opt-in** and **opt-out recovery** popups, you need to create two separate campaigns in Pushwoosh [Customer Journey Builder](/product/customer-journey/journey-elements).
### Opt-in popup
To automate showing the opt-in popup, you can build a customer journey starting with the [Trigger-based Entry](/product/customer-journey/journey-elements/#trigger-based-entry). The default [PW\_DeviceRegistered](/product/audience-data-and-segmentation/events/default-events/#pw_deviceregistered) Event is perfect for setting up an opt-in campaign, as it fires when a user launches the app for the first time.
In the example below, users will see the opt-in popup immediately after the first launch of the app:
 ### Opt-out recovery popup
As for the opt-out recovery campaign, we recommend creating a customer journey for a segment of users who have disabled or never enabled notifications in the app.
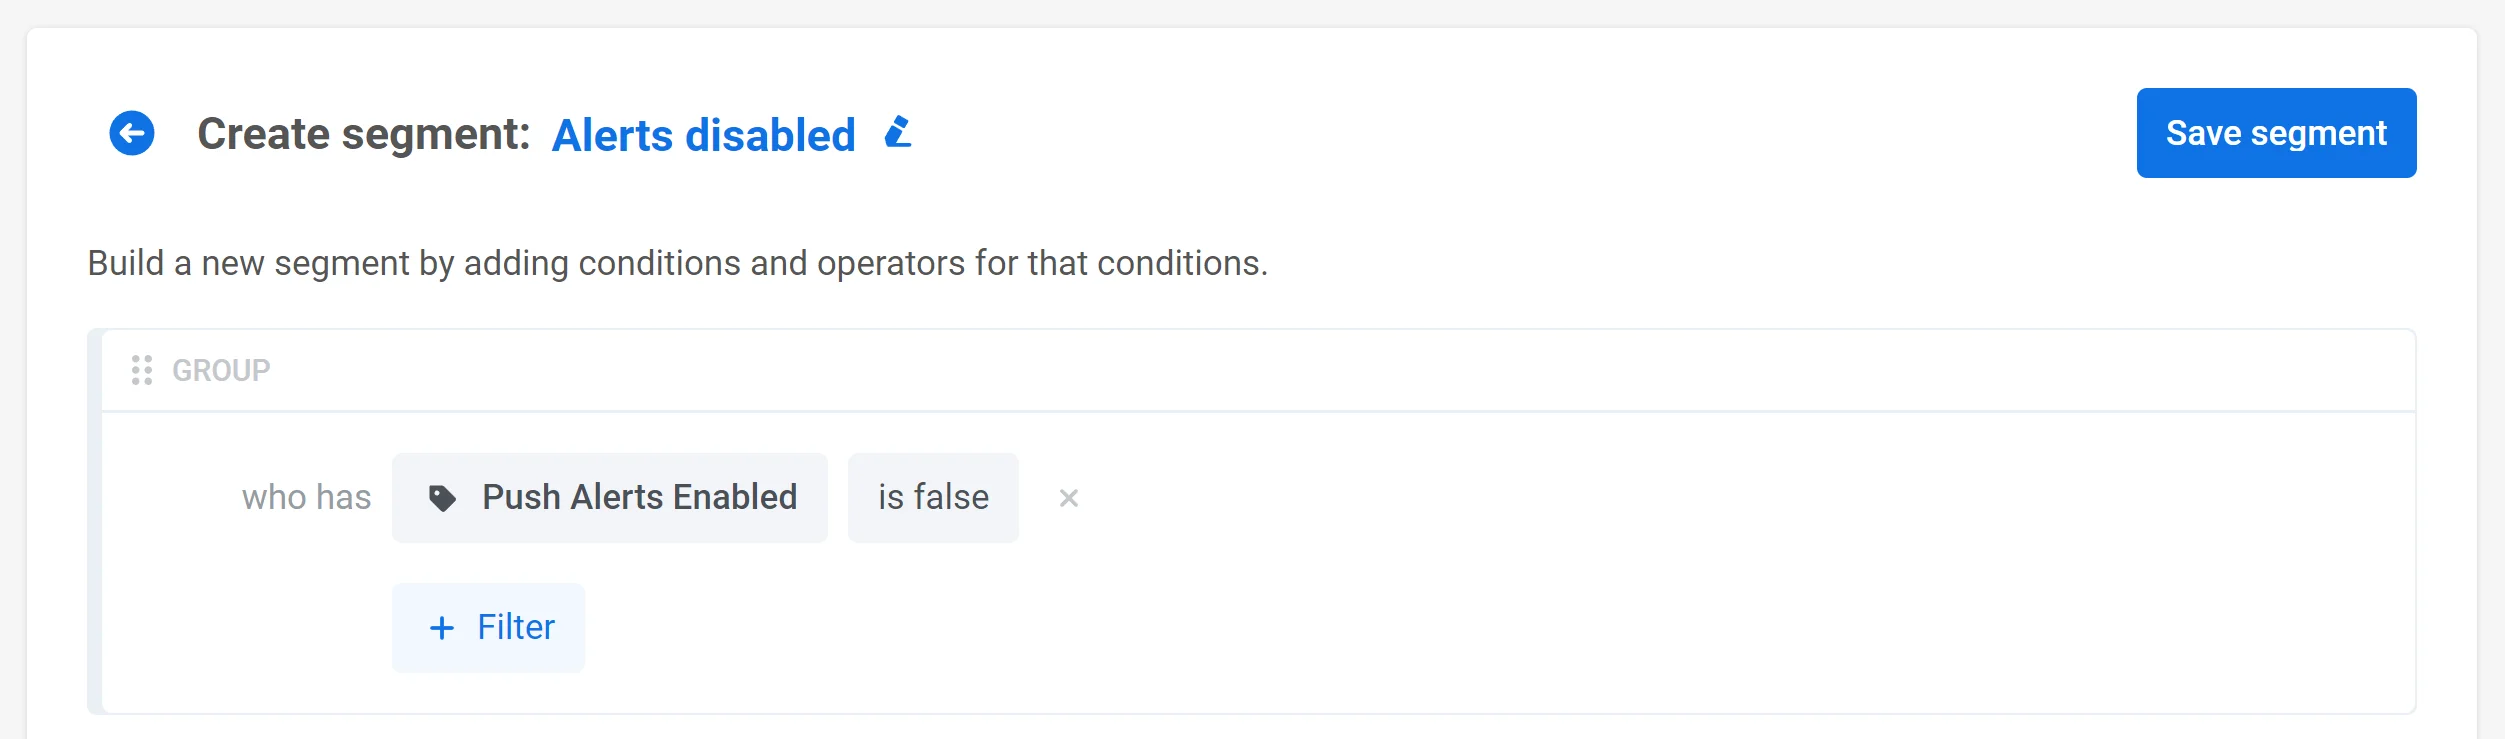
First, you need to configure a custom _Push Alerts Enabled_ [Tag](/product/audience-data-and-segmentation/user-data-tags/tags/) and build a [Segment](/product/audience-data-and-segmentation/segmentation/) of users who have alerts disabled:
### Opt-out recovery popup
As for the opt-out recovery campaign, we recommend creating a customer journey for a segment of users who have disabled or never enabled notifications in the app.
First, you need to configure a custom _Push Alerts Enabled_ [Tag](/product/audience-data-and-segmentation/user-data-tags/tags/) and build a [Segment](/product/audience-data-and-segmentation/segmentation/) of users who have alerts disabled:
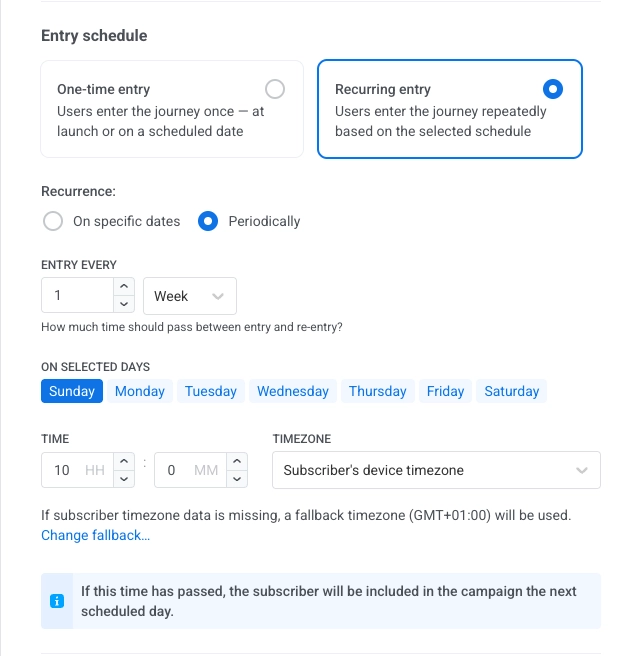
 After that, you can build a customer journey starting with the [Audience-based Entry](/product/customer-journey/journey-elements/#audience-based-entry). Select the segment you created and set **Entry schedule** → **Recurring entry** → **Periodically** (e.g. once a month):
 You can also add the [Wait for Trigger](/product/customer-journey/journey-elements/#wait-for-trigger) step with the default [PW\_ApplicationOpen](/product/audience-data-and-segmentation/events/default-events/#pw_applicationopen) Event as the trigger so that the popup will appear once a user opens the app. As a result, the journey will look like this:
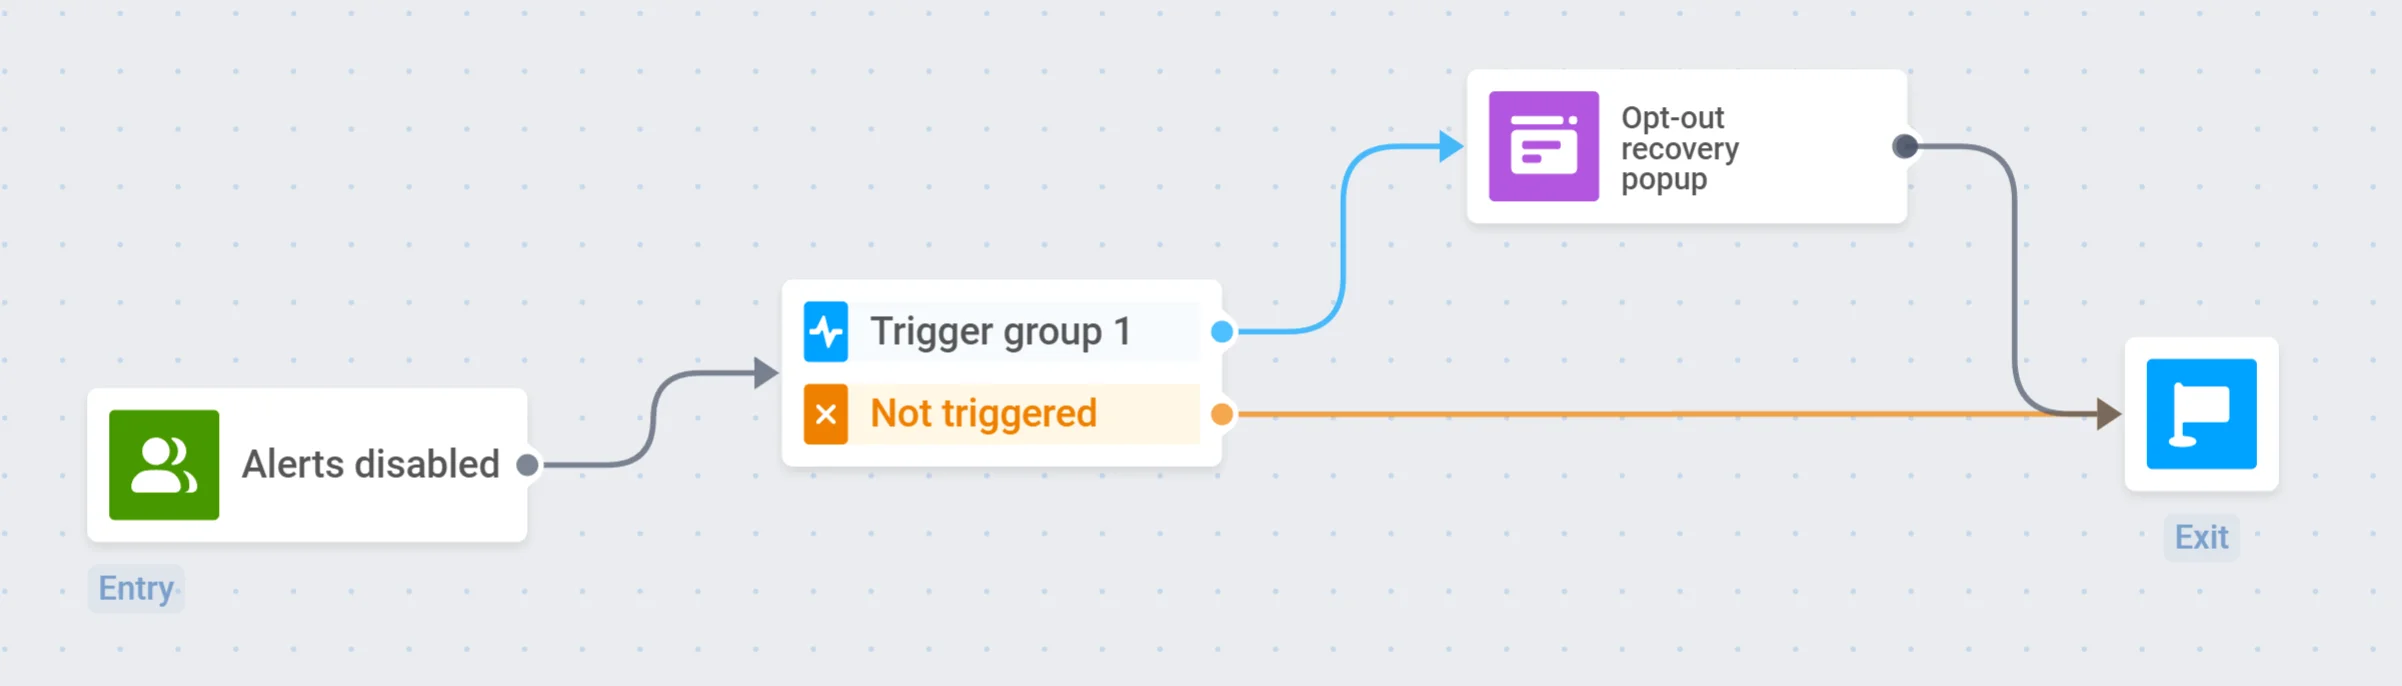 Every month, Pushwoosh will launch this journey for a segment of users who have notifications turned off.
## More useful articles and insights
* [Popular in-app formats and best examples in Pushwoosh Blog](https://blog.pushwoosh.com/blog/what-are-in-apps/)
* [Tips on using in-apps within your omnichannel strategy](https://blog.pushwoosh.com/blog/push-notifications-in-app-messaging/)
* [In-App (Rich Media) Editor documentation](/product/content/in-apps/no-code-in-app-editor/create-rich-media-in-the-built-in-editor/)
Every month, Pushwoosh will launch this journey for a segment of users who have notifications turned off.
## More useful articles and insights
* [Popular in-app formats and best examples in Pushwoosh Blog](https://blog.pushwoosh.com/blog/what-are-in-apps/)
* [Tips on using in-apps within your omnichannel strategy](https://blog.pushwoosh.com/blog/push-notifications-in-app-messaging/)
* [In-App (Rich Media) Editor documentation](/product/content/in-apps/no-code-in-app-editor/create-rich-media-in-the-built-in-editor/)