# Create an in-app from a template
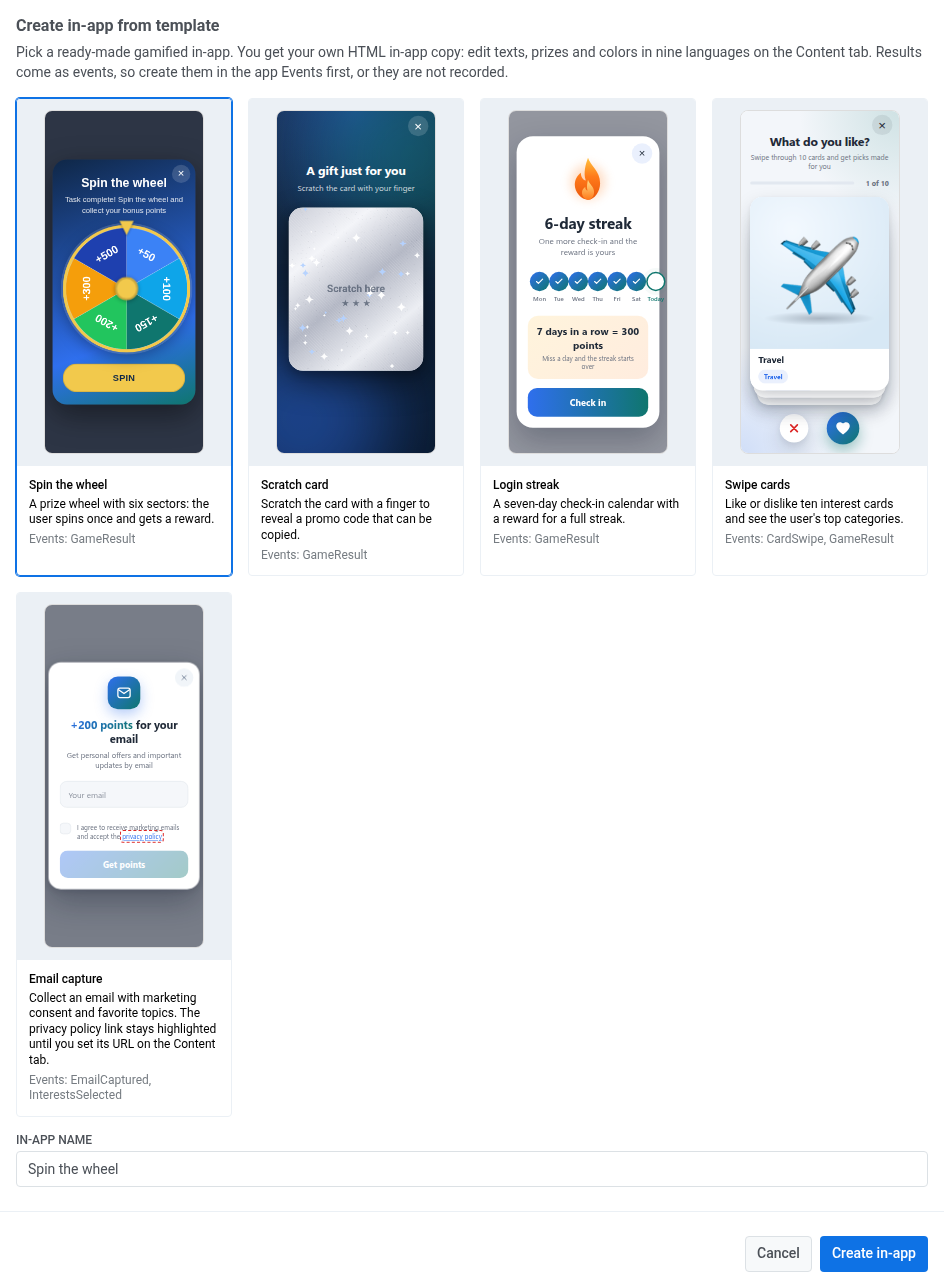
The **From template** gallery offers five gamified HTML in-apps that Pushwoosh has already built: a prize wheel, a scratch card, a check-in streak, interest cards, and an email signup form. Unlike an in-app you design in the editor or upload as a ZIP, each one comes with its game logic and texts in nine languages ready. Creating an in-app from one gives you your own copy, which you edit and send like any other in-app. Each template reports what the user did as custom events, so you can segment users and trigger journeys by the result.
## Prepare events and tags
The in-app sends its results as custom events with these names:
| Template | Events |
|---|---|
| Spin the wheel | `GameResult` |
| Scratch card | `GameResult` |
| Login streak | `GameResult` |
| Swipe cards | `CardSwipe`, `GameResult` |
| Email capture | `EmailCaptured`, `InterestsSelected` |
Pushwoosh [creates an event automatically](/product/audience-data-and-segmentation/events/#events-created-automatically) the first time a user sends it, together with its attributes. Create the events in advance in **Audience** → **Events** only if you want to build segments or journey conditions on them before the first user plays.
Email capture also saves the categories the user picks to the `Favorite Categories` tag. To segment by them, [create](/product/audience-data-and-segmentation/user-data-tags/tags/#how-to-set-up-a-custom-tag) a `Favorite Categories` tag with the **List** type before you send the in-app.
See [What each template sends](#what-each-template-sends) for the attributes of each event.
## Create the in-app
1. Go to **Content** → **In-Apps**.
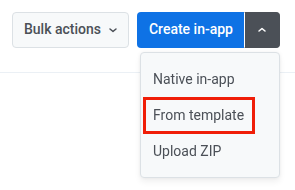
2. Click the arrow next to **Create in-app** and choose **From template**.
 3. Pick a template. Each tile shows a preview, a short description, and the events the template sends.
4. In **In-app name**, keep the template name or enter your own.
5. Click **Create in-app**.
 The in-app is created right away and opens in the HTML in-app editor.
## Edit texts and colors
On the **Content** tab, the left side shows a live preview and the right side lists every text and color of the template.
1. In **Language**, choose the language to edit. Texts come translated into English, French, Russian, Spanish, Portuguese, Japanese, Chinese, Arabic, and Hebrew. English is the default language.
2. Change the texts and colors you need. For right-to-left languages, **Text direction** is already set to `rtl`.
3. Click **Save**.
### Set button links in Spin the wheel and Swipe cards
The last button of these two templates can open a page or a screen of your app:
- **Spin the wheel:** in **Claim button URL**, set where **Claim points** leads.
- **Swipe cards:** in **Button URL**, set where **See your picks** leads.
Enter a web address, for example `https://example.com/rewards`, or a deep link of your app, for example `myapp://rewards`. If the field is empty or the value has no scheme like `https:` or `myapp:`, the button just closes the in-app.
### Set the privacy policy link in Email capture
The Email capture form asks the user to accept your privacy policy, and the template has no link to it. In **Policy link URL**, enter the address of your privacy policy page, starting with `https://`.
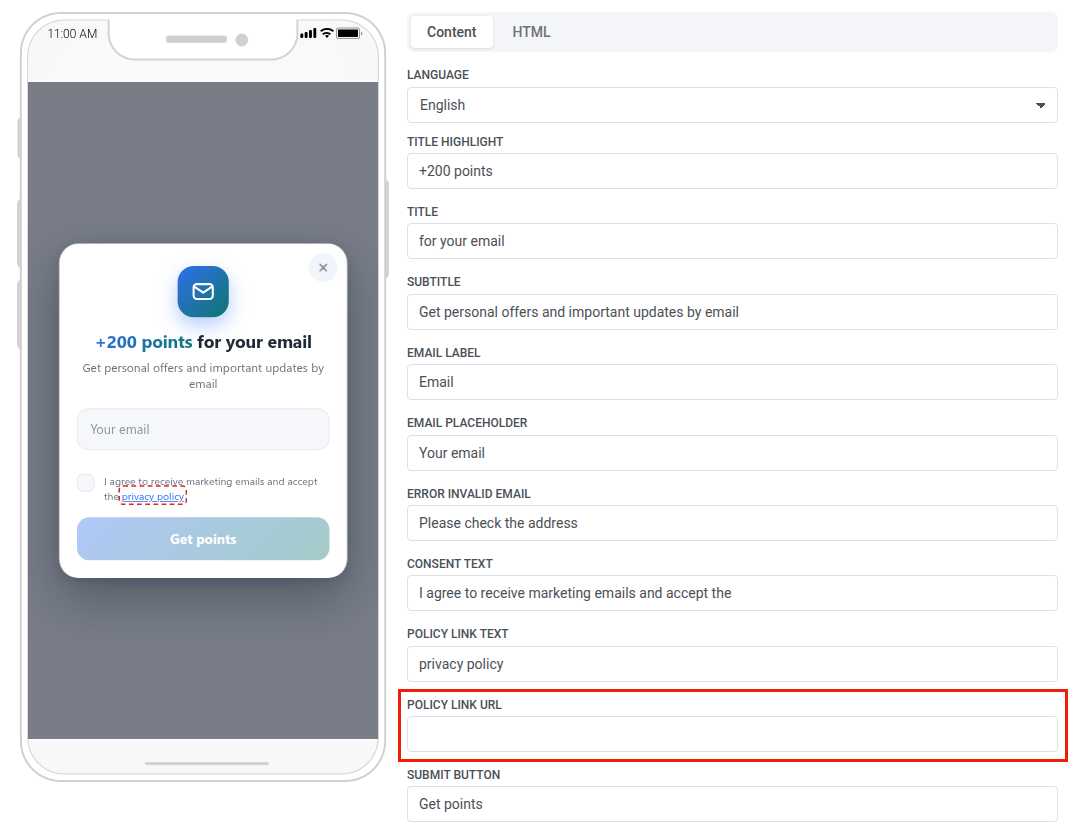 Until the field holds an `http://` or `https://` address, the link has a red dashed outline and does nothing on tap. The outline shows on the user's device too, so set the URL in every language before you send the in-app.
## What each template sends
Use these events and attributes in segments, journey conditions, and event statistics. Button names below are the default English texts of the templates.
### Spin the wheel
The user taps **SPIN**, the wheel always stops on the fifth sector, and the in-app sends `GameResult` once.
| Attribute | Value |
|---|---|
| `game` | `spin_wheel` |
| `result` | `win` |
| `prize_type` | `points` |
| `prize_value` | `300` |
Editing the sector texts doesn't change `prize_value`. If you change the fifth sector to a different prize, ask your developer to update the value on the **HTML** tab.
### Scratch card
The user scratches the card to reveal the promo code from the **Promo code** field, and the in-app sends `GameResult` once. The user can copy the code with the **Claim gift** button.
| Attribute | Value |
|---|---|
| `game` | `scratch_card` |
| `result` | `win` |
| `prize_type` | `points` |
| `prize_value` | `500` |
### Login streak
The in-app shows a week with six days already checked. It doesn't count the user's real visits, so send it to users who are on day six of a streak you track yourself, for example with a tag. When the user taps **Check in**, the seventh day is checked and the in-app sends `GameResult`.
| Attribute | Value |
|---|---|
| `game` | `login_streak` |
| `result` | `day_7` |
| `prize_type` | `points` |
| `prize_value` | `300` |
### Swipe cards
The user likes or dislikes ten interest cards. Each swipe sends `CardSwipe`:
| Attribute | Value |
|---|---|
| `card_name` | Card text, for example `Movies` |
| `category` | Category text of the card, for example `Entertainment` |
| `reaction` | `like` or `dislike` |
After the last card, the in-app shows the user's top categories and sends `GameResult`:
| Attribute | Value |
|---|---|
| `game` | `swipe_cards` |
| `result` | Up to two most-liked categories in lowercase, comma-separated, for example `entertainment,culture`. `none` if the user liked nothing. |
| `prize_type` | `none` |
| `prize_value` | `0` |
`card_name`, `category`, and `result` carry the texts in the language the user saw. To compare results across languages, segment by the values of each language.
### Email capture
The form has three steps.
1. The user enters an email and checks the consent box. The **Get points** button stays disabled until both are done. On submit, the in-app saves the email to the user's profile and sends `EmailCaptured`:
| Attribute | Value |
|---|---|
| `source` | `inapp_form` |
| `consent_marketing` | `true` |
2. The user picks up to three categories and taps **Done**. The in-app sends `InterestsSelected` with `categories`: the picked categories, comma-separated, for example `News,Travel`. It also saves them to the `Favorite Categories` tag. If the user taps **Skip**, nothing is sent.
3. The user sees the confirmation screen and closes the in-app.
To segment by these categories, create the `Favorite Categories` tag first as described in [Prepare events and tags](#prepare-events-and-tags).
## Send the in-app
A template in-app is sent like any other in-app: in a Customer Journey, as a one-time in-app, or from a push. See [Use your in-app templates in campaigns](/product/content/in-apps/#use-your-in-app-templates-in-campaigns).