# Create email content with HTML code editor
If you are proficient in HTML and prefer to write your own code, you can create emails using the Pushwoosh HTML code editor.
## Create email content
To begin creating email content, paste your HTML code into the HTML tab. The editor provides real-time email previews as you are working on them.
Alternatively, you can upload an HTML file by clicking on **Upload HTML File** located in the bottom panel.
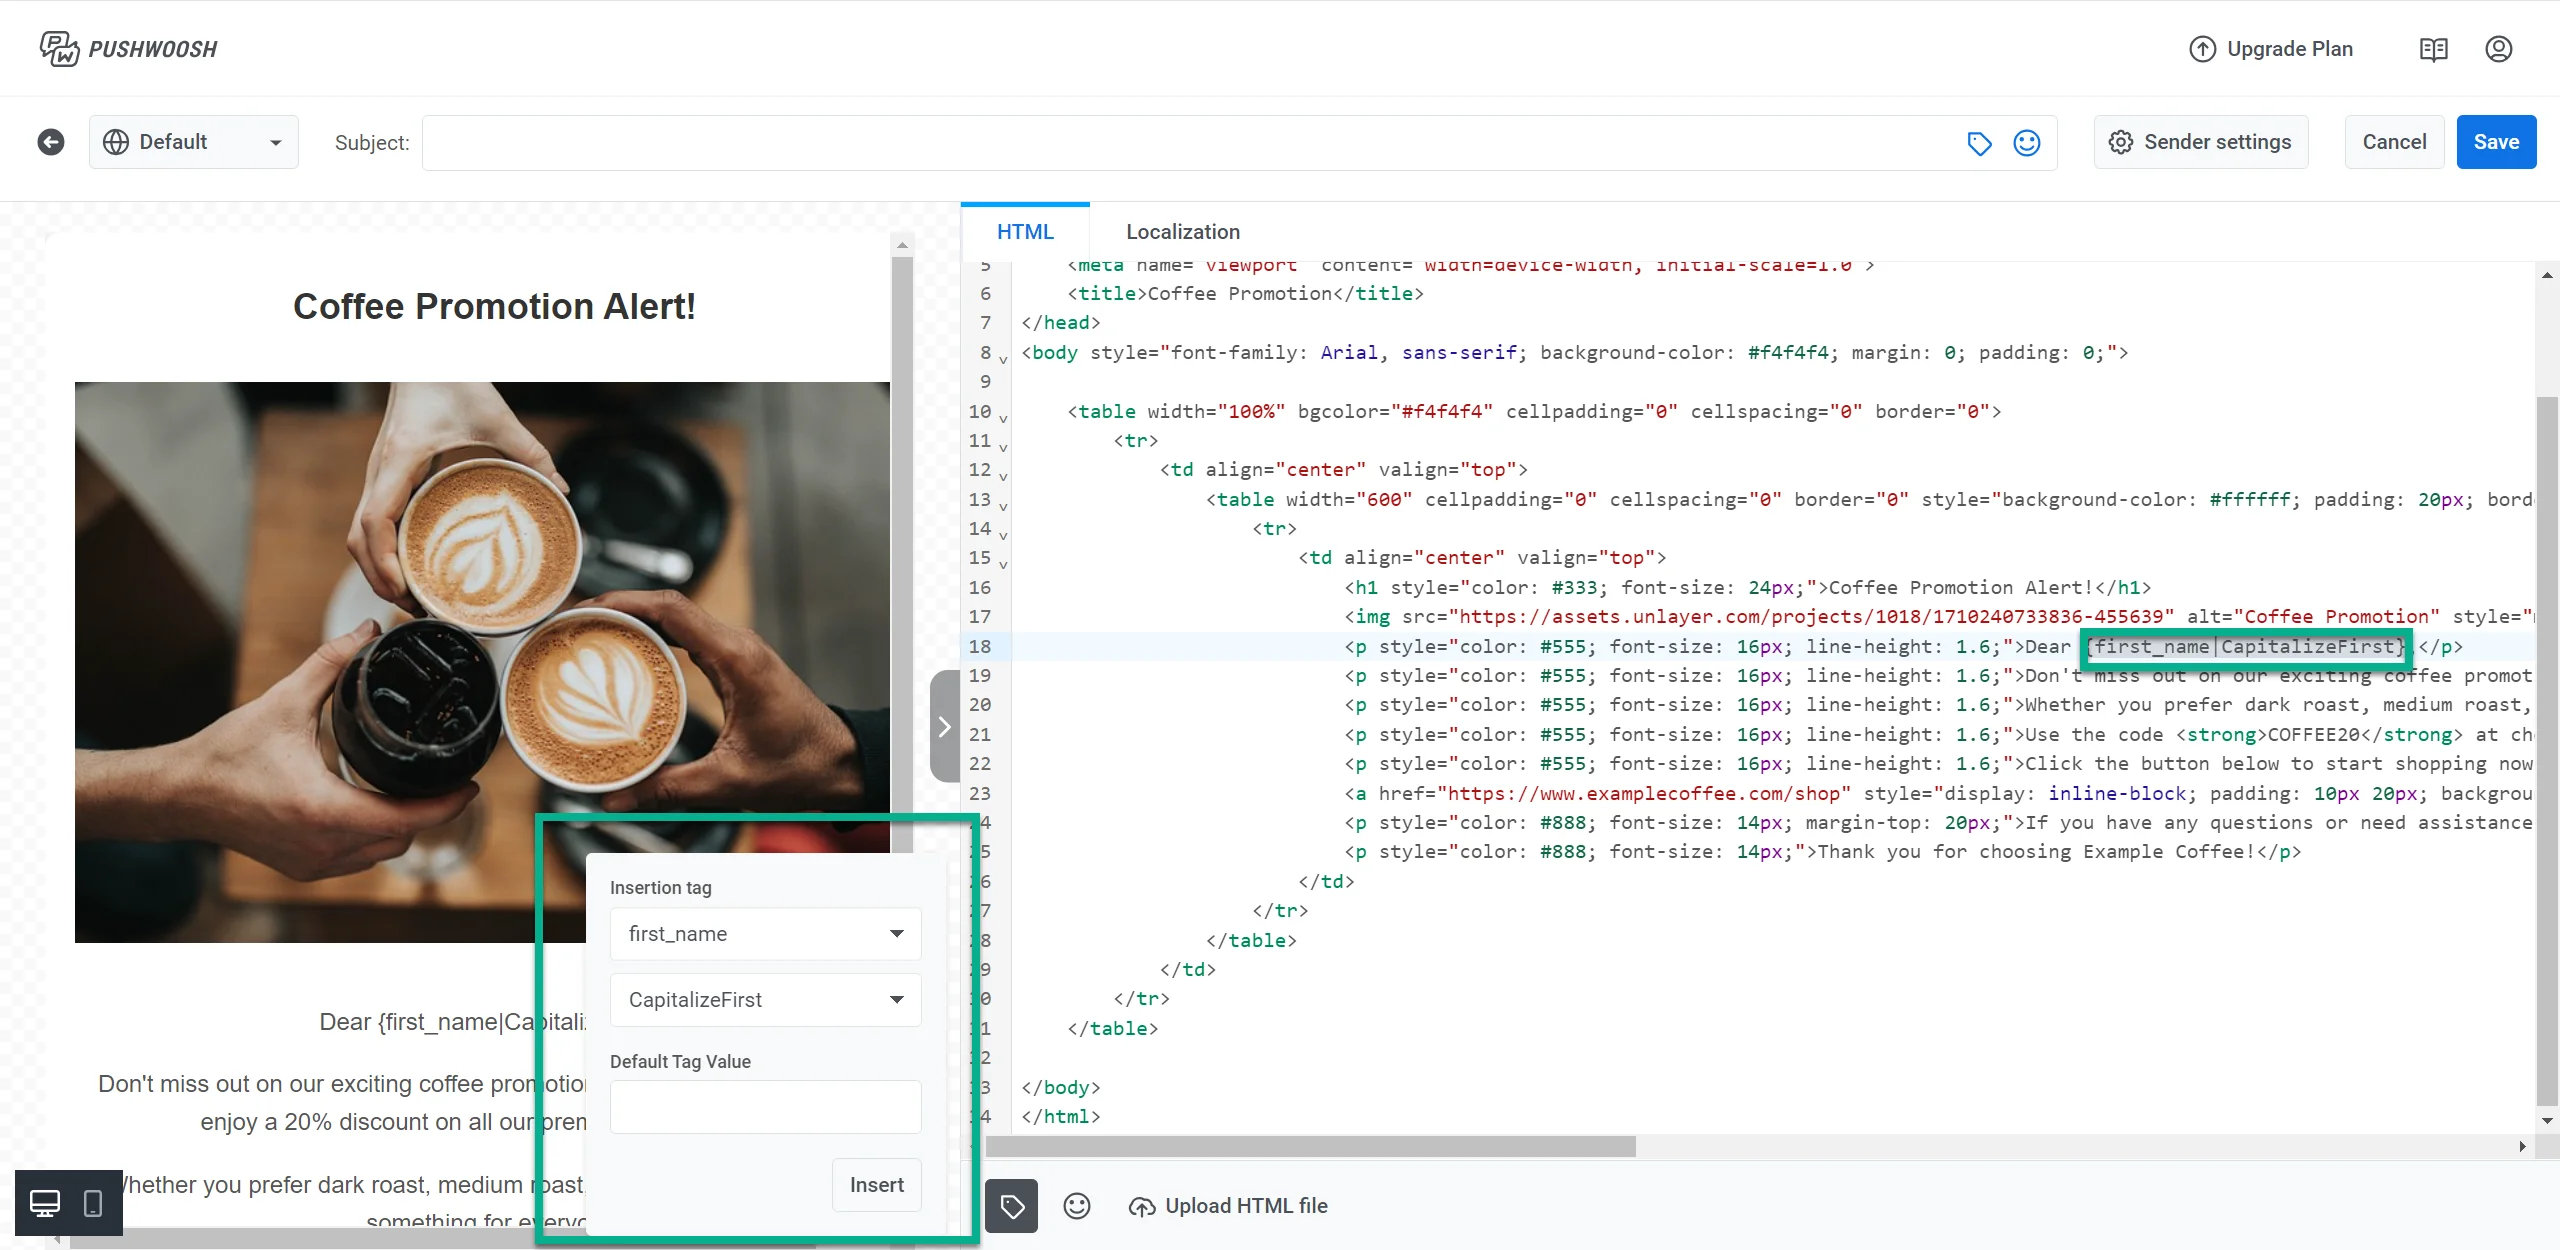
To add a personalized touch to your emails, use custom tags. For this:
1. Click on the **Tag** icon located at the bottom of the editor.
2. Select the desired Tag, and its modifier, and provide a default value if needed.
3. Click **Insert** to include the custom tag in your email content.
To include an emoji in your email, click the **Emoji** icon located at the bottom of the editor.
### Add images
To add an image to your email, include an `` tag in your HTML and set the `src` attribute to the image URL.
To reuse an image from your [Media store](/product/content/media-store/), copy its URL there and paste it into the `src` attribute. See [Copy an image URL](/product/content/media-store/#copy-an-image-url) for the steps.
```
```
Replace `YOUR-MEDIA-STORE-URL` with the URL you copied from the Media store.
## Use localization
Localization empowers you to deliver personalized experiences to users in different languages.
In the HTML code editor, you can use localization by defining a default language and adding multiple language options. For instance, you can set a default message in English and then include translations in German and Spanish. This ensures that your email content adapts to each user's language preferences.
Below is an example of how to structure your localization data. This uses English as the Default language and German and Spanish translations.
```json
{
"default": {
"button": "Shop now",
"description": "For a limited time, you can enjoy a 20% discount on all our premium coffee blends",
"subtitle": "Don't miss it",
"title": "☕ Coffee Promotion Alert!"
},
"de": {
"button": "Jetzt einkaufen",
"description": "Für kurze Zeit erhalten Sie einen Rabatt von 20% auf alle unsere Premium-Kaffeemischungen",
"subtitle": "Verpassen Sie es nicht",
"title": "☕ Kaffee-Promotion Benachrichtigung!"
},
"es": {
"button": "Comprar ahora",
"description": "Por tiempo limitado, puedes disfrutar de un descuento del 20% en todas nuestras mezclas de café premium",
"subtitle": "No te lo pierdas",
"title": "☕ ¡Alerta de Promoción de Café!"
}
}
```
Once your localization data is structured and added in the **Localization Tab** of the editor, incorporate it into your HTML content using placeholders. The placeholders dynamically insert localized text into your content, based on the user's language preference. Here's how to implement it in your HTML
```
{{title|text|}}
{{subtitle|text|}}
{{description|text|}}
{{button|text|}}
```
Consider this scenario: you're advertising a limited-time discount on coffee blends. By using the localization structure mentioned above, you can communicate your promotional message effectively to users speaking different languages. Your HTML code for the promotion might look like this:
```html
☕ Coffee Promotion Alert
```
With this setup, if a user's language is German, they'll see the email in German. Users who opted to receive emails in English will see it in English. Those who opted to receive it in Spanish will receive it in Spanish. This ensures that all recipients get your message in their preferred language.
## Insert and combine email content blocks
Pushwoosh allows you to combine email content by inserting one piece of email content into another. This makes it easy to reuse elements like headers, footers, or specific content blocks across different emails.
For example, if you have **Email content A** (a header) and **Email content B** (a newsletter), you can insert **Email content A** into **Email content B** without manually copying content each time.
### Syntax
To insert one piece of content into another, use the following syntax:
```
{% email_content "AAAAA-BBBBB" %}
```
Where "AAAAA-BBBBB" is the ID of the email content you want to insert. You can find the ID located beneath the content name in your list of email content.
**Example**
Let’s say you have two pieces of content:
* **Header content** (ID: "AAAAA-BBBBB") with a predefined header design.
* **Newsletter content**, where you want to include the header.
To insert the header into the newsletter, you would use the following:
```
{% email_content "AAAAA-BBBBB" %}
```
This allows you to easily reuse a predefined header in multiple email campaigns. It saves time and ensures consistency across your emails.
## Add an unsubscribe link
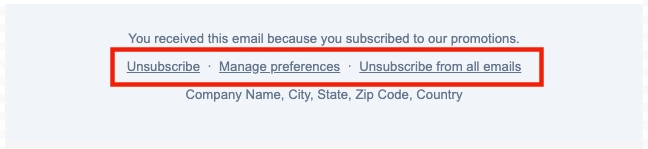
Include an unsubscribe link in your email so recipients can opt out in line with regulations and their preferences. Pushwoosh provides three variables you can use in your HTML.
### Unsubscribe link
Add this link so users can opt out from the message they received:
```
Unsubscribe
```
The variable is replaced with the Pushwoosh unsubscribe URL when you send the email.
- When the subscription preference center is enabled, recipients are unsubscribed only from the category assigned to that email (e.g., *Newsletter*). A confirmation screen appears where they can **Resubscribe** to that category or **Manage preferences** to adjust all email categories. [Learn more](/product/messaging-channels/emails/email-preferences/#default-behavior-unsubscribe-from-a-category)
- When the subscription preference center is not enabled, recipients unsubscribe from all marketing emails.
Clicks are counted in the unsubscribe rate for that message in [Message History](/product/statistics-and-analytics/message-history).
### Unsubscribe from all categories
Add a link that unsubscribes the user from all email categories at once:
```
Unsubscribe from all emails
```
### Preference center link
Add a direct link to the [preference center](/product/messaging-channels/emails/email-preferences/#optional-setup-full-preference-center) where users manage which categories they receive:
```
Manage preferences
```
[Learn how the preference center works](/product/messaging-channels/emails/email-preferences/#how-to-let-users-unsubscribe-from-a-category-or-manage-preferences)
The screenshot below shows a footer that uses all three link types.
## Save email content
After you have finished creating your email, click on the **Save** button located at the top of the editor.
In the new window that appears, give your email a clear name, which could be the same as your Subject line. Also, create a label to help you easily find it in your list of emails.
If you haven't [set up sender details](/product/content/email-content/set-up-your-email-in-the-editor) yet, make sure to do that as well. Then, click **Save.**
Now that your email content is ready, it can be used in email campaigns. [Learn more](/product/messaging-channels/emails/sending-emails)
## Send a test email
Before sending your email campaign, you can send a test email to preview how the content will appear in recipients' inboxes. This allows you to review the layout, content, and any personalized elements to ensure accuracy before finalizing the campaign. If needed, adjust the content based on the test results.
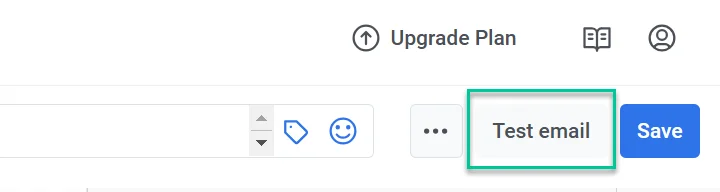
To send a test email, click **Test email** in the email editor.
In the window that opens:
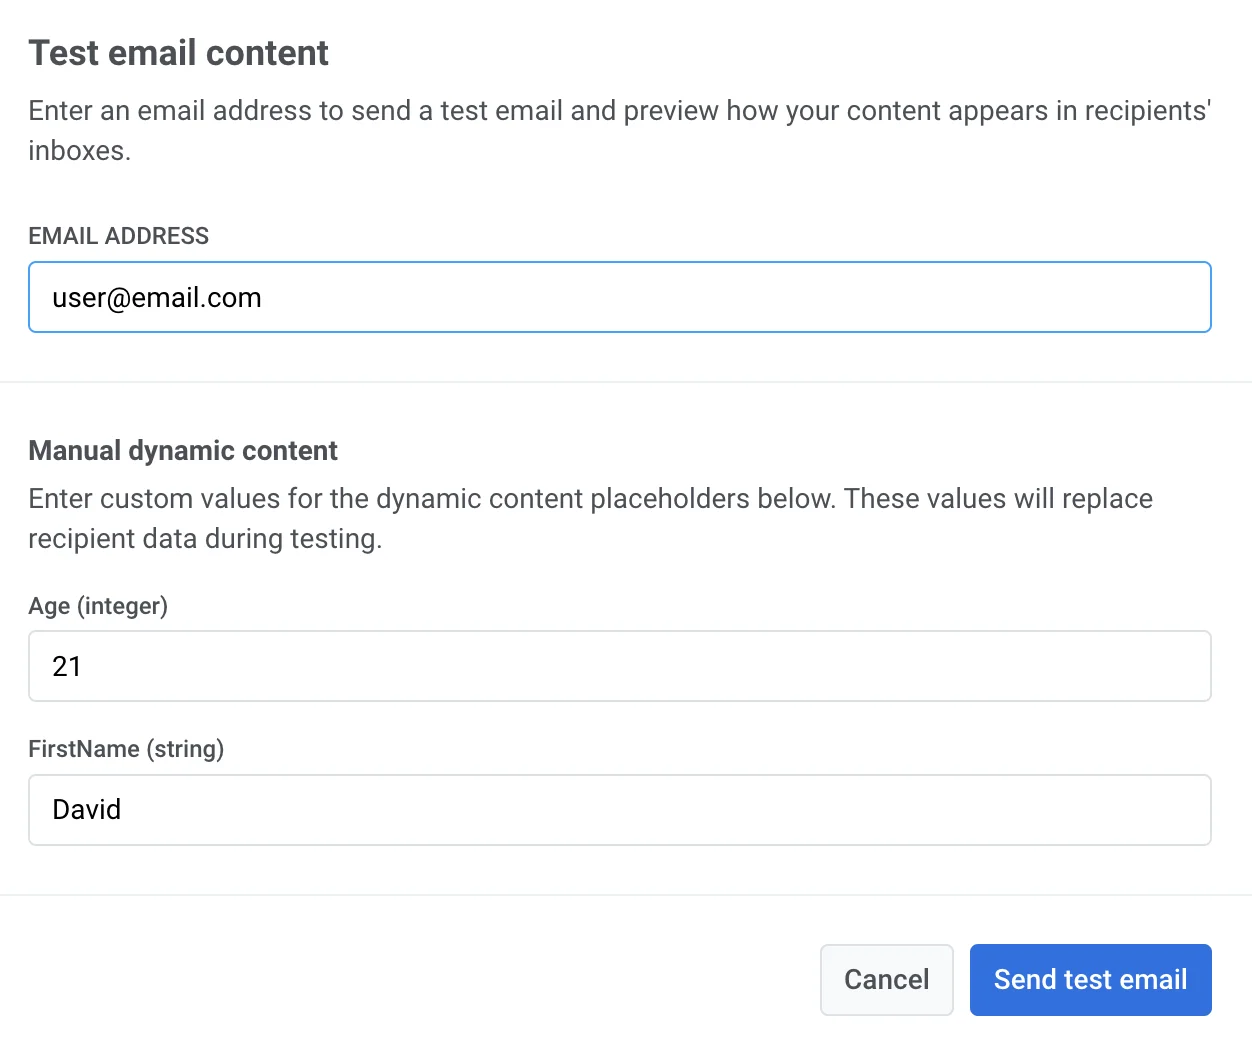
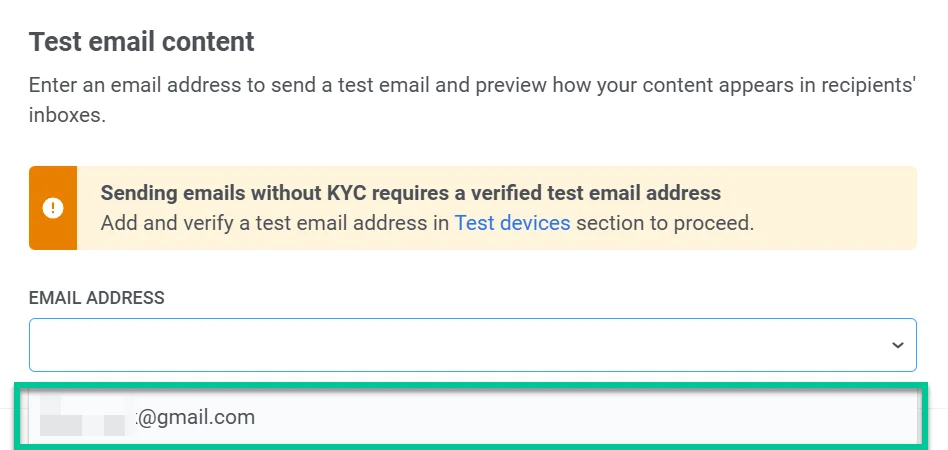
1. In the **Email address** field, enter the email address where you want to receive the test email.
If KYC has not been completed, you will need to select a verified email address from the list of test addresses instead of entering an email.
2. If your email contains dynamic content (placeholders for personalized data), add sample values for testing purposes.
For example:
* **Age (integer)**: Enter a number to represent the age placeholder (e.g., `21`).
* **FirstName (string)**: Enter a sample first name (e.g., `David`).
These values will replace actual recipient data in the test email, allowing you to verify how the dynamic content appears.
3. Once you've filled in the necessary details, click **Send test email** to send the test message to the provided email address.
 To include an emoji in your email, click the **Emoji** icon located at the bottom of the editor.
### Add images
To add an image to your email, include an `
To include an emoji in your email, click the **Emoji** icon located at the bottom of the editor.
### Add images
To add an image to your email, include an `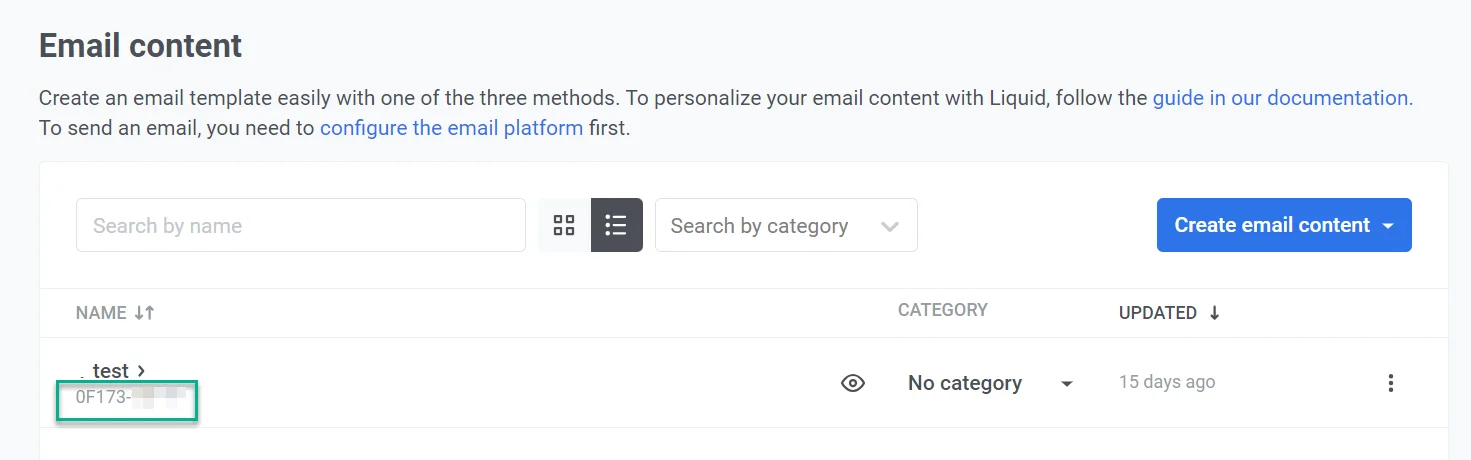 **Example**
Let’s say you have two pieces of content:
* **Header content** (ID: "AAAAA-BBBBB") with a predefined header design.
* **Newsletter content**, where you want to include the header.
To insert the header into the newsletter, you would use the following:
```
{% email_content "AAAAA-BBBBB" %}
```
This allows you to easily reuse a predefined header in multiple email campaigns. It saves time and ensures consistency across your emails.
## Add an unsubscribe link
Include an unsubscribe link in your email so recipients can opt out in line with regulations and their preferences. Pushwoosh provides three variables you can use in your HTML.
### Unsubscribe link
Add this link so users can opt out from the message they received:
```
Unsubscribe
```
The variable is replaced with the Pushwoosh unsubscribe URL when you send the email.
- When the subscription preference center is enabled, recipients are unsubscribed only from the category assigned to that email (e.g., *Newsletter*). A confirmation screen appears where they can **Resubscribe** to that category or **Manage preferences** to adjust all email categories. [Learn more](/product/messaging-channels/emails/email-preferences/#default-behavior-unsubscribe-from-a-category)
- When the subscription preference center is not enabled, recipients unsubscribe from all marketing emails.
Clicks are counted in the unsubscribe rate for that message in [Message History](/product/statistics-and-analytics/message-history).
### Unsubscribe from all categories
Add a link that unsubscribes the user from all email categories at once:
```
Unsubscribe from all emails
```
### Preference center link
Add a direct link to the [preference center](/product/messaging-channels/emails/email-preferences/#optional-setup-full-preference-center) where users manage which categories they receive:
```
Manage preferences
```
[Learn how the preference center works](/product/messaging-channels/emails/email-preferences/#how-to-let-users-unsubscribe-from-a-category-or-manage-preferences)
The screenshot below shows a footer that uses all three link types.
**Example**
Let’s say you have two pieces of content:
* **Header content** (ID: "AAAAA-BBBBB") with a predefined header design.
* **Newsletter content**, where you want to include the header.
To insert the header into the newsletter, you would use the following:
```
{% email_content "AAAAA-BBBBB" %}
```
This allows you to easily reuse a predefined header in multiple email campaigns. It saves time and ensures consistency across your emails.
## Add an unsubscribe link
Include an unsubscribe link in your email so recipients can opt out in line with regulations and their preferences. Pushwoosh provides three variables you can use in your HTML.
### Unsubscribe link
Add this link so users can opt out from the message they received:
```
Unsubscribe
```
The variable is replaced with the Pushwoosh unsubscribe URL when you send the email.
- When the subscription preference center is enabled, recipients are unsubscribed only from the category assigned to that email (e.g., *Newsletter*). A confirmation screen appears where they can **Resubscribe** to that category or **Manage preferences** to adjust all email categories. [Learn more](/product/messaging-channels/emails/email-preferences/#default-behavior-unsubscribe-from-a-category)
- When the subscription preference center is not enabled, recipients unsubscribe from all marketing emails.
Clicks are counted in the unsubscribe rate for that message in [Message History](/product/statistics-and-analytics/message-history).
### Unsubscribe from all categories
Add a link that unsubscribes the user from all email categories at once:
```
Unsubscribe from all emails
```
### Preference center link
Add a direct link to the [preference center](/product/messaging-channels/emails/email-preferences/#optional-setup-full-preference-center) where users manage which categories they receive:
```
Manage preferences
```
[Learn how the preference center works](/product/messaging-channels/emails/email-preferences/#how-to-let-users-unsubscribe-from-a-category-or-manage-preferences)
The screenshot below shows a footer that uses all three link types.
 ## Save email content
After you have finished creating your email, click on the **Save** button located at the top of the editor.
## Save email content
After you have finished creating your email, click on the **Save** button located at the top of the editor.
 In the new window that appears, give your email a clear name, which could be the same as your Subject line. Also, create a label to help you easily find it in your list of emails.
If you haven't [set up sender details](/product/content/email-content/set-up-your-email-in-the-editor) yet, make sure to do that as well. Then, click **Save.**
Now that your email content is ready, it can be used in email campaigns. [Learn more](/product/messaging-channels/emails/sending-emails)
## Send a test email
Before sending your email campaign, you can send a test email to preview how the content will appear in recipients' inboxes. This allows you to review the layout, content, and any personalized elements to ensure accuracy before finalizing the campaign. If needed, adjust the content based on the test results.
To send a test email, click **Test email** in the email editor.
In the new window that appears, give your email a clear name, which could be the same as your Subject line. Also, create a label to help you easily find it in your list of emails.
If you haven't [set up sender details](/product/content/email-content/set-up-your-email-in-the-editor) yet, make sure to do that as well. Then, click **Save.**
Now that your email content is ready, it can be used in email campaigns. [Learn more](/product/messaging-channels/emails/sending-emails)
## Send a test email
Before sending your email campaign, you can send a test email to preview how the content will appear in recipients' inboxes. This allows you to review the layout, content, and any personalized elements to ensure accuracy before finalizing the campaign. If needed, adjust the content based on the test results.
To send a test email, click **Test email** in the email editor.
 In the window that opens:
1. In the **Email address** field, enter the email address where you want to receive the test email.
If KYC has not been completed, you will need to select a verified email address from the list of test addresses instead of entering an email.
In the window that opens:
1. In the **Email address** field, enter the email address where you want to receive the test email.
If KYC has not been completed, you will need to select a verified email address from the list of test addresses instead of entering an email.
 2. If your email contains dynamic content (placeholders for personalized data), add sample values for testing purposes.
For example:
* **Age (integer)**: Enter a number to represent the age placeholder (e.g., `21`).
* **FirstName (string)**: Enter a sample first name (e.g., `David`).
These values will replace actual recipient data in the test email, allowing you to verify how the dynamic content appears.
3. Once you've filled in the necessary details, click **Send test email** to send the test message to the provided email address.
2. If your email contains dynamic content (placeholders for personalized data), add sample values for testing purposes.
For example:
* **Age (integer)**: Enter a number to represent the age placeholder (e.g., `21`).
* **FirstName (string)**: Enter a sample first name (e.g., `David`).
These values will replace actual recipient data in the test email, allowing you to verify how the dynamic content appears.
3. Once you've filled in the necessary details, click **Send test email** to send the test message to the provided email address.