# Show content to specific recipients
A **display condition** shows or hides a block for specific recipients based on their [Tags](/product/audience-data-and-segmentation/user-data-tags/tags/). Every subscriber gets the same email, but each one only sees the blocks meant for them.
You can add a display condition to any block or element on the canvas, except the **Footer**.
**To set a display condition:**
1. Select the block or element on the canvas.
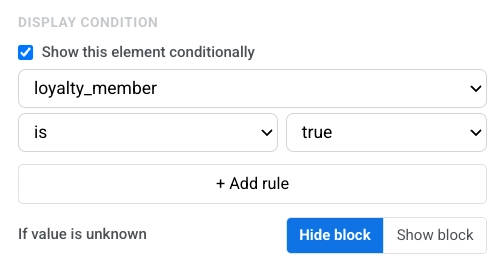
2. In the right panel under **Display condition**, turn on **Show this block conditionally** (**Show this element conditionally** if you selected an element inside a block).
3. In the first field, pick a Tag.
4. Set the operator and value (for example, **is** and **true**).
5. Click **+ Add rule** to add more rules. Choose **All rules** if every rule must match, or **Any rule** if at least one is enough.
6. Under **If value is unknown**, choose **Hide block** or **Show block**. This controls what happens when the Tag has no value for a recipient.
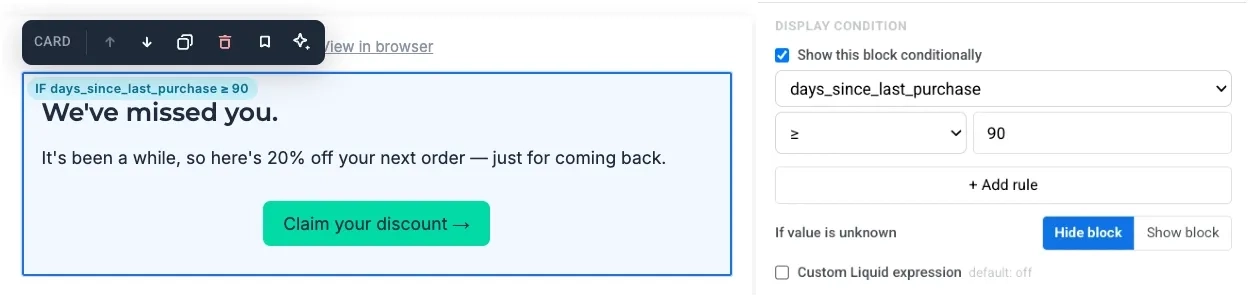
When a condition is active, the block shows a chip on the canvas with a short summary of the rule: **IF** for a standalone condition, or **ELSE IF** / **ELSE** for a block in a branch chain.
## Show different content to different groups
A single display condition only controls one block: the editor shows it to some recipients and hides it from others. It does not replace one block with another.
Use **Branch** when different recipients should see different blocks in the same place, and each recipient should see exactly one variant.
**To set up a branch chain:**
1. Place two or more blocks (or elements inside the same block) directly next to each other on the canvas.
2. On the **first block**, turn on **Show this block conditionally** (or **Show this element conditionally**) and set the Tag rule. The first block has no **Branch** setting. The editor checks this block first.
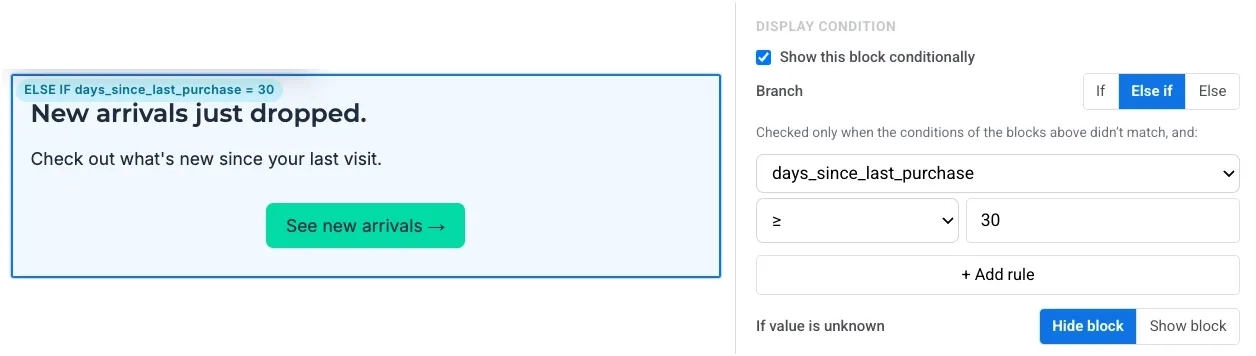
3. On **each middle block** (every block below the first except the last), turn on the display condition, set a Tag rule, and set **Branch** to **Else if**. The editor checks this block only when the conditions of the blocks above it didn't match.
4. On the **last block**, turn on the display condition and set **Branch** to **Else**. Do not add a Tag rule. This block is the fallback for everyone who did not match any block above.
The editor checks blocks in order from top to bottom and shows the first one that matches. All other blocks in the chain stay hidden for that recipient.
### Example scenario: re-engagement by last purchase
A re-engagement email where each recipient sees content based on how long ago they last bought something.
| Block | Branch | Condition | What the recipient sees |
|---|---|---|---|
| Block 1 | None | `days_since_last_purchase` **≥** `90` | "We miss you" message with a win-back discount |
| Block 2 | **Else if** | `days_since_last_purchase` **≥** `30` | A reminder about new arrivals |
| Block 3 | **Else** | None | A regular promo block |
A recipient inactive for 120 days matches both Block 1 and Block 2, but sees the win-back message because Block 1 comes first. Someone inactive for 30–89 days sees the new-arrivals reminder. Everyone else sees the regular promo block.
**To set up this scenario:**
1. Add three **Text** blocks one after another as three separate blocks on the canvas.
2. **Block 1:** turn on **Show this block conditionally**. Set `days_since_last_purchase` **≥** `90`, leave **If value is unknown** on **Hide block**, and add the win-back copy.
3. **Block 2:** turn on the display condition. Set `days_since_last_purchase` **≥** `30`, set **Branch** to **Else if**, and add the new-arrivals copy.
4. **Block 3:** turn on the display condition, set **Branch** to **Else**, and add the regular promo copy. Do not add a Tag rule.
## Write a custom Liquid condition
When the rule builder is not enough, write the condition yourself in [Liquid](/product/personalization/liquid-templates/).
1. Select the block or element on the canvas.
2. Under **Display condition**, turn on **Custom Liquid expression**.
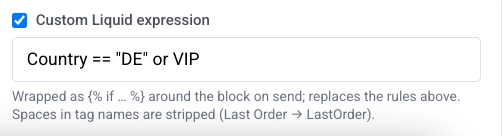
3. Type your condition. For example, to show a block to recipients in Germany or VIP subscribers:
```
Country == "DE" or VIP
```
The editor wraps your expression as `{% if ... %}` around the block when the email is sent. A custom expression replaces any rules set in the builder above it.
Tag names with spaces are converted automatically. For example, `Last Order` becomes `LastOrder`.
 3. In the first field, pick a Tag.
4. Set the operator and value (for example, **is** and **true**).
3. In the first field, pick a Tag.
4. Set the operator and value (for example, **is** and **true**).
 5. Click **+ Add rule** to add more rules. Choose **All rules** if every rule must match, or **Any rule** if at least one is enough.
6. Under **If value is unknown**, choose **Hide block** or **Show block**. This controls what happens when the Tag has no value for a recipient.
When a condition is active, the block shows a chip on the canvas with a short summary of the rule: **IF** for a standalone condition, or **ELSE IF** / **ELSE** for a block in a branch chain.
## Show different content to different groups
A single display condition only controls one block: the editor shows it to some recipients and hides it from others. It does not replace one block with another.
Use **Branch** when different recipients should see different blocks in the same place, and each recipient should see exactly one variant.
**To set up a branch chain:**
1. Place two or more blocks (or elements inside the same block) directly next to each other on the canvas.
2. On the **first block**, turn on **Show this block conditionally** (or **Show this element conditionally**) and set the Tag rule. The first block has no **Branch** setting. The editor checks this block first.
3. On **each middle block** (every block below the first except the last), turn on the display condition, set a Tag rule, and set **Branch** to **Else if**. The editor checks this block only when the conditions of the blocks above it didn't match.
4. On the **last block**, turn on the display condition and set **Branch** to **Else**. Do not add a Tag rule. This block is the fallback for everyone who did not match any block above.
The editor checks blocks in order from top to bottom and shows the first one that matches. All other blocks in the chain stay hidden for that recipient.
### Example scenario: re-engagement by last purchase
A re-engagement email where each recipient sees content based on how long ago they last bought something.
| Block | Branch | Condition | What the recipient sees |
|---|---|---|---|
| Block 1 | None | `days_since_last_purchase` **≥** `90` | "We miss you" message with a win-back discount |
| Block 2 | **Else if** | `days_since_last_purchase` **≥** `30` | A reminder about new arrivals |
| Block 3 | **Else** | None | A regular promo block |
A recipient inactive for 120 days matches both Block 1 and Block 2, but sees the win-back message because Block 1 comes first. Someone inactive for 30–89 days sees the new-arrivals reminder. Everyone else sees the regular promo block.
**To set up this scenario:**
1. Add three **Text** blocks one after another as three separate blocks on the canvas.
2. **Block 1:** turn on **Show this block conditionally**. Set `days_since_last_purchase` **≥** `90`, leave **If value is unknown** on **Hide block**, and add the win-back copy.
5. Click **+ Add rule** to add more rules. Choose **All rules** if every rule must match, or **Any rule** if at least one is enough.
6. Under **If value is unknown**, choose **Hide block** or **Show block**. This controls what happens when the Tag has no value for a recipient.
When a condition is active, the block shows a chip on the canvas with a short summary of the rule: **IF** for a standalone condition, or **ELSE IF** / **ELSE** for a block in a branch chain.
## Show different content to different groups
A single display condition only controls one block: the editor shows it to some recipients and hides it from others. It does not replace one block with another.
Use **Branch** when different recipients should see different blocks in the same place, and each recipient should see exactly one variant.
**To set up a branch chain:**
1. Place two or more blocks (or elements inside the same block) directly next to each other on the canvas.
2. On the **first block**, turn on **Show this block conditionally** (or **Show this element conditionally**) and set the Tag rule. The first block has no **Branch** setting. The editor checks this block first.
3. On **each middle block** (every block below the first except the last), turn on the display condition, set a Tag rule, and set **Branch** to **Else if**. The editor checks this block only when the conditions of the blocks above it didn't match.
4. On the **last block**, turn on the display condition and set **Branch** to **Else**. Do not add a Tag rule. This block is the fallback for everyone who did not match any block above.
The editor checks blocks in order from top to bottom and shows the first one that matches. All other blocks in the chain stay hidden for that recipient.
### Example scenario: re-engagement by last purchase
A re-engagement email where each recipient sees content based on how long ago they last bought something.
| Block | Branch | Condition | What the recipient sees |
|---|---|---|---|
| Block 1 | None | `days_since_last_purchase` **≥** `90` | "We miss you" message with a win-back discount |
| Block 2 | **Else if** | `days_since_last_purchase` **≥** `30` | A reminder about new arrivals |
| Block 3 | **Else** | None | A regular promo block |
A recipient inactive for 120 days matches both Block 1 and Block 2, but sees the win-back message because Block 1 comes first. Someone inactive for 30–89 days sees the new-arrivals reminder. Everyone else sees the regular promo block.
**To set up this scenario:**
1. Add three **Text** blocks one after another as three separate blocks on the canvas.
2. **Block 1:** turn on **Show this block conditionally**. Set `days_since_last_purchase` **≥** `90`, leave **If value is unknown** on **Hide block**, and add the win-back copy.
 3. **Block 2:** turn on the display condition. Set `days_since_last_purchase` **≥** `30`, set **Branch** to **Else if**, and add the new-arrivals copy.
 4. **Block 3:** turn on the display condition, set **Branch** to **Else**, and add the regular promo copy. Do not add a Tag rule.
 ## Write a custom Liquid condition
When the rule builder is not enough, write the condition yourself in [Liquid](/product/personalization/liquid-templates/).
1. Select the block or element on the canvas.
2. Under **Display condition**, turn on **Custom Liquid expression**.
3. Type your condition. For example, to show a block to recipients in Germany or VIP subscribers:
```
Country == "DE" or VIP
```
The editor wraps your expression as `{% if ... %}` around the block when the email is sent. A custom expression replaces any rules set in the builder above it.
Tag names with spaces are converted automatically. For example, `Last Order` becomes `LastOrder`.
## Write a custom Liquid condition
When the rule builder is not enough, write the condition yourself in [Liquid](/product/personalization/liquid-templates/).
1. Select the block or element on the canvas.
2. Under **Display condition**, turn on **Custom Liquid expression**.
3. Type your condition. For example, to show a block to recipients in Germany or VIP subscribers:
```
Country == "DE" or VIP
```
The editor wraps your expression as `{% if ... %}` around the block when the email is sent. A custom expression replaces any rules set in the builder above it.
Tag names with spaces are converted automatically. For example, `Last Order` becomes `LastOrder`.