User Explorer
The User Explorer section provides a detailed view of your audience, allowing you to explore individual user data, including their devices, received messages, and interactions. It gathers and organizes customer data from multiple touchpoints, structuring real-time insights into centralized user profiles. This enables effective debugging, user segmentation, and targeted marketing strategies.
Search for a user
Anchor link toTo find a specific user, enter their User ID, HWID, or push token into the search field and click Search.
If a user has more than one device, you’ll see the list of devices linked to the user, including:
- HWID (Hardware ID) – Unique identifier for each device.
- Platform – The operating system used (e.g., Android, iOS, Chrome).
- Device Model – The specific device type (e.g., iPad Mini 4).
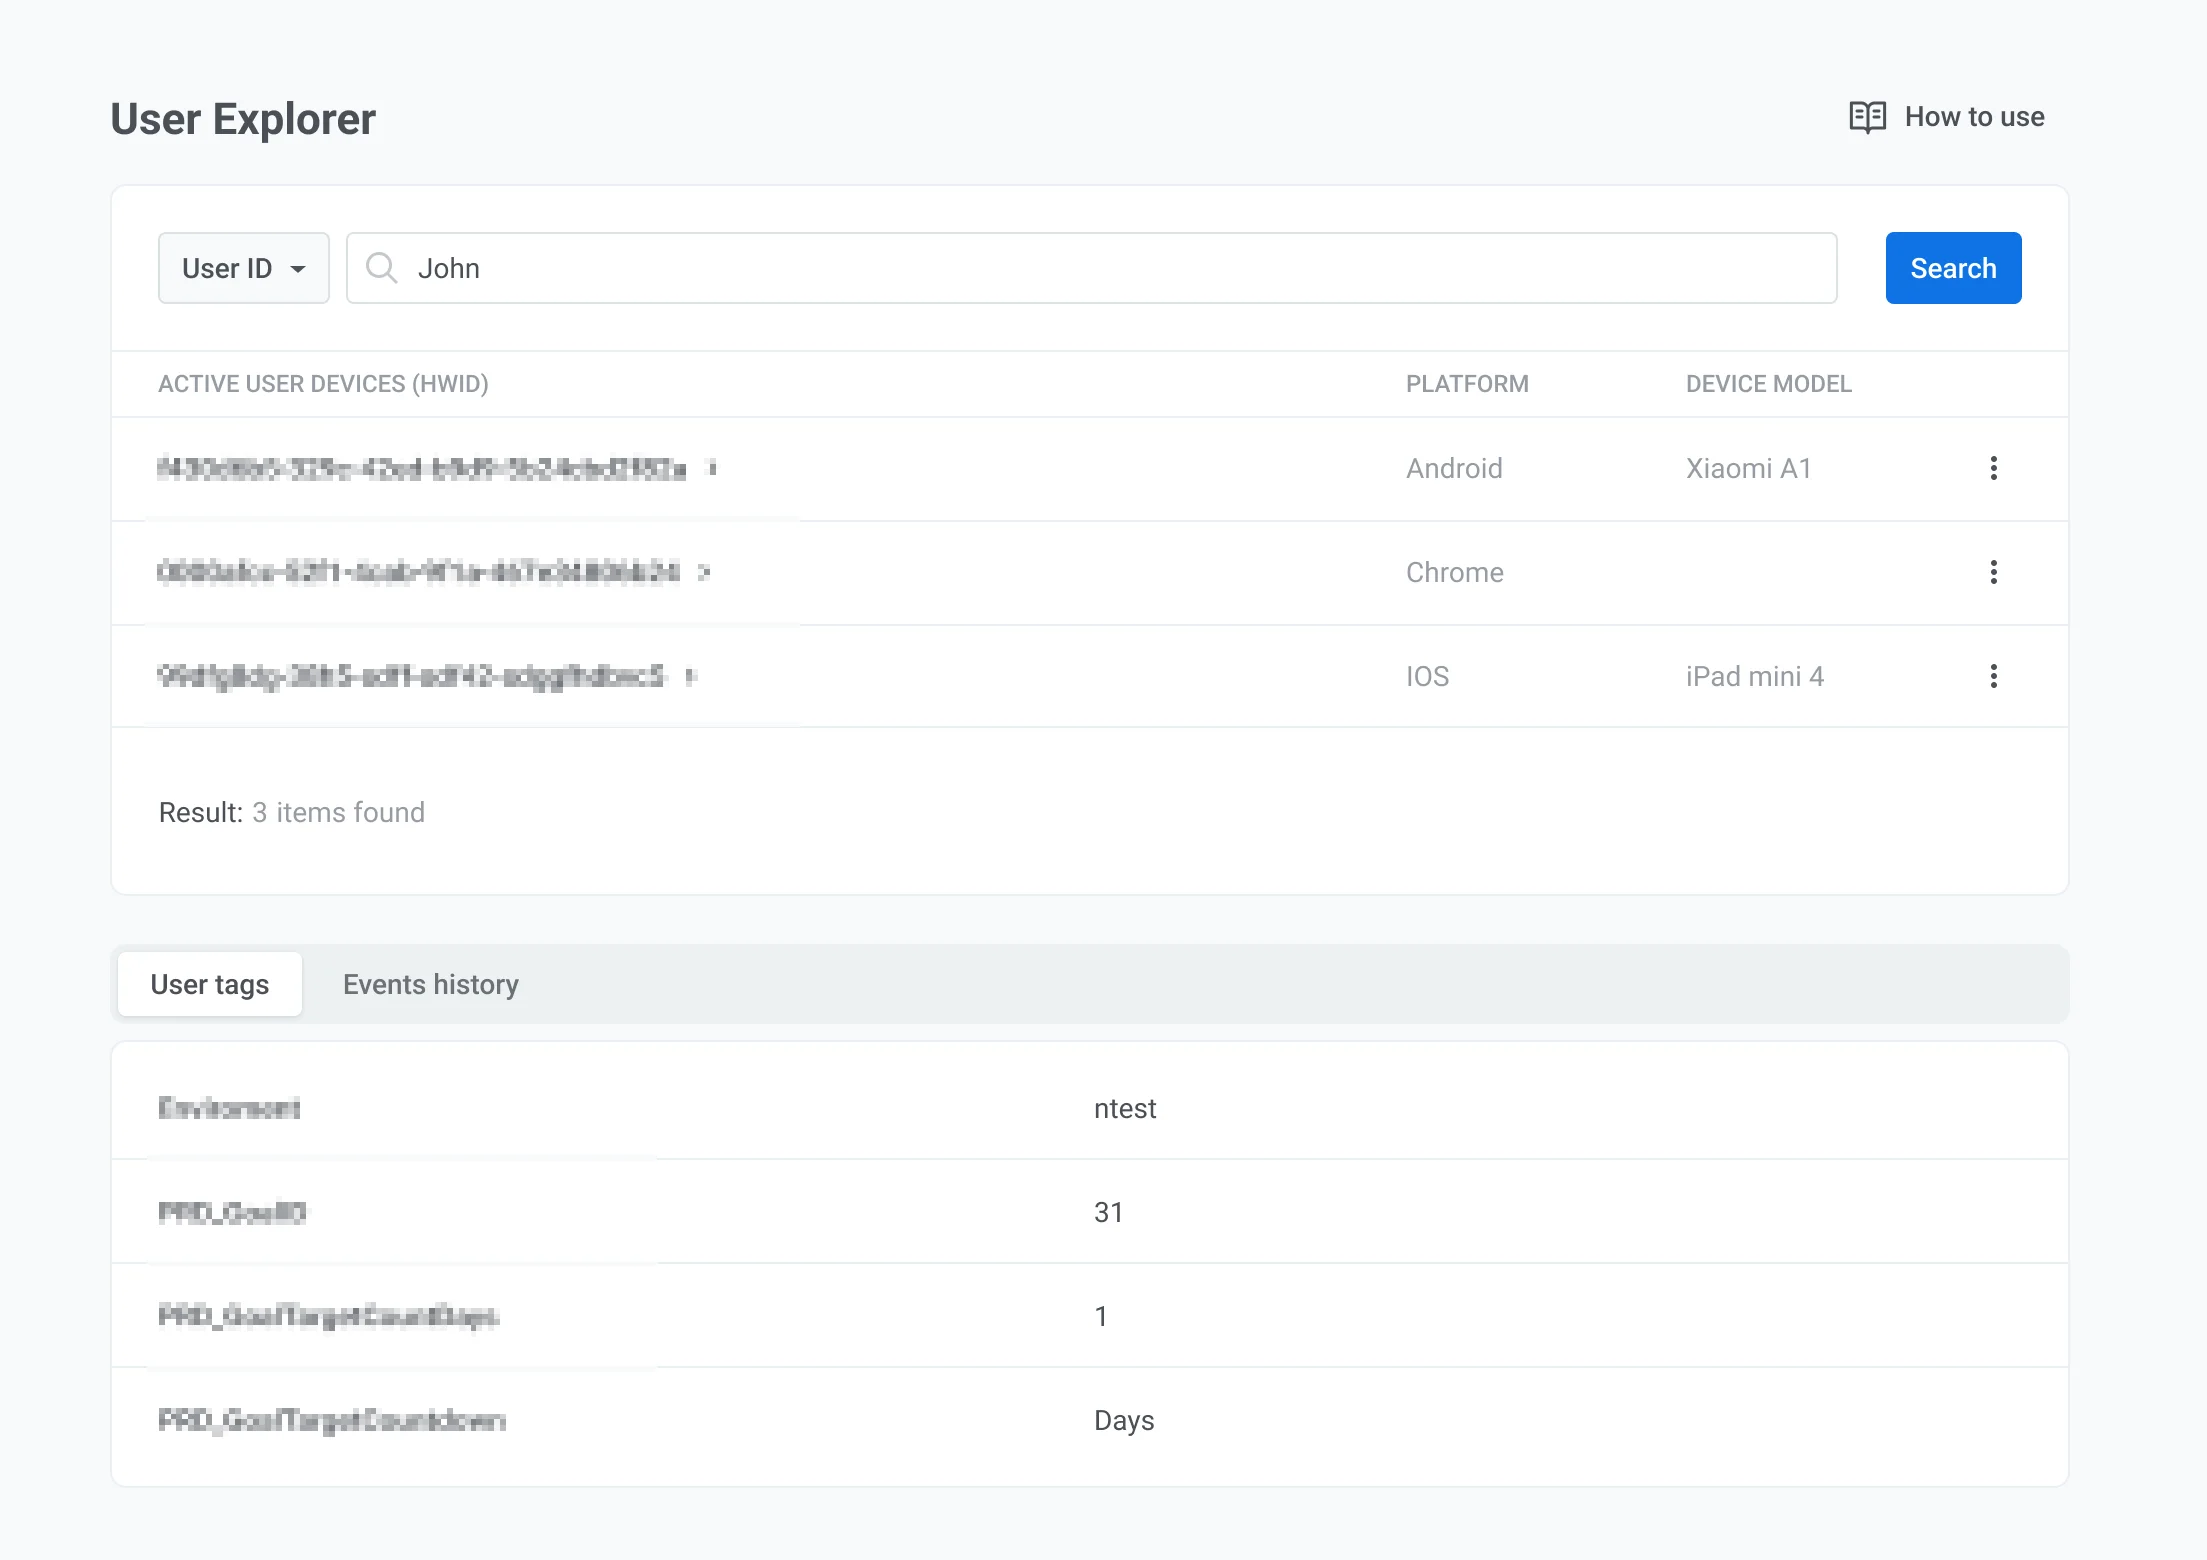
On this page, you’ll also find:
- User tags – all tags assigned to the user along with their values.
- Events history – user interactions, such as app opens, purchases, and campaign engagements.
Managing user devices
Anchor link toSetting a test device
Anchor link toUser Explorer allows you to mark specific devices as test devices, enabling you to send test messages and verify campaign functionality before launching to a wider audience.
To set a test device:
- Locate the device in the Active user devices list.
- Click the three-dot menu (⋮) next to the device and select Set as test device.
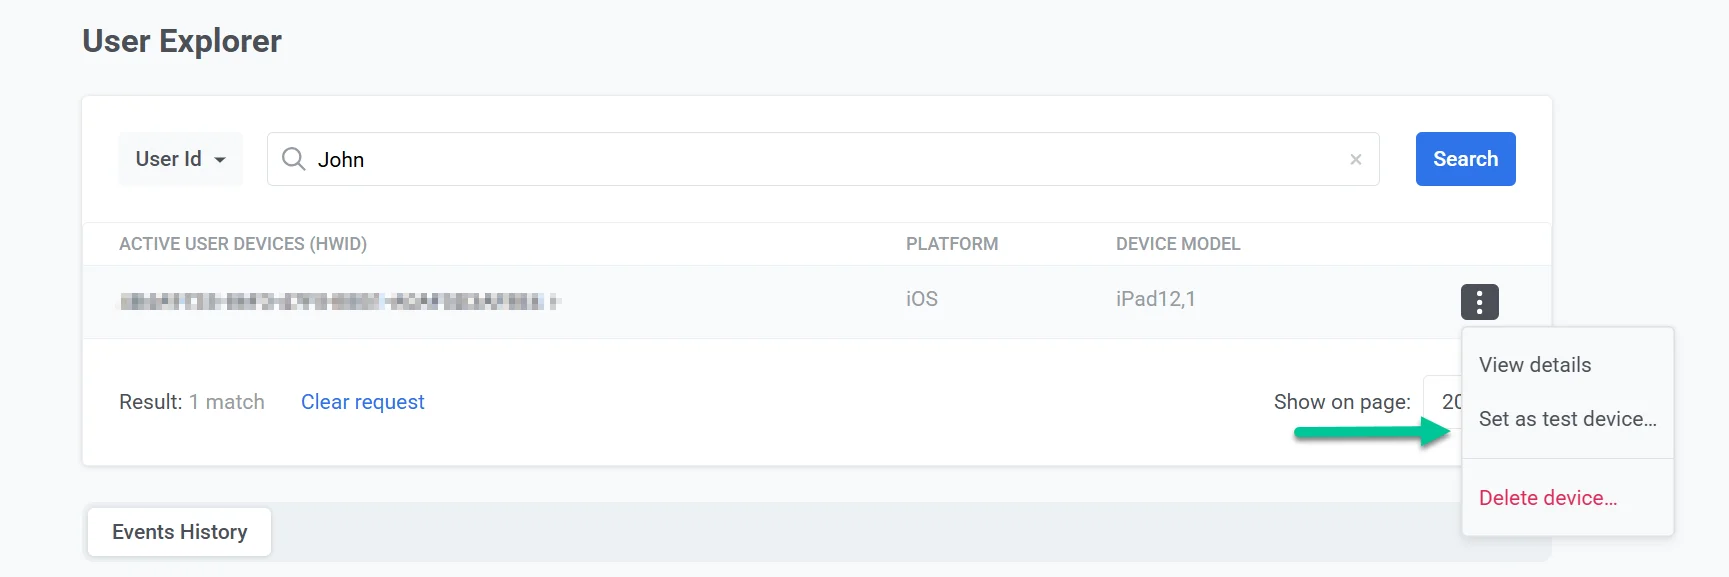
- In the pop-up window:
- Provide a recognizable name for the test device.
- (Optional) Add a description to help identify it later.
- Click Apply.
The device is now marked as a test device and can receive test messages. You can remove it from the test list anytime by selecting Remove from test devices.
Managing email devices
Anchor link toFor email devices you also can:
- Mark the email as a test email to send test messages before launching a campaign.
- Add the email address to your email campaign subscriber list.
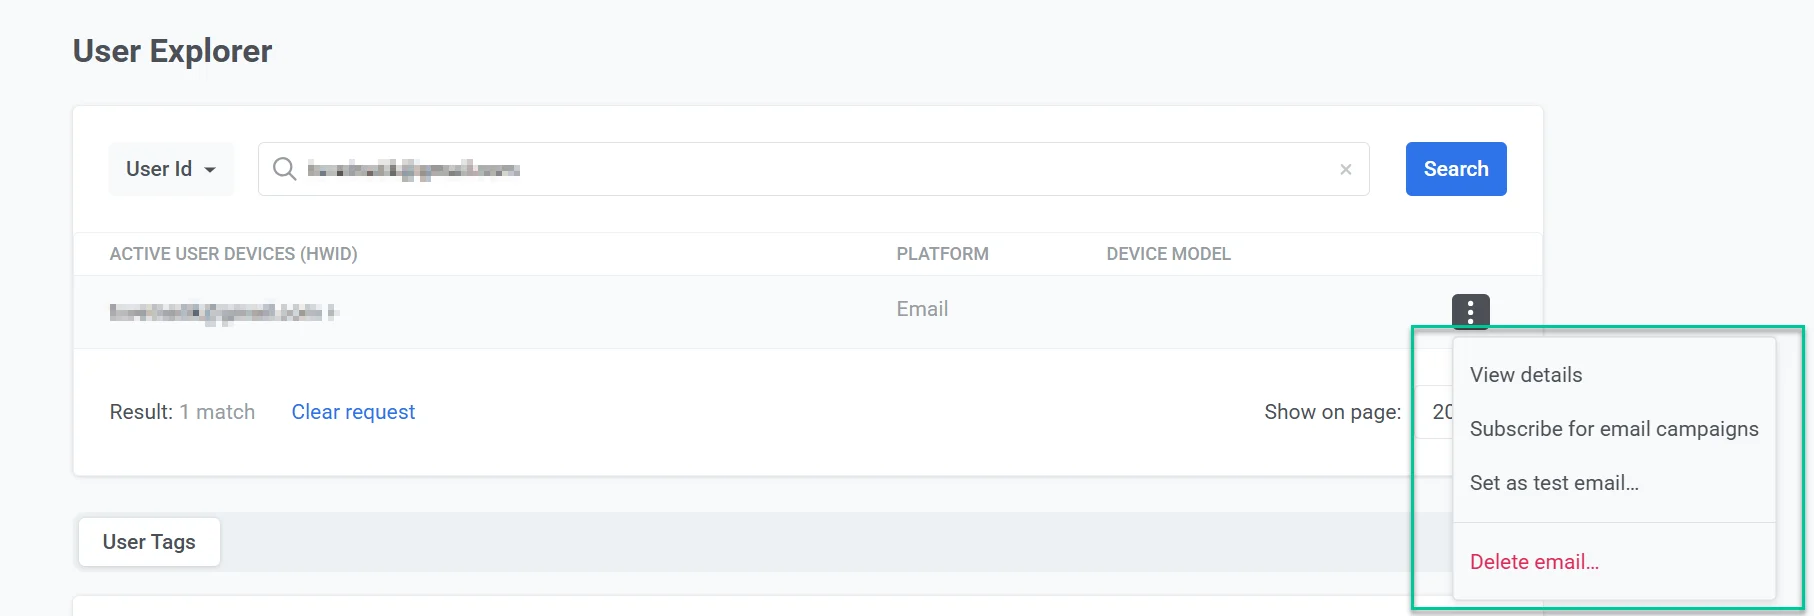
Deleting a device
Anchor link toIf a device is no longer needed, you can delete it directly within User Explorer. This permanently removes the device from the system, meaning it will no longer receive push notifications or be linked to the user’s profile.
View subscriber information
Anchor link toFor detailed insights into user behavior on a specific device, click on the active device in the Devices list.
User info tab
Anchor link toThe User info page provides detailed information about a user including their device, application activity, and custom tags. This data helps you analyze user behavior, manage segmentation, and personalize messaging.
User identity
Anchor link toThe User identity section shows a user’s unique identifiers and basic demographic details.
This section displays key user identifiers:
- User ID – A unique identifier assigned to the user. By default, it’s equal to HWID, but it can be configured to a custom UserID with assistance from your development team. Learn more
- HWID (Hardware ID) – A unique identifier for the user’s device. Learn more
- Token – The push token used for delivering notifications. Learn more
- Country, City, and Language – User’s location and preferred language settings.

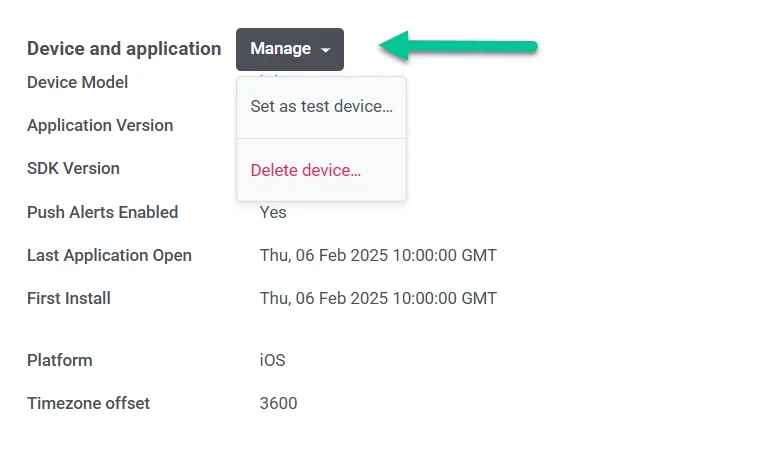
Device and application information
Anchor link toThe Device & App section provides details about the user’s device, installed app, and Pushwoosh SDK versions, and whether that user is engaged enough to enable push notifications for your app and visit the app from time to time.
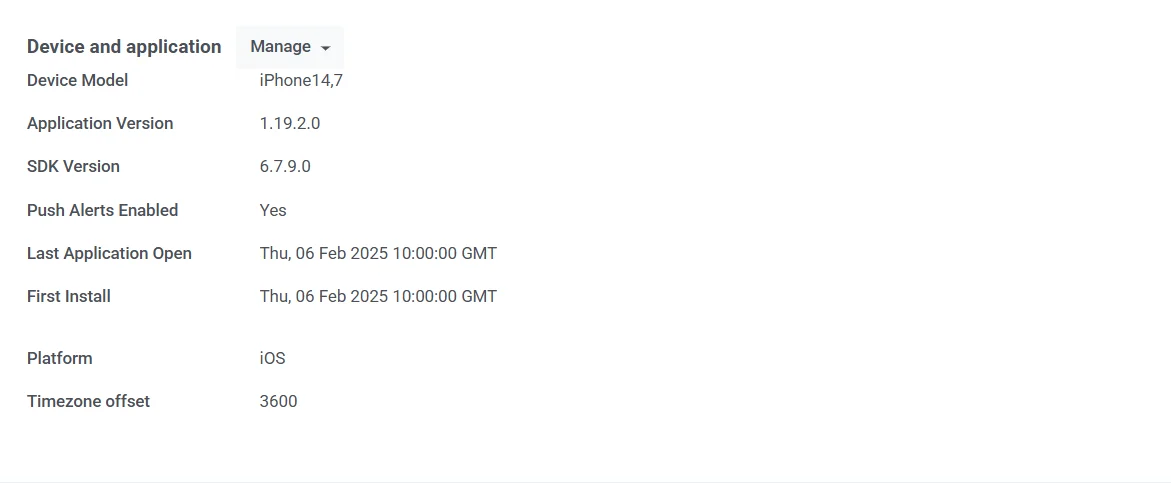
Managing a device
Anchor link toThe Device & Application section in User Explorer allows you to manage individual user devices. You can:
- Set a device as a test device to send test messages.
- Delete a device permanently if it is no longer needed.
To manage a device, click the Manage button and select one of the available actions:
- Set as test device to use the device for test messaging.
- Delete device to remove it from the system.
Custom tags
Anchor link toCustom tags are tags you create by yourself for your account in addition to default ones provided by Pushwoosh out-of-the-box. In that section, you’ll find the list of custom tags a user or device has values set for.
How to edit a custom tag
Anchor link to- Locate the Custom Tags section in the user profile.
- Click the pencil icon next to a tag value to edit it.
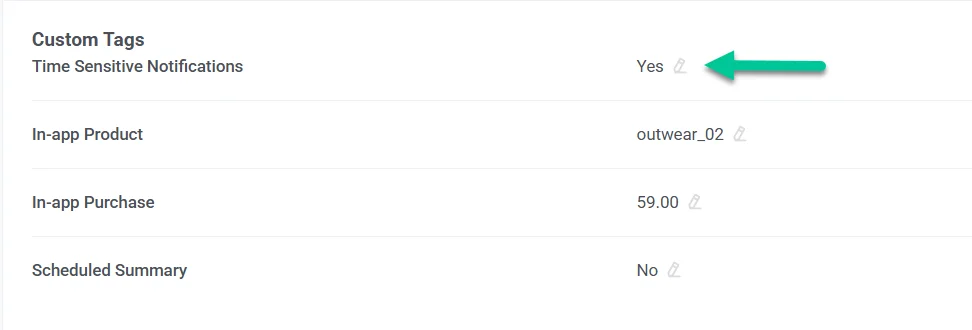
- Enter a new value in the input field.
- Click Submit to save changes or Cancel to discard them.
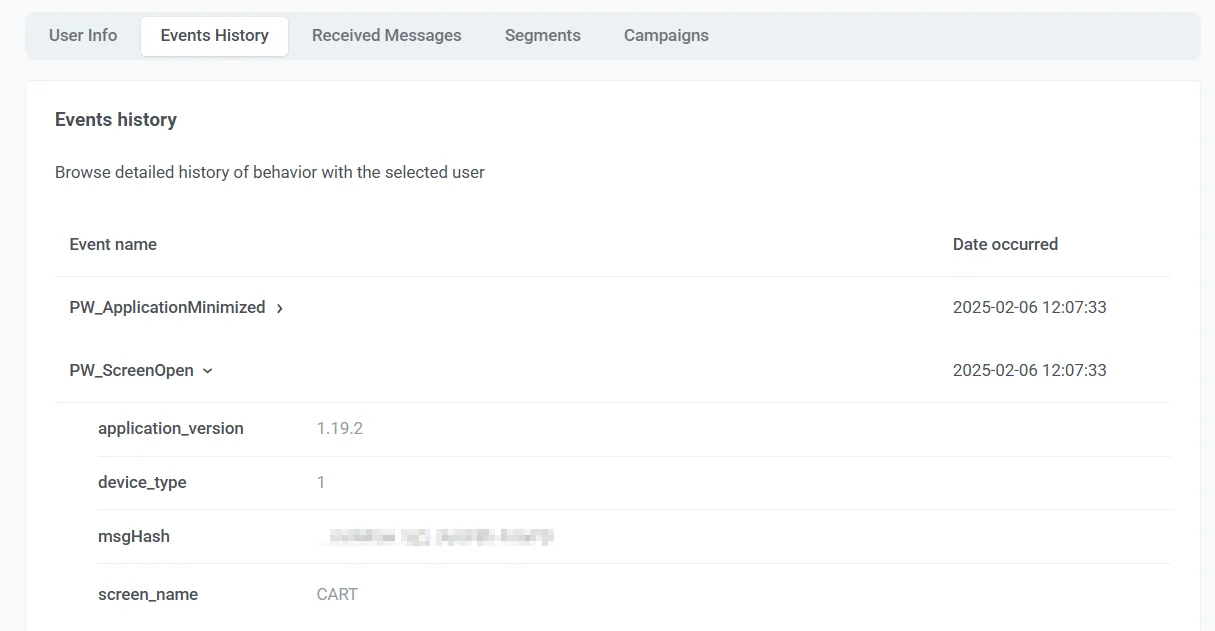
Events history tab
Anchor link toPushwoosh tracks and stores the Events log for each user device for up to one year.
In the Events history section of the user profile, you can view all events triggered by the user, listed in chronological order.
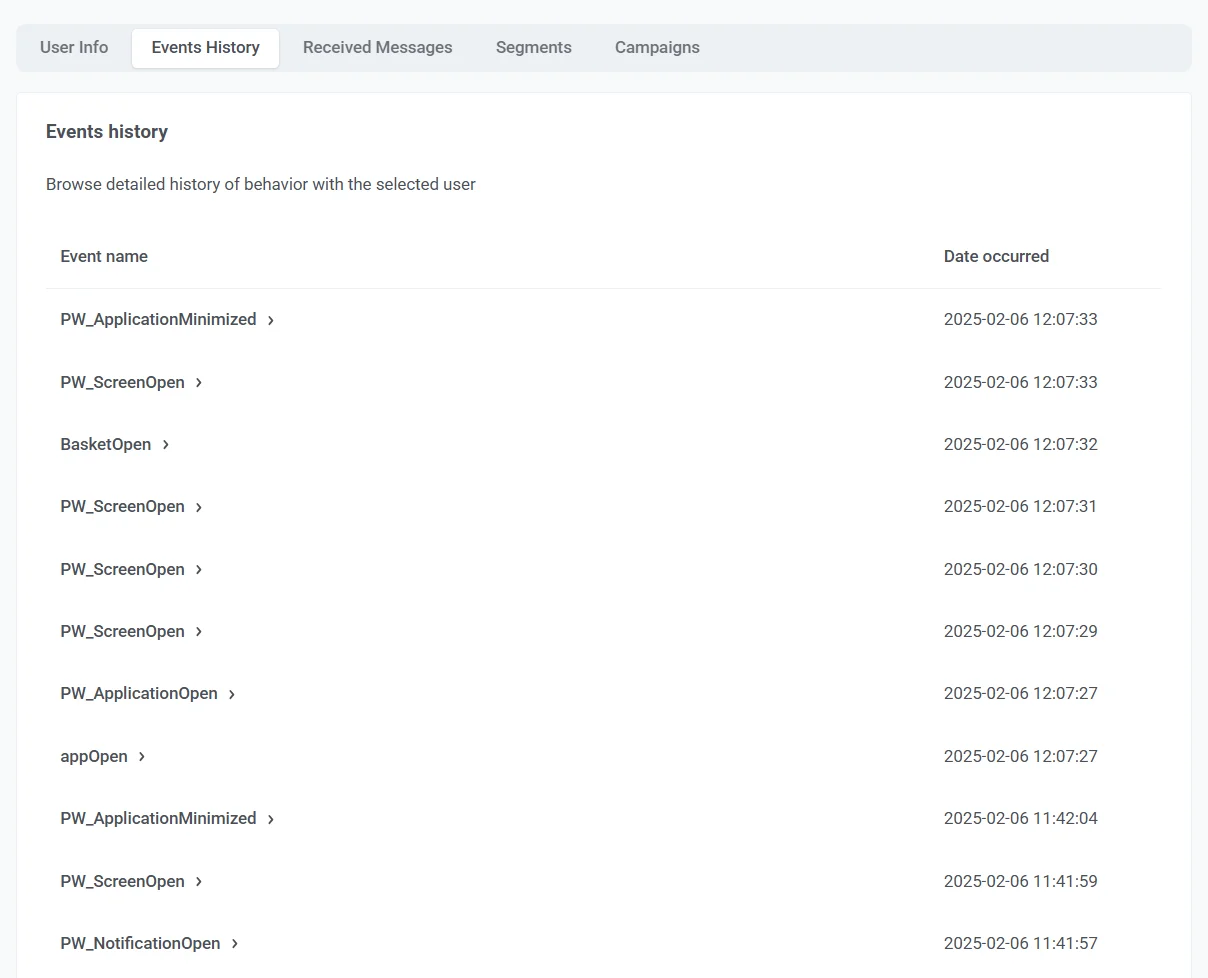
To view detailed information about an event, click on it. You can then review additional attributes associated with the event, including:
- application_version – The app version used when the event occurred.
- device_type
- msgHash – A unique identifier for the message linked to this event.
- screen_name – The screen the user opened.
Received messages tab
Anchor link toThe Received Messages tab displays all messages sent to a user. Use the search bar to find a specific message using its unique message code.
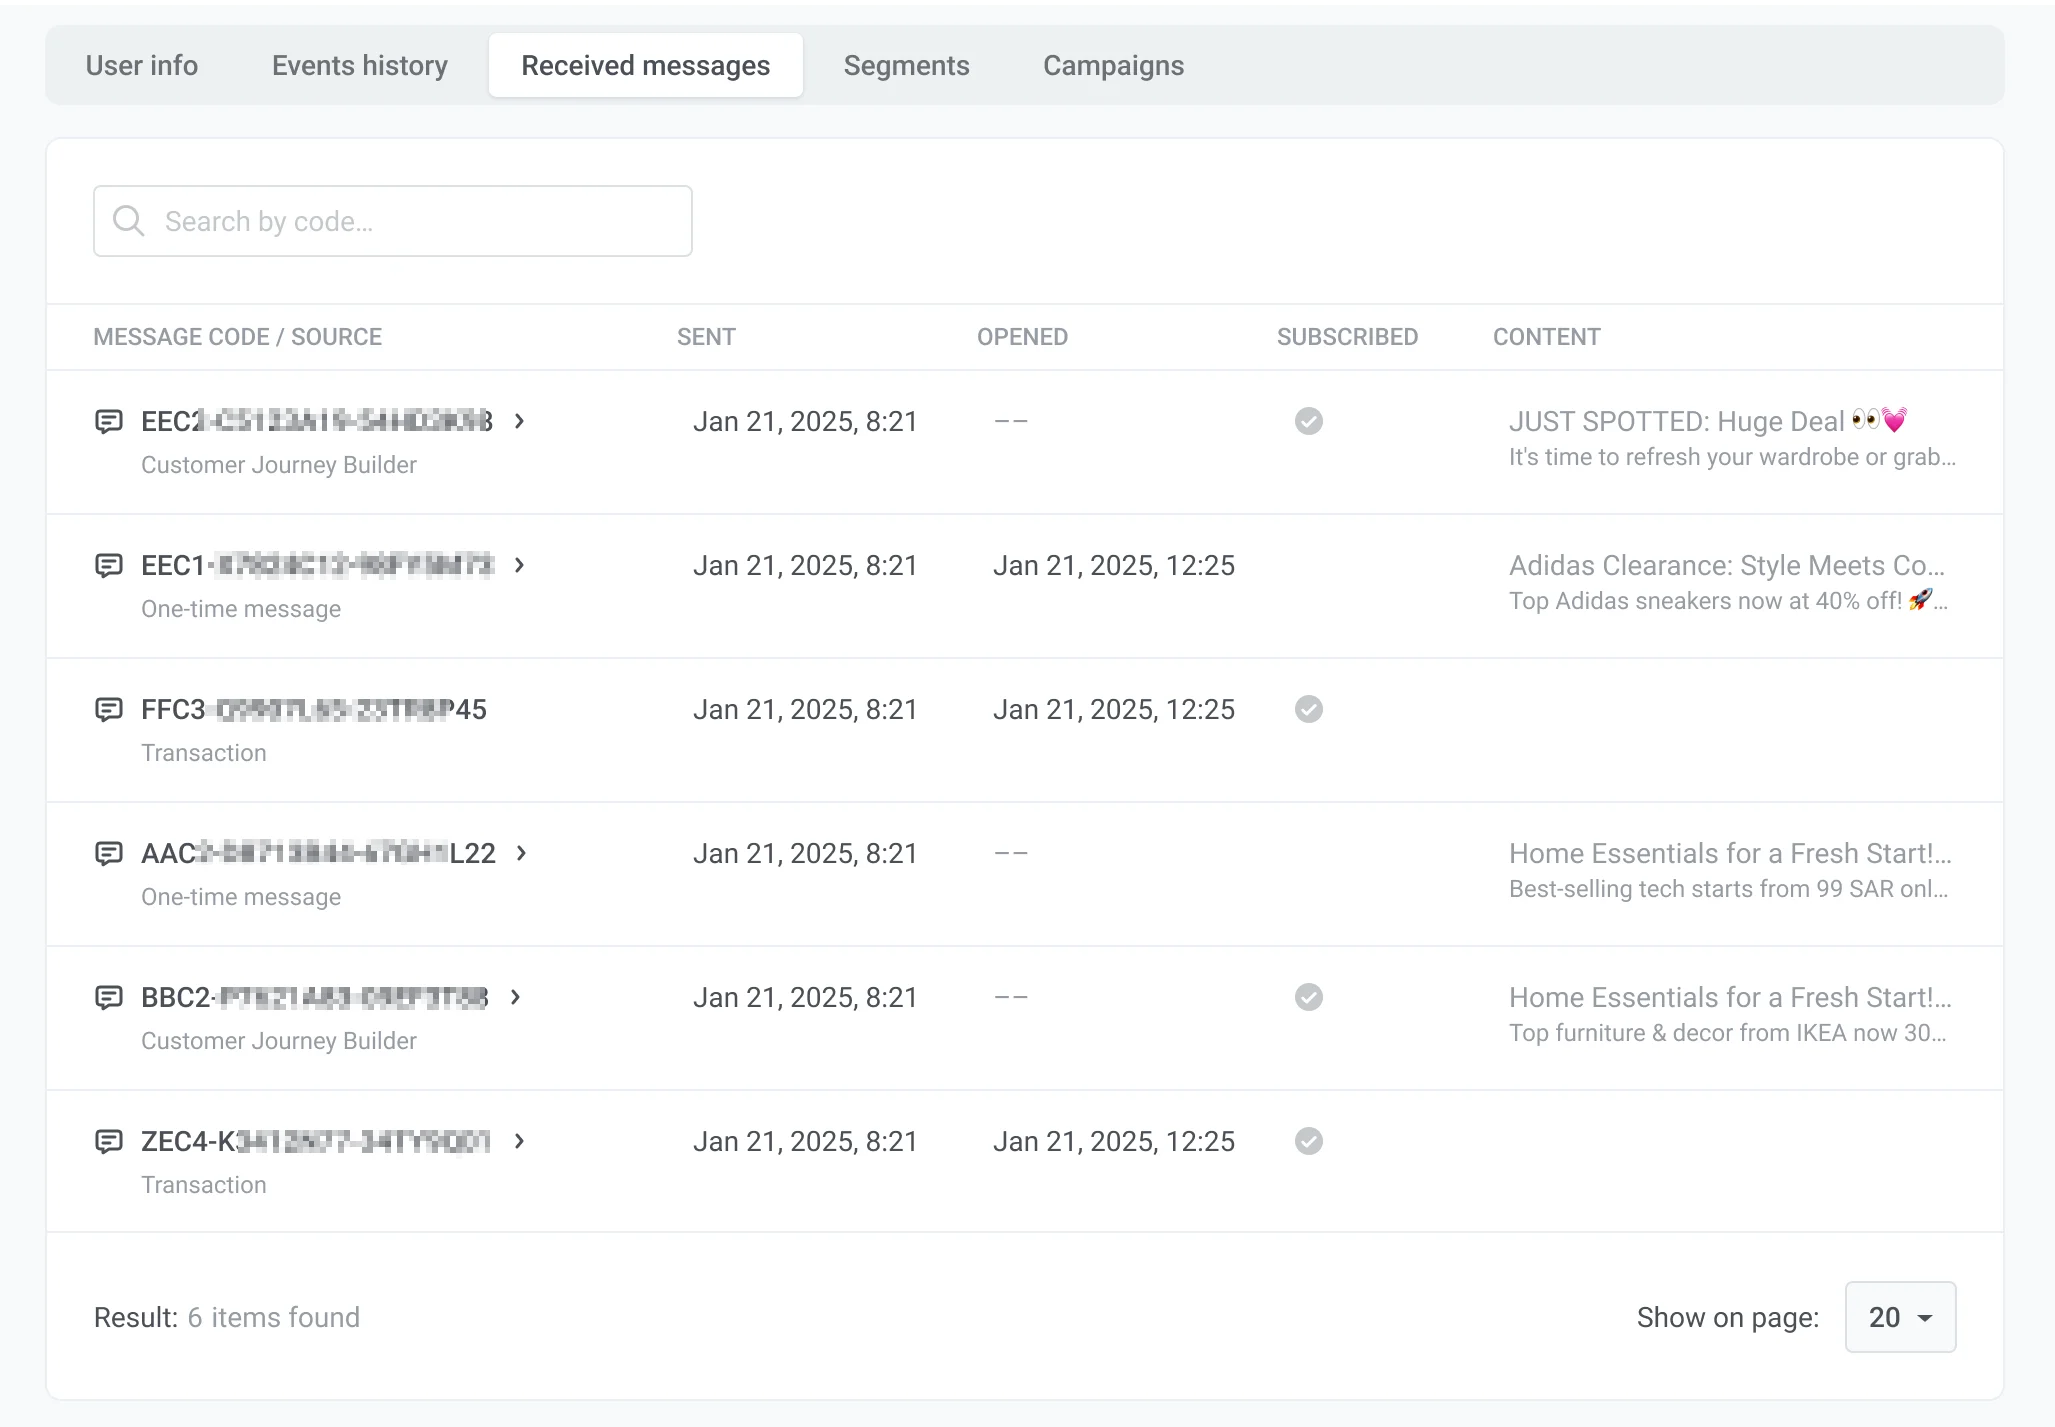
Each message entry includes:
- Message code / Source: The unique identifier and origin (e.g., Customer Journey Builder, One-time message, Transaction).
- Sent: The date and time the message was sent.
- Opened: Indicates whether the user has opened the message.
- Subscribed: Displays the user’s subscription status.
- Content preview: A snippet of the message content.
To see detailed stats of a message, click on the Message ID.
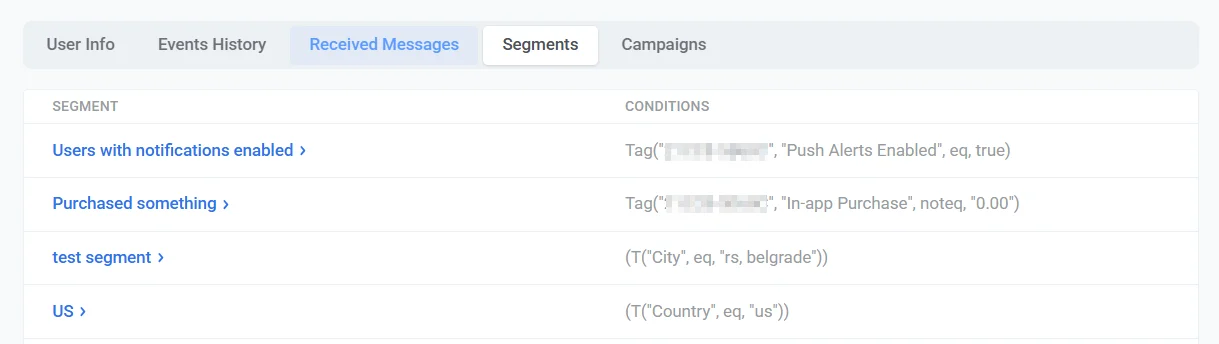
Segments tab
Anchor link toThe Segments tab in User Explorer shows the segments a user belongs to.
Click a segment to view its estimated size and modify its conditions to refine targeting.
Campaigns tab
Anchor link toThe Campaigns tab in User Explorer provides a detailed view of the campaigns a user has participated in. It helps you track their journey through marketing and transactional campaigns, analyze engagement, and optimize future outreach.
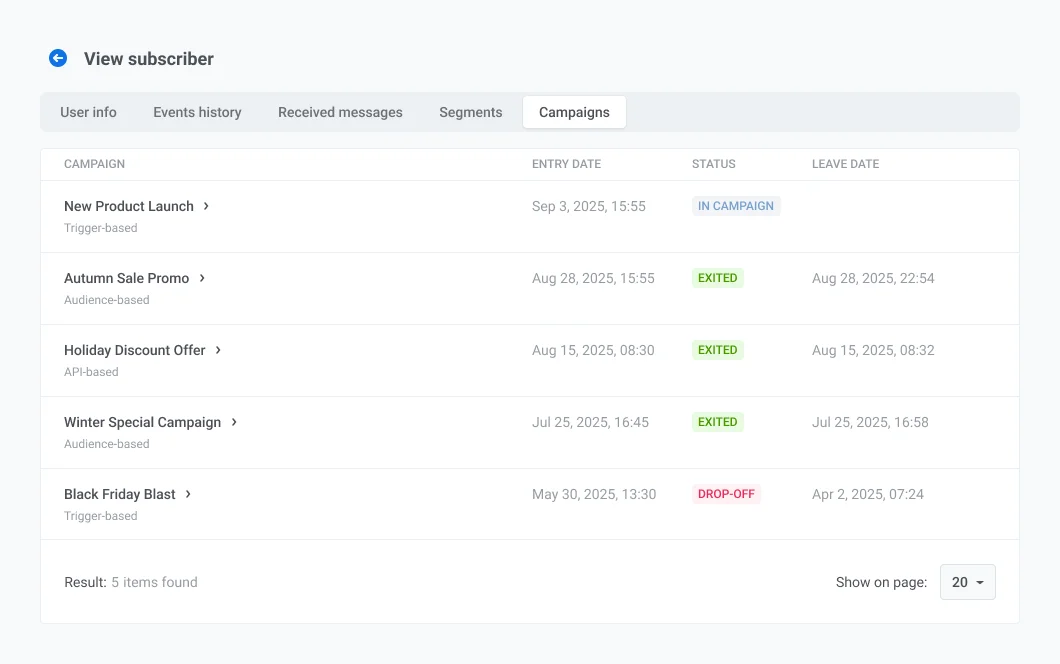
Each campaign entry includes:
- Campaign name
- Campaign type (audience-based, trigger-based, API-based).
- Entry date – When the user entered the campaign.
- The user’s current state in the campaign:
- IN CAMPAIGN – Actively participating.
- EXITED – Completed the campaign.
- DROP-OFF – Was removed due to an error.
- Leave date – When the user exited or dropped off the campaign.
Click a campaign name to view detailed performance metrics.