# Create and embed a subscription form
Pushwoosh gives you the flexibility to create subscription forms for different signup scenarios, customize the fields you collect, and display the form as a modal or inline widget on your website.
## How to build a form
To create a new subscription form:
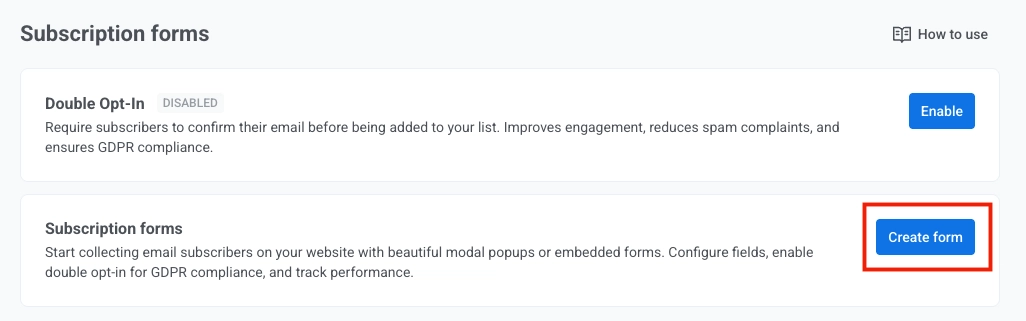
1. Go to **Audience → Subscription forms**.
2. Click **Create form**.
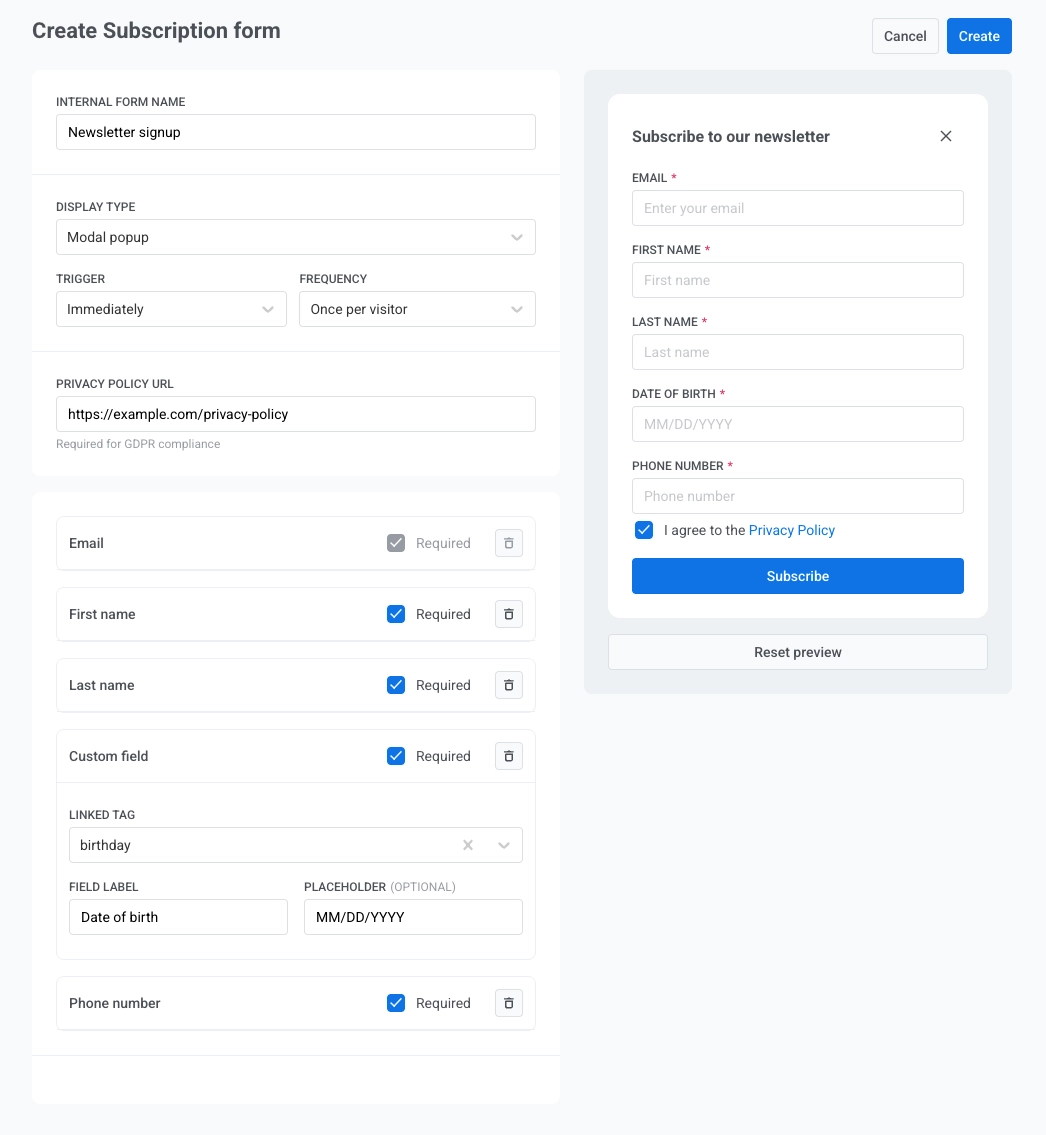
3. Configure the form. A live preview appears on the right and updates as you change settings.
### Configure general settings
Configure the following fields.
> **All fields in this section are required.**
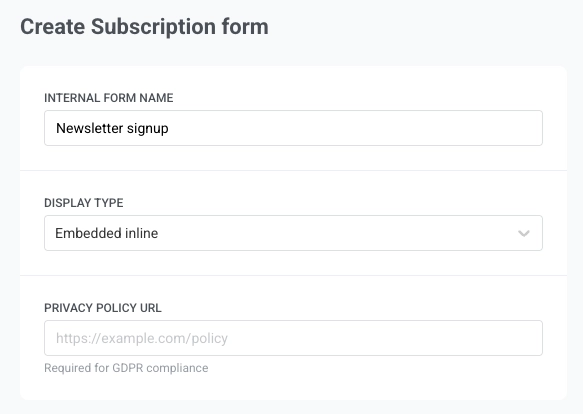
- **Internal form name:** used only inside Pushwoosh, not shown to subscribers. Example: "Newsletter signup".
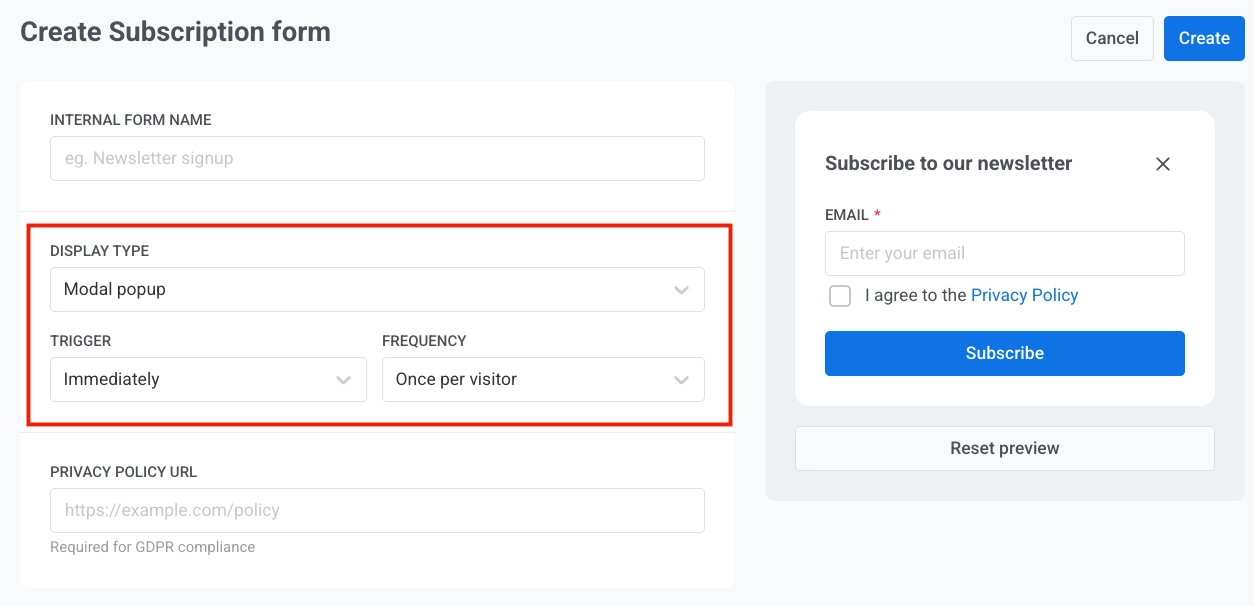
- **Display type:** choose how the form appears on your site:
- **Modal popup:** a popup overlay that appears on top of the page when the **Trigger** you set fires, for example **Immediately** or after a few seconds (see [Set modal popup timing](#set-modal-popup-timing)). Good for newsletter signups or promotional offers that you want visitors to notice.
- **Embedded inline:** the form sits inside your page content (e.g. in a sidebar or at the bottom of an article). Visitors see it as part of the page layout, not as a separate popup.
- **Privacy policy URL:** the form shows a consent checkbox ("I agree to the Privacy Policy") that links to this URL. Example: `https://example.com/policy`.
#### Set modal popup timing
For **Modal popup** only:
1. Define when the popup appears on the page. In the **Trigger** dropdown select:
- **Immediately** (default)
- After 3 seconds
- After 5 seconds
- After 10 seconds
2. In the **Frequency** dropdown select how often each visitor sees the popup:
- **Once per visitor** (default): once per device
- **Once per session**: once per browser session
- **Always**: every time they visit the page
### Configure form fields
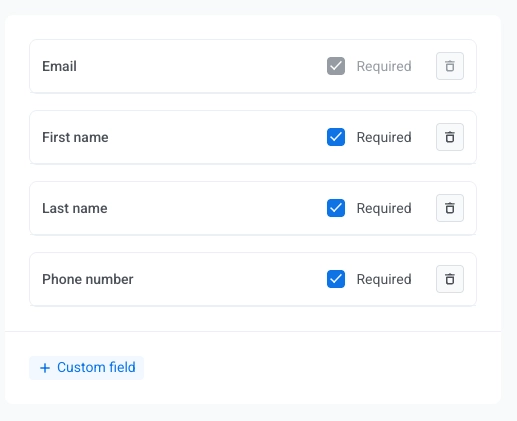
Each form includes an **Email** field by default (it cannot be removed). You can add up to four more fields, for a total of five.
Click **+ First name**, **+ Last name**, **+ Phone number**, or **+ Custom field** to add them.
For each field, check **Required** if the visitor must fill it in (required fields show an asterisk `*`). Use the trash icon to remove a field.
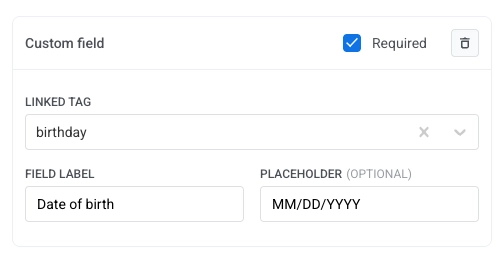
#### Create a custom field
1. Click **+ Custom field** in the field list.
2. Under **Linked tag**, choose the Pushwoosh tag that will store the value submitted from this field (for example `birthday`). You need to create the tag in advance.
3. Set **Field label**: the text visitors see next to the input (for example `Date of birth`).
4. Optionally set **Placeholder (optional)**: hint text inside the empty field (for example `MM/DD/YYYY`).
5. Turn **Required** on or off.
### Customize form labels
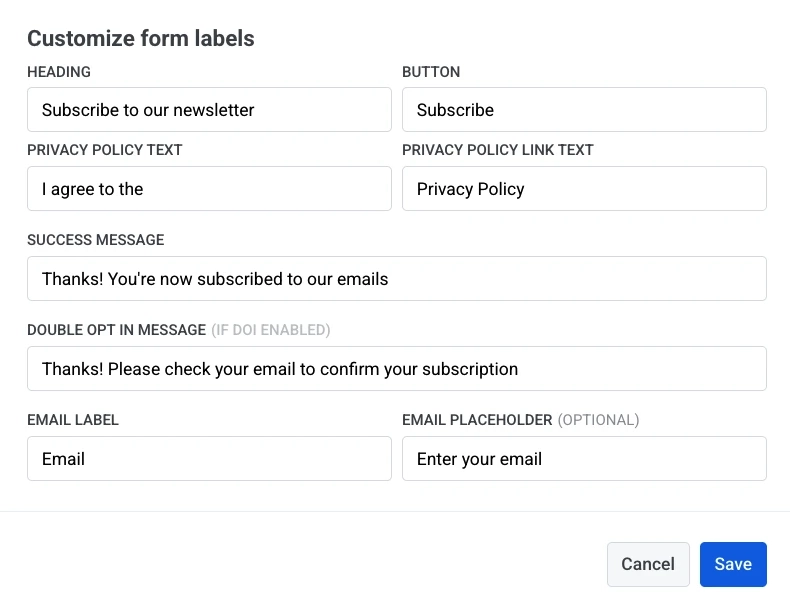
By default, all form text is in English. To translate the form into another language or change any wording, click **Customize labels** below the live preview.
In the **Customize form labels** dialog, you can edit:
- **Heading**
- **Button**
- **Privacy Policy Text**
- **Privacy Policy Link Text**
- **Success Message**
- **Double Opt In Message** (applies only if double opt-in is enabled)
- **Label** and optional **Placeholder** for each form field
Click **Save** to apply your changes. They appear immediately in the live preview. The published form updates after you save or publish the subscription form.
### Preview and save the form
A live preview appears on the right side of the Create Subscription form interface and updates as you change settings. Use **Reset preview** below the preview to restore the default preview state.
When you finish configuring the form, click **Create** in the top right corner.
### Copy the embed code and add it to your site
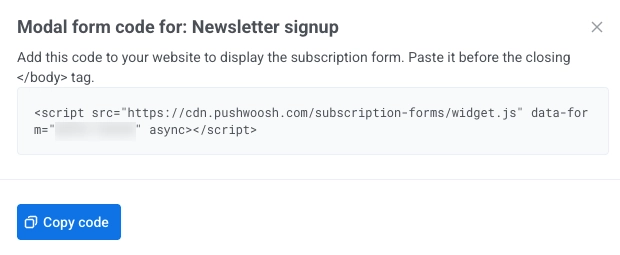
A dialog opens with the embed code for your form. Click **Copy code** to copy the snippet to the clipboard.
#### Where to paste the embed code on your website
Add the script to the page HTML where it should run.
- For **Modal popup**, placing the script before the closing `` tag is the usual approach.
- For **Embedded inline**, put the snippet in the exact place in your markup where you want the form block to appear.
 3. Configure the form. A live preview appears on the right and updates as you change settings.
### Configure general settings
Configure the following fields.
> **All fields in this section are required.**
- **Internal form name:** used only inside Pushwoosh, not shown to subscribers. Example: "Newsletter signup".
- **Display type:** choose how the form appears on your site:
- **Modal popup:** a popup overlay that appears on top of the page when the **Trigger** you set fires, for example **Immediately** or after a few seconds (see [Set modal popup timing](#set-modal-popup-timing)). Good for newsletter signups or promotional offers that you want visitors to notice.
- **Embedded inline:** the form sits inside your page content (e.g. in a sidebar or at the bottom of an article). Visitors see it as part of the page layout, not as a separate popup.
- **Privacy policy URL:** the form shows a consent checkbox ("I agree to the Privacy Policy") that links to this URL. Example: `https://example.com/policy`.
3. Configure the form. A live preview appears on the right and updates as you change settings.
### Configure general settings
Configure the following fields.
> **All fields in this section are required.**
- **Internal form name:** used only inside Pushwoosh, not shown to subscribers. Example: "Newsletter signup".
- **Display type:** choose how the form appears on your site:
- **Modal popup:** a popup overlay that appears on top of the page when the **Trigger** you set fires, for example **Immediately** or after a few seconds (see [Set modal popup timing](#set-modal-popup-timing)). Good for newsletter signups or promotional offers that you want visitors to notice.
- **Embedded inline:** the form sits inside your page content (e.g. in a sidebar or at the bottom of an article). Visitors see it as part of the page layout, not as a separate popup.
- **Privacy policy URL:** the form shows a consent checkbox ("I agree to the Privacy Policy") that links to this URL. Example: `https://example.com/policy`.
 #### Set modal popup timing
For **Modal popup** only:
1. Define when the popup appears on the page. In the **Trigger** dropdown select:
- **Immediately** (default)
- After 3 seconds
- After 5 seconds
- After 10 seconds
2. In the **Frequency** dropdown select how often each visitor sees the popup:
- **Once per visitor** (default): once per device
- **Once per session**: once per browser session
- **Always**: every time they visit the page
#### Set modal popup timing
For **Modal popup** only:
1. Define when the popup appears on the page. In the **Trigger** dropdown select:
- **Immediately** (default)
- After 3 seconds
- After 5 seconds
- After 10 seconds
2. In the **Frequency** dropdown select how often each visitor sees the popup:
- **Once per visitor** (default): once per device
- **Once per session**: once per browser session
- **Always**: every time they visit the page
 ### Configure form fields
Each form includes an **Email** field by default (it cannot be removed). You can add up to four more fields, for a total of five.
Click **+ First name**, **+ Last name**, **+ Phone number**, or **+ Custom field** to add them.
For each field, check **Required** if the visitor must fill it in (required fields show an asterisk `*`). Use the trash icon to remove a field.
### Configure form fields
Each form includes an **Email** field by default (it cannot be removed). You can add up to four more fields, for a total of five.
Click **+ First name**, **+ Last name**, **+ Phone number**, or **+ Custom field** to add them.
For each field, check **Required** if the visitor must fill it in (required fields show an asterisk `*`). Use the trash icon to remove a field.
 #### Create a custom field
1. Click **+ Custom field** in the field list.
2. Under **Linked tag**, choose the Pushwoosh tag that will store the value submitted from this field (for example `birthday`). You need to create the tag in advance.
3. Set **Field label**: the text visitors see next to the input (for example `Date of birth`).
4. Optionally set **Placeholder (optional)**: hint text inside the empty field (for example `MM/DD/YYYY`).
5. Turn **Required** on or off.
#### Create a custom field
1. Click **+ Custom field** in the field list.
2. Under **Linked tag**, choose the Pushwoosh tag that will store the value submitted from this field (for example `birthday`). You need to create the tag in advance.
3. Set **Field label**: the text visitors see next to the input (for example `Date of birth`).
4. Optionally set **Placeholder (optional)**: hint text inside the empty field (for example `MM/DD/YYYY`).
5. Turn **Required** on or off.
 ### Customize form labels
By default, all form text is in English. To translate the form into another language or change any wording, click **Customize labels** below the live preview.
### Customize form labels
By default, all form text is in English. To translate the form into another language or change any wording, click **Customize labels** below the live preview.
 In the **Customize form labels** dialog, you can edit:
- **Heading**
- **Button**
- **Privacy Policy Text**
- **Privacy Policy Link Text**
- **Success Message**
- **Double Opt In Message** (applies only if double opt-in is enabled)
- **Label** and optional **Placeholder** for each form field
Click **Save** to apply your changes. They appear immediately in the live preview. The published form updates after you save or publish the subscription form.
### Preview and save the form
A live preview appears on the right side of the Create Subscription form interface and updates as you change settings. Use **Reset preview** below the preview to restore the default preview state.
In the **Customize form labels** dialog, you can edit:
- **Heading**
- **Button**
- **Privacy Policy Text**
- **Privacy Policy Link Text**
- **Success Message**
- **Double Opt In Message** (applies only if double opt-in is enabled)
- **Label** and optional **Placeholder** for each form field
Click **Save** to apply your changes. They appear immediately in the live preview. The published form updates after you save or publish the subscription form.
### Preview and save the form
A live preview appears on the right side of the Create Subscription form interface and updates as you change settings. Use **Reset preview** below the preview to restore the default preview state.
 When you finish configuring the form, click **Create** in the top right corner.
### Copy the embed code and add it to your site
A dialog opens with the embed code for your form. Click **Copy code** to copy the snippet to the clipboard.
When you finish configuring the form, click **Create** in the top right corner.
### Copy the embed code and add it to your site
A dialog opens with the embed code for your form. Click **Copy code** to copy the snippet to the clipboard.
 #### Where to paste the embed code on your website
Add the script to the page HTML where it should run.
- For **Modal popup**, placing the script before the closing `
#### Where to paste the embed code on your website
Add the script to the page HTML where it should run.
- For **Modal popup**, placing the script before the closing `