# Feature flags
A feature flag is a remote switch for a feature in your app or website. Your developers wrap the feature in a flag once, and after that you decide in the Control Panel who gets it: users in a specific segment, a percentage of all users, or both. A flag can also carry properties, such as a button color or a discount limit, so you can change how the feature behaves for each audience without a new release. If something goes wrong, the kill switch turns the feature off for everyone.
## Before you start
* **Plan.** Feature flags are available only on plans that include them. On other plans, **Feature Flags** doesn't appear in the **Audience** menu. To turn them on, contact your account manager. If your plan stops including feature flags, devices stop receiving flags and your app or website falls back to the defaults set in its code. Creating or restoring a flag then fails with the message **Feature flags are not available on your plan**, for example in a Control Panel tab that was opened before the plan changed.
* **Access.** You need access to segments in the Control Panel to see **Feature Flags** in the menu.
* **Developer setup.** A flag affects users only after your developers read it in the app or website code by its key. Share the [Web SDK guide](/developer/pushwoosh-sdk/web-push-notifications/feature-flags/) with them.
## How a flag decides what each user gets
Every flag has a list of rules. Each rule has a segment, a rollout percentage, and optional property values. For every device, Pushwoosh checks the rules from top to bottom:
1. The first rule whose segment the device matches decides. A rule with no segment matches every device.
2. The rule's rollout percentage decides whether this user gets the flag on. At 20%, two users in ten get it.
3. A user who gets the flag on receives the property values set in that rule. A user who gets it off receives the default property values.
A device stops at the first matching rule even when that rule turns the flag off for it, so a later rule never applies to users that an earlier rule already matched. A device that matches no rule gets the flag off.
The rollout is sticky. Pushwoosh places each user in a fixed bucket, one of 10,000, by their User ID, or by their device ID when no User ID is set, so the same user keeps the same result on every visit and on every device signed in with that User ID. When you raise the percentage, users who already have the flag keep it and new users join them.
## Create a flag
1. Go to **Audience** → **Feature Flags**.
2. Click **Create feature flag**.
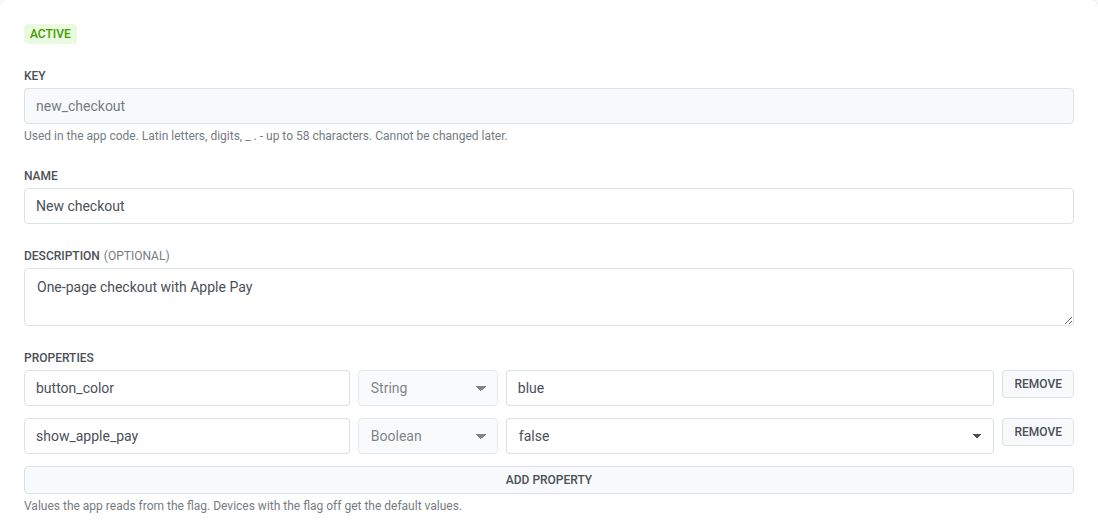
3. Enter the **Key**. Your developers use it in code to read the flag, for example `new_checkout`. Use Latin letters, digits, `_`, `.`, and `-`, up to 58 characters. You can't change the key later, and you can't reuse a key that another flag of the application has, even an archived one. Keys are compared case-insensitively.
4. Enter a **Name** and, optionally, a **Description** so your team knows what the flag controls.
### Add properties
Properties are values the app or website reads from the flag, for example the text of a banner or the number of items in a recommendation block. Skip this step if the flag only turns a feature on and off.
1. In **Properties**, click **Add property**.
2. Enter the **Property key**, for example `button_color`. Use Latin letters, digits, and `_`, up to 64 characters.
3. Choose the type: **String**, **Number**, **Boolean**, or **JSON**. You can't change the type after you save the flag.
4. Enter the **Default value**. Users who get the flag off receive this value.
A flag can have up to 50 properties.
### Add rules
1. In **Rules**, click **Add rule**.
2. Enter a **Rule name**, for example `Paying customers`.
3. In **Segment**, choose who the rule applies to. Leave it empty to apply the rule to all users.
4. In **Rollout, %**, enter the share of the segment that gets the flag on, from 0 to 100 with up to two decimals.
5. In **Values for users this rule turns on**, change the properties that should differ from the defaults for these users. Properties you leave unchanged keep their default values.
6. To add another audience, repeat the steps. Use **Move up** and **Move down** to change the order, because the first matching rule decides.
A flag can have up to 10 rules.
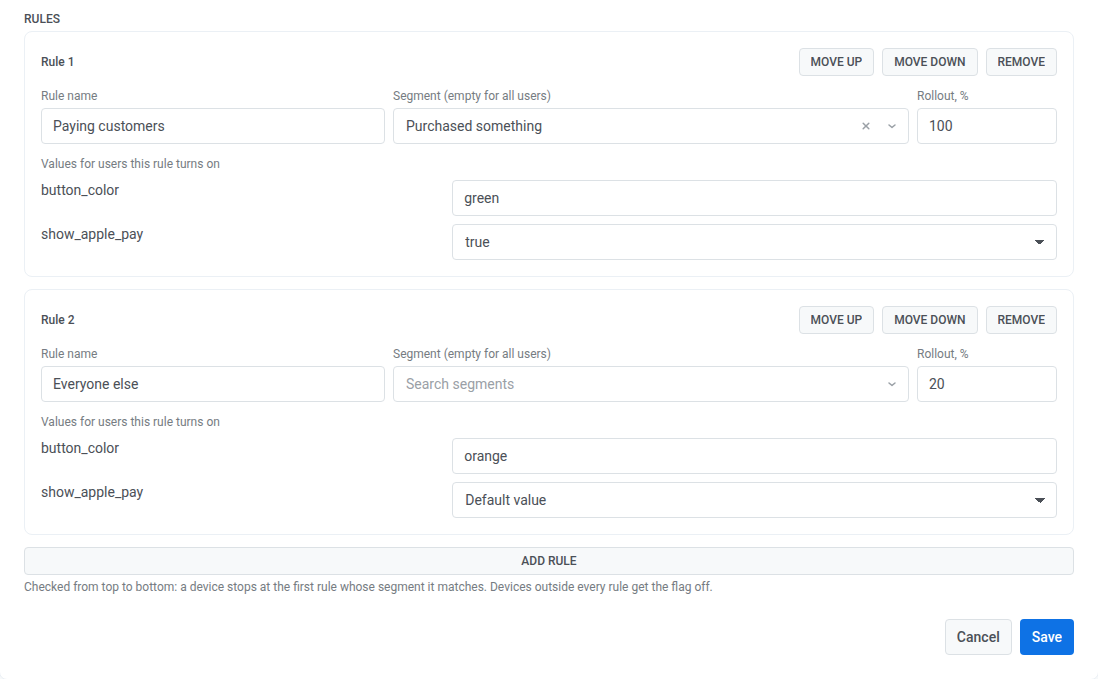
For example, to give a new checkout to all paying customers and to 20% of everyone else, create two rules:
| Rule | Segment | Rollout, % | Values for users this rule turns on |
| :---- | :---- | :---- | :---- |
| Paying customers | Purchased something | 100 | `button_color` = `green`, `show_apple_pay` = `true` |
| Everyone else | — | 20 | `button_color` = `orange` |
### Save the flag
Click **Save**. The flag is created as **Active**, and devices receive it the next time the SDK refreshes flags.
## Manage flags
The flag list shows the key, name, status, number of rules, and last update time of each flag. To see archived flags, turn on **Show archived**. To open a flag, click **Open** next to it.
A flag has one of three statuses:
| Status | What users get |
| :---- | :---- |
| **Active** | The flag works by its rules. |
| **Killed** | The flag is off for every user, with default property values. Rules and properties are kept. |
| **Archived** | Devices no longer receive the flag, so the code falls back to the defaults your developers set in it. |
The actions for a flag are at the top of its page. An active flag has **Reshuffle**, **Kill switch**, and **Archive**. A killed flag has **Turn back on** and **Archive**. An archived flag has **Restore**.
### Change a flag
Open the flag, edit the name, description, properties, or rules, and click **Save**. To roll a feature out gradually, raise the **Rollout, %** of a rule step by step.
If someone else saved the flag while you were editing it, the Control Panel doesn't overwrite their changes and asks you to reload the flag. Click **Reload** and make your changes again.
### Turn a flag off for everyone
Use the kill switch when a feature causes problems and you need to stop it immediately:
1. Open the flag and click **Kill switch**.
2. Confirm. Every device gets the flag off with default property values on its next refresh.
To turn the flag back on with its rules as they were, click **Turn back on**.
### Pick a different sample of users
Reshuffle places every user in a new bucket, so the same rollout percentage selects a different group of users. Use it when you want a fresh sample, for example to start a new test.
1. Open an active flag and click **Reshuffle**.
2. Confirm. Some users who have the flag on lose it immediately and others get it, while the percentages stay the same.
### Archive and restore a flag
Archive a flag when the feature is fully released or removed from the code. An archived flag doesn't count toward your plan's limit of flags per application, and its key stays reserved.
1. Open the flag and click **Archive**.
2. Confirm.
An archived flag can't be edited. To bring it back, turn on **Show archived** in the list, open the flag, and click **Restore**. A restored flag comes back as **Killed**, so it doesn't reach users on its own. Click **Turn back on** when you're ready.
## Limits
The Control Panel and the API enforce these limits when you save a flag:
| Limit | Value |
| :---- | :---- |
| Rules per flag | 10 |
| Properties per flag | 50 |
| Size of all property values of one flag | 10,000 bytes |
| Nesting depth of a JSON value | 5 levels |
| Flags per application | Set by your plan, archived flags don't count |
| Data one device receives for all flags of the application | 64 KB |
## Manage flags through the API
Your developers can create and change flags from their own systems with the [Feature Flags API](/developer/api-reference/feature-flags-api/), and AI assistants connected through the Pushwoosh MCP server can manage flags with the same operations.
 3. Enter the **Key**. Your developers use it in code to read the flag, for example `new_checkout`. Use Latin letters, digits, `_`, `.`, and `-`, up to 58 characters. You can't change the key later, and you can't reuse a key that another flag of the application has, even an archived one. Keys are compared case-insensitively.
4. Enter a **Name** and, optionally, a **Description** so your team knows what the flag controls.
### Add properties
Properties are values the app or website reads from the flag, for example the text of a banner or the number of items in a recommendation block. Skip this step if the flag only turns a feature on and off.
1. In **Properties**, click **Add property**.
2. Enter the **Property key**, for example `button_color`. Use Latin letters, digits, and `_`, up to 64 characters.
3. Choose the type: **String**, **Number**, **Boolean**, or **JSON**. You can't change the type after you save the flag.
4. Enter the **Default value**. Users who get the flag off receive this value.
A flag can have up to 50 properties.
3. Enter the **Key**. Your developers use it in code to read the flag, for example `new_checkout`. Use Latin letters, digits, `_`, `.`, and `-`, up to 58 characters. You can't change the key later, and you can't reuse a key that another flag of the application has, even an archived one. Keys are compared case-insensitively.
4. Enter a **Name** and, optionally, a **Description** so your team knows what the flag controls.
### Add properties
Properties are values the app or website reads from the flag, for example the text of a banner or the number of items in a recommendation block. Skip this step if the flag only turns a feature on and off.
1. In **Properties**, click **Add property**.
2. Enter the **Property key**, for example `button_color`. Use Latin letters, digits, and `_`, up to 64 characters.
3. Choose the type: **String**, **Number**, **Boolean**, or **JSON**. You can't change the type after you save the flag.
4. Enter the **Default value**. Users who get the flag off receive this value.
A flag can have up to 50 properties.
 ### Add rules
1. In **Rules**, click **Add rule**.
2. Enter a **Rule name**, for example `Paying customers`.
3. In **Segment**, choose who the rule applies to. Leave it empty to apply the rule to all users.
4. In **Rollout, %**, enter the share of the segment that gets the flag on, from 0 to 100 with up to two decimals.
5. In **Values for users this rule turns on**, change the properties that should differ from the defaults for these users. Properties you leave unchanged keep their default values.
6. To add another audience, repeat the steps. Use **Move up** and **Move down** to change the order, because the first matching rule decides.
A flag can have up to 10 rules.
### Add rules
1. In **Rules**, click **Add rule**.
2. Enter a **Rule name**, for example `Paying customers`.
3. In **Segment**, choose who the rule applies to. Leave it empty to apply the rule to all users.
4. In **Rollout, %**, enter the share of the segment that gets the flag on, from 0 to 100 with up to two decimals.
5. In **Values for users this rule turns on**, change the properties that should differ from the defaults for these users. Properties you leave unchanged keep their default values.
6. To add another audience, repeat the steps. Use **Move up** and **Move down** to change the order, because the first matching rule decides.
A flag can have up to 10 rules.
 For example, to give a new checkout to all paying customers and to 20% of everyone else, create two rules:
| Rule | Segment | Rollout, % | Values for users this rule turns on |
| :---- | :---- | :---- | :---- |
| Paying customers | Purchased something | 100 | `button_color` = `green`, `show_apple_pay` = `true` |
| Everyone else | — | 20 | `button_color` = `orange` |
### Save the flag
Click **Save**. The flag is created as **Active**, and devices receive it the next time the SDK refreshes flags.
## Manage flags
The flag list shows the key, name, status, number of rules, and last update time of each flag. To see archived flags, turn on **Show archived**. To open a flag, click **Open** next to it.
A flag has one of three statuses:
| Status | What users get |
| :---- | :---- |
| **Active** | The flag works by its rules. |
| **Killed** | The flag is off for every user, with default property values. Rules and properties are kept. |
| **Archived** | Devices no longer receive the flag, so the code falls back to the defaults your developers set in it. |
The actions for a flag are at the top of its page. An active flag has **Reshuffle**, **Kill switch**, and **Archive**. A killed flag has **Turn back on** and **Archive**. An archived flag has **Restore**.
For example, to give a new checkout to all paying customers and to 20% of everyone else, create two rules:
| Rule | Segment | Rollout, % | Values for users this rule turns on |
| :---- | :---- | :---- | :---- |
| Paying customers | Purchased something | 100 | `button_color` = `green`, `show_apple_pay` = `true` |
| Everyone else | — | 20 | `button_color` = `orange` |
### Save the flag
Click **Save**. The flag is created as **Active**, and devices receive it the next time the SDK refreshes flags.
## Manage flags
The flag list shows the key, name, status, number of rules, and last update time of each flag. To see archived flags, turn on **Show archived**. To open a flag, click **Open** next to it.
A flag has one of three statuses:
| Status | What users get |
| :---- | :---- |
| **Active** | The flag works by its rules. |
| **Killed** | The flag is off for every user, with default property values. Rules and properties are kept. |
| **Archived** | Devices no longer receive the flag, so the code falls back to the defaults your developers set in it. |
The actions for a flag are at the top of its page. An active flag has **Reshuffle**, **Kill switch**, and **Archive**. A killed flag has **Turn back on** and **Archive**. An archived flag has **Restore**.
 ### Change a flag
Open the flag, edit the name, description, properties, or rules, and click **Save**. To roll a feature out gradually, raise the **Rollout, %** of a rule step by step.
If someone else saved the flag while you were editing it, the Control Panel doesn't overwrite their changes and asks you to reload the flag. Click **Reload** and make your changes again.
### Turn a flag off for everyone
Use the kill switch when a feature causes problems and you need to stop it immediately:
1. Open the flag and click **Kill switch**.
2. Confirm. Every device gets the flag off with default property values on its next refresh.
To turn the flag back on with its rules as they were, click **Turn back on**.
### Pick a different sample of users
Reshuffle places every user in a new bucket, so the same rollout percentage selects a different group of users. Use it when you want a fresh sample, for example to start a new test.
1. Open an active flag and click **Reshuffle**.
2. Confirm. Some users who have the flag on lose it immediately and others get it, while the percentages stay the same.
### Archive and restore a flag
Archive a flag when the feature is fully released or removed from the code. An archived flag doesn't count toward your plan's limit of flags per application, and its key stays reserved.
1. Open the flag and click **Archive**.
2. Confirm.
An archived flag can't be edited. To bring it back, turn on **Show archived** in the list, open the flag, and click **Restore**. A restored flag comes back as **Killed**, so it doesn't reach users on its own. Click **Turn back on** when you're ready.
## Limits
The Control Panel and the API enforce these limits when you save a flag:
| Limit | Value |
| :---- | :---- |
| Rules per flag | 10 |
| Properties per flag | 50 |
| Size of all property values of one flag | 10,000 bytes |
| Nesting depth of a JSON value | 5 levels |
| Flags per application | Set by your plan, archived flags don't count |
| Data one device receives for all flags of the application | 64 KB |
## Manage flags through the API
Your developers can create and change flags from their own systems with the [Feature Flags API](/developer/api-reference/feature-flags-api/), and AI assistants connected through the Pushwoosh MCP server can manage flags with the same operations.
### Change a flag
Open the flag, edit the name, description, properties, or rules, and click **Save**. To roll a feature out gradually, raise the **Rollout, %** of a rule step by step.
If someone else saved the flag while you were editing it, the Control Panel doesn't overwrite their changes and asks you to reload the flag. Click **Reload** and make your changes again.
### Turn a flag off for everyone
Use the kill switch when a feature causes problems and you need to stop it immediately:
1. Open the flag and click **Kill switch**.
2. Confirm. Every device gets the flag off with default property values on its next refresh.
To turn the flag back on with its rules as they were, click **Turn back on**.
### Pick a different sample of users
Reshuffle places every user in a new bucket, so the same rollout percentage selects a different group of users. Use it when you want a fresh sample, for example to start a new test.
1. Open an active flag and click **Reshuffle**.
2. Confirm. Some users who have the flag on lose it immediately and others get it, while the percentages stay the same.
### Archive and restore a flag
Archive a flag when the feature is fully released or removed from the code. An archived flag doesn't count toward your plan's limit of flags per application, and its key stays reserved.
1. Open the flag and click **Archive**.
2. Confirm.
An archived flag can't be edited. To bring it back, turn on **Show archived** in the list, open the flag, and click **Restore**. A restored flag comes back as **Killed**, so it doesn't reach users on its own. Click **Turn back on** when you're ready.
## Limits
The Control Panel and the API enforce these limits when you save a flag:
| Limit | Value |
| :---- | :---- |
| Rules per flag | 10 |
| Properties per flag | 50 |
| Size of all property values of one flag | 10,000 bytes |
| Nesting depth of a JSON value | 5 levels |
| Flags per application | Set by your plan, archived flags don't count |
| Data one device receives for all flags of the application | 64 KB |
## Manage flags through the API
Your developers can create and change flags from their own systems with the [Feature Flags API](/developer/api-reference/feature-flags-api/), and AI assistants connected through the Pushwoosh MCP server can manage flags with the same operations.