Web inbox widget
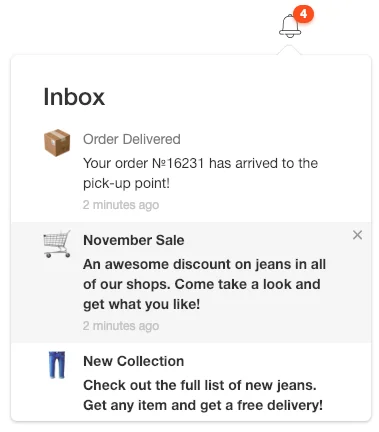
Web Message Inbox being integrated into your website increases conversions drastically. A ready-to-use Web Inbox Widget is out of the box subscribed to all methods needed to communicate with users. Just integrate the widget into your website and customize its appearance to fit your brand.
Prerequisites
Anchor link toTo integrate Message Inbox for websites, please follow the guide.
Integrating widget
Anchor link toWhen initializing Pushwoosh WebSDK, add the inboxWidget parameter:
Pushwoosh.push(['init', { ..., inboxWidget: { enable: true, triggerId: 'pwInbox' }}]);Trigger
Anchor link toTo render the widget, you should specify a trigger element for the widget. Any DOM-element on the page could be the trigger. Specify its ID as “pwInbox” or assign any custom ID to the triggerId parameter when initializing SDK.
When WebSDK is initialized, the unread messages badge displays on the trigger element. Once the trigger element is tapped, the widget appears on the page.

Positioning
Anchor link toBy default, the widget is located in the opposite direction from the screen border closest to the trigger element.
You can set the widget’s position through configuration params:
Pushwoosh.push(['init', {
  ...,  inboxWidget: {    enable: true,    triggerId: 'pwInbox',    position: 'top'  }}]);
By default, the inboxWidget should be placed before the closing </body> tag.
Render the widget anywhere on the page as shown in the example below:
Pushwoosh.push(['init', {  ...,  inboxWidget: {
    enable: true,    triggerId: 'pwInbox',    appendTo: '.widget-parent-element-class'  }}]);
Search for a parent element is performed by querySelector, so it needs clear specification of a class, id, or element.
Customizing widget
Anchor link toCustomizing texts
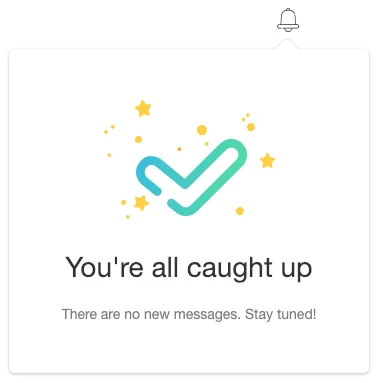
Anchor link toTo customize widget text, add emptyInboxTitle and emptyInboxText parameters:
Pushwoosh.push(['init', { ..., inboxWidget: { enable: true, triggerId: 'pwInbox', title: 'Inbox', // widget title emptyInboxTitle: 'You\'re all caught up', // empty inbox widget title emptyInboxText: 'There are no new messages. Stay tuned!' // empty inbox widget text }}]);The result looks like this:

Customizing appearance
Anchor link toTo customize the widget’s appearance, use the following parameters:
Pushwoosh.push(['init', { ..., inboxWidget: { enable: true, triggerId: 'pwInbox', bgColor: '#ffffff', // widget background borderColor: 'transparent', // widget border color borderRadius: 4, // widget border radius (px) widgetWidth: 350, // widget width (px) zIndex: 100 // z-index }}]);Unread messages count badge can be customized as follows:
Pushwoosh.push(['init', { ..., inboxWidget: { enable: true, triggerId: 'pwInbox', badgeBgColor: '#ff4c00', // badge color badgeTextColor: '#ffffff' // badge text color }}]);To customize text properties, add the following code:
Pushwoosh.push(['init', { ..., inboxWidget: { enable: true, triggerId: 'pwInbox', textColor: '#333333', // text color fontFamily: 'Helvetica, Arial, sans-serif', // font messageTitleColor: '#7a7a7a', // messages title color timeTextColor: '#c4c4c4', // timestamp text color emptyInboxTitleColor: '#333333', // empty inbox title color emptyInboxTextColor: '#7a7a7a' // empty inbox text color }}]);Lastly, you can specify the icon for empty inbox:
Pushwoosh.push(['init', { ..., inboxWidget: { enable: true, triggerId: 'pwInbox', emptyInboxIconUrl: 'https://pushon.pushwoosh.com/images/icon-empty-inbox.png' // URL path to an icon }}]);To open or close the widget, use the following API method:
Pushwoosh.pwinboxWidget.toggle(open?: boolean);