iOS push customization
When an iOS device receives a notification containing an alert, the system displays the contents of the alert in two stages. Initially, it displays an abbreviated banner with the title, subtitle, and two to four lines of body text from the notification. If the user presses the abbreviated banner, iOS displays the full notification interface, including any notification-related actions. The system provides the interface for the abbreviated banner, but you can customize the full interface using a notification content app extension.
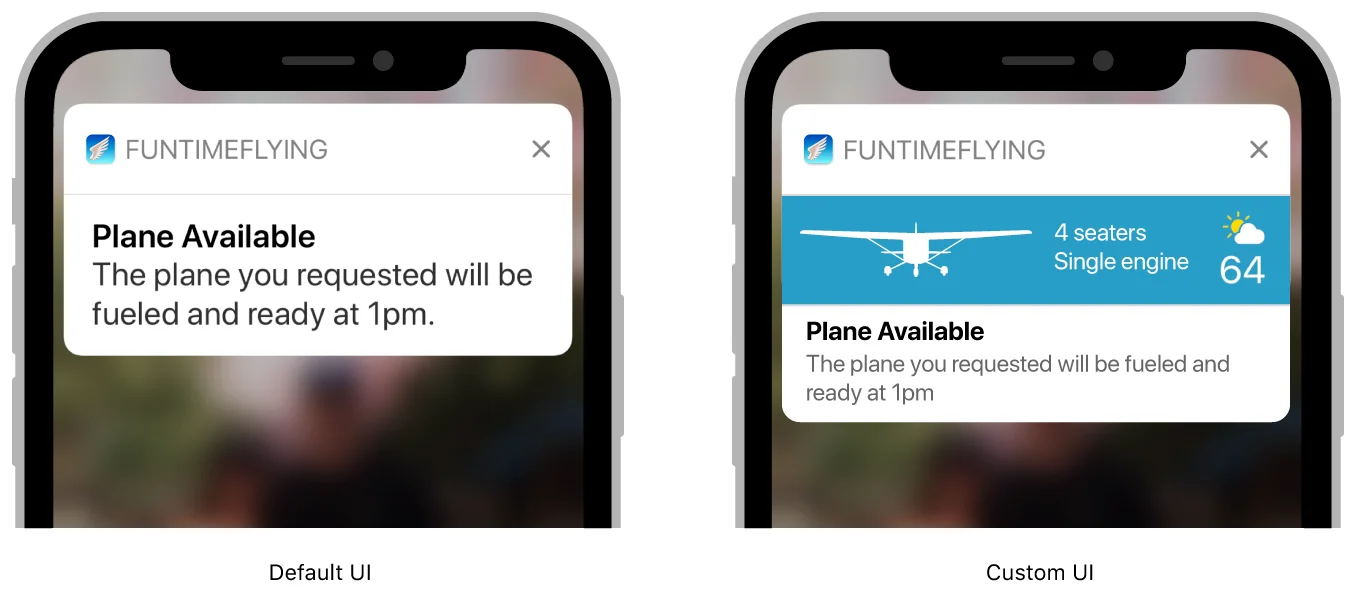
The notification content app extension manages a view controller that displays your custom notification interface. This view controller can supplement or replace the default system interface for your notifications. You can use your view controller to:
- Customize the placement of items, including the alert’s title, subtitle, and body text.
- Substitute different fonts or styling for interface elements.
- Display app-specific data—for example, data stored in app-specific keys of the notification’s payload.
- Include custom images or branding.
Your app extension must configure its view controller using the data immediately available, such as the contents of the notification and the files present in your app extension’s bundle. If you use an app group to share data between your app and your app extension, you may also use any files found in the app group. To ensure your notifications are delivered in a timely manner, configure the views as quickly as possible. Don’t perform any long-running tasks, like trying to retrieve data over the network.
Add the notification content app extension to your project
Anchor link toTo add a notification content app extension to your iOS app:
- Choose File > New > Target in Xcode.
- Select Notification Content Extension from iOS Application Extension.
- Click Next.
- Provide a name for your app extension.
- Click Finish.
Add views to your view controller
Anchor link toThe template provided by Xcode includes a storyboard and a view controller for you to configure. Build your custom notification interface by adding views to your view controller. For example, use labels to display the title, subtitle, and body text of the notification. You can also add image views and views that display noninteractive content. You don’t need to provide any initial content for your views.
You can add interactive controls (for example, buttons or switches) in iOS 12 and later. For more information, see Support Interactive Controls.
Configure your view controller
Anchor link toUse the didReceive(_:) method of your view controller to update its labels and other views. The notification payload contains the data to use when configuring your view controller. You can also use data from the other files of your app extension. Listing 1 shows a version of this method that retrieves the title and body text from the notification payload and assigns the strings to two UILabel controls, which are stored as outlets on the view controller.
// Configuring the notification interface at runtime
func didReceive(_ notification: UNNotification) {   self.bodyText?.text = notification.request.content.body   self.headlineText?.text = notification.request.content.title}
If a second notification arrives when your view controller is already visible, the system calls the didReceive(_:) method again with the new notification payload.
Support interactive controls
Anchor link toIn iOS 12 and later you can enable user interactions in your custom notifications. This lets you add interactive controls, such as buttons and switches to your custom interface.
To enable user interactions:
- Open your Notification Content Extension’s
info.plistfile. - Add the
UNNotificationExtensionUserInteractionEnabledkey to your extension attributes. Give it a Boolean value, set toYES.

Add Apple Pay to your push notification extension (example view)
Anchor link to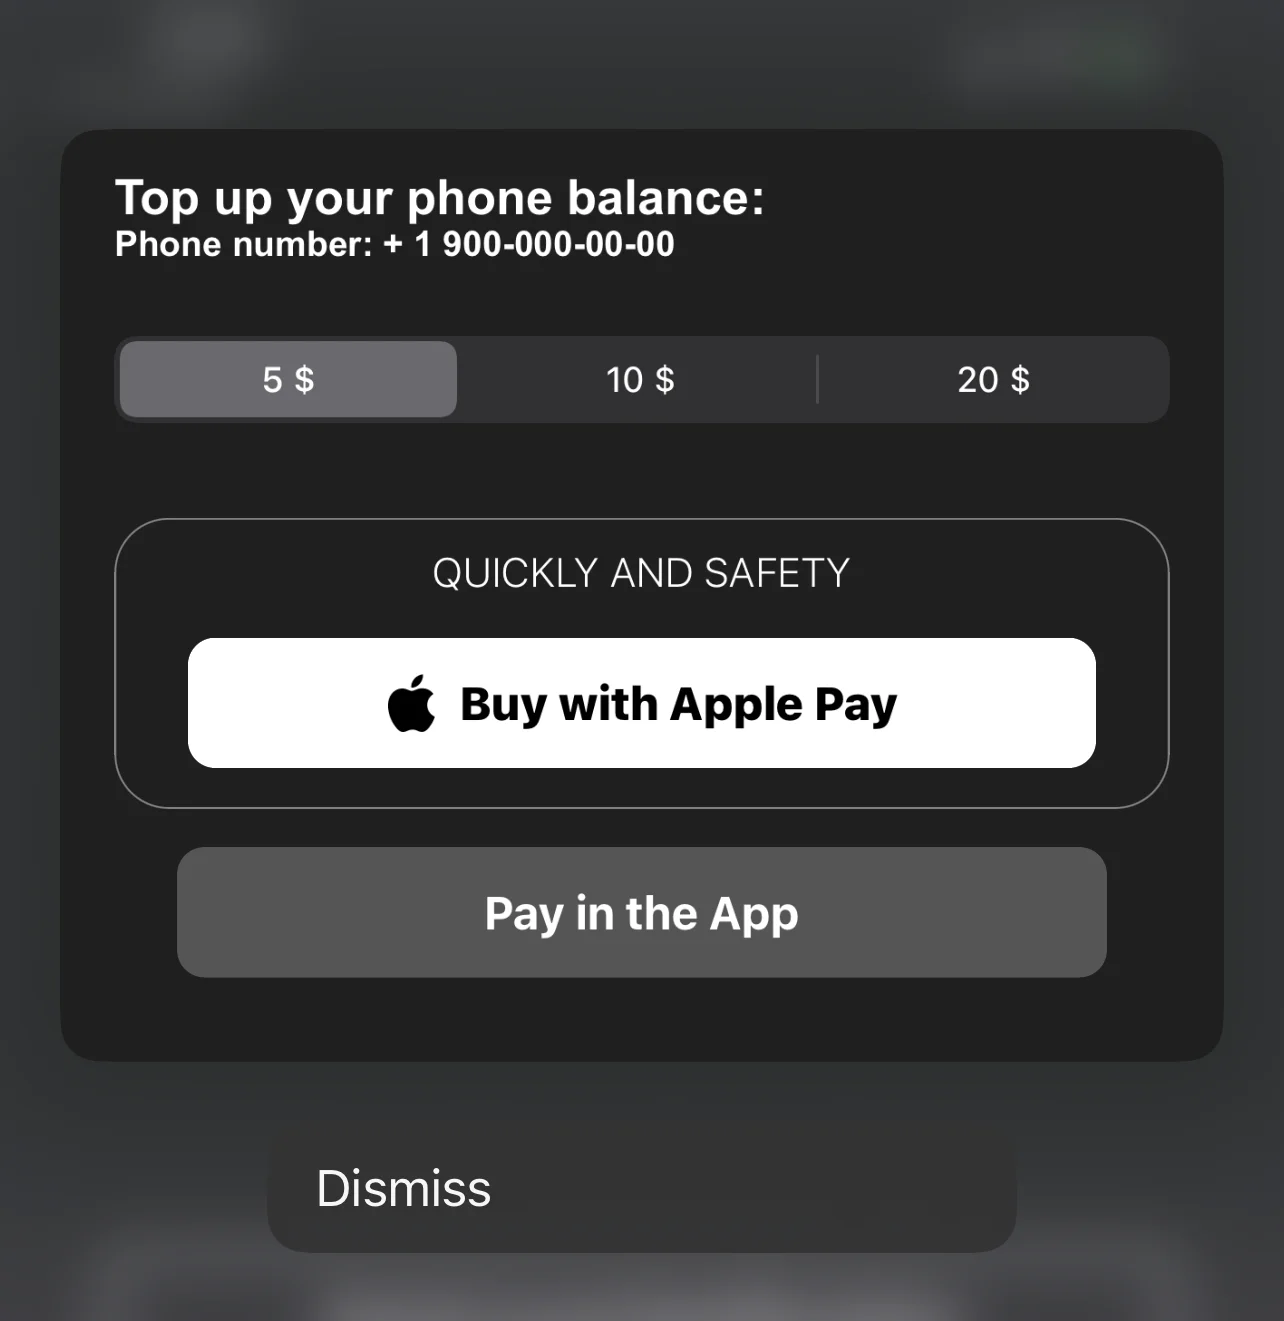
Code block example with Apple Pay button in Push Notification extension
Anchor link toimport UIKitimport Foundationimport UserNotificationsimport UserNotificationsUIimport PassKit
class NotificationViewController: UIViewController, UNNotificationContentExtension, PKPaymentAuthorizationViewControllerDelegate {
func paymentAuthorizationViewControllerDidFinish(_ controller: PKPaymentAuthorizationViewController) { controller.dismiss(animated: true, completion: nil) }
@IBOutlet weak var buyWithApplePayButton: UIButton! @IBOutlet weak var containerView: UIView! @IBOutlet weak var payInAppButton: UIButton! @IBOutlet weak var segmentCustom: UISegmentedControl!
private var amount: NSDecimalNumber = 0;
override func viewDidLoad() { super.viewDidLoad()
buttonCustomisation()
amount = NSDecimalNumber.init(value: 5) }
func buttonCustomisation () { self.buyWithApplePayButton.layer.masksToBounds = true self.buyWithApplePayButton.layer.cornerRadius = 10 self.payInAppButton.layer.masksToBounds = true self.payInAppButton.layer.cornerRadius = 10 self.containerView.layer.borderColor = UIColor.gray.cgColor self.containerView.layer.borderWidth = 0.7 self.containerView.layer.masksToBounds = true self.containerView.layer.cornerRadius = 20 }
func didReceive(_ notification: UNNotification) { // Configuring the notification interface at runtime }
@IBAction func buyWithApplePayAction(_ sender: Any) { let request = PKPaymentRequest() request.merchantIdentifier = "merchant.com.sample.ApplePayAction" request.supportedNetworks = [PKPaymentNetwork.visa, PKPaymentNetwork.masterCard, PKPaymentNetwork.amex] request.merchantCapabilities = PKMerchantCapability.capability3DS request.countryCode = "US" request.currencyCode = "USD"
request.paymentSummaryItems = [ PKPaymentSummaryItem(label: "Some Product", amount: amount) ]
let applePayController = PKPaymentAuthorizationViewController(paymentRequest: request) applePayController?.delegate = self self.present(applePayController!, animated: true, completion: nil) }
@IBAction func payInAppButtonAction(_ sender: Any) { print("pay in app button tapped") }
@IBAction func segmentAction(_ sender: Any) { switch segmentCustom.selectedSegmentIndex { case 0: amount = NSDecimalNumber.init(value: 5) break case 1: amount = NSDecimalNumber.init(value: 10) break case 2: amount = NSDecimalNumber.init(value: 20) break default: amount = NSDecimalNumber.init(value: 5) break } }}