Custom events
Unlike default events, which are universal across many apps and sectors, custom events are specific to your app. These events track specific actions unique to your needs, such as completing a workout or extending a subscription. They help you understand how users interact with your specific features. Also, they provide deeper insights into user behavior, help track retention, and allow for the creation of highly personalized and effective marketing campaigns. This ultimately improves user engagement and satisfaction.
Creating custom events
Anchor link toTo create a custom event in Pushwoosh:
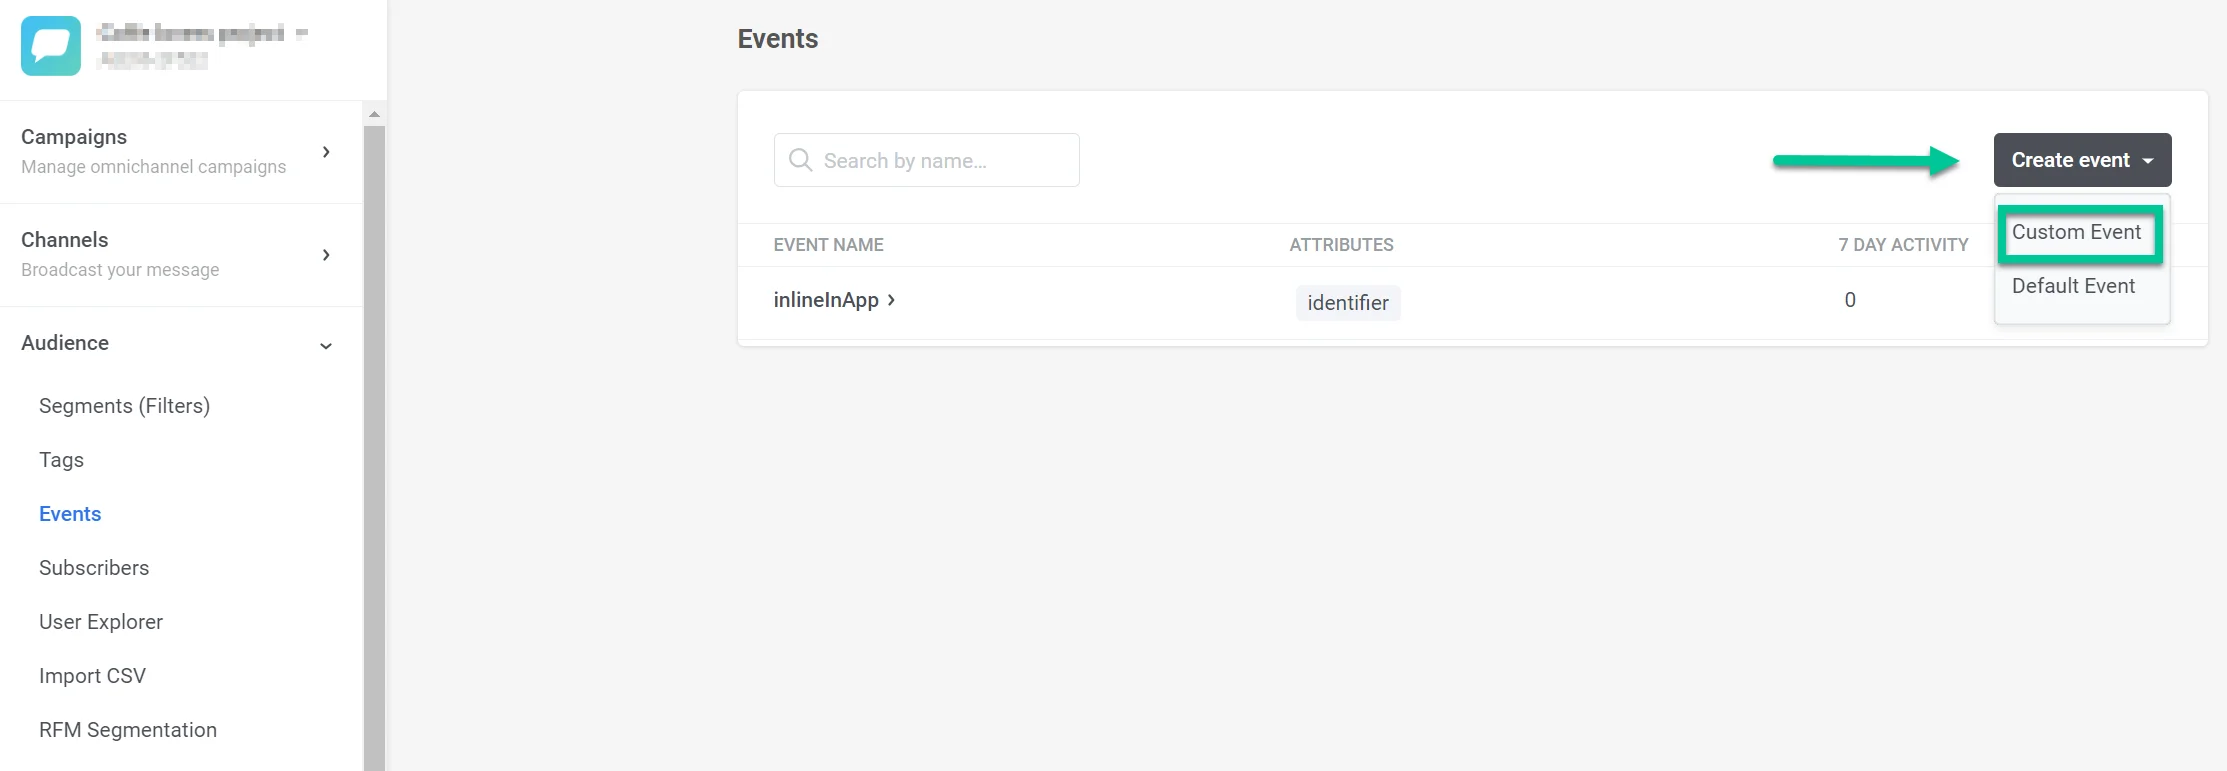
- Go to Audience > Events and click Create Event. In the drop-down menu that appears, select Custom Event.
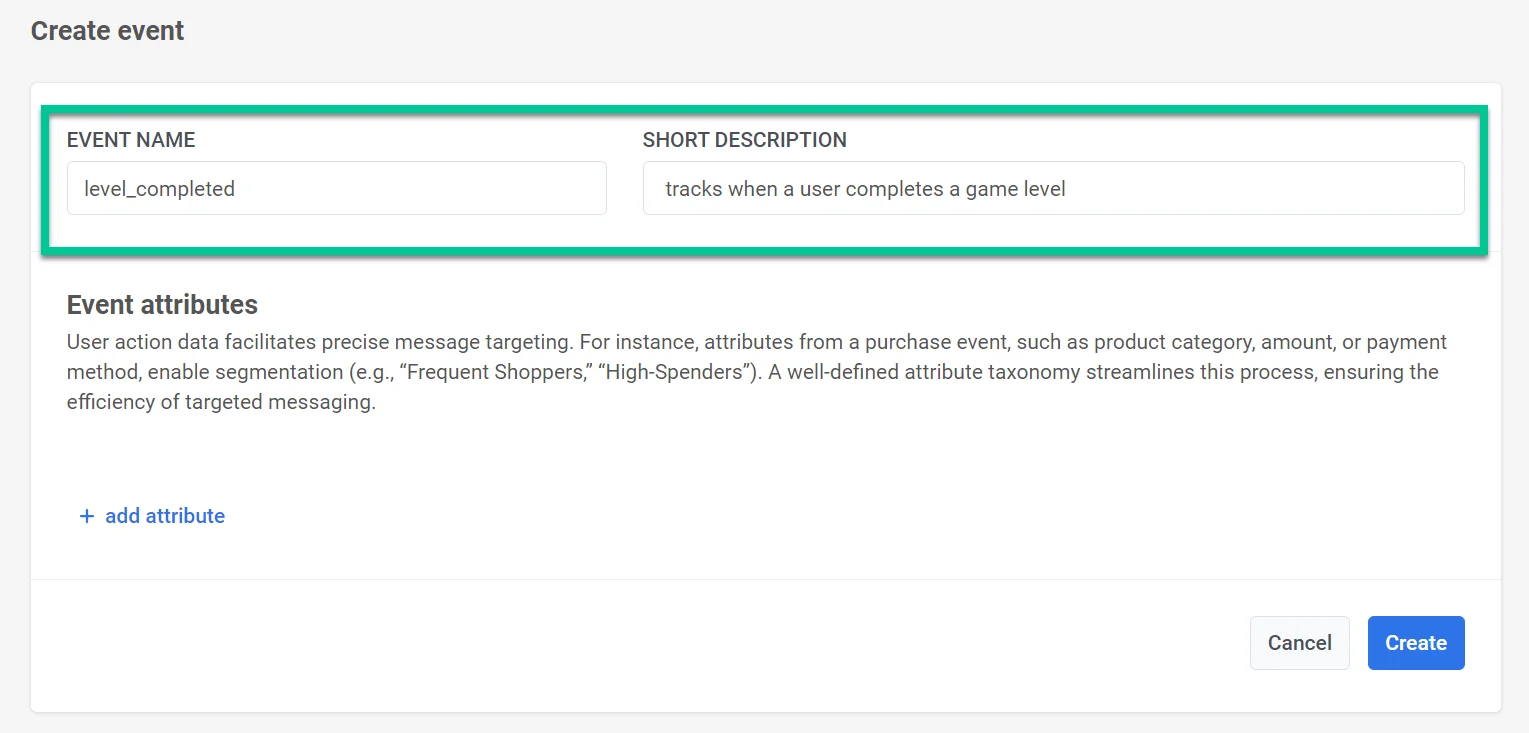
- In the window that opens, enter the name of your event in the Event Name field. For example, use level_completed to track when a user completes a game level. Provide a brief description of the event in the Description field. This helps quickly identify the event’s purpose.
- Define the specific attributes relevant to your event and select the attribute type (e.g., string, integer). Event attributes are specific pieces of information that describe the details of an event. They capture various aspects of a user’s interaction within your app. This provides valuable data for precise message targeting and segmentation. You can add up to 50 attributes to an event.
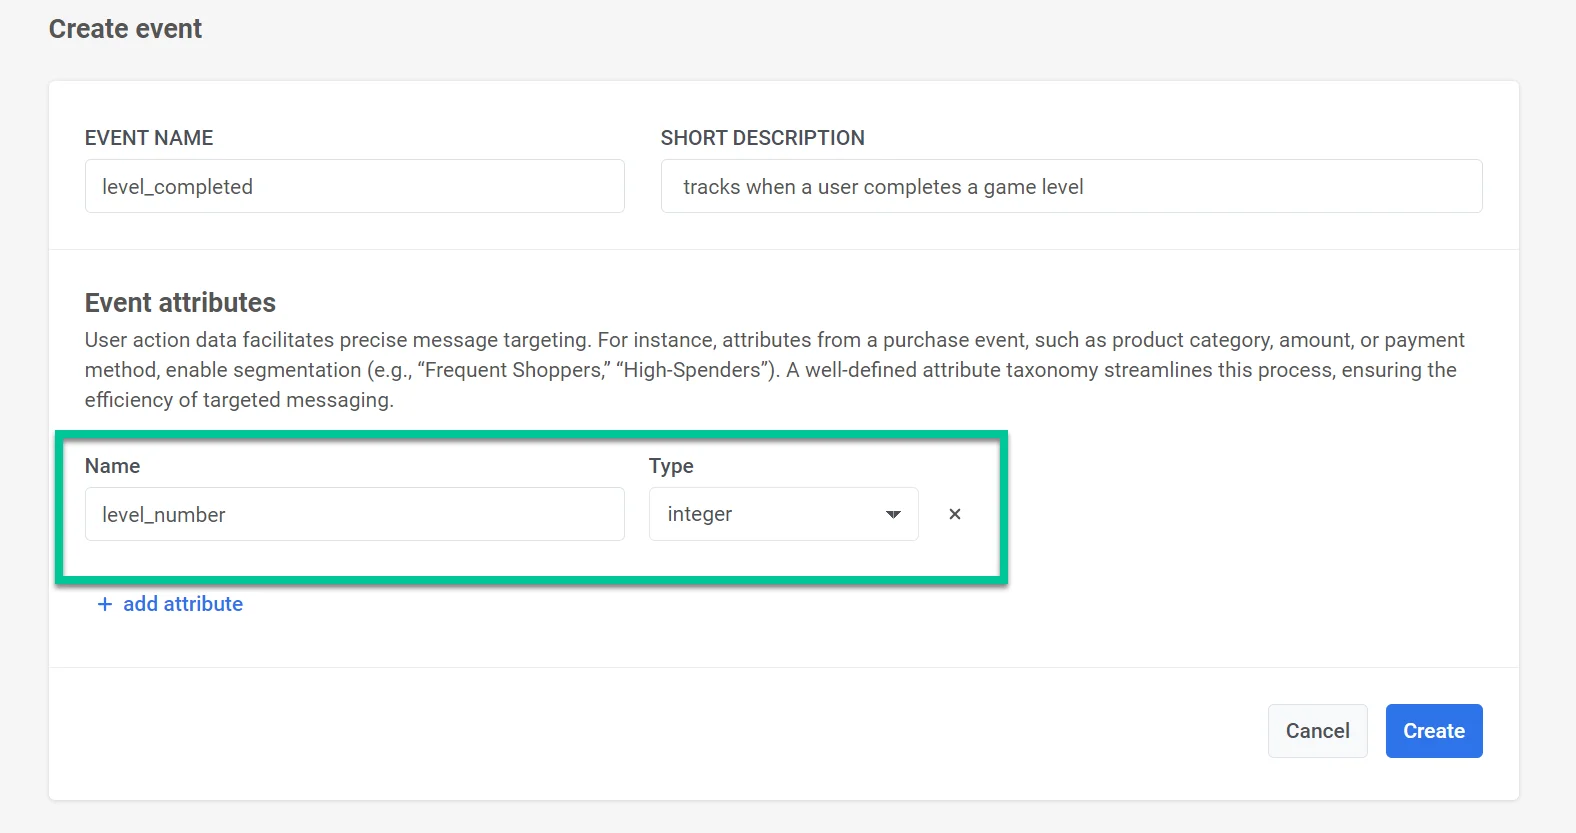
For each event that occurs, there will be corresponding attribute values. For example, attributes for the level_completed event could include level_number, completion_time, score, or points_earned. When the event is recorded in Pushwoosh, it will include these attribute values along with a timestamp. This data can later be used to build segments, target messages, and collect statistics.
After filling in the necessary details and adding attributes, click Create to finalize the event setup. If you decide not to proceed with creating the event, click Cancel to discard the changes.
Managing custom events
Anchor link toThe events list provides an overview of all custom events you’ve created for your application. Each event helps you track specific user interactions or behaviors.
Event Details
- Event Name that identifies the event (e.g., “button_clicked”, “video_watched”)
- Attributes or key pieces of information associated with the event, providing additional context (e.g., “button_id”, “video_category”)
- 7-Day Activity - the number of times the event occurred in the past seven days, offering a quick view of recent engagement

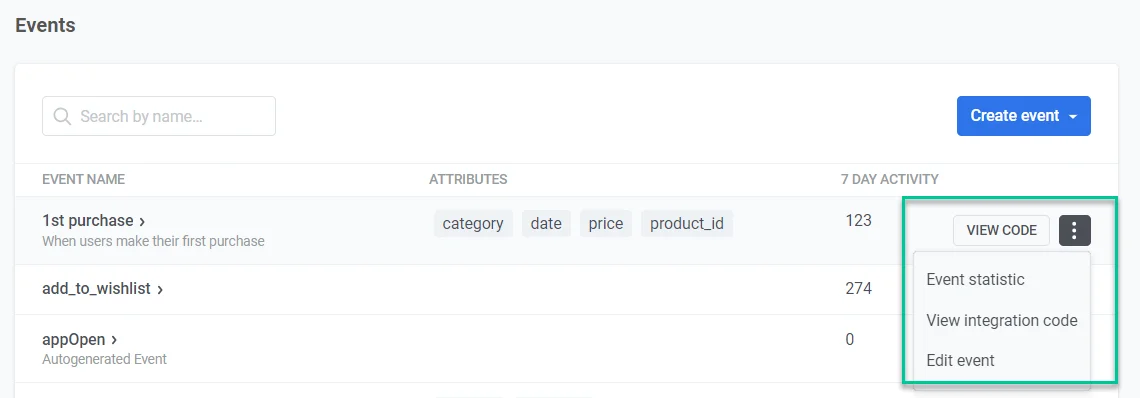
Each event has a menu for further management:
- Click View Code to access the code snippet required to integrate this event into your app’s codebase.
- Click Event Statistics to dive deeper into detailed statistics for the chosen event, providing insights into user behavior.
- Click Edit Event to modify an event’s settings, including its name and associated attributes, to ensure accurate data collection.
Using custom events in Pushwoosh
Anchor link toOnce you’ve set up your events, you can use them to:
- Create a customer journey that will launch at your custom event, using the Trigger-based entry element.
- Segment users by criteria such as how many times they performed a custom event or when the event last occurred. Use these segments to set up Audience-based entries to customer journeys or use the Segment Split option within the journey.
- Set a time delay in your customer journey based on the custom event users trigger within their journey.
- Use the custom event in the Wait for Trigger step to set different communication scenarios based on whether a user triggers this particular event or several events within a specified time.
Custom events use cases
Anchor link to| App Type | Custom Event | Description | Use Case |
|---|---|---|---|
| Fitness and Health apps | workout_complete | A user completes a workout session. | Send motivational messages or rewards to keep users engaged and encourage regular workouts. |
| E-commerce apps | cart_abandoned | A user adds items to their cart but does not complete the purchase. | Send a reminder email or push notification with a special offer or discount on the items left in the cart. |
| Education and e-Learning apps | complete_course | A user completes a course. | Send congratulatory messages and recommend advanced courses or related topics. |
| Media and entertainment apps | watch_video | A user watches a video. | Send notifications about similar content or new releases. Recommend other videos. |
| Travel and hospitality apps | book_flight | A user books a flight. | Send travel reminders, packing tips, and recommendations for activities at their destination. |
| Subscription apps | start_trial | A user starts a free trial. | Send onboarding messages with tips, offer assistance, and highlight key features. |
| Mobility or carsharing apps | ride_completed | A user completes a carsharing ride. | Send a follow-up in-app message, request feedback, or offer a discount on the next ride. |
| Gaming apps | level_completed | A user completes a game level. | Send congratulatory messages and offer tips or rewards for completing the next level. |
Tracking custom events
Anchor link toEvents statistics
Anchor link toYou can track each event you’ve created. For this:
- Navigate to Audience > Events.
- In the Events list, find the event you want to track and click on the three dots next to it. Select Event Statistics.
- Set the date range for which you want to analyze the event data.
- Refine the event data analysis by adding specific conditions or filters based on attributes like user segments, device types, or other custom criteria.
- View a graph that visualizes the frequency of the selected event being triggered over the specified date range.
- You can also export the event data to a CSV file for further analysis or reporting.
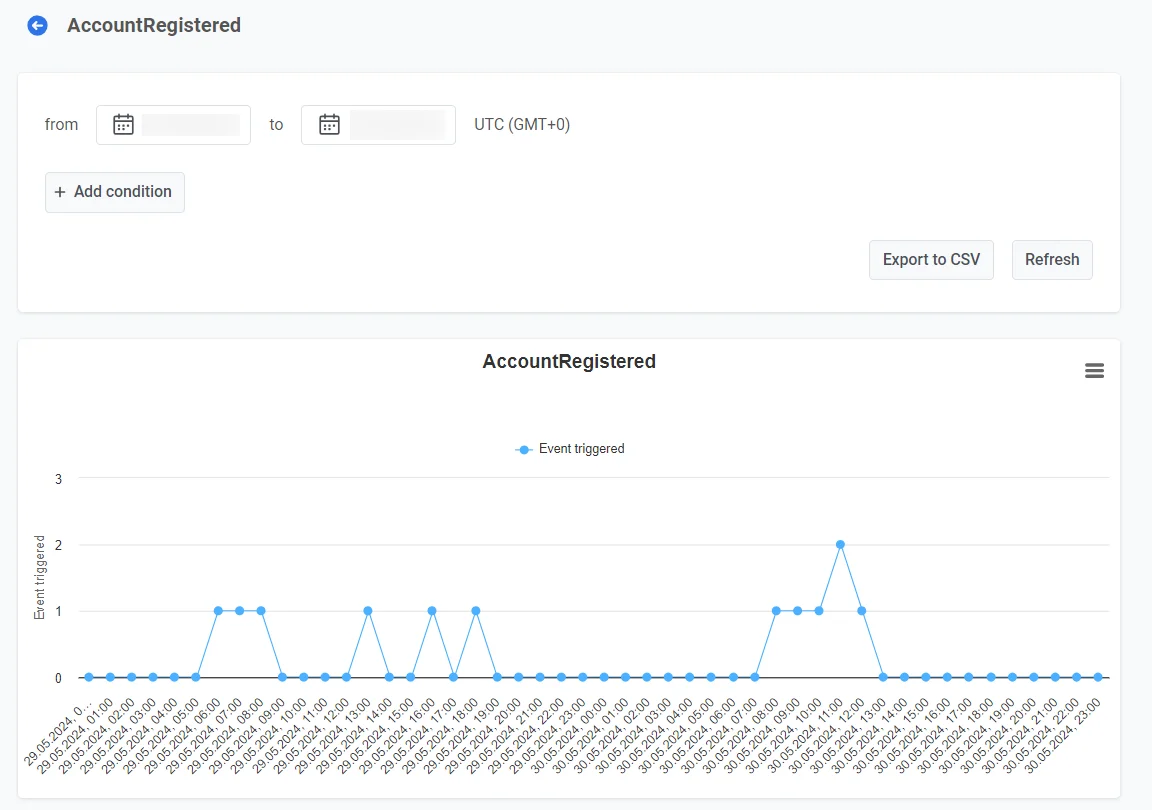
To update the event data displayed on the dashboard, click the Refresh button.
Dashboards
Anchor link toPushwoosh also allows you to track custom events using the Events dashboard, which contains statistics related to the events used in your campaigns, or by building your own custom dashboard. Learn more
Retention tab
Anchor link toUse the Retention tab to track retention related to specific events relevant to your business. Learn more