# Marketo 통합
이 가이드는 [Marketo](https://login.marketo.com/)를 Pushwoosh와 통합하는 방법을 설명합니다. Marketo를 사용한 마케팅 캠페인의 일부로 웹 푸시 알림 커뮤니케이션 채널을 사용할 수 있습니다.
예를 들어, 사용자가 Marketo 랜딩 페이지를 방문했지만 아무런 조치를 취하지 않았다고 가정해 보겠습니다. 이 사용자에게 웹 푸시 알림으로 리마인더를 보낼 수 있습니다. 이 웹 푸시 알림은 최대의 참여를 위해 이 사용자에 대해 기록된 Marketo 데이터로 개인화할 수도 있습니다!
## 1. Service Worker 생성하기
이 [가이드](/ko/developer/pushwoosh-sdk/web-push-notifications/web-push-sdk-30)를 따라 **사전 요구 사항 단계**와 **1 - 2.2 단계**를 수행하세요.
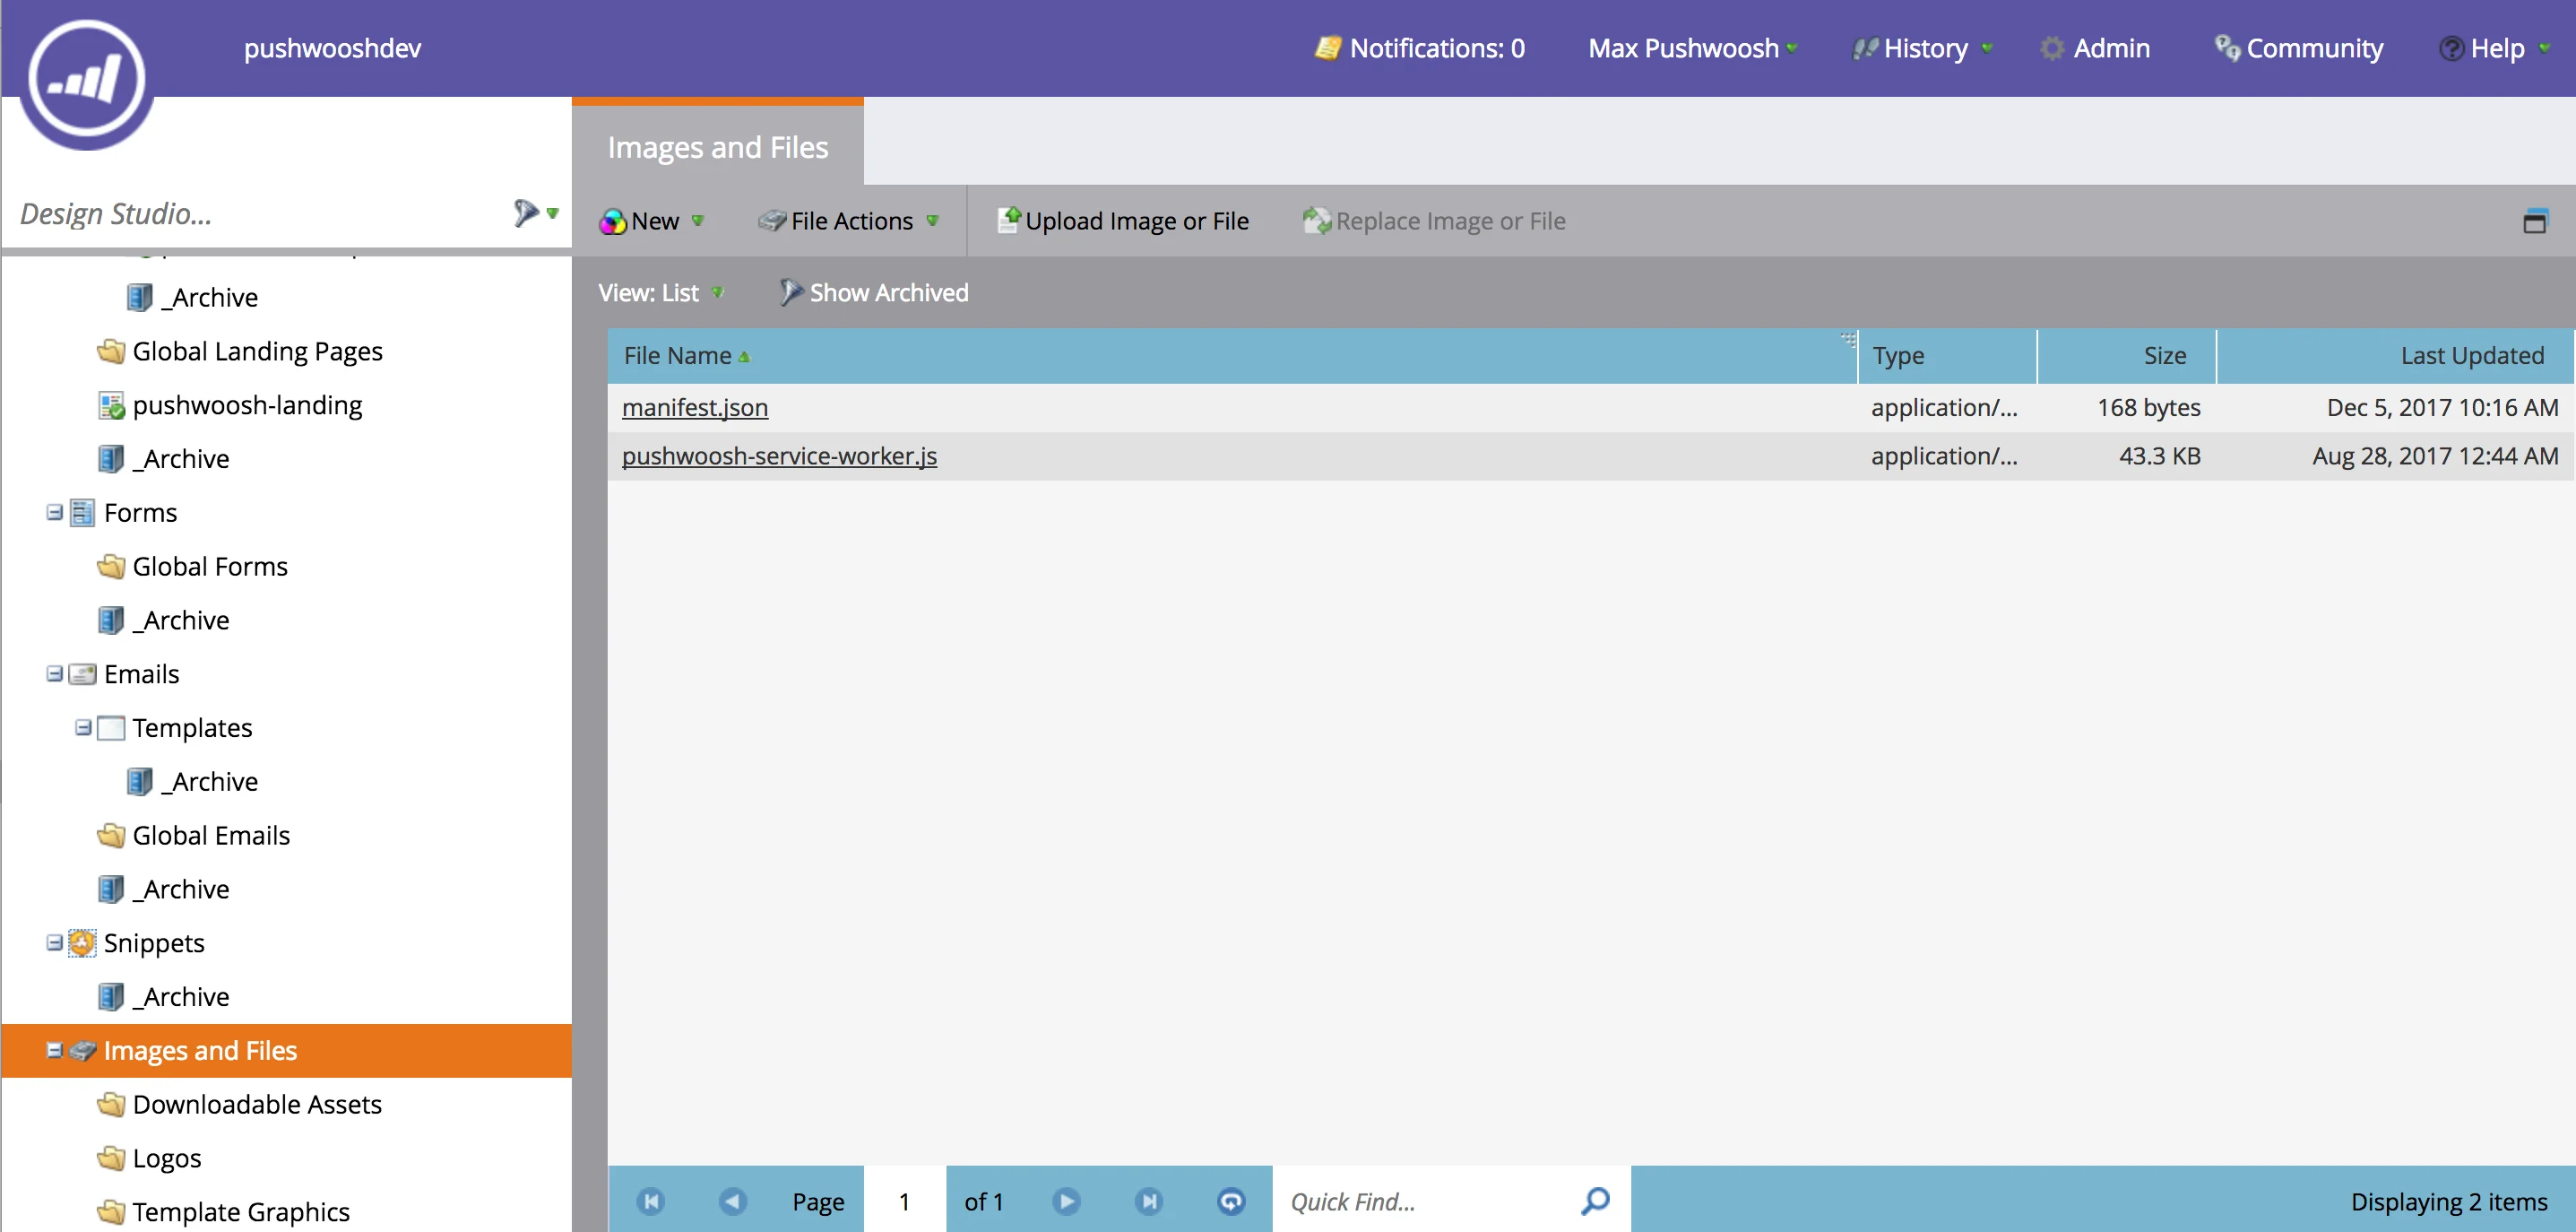
위 단계를 완료하면 _manifest.json_ 및 _pushwoosh-service-worker.js_ 파일이 준비되어 있어야 합니다.
**Marketo Design Studio**로 전환하세요.
Marketo는 "Images and Files"라는 리소스 폴더에만 파일을 업로드할 수 있습니다.
이 폴더에 _manifest.json_과 _pushwoosh-service-worker.js_를 업로드하세요.
## 2. 푸시 구독 페이지 생성하기
위에서 언급했듯이 Marketo는 랜딩 페이지의 범위와 다른 리소스 폴더에만 파일을 업로드할 수 있습니다.
예를 들어, 위에서 업로드한 파일을 클릭하고 URL을 확인하면 "[https://your-host-name.com/rs/765-IWA-819/images/pushwoosh-service-worker.js](https://your-host-name.com/rs/765-IWA-819/images/pushwoosh-service-worker.js)"와 같은 것을 볼 수 있습니다.
하지만 랜딩 페이지를 클릭하고 URL을 확인하면 "[https://your-host-name.com/lp/765-IWA-819/pushwoosh-landing.html](https://your-host-name.com/lp/765-IWA-819/pushwoosh-landing.html)"과 같을 것입니다.
랜딩 페이지 URL의 **"lp"** 부분과 스크립트 URL의 **"rs"** 부분을 주목하세요.
이는 랜딩 페이지와 다른 범위에 _Service Worker_ 스크립트를 등록해야 함을 의미합니다.
이를 위해 특별한 푸시 구독 페이지를 Marketo 리소스 폴더에 업로드한 다음 랜딩 페이지에서 열 것입니다. 이 구독 페이지를 만들어 보겠습니다.
다음 gist에서 _push-subscription.html_ 파일을 가져오세요:
[https://gist.github.com/shaders/2b518e3acaf9b4712d5260205243343d#file-push-subscription-html](https://gist.github.com/shaders/2b518e3acaf9b4712d5260205243343d#file-push-subscription-html)
파일을 열고 다음 줄을 변경하세요:
* 8행 - 이전 단계에서 업로드한 _manifest.json_ 파일의 URL로 링크를 변경합니다.
* 24행 - _scope_ 매개변수 값을 리소스 폴더의 URL로 변경합니다(_manifest.json_이 있는 폴더입니다).
* 20행 - _applicationCode_ 매개변수 값을 Pushwoosh 앱 ID로 변경합니다.
이 스크립트는 또한 Pushwoosh의 사용자 중심 푸시 알림을 Marketo의 리드 식별자와 매핑합니다: _userId:leadId_ (26행)
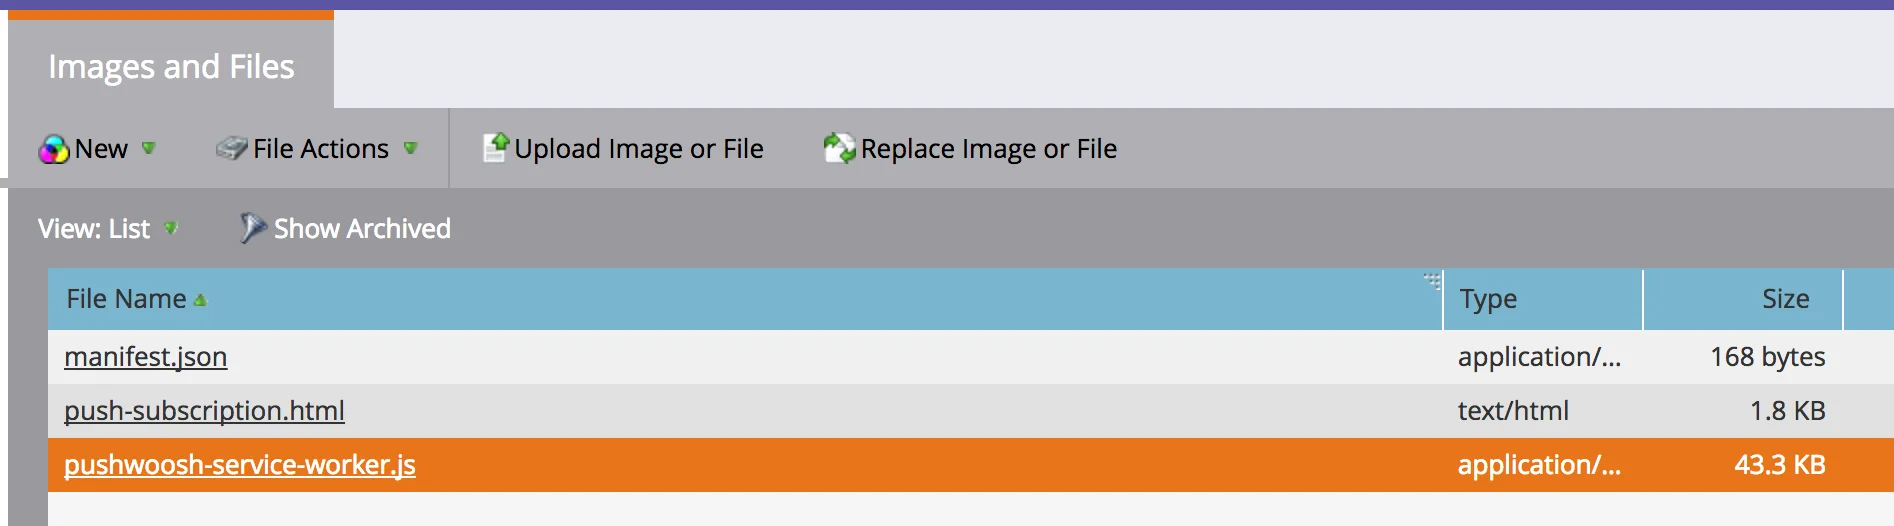
결과 파일을 "Images and Files" 폴더에 업로드하세요. 이제 폴더에 다음 파일들이 있어야 합니다:
## 3. 푸시 구독 기능이 있는 랜딩 페이지 생성하기
다음 gist에서 _pushwoosh-template.html_ 파일을 가져오세요:
[https://gist.github.com/shaders/2b518e3acaf9b4712d5260205243343d#file-pushwoosh-template-html](https://gist.github.com/shaders/2b518e3acaf9b4712d5260205243343d#file-pushwoosh-template-html)
파일을 열고 다음 줄을 변경하세요:
* 47행 - _scope_ 매개변수 값을 리소스 폴더의 URL로 변경합니다.
* 65행 - 이전 단계에서 업로드한 _push-subscription.html_ 파일의 URL로 링크를 변경합니다.
* 43행 - _applicationCode_ 매개변수 값을 Pushwoosh 앱 ID로 변경합니다.
이전 스크립트와 마찬가지로 이 스크립트도 Pushwoosh의 사용자 중심 푸시 알림을 Marketo의 리드 식별자와 매핑합니다: _userId:leadId_ (49행)
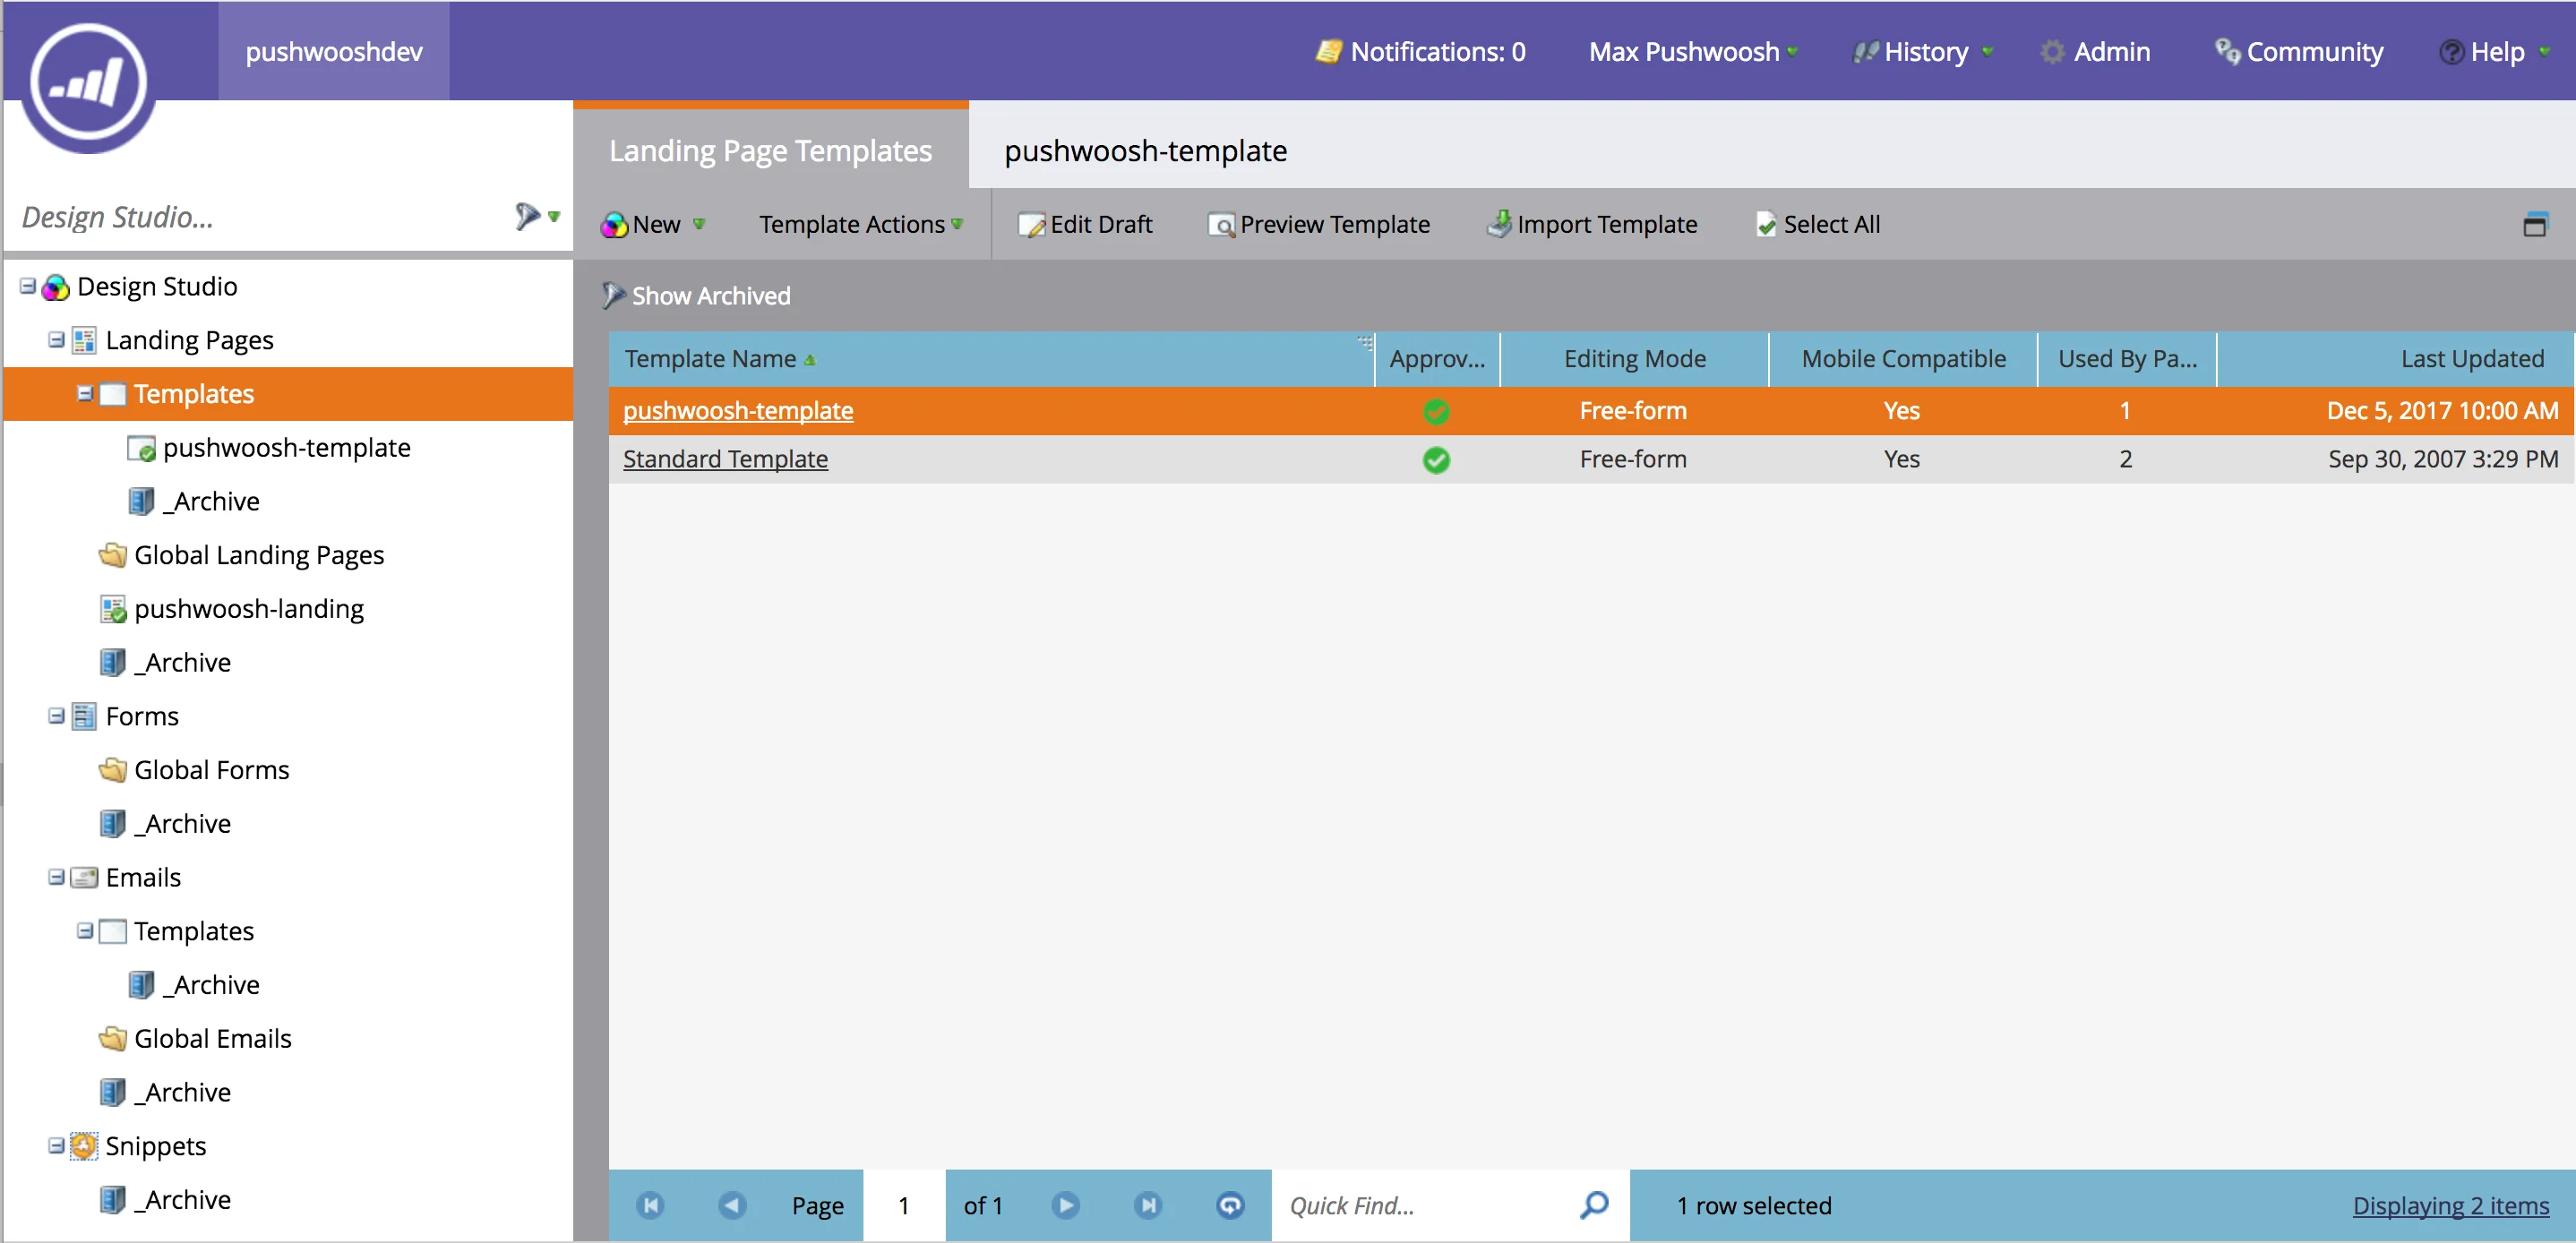
이제 **Marketo 랜딩 페이지**의 "**Templates**" 섹션으로 이동하여 템플릿을 만들고(아래 스크린샷에서는 "pushwoosh-template"이라고 함) 결과 파일의 내용을 거기에 복사하여 붙여넣으세요.
이제 이 템플릿을 기반으로 새 랜딩 페이지를 만들어 보겠습니다.
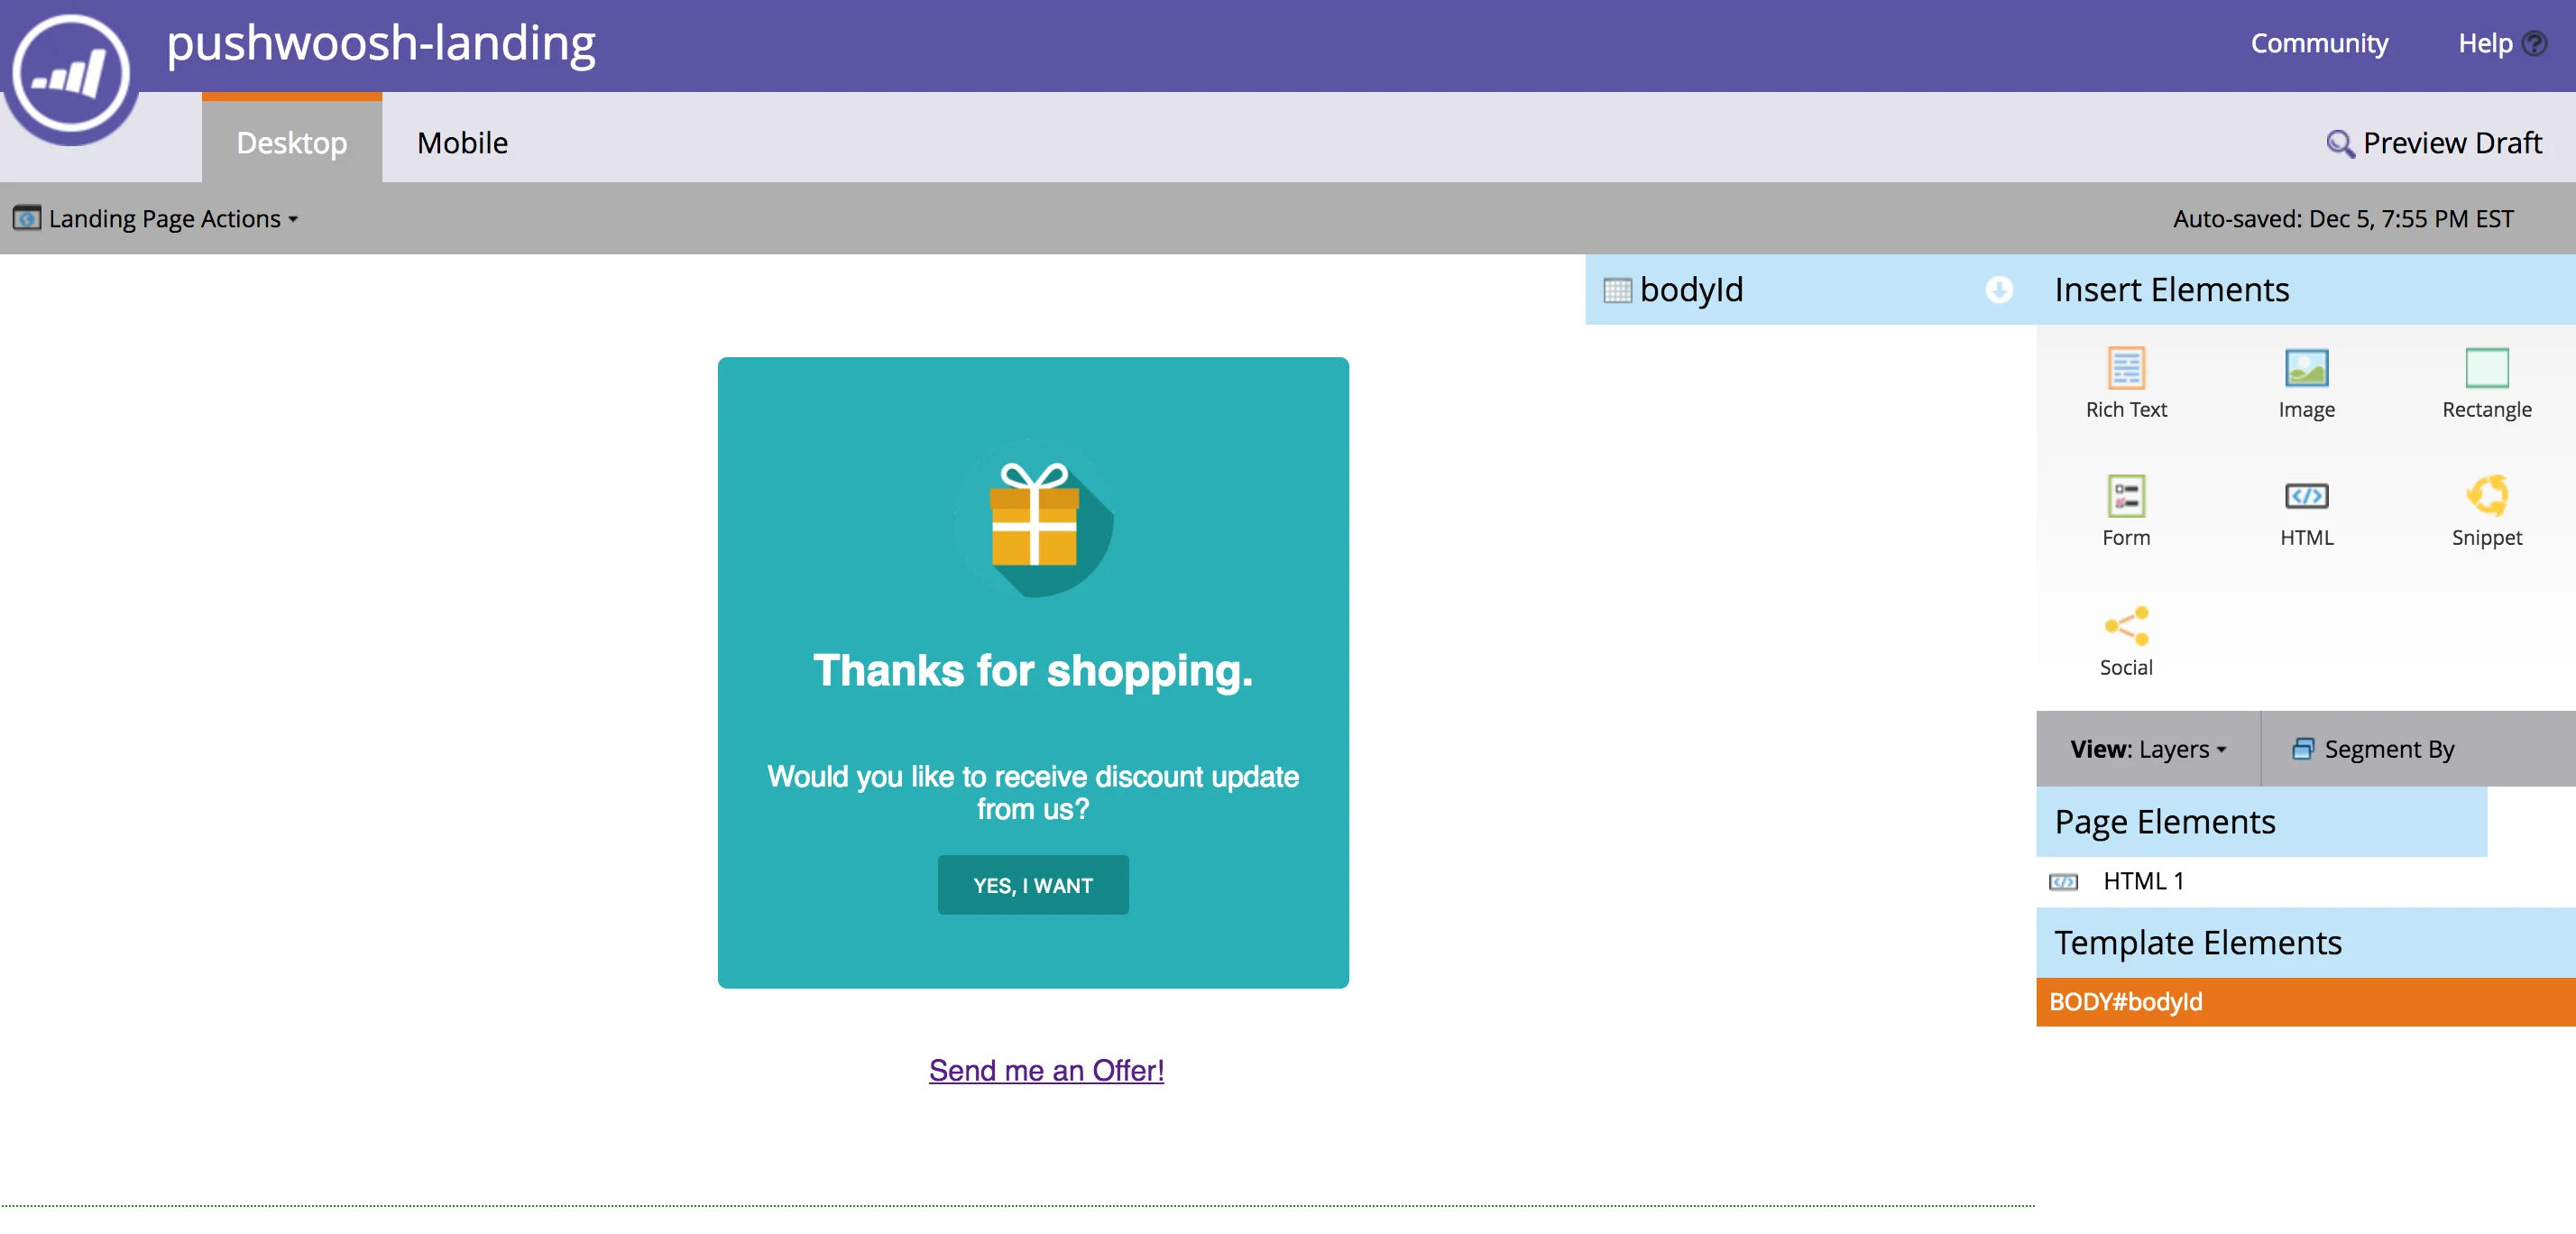
이 예에서는 단순화를 위해 Pushwoosh와 Marketo 캠페인 자동화 통합의 기능을 보여주기 위해 랜딩 페이지에 간단한 링크를 추가할 것입니다. 사용자가 이 링크를 클릭할 때 개인 푸시 알림을 트리거하는 캠페인을 만들 것입니다.
랜딩 페이지와 동일한 URL을 사용할 것입니다.
```txt
제안 보내기!
```
## 4. Pushwoosh Webhook 생성하기
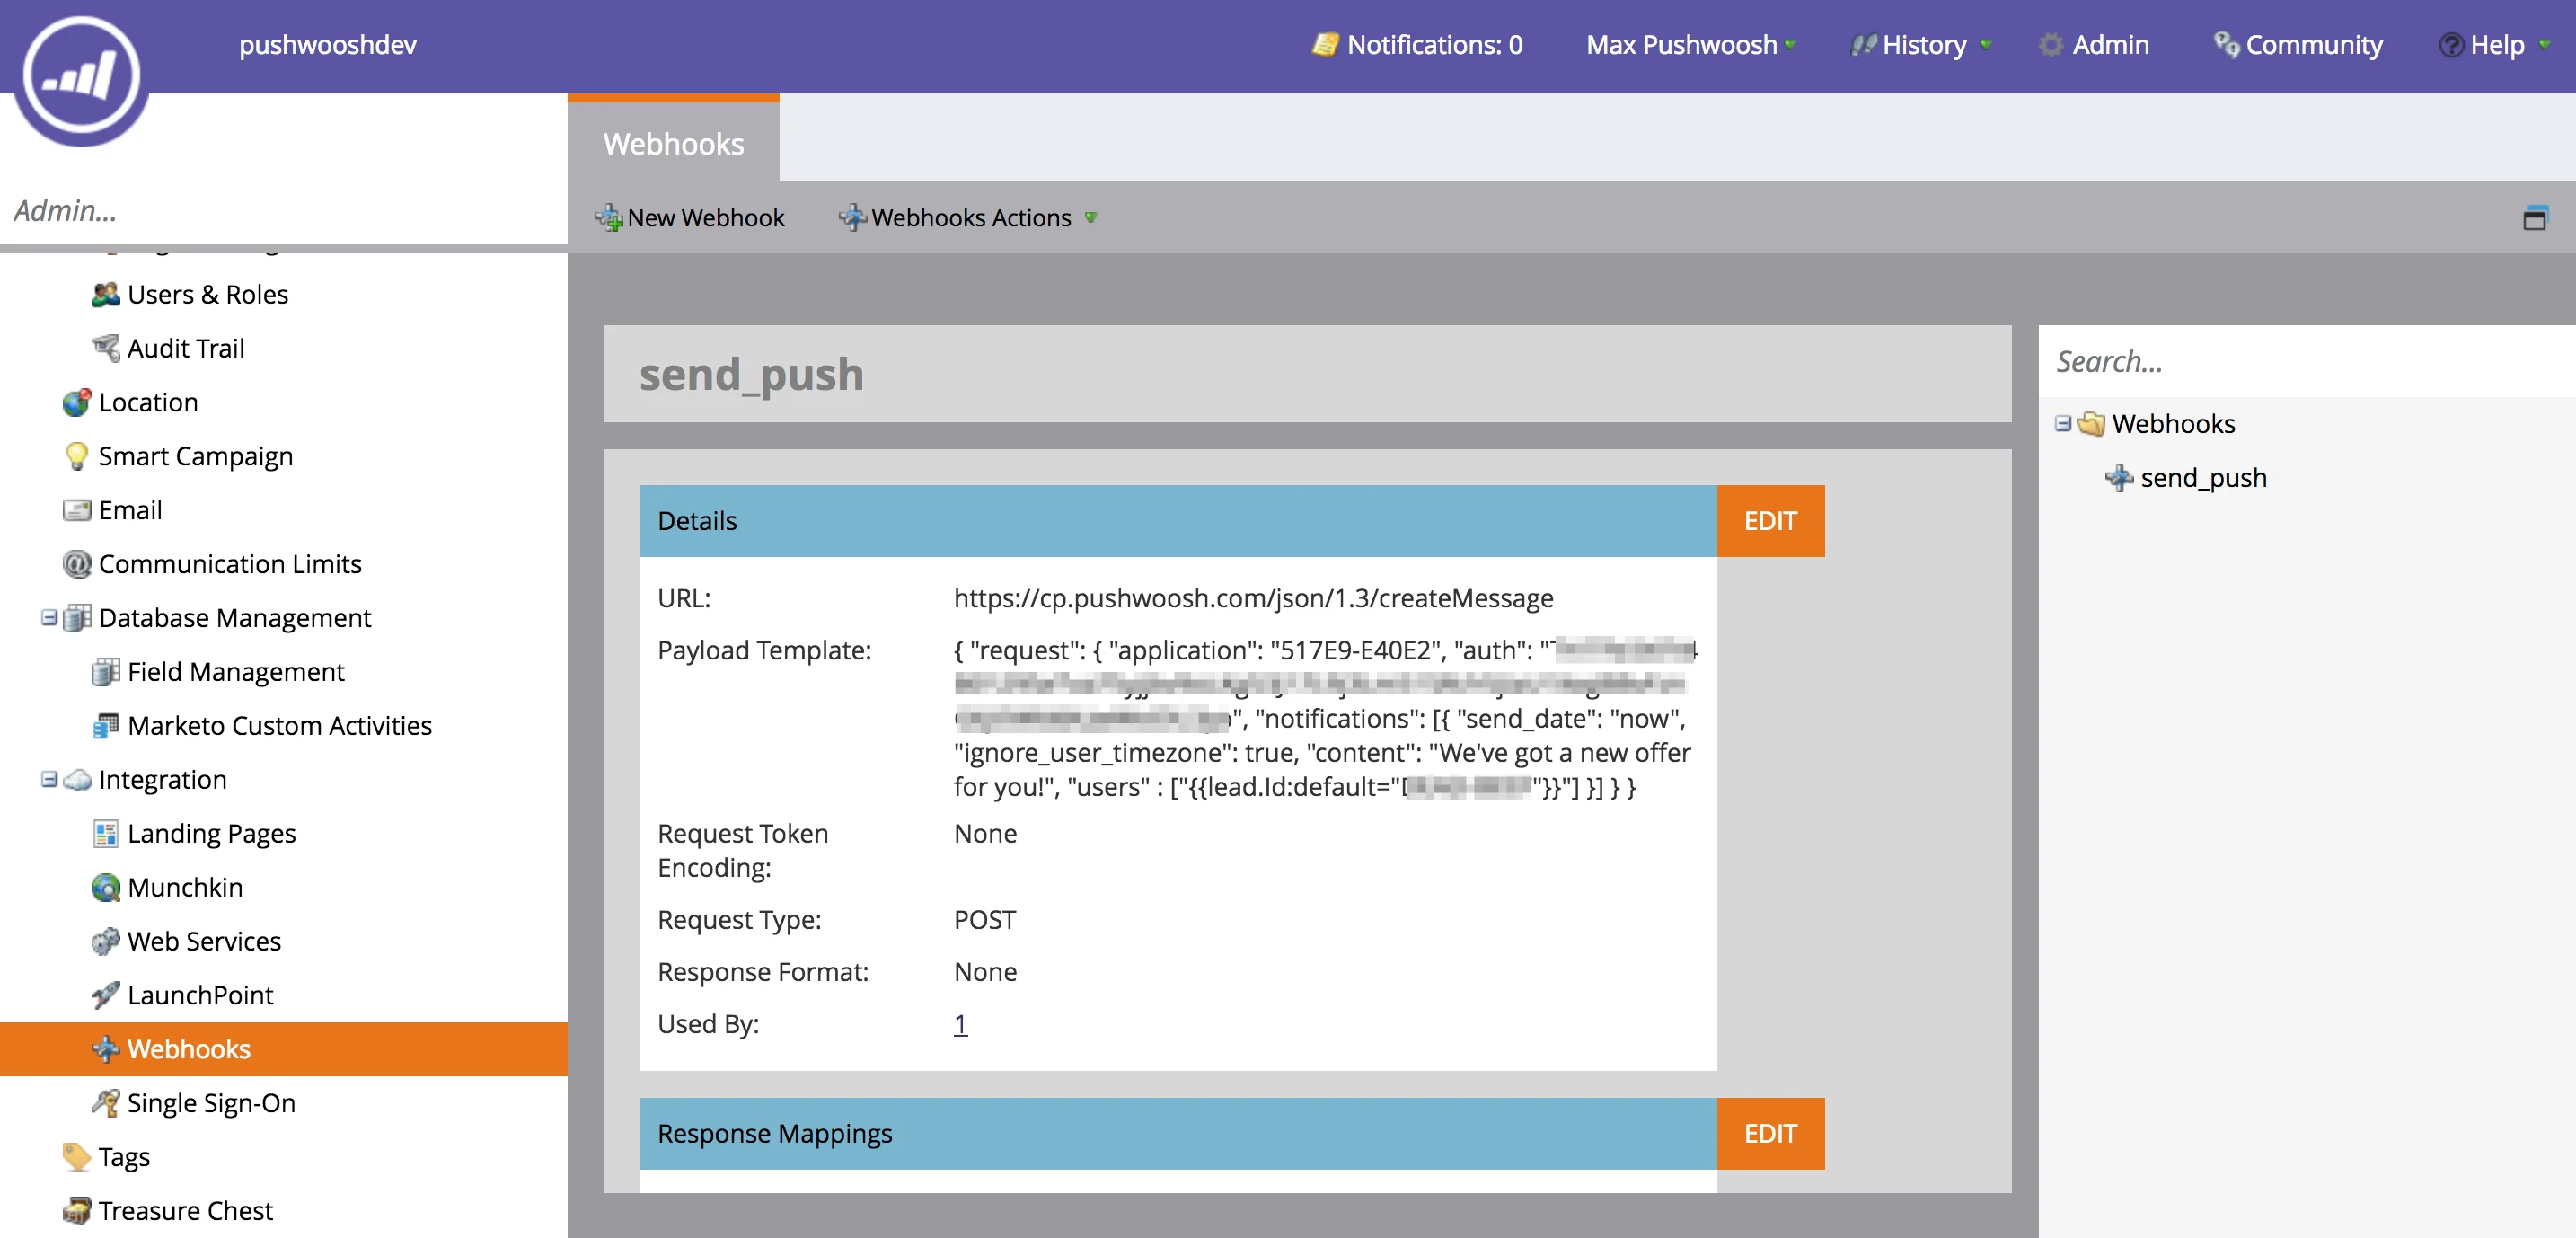
**Marketo의 "Admin" 섹션**으로 이동하여 다음 매개변수로 새 Webhook을 만드세요:
* URL - [https://go.pushwoosh.com/json/1.3/createMessage](https://go.pushwoosh.com/json/1.3/createMessage)
* 요청 유형: POST
다음 코드를 템플릿으로 붙여넣으세요.
```
{
"request": {
"application": "여기에_PUSHWOOSH_앱_ID_입력",
"auth": "여기에_PUSHWOOSH_API_토큰_입력",
"notifications": [{
"send_date": "now",
"ignore_user_timezone": true,
"content": "새로운 제안이 있습니다!",
"users" : ["{{lead.Id:default="ABCD-EFGH"}}"]
}]
}
}
```
Pushwoosh에서 사용자를 참조하기 위해 Marketo 리드 ID를 사용합니다. 사용자 중심 푸시 알림에 대한 자세한 내용은 [여기](/ko/product/messaging-channels/push-notifications/send-push-notifications/push-by-user-id)를 참조하세요.
이 매우 간단한 예에서는 정적 푸시 메시지를 사용합니다. 하지만 [`createMessage`](/ko/developer/api-reference/messages-api/#createmessage)의 모든 기능을 사용할 수 있습니다.
푸시 알림을 개인화하려면 Pushwoosh의 **Preset**을 사용하고 푸시 개인화를 위해 `/createMessage` 호출의 **"dynamic_content_placeholders"** 매개변수에 Marketo의 값을 전달할 수 있습니다.
## 5. Marketo 자동화 캠페인과 통합하기
Marketo의 "**Marketing Activities**" 섹션으로 이동하여 캠페인을 만드세요.
이 예에서는 사용자가 랜딩 페이지의 링크(바로 두 단계 위에서 만든 링크)를 클릭할 때 캠페인을 트리거합니다.
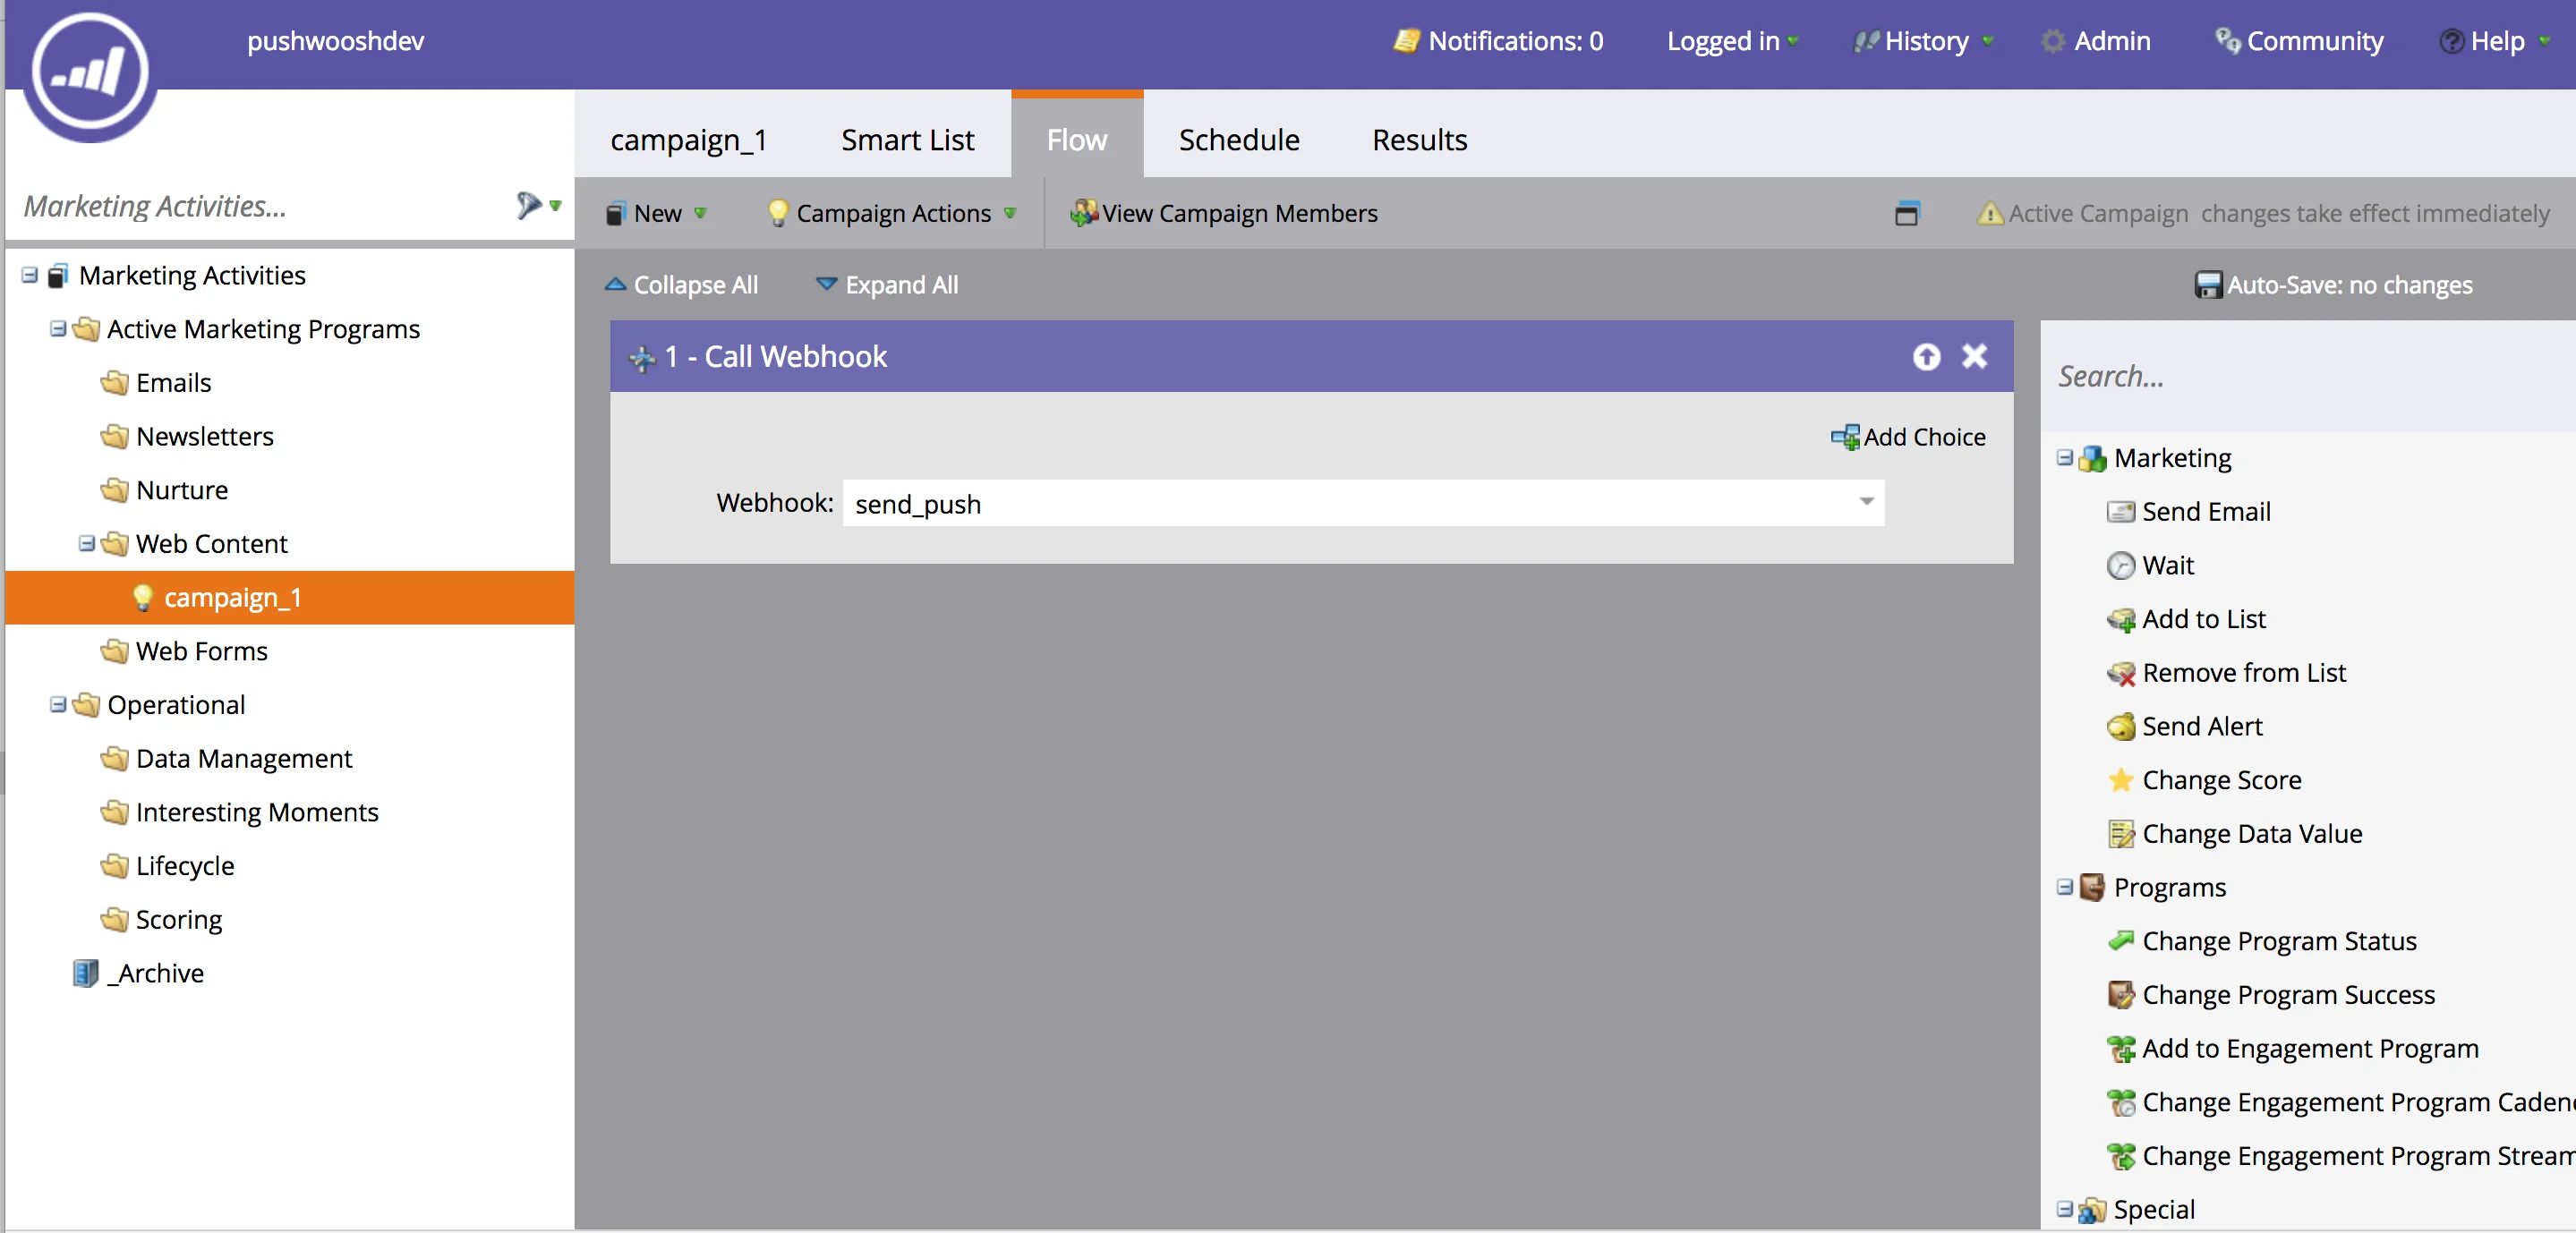
b. "Flow" 섹션에서 "send_push" Webhook을 선택합니다.
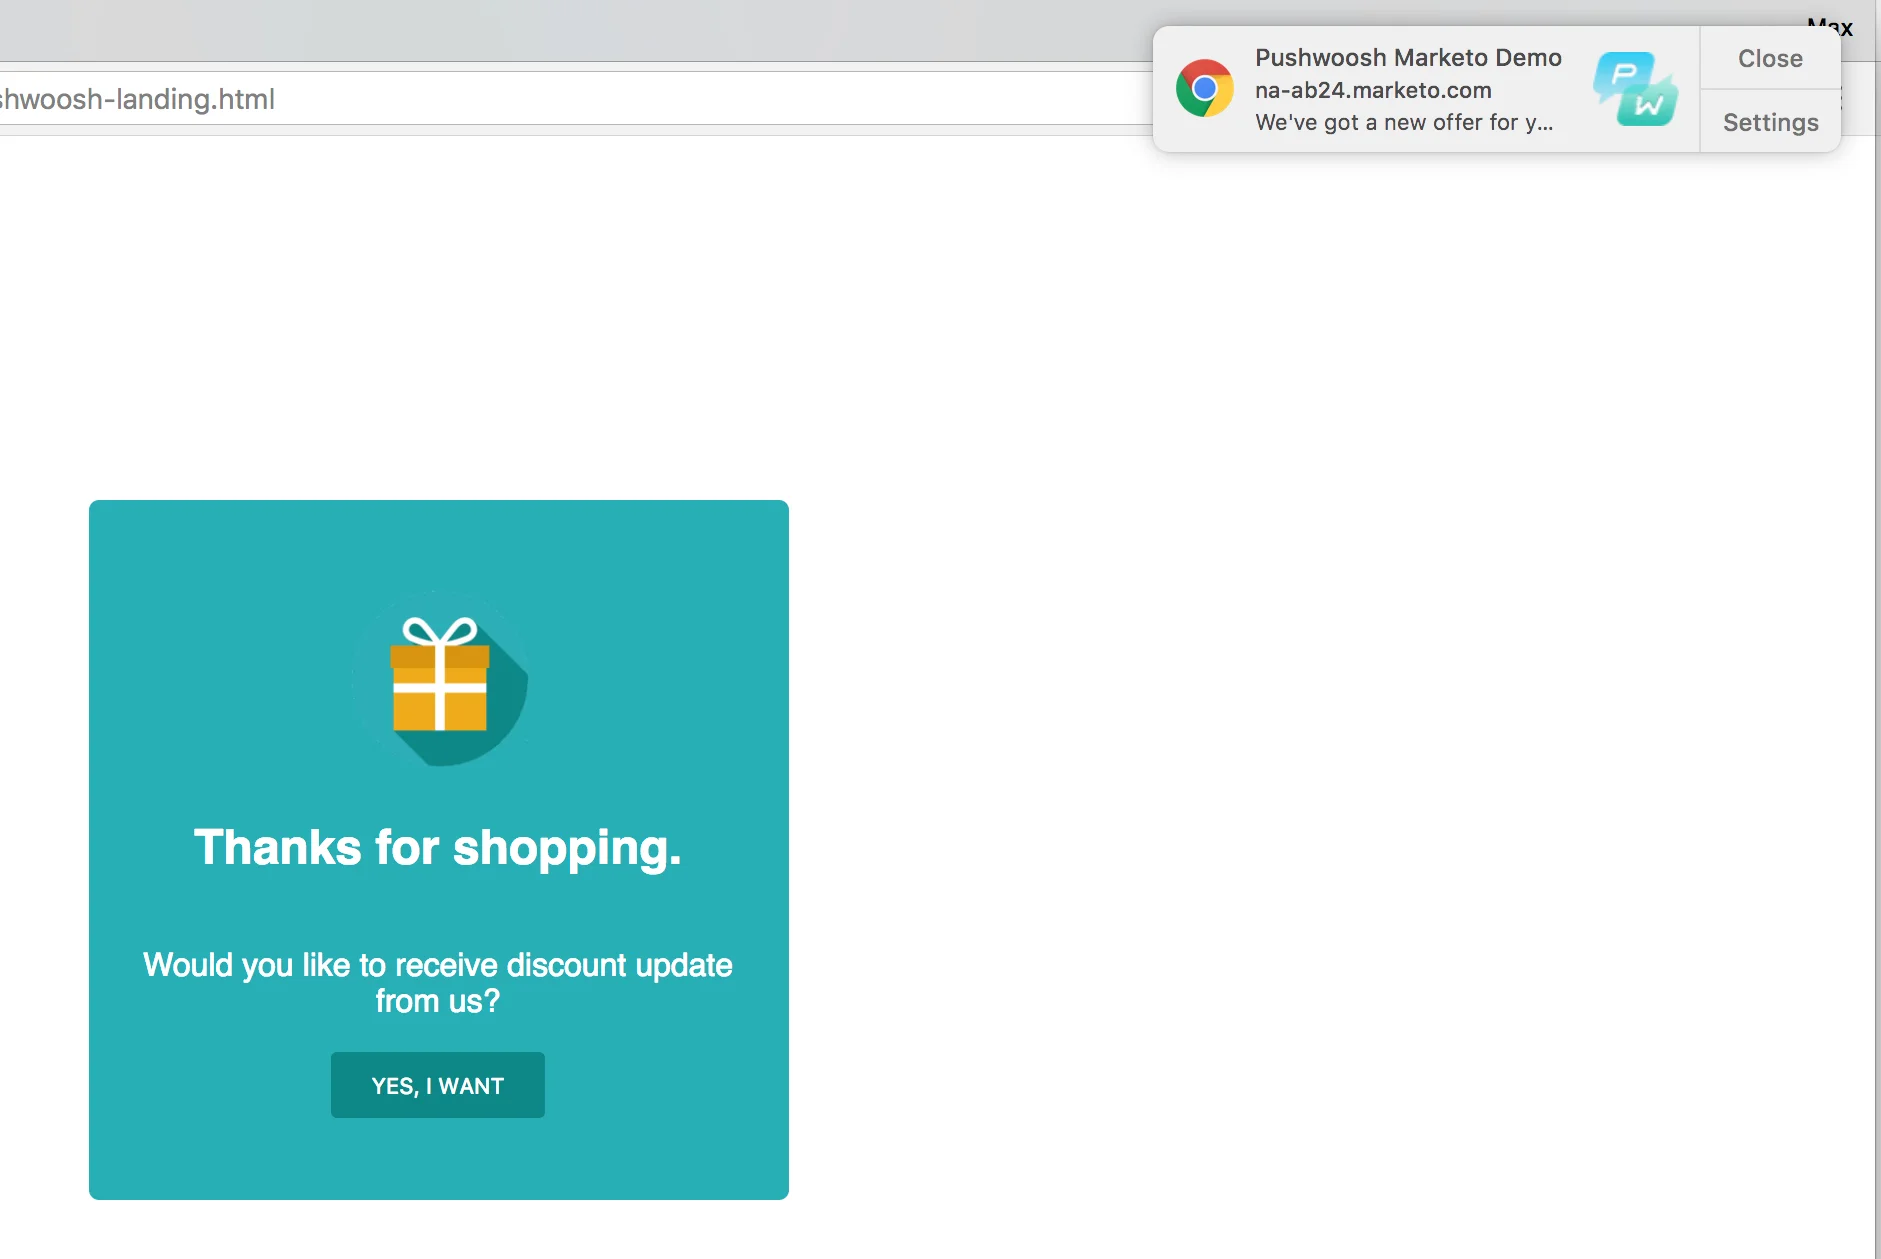
* 이제 랜딩 페이지 URL을 엽니다.
* **"네, 원합니다"** 버튼을 클릭하여 푸시 구독 대화 상자를 엽니다.
* 푸시 알림을 구독합니다.
* **"제안 보내기!"** 링크를 클릭합니다.
Marketo 자동 푸시 알림을 받았습니다!
 ## 2. 푸시 구독 페이지 생성하기
위에서 언급했듯이 Marketo는 랜딩 페이지의 범위와 다른 리소스 폴더에만 파일을 업로드할 수 있습니다.
예를 들어, 위에서 업로드한 파일을 클릭하고 URL을 확인하면 "[https://your-host-name.com/rs/765-IWA-819/images/pushwoosh-service-worker.js](https://your-host-name.com/rs/765-IWA-819/images/pushwoosh-service-worker.js)"와 같은 것을 볼 수 있습니다.
하지만 랜딩 페이지를 클릭하고 URL을 확인하면 "[https://your-host-name.com/lp/765-IWA-819/pushwoosh-landing.html](https://your-host-name.com/lp/765-IWA-819/pushwoosh-landing.html)"과 같을 것입니다.
랜딩 페이지 URL의 **"lp"** 부분과 스크립트 URL의 **"rs"** 부분을 주목하세요.
이는 랜딩 페이지와 다른 범위에 _Service Worker_ 스크립트를 등록해야 함을 의미합니다.
이를 위해 특별한 푸시 구독 페이지를 Marketo 리소스 폴더에 업로드한 다음 랜딩 페이지에서 열 것입니다. 이 구독 페이지를 만들어 보겠습니다.
다음 gist에서 _push-subscription.html_ 파일을 가져오세요:
[https://gist.github.com/shaders/2b518e3acaf9b4712d5260205243343d#file-push-subscription-html](https://gist.github.com/shaders/2b518e3acaf9b4712d5260205243343d#file-push-subscription-html)
파일을 열고 다음 줄을 변경하세요:
* 8행 - 이전 단계에서 업로드한 _manifest.json_ 파일의 URL로 링크를 변경합니다.
* 24행 - _scope_ 매개변수 값을 리소스 폴더의 URL로 변경합니다(_manifest.json_이 있는 폴더입니다).
* 20행 - _applicationCode_ 매개변수 값을 Pushwoosh 앱 ID로 변경합니다.
이 스크립트는 또한 Pushwoosh의 사용자 중심 푸시 알림을 Marketo의 리드 식별자와 매핑합니다: _userId:leadId_ (26행)
결과 파일을 "Images and Files" 폴더에 업로드하세요. 이제 폴더에 다음 파일들이 있어야 합니다:
## 2. 푸시 구독 페이지 생성하기
위에서 언급했듯이 Marketo는 랜딩 페이지의 범위와 다른 리소스 폴더에만 파일을 업로드할 수 있습니다.
예를 들어, 위에서 업로드한 파일을 클릭하고 URL을 확인하면 "[https://your-host-name.com/rs/765-IWA-819/images/pushwoosh-service-worker.js](https://your-host-name.com/rs/765-IWA-819/images/pushwoosh-service-worker.js)"와 같은 것을 볼 수 있습니다.
하지만 랜딩 페이지를 클릭하고 URL을 확인하면 "[https://your-host-name.com/lp/765-IWA-819/pushwoosh-landing.html](https://your-host-name.com/lp/765-IWA-819/pushwoosh-landing.html)"과 같을 것입니다.
랜딩 페이지 URL의 **"lp"** 부분과 스크립트 URL의 **"rs"** 부분을 주목하세요.
이는 랜딩 페이지와 다른 범위에 _Service Worker_ 스크립트를 등록해야 함을 의미합니다.
이를 위해 특별한 푸시 구독 페이지를 Marketo 리소스 폴더에 업로드한 다음 랜딩 페이지에서 열 것입니다. 이 구독 페이지를 만들어 보겠습니다.
다음 gist에서 _push-subscription.html_ 파일을 가져오세요:
[https://gist.github.com/shaders/2b518e3acaf9b4712d5260205243343d#file-push-subscription-html](https://gist.github.com/shaders/2b518e3acaf9b4712d5260205243343d#file-push-subscription-html)
파일을 열고 다음 줄을 변경하세요:
* 8행 - 이전 단계에서 업로드한 _manifest.json_ 파일의 URL로 링크를 변경합니다.
* 24행 - _scope_ 매개변수 값을 리소스 폴더의 URL로 변경합니다(_manifest.json_이 있는 폴더입니다).
* 20행 - _applicationCode_ 매개변수 값을 Pushwoosh 앱 ID로 변경합니다.
이 스크립트는 또한 Pushwoosh의 사용자 중심 푸시 알림을 Marketo의 리드 식별자와 매핑합니다: _userId:leadId_ (26행)
결과 파일을 "Images and Files" 폴더에 업로드하세요. 이제 폴더에 다음 파일들이 있어야 합니다:
 ## 3. 푸시 구독 기능이 있는 랜딩 페이지 생성하기
다음 gist에서 _pushwoosh-template.html_ 파일을 가져오세요:
[https://gist.github.com/shaders/2b518e3acaf9b4712d5260205243343d#file-pushwoosh-template-html](https://gist.github.com/shaders/2b518e3acaf9b4712d5260205243343d#file-pushwoosh-template-html)
파일을 열고 다음 줄을 변경하세요:
* 47행 - _scope_ 매개변수 값을 리소스 폴더의 URL로 변경합니다.
* 65행 - 이전 단계에서 업로드한 _push-subscription.html_ 파일의 URL로 링크를 변경합니다.
* 43행 - _applicationCode_ 매개변수 값을 Pushwoosh 앱 ID로 변경합니다.
이전 스크립트와 마찬가지로 이 스크립트도 Pushwoosh의 사용자 중심 푸시 알림을 Marketo의 리드 식별자와 매핑합니다: _userId:leadId_ (49행)
이제 **Marketo 랜딩 페이지**의 "**Templates**" 섹션으로 이동하여 템플릿을 만들고(아래 스크린샷에서는 "pushwoosh-template"이라고 함) 결과 파일의 내용을 거기에 복사하여 붙여넣으세요.
## 3. 푸시 구독 기능이 있는 랜딩 페이지 생성하기
다음 gist에서 _pushwoosh-template.html_ 파일을 가져오세요:
[https://gist.github.com/shaders/2b518e3acaf9b4712d5260205243343d#file-pushwoosh-template-html](https://gist.github.com/shaders/2b518e3acaf9b4712d5260205243343d#file-pushwoosh-template-html)
파일을 열고 다음 줄을 변경하세요:
* 47행 - _scope_ 매개변수 값을 리소스 폴더의 URL로 변경합니다.
* 65행 - 이전 단계에서 업로드한 _push-subscription.html_ 파일의 URL로 링크를 변경합니다.
* 43행 - _applicationCode_ 매개변수 값을 Pushwoosh 앱 ID로 변경합니다.
이전 스크립트와 마찬가지로 이 스크립트도 Pushwoosh의 사용자 중심 푸시 알림을 Marketo의 리드 식별자와 매핑합니다: _userId:leadId_ (49행)
이제 **Marketo 랜딩 페이지**의 "**Templates**" 섹션으로 이동하여 템플릿을 만들고(아래 스크린샷에서는 "pushwoosh-template"이라고 함) 결과 파일의 내용을 거기에 복사하여 붙여넣으세요.
 이제 이 템플릿을 기반으로 새 랜딩 페이지를 만들어 보겠습니다.
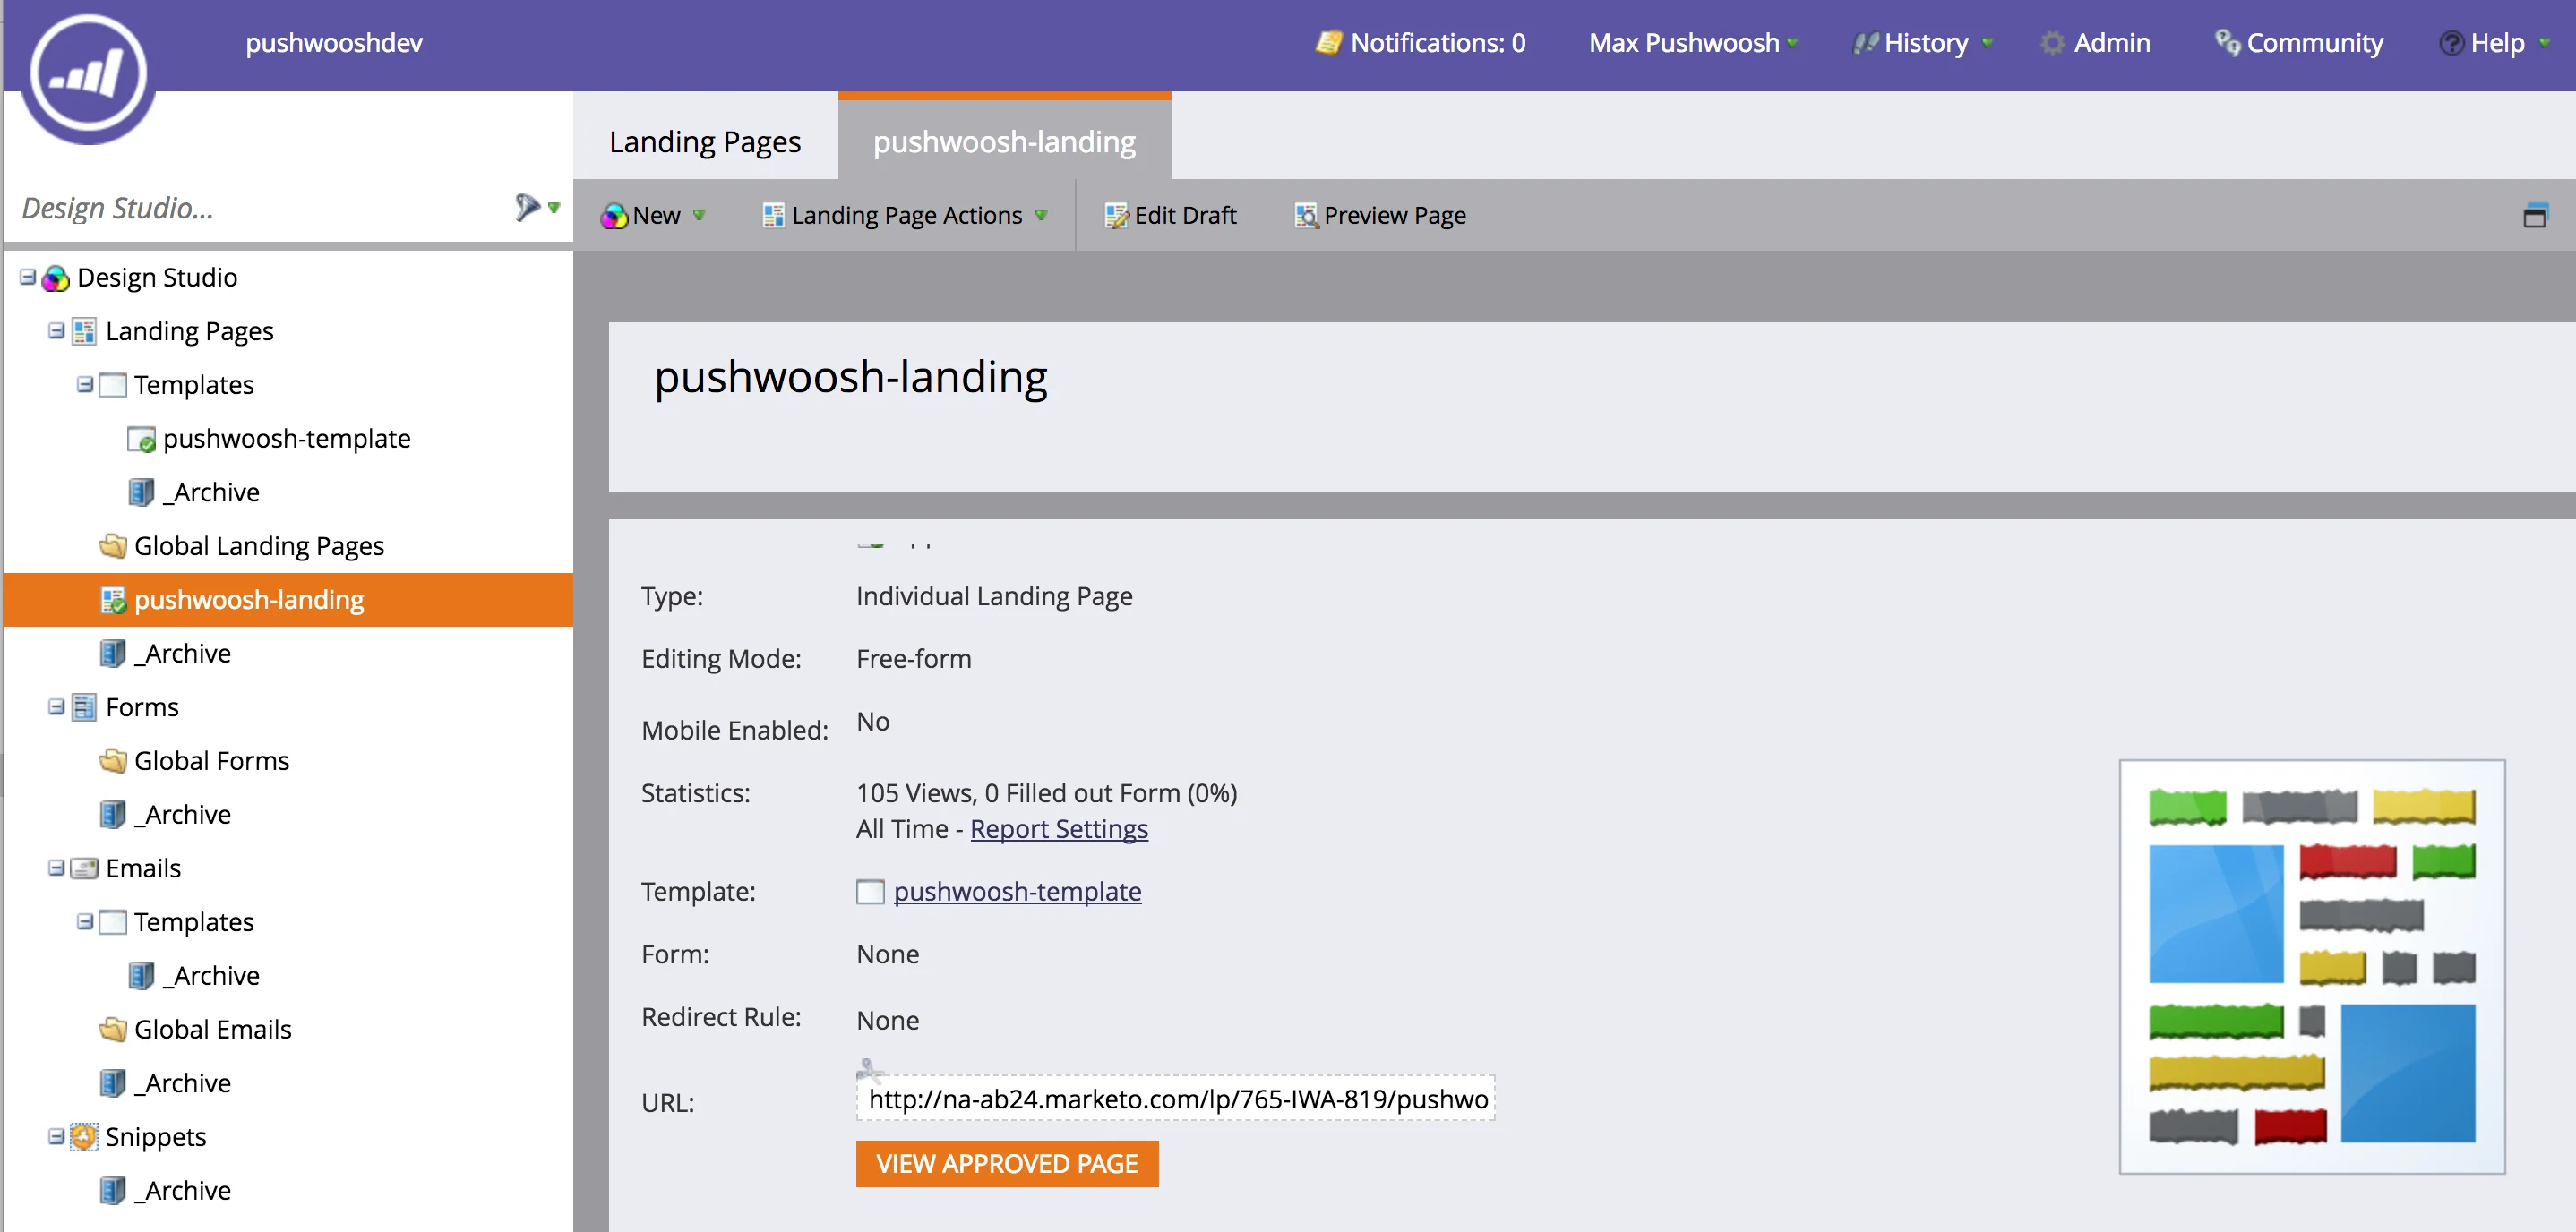 이 예에서는 단순화를 위해 Pushwoosh와 Marketo 캠페인 자동화 통합의 기능을 보여주기 위해 랜딩 페이지에 간단한 링크를 추가할 것입니다. 사용자가 이 링크를 클릭할 때 개인 푸시 알림을 트리거하는 캠페인을 만들 것입니다.
랜딩 페이지와 동일한 URL을 사용할 것입니다.
```txt
제안 보내기!
```
이 예에서는 단순화를 위해 Pushwoosh와 Marketo 캠페인 자동화 통합의 기능을 보여주기 위해 랜딩 페이지에 간단한 링크를 추가할 것입니다. 사용자가 이 링크를 클릭할 때 개인 푸시 알림을 트리거하는 캠페인을 만들 것입니다.
랜딩 페이지와 동일한 URL을 사용할 것입니다.
```txt
제안 보내기!
```
 ## 4. Pushwoosh Webhook 생성하기
**Marketo의 "Admin" 섹션**으로 이동하여 다음 매개변수로 새 Webhook을 만드세요:
* URL - [https://go.pushwoosh.com/json/1.3/createMessage](https://go.pushwoosh.com/json/1.3/createMessage)
* 요청 유형: POST
다음 코드를 템플릿으로 붙여넣으세요.
```
{
"request": {
"application": "여기에_PUSHWOOSH_앱_ID_입력",
"auth": "여기에_PUSHWOOSH_API_토큰_입력",
"notifications": [{
"send_date": "now",
"ignore_user_timezone": true,
"content": "새로운 제안이 있습니다!",
"users" : ["{{lead.Id:default="ABCD-EFGH"}}"]
}]
}
}
```
Pushwoosh에서 사용자를 참조하기 위해 Marketo 리드 ID를 사용합니다. 사용자 중심 푸시 알림에 대한 자세한 내용은 [여기](/ko/product/messaging-channels/push-notifications/send-push-notifications/push-by-user-id)를 참조하세요.
## 4. Pushwoosh Webhook 생성하기
**Marketo의 "Admin" 섹션**으로 이동하여 다음 매개변수로 새 Webhook을 만드세요:
* URL - [https://go.pushwoosh.com/json/1.3/createMessage](https://go.pushwoosh.com/json/1.3/createMessage)
* 요청 유형: POST
다음 코드를 템플릿으로 붙여넣으세요.
```
{
"request": {
"application": "여기에_PUSHWOOSH_앱_ID_입력",
"auth": "여기에_PUSHWOOSH_API_토큰_입력",
"notifications": [{
"send_date": "now",
"ignore_user_timezone": true,
"content": "새로운 제안이 있습니다!",
"users" : ["{{lead.Id:default="ABCD-EFGH"}}"]
}]
}
}
```
Pushwoosh에서 사용자를 참조하기 위해 Marketo 리드 ID를 사용합니다. 사용자 중심 푸시 알림에 대한 자세한 내용은 [여기](/ko/product/messaging-channels/push-notifications/send-push-notifications/push-by-user-id)를 참조하세요.
 이 매우 간단한 예에서는 정적 푸시 메시지를 사용합니다. 하지만 [`createMessage`](/ko/developer/api-reference/messages-api/#createmessage)의 모든 기능을 사용할 수 있습니다.
푸시 알림을 개인화하려면 Pushwoosh의 **Preset**을 사용하고 푸시 개인화를 위해 `/createMessage` 호출의 **"dynamic_content_placeholders"** 매개변수에 Marketo의 값을 전달할 수 있습니다.
## 5. Marketo 자동화 캠페인과 통합하기
Marketo의 "**Marketing Activities**" 섹션으로 이동하여 캠페인을 만드세요.
이 예에서는 사용자가 랜딩 페이지의 링크(바로 두 단계 위에서 만든 링크)를 클릭할 때 캠페인을 트리거합니다.
이 매우 간단한 예에서는 정적 푸시 메시지를 사용합니다. 하지만 [`createMessage`](/ko/developer/api-reference/messages-api/#createmessage)의 모든 기능을 사용할 수 있습니다.
푸시 알림을 개인화하려면 Pushwoosh의 **Preset**을 사용하고 푸시 개인화를 위해 `/createMessage` 호출의 **"dynamic_content_placeholders"** 매개변수에 Marketo의 값을 전달할 수 있습니다.
## 5. Marketo 자동화 캠페인과 통합하기
Marketo의 "**Marketing Activities**" 섹션으로 이동하여 캠페인을 만드세요.
이 예에서는 사용자가 랜딩 페이지의 링크(바로 두 단계 위에서 만든 링크)를 클릭할 때 캠페인을 트리거합니다.
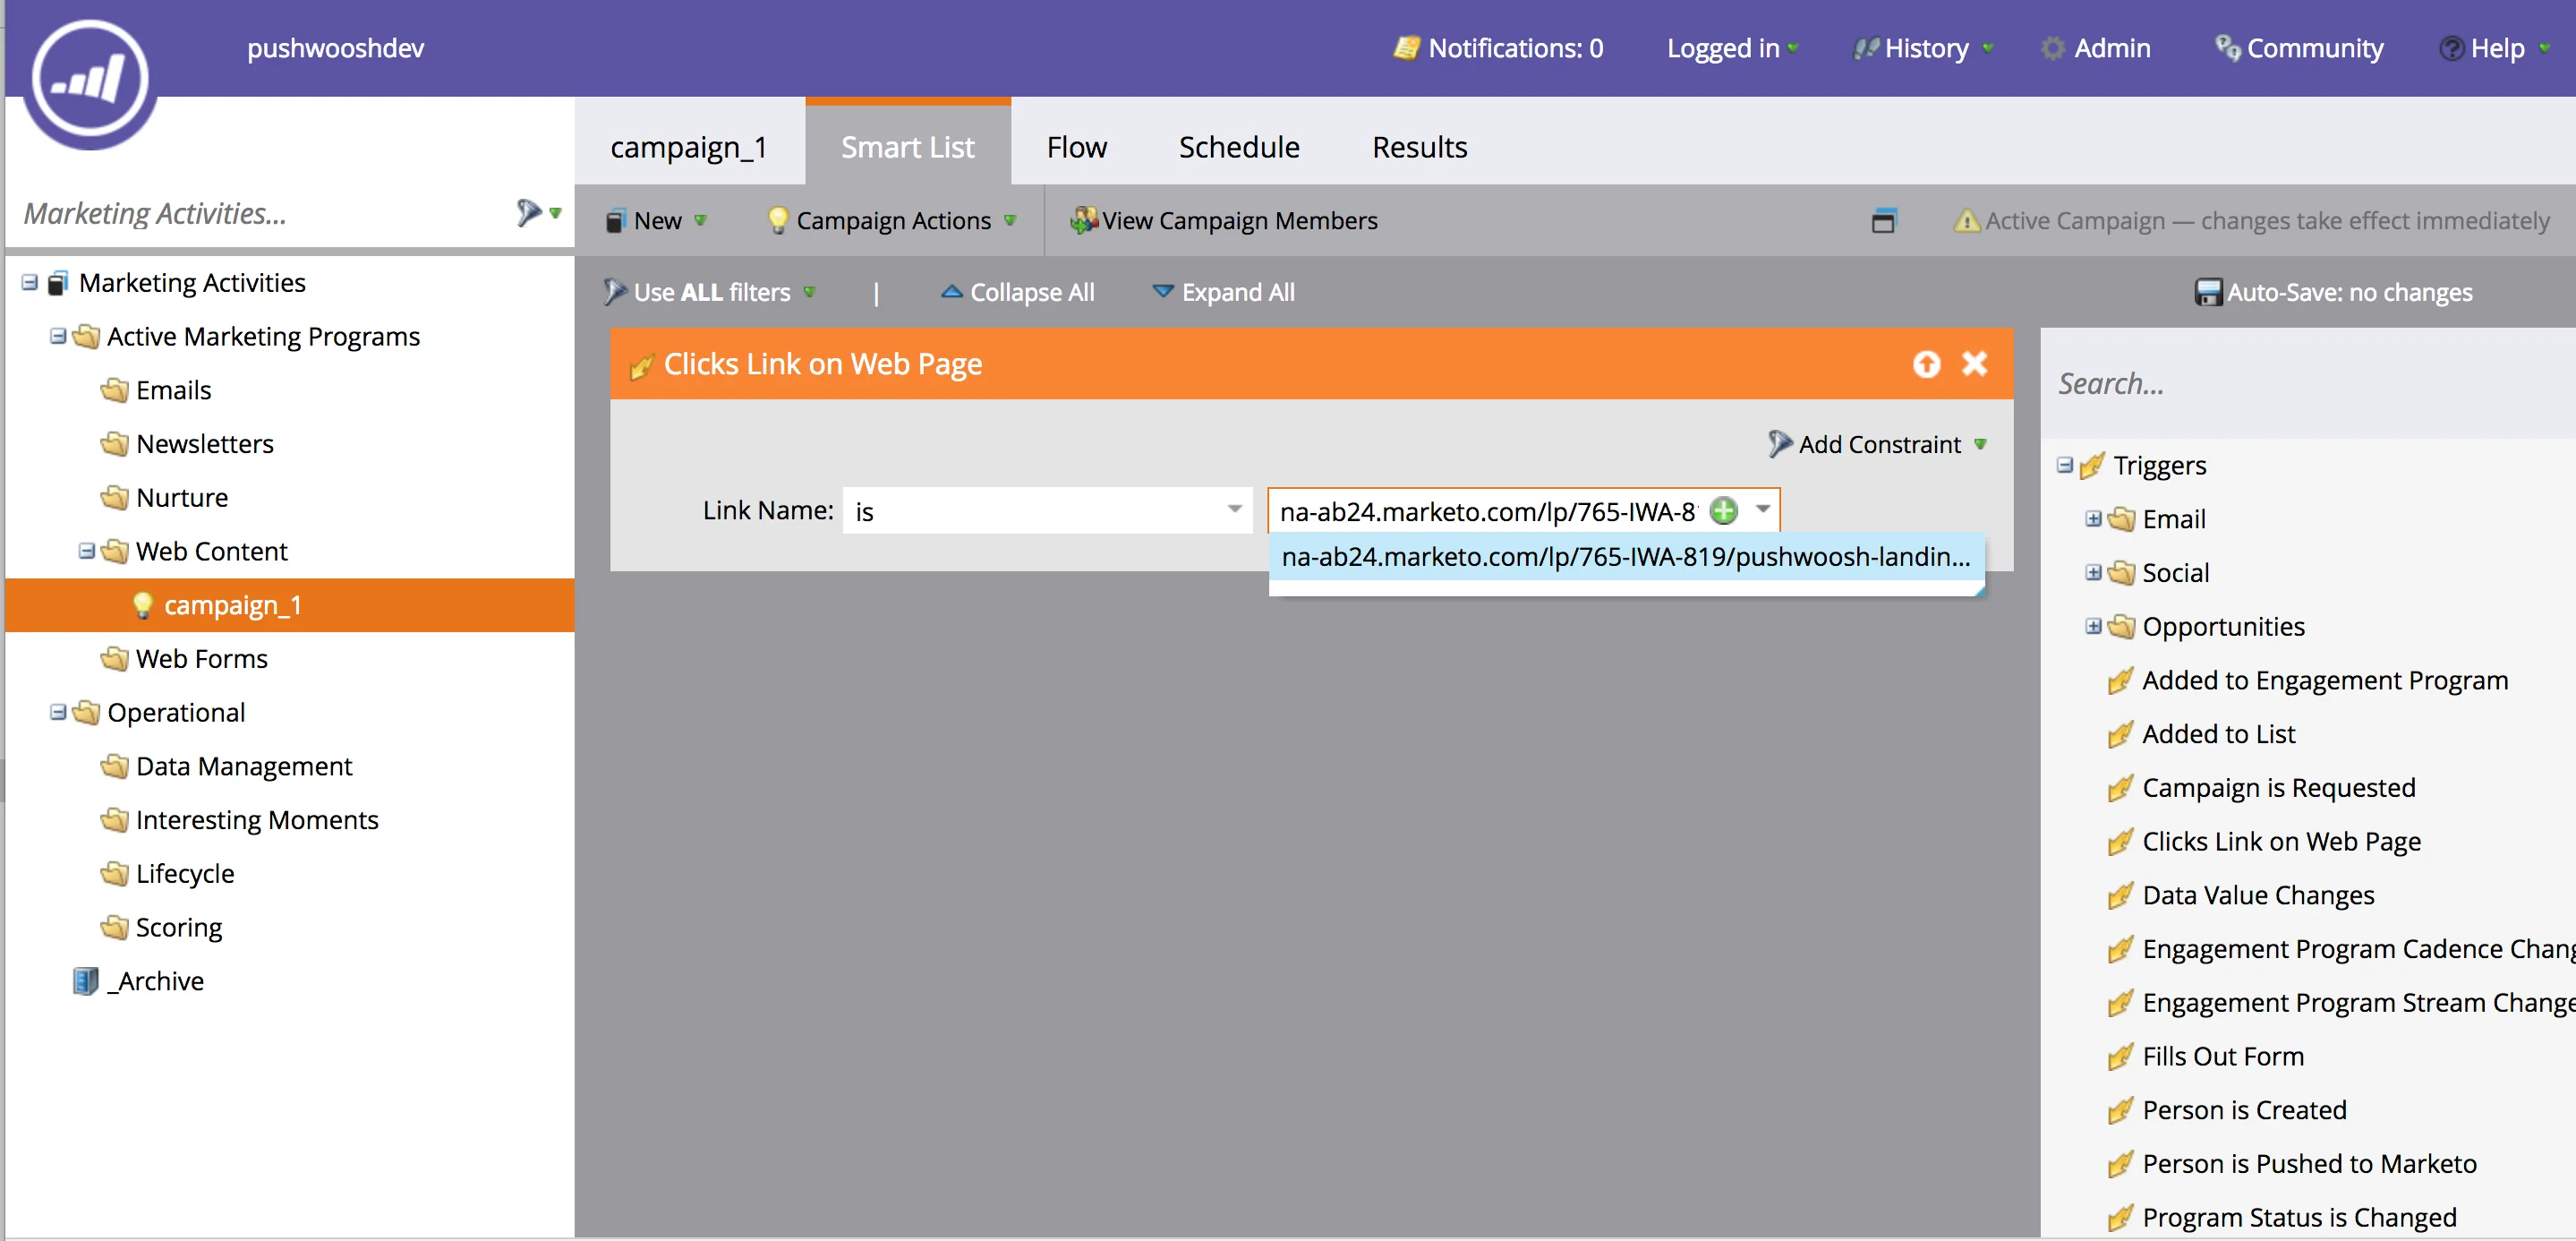 b. "Flow" 섹션에서 "send_push" Webhook을 선택합니다.
 * 이제 랜딩 페이지 URL을 엽니다.
* **"네, 원합니다"** 버튼을 클릭하여 푸시 구독 대화 상자를 엽니다.
* 푸시 알림을 구독합니다.
* **"제안 보내기!"** 링크를 클릭합니다.
Marketo 자동 푸시 알림을 받았습니다!
* 이제 랜딩 페이지 URL을 엽니다.
* **"네, 원합니다"** 버튼을 클릭하여 푸시 구독 대화 상자를 엽니다.
* 푸시 알림을 구독합니다.
* **"제안 보내기!"** 링크를 클릭합니다.
Marketo 자동 푸시 알림을 받았습니다!