# 옵트인 및 옵트아웃 팝업 만들기
인앱 메시지는 푸시 알림 전송에 대한 사용자 동의를 얻는 데 매우 중요합니다. 또한 어떤 이유로든 푸시 알림 구독을 취소한 사용자를 복구하는 데 사용할 수도 있습니다. 이러한 사용자를 다시 참여시키면 전반적인 사용자 리텐션을 개선하고 비즈니스에 대한 평생 가치를 높이는 데 도움이 될 수 있습니다.
[Pushwoosh 인앱 편집기](/ko/product/content/in-apps/no-code-in-app-editor/create-rich-media-in-the-built-in-editor/)를 사용하면 개발자나 디자이너 기술 없이도 쉽게 인앱을 만들 수 있습니다. 헤더, 텍스트, 이미지(AI 생성 사진 및 스톡 사진 포함), 버튼, 양식 및 기타 요소를 캔버스에 추가하고 몇 번의 클릭만으로 사용자 지정할 수 있습니다. 옴니채널 고객 여정에 인앱 메시지를 통합하여 사용자 커뮤니케이션을 최대한 활용할 수 있습니다.
## Pushwoosh 인앱 편집기에서 옵트인 및 옵트아웃 복구 템플릿 빌드하기
옵트인 및 옵트아웃 복구 요청을 위해 별도의 인앱을 만들지 또는 동일한 인앱을 사용할지는 사용자에게 달려 있습니다. 다음은 컨텍스트에 따라 두 가지 목표를 모두 달성하는 데 도움이 되는 팝업의 예입니다.
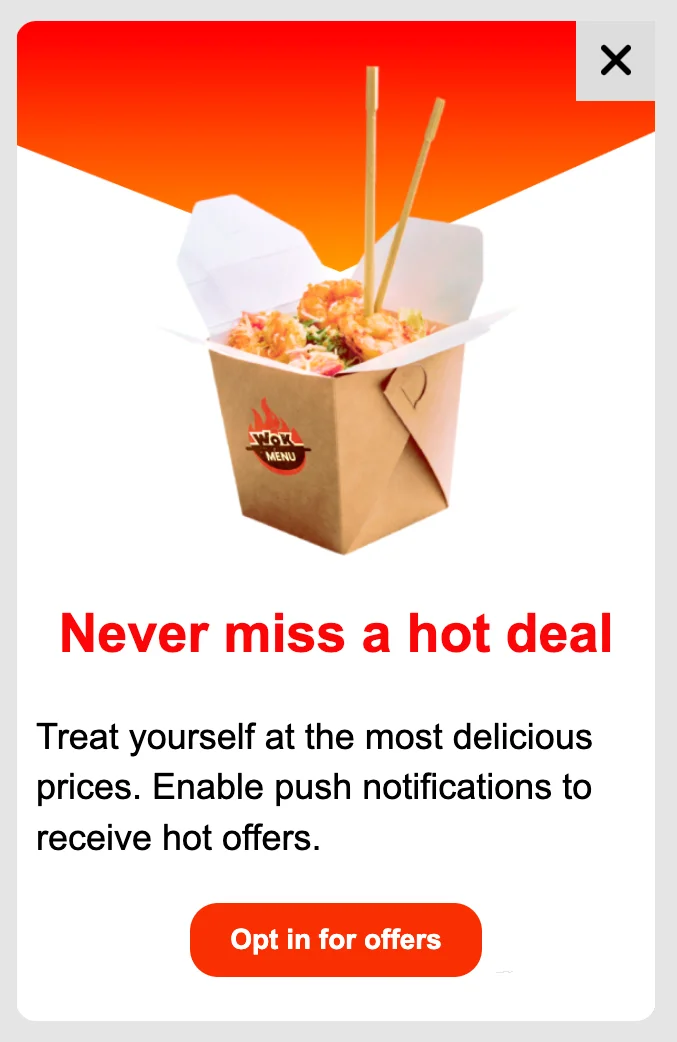 [인앱 편집기에서 부분 화면 팝업을 만든](/ko/product/content/in-apps/no-code-in-app-editor/configure-in-app-template-settings/#configure-how-the-in-app-looks-on-device) 다음, 여기로 돌아와 앱에 표시될 시점을 자동화하세요.
## Customer Journey Builder에서 인앱 메시지 표시 자동화하기
인앱 메시지를 만든 후에는 사용자가 적절한 순간에 볼 수 있도록 앱에서의 표시를 구성해야 합니다. **옵트인** 및 **옵트아웃 복구** 팝업을 설정하려면 Pushwoosh [Customer Journey Builder](/ko/product/customer-journey/journey-elements)에서 두 개의 개별 캠페인을 만들어야 합니다.
### 옵트인 팝업
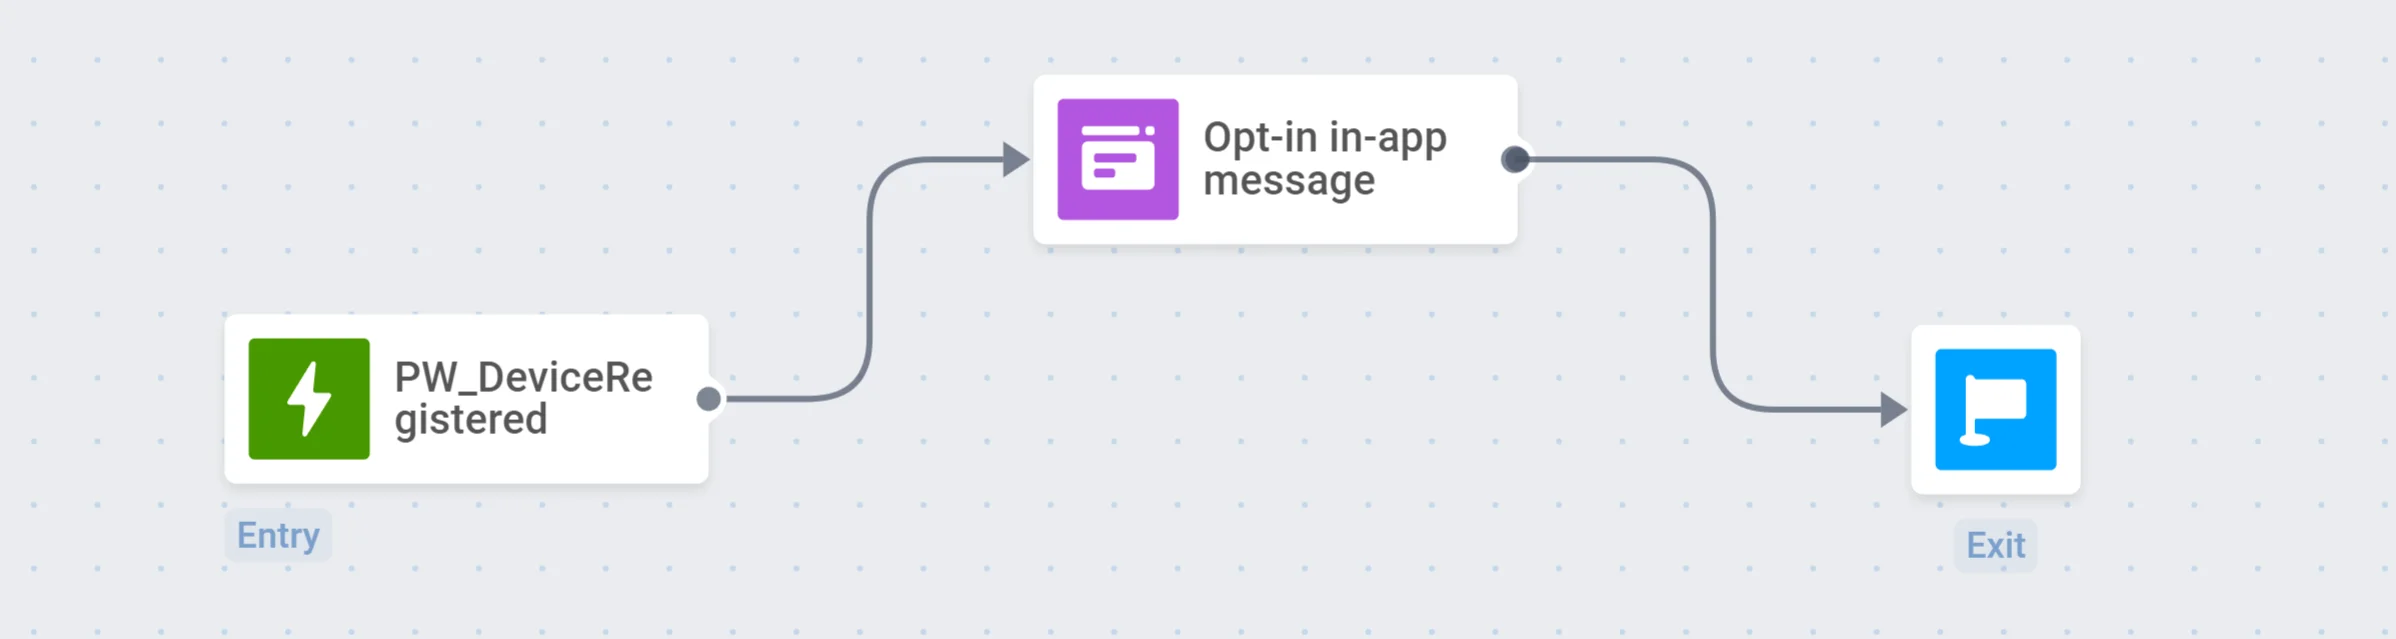
옵트인 팝업 표시를 자동화하려면 [Trigger-based Entry](/ko/product/customer-journey/journey-elements/#trigger-based-entry)로 시작하는 고객 여정을 빌드할 수 있습니다. 기본 [PW_DeviceRegistered](/ko/product/audience-data-and-segmentation/events/default-events/#pw_deviceregistered) 이벤트는 사용자가 앱을 처음 실행할 때 발생하므로 옵트인 캠페인을 설정하는 데 적합합니다.
아래 예에서 사용자는 앱을 처음 실행한 직후 옵트인 팝업을 보게 됩니다.
[인앱 편집기에서 부분 화면 팝업을 만든](/ko/product/content/in-apps/no-code-in-app-editor/configure-in-app-template-settings/#configure-how-the-in-app-looks-on-device) 다음, 여기로 돌아와 앱에 표시될 시점을 자동화하세요.
## Customer Journey Builder에서 인앱 메시지 표시 자동화하기
인앱 메시지를 만든 후에는 사용자가 적절한 순간에 볼 수 있도록 앱에서의 표시를 구성해야 합니다. **옵트인** 및 **옵트아웃 복구** 팝업을 설정하려면 Pushwoosh [Customer Journey Builder](/ko/product/customer-journey/journey-elements)에서 두 개의 개별 캠페인을 만들어야 합니다.
### 옵트인 팝업
옵트인 팝업 표시를 자동화하려면 [Trigger-based Entry](/ko/product/customer-journey/journey-elements/#trigger-based-entry)로 시작하는 고객 여정을 빌드할 수 있습니다. 기본 [PW_DeviceRegistered](/ko/product/audience-data-and-segmentation/events/default-events/#pw_deviceregistered) 이벤트는 사용자가 앱을 처음 실행할 때 발생하므로 옵트인 캠페인을 설정하는 데 적합합니다.
아래 예에서 사용자는 앱을 처음 실행한 직후 옵트인 팝업을 보게 됩니다.
 ### 옵트아웃 복구 팝업
옵트아웃 복구 캠페인의 경우, 앱에서 알림을 비활성화했거나 활성화한 적이 없는 사용자 세그먼트에 대한 고객 여정을 만드는 것을 권장합니다.
먼저, 사용자 지정 _Push Alerts Enabled_ [태그](/ko/product/audience-data-and-segmentation/user-data-tags/tags/)를 구성하고 알림이 비활성화된 사용자의 [세그먼트](/ko/product/audience-data-and-segmentation/segmentation/)를 빌드해야 합니다.
### 옵트아웃 복구 팝업
옵트아웃 복구 캠페인의 경우, 앱에서 알림을 비활성화했거나 활성화한 적이 없는 사용자 세그먼트에 대한 고객 여정을 만드는 것을 권장합니다.
먼저, 사용자 지정 _Push Alerts Enabled_ [태그](/ko/product/audience-data-and-segmentation/user-data-tags/tags/)를 구성하고 알림이 비활성화된 사용자의 [세그먼트](/ko/product/audience-data-and-segmentation/segmentation/)를 빌드해야 합니다.
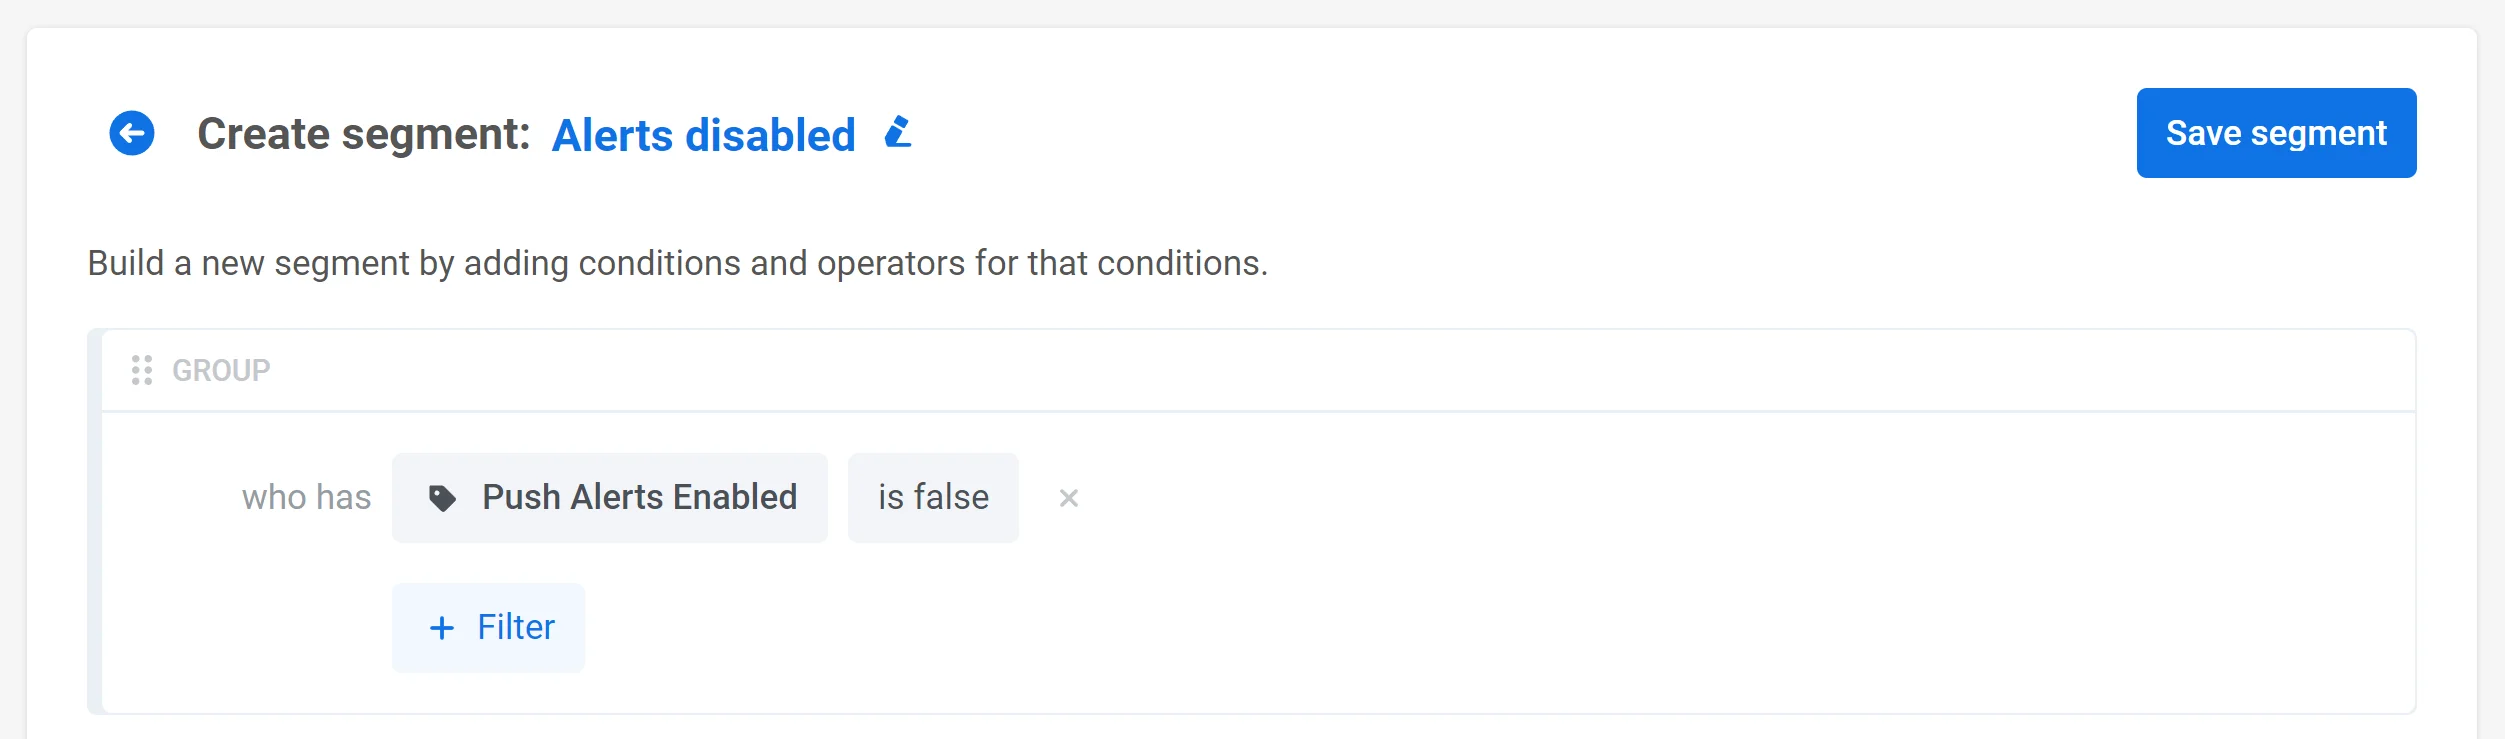 그 후, [Audience-based Entry](/ko/product/customer-journey/journey-elements/#audience-based-entry)로 시작하는 고객 여정을 빌드할 수 있습니다. 생성한 세그먼트를 선택하고 **Entry schedule** → **Recurring entry** → **Periodically**(예: 한 달에 한 번)로 설정합니다.
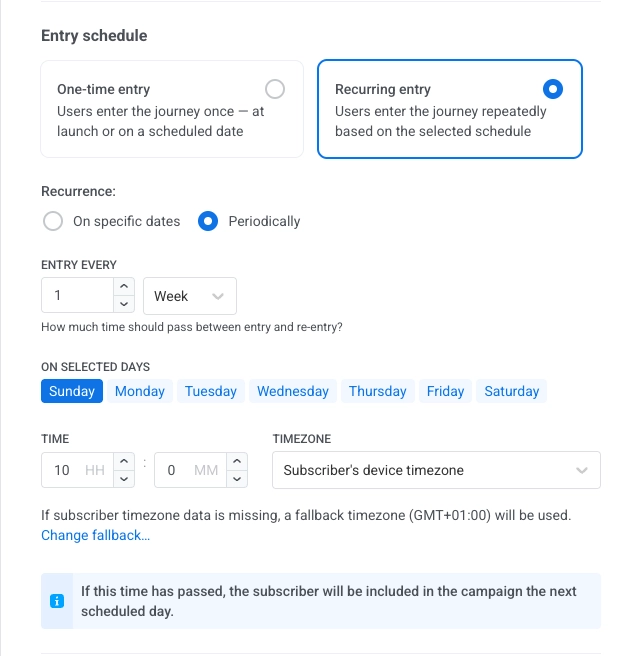 또한 기본 [PW_ApplicationOpen](/ko/product/audience-data-and-segmentation/events/default-events/#pw_applicationopen) 이벤트를 트리거로 사용하여 [Wait for Trigger](/ko/product/customer-journey/journey-elements/#wait-for-trigger) 단계를 추가하여 사용자가 앱을 열 때 팝업이 나타나도록 할 수 있습니다. 결과적으로 여정은 다음과 같이 보일 것입니다.
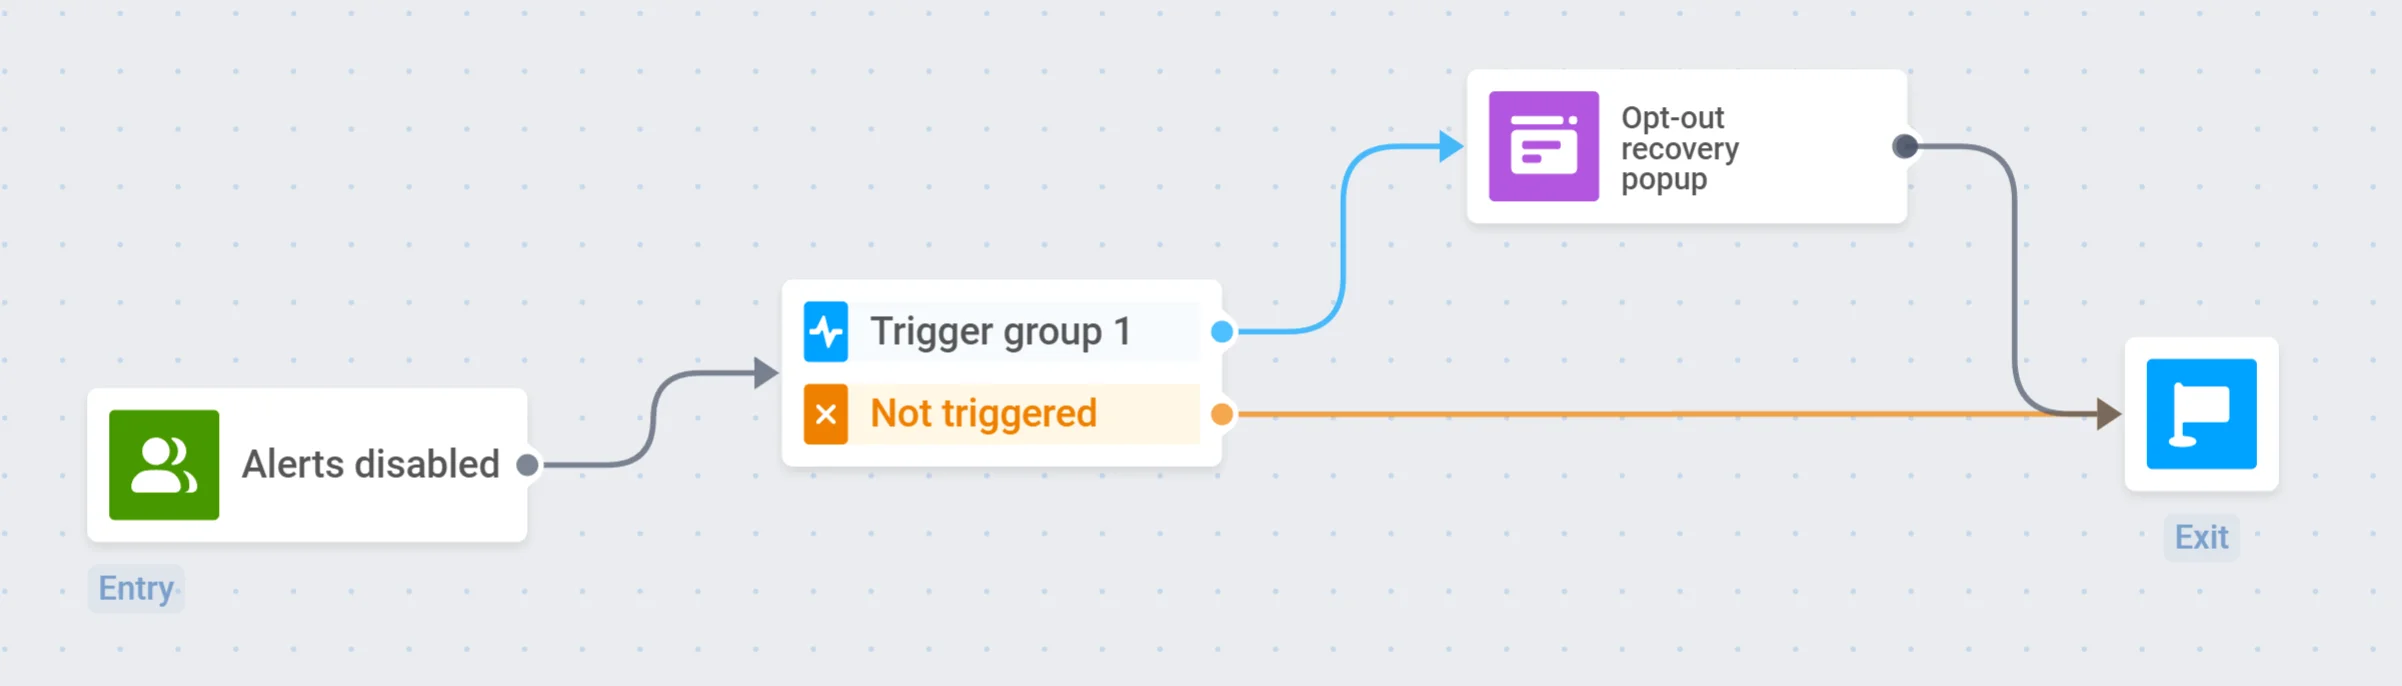 매월 Pushwoosh는 알림이 꺼져 있는 사용자 세그먼트에 대해 이 여정을 시작합니다.
## 더 유용한 기사 및 인사이트
* [Pushwoosh 블로그의 인기 있는 인앱 형식 및 우수 사례](https://blog.pushwoosh.com/blog/what-are-in-apps/)
* [옴니채널 전략 내에서 인앱 사용에 대한 팁](https://blog.pushwoosh.com/blog/push-notifications-in-app-messaging/)
* [인앱(리치 미디어) 편집기 문서](/ko/product/content/in-apps/no-code-in-app-editor/create-rich-media-in-the-built-in-editor/)
매월 Pushwoosh는 알림이 꺼져 있는 사용자 세그먼트에 대해 이 여정을 시작합니다.
## 더 유용한 기사 및 인사이트
* [Pushwoosh 블로그의 인기 있는 인앱 형식 및 우수 사례](https://blog.pushwoosh.com/blog/what-are-in-apps/)
* [옴니채널 전략 내에서 인앱 사용에 대한 팁](https://blog.pushwoosh.com/blog/push-notifications-in-app-messaging/)
* [인앱(리치 미디어) 편집기 문서](/ko/product/content/in-apps/no-code-in-app-editor/create-rich-media-in-the-built-in-editor/)