# iOS SDK 7.0+ 기본 통합 가이드
이 섹션에서는 Pushwoosh SDK를 iOS 애플리케이션에 통합하는 방법에 대한 정보를 제공합니다.
## 전제 조건
Pushwoosh iOS SDK를 앱에 통합하려면 다음이 필요합니다:
## 통합 단계
### 1. 설치
**Swift Package Manager** 또는 **CocoaPods**를 사용하여 Pushwoosh SDK를 애플리케이션에 통합할 수 있습니다.
#### Swift Package Manager
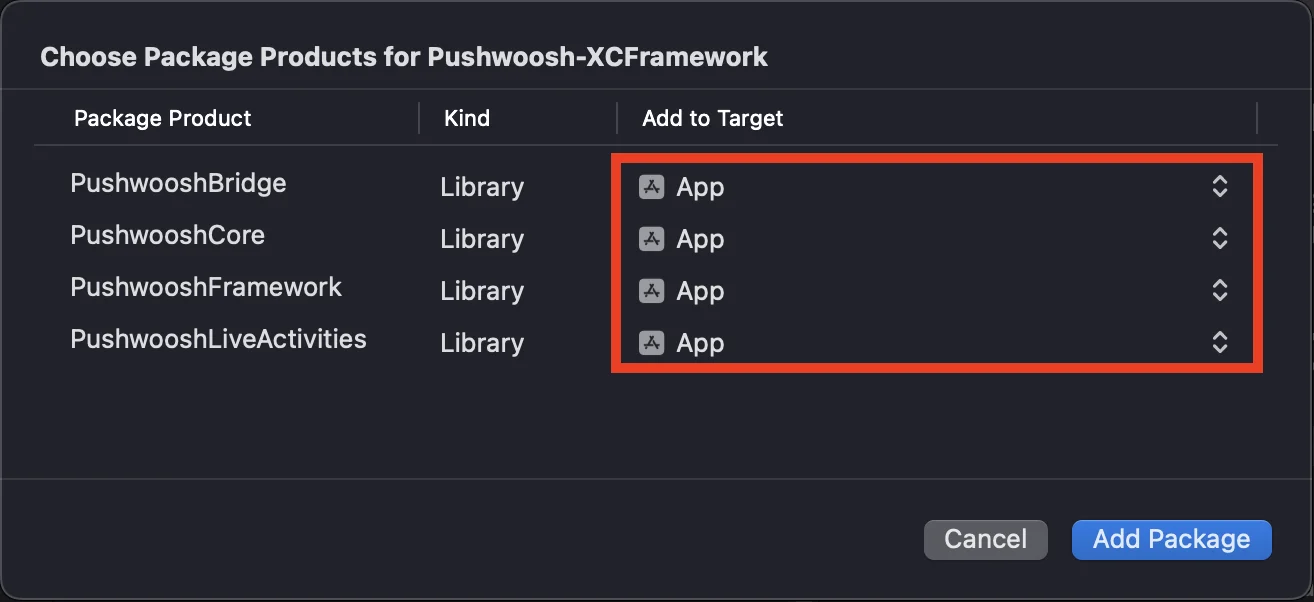
**Package Dependencies** 섹션에서 다음 패키지를 추가하세요:
```
https://github.com/Pushwoosh/Pushwoosh-XCFramework
```
Pushwoosh iOS SDK를 사용하려면 Swift Package Manager를 통해 통합할 때 다음 세 가지 프레임워크를 앱 타겟에 추가해야 합니다:
* ```PushwooshFramework```
* ```PushwooshCore```
* ```PushwooshBridge```
 #### CocoaPods
`Podfile`을 열고 종속성을 추가하세요:
```bash
# Uncomment the next line to define a global platform for your project
# platform :ios, '9.0'
target 'MyApp' do
# Comment the next line if you don't want to use dynamic frameworks
use_frameworks!
pod 'PushwooshXCFramework'
end
```
그런 다음 터미널에서 다음 명령을 실행하여 종속성을 설치하세요:
```bash
pod install
```
### 2. 기능
프로젝트에서 푸시 알림을 활성화하려면 특정 기능을 추가해야 합니다.
Signing & Capabilities 섹션에서 다음 기능을 추가하세요:
- `Push Notifications`
- `Background Modes`. 이 기능을 추가한 후 `Remote notifications` 확인란을 선택하세요.
Time Sensitive Notifications(iOS 15+)를 사용하려는 경우 `Time Sensitive Notifications` 기능도 추가하세요.
### 3. 초기화 코드
#### AppDelegate
AppDelegate 클래스에 다음 코드를 추가하세요:
```swift
import SwiftUI
import PushwooshFramework
@main
struct MyApp: App {
// AppDelegate를 UIApplicationDelegate로 등록
@UIApplicationDelegateAdaptor(AppDelegate.self) var appDelegate
var body: some Scene {
WindowGroup {
ContentView()
}
}
}
class AppDelegate: NSObject, UIApplicationDelegate, PWMessagingDelegate {
func application(_ application: UIApplication, didFinishLaunchingWithOptions launchOptions: [UIApplication.LaunchOptionsKey: Any]?) -> Bool {
// 초기화 코드
// 푸시 처리를 위한 사용자 정의 델리게이트 설정
Pushwoosh.configure.delegate = self
// 푸시 알림 등록
Pushwoosh.configure.registerForPushNotifications()
return true
}
// APNS에서 받은 토큰 처리
func application(_ application: UIApplication, didRegisterForRemoteNotificationsWithDeviceToken deviceToken: Data) {
Pushwoosh.configure.handlePushRegistration(deviceToken)
}
// 토큰 수신 오류 처리
func application(_ application: UIApplication, didFailToRegisterForRemoteNotificationsWithError error: Error) {
Pushwoosh.configure.handlePushRegistrationFailure(error)
}
// 자동 푸시 알림용
func application(_ application: UIApplication, didReceiveRemoteNotification userInfo: [AnyHashable: Any], fetchCompletionHandler completionHandler: @escaping (UIBackgroundFetchResult) -> Void) {
Pushwoosh.configure.handlePushReceived(userInfo)
completionHandler(.noData)
}
// 푸시가 수신될 때 실행됨
func pushwoosh(_ pushwoosh: Pushwoosh, onMessageReceived message: PWMessage) {
print("onMessageReceived: ", message.payload!.description)
}
// 사용자가 알림을 탭할 때 실행됨
func pushwoosh(_ pushwoosh: Pushwoosh, onMessageOpened message: PWMessage) {
print("onMessageOpened: ", message.payload!.description)
}
}
struct ContentView: View {
var body: some View {
Text("Pushwoosh with SwiftUI")
.padding()
}
}
```
```swift
import PushwooshFramework
@UIApplicationMain
class AppDelegate: UIResponder, UIApplicationDelegate, PWMessagingDelegate {
var window: UIWindow?
func application(_ application: UIApplication, didFinishLaunchingWithOptions launchOptions: [UIApplication.LaunchOptionsKey: Any]?) -> Bool {
//초기화 코드
//푸시 처리를 위한 사용자 정의 델리게이트 설정, 이 경우 AppDelegate
Pushwoosh.configure.delegate = self;
//푸시 알림 등록
Pushwoosh.configure.registerForPushNotifications()
return true
}
//APNS에서 받은 토큰 처리
func application(_ application: UIApplication, didRegisterForRemoteNotificationsWithDeviceToken deviceToken: Data) {
Pushwoosh.configure.handlePushRegistration(deviceToken)
}
//토큰 수신 오류 처리
func application(_ application: UIApplication, didFailToRegisterForRemoteNotificationsWithError error: Error) {
Pushwoosh.configure.handlePushRegistrationFailure(error);
}
//자동 푸시 알림용
func application(_ application: UIApplication, didReceiveRemoteNotification userInfo: [AnyHashable : Any], fetchCompletionHandler completionHandler: @escaping (UIBackgroundFetchResult) -> Void) {
Pushwoosh.configure.handlePushReceived(userInfo)
completionHandler(.noData)
}
//이 이벤트는 푸시가 수신될 때 실행됩니다
func pushwoosh(_ pushwoosh: Pushwoosh, onMessageReceived message: PWMessage) {
print("onMessageReceived: ", message.payload!.description)
}
// 사용자가 알림을 탭할 때 실행됨
func pushwoosh(_ pushwoosh: Pushwoosh, onMessageOpened message: PWMessage) {
print("onMessageOpened: ", message.payload!.description)
}
}
```
```objective-c
#import
@implementation AppDelegate
- (BOOL)application:(UIApplication *)application didFinishLaunchingWithOptions:(NSDictionary *)launchOptions {
//-----------PUSHWOOSH 부분-----------
// 푸시 처리를 위한 사용자 정의 델리게이트 설정, 이 경우 AppDelegate
[Pushwoosh configure].delegate = self;
//푸시 알림 등록!
[[Pushwoosh configure] registerForPushNotifications];
return YES;
}
//APNS에서 받은 토큰 처리
- (void)application:(UIApplication *)application
didRegisterForRemoteNotificationsWithDeviceToken:(NSData *)deviceToken {
[[Pushwoosh configure] handlePushRegistration:deviceToken];
}
//토큰 수신 오류 처리
- (void)application:(UIApplication *)application didFailToRegisterForRemoteNotificationsWithError:(NSError *)error {
[[Pushwoosh configure] handlePushRegistrationFailure:error];
}
//자동 푸시 알림용
- (void)application:(UIApplication *)application
didReceiveRemoteNotification:(NSDictionary *)userInfo
fetchCompletionHandler:(void (^)(UIBackgroundFetchResult))completionHandler {
[[Pushwoosh configure] handlePushReceived:userInfo];
completionHandler(UIBackgroundFetchResultNoData);
}
//이 이벤트는 푸시가 수신될 때 실행됩니다
- (void)pushwoosh:(Pushwoosh *)pushwoosh onMessageReceived:(PWMessage *)message {
NSLog(@"onMessageReceived: %@", message.payload);
}
//이 이벤트는 사용자가 알림을 탭할 때 실행됩니다
- (void)pushwoosh:(Pushwoosh *)pushwoosh onMessageOpened:(PWMessage *)message {
NSLog(@"onMessageOpened: %@", message.payload);
}
@end
```
#### Info.plist
`Info.plist`에서:
- `Pushwoosh_APPID` 키를 Pushwoosh Application Code로 설정합니다.
- `Pushwoosh_API_TOKEN` 키를 [Pushwoosh Device API Token](/ko/developer/api-reference/api-access-token/#device-api-token)으로 설정합니다.
### 4. 메시지 전송 추적
Pushwoosh는 Notification Service Extension을 통해 푸시 알림의 전송 이벤트를 추적하는 것을 지원합니다.
#### Notification Service Extension 추가
1. Xcode에서 **File** > **New** > **Target...**을 선택합니다.
2. **Notification Service Extension**을 선택하고 **Next**를 누릅니다.
3. 타겟 이름을 입력하고 **Finish**를 누릅니다.
4. 활성화하라는 메시지가 나타나면 **Cancel**을 누릅니다.
#### Notification Service Extension의 종속성 (CocoaPods만 해당)
참고: Swift Package Manager를 사용하여 종속성을 관리하는 경우, 종속성이 자동으로 추가되므로 이 단계를 건너뛸 수 있습니다.
`Podfile`을 열고 타겟에 대한 종속성을 추가하세요:
```ruby title="Podfile"
# Uncomment the next line to define a global platform for your project
# platform :ios, '9.0'
target 'MyApp' do
# Comment the next line if you don't want to use dynamic frameworks
use_frameworks!
pod 'PushwooshXCFramework'
end
target 'MyAppNotificationExtension' do
use_frameworks!
pod 'PushwooshXCFramework'
end
```
터미널에서 다음 명령을 실행하여 종속성을 업데이트하세요:
```shell
pod update
```
#### Notification Service Extension에 Pushwoosh SDK 추가
생성된 `NotificationService` 클래스를 `PushwooshNotificationServiceExtension`의 서브클래스로 교체하세요. 그러면 Pushwoosh가 전송 이벤트 전송, 배지 수 계산, 미디어 첨부 파일 다운로드, 필수적인 `serviceExtensionTimeWillExpire` 타임아웃 폴백 등 푸시에 필요한 모든 것을 처리합니다. 다른 코드는 필요하지 않습니다.
```swift
import PushwooshFramework
class NotificationService: PushwooshNotificationServiceExtension {}
```
```objective-c
#import
@interface NotificationService : PushwooshNotificationServiceExtension
@end
@implementation NotificationService
@end
```
참고: 소스 파일을 완전히 건너뛸 수 있습니다. 확장 프로그램의 Info.plist에서 `NSExtensionPrincipalClass`를 `PushwooshNotificationServiceExtension`으로 설정하고 코드를 전혀 작성하지 않아도 됩니다.
알림이 표시되기 전에 수정하려면 `didReceive(_:withContentHandler:)`를 재정의하고, 자체 콘텐츠 핸들러로 `super`를 호출하고, 그 안의 콘텐츠를 변경한 다음, 원래 핸들러로 전달하세요. Pushwoosh는 여전히 전송 이벤트, 배지, 첨부 파일 및 타임아웃 폴백을 실행합니다.
```swift
import UserNotifications
import PushwooshFramework
class NotificationService: PushwooshNotificationServiceExtension {
override func didReceive(_ request: UNNotificationRequest,
withContentHandler contentHandler: @escaping (UNNotificationContent) -> Void) {
super.didReceive(request) { content in
let mutable = (content.mutableCopy() as? UNMutableNotificationContent) ?? content
// 여기에서 알림 내용을 수정하세요...
contentHandler(mutable)
}
}
}
```
```objective-c
#import
@interface NotificationService : PushwooshNotificationServiceExtension
@end
@implementation NotificationService
- (void)didReceiveNotificationRequest:(UNNotificationRequest *)request
withContentHandler:(void (^)(UNNotificationContent * _Nonnull))contentHandler {
[super didReceiveNotificationRequest:request withContentHandler:^(UNNotificationContent *content) {
UNMutableNotificationContent *mutable = [content mutableCopy];
// 여기에서 알림 내용을 수정하세요...
contentHandler(mutable);
}];
}
@end
```
#### Info.plist
확장 프로그램은 호스트 앱에서 `Pushwoosh_APPID` (및 기타 `Pushwoosh_*` 키)를 상속하므로 확장 프로그램의 Info.plist에 이를 복제할 필요가 없습니다. 호스트 값을 재정의하려는 경우에만 키를 추가하세요.
배지 수와 리버스 프록시 설정을 앱과 동기화하려면 앱과 확장 프로그램 간에 [App Group](/ko/developer/pushwoosh-sdk/ios-sdk/setting-up-badges)을 공유하세요. 두 타겟에 App Groups 기능을 추가한 다음, **메인 앱의** Info.plist에서 App Group ID를 설정하세요:
- `PW_APP_GROUPS_NAME` - App Group 식별자 (예: `group.com.example.app`).
확장 프로그램은 호스트 앱에서 이 값을 상속하므로 확장 프로그램의 Info.plist에서 반복할 필요가 없습니다. 호스트를 재정의하려는 경우에만 추가하세요. 또는 `pushwooshAppGroupsName`을 재정의하여 코드에서 제공할 수도 있습니다.
### 5. 프로젝트 실행
1. 프로젝트를 빌드하고 실행합니다.
2. Pushwoosh Control Panel로 이동하여 [푸시 알림을 보냅니다](/ko/product/messaging-channels/push-notifications/send-push-notifications/one-time-push).
3. 앱에서 알림을 볼 수 있어야 합니다.
## 확장된 Pushwoosh iOS 통합
이 단계에서는 이미 SDK를 통합했으며 푸시 알림을 보내고 받을 수 있습니다. 이제 핵심 기능을 살펴보겠습니다.
### 푸시 알림
Pushwoosh SDK에는 푸시 알림 처리를 위해 설계된 두 가지 콜백이 있습니다:
- `onMessageReceived`: 이 메서드는 푸시 알림이 수신될 때 호출됩니다.
- `onMessageOpened`: 이 메서드는 사용자가 알림과 상호 작용(열기)할 때 호출됩니다.
이러한 콜백을 통해 개발자는 애플리케이션 내에서 푸시 알림의 수신 및 사용자 상호 작용을 관리할 수 있습니다.
```swift
import PushwooshFramework
class AppDelegate: NSObject, UIApplicationDelegate, PWMessagingDelegate {
func application(_ application: UIApplication, didFinishLaunchingWithOptions launchOptions: [UIApplication.LaunchOptionsKey : Any]? = nil) -> Bool {
Pushwoosh.configure.delegate = self;
}
func pushwoosh(_ pushwoosh: Pushwoosh, onMessageOpened message: PWMessage) {
if let payload = message.payload {
print("onMessageOpened: \(payload)")
}
}
func pushwoosh(_ pushwoosh: Pushwoosh, onMessageReceived message: PWMessage) {
if let payload = message.payload {
print("onMessageReceived: \(payload)")
}
}
}
```
```objective-c
#import
@interface AppDelegate ()
@end
@implementation AppDelegate
- (BOOL)application:(UIApplication *)application didFinishLaunchingWithOptions:(NSDictionary *)launchOptions {
[[Pushwoosh configure] setDelegate:self];
return YES;
}
- (void)pushwoosh:(Pushwoosh *)pushwoosh onMessageOpened:(PWMessage *)message {
if (message.payload) {
NSLog(@"onMessageOpened: %@", message.payload);
}
}
- (void)pushwoosh:(Pushwoosh *)pushwoosh onMessageReceived:(PWMessage *)message {
if (message.payload) {
NSLog(@"onMessageReceived: %@", message.payload);
}
}
@end
```
### 사용자 구성
개별 사용자 행동 및 선호도에 초점을 맞춤으로써 개인화된 콘텐츠를 제공하여 사용자 만족도와 충성도를 높일 수 있습니다.
```swift
import PushwooshFramework
class Registration {
func afterUserLogin(user: User) {
let pushwoosh = Pushwoosh.configure
// 사용자 ID 설정
if let userId = user.userId {
pushwoosh.setUserId(userId)
}
// 사용자 이메일 설정
if let userEmail = user.email {
pushwoosh.setEmail(userEmail)
}
// 사용자 SMS 번호 설정
if let userSmsNumber = user.SmsNumber {
pushwoosh.registerSmsNumber(userSmsNumber)
}
// 사용자 WhatsApp 번호 설정
if let userWhatsAppNumber = user.WhatsAppNumber {
pushwoosh.registerSmsNumber(userWhatsAppNumber)
}
// Pushwoosh에 대한 태그로 추가 사용자 정보 설정
if let age = user.userDetails.age,
let name = user.userDetails.userName,
let lastLogin = user.userDetails.lastLoginDate {
pushwoosh.setTags([
"age": age,
"name": name,
"last_login": lastLogin
])
}
}
}
```
```objective-c
#import
@implementation Registration
- (void)afterUserLogin:(User *)user {
Pushwoosh *pushwoosh = [Pushwoosh configure];
// 사용자 ID 설정
if (user.userId) {
[pushwoosh setUserId:user.userId];
}
// 사용자 이메일 설정
if (user.email) {
[pushwoosh setEmail:user.email];
}
// Pushwoosh에 대한 태그로 추가 사용자 정보 설정
if (user.userDetails.age && user.userDetails.userName && user.userDetails.lastLoginDate) {
NSDictionary *tags = @{
@"age": user.userDetails.age,
@"name": user.userDetails.userName,
@"last_login": user.userDetails.lastLoginDate
};
[pushwoosh setTags:tags];
}
}
@end
```
### 태그
태그는 사용자 또는 장치에 할당된 키-값 쌍으로, 선호도나 행동과 같은 속성을 기반으로 세분화하여 타겟 메시징을 가능하게 합니다.
```swift
import PushwooshFramework
class UpdateUser {
func afterUserUpdateProfile(user: User) {
let pushwoosh = Pushwoosh.configure
// 즐겨찾는 카테고리 목록 설정
pushwoosh.setTags(["favorite_categories" : user.getFavoriteCategories()])
// 결제 정보 설정
pushwoosh.setTags([
"is_subscribed": user.isSubscribed(),
"payment_status": user.getPaymentStatus(),
"billing_address": user.getBillingAddress()
])
}
}
```
```objective-c
#import
@implementation UpdateUser
- (void)afterUserUpdateProfile:(User *)user {
Pushwoosh *pushwoosh = [Pushwoosh configure];
// 즐겨찾는 카테고리 목록 설정
[pushwoosh setTags:@{@"favorite_categories" : user.getFavoriteCategories}];
// 결제 정보 설정
NSDictionary *tags = @{
@"is_subscribed": @(user.isSubscribed),
@"payment_status": user.getPaymentStatus,
@"billing_address": user.getBillingAddress
};
[pushwoosh setTags:tags];
}
@end
```
### 이벤트
이벤트는 앱 내에서 발생하는 특정 사용자 행동 또는 발생으로, 행동을 분석하고 해당 메시지나 작업을 트리거하기 위해 추적할 수 있습니다.
```swift
import PushwooshFramework
class Registration {
func afterUserLogin(user: User) {
if let userName = user.getUserName(), let lastLogin = user.getLastLoginDate() {
PWInAppManager.shared().postEvent("login", withAttributes: [
"name": userName,
"last_login": lastLogin
])
}
}
func afterUserPurchase(user: User, product: Product) {
let pushwoosh = Pushwoosh.configure
// 구매 이벤트 추적
PWInAppManager.shared().postEvent("purchase", withAttributes: [
"product_id": product.getId(),
"product_name": product.getName(),
"price": product.getPrice(),
"quantity": product.getQuantity()
])
// 사용자 태그 설정
let lastPurchaseDate = Date().timeIntervalSince1970
let lifetimeSpend = getCurrentLifetimeSpend() + product.getPrice()
pushwoosh.setTags([
"last_purchase_date": lastPurchaseDate,
"lifetime_spend": lifetimeSpend
])
}
}
```
```objective-c
#import
#import
@implementation Registration
- (void)afterUserLogin:(User *)user {
NSString *userName = [user getUserName];
NSDate *lastLogin = [user getLastLoginDate];
if (userName && lastLogin) {
[[PWInAppManager sharedManager] postEvent:@"login" withAttributes:@{
@"name": userName,
@"last_login": lastLogin
}];
}
}
- (void)afterUserPurchase:(User *)user product:(Product *)product {
Pushwoosh *pushwoosh = [Pushwoosh configure];
// 구매 이벤트 추적
[[PWInAppManager sharedManager] postEvent:@"purchase" withAttributes:@{
@"product_id": [product getId],
@"product_name": [product getName],
@"price": @([product getPrice]),
@"quantity": @([product getQuantity])
}];
// 사용자 태그 설정
NSTimeInterval lastPurchaseDate = [[NSDate date] timeIntervalSince1970];
double lifetimeSpend = /* 현재까지의 총 지출액 가져오기 */ + [product getPrice];
NSDictionary *tags = @{
@"last_purchase_date": @(lastPurchaseDate),
@"lifetime_spend": @(lifetimeSpend)
};
[pushwoosh setTags:tags];
}
@end
```
### 리치 미디어
리치 미디어는 사용자 참여를 향상시키기 위해 알림 및 인앱 메시지에 사용되는 이미지, 비디오 또는 HTML과 같은 대화형 멀티미디어 콘텐츠를 의미합니다.
```swift
import PushwooshFramework
class ViewController: UIViewController, PWRichMediaPresentingDelegate {
override func viewDidLoad() {
super.viewDidLoad()
let richMediaConfiguration = PWModalWindowConfiguration.shared()
PWRichMediaManager.shared().delegate = self
richMediaConfiguration.configureModalWindow(with: .PWModalWindowPositionBottom,
present: .PWAnimationPresentFromBottom,
dismiss: .PWAnimationDismissDown)
}
func richMediaManager(_ richMediaManager: PWRichMediaManager!, shouldPresent richMedia: PWRichMedia!) -> Bool {
print("Rich media will be presented with: \(richMedia.pushPayload!)")
return true
}
func richMediaManager(_ richMediaManager: PWRichMediaManager!, didPresent richMedia: PWRichMedia!) {
print("Rich media has been presented with: \(richMedia.pushPayload!)")
}
func richMediaManager(_ richMediaManager: PWRichMediaManager!, didClose richMedia: PWRichMedia!) {
print("Rich media has been closed with: \(richMedia.pushPayload!)")
}
func richMediaManager(_ richMediaManager: PWRichMediaManager!, presentingDidFailFor richMedia: PWRichMedia!, withError error: (any Error)!) {
print("Failed to present rich media with: \(richMedia.pushPayload!). Error: \(error.localizedDescription)")
}
}
```
```objective-c
#import "ViewController.h"
#import
#import
#import
@interface ViewController ()
@end
@implementation ViewController
- (void)viewDidLoad {
[super viewDidLoad];
[[PWRichMediaManager sharedManager] setDelegate:self];
[[PWModalWindowConfiguration shared] configureModalWindowWith:PWModalWindowPositionBottom
presentAnimation:PWAnimationPresentFromBottom
dismissAnimation:PWAnimationDismissDown];
}
- (BOOL)richMediaManager:(PWRichMediaManager *)richMediaManager shouldPresentRichMedia:(PWRichMedia *)richMedia {
NSLog(@"Rich media will be presented with: %@", richMedia.pushPayload);
return YES;
}
- (void)richMediaManager:(PWRichMediaManager *)richMediaManager didPresentRichMedia:(PWRichMedia *)richMedia {
NSLog(@"Rich media has been presented with: %@", richMedia.pushPayload);
}
- (void)richMediaManager:(PWRichMediaManager *)richMediaManager didCloseRichMedia:(PWRichMedia *)richMedia {
NSLog(@"Rich media has been closed with:: %@", richMedia.pushPayload);
}
- (void)richMediaManager:(PWRichMediaManager *)richMediaManager presentingDidFailForRichMedia:(PWRichMedia *)richMedia withError:(NSError *)error {
NSLog(@"Failed to present rich media with: %@. Error: %@", richMedia.pushPayload, error.localizedDescription);
}
@end
```
## 문제 해결
### 'PushwooshFramework' 모듈 빌드 실패
프로젝트를 빌드할 때 다음과 유사한 오류가 발생할 수 있습니다:
```
Failed to build module 'PushwooshFramework'; this SDK is not supported by the compiler
(the SDK is built with 'Apple Swift version 5.10 (swiftlang-5.10.0.13 clang-1500.3.9.4)',
while this compiler is 'Apple Swift version 6.1.2 effective-5.10 (swiftlang-6.1.2.1.2 clang-1700.0.13.5)')
```
**원인:** 이 오류는 Swift 컴파일러 버전 비호환성과 관련이 없습니다. Pushwoosh iOS SDK 버전 6.8.0부터 SDK는 서로 상호 작용하는 여러 구성 요소로 모듈화되었습니다. 이 오류는 필요한 모든 프레임워크가 프로젝트에 추가되지 않았을 때 발생합니다.
**해결책:** Swift Package Manager를 통해 통합할 때 필요한 네 가지 프레임워크가 모두 앱 타겟에 추가되었는지 확인하세요:
* ```PushwooshFramework```
* ```PushwooshCore```
* ```PushwooshBridge```
* ```PushwooshLiveActivities```
Xcode에서 이를 확인하려면:
1. Project Navigator에서 프로젝트를 선택합니다.
2. 앱 타겟을 선택합니다.
3. **General** > **Frameworks, Libraries, and Embedded Content**로 이동합니다.
4. 네 가지 프레임워크가 모두 나열되어 있는지 확인합니다.
---
통합 과정에서 문제가 발생하면 [지원 및 커뮤니티](/ko/developer/pushwoosh-sdk/support-and-community) 섹션을 참조하세요.
#### CocoaPods
`Podfile`을 열고 종속성을 추가하세요:
```bash
# Uncomment the next line to define a global platform for your project
# platform :ios, '9.0'
target 'MyApp' do
# Comment the next line if you don't want to use dynamic frameworks
use_frameworks!
pod 'PushwooshXCFramework'
end
```
그런 다음 터미널에서 다음 명령을 실행하여 종속성을 설치하세요:
```bash
pod install
```
### 2. 기능
프로젝트에서 푸시 알림을 활성화하려면 특정 기능을 추가해야 합니다.
Signing & Capabilities 섹션에서 다음 기능을 추가하세요:
- `Push Notifications`
- `Background Modes`. 이 기능을 추가한 후 `Remote notifications` 확인란을 선택하세요.
Time Sensitive Notifications(iOS 15+)를 사용하려는 경우 `Time Sensitive Notifications` 기능도 추가하세요.
### 3. 초기화 코드
#### AppDelegate
AppDelegate 클래스에 다음 코드를 추가하세요:
```swift
import SwiftUI
import PushwooshFramework
@main
struct MyApp: App {
// AppDelegate를 UIApplicationDelegate로 등록
@UIApplicationDelegateAdaptor(AppDelegate.self) var appDelegate
var body: some Scene {
WindowGroup {
ContentView()
}
}
}
class AppDelegate: NSObject, UIApplicationDelegate, PWMessagingDelegate {
func application(_ application: UIApplication, didFinishLaunchingWithOptions launchOptions: [UIApplication.LaunchOptionsKey: Any]?) -> Bool {
// 초기화 코드
// 푸시 처리를 위한 사용자 정의 델리게이트 설정
Pushwoosh.configure.delegate = self
// 푸시 알림 등록
Pushwoosh.configure.registerForPushNotifications()
return true
}
// APNS에서 받은 토큰 처리
func application(_ application: UIApplication, didRegisterForRemoteNotificationsWithDeviceToken deviceToken: Data) {
Pushwoosh.configure.handlePushRegistration(deviceToken)
}
// 토큰 수신 오류 처리
func application(_ application: UIApplication, didFailToRegisterForRemoteNotificationsWithError error: Error) {
Pushwoosh.configure.handlePushRegistrationFailure(error)
}
// 자동 푸시 알림용
func application(_ application: UIApplication, didReceiveRemoteNotification userInfo: [AnyHashable: Any], fetchCompletionHandler completionHandler: @escaping (UIBackgroundFetchResult) -> Void) {
Pushwoosh.configure.handlePushReceived(userInfo)
completionHandler(.noData)
}
// 푸시가 수신될 때 실행됨
func pushwoosh(_ pushwoosh: Pushwoosh, onMessageReceived message: PWMessage) {
print("onMessageReceived: ", message.payload!.description)
}
// 사용자가 알림을 탭할 때 실행됨
func pushwoosh(_ pushwoosh: Pushwoosh, onMessageOpened message: PWMessage) {
print("onMessageOpened: ", message.payload!.description)
}
}
struct ContentView: View {
var body: some View {
Text("Pushwoosh with SwiftUI")
.padding()
}
}
```
```swift
import PushwooshFramework
@UIApplicationMain
class AppDelegate: UIResponder, UIApplicationDelegate, PWMessagingDelegate {
var window: UIWindow?
func application(_ application: UIApplication, didFinishLaunchingWithOptions launchOptions: [UIApplication.LaunchOptionsKey: Any]?) -> Bool {
//초기화 코드
//푸시 처리를 위한 사용자 정의 델리게이트 설정, 이 경우 AppDelegate
Pushwoosh.configure.delegate = self;
//푸시 알림 등록
Pushwoosh.configure.registerForPushNotifications()
return true
}
//APNS에서 받은 토큰 처리
func application(_ application: UIApplication, didRegisterForRemoteNotificationsWithDeviceToken deviceToken: Data) {
Pushwoosh.configure.handlePushRegistration(deviceToken)
}
//토큰 수신 오류 처리
func application(_ application: UIApplication, didFailToRegisterForRemoteNotificationsWithError error: Error) {
Pushwoosh.configure.handlePushRegistrationFailure(error);
}
//자동 푸시 알림용
func application(_ application: UIApplication, didReceiveRemoteNotification userInfo: [AnyHashable : Any], fetchCompletionHandler completionHandler: @escaping (UIBackgroundFetchResult) -> Void) {
Pushwoosh.configure.handlePushReceived(userInfo)
completionHandler(.noData)
}
//이 이벤트는 푸시가 수신될 때 실행됩니다
func pushwoosh(_ pushwoosh: Pushwoosh, onMessageReceived message: PWMessage) {
print("onMessageReceived: ", message.payload!.description)
}
// 사용자가 알림을 탭할 때 실행됨
func pushwoosh(_ pushwoosh: Pushwoosh, onMessageOpened message: PWMessage) {
print("onMessageOpened: ", message.payload!.description)
}
}
```
```objective-c
#import
@implementation AppDelegate
- (BOOL)application:(UIApplication *)application didFinishLaunchingWithOptions:(NSDictionary *)launchOptions {
//-----------PUSHWOOSH 부분-----------
// 푸시 처리를 위한 사용자 정의 델리게이트 설정, 이 경우 AppDelegate
[Pushwoosh configure].delegate = self;
//푸시 알림 등록!
[[Pushwoosh configure] registerForPushNotifications];
return YES;
}
//APNS에서 받은 토큰 처리
- (void)application:(UIApplication *)application
didRegisterForRemoteNotificationsWithDeviceToken:(NSData *)deviceToken {
[[Pushwoosh configure] handlePushRegistration:deviceToken];
}
//토큰 수신 오류 처리
- (void)application:(UIApplication *)application didFailToRegisterForRemoteNotificationsWithError:(NSError *)error {
[[Pushwoosh configure] handlePushRegistrationFailure:error];
}
//자동 푸시 알림용
- (void)application:(UIApplication *)application
didReceiveRemoteNotification:(NSDictionary *)userInfo
fetchCompletionHandler:(void (^)(UIBackgroundFetchResult))completionHandler {
[[Pushwoosh configure] handlePushReceived:userInfo];
completionHandler(UIBackgroundFetchResultNoData);
}
//이 이벤트는 푸시가 수신될 때 실행됩니다
- (void)pushwoosh:(Pushwoosh *)pushwoosh onMessageReceived:(PWMessage *)message {
NSLog(@"onMessageReceived: %@", message.payload);
}
//이 이벤트는 사용자가 알림을 탭할 때 실행됩니다
- (void)pushwoosh:(Pushwoosh *)pushwoosh onMessageOpened:(PWMessage *)message {
NSLog(@"onMessageOpened: %@", message.payload);
}
@end
```
#### Info.plist
`Info.plist`에서:
- `Pushwoosh_APPID` 키를 Pushwoosh Application Code로 설정합니다.
- `Pushwoosh_API_TOKEN` 키를 [Pushwoosh Device API Token](/ko/developer/api-reference/api-access-token/#device-api-token)으로 설정합니다.
### 4. 메시지 전송 추적
Pushwoosh는 Notification Service Extension을 통해 푸시 알림의 전송 이벤트를 추적하는 것을 지원합니다.
#### Notification Service Extension 추가
1. Xcode에서 **File** > **New** > **Target...**을 선택합니다.
2. **Notification Service Extension**을 선택하고 **Next**를 누릅니다.
3. 타겟 이름을 입력하고 **Finish**를 누릅니다.
4. 활성화하라는 메시지가 나타나면 **Cancel**을 누릅니다.
#### Notification Service Extension의 종속성 (CocoaPods만 해당)
참고: Swift Package Manager를 사용하여 종속성을 관리하는 경우, 종속성이 자동으로 추가되므로 이 단계를 건너뛸 수 있습니다.
`Podfile`을 열고 타겟에 대한 종속성을 추가하세요:
```ruby title="Podfile"
# Uncomment the next line to define a global platform for your project
# platform :ios, '9.0'
target 'MyApp' do
# Comment the next line if you don't want to use dynamic frameworks
use_frameworks!
pod 'PushwooshXCFramework'
end
target 'MyAppNotificationExtension' do
use_frameworks!
pod 'PushwooshXCFramework'
end
```
터미널에서 다음 명령을 실행하여 종속성을 업데이트하세요:
```shell
pod update
```
#### Notification Service Extension에 Pushwoosh SDK 추가
생성된 `NotificationService` 클래스를 `PushwooshNotificationServiceExtension`의 서브클래스로 교체하세요. 그러면 Pushwoosh가 전송 이벤트 전송, 배지 수 계산, 미디어 첨부 파일 다운로드, 필수적인 `serviceExtensionTimeWillExpire` 타임아웃 폴백 등 푸시에 필요한 모든 것을 처리합니다. 다른 코드는 필요하지 않습니다.
```swift
import PushwooshFramework
class NotificationService: PushwooshNotificationServiceExtension {}
```
```objective-c
#import
@interface NotificationService : PushwooshNotificationServiceExtension
@end
@implementation NotificationService
@end
```
참고: 소스 파일을 완전히 건너뛸 수 있습니다. 확장 프로그램의 Info.plist에서 `NSExtensionPrincipalClass`를 `PushwooshNotificationServiceExtension`으로 설정하고 코드를 전혀 작성하지 않아도 됩니다.
알림이 표시되기 전에 수정하려면 `didReceive(_:withContentHandler:)`를 재정의하고, 자체 콘텐츠 핸들러로 `super`를 호출하고, 그 안의 콘텐츠를 변경한 다음, 원래 핸들러로 전달하세요. Pushwoosh는 여전히 전송 이벤트, 배지, 첨부 파일 및 타임아웃 폴백을 실행합니다.
```swift
import UserNotifications
import PushwooshFramework
class NotificationService: PushwooshNotificationServiceExtension {
override func didReceive(_ request: UNNotificationRequest,
withContentHandler contentHandler: @escaping (UNNotificationContent) -> Void) {
super.didReceive(request) { content in
let mutable = (content.mutableCopy() as? UNMutableNotificationContent) ?? content
// 여기에서 알림 내용을 수정하세요...
contentHandler(mutable)
}
}
}
```
```objective-c
#import
@interface NotificationService : PushwooshNotificationServiceExtension
@end
@implementation NotificationService
- (void)didReceiveNotificationRequest:(UNNotificationRequest *)request
withContentHandler:(void (^)(UNNotificationContent * _Nonnull))contentHandler {
[super didReceiveNotificationRequest:request withContentHandler:^(UNNotificationContent *content) {
UNMutableNotificationContent *mutable = [content mutableCopy];
// 여기에서 알림 내용을 수정하세요...
contentHandler(mutable);
}];
}
@end
```
#### Info.plist
확장 프로그램은 호스트 앱에서 `Pushwoosh_APPID` (및 기타 `Pushwoosh_*` 키)를 상속하므로 확장 프로그램의 Info.plist에 이를 복제할 필요가 없습니다. 호스트 값을 재정의하려는 경우에만 키를 추가하세요.
배지 수와 리버스 프록시 설정을 앱과 동기화하려면 앱과 확장 프로그램 간에 [App Group](/ko/developer/pushwoosh-sdk/ios-sdk/setting-up-badges)을 공유하세요. 두 타겟에 App Groups 기능을 추가한 다음, **메인 앱의** Info.plist에서 App Group ID를 설정하세요:
- `PW_APP_GROUPS_NAME` - App Group 식별자 (예: `group.com.example.app`).
확장 프로그램은 호스트 앱에서 이 값을 상속하므로 확장 프로그램의 Info.plist에서 반복할 필요가 없습니다. 호스트를 재정의하려는 경우에만 추가하세요. 또는 `pushwooshAppGroupsName`을 재정의하여 코드에서 제공할 수도 있습니다.
### 5. 프로젝트 실행
1. 프로젝트를 빌드하고 실행합니다.
2. Pushwoosh Control Panel로 이동하여 [푸시 알림을 보냅니다](/ko/product/messaging-channels/push-notifications/send-push-notifications/one-time-push).
3. 앱에서 알림을 볼 수 있어야 합니다.
## 확장된 Pushwoosh iOS 통합
이 단계에서는 이미 SDK를 통합했으며 푸시 알림을 보내고 받을 수 있습니다. 이제 핵심 기능을 살펴보겠습니다.
### 푸시 알림
Pushwoosh SDK에는 푸시 알림 처리를 위해 설계된 두 가지 콜백이 있습니다:
- `onMessageReceived`: 이 메서드는 푸시 알림이 수신될 때 호출됩니다.
- `onMessageOpened`: 이 메서드는 사용자가 알림과 상호 작용(열기)할 때 호출됩니다.
이러한 콜백을 통해 개발자는 애플리케이션 내에서 푸시 알림의 수신 및 사용자 상호 작용을 관리할 수 있습니다.
```swift
import PushwooshFramework
class AppDelegate: NSObject, UIApplicationDelegate, PWMessagingDelegate {
func application(_ application: UIApplication, didFinishLaunchingWithOptions launchOptions: [UIApplication.LaunchOptionsKey : Any]? = nil) -> Bool {
Pushwoosh.configure.delegate = self;
}
func pushwoosh(_ pushwoosh: Pushwoosh, onMessageOpened message: PWMessage) {
if let payload = message.payload {
print("onMessageOpened: \(payload)")
}
}
func pushwoosh(_ pushwoosh: Pushwoosh, onMessageReceived message: PWMessage) {
if let payload = message.payload {
print("onMessageReceived: \(payload)")
}
}
}
```
```objective-c
#import
@interface AppDelegate ()
@end
@implementation AppDelegate
- (BOOL)application:(UIApplication *)application didFinishLaunchingWithOptions:(NSDictionary *)launchOptions {
[[Pushwoosh configure] setDelegate:self];
return YES;
}
- (void)pushwoosh:(Pushwoosh *)pushwoosh onMessageOpened:(PWMessage *)message {
if (message.payload) {
NSLog(@"onMessageOpened: %@", message.payload);
}
}
- (void)pushwoosh:(Pushwoosh *)pushwoosh onMessageReceived:(PWMessage *)message {
if (message.payload) {
NSLog(@"onMessageReceived: %@", message.payload);
}
}
@end
```
### 사용자 구성
개별 사용자 행동 및 선호도에 초점을 맞춤으로써 개인화된 콘텐츠를 제공하여 사용자 만족도와 충성도를 높일 수 있습니다.
```swift
import PushwooshFramework
class Registration {
func afterUserLogin(user: User) {
let pushwoosh = Pushwoosh.configure
// 사용자 ID 설정
if let userId = user.userId {
pushwoosh.setUserId(userId)
}
// 사용자 이메일 설정
if let userEmail = user.email {
pushwoosh.setEmail(userEmail)
}
// 사용자 SMS 번호 설정
if let userSmsNumber = user.SmsNumber {
pushwoosh.registerSmsNumber(userSmsNumber)
}
// 사용자 WhatsApp 번호 설정
if let userWhatsAppNumber = user.WhatsAppNumber {
pushwoosh.registerSmsNumber(userWhatsAppNumber)
}
// Pushwoosh에 대한 태그로 추가 사용자 정보 설정
if let age = user.userDetails.age,
let name = user.userDetails.userName,
let lastLogin = user.userDetails.lastLoginDate {
pushwoosh.setTags([
"age": age,
"name": name,
"last_login": lastLogin
])
}
}
}
```
```objective-c
#import
@implementation Registration
- (void)afterUserLogin:(User *)user {
Pushwoosh *pushwoosh = [Pushwoosh configure];
// 사용자 ID 설정
if (user.userId) {
[pushwoosh setUserId:user.userId];
}
// 사용자 이메일 설정
if (user.email) {
[pushwoosh setEmail:user.email];
}
// Pushwoosh에 대한 태그로 추가 사용자 정보 설정
if (user.userDetails.age && user.userDetails.userName && user.userDetails.lastLoginDate) {
NSDictionary *tags = @{
@"age": user.userDetails.age,
@"name": user.userDetails.userName,
@"last_login": user.userDetails.lastLoginDate
};
[pushwoosh setTags:tags];
}
}
@end
```
### 태그
태그는 사용자 또는 장치에 할당된 키-값 쌍으로, 선호도나 행동과 같은 속성을 기반으로 세분화하여 타겟 메시징을 가능하게 합니다.
```swift
import PushwooshFramework
class UpdateUser {
func afterUserUpdateProfile(user: User) {
let pushwoosh = Pushwoosh.configure
// 즐겨찾는 카테고리 목록 설정
pushwoosh.setTags(["favorite_categories" : user.getFavoriteCategories()])
// 결제 정보 설정
pushwoosh.setTags([
"is_subscribed": user.isSubscribed(),
"payment_status": user.getPaymentStatus(),
"billing_address": user.getBillingAddress()
])
}
}
```
```objective-c
#import
@implementation UpdateUser
- (void)afterUserUpdateProfile:(User *)user {
Pushwoosh *pushwoosh = [Pushwoosh configure];
// 즐겨찾는 카테고리 목록 설정
[pushwoosh setTags:@{@"favorite_categories" : user.getFavoriteCategories}];
// 결제 정보 설정
NSDictionary *tags = @{
@"is_subscribed": @(user.isSubscribed),
@"payment_status": user.getPaymentStatus,
@"billing_address": user.getBillingAddress
};
[pushwoosh setTags:tags];
}
@end
```
### 이벤트
이벤트는 앱 내에서 발생하는 특정 사용자 행동 또는 발생으로, 행동을 분석하고 해당 메시지나 작업을 트리거하기 위해 추적할 수 있습니다.
```swift
import PushwooshFramework
class Registration {
func afterUserLogin(user: User) {
if let userName = user.getUserName(), let lastLogin = user.getLastLoginDate() {
PWInAppManager.shared().postEvent("login", withAttributes: [
"name": userName,
"last_login": lastLogin
])
}
}
func afterUserPurchase(user: User, product: Product) {
let pushwoosh = Pushwoosh.configure
// 구매 이벤트 추적
PWInAppManager.shared().postEvent("purchase", withAttributes: [
"product_id": product.getId(),
"product_name": product.getName(),
"price": product.getPrice(),
"quantity": product.getQuantity()
])
// 사용자 태그 설정
let lastPurchaseDate = Date().timeIntervalSince1970
let lifetimeSpend = getCurrentLifetimeSpend() + product.getPrice()
pushwoosh.setTags([
"last_purchase_date": lastPurchaseDate,
"lifetime_spend": lifetimeSpend
])
}
}
```
```objective-c
#import
#import
@implementation Registration
- (void)afterUserLogin:(User *)user {
NSString *userName = [user getUserName];
NSDate *lastLogin = [user getLastLoginDate];
if (userName && lastLogin) {
[[PWInAppManager sharedManager] postEvent:@"login" withAttributes:@{
@"name": userName,
@"last_login": lastLogin
}];
}
}
- (void)afterUserPurchase:(User *)user product:(Product *)product {
Pushwoosh *pushwoosh = [Pushwoosh configure];
// 구매 이벤트 추적
[[PWInAppManager sharedManager] postEvent:@"purchase" withAttributes:@{
@"product_id": [product getId],
@"product_name": [product getName],
@"price": @([product getPrice]),
@"quantity": @([product getQuantity])
}];
// 사용자 태그 설정
NSTimeInterval lastPurchaseDate = [[NSDate date] timeIntervalSince1970];
double lifetimeSpend = /* 현재까지의 총 지출액 가져오기 */ + [product getPrice];
NSDictionary *tags = @{
@"last_purchase_date": @(lastPurchaseDate),
@"lifetime_spend": @(lifetimeSpend)
};
[pushwoosh setTags:tags];
}
@end
```
### 리치 미디어
리치 미디어는 사용자 참여를 향상시키기 위해 알림 및 인앱 메시지에 사용되는 이미지, 비디오 또는 HTML과 같은 대화형 멀티미디어 콘텐츠를 의미합니다.
```swift
import PushwooshFramework
class ViewController: UIViewController, PWRichMediaPresentingDelegate {
override func viewDidLoad() {
super.viewDidLoad()
let richMediaConfiguration = PWModalWindowConfiguration.shared()
PWRichMediaManager.shared().delegate = self
richMediaConfiguration.configureModalWindow(with: .PWModalWindowPositionBottom,
present: .PWAnimationPresentFromBottom,
dismiss: .PWAnimationDismissDown)
}
func richMediaManager(_ richMediaManager: PWRichMediaManager!, shouldPresent richMedia: PWRichMedia!) -> Bool {
print("Rich media will be presented with: \(richMedia.pushPayload!)")
return true
}
func richMediaManager(_ richMediaManager: PWRichMediaManager!, didPresent richMedia: PWRichMedia!) {
print("Rich media has been presented with: \(richMedia.pushPayload!)")
}
func richMediaManager(_ richMediaManager: PWRichMediaManager!, didClose richMedia: PWRichMedia!) {
print("Rich media has been closed with: \(richMedia.pushPayload!)")
}
func richMediaManager(_ richMediaManager: PWRichMediaManager!, presentingDidFailFor richMedia: PWRichMedia!, withError error: (any Error)!) {
print("Failed to present rich media with: \(richMedia.pushPayload!). Error: \(error.localizedDescription)")
}
}
```
```objective-c
#import "ViewController.h"
#import
#import
#import
@interface ViewController ()
@end
@implementation ViewController
- (void)viewDidLoad {
[super viewDidLoad];
[[PWRichMediaManager sharedManager] setDelegate:self];
[[PWModalWindowConfiguration shared] configureModalWindowWith:PWModalWindowPositionBottom
presentAnimation:PWAnimationPresentFromBottom
dismissAnimation:PWAnimationDismissDown];
}
- (BOOL)richMediaManager:(PWRichMediaManager *)richMediaManager shouldPresentRichMedia:(PWRichMedia *)richMedia {
NSLog(@"Rich media will be presented with: %@", richMedia.pushPayload);
return YES;
}
- (void)richMediaManager:(PWRichMediaManager *)richMediaManager didPresentRichMedia:(PWRichMedia *)richMedia {
NSLog(@"Rich media has been presented with: %@", richMedia.pushPayload);
}
- (void)richMediaManager:(PWRichMediaManager *)richMediaManager didCloseRichMedia:(PWRichMedia *)richMedia {
NSLog(@"Rich media has been closed with:: %@", richMedia.pushPayload);
}
- (void)richMediaManager:(PWRichMediaManager *)richMediaManager presentingDidFailForRichMedia:(PWRichMedia *)richMedia withError:(NSError *)error {
NSLog(@"Failed to present rich media with: %@. Error: %@", richMedia.pushPayload, error.localizedDescription);
}
@end
```
## 문제 해결
### 'PushwooshFramework' 모듈 빌드 실패
프로젝트를 빌드할 때 다음과 유사한 오류가 발생할 수 있습니다:
```
Failed to build module 'PushwooshFramework'; this SDK is not supported by the compiler
(the SDK is built with 'Apple Swift version 5.10 (swiftlang-5.10.0.13 clang-1500.3.9.4)',
while this compiler is 'Apple Swift version 6.1.2 effective-5.10 (swiftlang-6.1.2.1.2 clang-1700.0.13.5)')
```
**원인:** 이 오류는 Swift 컴파일러 버전 비호환성과 관련이 없습니다. Pushwoosh iOS SDK 버전 6.8.0부터 SDK는 서로 상호 작용하는 여러 구성 요소로 모듈화되었습니다. 이 오류는 필요한 모든 프레임워크가 프로젝트에 추가되지 않았을 때 발생합니다.
**해결책:** Swift Package Manager를 통해 통합할 때 필요한 네 가지 프레임워크가 모두 앱 타겟에 추가되었는지 확인하세요:
* ```PushwooshFramework```
* ```PushwooshCore```
* ```PushwooshBridge```
* ```PushwooshLiveActivities```
Xcode에서 이를 확인하려면:
1. Project Navigator에서 프로젝트를 선택합니다.
2. 앱 타겟을 선택합니다.
3. **General** > **Frameworks, Libraries, and Embedded Content**로 이동합니다.
4. 네 가지 프레임워크가 모두 나열되어 있는지 확인합니다.
---
통합 과정에서 문제가 발생하면 [지원 및 커뮤니티](/ko/developer/pushwoosh-sdk/support-and-community) 섹션을 참조하세요.