# iOS 리치 알림 연동
iOS 10부터 푸시 알림에 정적 또는 애니메이션 이미지, 동영상까지 첨부할 수 있습니다. 사용자가 알림을 세게 탭하면 알림에 바로 표시됩니다.
이 기능은 코딩이 거의 필요 없이 매우 간단하게 활성화할 수 있습니다. 함께 해보겠습니다!
## 1. Notification Service Extension 생성하기
먼저 [Notification Service Extension](https://developer.apple.com/reference/usernotifications/unnotificationserviceextension)을 생성합니다. 이 extension은 사용자에게 표시될 콘텐츠를 다운로드합니다.
프로젝트에 새 타겟을 추가(File -> New -> Target)하고 _Notification Service Extension_을 생성합니다.
## 2. Notification Service Extension 코드
이 코드는 첨부 파일을 다운로드하고 알림 콘텐츠 핸들러를 호출합니다.
extension에 그대로 복사하여 붙여넣기만 하면 됩니다.
```swift
import UserNotifications
import PushwooshFramework
class NotificationService: UNNotificationServiceExtension {
var contentHandler: ((UNNotificationContent) -> Void)?
var bestAttemptContent: UNMutableNotificationContent?
override func didReceive(_ request: UNNotificationRequest, withContentHandler contentHandler: @escaping (UNNotificationContent) -> Void) {
PWNotificationExtensionManager.shared().handle(request, contentHandler: contentHandler)
}
}
```
```objective-c
#import "PWNotificationExtensionManager.h"
@interface NotificationService : UNNotificationServiceExtension
@end
@implementation NotificationService
- (void)didReceiveNotificationRequest:(UNNotificationRequest *)request withContentHandler:(void (^)(UNNotificationContent * _Nonnull))contentHandler {
[[PWNotificationExtensionManager sharedManager] handleNotificationRequest:request contentHandler:contentHandler];
}
@end
```
## 3. 안전하지 않은 첨부 파일 URL 허용하기
Notification Service Extension은 별도의 바이너리이며 **자체 Info.plist** 파일이 있습니다.
**extension의 Info.plist** 파일에 **App Transport Security Settings**를 추가하고 **Allow Arbitrary Loads** 플래그를 `true`로 설정합니다.
**Info.plist**:
```xml
NSAppTransportSecurityNSAllowsArbitraryLoads
```
## 4. 리치 알림 보내기
리치 알림을 보내려면 **BANNER URL** 필드에 파일의 URL을 지정하기만 하면 됩니다.
Woosh! 알림을 세게 탭하면 모든 과정이 완료됩니다!
## 피드백을 공유해주세요
여러분의 피드백은 더 나은 경험을 만드는 데 도움이 됩니다. SDK 연동 과정에서 문제가 발생하면 언제든지 알려주세요. 어려움이 있으시면 주저하지 마시고 [이 양식을 통해](https://docs.google.com/forms/d/e/1FAIpQLSd_0b8jwn-V_JmoPLIxIFYbHACCQhrzidOZV3ELywoQPXRSxw/viewform) 의견을 공유해주시기 바랍니다.
 ## 2. Notification Service Extension 코드
이 코드는 첨부 파일을 다운로드하고 알림 콘텐츠 핸들러를 호출합니다.
extension에 그대로 복사하여 붙여넣기만 하면 됩니다.
## 2. Notification Service Extension 코드
이 코드는 첨부 파일을 다운로드하고 알림 콘텐츠 핸들러를 호출합니다.
extension에 그대로 복사하여 붙여넣기만 하면 됩니다.
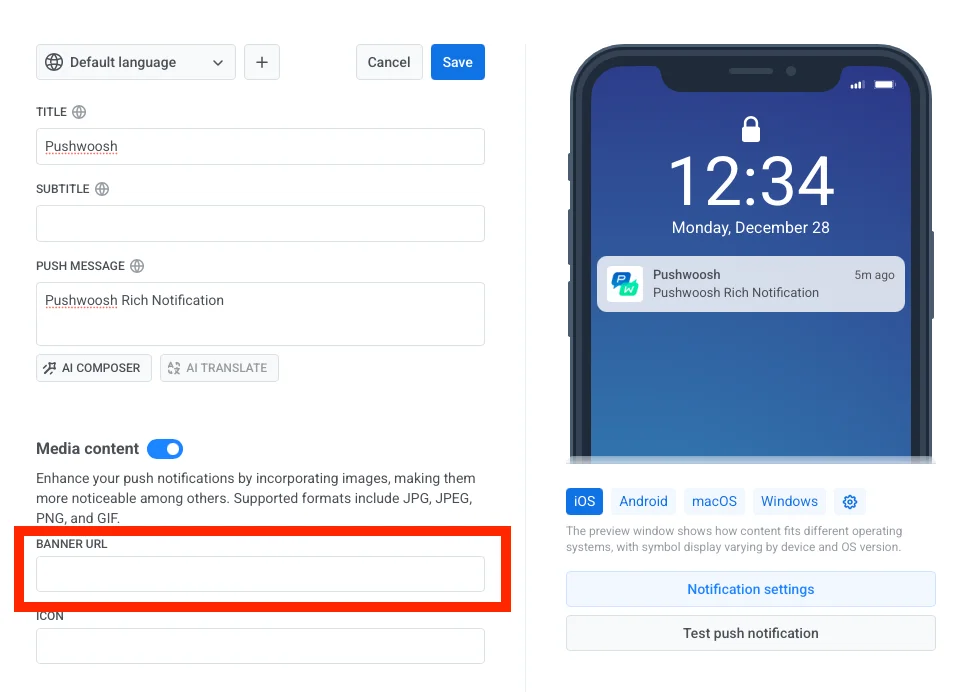 Woosh! 알림을 세게 탭하면 모든 과정이 완료됩니다!
## 피드백을 공유해주세요
여러분의 피드백은 더 나은 경험을 만드는 데 도움이 됩니다. SDK 연동 과정에서 문제가 발생하면 언제든지 알려주세요. 어려움이 있으시면 주저하지 마시고 [이 양식을 통해](https://docs.google.com/forms/d/e/1FAIpQLSd_0b8jwn-V_JmoPLIxIFYbHACCQhrzidOZV3ELywoQPXRSxw/viewform) 의견을 공유해주시기 바랍니다.
Woosh! 알림을 세게 탭하면 모든 과정이 완료됩니다!
## 피드백을 공유해주세요
여러분의 피드백은 더 나은 경험을 만드는 데 도움이 됩니다. SDK 연동 과정에서 문제가 발생하면 언제든지 알려주세요. 어려움이 있으시면 주저하지 마시고 [이 양식을 통해](https://docs.google.com/forms/d/e/1FAIpQLSd_0b8jwn-V_JmoPLIxIFYbHACCQhrzidOZV3ELywoQPXRSxw/viewform) 의견을 공유해주시기 바랍니다.