# iOS 푸시 스토리
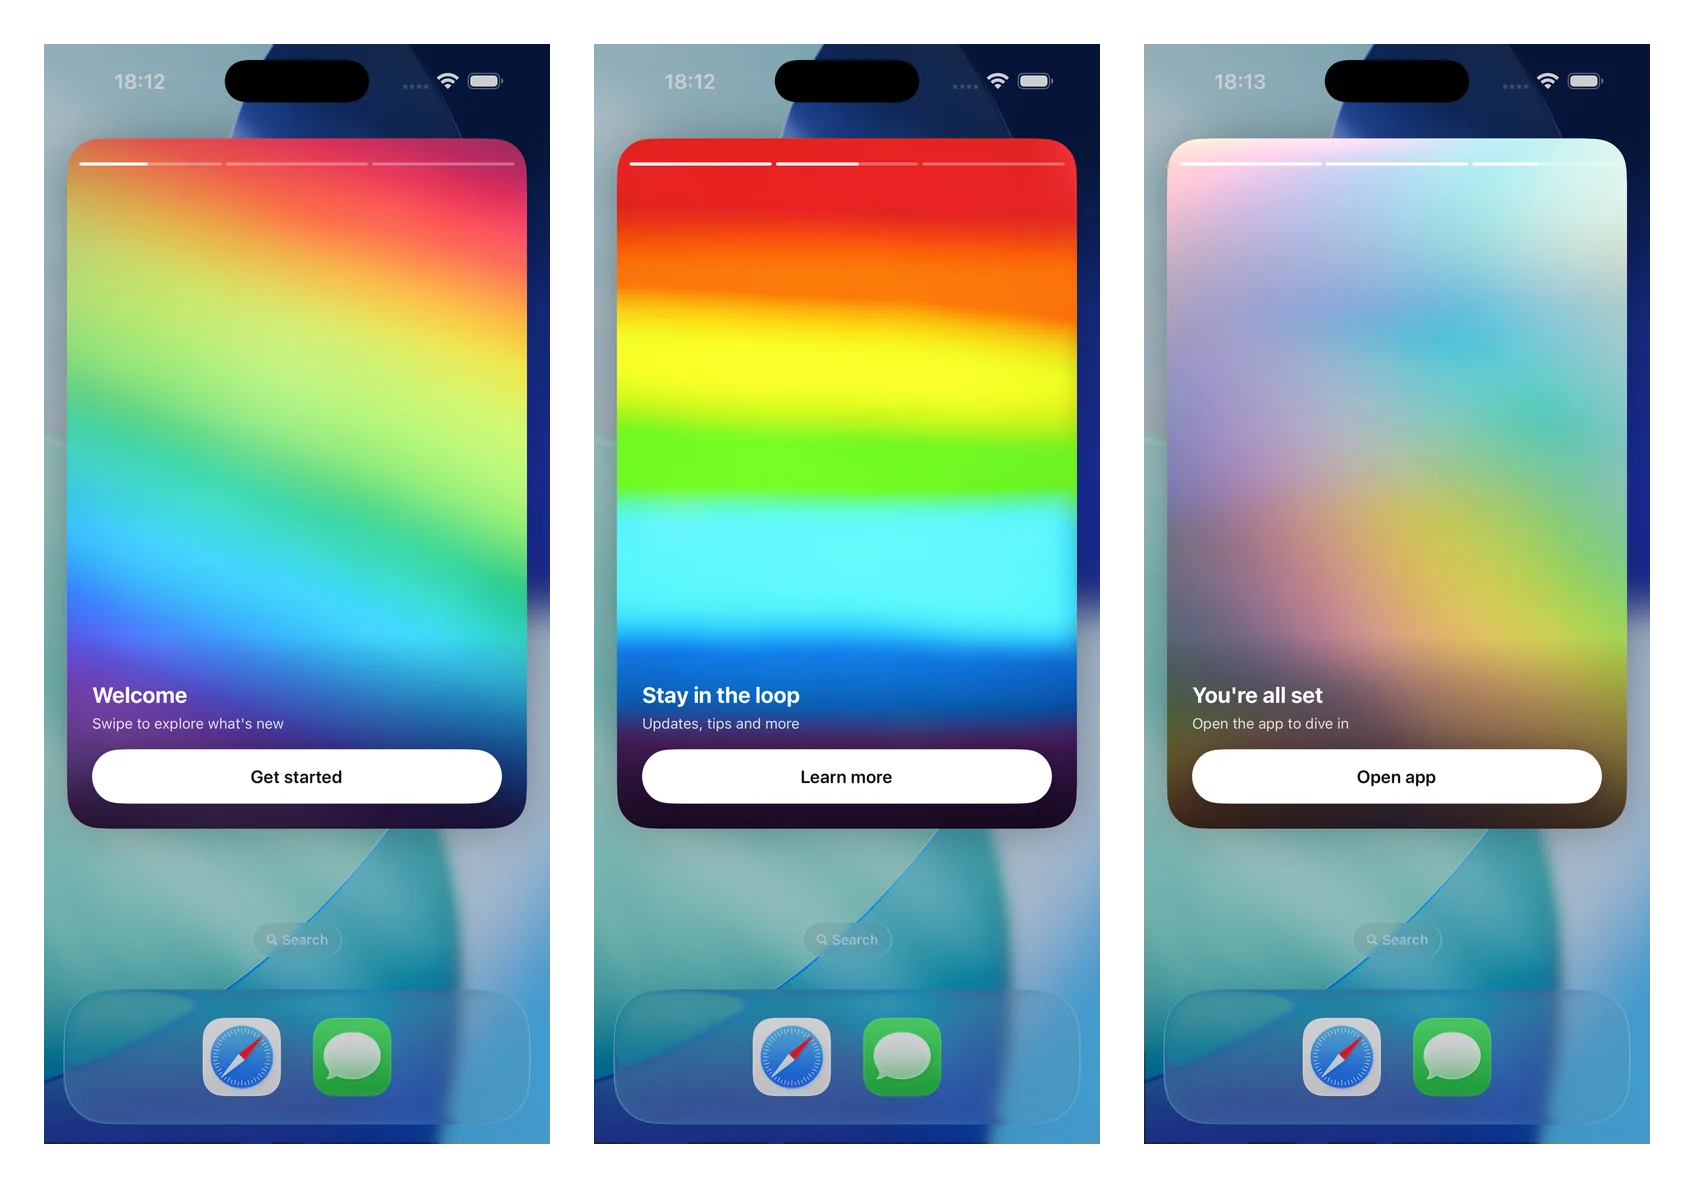
푸시 스토리는 확장된 푸시 알림을 전체 화면, 인스타그램 스타일의 스토리 경험으로 전환합니다: 전체 이미지, 상단 진행률 표시줄, 자동 전환 페이지, 탭하여 탐색, 딥 링크가 있는 버튼. 이는 독립형 `PushwooshNotificationUI` 모듈을 사용하는 Notification Content Extension에 의해 렌더링됩니다. 하나의 뷰 컨트롤러를 서브클래싱하면 SDK가 파싱, 이미지 로딩, 진행률, 타이밍, 탐색 및 딥 링크를 처리합니다.
버전 7.0.46부터 사용 가능합니다.
## 1. Notification Content Extension 추가하기
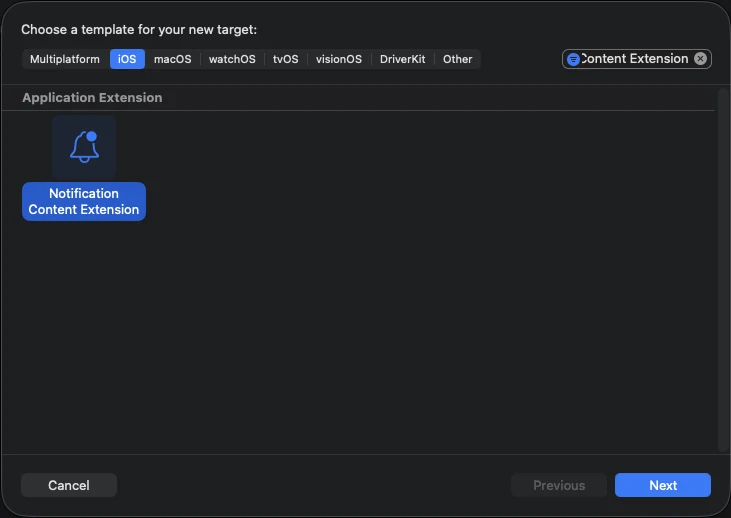
Xcode에서 **File > New > Target…**을 선택하고, **Notification Content Extension**을 선택한 후 이름을 지정합니다(예: **StoriesContentExtension**).
## 2. PushwooshNotificationUI 모듈 추가하기
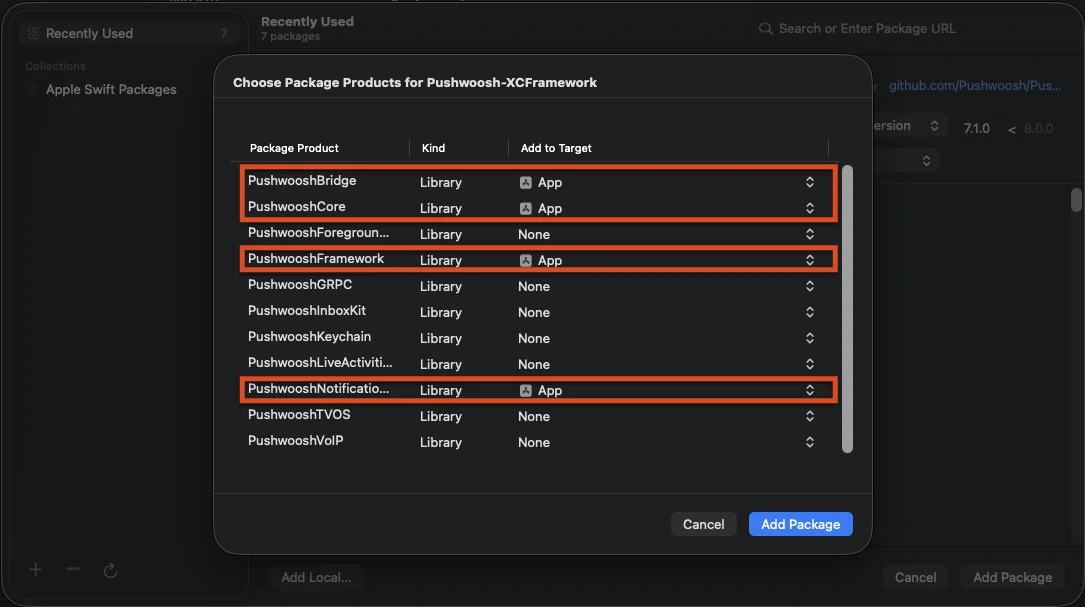
`PushwooshNotificationUI`는 다른 Pushwoosh 종속성이 없는 독립형 모듈이므로 익스텐션 프로세스 내에서 작은 크기를 유지합니다. 앱 타겟이 아닌 **콘텐츠 익스텐션 타겟**에 추가하십시오.
**Swift Package Manager**
**CocoaPods**
```ruby
target 'StoriesContentExtension' do
use_frameworks!
pod 'PushwooshXCFramework/PushwooshNotificationUI'
end
```
## 3. 스토리 뷰 컨트롤러 서브클래싱하기
생성된 `NotificationViewController` 본문을 `PushwooshStoriesViewController`의 서브클래스로 교체합니다. 이것이 전체 통합 과정입니다.
```swift
import PushwooshNotificationUI
class NotificationViewController: PushwooshStoriesViewController {}
```
## 4. 익스텐션 Info.plist 구성하기
콘텐츠 익스텐션의 **Info.plist**에서 `NSExtension > NSExtensionAttributes` 아래에 다음 키를 설정합니다:
```xml
UNNotificationExtensionCategoryPW_STORIESUNNotificationExtensionUserInteractionEnabledUNNotificationExtensionDefaultContentHiddenUNNotificationExtensionInitialContentSizeRatio1.5
```
## 5. 푸시 스토리 알림 보내기
카테고리가 `PW_STORIES`이고 커스텀 데이터에 `pw_stories` 블록이 포함된 알림을 보냅니다. 카테고리에는 전용 `ios_category_custom` 필드를 사용하고, 스토리 페이로드에는 `data` 필드를 사용합니다.
```json
{
"request": {
"application": "APPLICATION_CODE",
"auth": "API_ACCESS_TOKEN",
"notifications": [
{
"send_date": "now",
"content": "Tap to explore",
"ios_title": "Push Stories",
"ios_category_custom": "PW_STORIES",
"ios_root_params": {
"aps": {
"mutable-content": 1
}
},
"data": {
"pw_stories": {
"pages": [
{
"image": "https://example.com/story-1.jpg",
"duration": 5.0,
"link": "yourapp://page1",
"button_title": "Get started",
"title": "Welcome",
"subtitle": "Swipe to explore what's new"
},
{
"image": "https://example.com/story-2.jpg",
"duration": 4.0,
"link": "yourapp://page2",
"button_title": "Learn more",
"title": "Stay in the loop",
"subtitle": "Updates, tips and more"
}
]
}
}
}
]
}
}
```
각 페이지는 다음 필드를 지원합니다. `image`만 필수이며 나머지는 선택 사항입니다.
| 필드 | 설명 |
|-------|-------------|
| `image` | 페이지의 전체 화면 이미지 URL입니다. |
| `duration` | 페이지가 자동으로 전환되기 전에 화면에 머무는 시간(초)입니다. 기본값은 약 5초입니다. |
| `link` | 페이지 버튼을 탭했을 때 열리는 딥 링크입니다. |
| `button_title` | 페이지 버튼의 제목입니다. |
| `title` | 페이지에 오버레이되는 제목 텍스트입니다. |
| `subtitle` | 페이지에 오버레이되는 부제목 텍스트입니다. |
## 사용자 정의
서브클래스의 속성을 재정의하여 경험을 조정할 수 있습니다. 모든 속성에는 합리적인 기본값이 있습니다.
```swift
import PushwooshNotificationUI
class NotificationViewController: PushwooshStoriesViewController {
override var storyAspectRatio: CGFloat { 1.5 } // InitialContentSizeRatio와 동기화 유지
override var hapticsEnabled: Bool { true }
override var longPressToPauseEnabled: Bool { true }
override var crossfadesBetweenPages: Bool { true }
override var loopsAfterLastPage: Bool { false }
}
```
| 속성 | 기본값 | 설명 |
|----------|---------|-------------|
| `storyAspectRatio` | `1.5` | 스토리 영역의 종횡비(높이 ÷ 너비)입니다. `UNNotificationExtensionInitialContentSizeRatio`와 동기화하여 유지하십시오. |
| `hapticsEnabled` | `false` | 탭 영역 탐색 시 가벼운 촉각 탭을 재생합니다. |
| `longPressToPauseEnabled` | `false` | 길게 누르면 현재 페이지가 일시 중지되고, 손을 떼면 다시 시작됩니다. |
| `crossfadesBetweenPages` | `false` | 페이지 간에 하드 컷 대신 크로스 디졸브 효과를 줍니다. 동작 줄이기가 켜져 있으면 즉시 변경으로 대체됩니다. |
| `loopsAfterLastPage` | `false` | 마지막 페이지가 끝나면 첫 페이지부터 다시 시작합니다. |
| `appGroupIdentifier` | `nil` | 미디어 사전 캐시를 위해 Notification Service Extension과 공유되는 App Group입니다(아래 참조). |
`showDefaultContent(for:)`를 재정의하여 페이로드가 없거나 형식이 잘못되었을 때 표시되는 대체 콘텐츠를 사용자 정의할 수도 있습니다(기본적으로 알림 본문을 표시함).
### 미디어 사전 캐시
즉각적이고 오프라인에서도 첫 프레임을 표시하려면 Content Extension과 Notification Service Extension 간에 App Group을 공유하십시오. 스토리 컨트롤러에서 `appGroupIdentifier`를 재정의한 다음, Service Extension의 `didReceive(_:withContentHandler:)`에서 미디어를 미리 다운로드합니다:
```swift
import PushwooshNotificationUI
PushwooshStoriesMediaPrefetcher.prefetch(
userInfo: request.content.userInfo,
appGroupIdentifier: "group.com.example.app"
) {
contentHandler(bestAttemptContent)
}
```
두 익스텐션 모두에서 동일한 그룹 식별자로 **App Groups** 기능을 활성화하고, Service Extension이 실행되도록 `mutable-content: 1`을 보냅니다. App Group이 없으면 미디어는 익스텐션의 `tmp` 디렉토리에 캐시됩니다.
### 생명주기 및 분석 콜백
`storiesDelegate`를 설정하여 스토리 이벤트(페이지 노출, 버튼 탭, 완료 및 대체)를 관찰합니다. `PushwooshStoriesDelegate`를 준수하십시오. 모든 메서드는 선택 사항이므로 필요한 것만 구현하면 됩니다.
```swift
import PushwooshNotificationUI
class NotificationViewController: PushwooshStoriesViewController, PushwooshStoriesDelegate {
override func viewDidLoad() {
super.viewDidLoad()
storiesDelegate = self
}
func storiesViewController(_ controller: PushwooshStoriesViewController, didStartWithPageCount pageCount: Int) {}
func storiesViewController(_ controller: PushwooshStoriesViewController, didShow page: StoryPage, at index: Int) {}
func storiesViewController(_ controller: PushwooshStoriesViewController, didTapActionFor page: StoryPage, at index: Int) {}
func storiesViewControllerDidFinish(_ controller: PushwooshStoriesViewController) {}
func storiesViewControllerDidShowFallback(_ controller: PushwooshStoriesViewController) {}
}
```
| 콜백 | 실행 시점 |
|----------|----------------|
| `didStartWithPageCount:` | 유효한 스토리 페이로드가 파싱되었고 재생이 곧 시작될 때. |
| `didShow:at:` | 페이지가 보이게 되었을 때. 페이지별 노출 수에 사용합니다. |
| `didTapActionFor:at:` | 사용자가 행동 유도 버튼을 탭했을 때. |
| `storiesViewControllerDidFinish:` | 마지막 페이지 재생이 끝났을 때. |
| `storiesViewControllerDidShowFallback:` | 페이로드가 없거나 형식이 잘못되어 대체 콘텐츠가 표시되었을 때. |
콜백에 전달되는 `StoryPage`는 페이지의 `imageURL`, `duration`, `link`, `buttonTitle`, `title`, `subtitle`을 노출합니다.
### 탐색
화면의 오른쪽 1/3을 탭하면 다음 페이지로, 왼쪽 1/3을 탭하면 이전 페이지로 이동합니다. 수평 스와이프는 시스템의 알림 해제 제스처와 충돌하기 때문에 의도적으로 사용되지 않습니다. 페이지 버튼을 탭하면 딥 링크가 열리고 알림이 해제됩니다.
## 참고 자료
 ## 1. Notification Content Extension 추가하기
Xcode에서 **File > New > Target…**을 선택하고, **Notification Content Extension**을 선택한 후 이름을 지정합니다(예: **StoriesContentExtension**).
## 1. Notification Content Extension 추가하기
Xcode에서 **File > New > Target…**을 선택하고, **Notification Content Extension**을 선택한 후 이름을 지정합니다(예: **StoriesContentExtension**).
 ## 2. PushwooshNotificationUI 모듈 추가하기
`PushwooshNotificationUI`는 다른 Pushwoosh 종속성이 없는 독립형 모듈이므로 익스텐션 프로세스 내에서 작은 크기를 유지합니다. 앱 타겟이 아닌 **콘텐츠 익스텐션 타겟**에 추가하십시오.
**Swift Package Manager**
## 2. PushwooshNotificationUI 모듈 추가하기
`PushwooshNotificationUI`는 다른 Pushwoosh 종속성이 없는 독립형 모듈이므로 익스텐션 프로세스 내에서 작은 크기를 유지합니다. 앱 타겟이 아닌 **콘텐츠 익스텐션 타겟**에 추가하십시오.
**Swift Package Manager**
 **CocoaPods**
```ruby
target 'StoriesContentExtension' do
use_frameworks!
pod 'PushwooshXCFramework/PushwooshNotificationUI'
end
```
## 3. 스토리 뷰 컨트롤러 서브클래싱하기
생성된 `NotificationViewController` 본문을 `PushwooshStoriesViewController`의 서브클래스로 교체합니다. 이것이 전체 통합 과정입니다.
**CocoaPods**
```ruby
target 'StoriesContentExtension' do
use_frameworks!
pod 'PushwooshXCFramework/PushwooshNotificationUI'
end
```
## 3. 스토리 뷰 컨트롤러 서브클래싱하기
생성된 `NotificationViewController` 본문을 `PushwooshStoriesViewController`의 서브클래스로 교체합니다. 이것이 전체 통합 과정입니다.