# iOS 푸시 사용자 정의
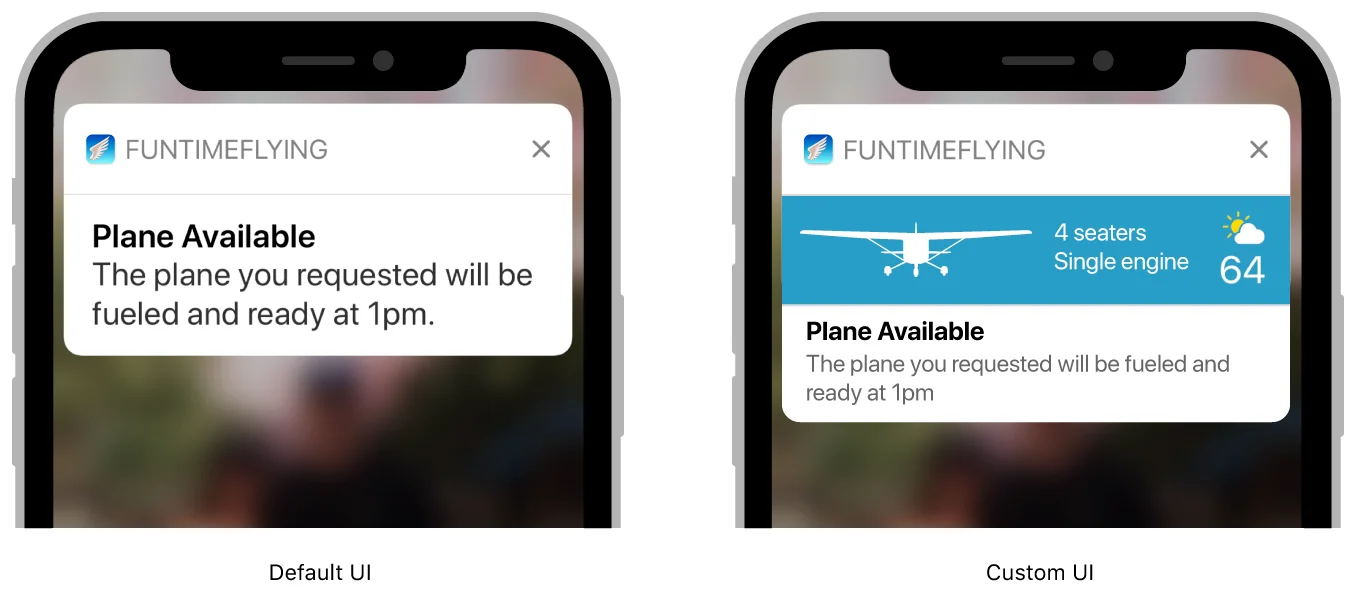
iOS 기기가 경고가 포함된 알림을 받으면 시스템은 경고 내용을 두 단계로 표시합니다. 처음에는 알림의 제목, 부제목 및 2~4줄의 본문 텍스트가 포함된 축약된 배너를 표시합니다. 사용자가 축약된 배너를 누르면 iOS는 알림 관련 작업을 포함한 전체 알림 인터페이스를 표시합니다. 시스템은 축약된 배너에 대한 인터페이스를 제공하지만, 알림 콘텐츠 앱 확장 프로그램을 사용하여 전체 인터페이스를 사용자 정의할 수 있습니다.
알림 콘텐츠 앱 확장 프로그램은 사용자 정의 알림 인터페이스를 표시하는 뷰 컨트롤러를 관리합니다. 이 뷰 컨트롤러는 알림에 대한 기본 시스템 인터페이스를 보완하거나 대체할 수 있습니다. 뷰 컨트롤러를 사용하여 다음을 수행할 수 있습니다.
* 경고의 제목, 부제목 및 본문 텍스트를 포함한 항목의 배치 사용자 정의.
* 인터페이스 요소에 다른 글꼴이나 스타일링 대체.
* 앱별 데이터 표시—예를 들어, 알림 페이로드의 앱별 키에 저장된 데이터.
* 사용자 정의 이미지 또는 브랜딩 포함.
앱 확장 프로그램은 알림 내용 및 앱 확장 프로그램 번들에 있는 파일과 같이 즉시 사용 가능한 데이터를 사용하여 뷰 컨트롤러를 구성해야 합니다. 앱과 앱 확장 프로그램 간에 데이터를 공유하기 위해 앱 그룹을 사용하는 경우, 앱 그룹에 있는 모든 파일도 사용할 수 있습니다. 알림이 적시에 전달되도록 하려면 뷰를 최대한 빨리 구성하세요. 네트워크를 통해 데이터를 검색하는 것과 같은 장기 실행 작업을 수행하지 마세요.
### 프로젝트에 알림 콘텐츠 앱 확장 프로그램 추가하기
iOS 앱에 알림 콘텐츠 앱 확장 프로그램을 추가하려면:
1. Xcode에서 **File** > **New** > **Target**을 선택합니다.
2. iOS Application Extension에서 **Notification Content Extension**을 선택합니다.
3. **Next**를 클릭합니다.
4. 앱 확장 프로그램의 **이름**을 입력합니다.
5. **Finish**를 클릭합니다.
### 뷰 컨트롤러에 뷰 추가하기
Xcode에서 제공하는 템플릿에는 구성할 수 있는 스토리보드와 뷰 컨트롤러가 포함되어 있습니다. 뷰 컨트롤러에 뷰를 추가하여 사용자 정의 알림 인터페이스를 구축하세요. 예를 들어, 레이블을 사용하여 알림의 제목, 부제목 및 본문 텍스트를 표시합니다. 이미지 뷰와 비대화형 콘텐츠를 표시하는 뷰를 추가할 수도 있습니다. 뷰에 대한 초기 콘텐츠를 제공할 필요는 없습니다.
iOS 12 이상에서는 대화형 컨트롤(예: 버튼 또는 스위치)을 추가할 수 있습니다. 자세한 내용은 대화형 컨트롤 지원을 참조하세요.
### 뷰 컨트롤러 구성하기
뷰 컨트롤러의 `didReceive(_:)` 메서드를 사용하여 레이블 및 기타 뷰를 업데이트합니다. 알림 페이로드에는 뷰 컨트롤러를 구성할 때 사용할 데이터가 포함되어 있습니다. 앱 확장 프로그램의 다른 파일에 있는 데이터도 사용할 수 있습니다. [목록 1](https://developer.apple.com/documentation/usernotificationsui/customizing_the_appearance_of_notifications#2950663)은 알림 페이로드에서 제목과 본문 텍스트를 검색하여 뷰 컨트롤러의 아웃렛으로 저장된 두 개의 [`UILabel`](https://developer.apple.com/documentation/uikit/uilabel) 컨트롤에 문자열을 할당하는 이 메서드의 버전을 보여줍니다.
```swift
// 런타임에 알림 인터페이스 구성하기
func didReceive(_ notification: UNNotification) {
self.bodyText?.text = notification.request.content.body
self.headlineText?.text = notification.request.content.title
}
```
뷰 컨트롤러가 이미 표시된 상태에서 두 번째 알림이 도착하면 시스템은 새 알림 페이로드와 함께 `didReceive(_:)` 메서드를 다시 호출합니다.
### 대화형 컨트롤 지원
iOS 12 이상에서는 사용자 정의 알림에서 사용자 상호 작용을 활성화할 수 있습니다. 이를 통해 사용자 정의 인터페이스에 버튼 및 스위치와 같은 대화형 컨트롤을 추가할 수 있습니다.
사용자 상호 작용을 활성화하려면:
1. 알림 콘텐츠 확장 프로그램의 `info.plist` 파일을 엽니다.
2. 확장 속성에 `UNNotificationExtensionUserInteractionEnabled` 키를 추가합니다. `YES`로 설정된 부울 값을 지정합니다.
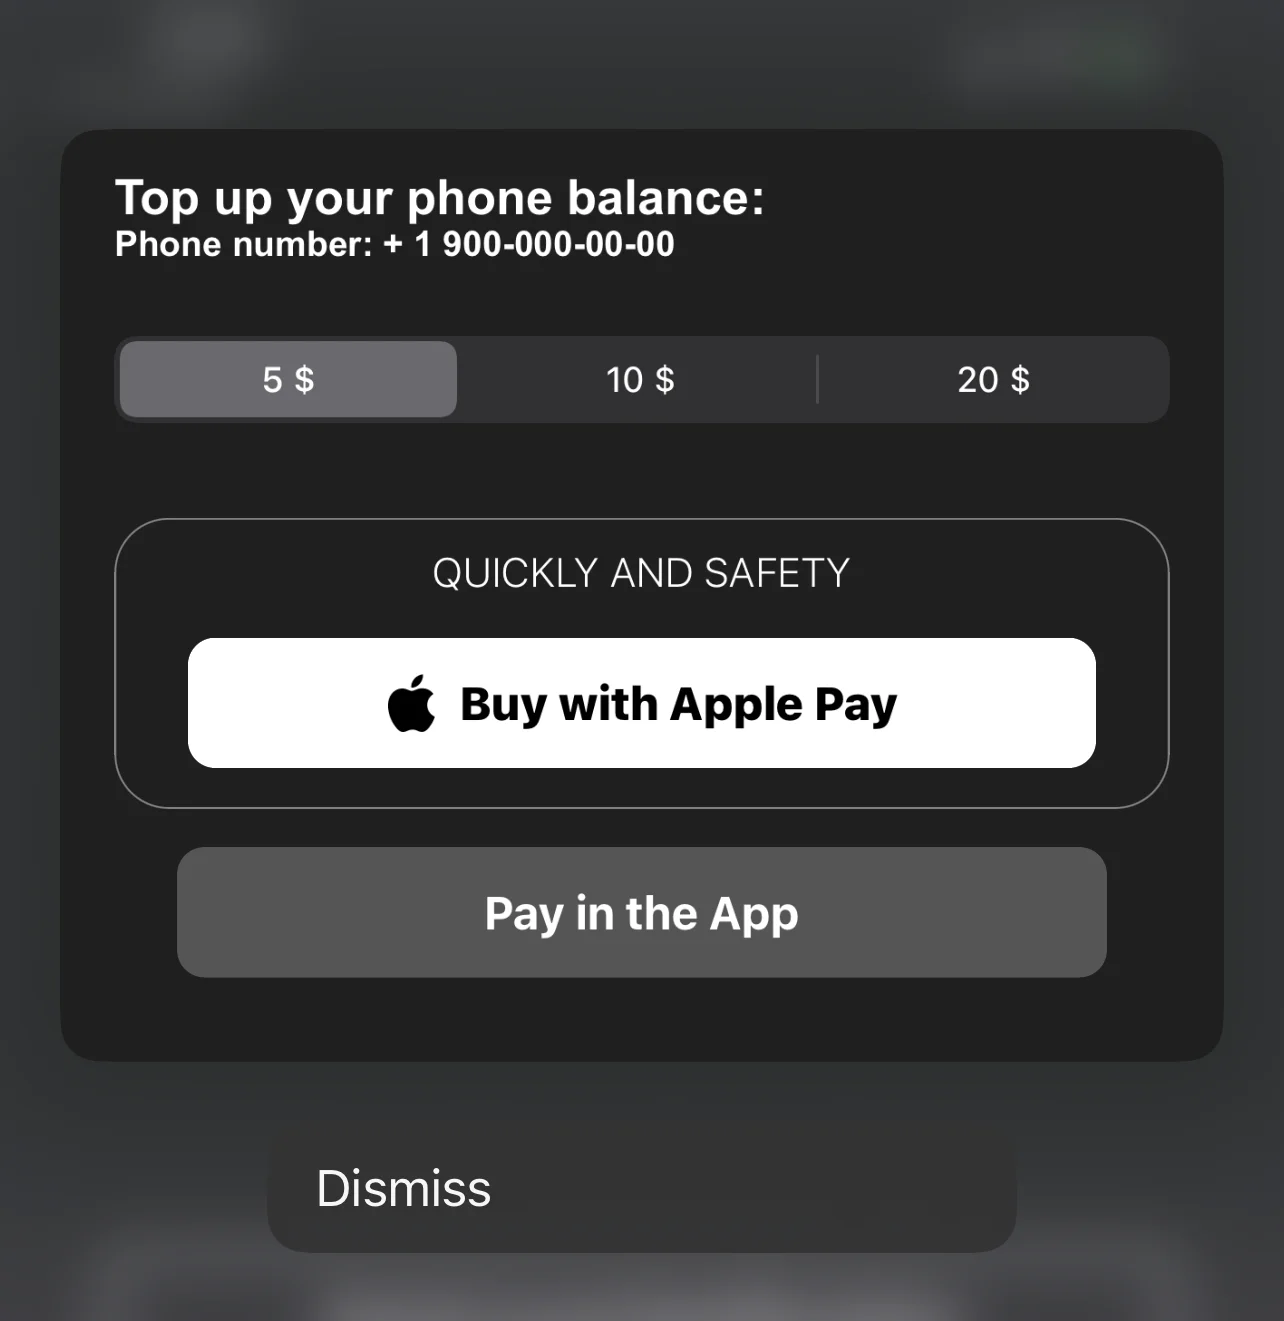
### 푸시 알림 확장 프로그램에 Apple Pay 추가하기 (예시 뷰)
### 푸시 알림 확장 프로그램에 Apple Pay 버튼이 있는 코드 블록 예제
```swift
import UIKit
import Foundation
import UserNotifications
import UserNotificationsUI
import PassKit
class NotificationViewController: UIViewController, UNNotificationContentExtension, PKPaymentAuthorizationViewControllerDelegate {
func paymentAuthorizationViewControllerDidFinish(_ controller: PKPaymentAuthorizationViewController) {
controller.dismiss(animated: true, completion: nil)
}
@IBOutlet weak var buyWithApplePayButton: UIButton!
@IBOutlet weak var containerView: UIView!
@IBOutlet weak var payInAppButton: UIButton!
@IBOutlet weak var segmentCustom: UISegmentedControl!
private var amount: NSDecimalNumber = 0;
override func viewDidLoad() {
super.viewDidLoad()
buttonCustomisation()
amount = NSDecimalNumber.init(value: 5)
}
func buttonCustomisation () {
self.buyWithApplePayButton.layer.masksToBounds = true
self.buyWithApplePayButton.layer.cornerRadius = 10
self.payInAppButton.layer.masksToBounds = true
self.payInAppButton.layer.cornerRadius = 10
self.containerView.layer.borderColor = UIColor.gray.cgColor
self.containerView.layer.borderWidth = 0.7
self.containerView.layer.masksToBounds = true
self.containerView.layer.cornerRadius = 20
}
func didReceive(_ notification: UNNotification) {
// Configuring the notification interface at runtime
}
@IBAction func buyWithApplePayAction(_ sender: Any) {
let request = PKPaymentRequest()
request.merchantIdentifier = "merchant.com.sample.ApplePayAction"
request.supportedNetworks = [PKPaymentNetwork.visa, PKPaymentNetwork.masterCard, PKPaymentNetwork.amex]
request.merchantCapabilities = PKMerchantCapability.capability3DS
request.countryCode = "US"
request.currencyCode = "USD"
request.paymentSummaryItems = [
PKPaymentSummaryItem(label: "Some Product", amount: amount)
]
let applePayController = PKPaymentAuthorizationViewController(paymentRequest: request)
applePayController?.delegate = self
self.present(applePayController!, animated: true, completion: nil)
}
@IBAction func payInAppButtonAction(_ sender: Any) {
print("pay in app button tapped")
}
@IBAction func segmentAction(_ sender: Any) {
switch segmentCustom.selectedSegmentIndex {
case 0:
amount = NSDecimalNumber.init(value: 5)
break
case 1:
amount = NSDecimalNumber.init(value: 10)
break
case 2:
amount = NSDecimalNumber.init(value: 20)
break
default:
amount = NSDecimalNumber.init(value: 5)
break
}
}
}
```
 알림 콘텐츠 앱 확장 프로그램은 사용자 정의 알림 인터페이스를 표시하는 뷰 컨트롤러를 관리합니다. 이 뷰 컨트롤러는 알림에 대한 기본 시스템 인터페이스를 보완하거나 대체할 수 있습니다. 뷰 컨트롤러를 사용하여 다음을 수행할 수 있습니다.
* 경고의 제목, 부제목 및 본문 텍스트를 포함한 항목의 배치 사용자 정의.
* 인터페이스 요소에 다른 글꼴이나 스타일링 대체.
* 앱별 데이터 표시—예를 들어, 알림 페이로드의 앱별 키에 저장된 데이터.
* 사용자 정의 이미지 또는 브랜딩 포함.
앱 확장 프로그램은 알림 내용 및 앱 확장 프로그램 번들에 있는 파일과 같이 즉시 사용 가능한 데이터를 사용하여 뷰 컨트롤러를 구성해야 합니다. 앱과 앱 확장 프로그램 간에 데이터를 공유하기 위해 앱 그룹을 사용하는 경우, 앱 그룹에 있는 모든 파일도 사용할 수 있습니다. 알림이 적시에 전달되도록 하려면 뷰를 최대한 빨리 구성하세요. 네트워크를 통해 데이터를 검색하는 것과 같은 장기 실행 작업을 수행하지 마세요.
### 프로젝트에 알림 콘텐츠 앱 확장 프로그램 추가하기
iOS 앱에 알림 콘텐츠 앱 확장 프로그램을 추가하려면:
1. Xcode에서 **File** > **New** > **Target**을 선택합니다.
2. iOS Application Extension에서 **Notification Content Extension**을 선택합니다.
3. **Next**를 클릭합니다.
4. 앱 확장 프로그램의 **이름**을 입력합니다.
5. **Finish**를 클릭합니다.
### 뷰 컨트롤러에 뷰 추가하기
Xcode에서 제공하는 템플릿에는 구성할 수 있는 스토리보드와 뷰 컨트롤러가 포함되어 있습니다. 뷰 컨트롤러에 뷰를 추가하여 사용자 정의 알림 인터페이스를 구축하세요. 예를 들어, 레이블을 사용하여 알림의 제목, 부제목 및 본문 텍스트를 표시합니다. 이미지 뷰와 비대화형 콘텐츠를 표시하는 뷰를 추가할 수도 있습니다. 뷰에 대한 초기 콘텐츠를 제공할 필요는 없습니다.
iOS 12 이상에서는 대화형 컨트롤(예: 버튼 또는 스위치)을 추가할 수 있습니다. 자세한 내용은 대화형 컨트롤 지원을 참조하세요.
### 뷰 컨트롤러 구성하기
뷰 컨트롤러의 `didReceive(_:)` 메서드를 사용하여 레이블 및 기타 뷰를 업데이트합니다. 알림 페이로드에는 뷰 컨트롤러를 구성할 때 사용할 데이터가 포함되어 있습니다. 앱 확장 프로그램의 다른 파일에 있는 데이터도 사용할 수 있습니다. [목록 1](https://developer.apple.com/documentation/usernotificationsui/customizing_the_appearance_of_notifications#2950663)은 알림 페이로드에서 제목과 본문 텍스트를 검색하여 뷰 컨트롤러의 아웃렛으로 저장된 두 개의 [`UILabel`](https://developer.apple.com/documentation/uikit/uilabel) 컨트롤에 문자열을 할당하는 이 메서드의 버전을 보여줍니다.
알림 콘텐츠 앱 확장 프로그램은 사용자 정의 알림 인터페이스를 표시하는 뷰 컨트롤러를 관리합니다. 이 뷰 컨트롤러는 알림에 대한 기본 시스템 인터페이스를 보완하거나 대체할 수 있습니다. 뷰 컨트롤러를 사용하여 다음을 수행할 수 있습니다.
* 경고의 제목, 부제목 및 본문 텍스트를 포함한 항목의 배치 사용자 정의.
* 인터페이스 요소에 다른 글꼴이나 스타일링 대체.
* 앱별 데이터 표시—예를 들어, 알림 페이로드의 앱별 키에 저장된 데이터.
* 사용자 정의 이미지 또는 브랜딩 포함.
앱 확장 프로그램은 알림 내용 및 앱 확장 프로그램 번들에 있는 파일과 같이 즉시 사용 가능한 데이터를 사용하여 뷰 컨트롤러를 구성해야 합니다. 앱과 앱 확장 프로그램 간에 데이터를 공유하기 위해 앱 그룹을 사용하는 경우, 앱 그룹에 있는 모든 파일도 사용할 수 있습니다. 알림이 적시에 전달되도록 하려면 뷰를 최대한 빨리 구성하세요. 네트워크를 통해 데이터를 검색하는 것과 같은 장기 실행 작업을 수행하지 마세요.
### 프로젝트에 알림 콘텐츠 앱 확장 프로그램 추가하기
iOS 앱에 알림 콘텐츠 앱 확장 프로그램을 추가하려면:
1. Xcode에서 **File** > **New** > **Target**을 선택합니다.
2. iOS Application Extension에서 **Notification Content Extension**을 선택합니다.
3. **Next**를 클릭합니다.
4. 앱 확장 프로그램의 **이름**을 입력합니다.
5. **Finish**를 클릭합니다.
### 뷰 컨트롤러에 뷰 추가하기
Xcode에서 제공하는 템플릿에는 구성할 수 있는 스토리보드와 뷰 컨트롤러가 포함되어 있습니다. 뷰 컨트롤러에 뷰를 추가하여 사용자 정의 알림 인터페이스를 구축하세요. 예를 들어, 레이블을 사용하여 알림의 제목, 부제목 및 본문 텍스트를 표시합니다. 이미지 뷰와 비대화형 콘텐츠를 표시하는 뷰를 추가할 수도 있습니다. 뷰에 대한 초기 콘텐츠를 제공할 필요는 없습니다.
iOS 12 이상에서는 대화형 컨트롤(예: 버튼 또는 스위치)을 추가할 수 있습니다. 자세한 내용은 대화형 컨트롤 지원을 참조하세요.
### 뷰 컨트롤러 구성하기
뷰 컨트롤러의 `didReceive(_:)` 메서드를 사용하여 레이블 및 기타 뷰를 업데이트합니다. 알림 페이로드에는 뷰 컨트롤러를 구성할 때 사용할 데이터가 포함되어 있습니다. 앱 확장 프로그램의 다른 파일에 있는 데이터도 사용할 수 있습니다. [목록 1](https://developer.apple.com/documentation/usernotificationsui/customizing_the_appearance_of_notifications#2950663)은 알림 페이로드에서 제목과 본문 텍스트를 검색하여 뷰 컨트롤러의 아웃렛으로 저장된 두 개의 [`UILabel`](https://developer.apple.com/documentation/uikit/uilabel) 컨트롤에 문자열을 할당하는 이 메서드의 버전을 보여줍니다.
 ### 푸시 알림 확장 프로그램에 Apple Pay 추가하기 (예시 뷰)
 ### 푸시 알림 확장 프로그램에 Apple Pay 버튼이 있는 코드 블록 예제