# iOS SDK 사용자 정의
## 통합
* [딥 링킹](#deep-linking)
* [유니버설 링크](#universal-links)
* [인앱 구매 추적](#in-app-purchase-tracking)
* [지오존 푸시 알림](#geozones-push-notifications)
* [리치 미디어 큐 생성](#creating-a-rich-media-queue)
* [포스 터치로 리치 알림에 전송된 비디오 자동 재생](#autoplay-a-video-sent-in-a-rich-notification-with-force-touch)
* [사용자 정의 푸시 사운드](#custom-push-sound)
* [iOS 임시 푸시](#ios-provisional-push)
### 딥 링킹
**Info.plist** 파일에 `URL Identifier` 및 `URL Scheme`을 포함하는 `URL types` 배열을 추가합니다.\
아래 예시에서 `URL Scheme`은 _com.pushwoosh_이고 `URL Identifier`는 _promotion_입니다.
앱 델리게이트 파일(일반적으로 iOS 12 이하는 AppDelegate.m, iOS 13 이상은 SceneDelegate.m)에서 아래 예시에 설명된 대로 적절한 openURL 델리게이트 함수를 추가합니다. 이 예시는 올바른 페이지를 확인하고 URL에서 "id" 값을 파싱한 후 이에 응답하여 PromoPageViewController를 엽니다.
```AppDelegate.swift```
```swift
func application(_ app: UIApplication, open url: URL, options: [UIApplication.OpenURLOptionsKey : Any] = [:]) -> Bool {
let components = URLComponents(url: url, resolvingAgainstBaseURL: false)
let page = components?.host
var promotionId: String?
if page == "promotion" {
return
}
let items = components?.queryItems ?? []
for item in items {
if item.name == "id" {
promotionId = item.value
}
}
//show PromoPageViewController
}
```
```objective-c
- (BOOL)application:(UIApplication *)application openURL:(NSURL *)url sourceApplication:(NSString *)sourceApplication annotation:(id)annotation {
NSURLComponents *components = [NSURLComponents componentsWithURL:url resolvingAgainstBaseURL:NO];
NSString *page = components.host;
NSString *promotionId = nil;
//return if this is not a promotion deep link
if(![page isEqualToString:@"promotion"])
return NO;
for(NSURLQueryItem *item in components.queryItems)
{
if([item.name isEqualToString:@"id"])
promotionId = item.value;
}
PromoPageViewController *vc = [[PromoPageViewController alloc] init];
vc.promotionId = promotionId
[self presentViewController:vc animated:YES completion:nil];
}
```
```SceneDelegate.swift```
```swift
func scene(_ scene: UIScene, openURLContexts URLContexts: Set) {
guard let urlContext = URLContexts.first else { return }
let components = URLComponents(url: urlContext.url, resolvingAgainstBaseURL: false)
let page = components?.host
var promotionId: String?
guard page == "promotion" else {
return
}
let items = components?.queryItems ?? []
for item in items {
if item.name == "id" {
promotionId = item.value
}
}
//show PromoPageViewController
}
```
```objective-c
- (void)scene:(UIWindowScene *)scene openURLContexts:(NSSet *)URLContexts {
UIOpenURLContext *urlContext = URLContexts.anyObject;
if (!urlContext) {
return;
}
NSURLComponents *components = [NSURLComponents componentsWithURL:urlContext.URL resolvingAgainstBaseURL:NO];
NSString *page = components.host;
NSString *promotionId = nil;
if (![page isEqualToString:@"promotion"]) {
return;
}
for (NSURLQueryItem *item in components.queryItems) {
if ([item.name isEqualToString:@"id"]) {
promotionId = item.value;
}
}
//show PromoPageViewController
}
```
### 유니버설 링크
유니버설 링크를 사용하면 사용자가 웹사이트 링크를 탭할 때 앱을 직접 열 수 있습니다. 사용자 정의 URL 스킴과 달리 유니버설 링크는 표준 `https://` URL을 사용하며 더 원활한 사용자 경험을 제공합니다.
#### 작동 방식
푸시 알림에 `https://` URL("url" 또는 "l" 매개변수)이 포함된 경우 SDK는 다음을 수행합니다:
1. URL로 `NSUserActivity`를 생성합니다
2. 앱의 유니버설 링크 핸들러(`scene:continueUserActivity:` 또는 `application:continueUserActivity:restorationHandler:`)를 호출합니다
3. 앱이 URL을 처리하지 않으면 대체 수단으로 Safari에서 열립니다
#### 설정
1. **Xcode에서 Associated Domains 구성**
앱에 Associated Domains 기능을 추가하고 도메인을 추가합니다:
```
applinks:yourdomain.com
```
2. **Apple App Site Association 파일 호스팅**
웹 서버의 `https://yourdomain.com/.well-known/apple-app-site-association`에 `apple-app-site-association` 파일을 생성합니다:
```json
{
"applinks": {
"apps": [],
"details": [
{
"appID": "TEAM_ID.com.your.bundleid",
"paths": ["/path/*", "/promotion/*"]
}
]
}
}
```
`TEAM_ID`를 Apple 개발자 팀 ID로, `com.your.bundleid`를 앱의 번들 식별자로 교체합니다.
3. **유니버설 링크 핸들러 구현**
```SceneDelegate.swift``` (iOS 13+)
```swift
func scene(_ scene: UIScene, continue userActivity: NSUserActivity) {
guard userActivity.activityType == NSUserActivityTypeBrowsingWeb,
let url = userActivity.webpageURL else {
return
}
// Handle the Universal Link URL
let components = URLComponents(url: url, resolvingAgainstBaseURL: false)
let path = components?.path
if path?.starts(with: "/promotion") == true {
// Navigate to promotion screen
let promotionId = components?.queryItems?.first(where: { $0.name == "id" })?.value
// Show promotion with promotionId
}
}
```
```objective-c
- (void)scene:(UIScene *)scene continueUserActivity:(NSUserActivity *)userActivity {
if (![userActivity.activityType isEqualToString:NSUserActivityTypeBrowsingWeb]) {
return;
}
NSURL *url = userActivity.webpageURL;
if (!url) {
return;
}
// Handle the Universal Link URL
NSURLComponents *components = [NSURLComponents componentsWithURL:url resolvingAgainstBaseURL:NO];
NSString *path = components.path;
if ([path hasPrefix:@"/promotion"]) {
// Navigate to promotion screen
NSString *promotionId = nil;
for (NSURLQueryItem *item in components.queryItems) {
if ([item.name isEqualToString:@"id"]) {
promotionId = item.value;
break;
}
}
// Show promotion with promotionId
}
}
```
```AppDelegate.swift``` (iOS 12 및 이전 버전, 또는 대체 수단으로)
```swift
func application(_ application: UIApplication,
continue userActivity: NSUserActivity,
restorationHandler: @escaping ([UIUserActivityRestoring]?) -> Void) -> Bool {
guard userActivity.activityType == NSUserActivityTypeBrowsingWeb,
let url = userActivity.webpageURL else {
return false
}
// Handle the Universal Link URL
let components = URLComponents(url: url, resolvingAgainstBaseURL: false)
let path = components?.path
if path?.starts(with: "/promotion") == true {
// Navigate to promotion screen
return true
}
return false
}
```
```objective-c
- (BOOL)application:(UIApplication *)application
continueUserActivity:(NSUserActivity *)userActivity
restorationHandler:(void (^)(NSArray> *restorableObjects))restorationHandler {
if (![userActivity.activityType isEqualToString:NSUserActivityTypeBrowsingWeb]) {
return NO;
}
NSURL *url = userActivity.webpageURL;
if (!url) {
return NO;
}
// Handle the Universal Link URL
NSURLComponents *components = [NSURLComponents componentsWithURL:url resolvingAgainstBaseURL:NO];
NSString *path = components.path;
if ([path hasPrefix:@"/promotion"]) {
// Navigate to promotion screen
return YES;
}
return NO;
}
```
#### 유니버설 링크로 푸시 보내기
푸시 알림을 생성할 때 **Action** 필드에 웹사이트 URL을 사용합니다:
```
https://yourdomain.com/promotion?id=123
```
SDK는 이 URL을 유니버설 링크 핸들러로 자동으로 라우팅하여 사용자를 앱의 적절한 화면으로 이동시킬 수 있습니다.
### 인앱 구매 추적
기본적으로 인앱 구매 추적은 비활성화되어 있습니다. [Customer Journeys](/ko/product/customer-journey/pushwoosh-journey-overview)를 구성할 때 인앱 구매를 추적하려면 _info.plist_ 파일에서 _Pushwoosh\_PURCHASE\_TRACKING\_ENABLED_ 플래그를 _true_로 설정합니다. 사용 가능한 플래그 목록은 [표](/ko/developer/pushwoosh-sdk/ios-sdk/setting-up-pushwoosh-ios-sdk/advanced-integration-guide/#complete-list-of-infoplist-properties)에서 찾을 수 있습니다.
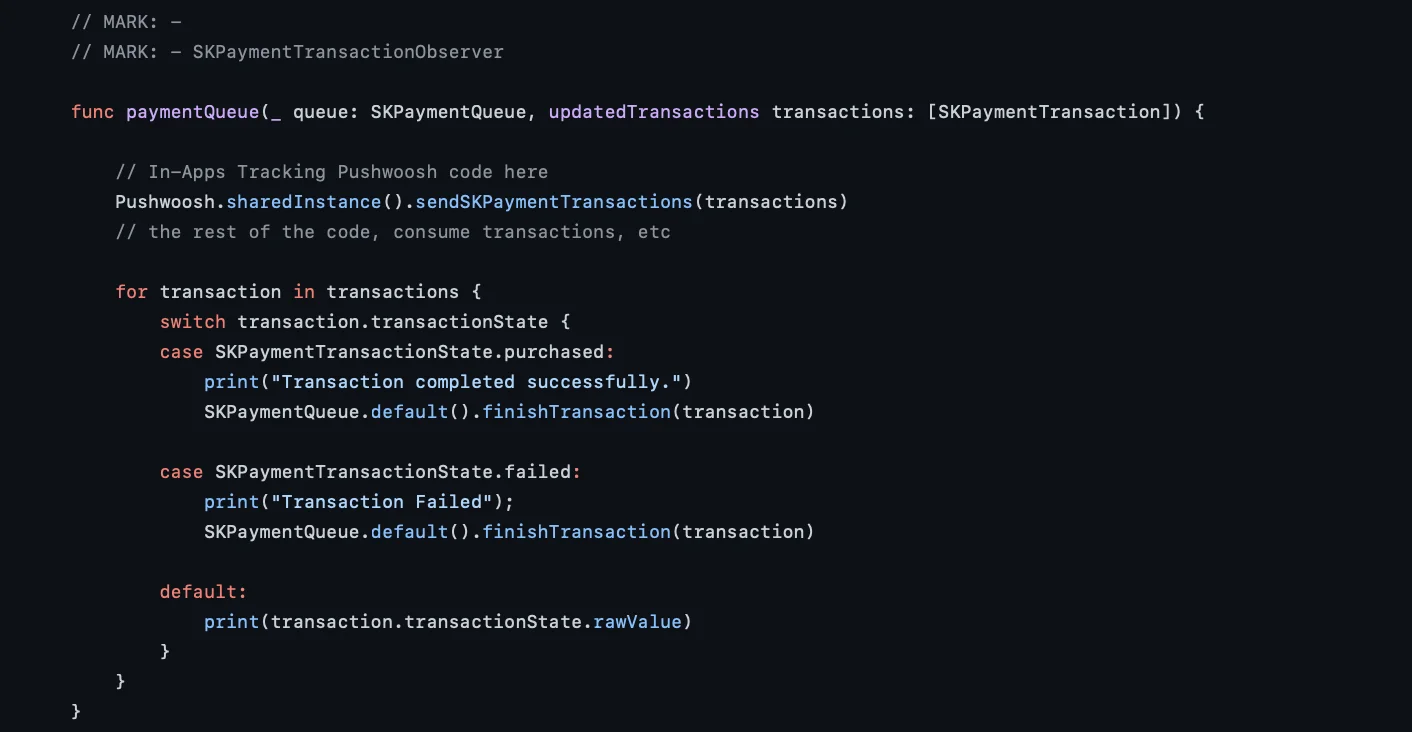
인앱 구매를 수동으로 추적하려면 아래 코드를 사용할 수 있습니다.
`paymentQueue:updatedTransactions: delegate` 메서드에서 `PushManager`의 `sendSKPaymentTransactions` 메서드를 호출합니다
```swift
func paymentQueue(_ queue: SKPaymentQueue, updatedTransactions transactions: [SKPaymentTransaction]) {
// In-Apps Tracking Pushwoosh code here
Pushwoosh.sharedInstance().sendSKPaymentTransactions(transactions)
// the rest of the code, consume transactions, etc
}
```
```objective-c
- (void)paymentQueue:(SKPaymentQueue *)queue updatedTransactions:(NSArray *)transactions {
[[PushNotificationManager pushManager] sendSKPaymentTransactions:transactions];
//the rest of the code, consume transactions, etc
}
```
### 지오존 푸시 알림
지오존 푸시 알림은 별도의 프레임워크인 **PushwooshGeozones**에 캡슐화되어 있습니다.
1. 프로젝트에 PushwooshGeozones.framework 추가
종속성 관리자를 사용하여 프로젝트에 PushwooshGeozones.framework를 추가하려면 `podfile` 또는 `cartfile`에 다음 줄을 추가합니다:
```plaintext
pod 'PushwooshXCFramework/Geozones'
```
```plaintext
github "Pushwoosh/pushwoosh-ios-sdk"
```
**PushwooshGeozones.xcframework**를 사용하려면 다음 패키지 URL을 입력합니다:
[PushwooshGeozones-XCFramework](https://github.com/Pushwoosh/PushwooshGeozones-XCFramework)
또는 프레임워크를 프로젝트의 **Build Phases**에 있는 **Link Binaries With Libraries**로 간단히 드래그 앤 드롭할 수 있습니다.
2. Info.plist에 다음 키를 추가합니다:
- **NSLocationWhenInUseUsageDescription** – *(필수)* 앱이 포그라운드에서 실행 중일 때만 지오존을 추적합니다.
- **NSLocationAlwaysAndWhenInUseUsageDescription** – *(필수)* 앱이 **포그라운드 및 백그라운드 모두에서** 지오존을 추적하고 권한 요청 대화 상자 팝업을 표시합니다.
- **NSLocationAlwaysUsageDescription** – *(선택 사항)* 앱이 **항상** 지오존을 추적합니다. 앱이 iOS 10 및 이전 버전을 대상으로 하는 경우 사용해야 합니다.
```xml
NSLocationAlwaysAndWhenInUseUsageDescriptionfor app to track Geozones in both conditions and to show a permission request dialogNSLocationWhenInUseUsageDescriptionfor app to track Geozones only while running in the foreground
```
![]()
3. 프레임워크 가져오기
```swift
import PushwooshGeozones
```
```objc
#import
```
4. 지오존 추적 시작
```swift
PWGeozonesManager.shared()?.startLocationTracking()
```
[GitHub reference](https://github.com/Pushwoosh/pushwoosh-quickstart-ios/blob/main/customizing/customizing/Geozones%20Push%20Notification/GeozonesViewController.swift)
```objc
[[PWGeozonesManager sharedManager] startLocationTracking];
```
[GitHub reference](https://github.com/Pushwoosh/pushwoosh-quickstart-ios/blob/main/customizing/customizingObjC/customizingObjC/Geozones%20Push%20Notification/PWGeozonesViewController.m)
##### 예시
```swift
override func viewDidLoad() {
super.viewDidLoad()
// Start Geozones tracking when needed
PWGeozonesManager.shared().startLocationTracking()
}
```
```objc
- (void)viewDidLoad {
[super viewDidLoad];
// Do any additional setup after loading the view.
// Start Geozones tracking when needed
[[PWGeozonesManager sharedManager] startLocationTracking];
}
```
### 리치 미디어 큐 생성
동시에 표시할 여러 리치 미디어 페이지가 있는 경우(예: 둘 이상의 인앱에 대한 트리거 이벤트가 한 번에 발생하거나 다른 트리거 이벤트가 발생할 때 이미 리치 미디어 페이지가 표시되고 있는 경우), 리치 미디어 페이지 표시를 위한 큐를 설정할 수 있습니다. 큐를 생성하려면 아래 설명된 단계를 따릅니다.
1. PWRichMediaPresentingDelegate를 구현하는 클래스를 생성합니다:
```objective-c
@interface ChainedRichMediaPresentingDelegate ()
@property (nonatomic) NSMutableArray *queue;
@property (nonatomic) BOOL inAppIsPresenting;
@end
@implementation ChainedRichMediaPresentingDelegate
- (instancetype)init {
self = [super init];
if (self) {
_queue = [NSMutableArray new];
}
return self;
}
- (BOOL)richMediaManager:(PWRichMediaManager *)richMediaManager shouldPresentRichMedia:(PWRichMedia *)richMedia {
[_queue addObject:richMedia];
return !_inAppIsPresenting;
}
- (void)richMediaManager:(PWRichMediaManager *)richMediaManager didPresentRichMedia:(PWRichMedia *)richMedia {
_inAppIsPresenting = YES;
}
- (void)richMediaManager:(PWRichMediaManager *)richMediaManager didCloseRichMedia:(PWRichMedia *)richMedia {
_inAppIsPresenting = NO;
[_queue removeObject:richMedia];
if (_queue.count) {
[[PWRichMediaManager sharedManager] presentRichMedia:_queue.firstObject];
}
}
- (void)richMediaManager:(PWRichMediaManager *)richMediaManager presentingDidFailForRichMedia:(PWRichMedia *)richMedia withError:(NSError *)error {
[self richMediaManager:richMediaManager didCloseRichMedia:richMedia];
}
@end
```
2\. 델리게이트를 설정합니다:
```objective-c
[PWRichMediaManager sharedManager].delegate = [ChainedRichMediaPresentingDelegate new];
```
### 포스 터치로 리치 알림에 전송된 비디오 자동 재생
[리치 알림 첨부 파일](/ko/developer/pushwoosh-sdk/ios-sdk/ios-rich-notifications-integration/)로 전송된 비디오가 사용자 상호 작용 없이 알림이 확장될 때 자동 재생되도록 하려면 아래 단계를 따릅니다:
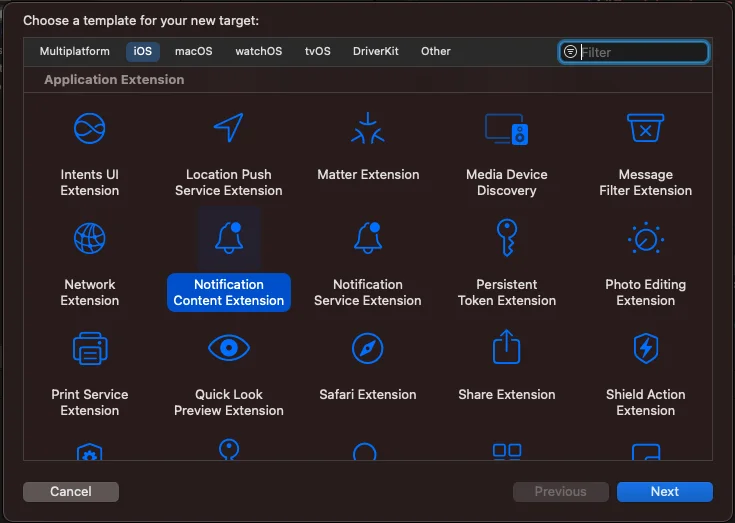
1. 프로젝트에 Notification Content Extension을 추가합니다:
* Xcode에서 File > New > Target을 선택합니다.
* Notification Content Extension을 선택합니다.
* 이름을 지정하고 설정을 완료합니다.
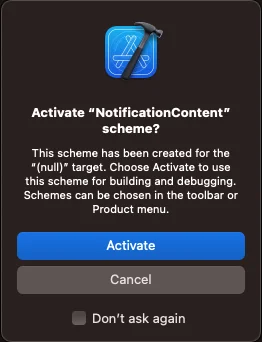
"Activate scheme" 메시지가 표시되면 Cancel을 선택합니다.
2. Content Extension의 속성과 메서드를 다음과 같이 조정합니다:
```
import UIKit
import UserNotifications
import UserNotificationsUI
import AVKit
class NotificationViewController: UIViewController, UNNotificationContentExtension {
var playerController: AVPlayerViewController!
@IBOutlet weak var playerBackgroundView: UIView!
override func viewDidLoad() {
super.viewDidLoad()
// Do any required interface initialization here.
}
func didReceive(_ notification: UNNotification) {
let attachment = notification.request.content.attachments.first
playerController = AVPlayerViewController()
// Set height programmatically
// preferredContentSize.height = 250
if let url = attachment?.url {
setupVideoPlayer(url: url)
} else {
print("No valid URL...")
}
}
private func setupVideoPlayer(url: URL) {
guard let playerController = self.playerController else { return }
let player = AVPlayer(url: url)
playerController.player = player
playerController.view.frame = self.playerBackgroundView.bounds
playerBackgroundView.addSubview(playerController.view)
addChild(playerController)
playerController.didMove(toParent: self)
player.play()
}
```
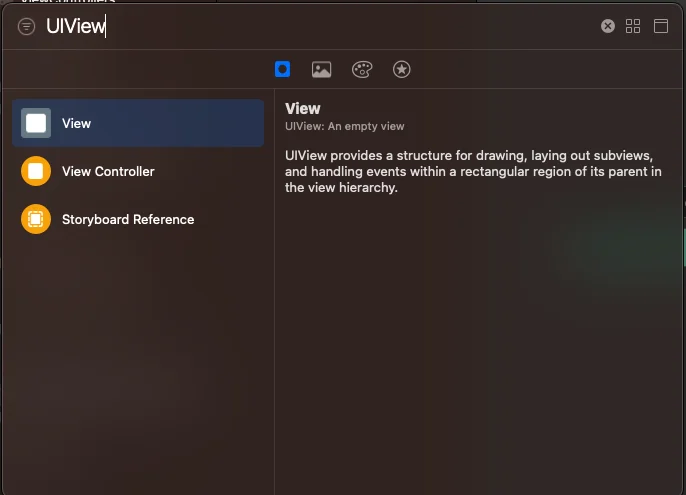
3. MainInterface.storyboard에 UIView를 통합합니다:
4. playerBackgroundView IBOutlet을 방금 추가한 UIView와 연결합니다:
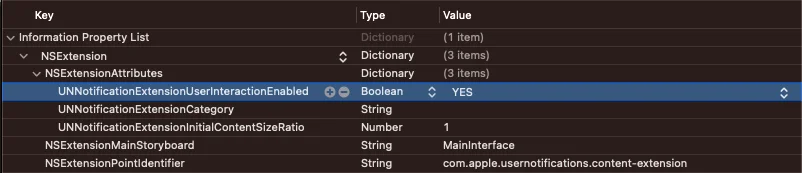
5. info.plist 파일을 다음 항목으로 업데이트합니다:
```
UNNotificationExtensionUserInteractionEnabled = true
```
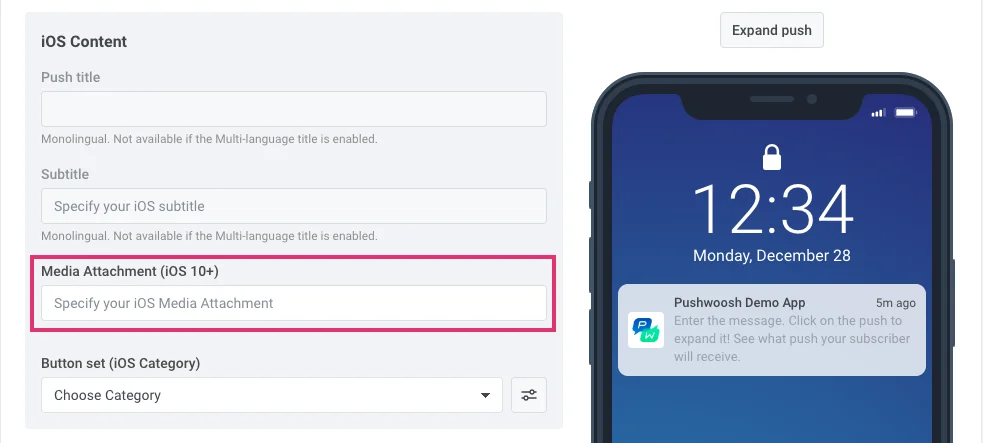
알림에 비디오를 첨부하려면 Control Panel의 Media Attachment 필드에 비디오 URL을 입력합니다:
API [/createMessage](/ko/developer/api-reference/messages-api#createmessage) 요청을 통해 알림을 보낼 때 "ios\_attachment" 매개변수에 URL을 포함하고 "mutable-content" 플래그가 \`1\`로 설정되었는지 확인합니다.
### 사용자 정의 푸시 사운드
푸시 알림 수신 시 사용자 정의 사운드를 재생하려면 먼저 오디오 파일을 프로젝트의 루트 폴더에 넣습니다.
그런 다음 푸시 매개변수에서 사운드 파일 이름을 지정합니다. 메시지의 [iOS 관련 설정](/ko/product/messaging-channels/push-notifications/send-push-notifications/one-time-push#ios)의 Sound 필드를 채우거나 [createMessage API 요청](/ko/developer/api-reference/messages-api/)의 "ios\_sound" 매개변수 값으로 파일 이름을 지정합니다.
사용자 정의 iOS 사운드용 오디오 파일은 **.aif**, **.caf**, **.wav** 형식 중 하나여야 합니다. **파일 이름에 형식을 지정해야 합니다. 그렇지 않으면 Pushwoosh iOS SDK에서 무시됩니다.**
### iOS 임시 푸시
#### 작동 방식
임시 푸시 알림은 사용자의 알림 센터에 조용히 표시되지만 잠금 화면에는 표시되지 않습니다. 이 유형의 푸시는 사용자가 명시적으로 허용할 필요가 없습니다. 사용자가 앱을 설치하고 실행하는 즉시 전송을 시작할 수 있습니다.
그러나 사용자는 여전히 눈에 띄는 푸시 알림을 구독할 수 있습니다. 임시 푸시를 열 때 두 가지 옵션으로 경험을 선택할 수 있습니다. 알림 및 소리 없이 알림 센터에 푸시를 유지하거나, 잠금 화면에 표시되도록 눈에 띄게 푸시를 보낼 수 있도록 허용하는 것입니다.
임시 푸시는 사용자가 앱에서 알림을 받을지 여부에 대해 정보에 입각한 결정을 내릴 수 있도록 설계되었습니다. APN 네이티브 구독 요청은 사용자에게 한 번만 표시되며 나중에 구독하려면 휴대폰의 시스템 설정으로 이동해야 하므로 일부 사용자는 푸시로 어떤 가치를 얻는지 알지 못해 구독하지 않을 수 있습니다. 임시 푸시는 사용자에게 이러한 이해를 제공합니다. 사용자는 푸시 알림으로 전달되는 콘텐츠를 보고 이 콘텐츠에 대해 눈에 띄게 알림을 받아야 할지 결정할 수 있습니다.
#### 구현 방법
1\. [가이드](/ko/developer/pushwoosh-sdk/ios-sdk/setting-up-pushwoosh-ios-sdk/quick-start/)에 따라 Pushwoosh iOS SDK를 통합합니다.
2\. `registerForPushNotifications()` 메서드를 호출하기 전에 프로젝트의 AppDelegate에 다음 문자열을 추가합니다:
```swift
if #available(iOS 12.0, *) {
Pushwoosh.sharedInstance().additionalAuthorizationOptions = UNAuthorizationOptions.provisional
}
```
```objective-c
if (@available(iOS 12.0, *)) {
[Pushwoosh sharedInstance].additionalAuthorizationOptions = UNAuthorizationOptionProvisional;
}
```
이것으로 끝입니다! 앱 사용자는 앱을 설치하면 알림 센터로 직접 메시지를 받게 됩니다.
### 피드백을 공유해 주세요
귀하의 피드백은 더 나은 경험을 만드는 데 도움이 됩니다. SDK 통합 과정에서 문제가 발생하면 언제든지 의견을 들려주세요. 어려움이 있으시면 주저하지 마시고 [이 양식을 통해](https://docs.google.com/forms/d/e/1FAIpQLSd\_0b8jwn-V\_JmoPLIxIFYbHACCQhrzidOZV3ELywoQPXRSxw/viewform) 의견을 공유해 주세요.
 앱 델리게이트 파일(일반적으로 iOS 12 이하는 AppDelegate.m, iOS 13 이상은 SceneDelegate.m)에서 아래 예시에 설명된 대로 적절한 openURL 델리게이트 함수를 추가합니다. 이 예시는 올바른 페이지를 확인하고 URL에서 "id" 값을 파싱한 후 이에 응답하여 PromoPageViewController를 엽니다.
```AppDelegate.swift```
앱 델리게이트 파일(일반적으로 iOS 12 이하는 AppDelegate.m, iOS 13 이상은 SceneDelegate.m)에서 아래 예시에 설명된 대로 적절한 openURL 델리게이트 함수를 추가합니다. 이 예시는 올바른 페이지를 확인하고 URL에서 "id" 값을 파싱한 후 이에 응답하여 PromoPageViewController를 엽니다.
```AppDelegate.swift```
 "Activate scheme" 메시지가 표시되면 Cancel을 선택합니다.
 2. Content Extension의 속성과 메서드를 다음과 같이 조정합니다:
```
import UIKit
import UserNotifications
import UserNotificationsUI
import AVKit
class NotificationViewController: UIViewController, UNNotificationContentExtension {
var playerController: AVPlayerViewController!
@IBOutlet weak var playerBackgroundView: UIView!
override func viewDidLoad() {
super.viewDidLoad()
// Do any required interface initialization here.
}
func didReceive(_ notification: UNNotification) {
let attachment = notification.request.content.attachments.first
playerController = AVPlayerViewController()
// Set height programmatically
// preferredContentSize.height = 250
if let url = attachment?.url {
setupVideoPlayer(url: url)
} else {
print("No valid URL...")
}
}
private func setupVideoPlayer(url: URL) {
guard let playerController = self.playerController else { return }
let player = AVPlayer(url: url)
playerController.player = player
playerController.view.frame = self.playerBackgroundView.bounds
playerBackgroundView.addSubview(playerController.view)
addChild(playerController)
playerController.didMove(toParent: self)
player.play()
}
```
3. MainInterface.storyboard에 UIView를 통합합니다:
2. Content Extension의 속성과 메서드를 다음과 같이 조정합니다:
```
import UIKit
import UserNotifications
import UserNotificationsUI
import AVKit
class NotificationViewController: UIViewController, UNNotificationContentExtension {
var playerController: AVPlayerViewController!
@IBOutlet weak var playerBackgroundView: UIView!
override func viewDidLoad() {
super.viewDidLoad()
// Do any required interface initialization here.
}
func didReceive(_ notification: UNNotification) {
let attachment = notification.request.content.attachments.first
playerController = AVPlayerViewController()
// Set height programmatically
// preferredContentSize.height = 250
if let url = attachment?.url {
setupVideoPlayer(url: url)
} else {
print("No valid URL...")
}
}
private func setupVideoPlayer(url: URL) {
guard let playerController = self.playerController else { return }
let player = AVPlayer(url: url)
playerController.player = player
playerController.view.frame = self.playerBackgroundView.bounds
playerBackgroundView.addSubview(playerController.view)
addChild(playerController)
playerController.didMove(toParent: self)
player.play()
}
```
3. MainInterface.storyboard에 UIView를 통합합니다:
 4. playerBackgroundView IBOutlet을 방금 추가한 UIView와 연결합니다:
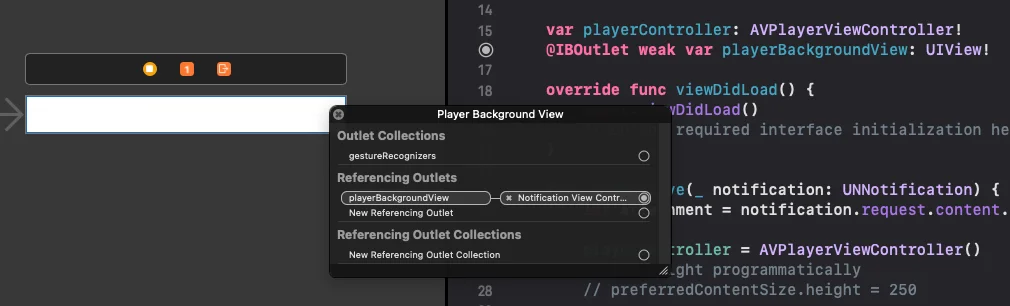 5. info.plist 파일을 다음 항목으로 업데이트합니다:
```
UNNotificationExtensionUserInteractionEnabled = true
```
5. info.plist 파일을 다음 항목으로 업데이트합니다:
```
UNNotificationExtensionUserInteractionEnabled = true
```
 알림에 비디오를 첨부하려면 Control Panel의 Media Attachment 필드에 비디오 URL을 입력합니다:
 API [/createMessage](/ko/developer/api-reference/messages-api#createmessage) 요청을 통해 알림을 보낼 때 "ios\_attachment" 매개변수에 URL을 포함하고 "mutable-content" 플래그가 \`1\`로 설정되었는지 확인합니다.
### 사용자 정의 푸시 사운드
푸시 알림 수신 시 사용자 정의 사운드를 재생하려면 먼저 오디오 파일을 프로젝트의 루트 폴더에 넣습니다.
API [/createMessage](/ko/developer/api-reference/messages-api#createmessage) 요청을 통해 알림을 보낼 때 "ios\_attachment" 매개변수에 URL을 포함하고 "mutable-content" 플래그가 \`1\`로 설정되었는지 확인합니다.
### 사용자 정의 푸시 사운드
푸시 알림 수신 시 사용자 정의 사운드를 재생하려면 먼저 오디오 파일을 프로젝트의 루트 폴더에 넣습니다.
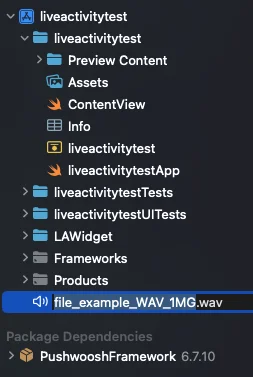 그런 다음 푸시 매개변수에서 사운드 파일 이름을 지정합니다. 메시지의 [iOS 관련 설정](/ko/product/messaging-channels/push-notifications/send-push-notifications/one-time-push#ios)의 Sound 필드를 채우거나 [createMessage API 요청](/ko/developer/api-reference/messages-api/)의 "ios\_sound" 매개변수 값으로 파일 이름을 지정합니다.
사용자 정의 iOS 사운드용 오디오 파일은 **.aif**, **.caf**, **.wav** 형식 중 하나여야 합니다. **파일 이름에 형식을 지정해야 합니다. 그렇지 않으면 Pushwoosh iOS SDK에서 무시됩니다.**
### iOS 임시 푸시
#### 작동 방식
임시 푸시 알림은 사용자의 알림 센터에 조용히 표시되지만 잠금 화면에는 표시되지 않습니다. 이 유형의 푸시는 사용자가 명시적으로 허용할 필요가 없습니다. 사용자가 앱을 설치하고 실행하는 즉시 전송을 시작할 수 있습니다.
그러나 사용자는 여전히 눈에 띄는 푸시 알림을 구독할 수 있습니다. 임시 푸시를 열 때 두 가지 옵션으로 경험을 선택할 수 있습니다. 알림 및 소리 없이 알림 센터에 푸시를 유지하거나, 잠금 화면에 표시되도록 눈에 띄게 푸시를 보낼 수 있도록 허용하는 것입니다.
임시 푸시는 사용자가 앱에서 알림을 받을지 여부에 대해 정보에 입각한 결정을 내릴 수 있도록 설계되었습니다. APN 네이티브 구독 요청은 사용자에게 한 번만 표시되며 나중에 구독하려면 휴대폰의 시스템 설정으로 이동해야 하므로 일부 사용자는 푸시로 어떤 가치를 얻는지 알지 못해 구독하지 않을 수 있습니다. 임시 푸시는 사용자에게 이러한 이해를 제공합니다. 사용자는 푸시 알림으로 전달되는 콘텐츠를 보고 이 콘텐츠에 대해 눈에 띄게 알림을 받아야 할지 결정할 수 있습니다.
#### 구현 방법
1\. [가이드](/ko/developer/pushwoosh-sdk/ios-sdk/setting-up-pushwoosh-ios-sdk/quick-start/)에 따라 Pushwoosh iOS SDK를 통합합니다.
2\. `registerForPushNotifications()` 메서드를 호출하기 전에 프로젝트의 AppDelegate에 다음 문자열을 추가합니다:
그런 다음 푸시 매개변수에서 사운드 파일 이름을 지정합니다. 메시지의 [iOS 관련 설정](/ko/product/messaging-channels/push-notifications/send-push-notifications/one-time-push#ios)의 Sound 필드를 채우거나 [createMessage API 요청](/ko/developer/api-reference/messages-api/)의 "ios\_sound" 매개변수 값으로 파일 이름을 지정합니다.
사용자 정의 iOS 사운드용 오디오 파일은 **.aif**, **.caf**, **.wav** 형식 중 하나여야 합니다. **파일 이름에 형식을 지정해야 합니다. 그렇지 않으면 Pushwoosh iOS SDK에서 무시됩니다.**
### iOS 임시 푸시
#### 작동 방식
임시 푸시 알림은 사용자의 알림 센터에 조용히 표시되지만 잠금 화면에는 표시되지 않습니다. 이 유형의 푸시는 사용자가 명시적으로 허용할 필요가 없습니다. 사용자가 앱을 설치하고 실행하는 즉시 전송을 시작할 수 있습니다.
그러나 사용자는 여전히 눈에 띄는 푸시 알림을 구독할 수 있습니다. 임시 푸시를 열 때 두 가지 옵션으로 경험을 선택할 수 있습니다. 알림 및 소리 없이 알림 센터에 푸시를 유지하거나, 잠금 화면에 표시되도록 눈에 띄게 푸시를 보낼 수 있도록 허용하는 것입니다.
임시 푸시는 사용자가 앱에서 알림을 받을지 여부에 대해 정보에 입각한 결정을 내릴 수 있도록 설계되었습니다. APN 네이티브 구독 요청은 사용자에게 한 번만 표시되며 나중에 구독하려면 휴대폰의 시스템 설정으로 이동해야 하므로 일부 사용자는 푸시로 어떤 가치를 얻는지 알지 못해 구독하지 않을 수 있습니다. 임시 푸시는 사용자에게 이러한 이해를 제공합니다. 사용자는 푸시 알림으로 전달되는 콘텐츠를 보고 이 콘텐츠에 대해 눈에 띄게 알림을 받아야 할지 결정할 수 있습니다.
#### 구현 방법
1\. [가이드](/ko/developer/pushwoosh-sdk/ios-sdk/setting-up-pushwoosh-ios-sdk/quick-start/)에 따라 Pushwoosh iOS SDK를 통합합니다.
2\. `registerForPushNotifications()` 메서드를 호출하기 전에 프로젝트의 AppDelegate에 다음 문자열을 추가합니다: