# Android SDK 사용자 정의

<Aside type="note">
프로젝트에 Pushwoosh Android SDK를 통합했는지 확인하세요:

*   [Firebase 통합](/ko/developer/pushwoosh-sdk/android-sdk/firebase-integration/quick-start/)
*   [Amazon 통합](/ko/developer/pushwoosh-sdk/android-sdk/amazon/)
</Aside>

## 딥링킹

딥링크를 처리할 액티비티에서 scheme, host, pathPrefix 파라미터와 함께 \<data> 태그를 추가하세요.

```txt
<activity
          android:name=".PromoActivity"
          android:label="PromoActivity">
    <intent-filter>
        <action android:name="android.intent.action.VIEW" />
        <category android:name="android.intent.category.DEFAULT" />
        <category android:name="android.intent.category.BROWSABLE" />

        <data android:scheme="com.pushwoosh"
          android:host="promotion"
          android:pathPrefix="" />
    </intent-filter>
</activity>
```

<Aside type="note">
딥링크 페이지 이름(예시의 _promotion_)은 **pathPrefix**가 아닌 **host** 필드로 이동합니다.
</Aside>

위의 예시에서 딥링크는 PromoActivity를 엽니다. 아래의 기본 구현은 간단함을 위해 프로모션 ID 값으로 알림을 표시합니다. 애플리케이션에서는 분명히 더 유용한 작업을 수행할 수 있습니다!

```java
public class PromoActivity extends Activity
{
		@Override
		protected void onCreate(Bundle savedInstanceState)
		{
				super.onCreate(savedInstanceState);

				setContentView(R.layout.deep_link);
				setTitle("Deep link activity");

				Intent intent = getIntent();
	  	  String action = intent.getAction();
	    	Uri data = intent.getData();

		    if (TextUtils.equals(action, Intent.ACTION_VIEW))
		    {
	  		  	openUrl(data);
		    }
		}

		private void openUrl(Uri uri)
		{
				String promoId = uri.getQueryParameter("id");
				Toast.makeText(getApplicationContext(), promoId, Toast.LENGTH_LONG).show();
		}
}
```

## 인앱 구매 추적

[Customer Journeys](/ko/product/customer-journey/pushwoosh-journey-overview)에서 인앱 구매를 추적하려면 다음 메서드를 호출하여 Pushwoosh로 구매 정보를 전송하도록 구성하세요:

```java
Pushwoosh.getInstance().sendInappPurchase(@NonNull String sku, @NonNull BigDecimal price, @NonNull String currency);
```

## 지오존 푸시 알림

지오존 푸시를 사용하려면 `com.pushwoosh:pushwoosh-location` 라이브러리를 추가하고 다음을 호출하세요:

```java
PushwooshLocation.startLocationTracking();
```

**AndroidManifest.xml**에 필요한 권한을 포함하세요:

```xml
<manifest ... >
  <!-- Required for geolocation-based push notifications -->
  <uses-permission android:name="android.permission.ACCESS_COARSE_LOCATION" />

  <!-- Required for precise location tracking -->
  <uses-permission android:name="android.permission.ACCESS_FINE_LOCATION" />

  <!-- Required for background location access on Android 10 (API level 29) and higher -->
  <uses-permission android:name="android.permission.ACCESS_BACKGROUND_LOCATION" />
</manifest>
```

## Pushwoosh로 로컬 알림 사용하기

Pushwoosh Local Notifications API를 사용하는 경우, AndroidManifest.xml에 RECEIVE\_BOOT\_COMPLETED 권한을 추가하세요:

```txt title="AndroidManifest.xml"
<uses-permission android:name="android.permission.RECEIVE_BOOT_COMPLETED"/>x
```

## Android에서 배지 번호 사용하기

Pushwoosh는 다음 Android 런처에서 앱 아이콘 바로가기에 배지 번호를 설정하는 것을 지원합니다:\
Sony, Samsung, LG, HTC, ASUS, ADW, APEX, NOVA, HUAWEI, ZUK, OPPO.\
이 기능을 사용하려면 애플리케이션에 `com.pushwoosh:pushwoosh-badge` 라이브러리를 추가하기만 하면 됩니다.

## 사용자 정의 액티비티 열기

푸시 알림에 응답하여 특정 액티비티를 시작하려면 해당 액티비티에 다음 인텐트 필터를 추가하세요:

```txt title="AndroidManifest.xml"
<activity android:name="YourActivity">
    <intent-filter>
        <action android:name="${applicationId}.MESSAGE"/>
        <category android:name="android.intent.category.DEFAULT"/>
    </intent-filter>
</activity>
```

## 로그 레벨 제어

디버깅 및 통합을 돕기 위해 SDK는 기본적으로 모든 요청을 콘솔에 출력합니다. 프로덕션 빌드를 준비할 때, AndroidManifest.xml에 값이 "ERROR"인 `com.pushwoosh.log_level` 메타데이터를 추가하세요. 이렇게 하면 오류에 대한 정보만 콘솔에 출력됩니다. 다른 옵션은 다음과 같습니다:

_NONE_ - SDK에서 로그 없음\
_ERROR_ - 콘솔에 오류만 표시\
_WARN_ - 경고도 표시\
_INFO_ - 정보 메시지 표시\
_DEBUG_ - 디버그 정보도 표시\
_NOISE_ - SDK가 출력할 수 있는 모든 것과 그 이상

```txt title="AndroidManifest.xml"
<meta-data android:name="com.pushwoosh.log_level" android:value="ERROR" />
```

## Proguard 사용하기

Proguard를 사용할 때 다음 옵션을 추가하세요:

```txt title="proguard-rules.pro"
-keep class com.pushwoosh.** { *; }
-dontwarn com.pushwoosh.**
```

**Google Play Services** 라이브러리의 Proguard 관련 요구 사항은 여기에서 확인하세요:\
[https://developers.google.com/android/guides/setup](https://developers.google.com/android/guides/setup)

## 알림 열기 동작 사용자 정의

푸시 알림의 결과로 표시할 액티비티를 프로그래밍 방식으로 선택해야 하는 경우, 사용자 정의 [NotificationServiceExtension](https://github.com/Pushwoosh/pushwoosh-android-sdk/blob/master/Documentation/notification/NotificationServiceExtension.md)을 생성하고 `com.pushwoosh.notification_service_extension` 값 아래의 메타데이터에 NotificationServiceExtension의 정규화된 클래스 이름을 포함할 수 있습니다.

```txt title="AndroidManifest.xml"
<meta-data
    android:name="com.pushwoosh.notification_service_extension"
    android:value="com.your.package.YourNotificationServiceExtension" />
```

```java title="YourNotificationServiceExtension.java"
public class YourNotificationServiceExtension extends NotificationServiceExtension {
    @Override
    protected void startActivityForPushMessage(PushMessage message) {
      // super.startActivityForPushMessage() starts default launcher activity
      // or activity marked with ${applicationId}.MESSAGE action.
      // Simply do not call it to override this behaviour.
        // super.startActivityForPushMessage(message);

        // start your activity instead:
        Intent launchIntent  = new Intent(getApplicationContext(), YourActivity.class);
        launchIntent.setFlags(Intent.FLAG_ACTIVITY_NEW_TASK | Intent.FLAG_ACTIVITY_RESET_TASK_IF_NEEDED);

        // (Optional) pass notification data to Activity
        launchIntent.putExtra(Pushwoosh.PUSH_RECEIVE_EVENT, message.toJson().toString());

        context.startActivity(launchIntent);
    }
}
```

<Aside type="note">
**중요**

프로덕션 빌드에서 proguard를 사용하는 경우, 사용자 정의 NotificationServiceExtension이 난독화되지 않도록 하세요(`-keep class` 규칙 추가). 그렇지 않으면 ClassNotFoundException이 발생할 수 있습니다.
</Aside>

## 푸시 알림 사용자 정의

푸시 알림의 뷰를 사용자 정의하려면 사용자 정의 Factory를 생성해야 합니다. 사용자 정의 [NotificationFactory](https://pushwoosh.github.io/pushwoosh-android-sdk/pushwoosh/com.pushwoosh.notification/-notification-factory/index.html)를 생성하고 `com.pushwoosh.notification_factory` 값 아래의 메타데이터에 NotificationFactory의 정규화된 클래스 이름을 포함할 수 있습니다.

```txt title="AndroidManifest.xml"
<meta-data
    android:name="com.pushwoosh.notification_factory"
    android:value="com.your.package.YourNotificationFactory" />
```

```java title="YourNotificationFactory"
public class YourNotificationFactory extends PushwooshNotificationFactory {
	@Override
	public Notification onGenerateNotification(@NonNull PushMessage pushMessage) {
		if (customNotification) {
       // TODO: generate and return custom notification
    }

    // return default Pushwoosh notification
		return super.onGenerateNotification(pushMessage);
	}
}
```

## 그룹 요약 사용자 정의

[그룹 요약](https://developer.android.com/training/notify-user/group#set_a_group_summary)의 모양을 사용자 정의하려면 사용자 정의 Factory를 생성하세요. 사용자 정의 SummaryNotificationFactory를 생성하고 com.pushwoosh.summary\_notification\_factory 값 아래의 메타데이터에 SummaryNotificationFactory의 정규화된 클래스 이름을 포함할 수 있습니다.

```java title="AndroidManifest.xml"
<meta-data
    android:name="com.pushwoosh.summary_notification_factory"
    android:value="com.your.package.YourSummaryNotificationFactory" />
```

```java title="YourSummaryNotificationFactory"
public class YourSummaryNotificationFactory extends PushwooshSummaryNotificationFactory {
    @Override
    public String summaryNotificationMessage(int notificationsAmount) {
	      // return the message you want
        return super.summaryNotificationMessage(notificationsAmount);
    }
    @Override
    public int summaryNotificationIconResId() {
	      // return the icon resource id you want
        return super.summaryNotificationIconResId();
    }
}
```

## 프라이빗 엔드포인트 URL

<Aside>
**사용자 정의 플랜** 구독 전용입니다. 자세한 내용은 [영업팀](https://www.pushwoosh.com/demo/?utm_source=docs&utm_medium=post&utm_campaign=customizing-android-sdk)에 문의하세요.
</Aside>

Pushwoosh는 사용자 정의 플랜 구독 고객을 위해 프라이빗 엔드포인트를 제공합니다. Android SDK에 프라이빗 엔드포인트를 설정하려면 **AndroidManifest.xml** 파일에 다음을 추가해야 합니다:

```txt title="AndroidManifest.xml"
<meta-data android:name="com.pushwoosh.base_url" android:value="PUSHWOOSH_PRIVATE_ENDPOINT_URL_PROVIDED" />
```

## 리치 미디어 큐 생성

동시에 여러 리치 미디어 페이지를 표시해야 하는 경우(예: 두 개 이상의 인앱에 대한 트리거 이벤트가 동시에 발생하거나, 다른 트리거 이벤트가 발생할 때 이미 리치 미디어 페이지가 표시되고 있는 경우), 리치 미디어 페이지 표시를 위한 큐를 설정할 수 있습니다. 큐를 생성하려면 프로젝트에 다음 코드를 추가하세요:

```java title="Application.java"
package com.pushwoosh.testingapp;

import com.pushwoosh.RichMediaManager;
import com.pushwoosh.exception.PushwooshException;
import com.pushwoosh.richmedia.RichMediaPresentingDelegate;
import com.pushwoosh.richmedia.RichMedia;
import com.pushwoosh.internal.utils.PWLog;

import java.util.ArrayDeque;
import java.util.concurrent.locks.ReentrantLock;

public class DefaultRichMediaPresentingDelegate implements RichMediaPresentingDelegate {
    private final String TAG = DefaultRichMediaPresentingDelegate.class.getSimpleName();
    private ArrayDeque<RichMedia> richMediaQueue = new ArrayDeque<>();
    private RichMedia currentRichMedia = null;
    private ReentrantLock reentrantLock;

    public DefaultRichMediaPresentingDelegate() {
        PWLog.noise(TAG, "new DefaultRichMediaPresentingDelegate:" + this);
        reentrantLock = new ReentrantLock();
    }

    @Override
    public boolean shouldPresent(RichMedia richMedia) {
        PWLog.noise(TAG, "shouldPresent:" + richMedia);
        if (currentRichMedia == null) {
            PWLog.noise(TAG, "currentRichMedia is null");
        }
        if (richMedia.isLockScreen()) {
            PWLog.noise(TAG, "isLockScreen is true");
            return true;
        }
        try {
            reentrantLock.lock();
            if (currentRichMedia == null) {
                PWLog.noise(TAG, "show:" + richMedia);
                currentRichMedia = richMedia;
                return true;
            } else {
                PWLog.noise(TAG, "add to queue:" + richMedia);
                richMediaQueue.add(richMedia);
                return false;
            }
        } finally {
            reentrantLock.unlock();
        }
    }

    @Override
    public void onPresent(RichMedia richMedia) {
        PWLog.noise(TAG, "onPresent" + richMedia);
    }

    @Override
    public void onError(RichMedia richMedia, PushwooshException pushwooshException) {
        PWLog.error(TAG, pushwooshException + " richMedia:"+richMedia.toString());
        tryShowNextRichMediaThreadSafety();
    }

    @Override
    public void onClose(RichMedia richMedia) {
        PWLog.noise(TAG, "onClose:" + richMedia);
        tryShowNextRichMediaThreadSafety();
    }

    private void tryShowNextRichMediaThreadSafety() {
        try {
            reentrantLock.lock();
            tryShowNextRichMedia();
        } finally {
            reentrantLock.unlock();
        }
    }

    private void tryShowNextRichMedia() {
        if (!richMediaQueue.isEmpty()) {
			currentRichMedia = richMediaQueue.poll();
			PWLog.noise(TAG, "try manual show:" + currentRichMedia);
			RichMediaManager.present(currentRichMedia);
		} else {
			PWLog.noise(TAG, "richMediaQueue is empty");
			currentRichMedia = null;
		}
    }
}
```

<Aside type="caution" title="Important">
**Activity** 대신 **Application**에 큐를 설정하는 것을 강력히 권장합니다. 그렇지 않으면 여러 큐가 생성될 수 있습니다.
</Aside>

<Aside type="note">
각 [postEvent](/ko/developer/api-reference/user-centric-api/#postevent) 메서드 호출은 하나의 인앱만 표시할 수 있으며, 각 푸시는 하나의 리치 미디어에만 연결될 수 있습니다. 여러 인앱을 표시하려면 필요한 횟수만큼 [postEvent](/ko/developer/api-reference/user-centric-api/#postevent) 메서드를 호출하세요.
</Aside>

## 사용자 정의 사운드 푸시

<Aside>
Android 8+ 기기에서 사용 가능합니다.
</Aside>

1.  오디오 파일을 적절한 폴더에 넣으세요. 네이티브 Android 프레임워크의 경우, 파일은 `/app/src/main/res/raw` 폴더에 위치해야 합니다.

<Aside type="note">
다른 프레임워크로 빌드된 프로젝트에서 오디오 파일을 어디에 배치해야 하는지는 해당 가이드를 참조하세요.
</Aside>

2\. [알림 채널](/ko/developer/pushwoosh-sdk/android-sdk/notification-channels/)을 생성하세요.

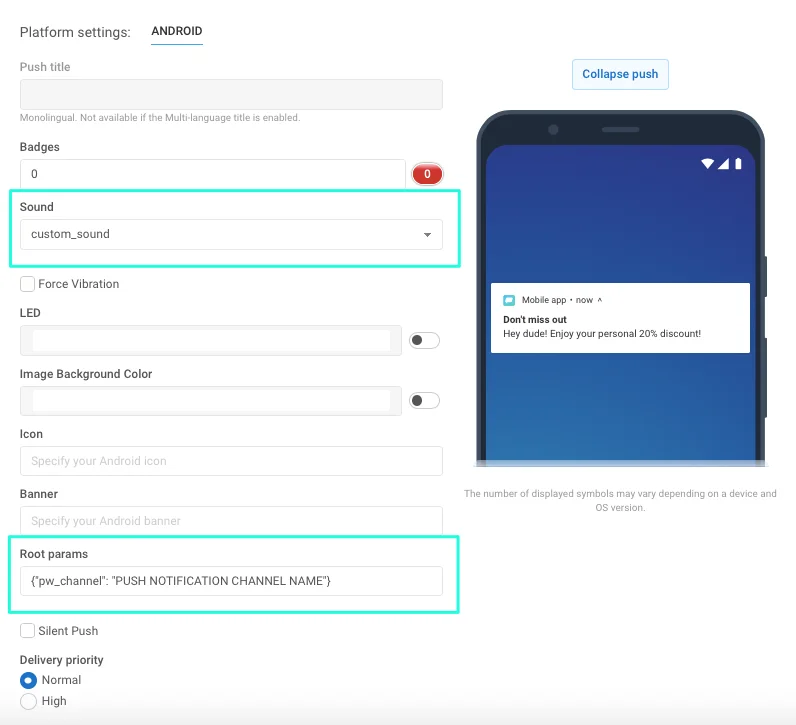
3\. 푸시 메시지를 구성하는 동안 사운드를 선택하세요.

<img src="/android-push-notifications-customizing-android-sdk-5.0-1.webp" alt=""/>

4\. 메시지가 속할 알림 채널을 설정하세요. 이렇게 하려면 "Android root params" 필드에 다음을 지정하세요:`{"pw_channel": "PUSH NOTIFICATION CHANNEL NAME"} //` `_`여기에 사용자 정의 사운드가 있는 채널의 이름을 지정해야 합니다`_`

원격 API를 사용하는 경우, /createMessage API 요청 내에서 파라미터를 다음과 같이 설정하세요:

```java
"android_root_params": {"pw_channel": "push"} // 여기에 사용자 정의 사운드가 있는 채널의 이름을 지정해야 합니다. 예를 들어, push.wav 사운드가 있는 알림의 경우 "push"입니다.
"android_sound": "push" // 여기에 확장자 없이 파일 이름을 지정해야 합니다.
```

지정된 파라미터로 푸시를 보내면, 선택한 사운드가 있는 알림 채널이 Android 8+의 모든 기기에 생성됩니다.

이제 사용자 정의 사운드로 푸시를 보내려면 해당 사운드와 연결된 채널만 지정하면 됩니다.

### 사용자 정의 알림 사운드를 위한 Proguard 규칙

앱이 코드 및 리소스 축소를 위해 proguard를 사용하는 경우, 사운드 파일을 손상시키지 않고 외부 라이브러리에서 사용할 수 있도록 유지하는 것이 중요합니다. **build.gradle**에 **`minifyEnabled = true`** 속성을 사용하는 경우, **proguard-rules.pro**에 다음 규칙을 추가하세요:

```
-keep public class your.package.name.R$raw {
 *;
}
```

**`shrinkResources=true`** 속성을 사용하여 코드 축소 외에 앱의 리소스를 축소하는 경우, 유지하려는 리소스를 추가로 지정해야 합니다. 이렇게 하려면 새 XML 파일을 아무 이름으로나 생성하여 프로젝트의 어딘가(예: res/xml)에 저장하고, **`resources`** 태그의 **`tools:keep`** 파라미터 아래에 리소스 이름을 지정하세요:

```
<?xml version="1.0" encoding="utf-8"?>
<resources xmlns:tools="http://schemas.android.com/tools"
 tools:keep="@raw/*"
/>
```

## Android SDK 메타데이터 플래그 전체 목록

플래그를 설정하려면 **application** 태그 내의 **AndroidManifest.xml** 파일에 메타데이터 블록을 추가해야 합니다. 예를 들어, Pushwoosh 애플리케이션 ID를 설정하려면 **AndroidManifest.xml** 파일에 다음 코드를 추가하세요:

```txt title="AndroidManifest.xml"
<meta-data
    android:name="com.pushwoosh.appid"
    android:value="XXXXX-XXXXX" />
```

<table><thead><tr><th width="262.33243208828077" align="center">플래그</th><th width="284" align="center">설명</th><th align="center">가능한 값</th></tr></thead><tbody><tr><td align="center">com.pushwoosh.appid</td><td align="center">Pushwoosh 애플리케이션 ID를 설정합니다.</td><td align="center">XXXXX-XXXXX</td></tr><tr><td align="center">com.pushwoosh.log_level</td><td align="center">로깅 레벨을 설정합니다. 자세한 내용은 <a href="#controlling-log-level">로그 레벨 제어</a>를 참조하세요. </td><td align="center">NONE / ERROR / WARN / INFO / <strong>DEBUG</strong> (<em>기본값</em>) / NOISE</td></tr><tr><td align="center">com.pushwoosh.base_url</td><td align="center">Pushwoosh 서버 기본 URL을 재정의합니다.</td><td align="center"><a href="https://cp.pushwoosh.com/json/1.3/">https://cp.pushwoosh.com/json/1.3/</a> (<em>기본값</em>)</td></tr><tr><td align="center">com.pushwoosh.notification_service_extension</td><td align="center">사용자 정의 NotificationServiceExtension. 자세한 내용은 <a href="#customising-notification-open-behaviour">알림 열기 동작 사용자 정의</a>를 참조하세요.  </td><td align="center">com.myapp.MyNotificationServiceExtension</td></tr><tr><td align="center">com.pushwoosh.notification_factory</td><td align="center"><p>사용자 정의 NotificationFactory.</p><p>자세한 내용은 <a href="#customizing-push-notifications">푸시 알림 사용자 정의</a>를 참조하세요. </p></td><td align="center">com.myapp.MyNotificationFactory</td></tr><tr><td align="center">com.pushwoosh.summary_notification_factory</td><td align="center">사용자 정의 SummaryNotificationFactory.</td><td align="center">com.myapp.MySummaryNotificationFactory</td></tr><tr><td align="center">com.pushwoosh.multi_notification_mode</td><td align="center">true인 경우, 알림이 그룹화됩니다. false인 경우, 마지막으로 수신된 알림만 표시됩니다.</td><td align="center">true / <strong>false</strong> (<em>기본값</em>)</td></tr><tr><td align="center">com.pushwoosh.allow_server_communication</td><td align="center">true인 경우, SDK가 Pushwoosh 서버로 네트워크 요청을 보낼 수 있습니다.</td><td align="center"><strong>true</strong> (<em>기본값</em>) / false</td></tr><tr><td align="center">com.pushwoosh.handle_notifications_using_workmanager</td><td align="center">true인 경우, WorkManager가 알림을 처리하도록 설정됩니다.</td><td align="center">true / <strong>false</strong> (<em>기본값</em>)</td></tr><tr><td align="center">com.pushwoosh.notification_icon</td><td align="center">사용자 정의 알림 (작은) 아이콘 리소스 이름. null인 경우, 기본 애플리케이션 아이콘이 사용됩니다. </td><td align="center">res/drawable-xxhdpi-v11/notification_small_icon.png / null</td></tr><tr><td align="center">com.pushwoosh.notification_icon_color</td><td align="center">알림 (작은) 아이콘 배경색.</td><td align="center">#FFFFFF</td></tr><tr><td align="center">com.pushwoosh.allow_collecting_device_data</td><td align="center">true인 경우, SDK가 기기 데이터를 수집하여 Pushwoosh로 전송할 수 있습니다.</td><td align="center"><strong>true</strong> (<em>기본값</em>) / false</td></tr><tr><td align="center">com.pushwoosh.allow_collecting_device_os_version</td><td align="center">true인 경우, SDK가 기기 OS 버전을 수집하여 Pushwoosh로 전송할 수 있습니다.</td><td align="center"><strong>true</strong> (<em>기본값</em>) / false</td></tr><tr><td align="center">com.pushwoosh.allow_collecting_device_locale</td><td align="center">true인 경우, SDK가 기기 로케일을 수집하여 Pushwoosh로 전송할 수 있습니다.</td><td align="center"><strong>true</strong> (<em>기본값</em>) / false</td></tr><tr><td align="center">com.pushwoosh.allow_collecting_device_model</td><td align="center">true인 경우, SDK가 기기 모델을 수집하여 Pushwoosh로 전송할 수 있습니다.</td><td align="center"><strong>true</strong> (<em>기본값</em>) / false</td></tr><tr><td align="center">com.pushwoosh.in_app_business_solutions_capping</td><td align="center">하루에 <em>push-unregister</em> 인앱이 표시될 수 있는 횟수를 제한합니다.</td><td align="center"><strong>1</strong> (<em>기본값</em>), 2, ..., n</td></tr><tr><td align="center">com.pushwoosh.start_foreground_service</td><td align="center">true인 경우, PushwooshLocation.startLocationTracking() 호출과 함께 Foreground Service가 시작됩니다.</td><td align="center">true / <strong>false</strong> (<em>기본값</em>)</td></tr><tr><td align="center">com.pushwoosh.foreground_service_notification_text</td><td align="center">“com.pushwoosh.start_foreground_service” 키에 대해 Foreground Service가 시작될 때 생성되는 알림의 텍스트를 설정합니다.</td><td align="center"><strong>Work in progress</strong> (<em>기본값</em>)</td></tr><tr><td align="center">com.pushwoosh.foreground_service_notification_channel_name</td><td align="center">“com.pushwoosh.start_foreground_service” 키에 대해 Foreground Service가 시작될 때 생성되는 알림의 채널 이름을 설정합니다. </td><td align="center"><strong>Foreground service</strong> (<em>기본값)</em></td></tr><tr><td align="center">com.pushwoosh.trusted_package_names</td><td align="center">지정된 패키지와 Pushwoosh HWID 공유를 허용합니다.</td><td align="center">"com.mycompany.myapp1, com.mycompany.myapp2"</td></tr></tbody></table>

## TTL(Time-To-Live)을 통한 푸시 알림 삭제

TTL(Time-to-Live)을 사용하여 지정된 기간 후에 푸시 알림을 자동으로 삭제하려면 다음 단계를 따르세요:

1.  사용자 정의 NotificationFactory를 생성하세요. [자세히 알아보기](#customizing-push-notifications)

2.  `onGenerateNotification()` 메서드에서 `Notification.Builder` 또는 `NotificationCompat.Builder` 클래스를 사용하여 알림을 생성하고 `setTimeoutAfter` 메서드를 호출하세요:

```java
public class YourNotificationFactory extends PushwooshNotificationFactory {

    @Override
    public Notification onGenerateNotification(@NonNull PushMessage pushMessage) {
        Notification.Builder builder = new Notification.Builder(getApplicationContext(), addChannel(pushData));

        Notification notification = builder.setContentText(pushData.getMessage())
                                           .setContentTitle(title)
                                           .setContentText(text)
                                           // rest of your notification creation code
                                           .setTimeoutAfter(timeout) // 알림이 취소되기 전까지의 시간(밀리초)
                                           .build();
    }
}

```

## 피드백을 공유해주세요

여러분의 피드백은 더 나은 경험을 만드는 데 도움이 됩니다. SDK 통합 과정에서 문제가 발생하면 언제든지 알려주세요. 어려움이 있으시면 주저하지 마시고 [이 양식](https://docs.google.com/forms/d/e/1FAIpQLSd_0b8jwn-V_JmoPLIxIFYbHACCQhrzidOZV3ELywoQPXRSxw/viewform)을 통해 의견을 공유해주세요.