# 사용자 지정 데이터 전송
이 가이드는 푸시 알림 페이로드에 사용자 지정 데이터를 앱으로 전달하는 방법을 더 잘 이해하는 데 도움이 될 것입니다. 이를 통해 앱이 해당 푸시에 반응하고 다양한 작업을 수행할 수 있습니다.
사용자 지정 데이터를 처리하는 방법은 비즈니스 목표에 따라 다를 수 있습니다. 이 문서에서는 사용자 지정 데이터를 파싱하고 간단한 작업을 수행하는 몇 가지 기본 예제를 보여줍니다:
* 앱의 배경색 변경하기
* 앱에서 사용자 지정 페이지 열기
## 전제 조건
이 가이드는 iOS 네이티브 개발을 다룹니다. [iOS 시작 가이드](/ko/developer/pushwoosh-sdk/ios-sdk/setting-up-pushwoosh-ios-sdk/quick-start/)에 따라 iOS 샘플 애플리케이션이 구성되어 있고 푸시 알림을 수신하고 있다고 가정합니다.
`AppDelegate`의 `didFinishLaunchingWithOptions` 함수에서, 푸시 알림 처리를 위해 `self.viewController`를 델리게이트로 사용할 것입니다:
```swift
func application(_ application: UIApplication, didFinishLaunchingWithOptions launchOptions: [UIApplication.LaunchOptionsKey: Any]?) -> Bool {
Pushwoosh.sharedInstance().delegate = self.viewController
Pushwoosh.sharedInstance().registerForPushNotifications()
if let launchOptions = launchOptions {
Pushwoosh.sharedInstance().handlePushReceived(launchOptions)
}
return true
}
```
`ViewController`는 `PWMessagingDelegate` 프로토콜을 구현합니다:
```swift
extension ViewController: PWMessagingDelegate
```
따라서 수신된 푸시 알림을 처리하는 `onMessageOpened` 함수를 가집니다:
```swift
// 사용자가 푸시 알림을 눌렀을 때
func pushwoosh(_ pushwoosh: Pushwoosh, onMessageOpened message: PWMessage) {}
```
## 다른 ViewController 열기 및 배경색 변경
이제 푸시 페이로드에서 `customData`를 가져옵니다. 예를 들어, 뷰의 배경색과 할인율을 변경해 보겠습니다. 사용자 지정 데이터에 JSON 객체 형식으로 `“r”`, `“g”`, `“b”`, `"d"` 항목이 포함될 것이라고 가정합니다:
```swift
guard let customDataJson = message.customData,
let redString = customDataJson["r"] as? String,
let greenString = customDataJson["g"] as? String,
let blueString = customDataJson["b"] as? String,
let discount = customDataJson["d"] as? String else {
return
}
setViewBackgroundColor(red: redString, green: greenString, blue: blueString, discount: discount)
```
다음 함수를 사용하여 새 ViewController를 열고 배경색과 할인율을 설정합니다:
```swift
func setViewBackgroundColor(red: String, green: String, blue: String, discount: String) {
let red = CGFloat((red as NSString).floatValue)
let green = CGFloat((green as NSString).floatValue)
let blue = CGFloat((blue as NSString).floatValue)
let color = UIColor(red: red / 255.0, green: green / 255.0, blue: blue / 255.0, alpha: 1)
if let topController = UIApplication.shared.topMostController() {
let storyboard = UIStoryboard(name: "Main", bundle: nil)
if let customViewController = storyboard.instantiateViewController(withIdentifier: "custom_page") as? CustomPageViewController {
customViewController.discount = discount
customViewController.bgColor = color
topController.present(customViewController, animated: true, completion: nil)
}
}
}
```
예제를 테스트해 보겠습니다. Pushwoosh Journey로 이동하여 캔버스에 **푸시 요소**를 추가합니다. 다음으로 **새 콘텐츠 만들기**를 클릭합니다. 열리는 푸시 콘텐츠 양식에 푸시 알림 텍스트를 입력합니다.
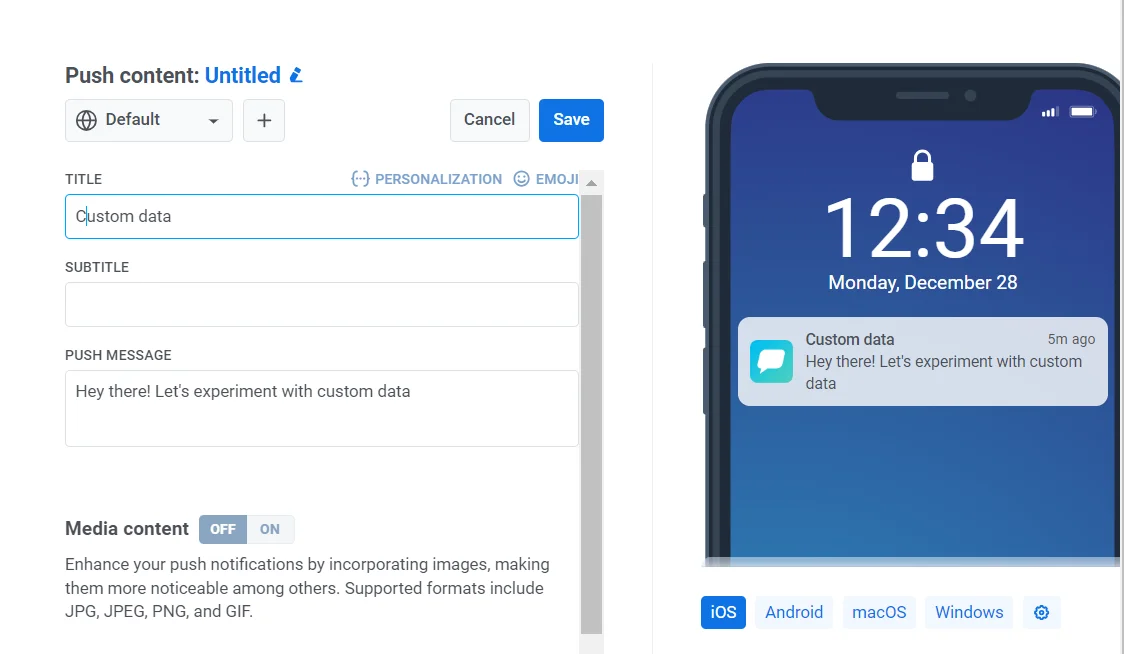 그런 다음 `사용자 지정 데이터 전송`을 켭니다. 사용자 지정 데이터 필드에 JSON을 삽입합니다.
사용자 지정 데이터 형식을 `“r”`, `“g”`, `“b”` 값이 포함된 JSON 객체로 결정했으므로, 제어판의 `“사용자 지정 데이터”` 필드를 사용하고 여기에 JSON 객체 `{"r":"30", "g":"144", "b":"255", "d":"25"}`를 채워야 합니다:
그런 다음 `사용자 지정 데이터 전송`을 켭니다. 사용자 지정 데이터 필드에 JSON을 삽입합니다.
사용자 지정 데이터 형식을 `“r”`, `“g”`, `“b”` 값이 포함된 JSON 객체로 결정했으므로, 제어판의 `“사용자 지정 데이터”` 필드를 사용하고 여기에 JSON 객체 `{"r":"30", "g":"144", "b":"255", "d":"25"}`를 채워야 합니다:
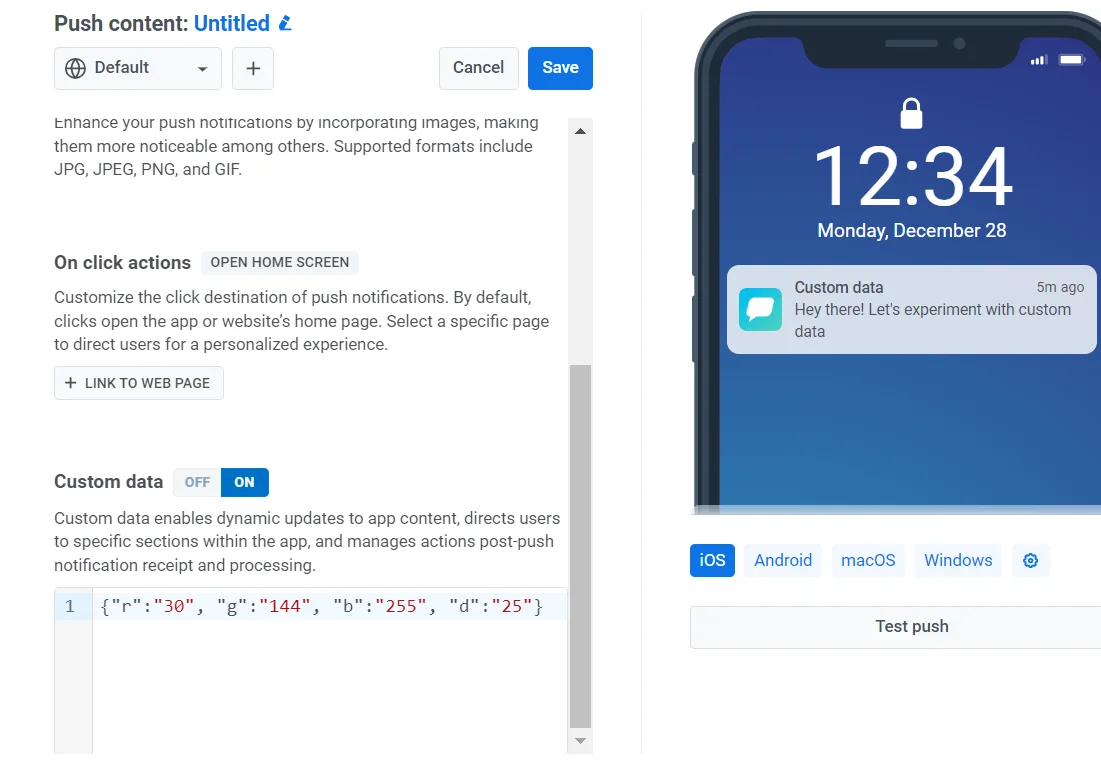 푸시 알림을 탭하면 `CustomPageViewController`가 열리고 배경색이 설정되며 할인이 적용됩니다:
 CustomPageViewController 코드:
```swift
class CustomPageViewController: UIViewController {
var bgColor: UIColor?
var discount: String?
@IBOutlet weak var titleLabel: UILabel!
override func viewDidLoad() {
super.viewDidLoad()
self.view.backgroundColor = self.bgColor
if self.discount != nil {
self.titleLabel?.text = "ONLY TODAY GET \(self.discount!)% DISCOUNT!"
}
}
func showPromoPage(discount: String) {
let vc = CustomPageViewController()
vc.bgColor = self.view.backgroundColor
vc.discount = discount
vc.modalTransitionStyle = UIModalTransitionStyle.crossDissolve
if self.presentedViewController != nil {
self.dismiss(animated: true, completion: {
self.present(vc, animated: true, completion: nil)
})
} else {
self.present(vc, animated: true, completion: nil)
}
}
@IBAction func closeButtonAction(_ sender: Any) {
self.dismiss(animated: true)
}
}
```
할인 값은 푸시 알림 페이로드의 JSON에서 `"d"` 매개변수로 올 것이라고 가정합니다. 푸시 알림 페이로드는 크기가 제한되어 있으므로 매개변수에 짧은 이름을 사용하는 것이 좋습니다.
```swift
guard let customDataJson = message.customData,
let redString = customDataJson["r"] as? String,
let greenString = customDataJson["g"] as? String,
let blueString = customDataJson["b"] as? String,
let discount = customDataJson["d"] as? String else {
return
}
```
푸시 알림 페이로드에서 전달하는 매개변수에 따라 다른 View Controller를 초기화하고 여는 코드를 작성할 수 있습니다.
## A/B 테스트 뷰 컨트롤러 열기
푸시 알림에서 사용자 지정 데이터를 사용하는 또 다른 사례를 고려해 보겠습니다. 예를 들어, 한 사용자 세그먼트에는 하나의 뷰 컨트롤러를 열고 다른 사용자 세그먼트에는 다른 뷰 컨트롤러를 열어야 합니다. 간단히 말해, 애플리케이션에서 A/B 테스트를 위해 사용자 지정 데이터를 사용할 수 있습니다.
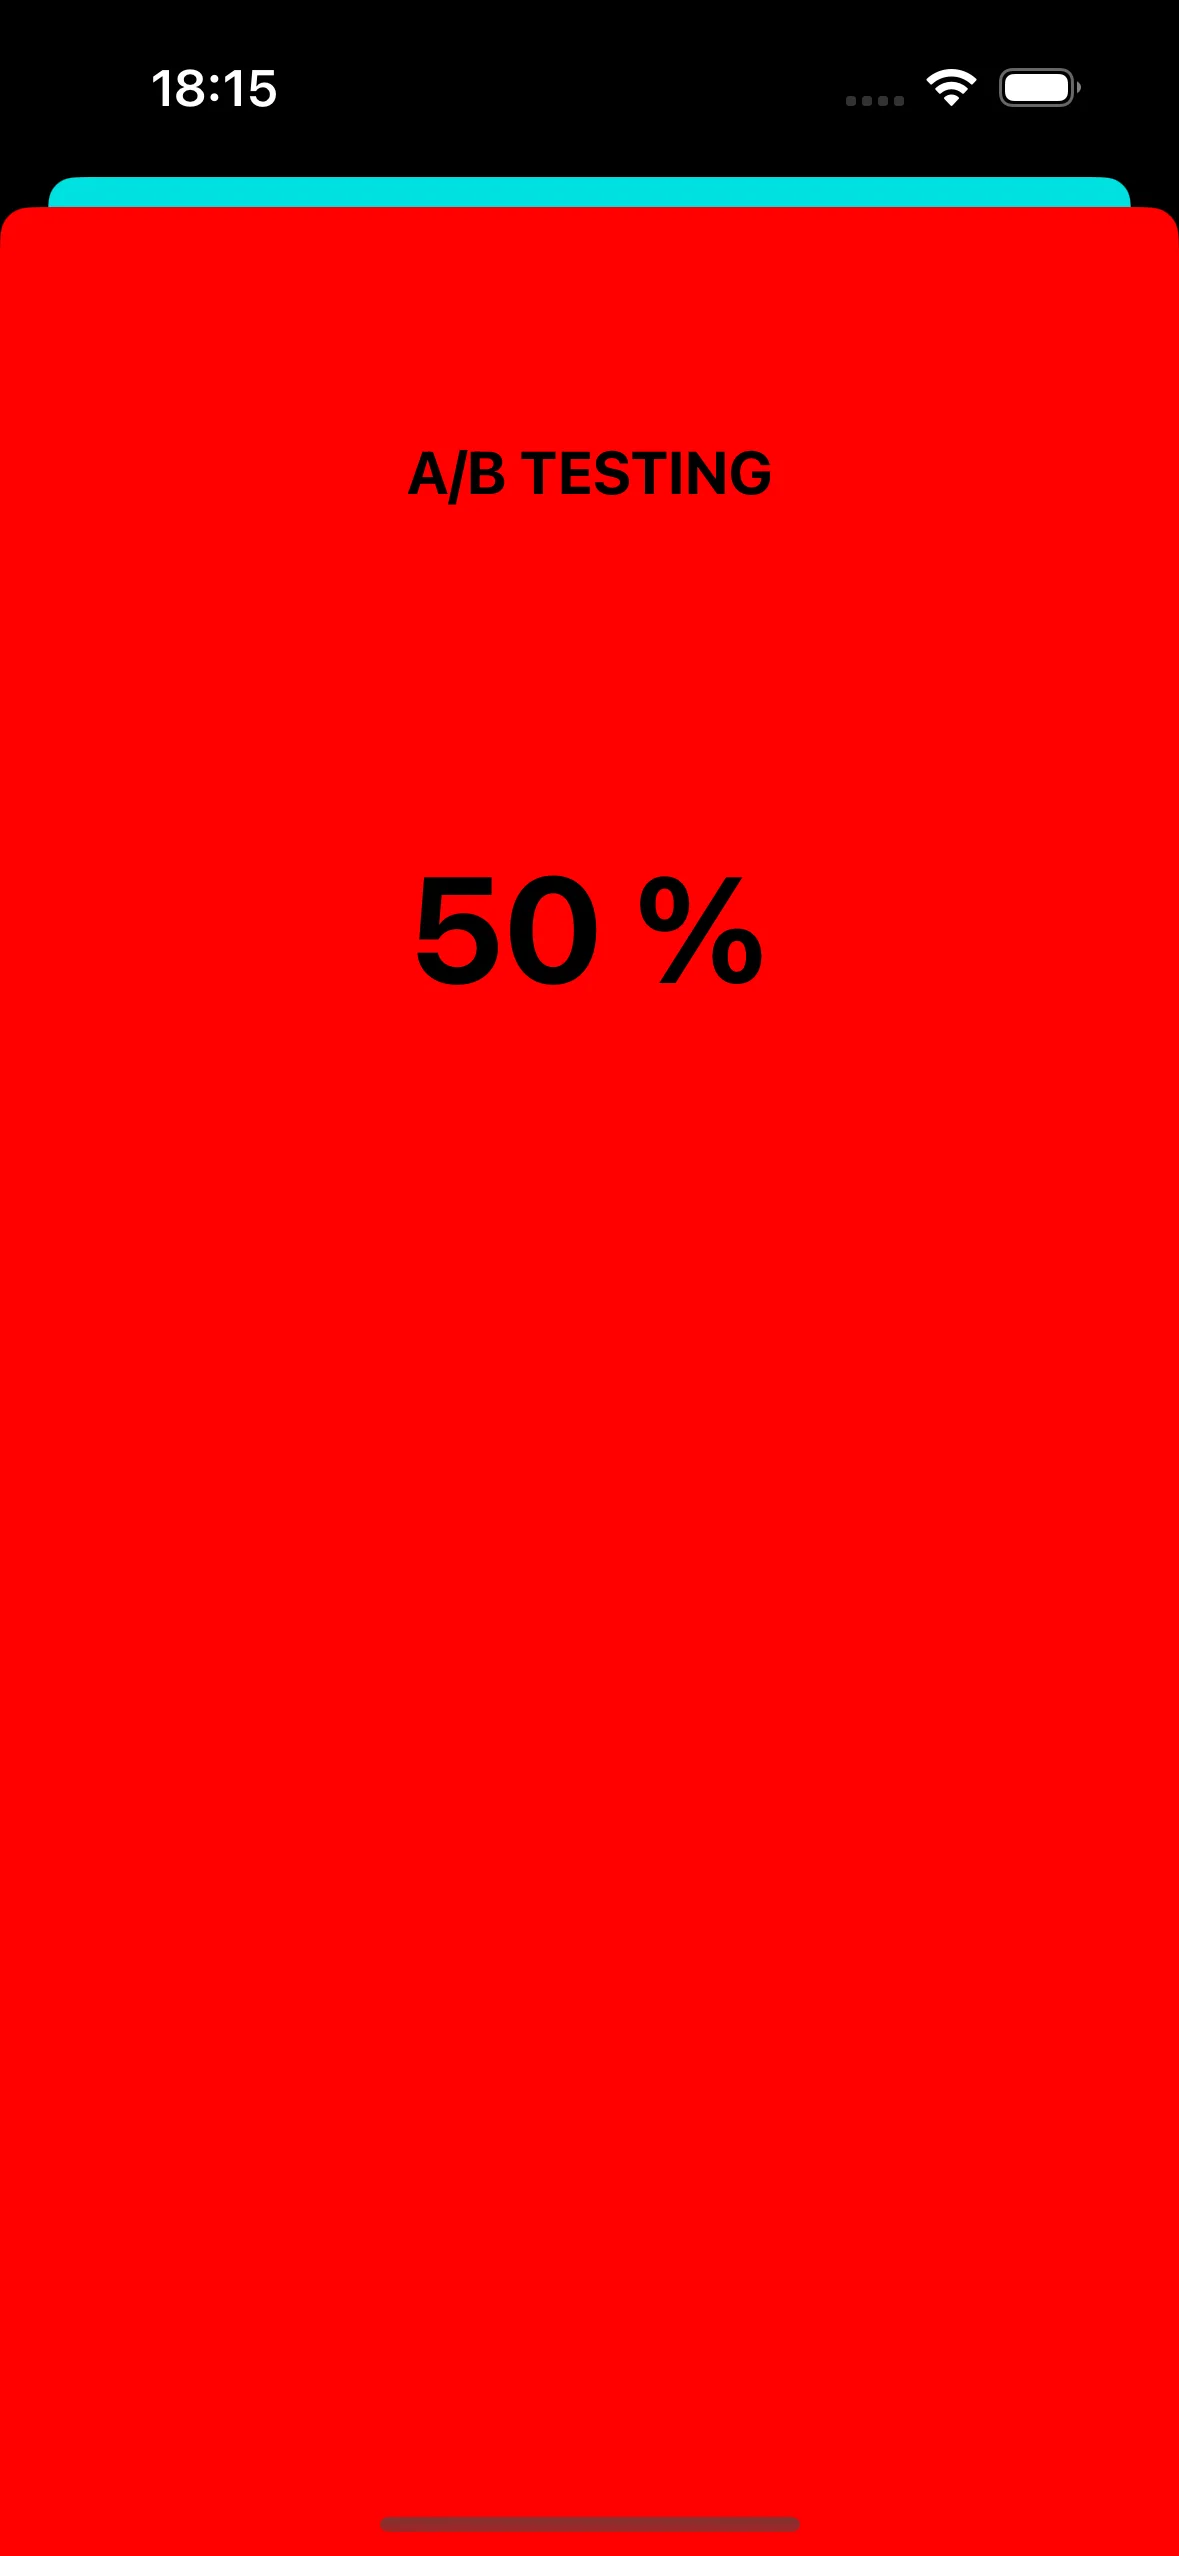
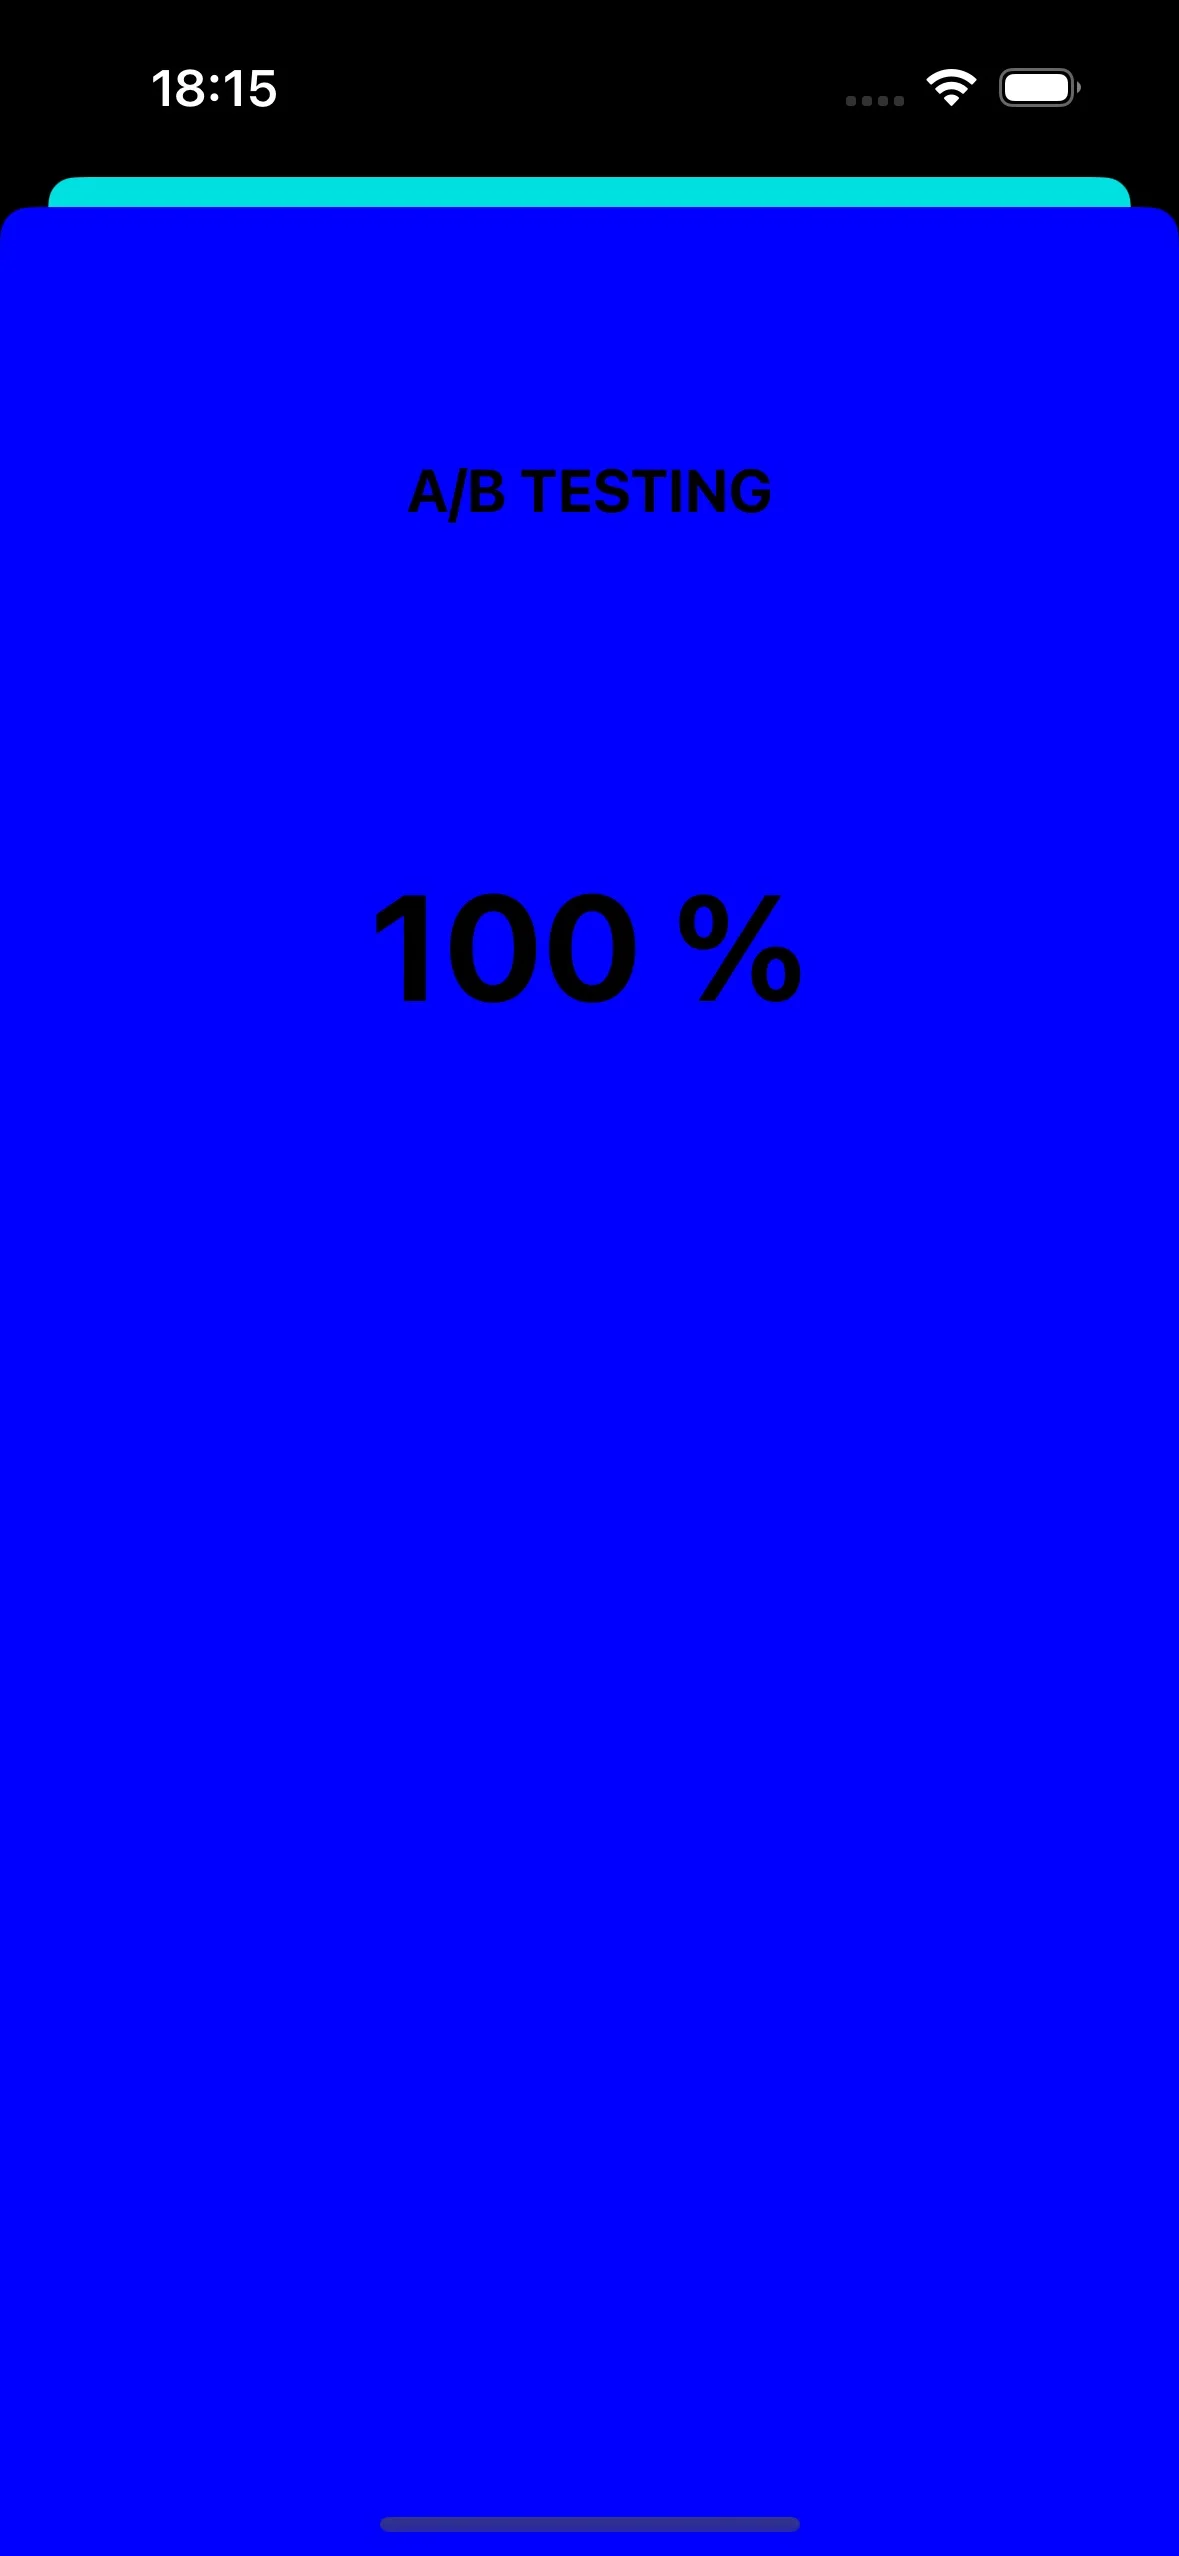
두 개의 뷰 컨트롤러를 만들어 보겠습니다. 한 컨트롤러(A)는 할인 값으로 열리고, 두 번째 컨트롤러(B)는 다른 할인 매개변수로 열립니다.
이제 푸시 알림 페이로드에 따라 적절한 뷰 컨트롤러를 여는 코드를 작성해 보겠습니다:
```swift
func pushwoosh(_ pushwoosh: Pushwoosh, onMessageOpened message: PWMessage) {
// MARK: - A/B Testing via Custom Data
guard let customDataJson = message.customData,
let viewController = customDataJson["vc"] as? String else {
return
}
if viewController == "A" {
setControllerA()
} else if viewController == "B" {
setControllerB()
}
}
func setControllerA() {
if let topController = UIApplication.shared.topMostController() {
let storyboard = UIStoryboard(name: "Main", bundle: nil)
if let customViewController = storyboard.instantiateViewController(withIdentifier: "a_vc") as? AViewController {
customViewController.discountA = "50"
topController.present(customViewController, animated: true, completion: nil)
}
}
}
func setControllerB() {
if let topController = UIApplication.shared.topMostController() {
let storyboard = UIStoryboard(name: "Main", bundle: nil)
if let customViewController = storyboard.instantiateViewController(withIdentifier: "b_vc") as? BViewController {
customViewController.discountB = "100"
topController.present(customViewController, animated: true, completion: nil)
}
}
}
```
사용자 지정 데이터 필드에 JSON을 추가합니다.
```
{
"vc": "A"
}
// 사용자 지정 데이터 선택 (A 또는 B)
{
"vc": "B"
}
```
푸시 페이로드에서 보낸 사용자 지정 데이터(`'vc': 'A'` 또는 `'vc': 'B'`)에 따라, 한 사용자 세그먼트는 하나의 컨트롤러를 열고 다른 사용자 세그먼트는 다른 컨트롤러를 엽니다.
#### 뷰 컨트롤러 "A"
CustomPageViewController 코드:
```swift
class CustomPageViewController: UIViewController {
var bgColor: UIColor?
var discount: String?
@IBOutlet weak var titleLabel: UILabel!
override func viewDidLoad() {
super.viewDidLoad()
self.view.backgroundColor = self.bgColor
if self.discount != nil {
self.titleLabel?.text = "ONLY TODAY GET \(self.discount!)% DISCOUNT!"
}
}
func showPromoPage(discount: String) {
let vc = CustomPageViewController()
vc.bgColor = self.view.backgroundColor
vc.discount = discount
vc.modalTransitionStyle = UIModalTransitionStyle.crossDissolve
if self.presentedViewController != nil {
self.dismiss(animated: true, completion: {
self.present(vc, animated: true, completion: nil)
})
} else {
self.present(vc, animated: true, completion: nil)
}
}
@IBAction func closeButtonAction(_ sender: Any) {
self.dismiss(animated: true)
}
}
```
할인 값은 푸시 알림 페이로드의 JSON에서 `"d"` 매개변수로 올 것이라고 가정합니다. 푸시 알림 페이로드는 크기가 제한되어 있으므로 매개변수에 짧은 이름을 사용하는 것이 좋습니다.
```swift
guard let customDataJson = message.customData,
let redString = customDataJson["r"] as? String,
let greenString = customDataJson["g"] as? String,
let blueString = customDataJson["b"] as? String,
let discount = customDataJson["d"] as? String else {
return
}
```
푸시 알림 페이로드에서 전달하는 매개변수에 따라 다른 View Controller를 초기화하고 여는 코드를 작성할 수 있습니다.
## A/B 테스트 뷰 컨트롤러 열기
푸시 알림에서 사용자 지정 데이터를 사용하는 또 다른 사례를 고려해 보겠습니다. 예를 들어, 한 사용자 세그먼트에는 하나의 뷰 컨트롤러를 열고 다른 사용자 세그먼트에는 다른 뷰 컨트롤러를 열어야 합니다. 간단히 말해, 애플리케이션에서 A/B 테스트를 위해 사용자 지정 데이터를 사용할 수 있습니다.
두 개의 뷰 컨트롤러를 만들어 보겠습니다. 한 컨트롤러(A)는 할인 값으로 열리고, 두 번째 컨트롤러(B)는 다른 할인 매개변수로 열립니다.
이제 푸시 알림 페이로드에 따라 적절한 뷰 컨트롤러를 여는 코드를 작성해 보겠습니다:
```swift
func pushwoosh(_ pushwoosh: Pushwoosh, onMessageOpened message: PWMessage) {
// MARK: - A/B Testing via Custom Data
guard let customDataJson = message.customData,
let viewController = customDataJson["vc"] as? String else {
return
}
if viewController == "A" {
setControllerA()
} else if viewController == "B" {
setControllerB()
}
}
func setControllerA() {
if let topController = UIApplication.shared.topMostController() {
let storyboard = UIStoryboard(name: "Main", bundle: nil)
if let customViewController = storyboard.instantiateViewController(withIdentifier: "a_vc") as? AViewController {
customViewController.discountA = "50"
topController.present(customViewController, animated: true, completion: nil)
}
}
}
func setControllerB() {
if let topController = UIApplication.shared.topMostController() {
let storyboard = UIStoryboard(name: "Main", bundle: nil)
if let customViewController = storyboard.instantiateViewController(withIdentifier: "b_vc") as? BViewController {
customViewController.discountB = "100"
topController.present(customViewController, animated: true, completion: nil)
}
}
}
```
사용자 지정 데이터 필드에 JSON을 추가합니다.
```
{
"vc": "A"
}
// 사용자 지정 데이터 선택 (A 또는 B)
{
"vc": "B"
}
```
푸시 페이로드에서 보낸 사용자 지정 데이터(`'vc': 'A'` 또는 `'vc': 'B'`)에 따라, 한 사용자 세그먼트는 하나의 컨트롤러를 열고 다른 사용자 세그먼트는 다른 컨트롤러를 엽니다.
#### 뷰 컨트롤러 "A"
 #### 뷰 컨트롤러 "B"
 ## 푸시 알림을 통해 앱 아이콘 변경
iOS에서 푸시 알림을 사용할 수 있는 또 다른 예는 앱 아이콘을 변경하는 것입니다.
먼저, 에셋에 세 가지 다른 아이콘을 추가합니다. 하나는 기본 앱 아이콘으로 사용되고, 다른 두 개는 푸시 알림의 사용자 지정 데이터에 따라 변경됩니다.
## 푸시 알림을 통해 앱 아이콘 변경
iOS에서 푸시 알림을 사용할 수 있는 또 다른 예는 앱 아이콘을 변경하는 것입니다.
먼저, 에셋에 세 가지 다른 아이콘을 추가합니다. 하나는 기본 앱 아이콘으로 사용되고, 다른 두 개는 푸시 알림의 사용자 지정 데이터에 따라 변경됩니다.
 iOS 애플리케이션에서 대체 앱 아이콘을 활성화하려면 `Info.plist` 파일에 필요한 구성을 추가해야 합니다. 다음은 그 단계입니다:
```xml
CFBundleIcons
CFBundleAlternateIcons
AppIcon-2
CFBundleIconFiles
Icon-2
UIPrerenderedIcon
AppIcon-3
CFBundleIconFiles
Icon-3
UIPrerenderedIcon
CFBundlePrimaryIcon
CFBundleIconFiles
Icon-1
UIPrerenderedIcon
```
`pushwoosh(_ pushwoosh: Pushwoosh, onMessageOpened message: PWMessage)` 콜백에서 푸시 알림으로 받은 사용자 지정 데이터에 따라 앱 아이콘을 변경하는 코드를 추가할 수 있습니다. 다음과 같이 구현할 수 있습니다:
```swift
func pushwoosh(_ pushwoosh: Pushwoosh, onMessageOpened message: PWMessage) {
// MARK: - Change the app icon dynamically
guard let customDataJson = message.customData,
let appIcon = customDataJson["i"] as? String else {
return
}
UIApplication.shared.setAlternateIconName(appIcon) { error in
if let error = error {
print(error.localizedDescription)
} else {
print("Success!")
}
}
}
```
JSON 코드를 추가합니다:
```
{
"i": "AppIcon-2"
}
```
iOS 애플리케이션에서 대체 앱 아이콘을 활성화하려면 `Info.plist` 파일에 필요한 구성을 추가해야 합니다. 다음은 그 단계입니다:
```xml
CFBundleIcons
CFBundleAlternateIcons
AppIcon-2
CFBundleIconFiles
Icon-2
UIPrerenderedIcon
AppIcon-3
CFBundleIconFiles
Icon-3
UIPrerenderedIcon
CFBundlePrimaryIcon
CFBundleIconFiles
Icon-1
UIPrerenderedIcon
```
`pushwoosh(_ pushwoosh: Pushwoosh, onMessageOpened message: PWMessage)` 콜백에서 푸시 알림으로 받은 사용자 지정 데이터에 따라 앱 아이콘을 변경하는 코드를 추가할 수 있습니다. 다음과 같이 구현할 수 있습니다:
```swift
func pushwoosh(_ pushwoosh: Pushwoosh, onMessageOpened message: PWMessage) {
// MARK: - Change the app icon dynamically
guard let customDataJson = message.customData,
let appIcon = customDataJson["i"] as? String else {
return
}
UIApplication.shared.setAlternateIconName(appIcon) { error in
if let error = error {
print(error.localizedDescription)
} else {
print("Success!")
}
}
}
```
JSON 코드를 추가합니다:
```
{
"i": "AppIcon-2"
}
```
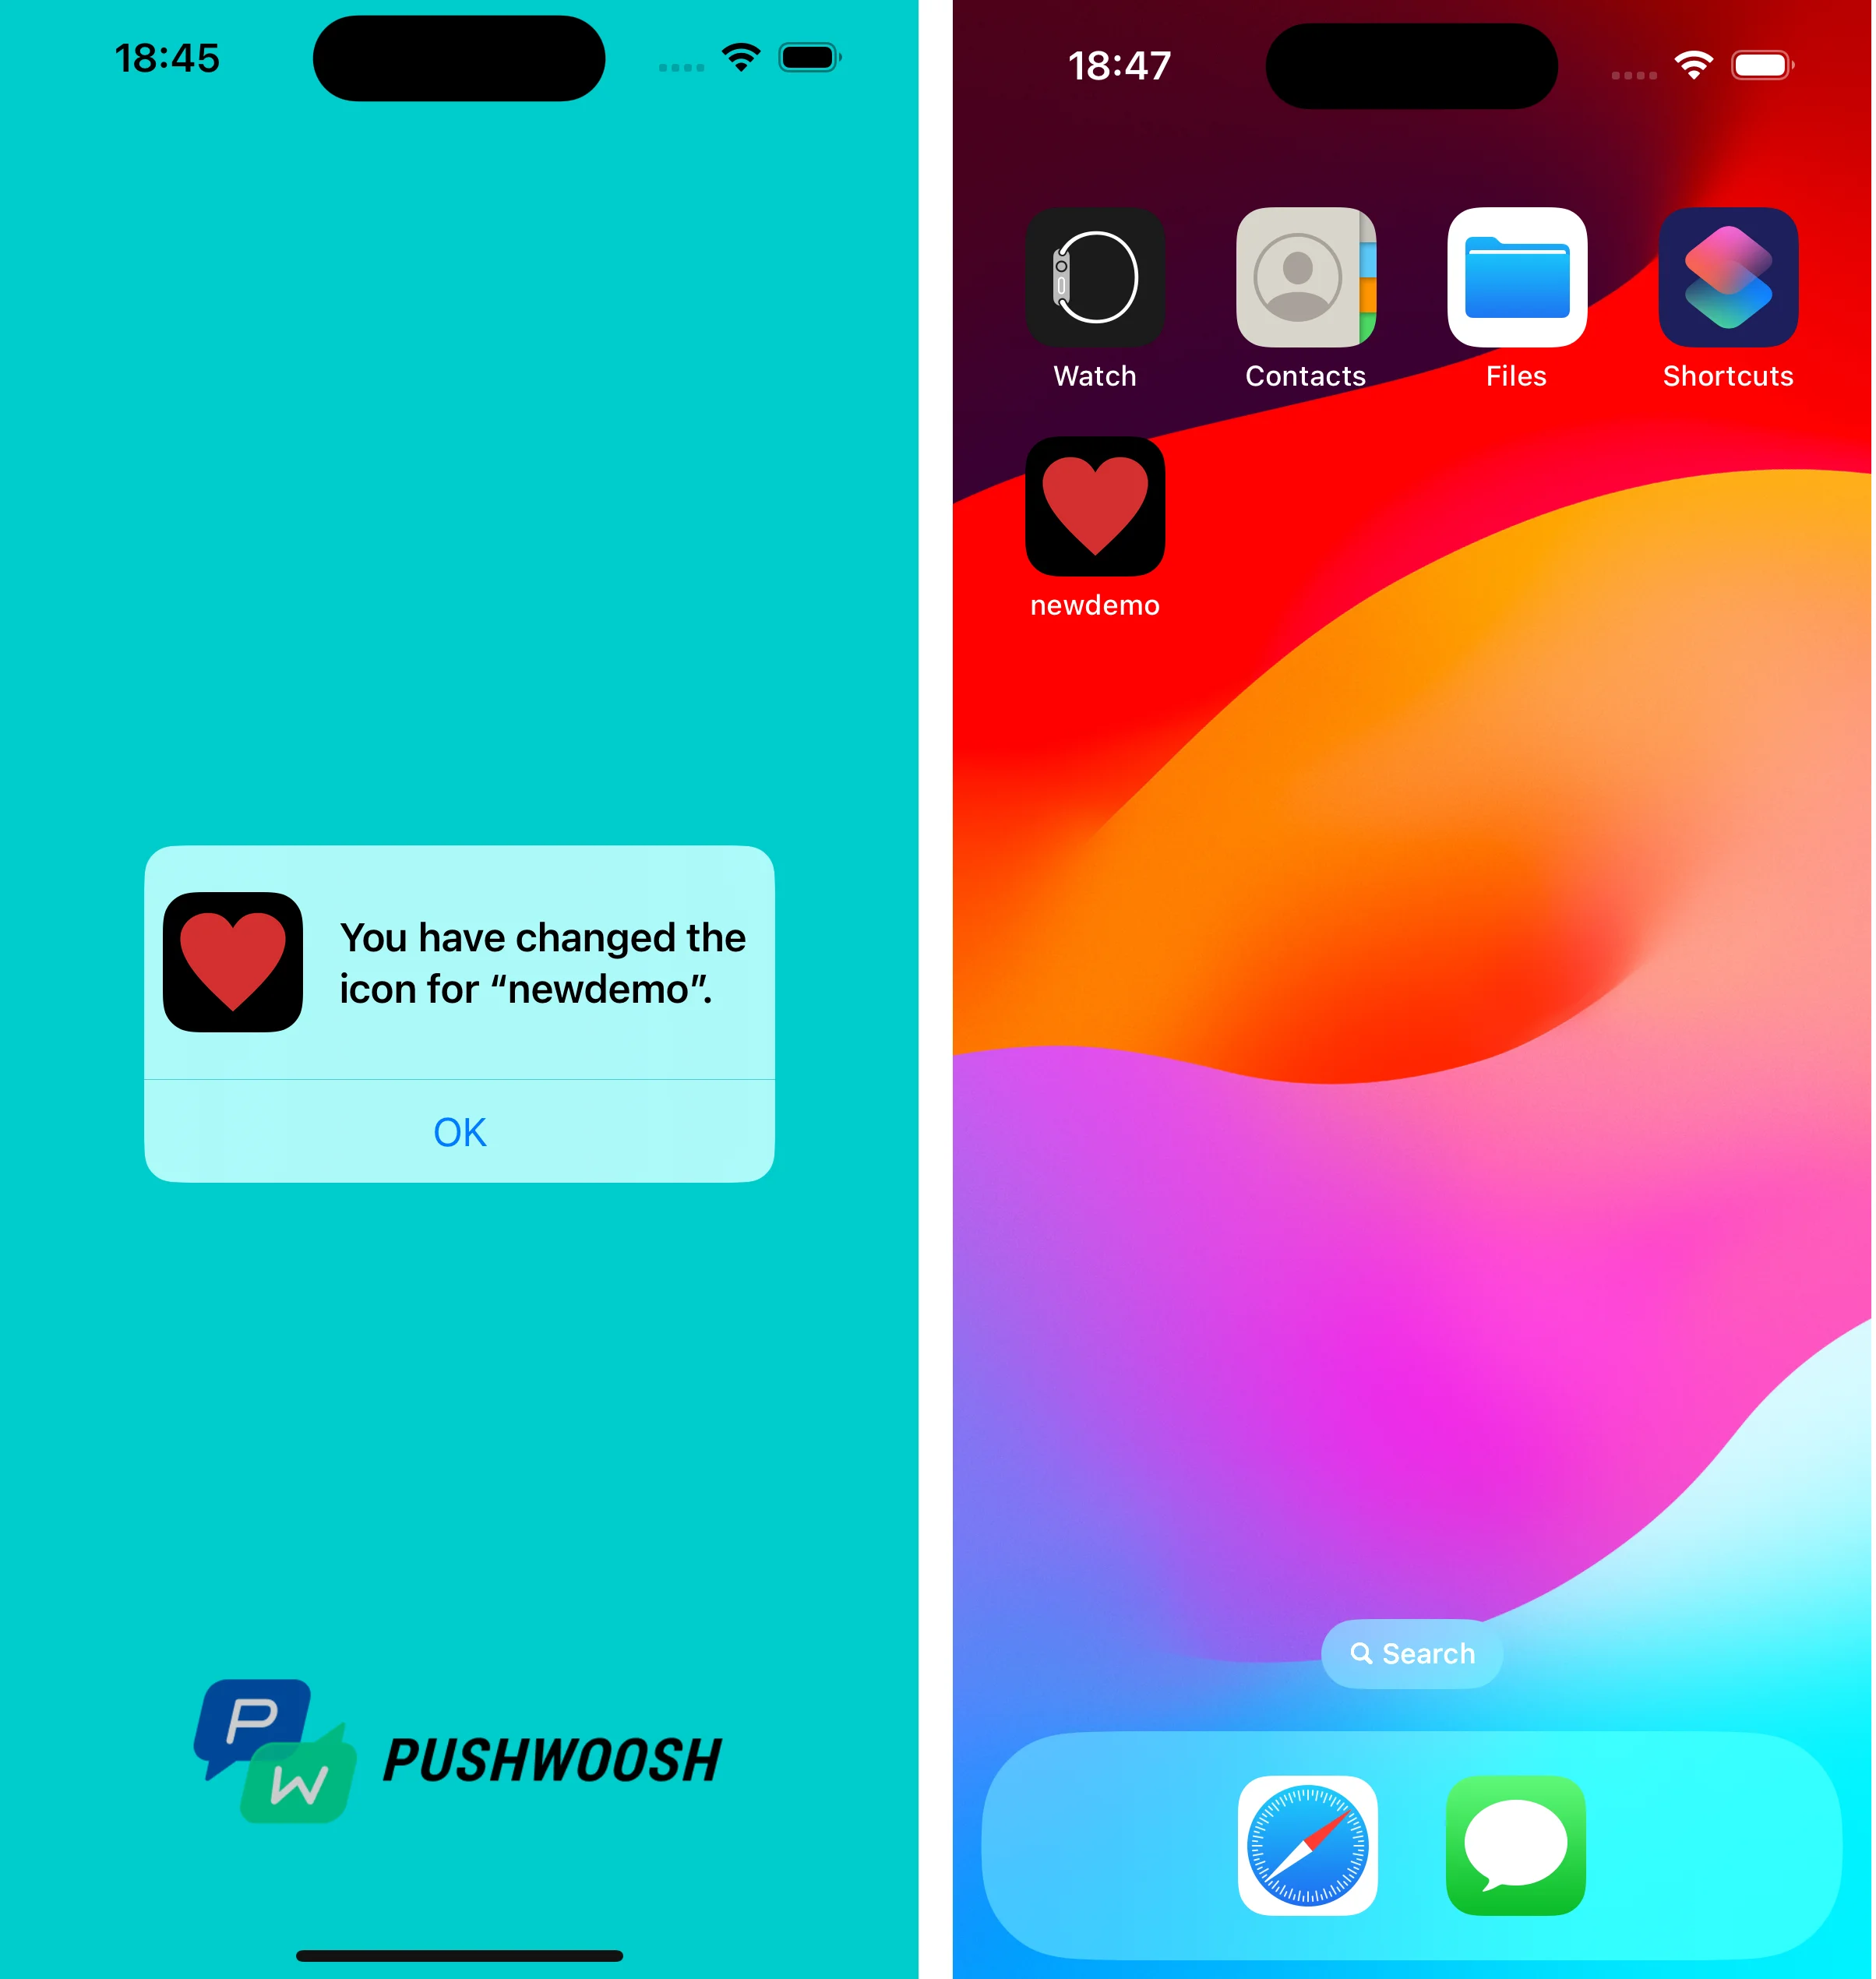
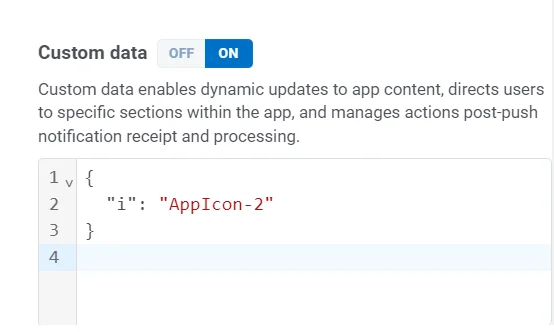 푸시 알림을 탭하면 시스템이 기기에서 앱 아이콘을 변경하라는 메시지를 표시합니다.
 사용자 지정 데이터를 활용하는 프로젝트는 [GitHub](https://github.com/Pushwoosh/pushwoosh-quickstart-ios/tree/main/customdata/newdemo)에서 찾을 수 있습니다.