# Mac OS X
[**SDK डाउनलोड करें**](https://github.com/Pushwoosh/pushwoosh-mac-sdk)\
[**सैंपल प्रोजेक्ट**](https://github.com/Pushwoosh/pushwoosh-mac-sdk/tree/master/Samples/Mac)\
[**SDK API डॉक्स**](https://github.com/Pushwoosh/pushwoosh-mac-sdk/tree/master/Documentation)
## Pushwoosh.framework को लिंक करना
अपनी `podfile` या `cartfile` में निम्नलिखित पंक्तियाँ डालकर एक डिपेंडेंसी मैनेजर के माध्यम से अपने प्रोजेक्ट में `Pushwoosh.framework` जोड़ें:
```
platform :osx, '10.7'
target 'MyApp' do
pod 'Pushwoosh_mac'
end
```
```
github "Pushwoosh/pushwoosh-mac-sdk"
```
वैकल्पिक रूप से, आप बस फ्रेमवर्क को अपने प्रोजेक्ट के **Build Phases** में **Link Binaries With Libraries** में ड्रैग और ड्रॉप कर सकते हैं।
## लाइब्रेरीज़ जोड़ना
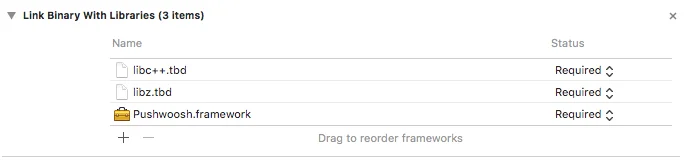
अपने प्रोजेक्ट के **Build Phases** टैब में, **Link Binaries With Libraries** खोलें और आइटम जोड़ें ("+" बटन) पर क्लिक करें। अपने प्रोजेक्ट में **libz.tbd** और **libc++.tbd** लाइब्रेरीज़ खोजें और जोड़ें:
 ## ऐप को Pushwoosh कंट्रोल पैनल से लिंक करना
अपने **Info.plist** में, एक स्ट्रिंग टाइप की `Pushwoosh_APPID` जोड़ें, जिसका मान आपका Pushwoosh एप्लीकेशन कोड हो।
## AppDelegate को संशोधित करना
अपने AppDelegate में निम्नलिखित कोड जोड़ें:
```swift
import PushKit
import Pushwoosh
func application(_ application: UIApplication, didFinishLaunchingWithOptions launchOptions: [UIApplicationLaunchOptionsKey : Any]? = nil) -> Bool {
//lots of your initialization code
//-----------PUSHWOOSH PART-----------
NSUserNotificationCenter.default.delegate = Pushwoosh.sharedInstance()?.notificationCenterDelegateProxy
// set custom delegate for push handling, in our case - view controller
Pushwoosh.sharedInstance().delegate = self
// handling push on app start
Pushwoosh.sharedInstance().handlePushReceived(aNotification.userInfo)
// register for push notifications!
Pushwoosh.sharedInstance().registerForPushNotifications()
```
```objective-c
#import
- (void)applicationDidFinishLaunching:(NSNotification *)aNotification
{
//lots of your initialization code
//-----------PUSHWOOSH PART-----------
[NSUserNotificationCenter defaultUserNotificationCenter].delegate = [Pushwoosh sharedInstance].notificationCenterDelegateProxy;
// set custom delegate for push handling, in our case - view controller
[Pushwoosh sharedInstance].delegate = self;
// handling push on app start
[[Pushwoosh sharedInstance] handlePushReceived:[aNotification userInfo]];
// register for push notifications!
[[Pushwoosh sharedInstance] registerForPushNotifications];
}
```
अपने **UIApplicationDelegate** (ऊपर दी गई फ़ाइल के समान) में निम्नलिखित कोड जोड़ें।
```swift
// system push notification registration success callback, delegate to PWMessagingDelegate
func application(_ application: NSApplication, didRegisterForRemoteNotificationsWithDeviceToken deviceToken: Data) {
Pushwoosh.sharedInstance()?.handlePushRegistration(deviceToken)
}
// system push notification registration error callback, delegate to PWMessagingDelegate
func application(_ application: NSApplication, didFailToRegisterForRemoteNotificationsWithError error: Error) {
Pushwoosh.sharedInstance()?.handlePushRegistrationFailure(error)
}
```
```objective-c
// system push notification registration success callback, delegate to pushManager
- (void)application:(NSApplication *)application didRegisterForRemoteNotificationsWithDeviceToken:(NSData *)deviceToken {
[[Pushwoosh sharedInstance] handlePushRegistration:deviceToken];
}
// system push notification registration error callback, delegate to pushManager
- (void)application:(NSApplication *)application didFailToRegisterForRemoteNotificationsWithError:(NSError *)error {
[[Pushwoosh sharedInstance] handlePushRegistrationFailure:error];
}
```
पुश नोटिफिकेशन को संभालने के लिए, अपने **UIApplicationDelegate** (तीन स्टेप्स ऊपर दी गई फ़ाइल के समान) में निम्नलिखित फ़ंक्शन जोड़ें:
```swift
//this event is fired when the push gets received
func pushwoosh(_ pushwoosh: Pushwoosh!, onMessageReceived message: PWMessage!) {
print("onMessageReceived: \(String(describing: message.payload))")
}
//this event is fired when user taps the notification
func pushwoosh(_ pushwoosh: Pushwoosh!, onMessageOpened message: PWMessage!) {
print("onMessageOpened: \(String(describing: message.payload))")
}
```
```objective-c
//this event is fired when the push gets received
- (void)pushwoosh:(Pushwoosh *)pushwoosh onMessageReceived:(PWMessage *)message {
NSLog(@"onMessageReceived: %@", message.payload);
}
//this event is fired when user taps the notification
- (void)pushwoosh:(Pushwoosh *)pushwoosh onMessageOpened:(PWMessage *)message {
NSLog(@"onMessageOpened: %@", message.payload);
}
```
## पुश नोटिफिकेशन सक्षम करना
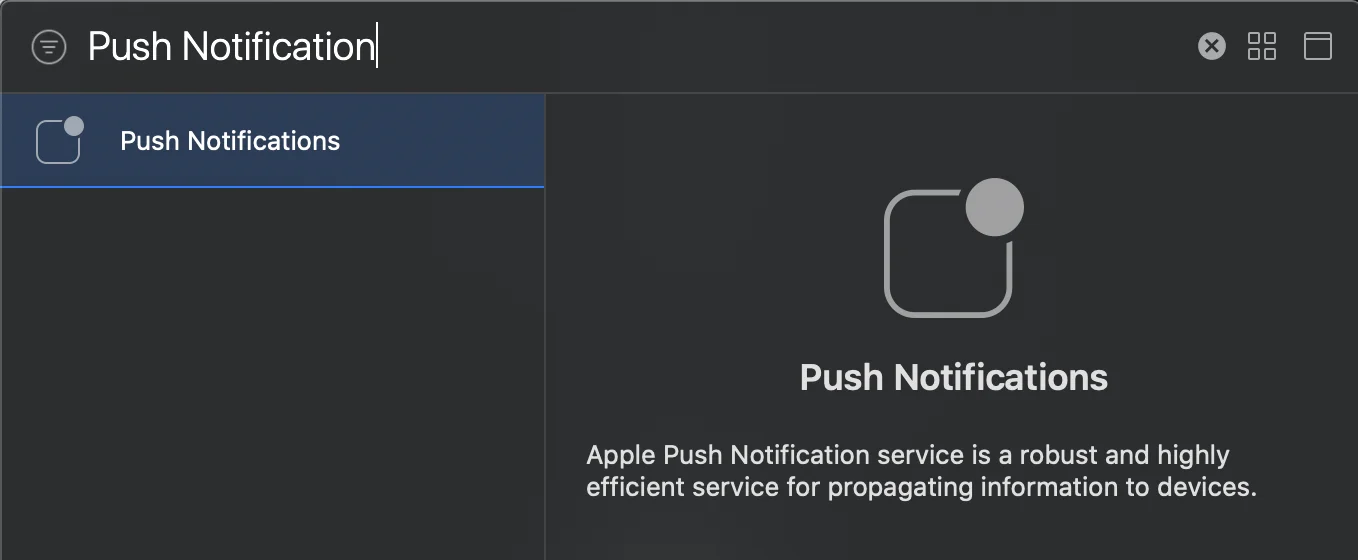
अपने टारगेट में **Signing and** **Capabilities** पर जाएं। **+ Capability** दबाएं और **Push Notifications** जोड़ें।
## ऐप को Pushwoosh कंट्रोल पैनल से लिंक करना
अपने **Info.plist** में, एक स्ट्रिंग टाइप की `Pushwoosh_APPID` जोड़ें, जिसका मान आपका Pushwoosh एप्लीकेशन कोड हो।
## AppDelegate को संशोधित करना
अपने AppDelegate में निम्नलिखित कोड जोड़ें:
```swift
import PushKit
import Pushwoosh
func application(_ application: UIApplication, didFinishLaunchingWithOptions launchOptions: [UIApplicationLaunchOptionsKey : Any]? = nil) -> Bool {
//lots of your initialization code
//-----------PUSHWOOSH PART-----------
NSUserNotificationCenter.default.delegate = Pushwoosh.sharedInstance()?.notificationCenterDelegateProxy
// set custom delegate for push handling, in our case - view controller
Pushwoosh.sharedInstance().delegate = self
// handling push on app start
Pushwoosh.sharedInstance().handlePushReceived(aNotification.userInfo)
// register for push notifications!
Pushwoosh.sharedInstance().registerForPushNotifications()
```
```objective-c
#import
- (void)applicationDidFinishLaunching:(NSNotification *)aNotification
{
//lots of your initialization code
//-----------PUSHWOOSH PART-----------
[NSUserNotificationCenter defaultUserNotificationCenter].delegate = [Pushwoosh sharedInstance].notificationCenterDelegateProxy;
// set custom delegate for push handling, in our case - view controller
[Pushwoosh sharedInstance].delegate = self;
// handling push on app start
[[Pushwoosh sharedInstance] handlePushReceived:[aNotification userInfo]];
// register for push notifications!
[[Pushwoosh sharedInstance] registerForPushNotifications];
}
```
अपने **UIApplicationDelegate** (ऊपर दी गई फ़ाइल के समान) में निम्नलिखित कोड जोड़ें।
```swift
// system push notification registration success callback, delegate to PWMessagingDelegate
func application(_ application: NSApplication, didRegisterForRemoteNotificationsWithDeviceToken deviceToken: Data) {
Pushwoosh.sharedInstance()?.handlePushRegistration(deviceToken)
}
// system push notification registration error callback, delegate to PWMessagingDelegate
func application(_ application: NSApplication, didFailToRegisterForRemoteNotificationsWithError error: Error) {
Pushwoosh.sharedInstance()?.handlePushRegistrationFailure(error)
}
```
```objective-c
// system push notification registration success callback, delegate to pushManager
- (void)application:(NSApplication *)application didRegisterForRemoteNotificationsWithDeviceToken:(NSData *)deviceToken {
[[Pushwoosh sharedInstance] handlePushRegistration:deviceToken];
}
// system push notification registration error callback, delegate to pushManager
- (void)application:(NSApplication *)application didFailToRegisterForRemoteNotificationsWithError:(NSError *)error {
[[Pushwoosh sharedInstance] handlePushRegistrationFailure:error];
}
```
पुश नोटिफिकेशन को संभालने के लिए, अपने **UIApplicationDelegate** (तीन स्टेप्स ऊपर दी गई फ़ाइल के समान) में निम्नलिखित फ़ंक्शन जोड़ें:
```swift
//this event is fired when the push gets received
func pushwoosh(_ pushwoosh: Pushwoosh!, onMessageReceived message: PWMessage!) {
print("onMessageReceived: \(String(describing: message.payload))")
}
//this event is fired when user taps the notification
func pushwoosh(_ pushwoosh: Pushwoosh!, onMessageOpened message: PWMessage!) {
print("onMessageOpened: \(String(describing: message.payload))")
}
```
```objective-c
//this event is fired when the push gets received
- (void)pushwoosh:(Pushwoosh *)pushwoosh onMessageReceived:(PWMessage *)message {
NSLog(@"onMessageReceived: %@", message.payload);
}
//this event is fired when user taps the notification
- (void)pushwoosh:(Pushwoosh *)pushwoosh onMessageOpened:(PWMessage *)message {
NSLog(@"onMessageOpened: %@", message.payload);
}
```
## पुश नोटिफिकेशन सक्षम करना
अपने टारगेट में **Signing and** **Capabilities** पर जाएं। **+ Capability** दबाएं और **Push Notifications** जोड़ें।