# स्विफ्ट पैकेज मैनेजर के साथ इनबॉक्सकिट सेट अप करें
*iOS SDK [7.0.40](https://github.com/Pushwoosh/pushwoosh-ios-sdk/releases/tag/7.0.40) से उपलब्ध है।*
InboxKit `Pushwoosh-XCFramework` स्विफ्ट पैकेज के अंदर एक अलग लाइब्रेरी उत्पाद के रूप में आता है। आपको मुख्य SDK को पहले से ही इंटीग्रेट करना होगा; यदि आप शुरू से शुरू कर रहे हैं, तो पहले [बेसिक इंटीग्रेशन गाइड](/hi/developer/pushwoosh-sdk/ios-sdk/setting-up-pushwoosh-ios-sdk-7-0/basic-integration-guide/) का पालन करें।
## InboxKit पैकेज उत्पाद जोड़ें
1. Xcode में अपना प्रोजेक्ट खोलें और प्रोजेक्ट की सेटिंग्स → **Package Dependencies** पर नेविगेट करें, फिर **+** बटन दबाएं।
2. निम्नलिखित पैकेज URL दर्ज करें:
```bash
https://github.com/Pushwoosh/Pushwoosh-XCFramework
```
3. नवीनतम स्थिर संस्करण के साथ **Dependency Rule** को **Up to Next Major Version** पर सेट करें, फिर **Add Package** पर क्लिक करें।
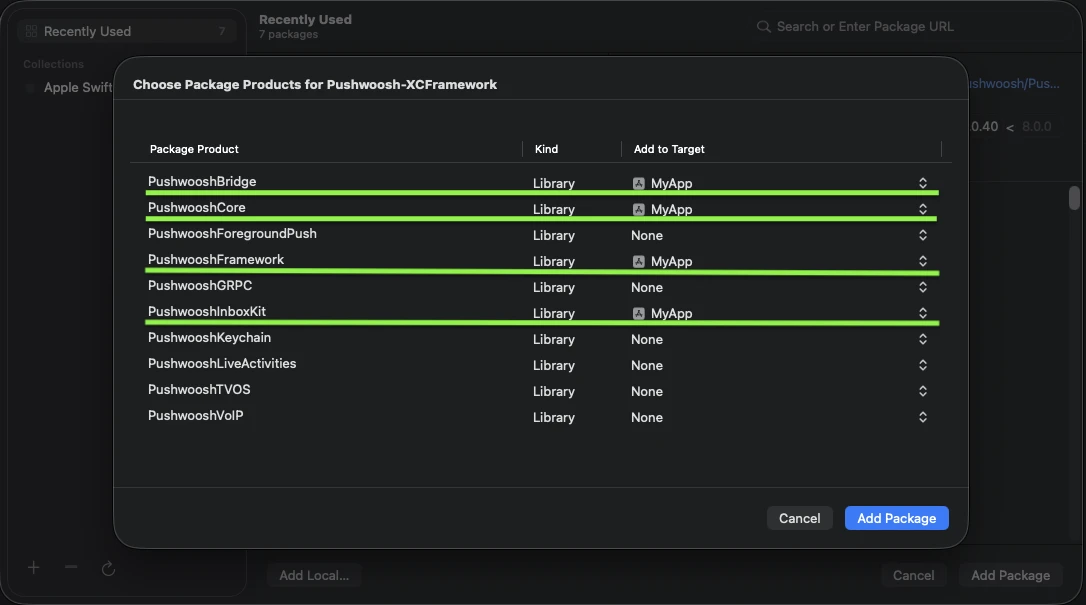
4. पैकेज चयन स्क्रीन पर, कम से कम निम्नलिखित उत्पादों को चुनें और उन्हें अपने मुख्य ऐप लक्ष्य में जोड़ें:
- **PushwooshFramework** (आवश्यक)
- **PushwooshCore** (आवश्यक)
- **PushwooshBridge** (आवश्यक)
- **PushwooshInboxKit** (नया मॉड्यूल)
चारों हाइलाइट किए गए उत्पादों को अपने मुख्य ऐप लक्ष्य में जोड़ें।
5. अपना मुख्य ऐप लक्ष्य खोलें और **Frameworks, Libraries, and Embedded Content** के तहत, पुष्टि करें कि `PushwooshInboxKit.xcframework` सूचीबद्ध और एम्बेडेड है।
बस इतना ही — InboxKit अब मुख्य SDK के साथ लिंक हो गया है।
## इनबॉक्स दिखाएं
इनबॉक्स कंट्रोलर को किसी भी नेविगेशन फ्लो में जोड़ें। तीन मानक सेल प्रकारों के साथ एक काम करने वाला इनबॉक्स प्राप्त करने के लिए डिफ़ॉल्ट कॉन्फ़िगरेशन पर्याप्त है:
```swift
import PushwooshInboxKit
let inboxVC = PushwooshInboxKitViewController()
navigationController?.pushViewController(inboxVC, animated: true)
```
```objective-c
@import PushwooshInboxKit;
PushwooshInboxKitViewController *inboxVC = [PushwooshInboxKitViewController new];
[self.navigationController pushViewController:inboxVC animated:YES];
```
## इनबॉक्स को कस्टमाइज़ करें
स्विफ्ट में, `PushwooshInboxKitAttributes` वैल्यू टाइप के माध्यम से कंट्रोलर को कॉन्फ़िगर करें। Objective-C में, कंट्रोलर पर `@objc`-फ्रेंडली सेटर्स का उपयोग करें — `PushwooshInboxKitAttributes` एक स्विफ्ट स्ट्रक्ट है और इसे ब्रिज नहीं किया गया है।
```swift
var attributes = PushwooshInboxKitAttributes()
attributes.pullToRefreshEnabled = true
attributes.swipeToDeleteEnabled = true
attributes.pinningEnabled = true
attributes.style.unreadBadgeColor = .systemBlue
attributes.style.titleFont = .systemFont(ofSize: 17, weight: .semibold)
let inboxVC = PushwooshInboxKitViewController(attributes: attributes)
```
```objective-c
PushwooshInboxKitViewController *inboxVC = [PushwooshInboxKitViewController new];
[inboxVC setBackgroundColor:[UIColor systemBackgroundColor]];
[inboxVC setEmptyMessage:@"You have no messages yet"];
```
`Style` स्ट्रक्ट डिफ़ॉल्ट सेल द्वारा उपयोग किए जाने वाले सभी रंगों, फोंट, कॉर्नर रेडिआई और डेट फॉर्मेटर को एक्सपोज करता है। प्रत्येक मान डिफ़ॉल्ट रूप से एक Apple सिमेंटिक रंग है, इसलिए इनबॉक्स सिस्टम डार्क मोड पर स्वचालित रूप से प्रतिक्रिया करता है।
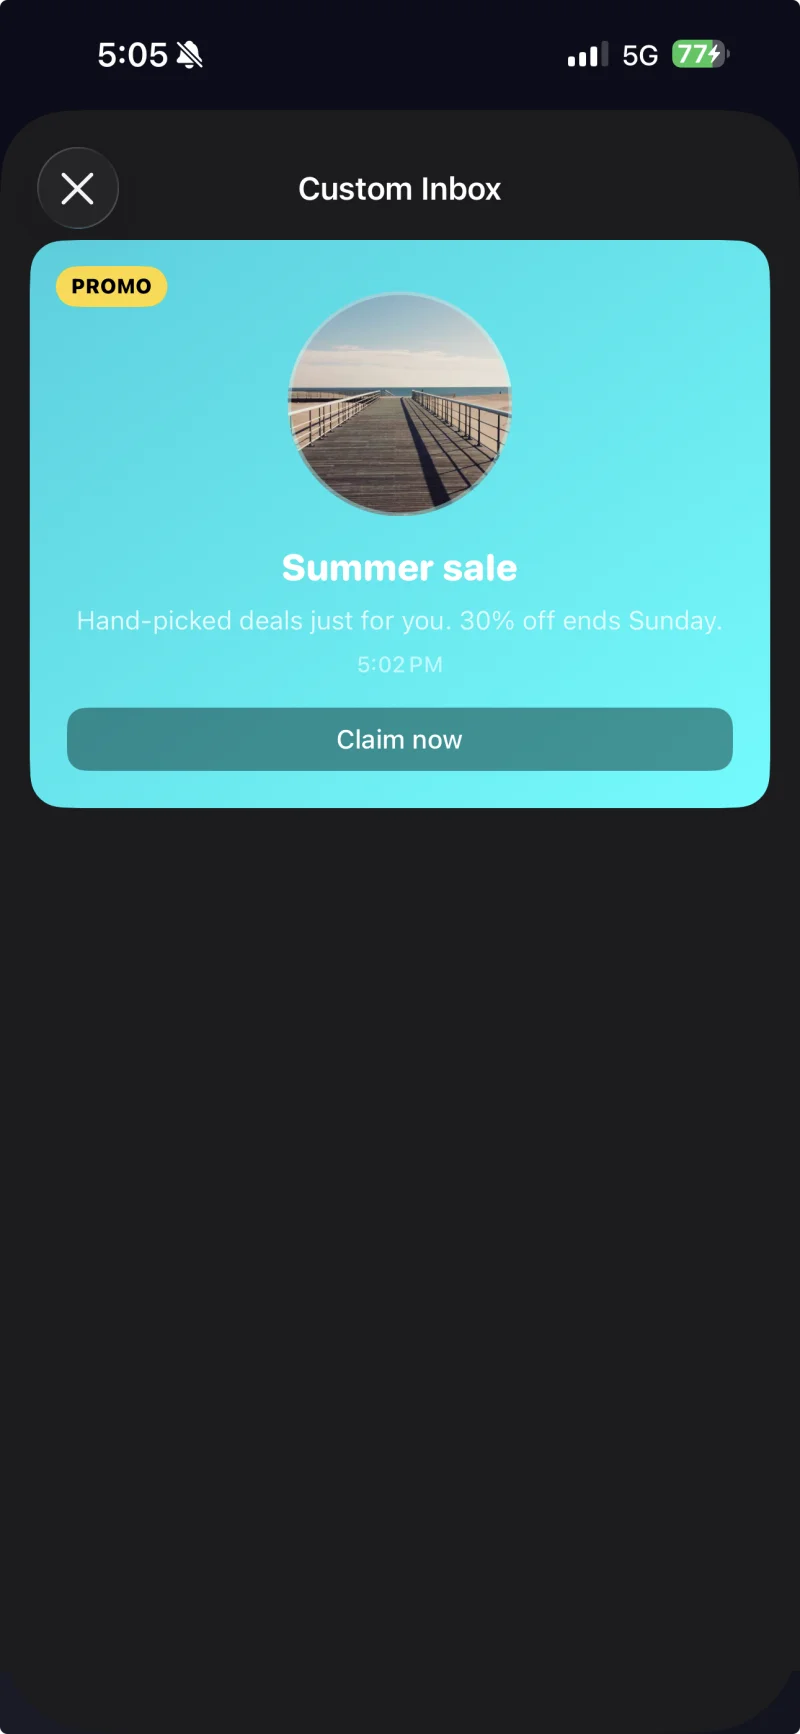
`PushwooshInboxKitAttributes.Style` के माध्यम से लागू की गई एक कस्टम थीम के साथ कैप्शन वाला सेल।
## टैप और रिफ्रेश को हैंडल करें
`PushwooshInboxKitDelegate` के अनुरूप उपयोगकर्ता क्रियाओं और रिफ्रेश घटनाओं पर प्रतिक्रिया दें। प्रत्येक विधि का एक डिफ़ॉल्ट कार्यान्वयन होता है, इसलिए आप केवल वही ओवरराइड करते हैं जिसकी आपको आवश्यकता है:
```swift
final class InboxCoordinator: NSObject, PushwooshInboxKitDelegate {
func inboxKit(_ vc: PushwooshInboxKitViewController,
didSelect message: PWInboxMessageProtocol) -> Bool {
// Return true to let the SDK open the message URL or richmedia.
// Return false if you handled the tap entirely (e.g. routed to a custom screen).
return true
}
func inboxKit(_ vc: PushwooshInboxKitViewController,
didRefreshWith messages: [PWInboxMessageProtocol],
error: Error?) {
// Show your own empty / error state here if needed.
}
}
inboxVC.delegate = inboxCoordinator
```
## अगले चरण