# iOS पुश स्टोरीज़
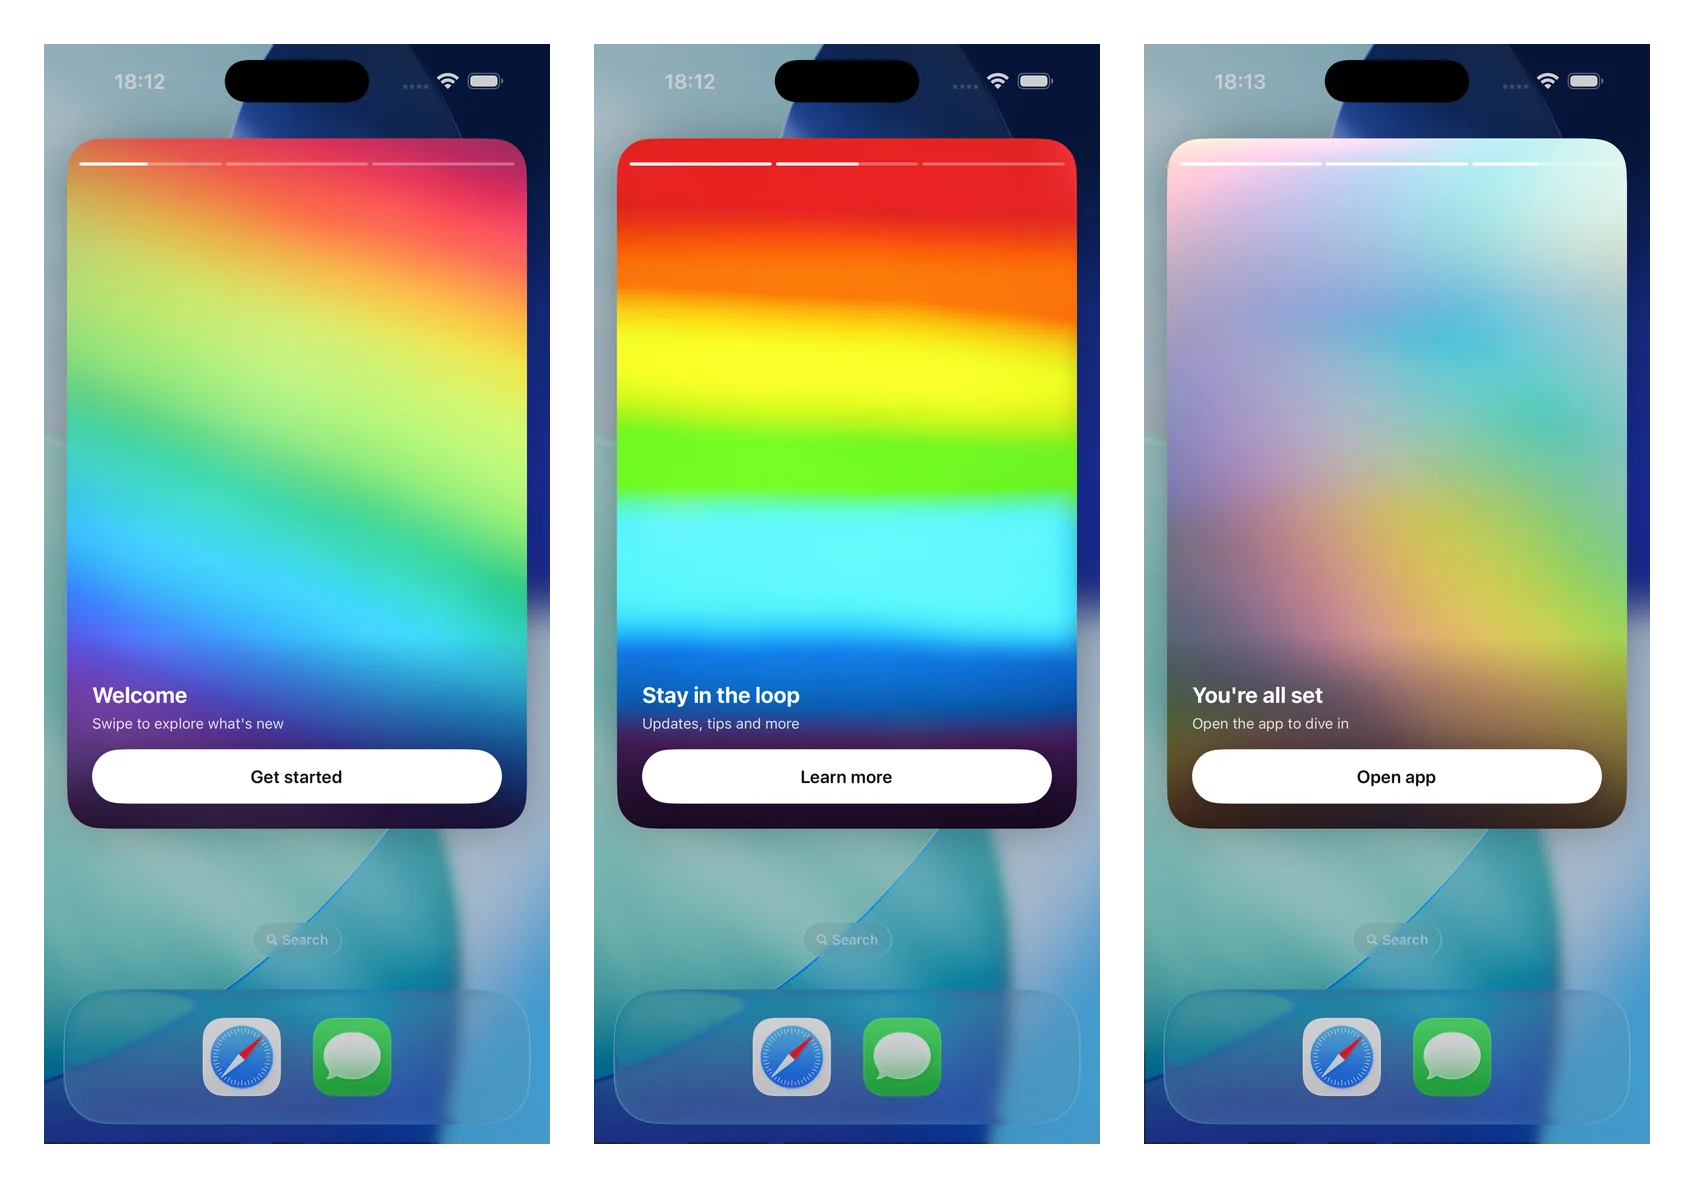
पुश स्टोरीज़ एक विस्तारित पुश नोटिफिकेशन को एक फ़ुल-स्क्रीन, इंस्टाग्राम-स्टाइल स्टोरीज़ अनुभव में बदल देती हैं: फ़ुल-ब्लीड इमेजेज़, टॉप प्रोग्रेस बार, ऑटो-एडवांसिंग पेज, टैप-टू-नेविगेट, और एक डीप लिंक वाला बटन। इन्हें एक Notification Content एक्सटेंशन द्वारा स्टैंडअलोन `PushwooshNotificationUI` मॉड्यूल का उपयोग करके रेंडर किया जाता है — आप एक व्यू कंट्रोलर को सबक्लास करते हैं और SDK पार्सिंग, इमेज लोडिंग, प्रोग्रेस, टाइमिंग, नेविगेशन और डीप लिंक्स को संभालता है।
संस्करण 7.0.46 से उपलब्ध है।
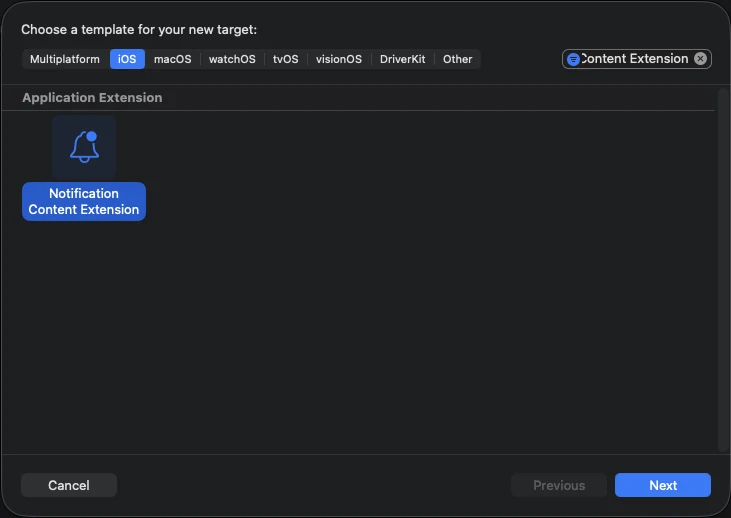
## 1. एक Notification Content एक्सटेंशन जोड़ें
Xcode में, **File > New > Target…** चुनें, **Notification Content Extension** चुनें, और इसे एक नाम दें (उदाहरण के लिए **StoriesContentExtension**)।
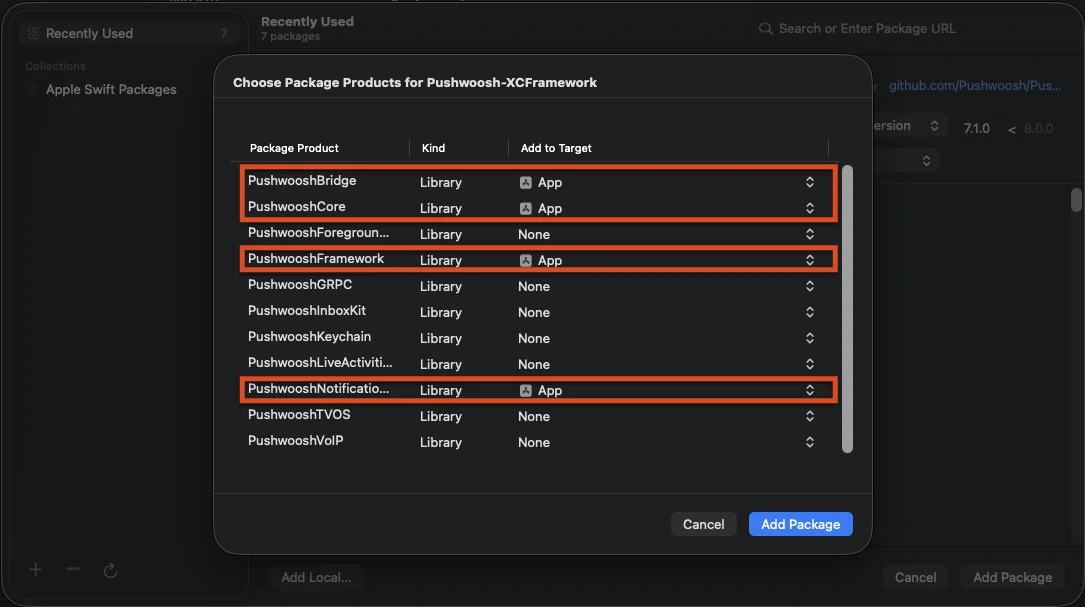
## 2. PushwooshNotificationUI मॉड्यूल जोड़ें
`PushwooshNotificationUI` एक स्टैंडअलोन मॉड्यूल है जिसकी कोई अन्य Pushwoosh निर्भरता नहीं है, इसलिए यह एक्सटेंशन प्रक्रिया के अंदर छोटा रहता है। इसे **कंटेंट एक्सटेंशन टारगेट** में जोड़ें (ऐप टारगेट में नहीं)।
**Swift Package Manager**
**CocoaPods**
```ruby
target 'StoriesContentExtension' do
use_frameworks!
pod 'PushwooshXCFramework/PushwooshNotificationUI'
end
```
## 3. स्टोरीज़ व्यू कंट्रोलर को सबक्लास करें
जेनरेट किए गए `NotificationViewController` बॉडी को `PushwooshStoriesViewController` के सबक्लास से बदलें। यही पूरा इंटीग्रेशन है।
```swift
import PushwooshNotificationUI
class NotificationViewController: PushwooshStoriesViewController {}
```
## 4. एक्सटेंशन Info.plist को कॉन्फ़िगर करें
कंटेंट एक्सटेंशन के **Info.plist** में, `NSExtension > NSExtensionAttributes` के तहत निम्नलिखित कीज़ सेट करें:
```xml
UNNotificationExtensionCategoryPW_STORIESUNNotificationExtensionUserInteractionEnabledUNNotificationExtensionDefaultContentHiddenUNNotificationExtensionInitialContentSizeRatio1.5
```
## 5. एक पुश स्टोरीज़ नोटिफिकेशन भेजें
एक नोटिफिकेशन भेजें जिसकी श्रेणी `PW_STORIES` हो और जिसके कस्टम डेटा में `pw_stories` ब्लॉक हो। श्रेणी के लिए समर्पित `ios_category_custom` फ़ील्ड और स्टोरीज़ पेलोड के लिए `data` फ़ील्ड का उपयोग करें।
```json
{
"request": {
"application": "APPLICATION_CODE",
"auth": "API_ACCESS_TOKEN",
"notifications": [
{
"send_date": "now",
"content": "Tap to explore",
"ios_title": "Push Stories",
"ios_category_custom": "PW_STORIES",
"ios_root_params": {
"aps": {
"mutable-content": 1
}
},
"data": {
"pw_stories": {
"pages": [
{
"image": "https://example.com/story-1.jpg",
"duration": 5.0,
"link": "yourapp://page1",
"button_title": "Get started",
"title": "Welcome",
"subtitle": "Swipe to explore what's new"
},
{
"image": "https://example.com/story-2.jpg",
"duration": 4.0,
"link": "yourapp://page2",
"button_title": "Learn more",
"title": "Stay in the loop",
"subtitle": "Updates, tips and more"
}
]
}
}
}
]
}
}
```
प्रत्येक पेज निम्नलिखित फ़ील्ड्स का समर्थन करता है। केवल `image` आवश्यक है; बाकी वैकल्पिक हैं।
| फ़ील्ड | विवरण |
|-------|-------------|
| `image` | पेज के लिए फ़ुल-स्क्रीन इमेज का URL। |
| `duration` | ऑटो-एडवांसिंग से पहले पेज स्क्रीन पर कितने सेकंड रहता है। डिफ़ॉल्ट रूप से लगभग 5 सेकंड। |
| `link` | पेज बटन टैप करने पर खुलने वाला डीप लिंक। |
| `button_title` | पेज बटन का शीर्षक। |
| `title` | पेज पर ओवरले किया गया शीर्षक टेक्स्ट। |
| `subtitle` | पेज पर ओवरले किया गया उपशीर्षक टेक्स्ट। |
## कस्टमाइज़ेशन
अनुभव को समायोजित करने के लिए अपनी सबक्लास पर प्रॉपर्टीज़ को ओवरराइड करें। सभी में समझदार डिफ़ॉल्ट हैं।
```swift
import PushwooshNotificationUI
class NotificationViewController: PushwooshStoriesViewController {
override var storyAspectRatio: CGFloat { 1.5 } // keep in sync with InitialContentSizeRatio
override var hapticsEnabled: Bool { true }
override var longPressToPauseEnabled: Bool { true }
override var crossfadesBetweenPages: Bool { true }
override var loopsAfterLastPage: Bool { false }
}
```
| प्रॉपर्टी | डिफ़ॉल्ट | विवरण |
|----------|---------|-------------|
| `storyAspectRatio` | `1.5` | स्टोरीज़ क्षेत्र का आस्पेक्ट रेशियो (ऊंचाई ÷ चौड़ाई)। इसे `UNNotificationExtensionInitialContentSizeRatio` के साथ सिंक में रखें। |
| `hapticsEnabled` | `false` | टैप-ज़ोन नेविगेशन पर एक हल्का टैक्टाइल टैप चलाएं। |
| `longPressToPauseEnabled` | `false` | दबाकर रखने से वर्तमान पेज रुक जाता है; उठाने पर फिर से शुरू हो जाता है। |
| `crossfadesBetweenPages` | `false` | पेजों के बीच हार्ड कट करने के बजाय क्रॉस-डिज़ॉल्व करें। जब रिड्यूस मोशन चालू होता है तो यह तत्काल परिवर्तन पर वापस आ जाता है। |
| `loopsAfterLastPage` | `false` | अंतिम पेज समाप्त होने के बाद पहले पेज से पुनः आरंभ करें। |
| `appGroupIdentifier` | `nil` | मीडिया प्री-कैश के लिए एक Notification Service Extension के साथ साझा किया गया App Group (नीचे देखें)। |
आप पेलोड के गुम या गलत प्रारूप में होने पर दिखाए जाने वाले फ़ॉलबैक को कस्टमाइज़ करने के लिए `showDefaultContent(for:)` को भी ओवरराइड कर सकते हैं (डिफ़ॉल्ट रूप से यह अलर्ट बॉडी दिखाता है)।
### मीडिया प्री-कैश
एक तत्काल, ऑफ़लाइन पहले फ्रेम के लिए, अपने Content Extension और एक Notification Service Extension के बीच एक App Group साझा करें। स्टोरीज़ कंट्रोलर पर `appGroupIdentifier` को ओवरराइड करें, फिर अपने Service Extension के `didReceive(_:withContentHandler:)` से मीडिया को प्री-डाउनलोड करें:
```swift
import PushwooshNotificationUI
PushwooshStoriesMediaPrefetcher.prefetch(
userInfo: request.content.userInfo,
appGroupIdentifier: "group.com.example.app"
) {
contentHandler(bestAttemptContent)
}
```
दोनों एक्सटेंशन पर समान ग्रुप आइडेंटिफ़ायर के साथ **App Groups** क्षमता को सक्षम करें, और `mutable-content: 1` भेजें ताकि Service Extension चले। App Group के बिना, मीडिया को एक्सटेंशन की `tmp` डायरेक्टरी में कैश किया जाता है।
### लाइफ़साइकल और एनालिटिक्स कॉलबैक
स्टोरी इवेंट्स — पेज इंप्रेशन, बटन टैप, समापन, और फ़ॉलबैक — का निरीक्षण करने के लिए `storiesDelegate` सेट करें। `PushwooshStoriesDelegate` के अनुरूप; हर मेथड वैकल्पिक है, इसलिए केवल उन्हीं को लागू करें जिनकी आपको आवश्यकता है।
```swift
import PushwooshNotificationUI
class NotificationViewController: PushwooshStoriesViewController, PushwooshStoriesDelegate {
override func viewDidLoad() {
super.viewDidLoad()
storiesDelegate = self
}
func storiesViewController(_ controller: PushwooshStoriesViewController, didStartWithPageCount pageCount: Int) {}
func storiesViewController(_ controller: PushwooshStoriesViewController, didShow page: StoryPage, at index: Int) {}
func storiesViewController(_ controller: PushwooshStoriesViewController, didTapActionFor page: StoryPage, at index: Int) {}
func storiesViewControllerDidFinish(_ controller: PushwooshStoriesViewController) {}
func storiesViewControllerDidShowFallback(_ controller: PushwooshStoriesViewController) {}
}
```
| कॉलबैक | यह कब फायर होता है |
|----------|----------------|
| `didStartWithPageCount:` | एक वैध स्टोरीज़ पेलोड पार्स किया गया था और प्लेबैक शुरू होने वाला है। |
| `didShow:at:` | एक पेज दिखाई देने लगा। इसे प्रति-पेज इंप्रेशन के लिए उपयोग करें। |
| `didTapActionFor:at:` | उपयोगकर्ता ने कॉल-टू-एक्शन बटन पर टैप किया। |
| `storiesViewControllerDidFinish:` | अंतिम पेज का प्लेबैक समाप्त हो गया। |
| `storiesViewControllerDidShowFallback:` | पेलोड गुम या गलत प्रारूप में था और फ़ॉलबैक कंटेंट दिखाया गया था। |
कॉलबैक को पास किया गया `StoryPage` पेज के `imageURL`, `duration`, `link`, `buttonTitle`, `title`, और `subtitle` को उजागर करता है।
### नेविगेशन
अगले पेज पर जाने के लिए स्क्रीन के दाएं तीसरे हिस्से पर टैप करें और वापस जाने के लिए बाएं तीसरे हिस्से पर। हॉरिजॉन्टल स्वाइप का जानबूझकर उपयोग नहीं किया जाता है, क्योंकि यह सिस्टम के नोटिफिकेशन-डिस्मिस जेस्चर से टकराता है। पेज बटन पर टैप करने से उसका डीप लिंक खुल जाता है और नोटिफिकेशन खारिज हो जाता है।
## संदर्भ
 ## 1. एक Notification Content एक्सटेंशन जोड़ें
Xcode में, **File > New > Target…** चुनें, **Notification Content Extension** चुनें, और इसे एक नाम दें (उदाहरण के लिए **StoriesContentExtension**)।
## 1. एक Notification Content एक्सटेंशन जोड़ें
Xcode में, **File > New > Target…** चुनें, **Notification Content Extension** चुनें, और इसे एक नाम दें (उदाहरण के लिए **StoriesContentExtension**)।
 ## 2. PushwooshNotificationUI मॉड्यूल जोड़ें
`PushwooshNotificationUI` एक स्टैंडअलोन मॉड्यूल है जिसकी कोई अन्य Pushwoosh निर्भरता नहीं है, इसलिए यह एक्सटेंशन प्रक्रिया के अंदर छोटा रहता है। इसे **कंटेंट एक्सटेंशन टारगेट** में जोड़ें (ऐप टारगेट में नहीं)।
**Swift Package Manager**
## 2. PushwooshNotificationUI मॉड्यूल जोड़ें
`PushwooshNotificationUI` एक स्टैंडअलोन मॉड्यूल है जिसकी कोई अन्य Pushwoosh निर्भरता नहीं है, इसलिए यह एक्सटेंशन प्रक्रिया के अंदर छोटा रहता है। इसे **कंटेंट एक्सटेंशन टारगेट** में जोड़ें (ऐप टारगेट में नहीं)।
**Swift Package Manager**
 **CocoaPods**
```ruby
target 'StoriesContentExtension' do
use_frameworks!
pod 'PushwooshXCFramework/PushwooshNotificationUI'
end
```
## 3. स्टोरीज़ व्यू कंट्रोलर को सबक्लास करें
जेनरेट किए गए `NotificationViewController` बॉडी को `PushwooshStoriesViewController` के सबक्लास से बदलें। यही पूरा इंटीग्रेशन है।
**CocoaPods**
```ruby
target 'StoriesContentExtension' do
use_frameworks!
pod 'PushwooshXCFramework/PushwooshNotificationUI'
end
```
## 3. स्टोरीज़ व्यू कंट्रोलर को सबक्लास करें
जेनरेट किए गए `NotificationViewController` बॉडी को `PushwooshStoriesViewController` के सबक्लास से बदलें। यही पूरा इंटीग्रेशन है।